
Split tunneling allows VPN users to route traffic from specified apps or devices through the VPN while traffic from other apps and devices travels over the default, non-VPN network. Split tunneling can be used for several different purposes including:
- Allowing normal use of the internet while simultaneously accessing resources only available to VPN users, such as a business server
- Setting up specific devices, such as game consoles or streaming media boxes, to use (or not use) the VPN without affecting other devices on the network
- Sending all of a device’s traffic through the VPN except when accessing content or services that don’t allow VPN connections, such as MLB.tv or Netflix
- Sending all traffic through the VPN except for content and services that require low latency, such as VoIP applications and online games
- Only routing torrent traffic through the VPN, while all other internet traffic goes to the default network
- Access the VPN without affecting your connection to other devices on the local network, such as printers or a Plex Media Server
Your imagination is the limit to the number of applications for split tunneling. Well, that and your hardware. Different types of split tunneling have different technical requirements. What you can achieve depends heavily on your device, wi-fi router, and VPN service.
Before you get started, it’s important to realize that split tunneling requires some advanced technical knowledge and haphazard implementation can lead to security risks. If you don’t properly configure your split-tunneling settings, your ISP or a third party could access some of your sensitive data. If in doubt, use a VPN with a split tunneling feature. These require little more than mastery of toggle switches.
Types of split tunneling
For typical VPN users, there are four main types of split tunneling.
The first type is the most simple and is useful if you need to access remote resources through a VPN while also maintaining a normal, non-VPN connection to the internet. We’ll explain how to do this in the tutorials below.
The second is by device. For example, if you want your game console to connect to the internet without a VPN, but your PC and smartphone to connect with a VPN. This type of split tunneling is typically done on your wi-fi router. In the popular DD-WRT router firmware, this is called “policy based routing.”
The third type of split tunneling is by application. You can set up a blacklist or whitelist of apps and services that you want to connect to the VPN or don’t want to connect to the VPN, respectively. The latter is sometimes called “inverse” split tunneling. For example, if you only want torrent traffic to go through the VPN, but all your other applications such as games and web browsers to connect to the internet without a VPN, this is the method you want to use. Split tunneling by application only works on some VPNs, operating systems, and router firmware. It’s important to make sure your chosen VPN offers split-tunneling.
The final type of split tunneling allows you to route traffic based on its destination rather than its source. For example, if you wanted to route all traffic through the VPN except for that traveling to Netflix or Hulu. This is called IP-based routing, and it’s the most difficult type of split-tunneling to accomplish. It requires a stateful router or firewall and, even if you have that, sites like Netflix have so many IP addresses that it’s hard to get it working reliably. As such, we won’t be covering IP routing in this article.
Not all operating systems support all types of split tunneling. In fact, Windows users will find that their options are severely limited. Macs aren’t bad, but routers with DD-WRT or Tomato firmware offer the most versatility. Unfortunately, they are also the most complicated to configure.
How to split tunnel on MacOS
First, check with your VPN provider to see if their app includes built-in split tunneling functionality. While not too common, some providers like ExpressVPN offer application-based split tunneling.
ExpressVPN’s Mac app provides a Connection per App feature that lets you create a blacklist or whitelist of apps to route through the VPN. Note that split tunneling isn’t available on macOS 11 and above. 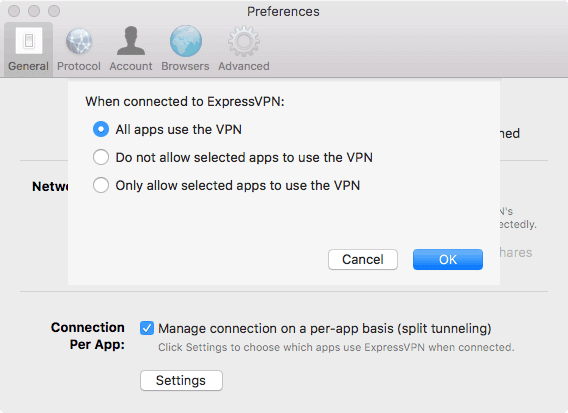
If your VPN app doesn’t have built-in support for split tunneling, we’ll have to get our hands dirty and do things the manual way.
You’ll need superuser administrative privileges and an existing L2TP or PPTP connection, as well as the destination subnet for the VPN private space.
- Go to System Preferences > Network
- In the left sidebar, click your VPN connection and go to Advanced settings > Options
- Uncheck the box for Send all traffic over VPN connection
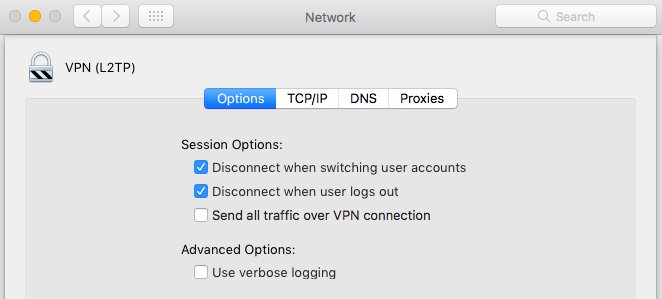
- Save your changes and connect to the VPN
- Once connected, go to Application > Utilities > Terminal
- Type ifconfig into the terminal and hit Enter. Make a note of the interface used by the VPN. Using L2TP, this will probably be ppp0

- Log in as root. An easy way to do this is to type sudo su into the terminal and authenticate with your Mac password.

- Enter the following command, replacing >DESTINATION SUBNET< with the subnet you want routed through the VPN, and >VPN INTERFACE< with the interface listed in the previous step.route add -net >DESTINATION SUBNET< -interface >VPN INTERFACE<
See also: Our list of recommended Mac VPN providers.
How to split tunnel on Windows
Some VPN providers offer split tunneling in their Windows apps, with varying degrees of functionality.
The NordVPN app allows users to choose which apps they want to use the VPN tunnel and which they trust to connect outside of it.

The Surfshark app for Windows has a Bypasser feature. This provides split tunneling for both websites and apps. Users can choose which apps use the VPN tunnel or, if it’s easier, specify which apps don’t use the VPN tunnel. Alternatively, they can choose which websites or IP addresses they want to bypass the VPN tunnel and connect to the internet normally. 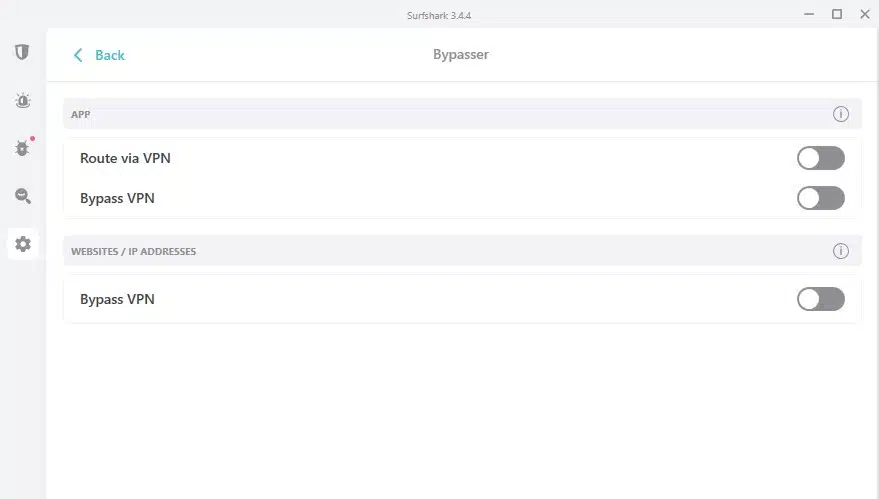
If your VPN app doesn’t have built-in support for split tunneling, we’ll have to get our hands dirty and do things the manual way.
Windows is fairly limited when it comes to split tunneling. There’s no way that we’re aware of to split tunnel by app or destination. Instead, the split tunneling option in Windows is much broader. You can choose not to tunnel IPv4 and IPv6 traffic so that only local traffic goes through the VPN. That’s useful if only need to use the VPN to access remote resources not available from your normal internet connection, but not much else.
Furthermore, Windows only split tunnels VPN protocols that it has built-in support for. That means you’ll need to configure an L2TP, SSTP, or PPTP connection first. OpenVPN won’t work here.
This example will use your local connection to access the internet while the VPN will be used to access remote resources, such as a private business server that can only be accessed via VPN. The VPN will only be used when a host isn’t available on the local network.
In this tutorial, will use Windows 10. We’ll assume you’ve already set up your VPN connection, and you only need to enable split tunneling. You’ll need admin privileges and the destination subnet for your VPN private space.
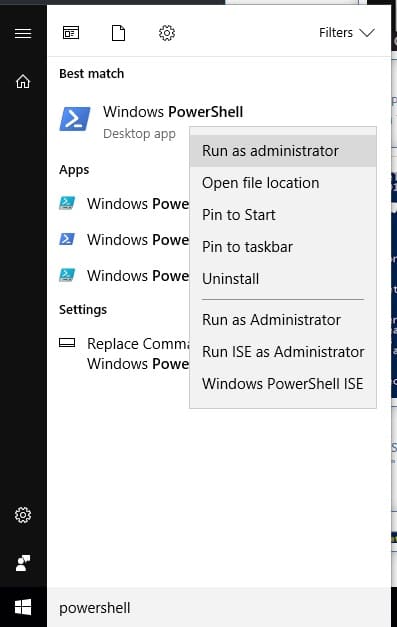
- In your Windows search bar, type Powershell and right click it to Run as administrator
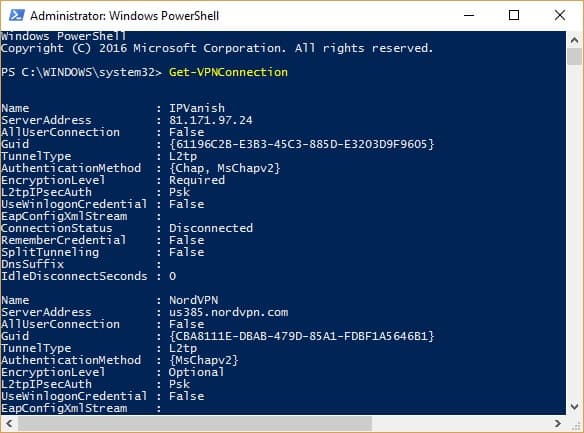
- Type Get-VPNConnection and press Enter to bring up a list of all your available VPN connections. (I test a lot of VPNs so there are several in my screenshot, but you’ll likely only have one.) Make a note of the Name of the VPN you want to split tunnel.
- Type the following command and hit Enter, replacing >VPN NAME< with the name you noted in the previous step:Set-VPNConnection -Name “>VPN NAME<” -SplitTunneling $True
You can check that split tunneling is enabled by entering the Get-VPNConnection command again. The split tunneling field should now be set to True.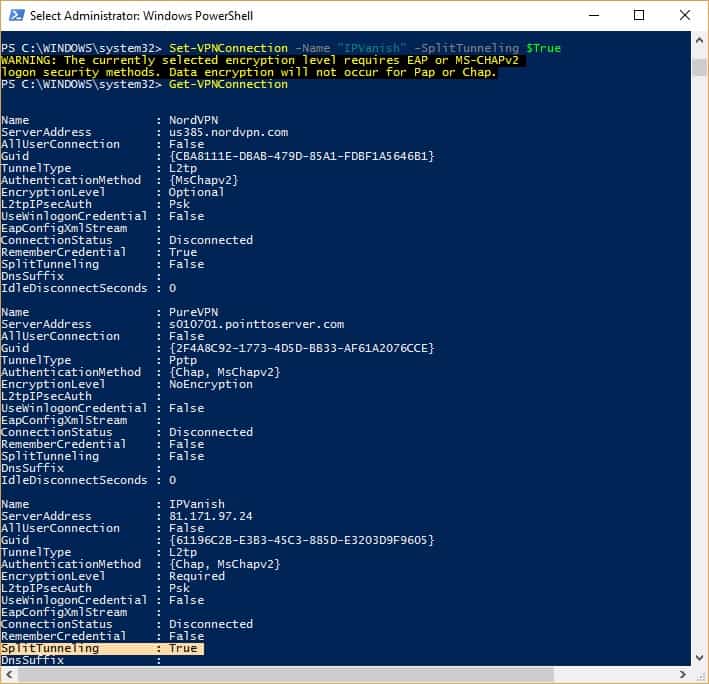
Next, enter this command and make a note of the Description field:
ipconfig /all
If necessary, add the route. Replace >DESTINATION SUBNET< with the subnet you want to route through the VPN, and >INTERFACE< with the name of the Description field we mentioned in the last step:
netsh interface ipv4 add route >DESTINATION SUBNET< ">INTERFACE NAME<"
If you want to disable split tunneling, enter this command:
Set-VPNConnection -Name ">VPN NAME<" -SplitTunneling $False
Split tunneling with your own OpenVPN server on Windows
If you’ve created your own OpenVPN server similar to the one in our tutorial that uses Amazon EC2, you can enable split tunneling on Windows by editing your config files.
Remove redirect-gateway def1 in your OpenVPN server config file (probably called server.conf). In the client config (client.ovpn or client.conf), add the following line:
route 12.12.12.0 255.255.255.0 vpn_gateway
This routes the 12.12.12.0 subnet through the VPN connection and everything else out of the non-VPN connection.
See also: The best VPN for Windows 10 users.
How to split tunnel on DD-WRT routers
Setting up OpenVPN and split tunneling on DD-WRT routers is tedious and tricky business, so if you want to go the router route then we recommend purchasing a subscription to ExpressVPN. With that, you can install the ExpressVPN custom router firmware, or buy a router with the firmware pre-installed. It’s far easier than setting up everything manually.
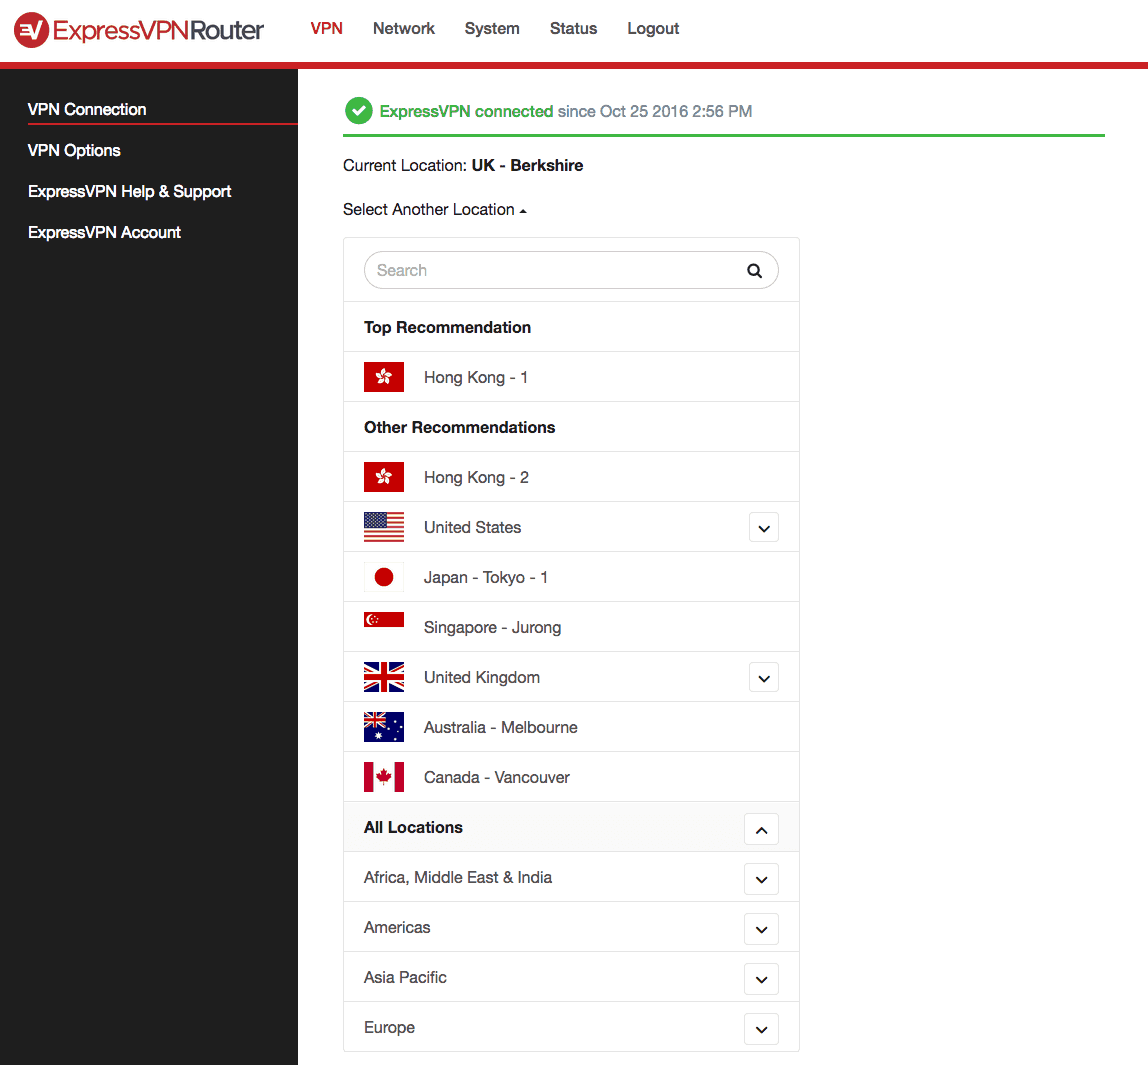
BEST VPN to split tunnel on DD-WRT routers:ExpressVPN is our to choice. This VPN leads the way with its easy to use no-fuss apps and router software. It has a vast server network that is optimized for high-speed connections. Hard to beat on privacy and security. Works with all major streaming services. There is a 30-day no-quibbles money-back guarantee so you can try it risk-free.
If you’re in the market for a new router, the AirCove router comes with ExpressVPN pre-installed. Users can connect to a maximum of five VPN locations at the same time by setting up groups — itself a form of split tunneling.
Alternatively, the InvizBox2 router comes with Proton VPN pre-installed. Users can perform device-level split tunneling by setting, for example, their Smart TV to connect to a UK server, but their games consoles to connect outside the VPN tunnel.
If you want to save a few bucks and do things the hard way, we’ll assume you’ve already set up your VPN connection in DD-WRT and have it working properly. DD-WRT allows you to split tunnel VPN traffic in a few different ways:
- by device, called “policy-based routing”
- by destination IP address, called “IP routing”
- by application or port
Policy based routing
In the DD-WRT dashboard, go to Service > VPN. Find the Policy based routing box and enter IP addresses for each of the devices you want to go through the VPN. Simple as that!
If you’re not sure of the IP addresses of your devices, you can find them by going to the Router status page of the DD-WRT dashboard. Under the Network section, find Active IP Connections. Click the number next to that to launch the Active IP Connections Table. Here you can view the IP addresses for all incoming and outgoing connection on the router, as well as protocols and port numbers.
Port based routing
If you want to specify which programs or apps use the VPN, one way to do this is by split tunneling by port. Each application likely uses a different port, for example web browsers use TCP ports 80 and 443, Spotify uses TCP port 4070, and Steam uses UDP ports 27000 thru 27030. So by specifying which specific ports to route VPN traffic through, we can split tunnel by application.
Unfortunately, this is more difficult than it sounds on DD-WRT. You’ll need to familiarize yourself with IPTables, which governs Linux firewall rules in the firmware. You might find this tutorial useful as an example.
Go to Administration > Commands. Under Firewall click Edit and enter the necessary commands. Then go to your OpenVPN client configuration in DD-WRT and find the Additional config box to modify your OpenVPN config.
Destination IP routing
If you want to tunnel traffic by its destination, i.e. by website or some other sort of server, then IP routing might do the trick.
Go to your OpenVPN client configuration in DD-WRT and find the Additional config box. Enter the following:
route-nopull
route XXX.XXX.XXX.XXX 255.255.255.255 net_gateway
route YYY.YYY.YYY.YYY 255.ZZZ.ZZZ.0 vpn_gateway
Replace the Xs with the same address you entered under Server IP field of your OpenVPN configuration. Replace the Ys with the IP address of the server you want to route VPN traffic to, and the Zs with the appropriate subnet (the latter will often be 255.255.255.0).
Note that if you want to route all VPN traffic going to a specific website, then you’ll need to add the IP addresses and subnets for all of the servers that website uses. Netflix, for instance, uses several dozen IPs and they can change at any time, so you will need to find an up-to-date list of Netflix IPs and update this configuration regularly.
How to split tunnel on Tomato routers
Tomato doesn’t have policy-based routing baked in like DD-WRT, so you’re pretty much stuck with using IPTables to get the job done. On the Tomato dashboard, with your OpenVPN connection already set up and working, this is an example of how to enable selective routing.
Go to Administration > Scripts > Firewall and add these commands:
iptables -I FORWARD -i br0 -o tun11 -j ACCEPT
iptables -I FORWARD -i tun11 -o br0 -j ACCEPT
iptables -I INPUT -i tun11 -j REJECT
iptables -t nat -A POSTROUTING -o tun11 -j MASQUERADE
Click the “WAN Up” tab and add these commands, replacing >SOURCE IP ADDRESS< with the local IP of the device you want to route through the VPN:
sleep 30
ip route flush table 200
ip route flush cache
ip rule add from >SOURCE IP ADDRESS< lookup 200
VPN_GW=`ifconfig tun11 | awk '/inet addr/ {split ($2,A,":"); print A[2]}'`
ip route add table 200 default via $VPN_GW dev tun11
In the left sidebar, go to VPN Tunneling > OpenVPN Client. On your OpenVPN client config, go to Advanced. Under Custom configuration, add this command:
route-nopull


This is interesting, I tried the Tomato configuration with the following two IP addresses
sleep 30
ip route flush table 200
ip route flush cache
ip rule add from 192.168.1.11 lookup 200
ip rule add from 192.168.1.211 lookup 200
VPN_GW=`ifconfig tun11 | awk ‘/inet addr/ {split ($2,A,”:”); print A[2]}’`
ip route add table 200 default via $VPN_GW dev tun11
This results in 192.168.1.11 and 192.168.1.211 to access Internet through VPN, which is exactly what was desired.
The problem I am having right now, though, is that every other IP from my network can not navigate Internet, as they do not have a routing rule.
Is it possible to solve it easily, with a few lines of code ?
Thank you