So, a new Android phone or tablet has just caught your attention, and you are looking to upgrade to the latest one as quickly as possible. But what do you do with your old device? There are a number of options available. You may want to give it away, trade it in with your carrier, put it up for sale, or recycle it.
Whatever decision you make, it’s important that all your personal data is wiped clean before disposing of it. You don’t want to accidentally pass on your personal information to someone else. Leaving personal details on your old device may expose you to security and privacy risks.
So, how do you properly wipe your data off your old Android device without running the risk of leaving remnant data? Is it enough to just delete the files or do a factory reset?
Basic file deletion and factory reset are not enough
A lot of people perform a factory reset to wipe everything off their Android device, before disposing or reselling it. But the problem is that a factory reset doesn’t really delete everything. According to a recent study by the University of Hertfordshire in conjunction with Comparitech, it was found that it’s still possible to recover photos, emails, text, and other documents from a reset Android device.
Contrary to popular belief, when you delete a file from your phone memory, SD card, or computer hard disk for that matter, the file isn’t actually removed. Permanent data erasure goes beyond basic file deletion commands, which only remove direct pointers to the data disk sectors and make data recovery possible with common software tools.
The operating system (Android, Windows, etc) uses a concept called indexing to keep track of where files are stored in a device. Each file on your device’s memory or storage has a pointer that tells the OS where the file’s data begins and ends. It’s a lot like the index page in textbooks. When you delete a file, the OS removes the pointer to that file (akin to erasing page numbers from the table of contents of a textbook) and marks the sectors containing the file’s data as available.
From the file system’s point of view, the file is no longer present on your storage device, and the sectors containing its data are considered free space. However, until the OS writes new data over the sectors containing the contents of the file, the files are still recoverable. A file recovery program can scan the device for these deleted files and restore them.
So if you are considering disposing of your old Android device, make sure you wipe your personal data the right way. In this article, we’ll show you how to securely wipe your personal data off your old Android device before selling or recycling it, to ensure it doesn’t have any remnants of personal data. Outlined below are five important steps you need to take to securely wipe your data and counter data remanence. We’ll take you through each step in detail.
Here’s how to wipe your Android phone completely before selling:
- Backup your data
- Encrypt your data
- Overwrite with junk data
- Remove your accounts, SIM and memory card
- Perform factory reset
Backup your data
The importance of backing up everything on your phone before wiping it cannot be overemphasized. Ideally, if Backup to Google Drive is turned on, device settings, apps and app data, SMS, call history, and contacts are automatically backed up and synced with Google Drive. Otherwise, you need to manually back them up.
Here’s how to backup your data on any Android device:
- You don’t have to worry much about backing up your email. You can easily recreate it on your new device. Most email setups keep copies of downloaded emails on the server. If you’re not certain about it, just log on to your email on another device to confirm the backups on the server.
- When it comes to apps, Google has a record of all the Android apps you’ve purchased. So long as you’re going to another Android device, you can download them again to your new phone at no charge. Better still, Google can also help you sync all your apps to your account. If you don’t have it already enabled, you can enable it by going to Settings >> Accounts >> Enable Automatically Sync Data. After that’s done, move to Settings >> System >> Backup >> Enable Backup to Google Drive. Some apps may have their own specific cloud backup storage. Others, like WhatsApp, rely on Google Drive, if enabled. This will ensure all your data is ready to be unpacked when your new phone arrives.
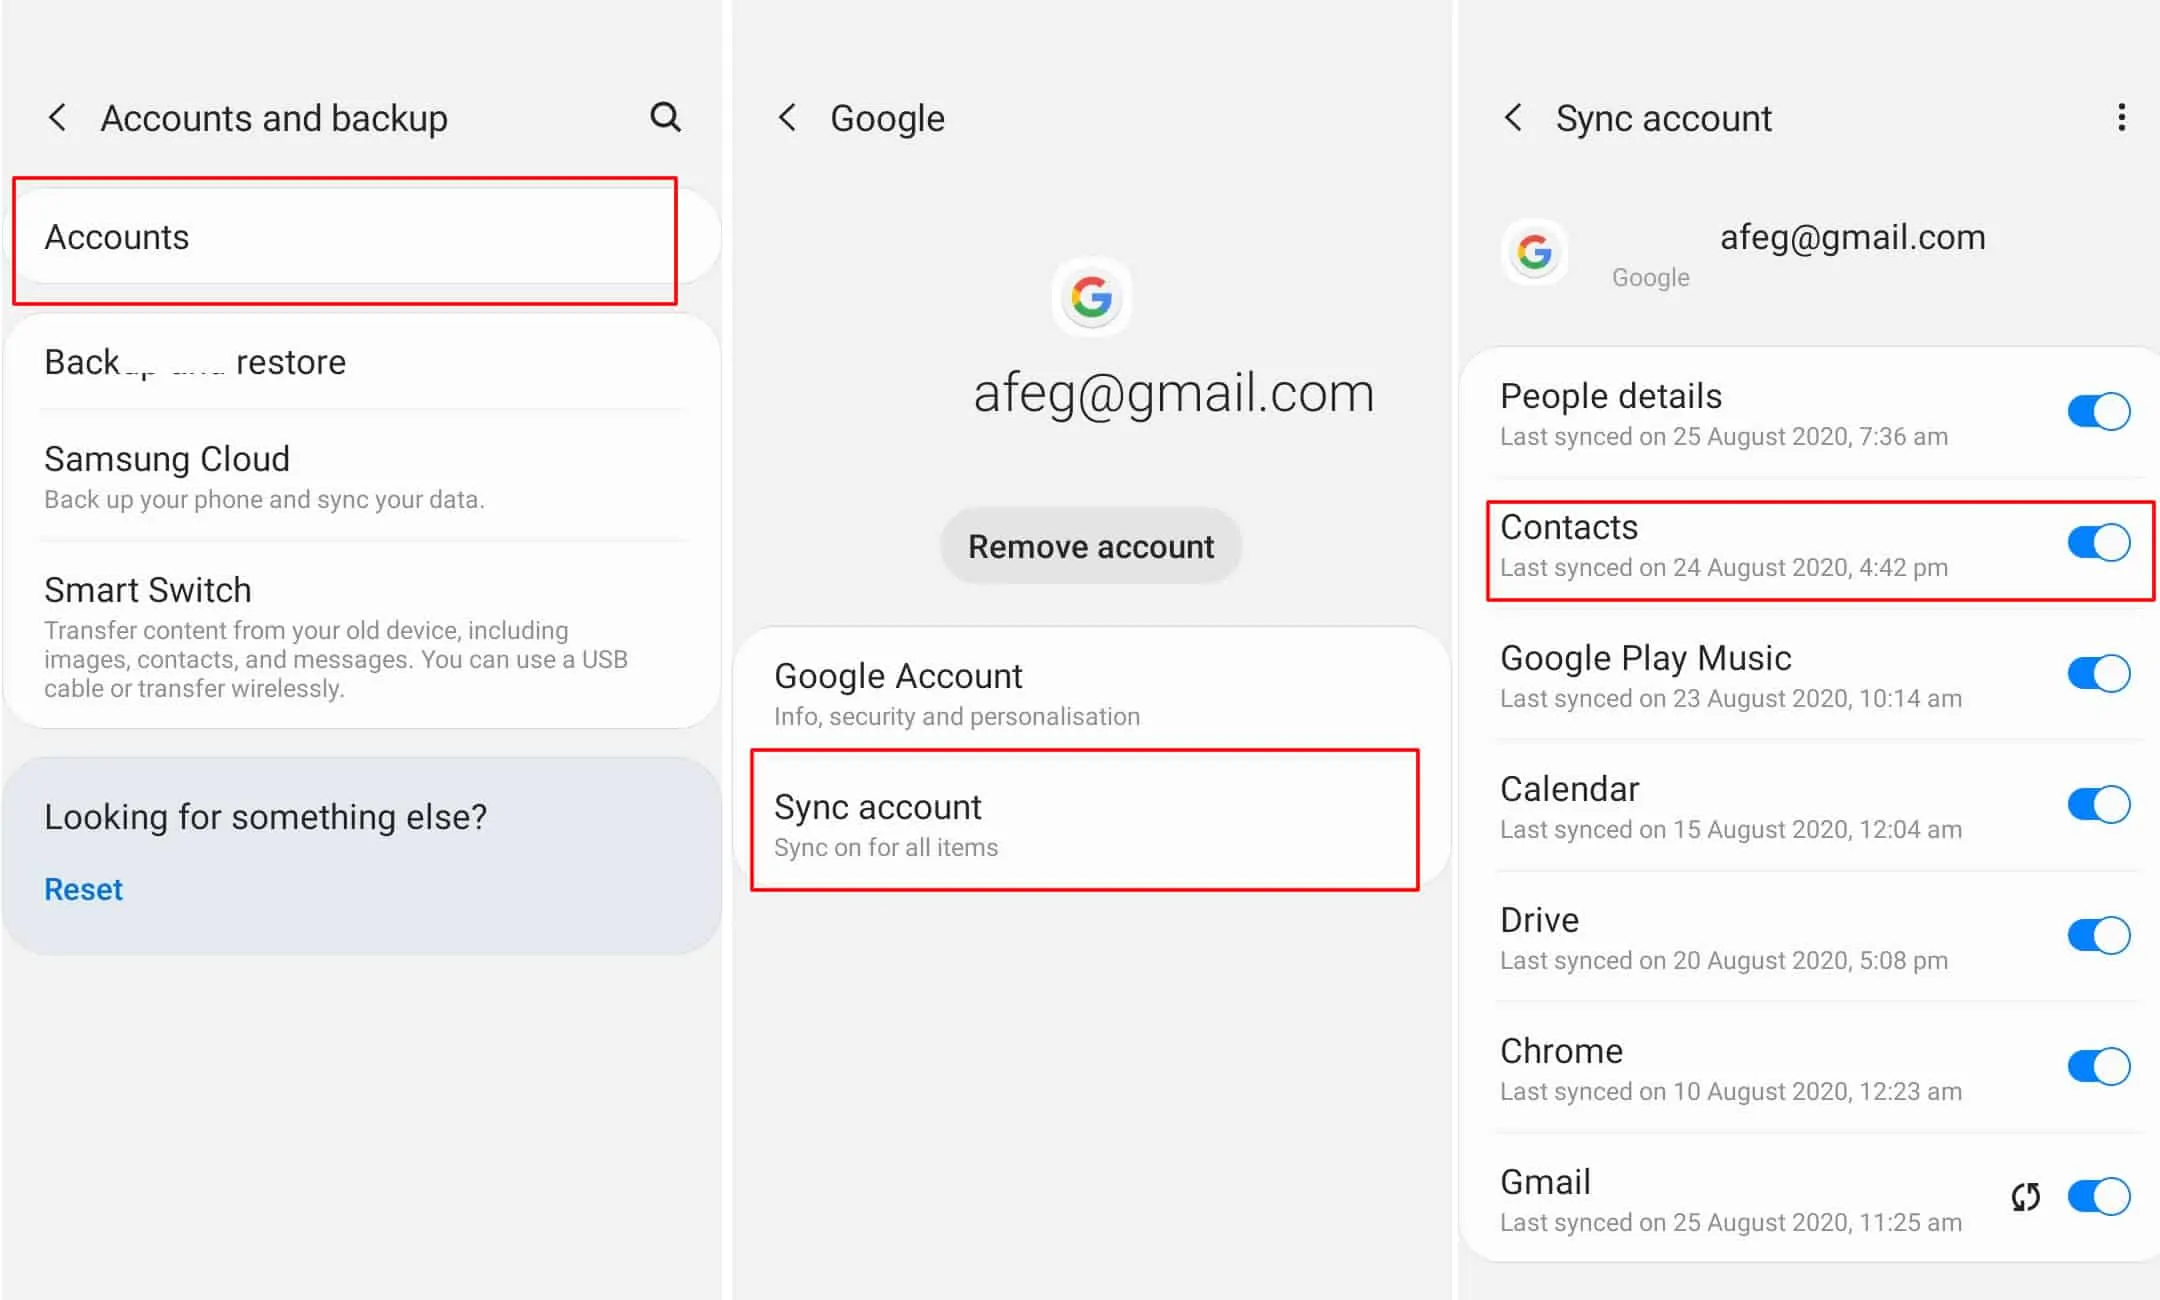
- One of the most important things you should back up is your contacts. Fortunately, Google makes it really easy to backup. By backing up everything to Google contacts, your contacts will follow you everywhere and sync with every new Android device. If you are not already using Google contacts, you can set it up by going to Settings >> Accounts >> Google Account >> Account Sync >> Enable Contacts. Please see Figure 1.0 below.
- Another important piece of data you want to backup are your photos, videos, and music. There are a couple of ways to do this but the fastest and most effective is to connect your phone to your PC or Mac using the USB cable that came with your phone. Mac users may need to install a small app called Android File Transfer to get this working. Once connected, you’ll find all of your photos and videos in a folder called DCIM, and your music files in a folder called Music. Now, you can just copy those folders over to your computer.
- What about all your text messages, call logs, system settings, calendar events, playlists, browser bookmarks, etc? To back up these, you may consider a third-party backup tool such as My Backup Pro, which allows you to backup your stuff to the cloud or to your memory card and sync it back over to your new device.
Encrypt your data
Encryption renders your personal data in your device in an unreadable or scrambled format, which means that even if someone tries to restore your data, they won’t be able to access it. This step is necessary to ensure that if by some miracle, a skilled hacker does manage to get hold of your erased data or some residue left behind after a total reset, they will not be able to make sense of it. Anyone attempting to access the encrypted data will need a special key (PIN, password, or lock screen pattern) to decrypt it, which, of course, they don’t have.
Most Android users rarely encrypt their phone data, probably due to either ignorance or fear of performance degradation. According to an estimate, only “10 percent of the world’s 1.4 billion Android phones were encrypted, compared to 95 percent of all iPhones.” But these days, it seems newer Android devices come with encryption enabled by default. If your device is reasonably recent (Android 6.0 and above), it should almost certainly be encrypted by default. But if you’re getting rid of an older Android device, it might not be.
If your phone doesn’t have encryption enabled by default, you can encrypt it manually with just a few taps:
- For Android devices running Android 5.0, navigate to Settings >> Security >> Encryption >> Encrypt phone. For Android 4.4 KitKat or lower, navigate to Settings > Security > Screen Lock > Encrypt phone.
- Tap “Encrypt phone” or “Encrypt tablet”, as the case may be. Please note that you’ll be asked to plug in your phone to charge while the encryption process is going on, just to ensure that it doesn’t power off and cause errors.
- You’ll now be prompted to set a PIN, password, or lock screen, which is needed to access your encrypted files.
Overwrite with junk data
If you want to be absolutely sure that your personal data cannot be accessed by anyone, you can overwrite your encrypted data with junk data, thereby making it impossible for anyone, no matter how highly skilled, to recover your old data. This is like trying to over-egg the pudding, but it gives you the full assurance that your personal data is irrecoverable.
There are two ways you can do this. You can load your device with large files such as video clips until the storage is filled up, and then erase these files; or preferably, you can use a special app from the Play Store such as iShredder or Shreddit. These apps use shredding algorithm techniques to digitally shred data permanently. Once completed, you are good to go for the final step, which is the factory data reset.
Remove your accounts, SIM and memory card
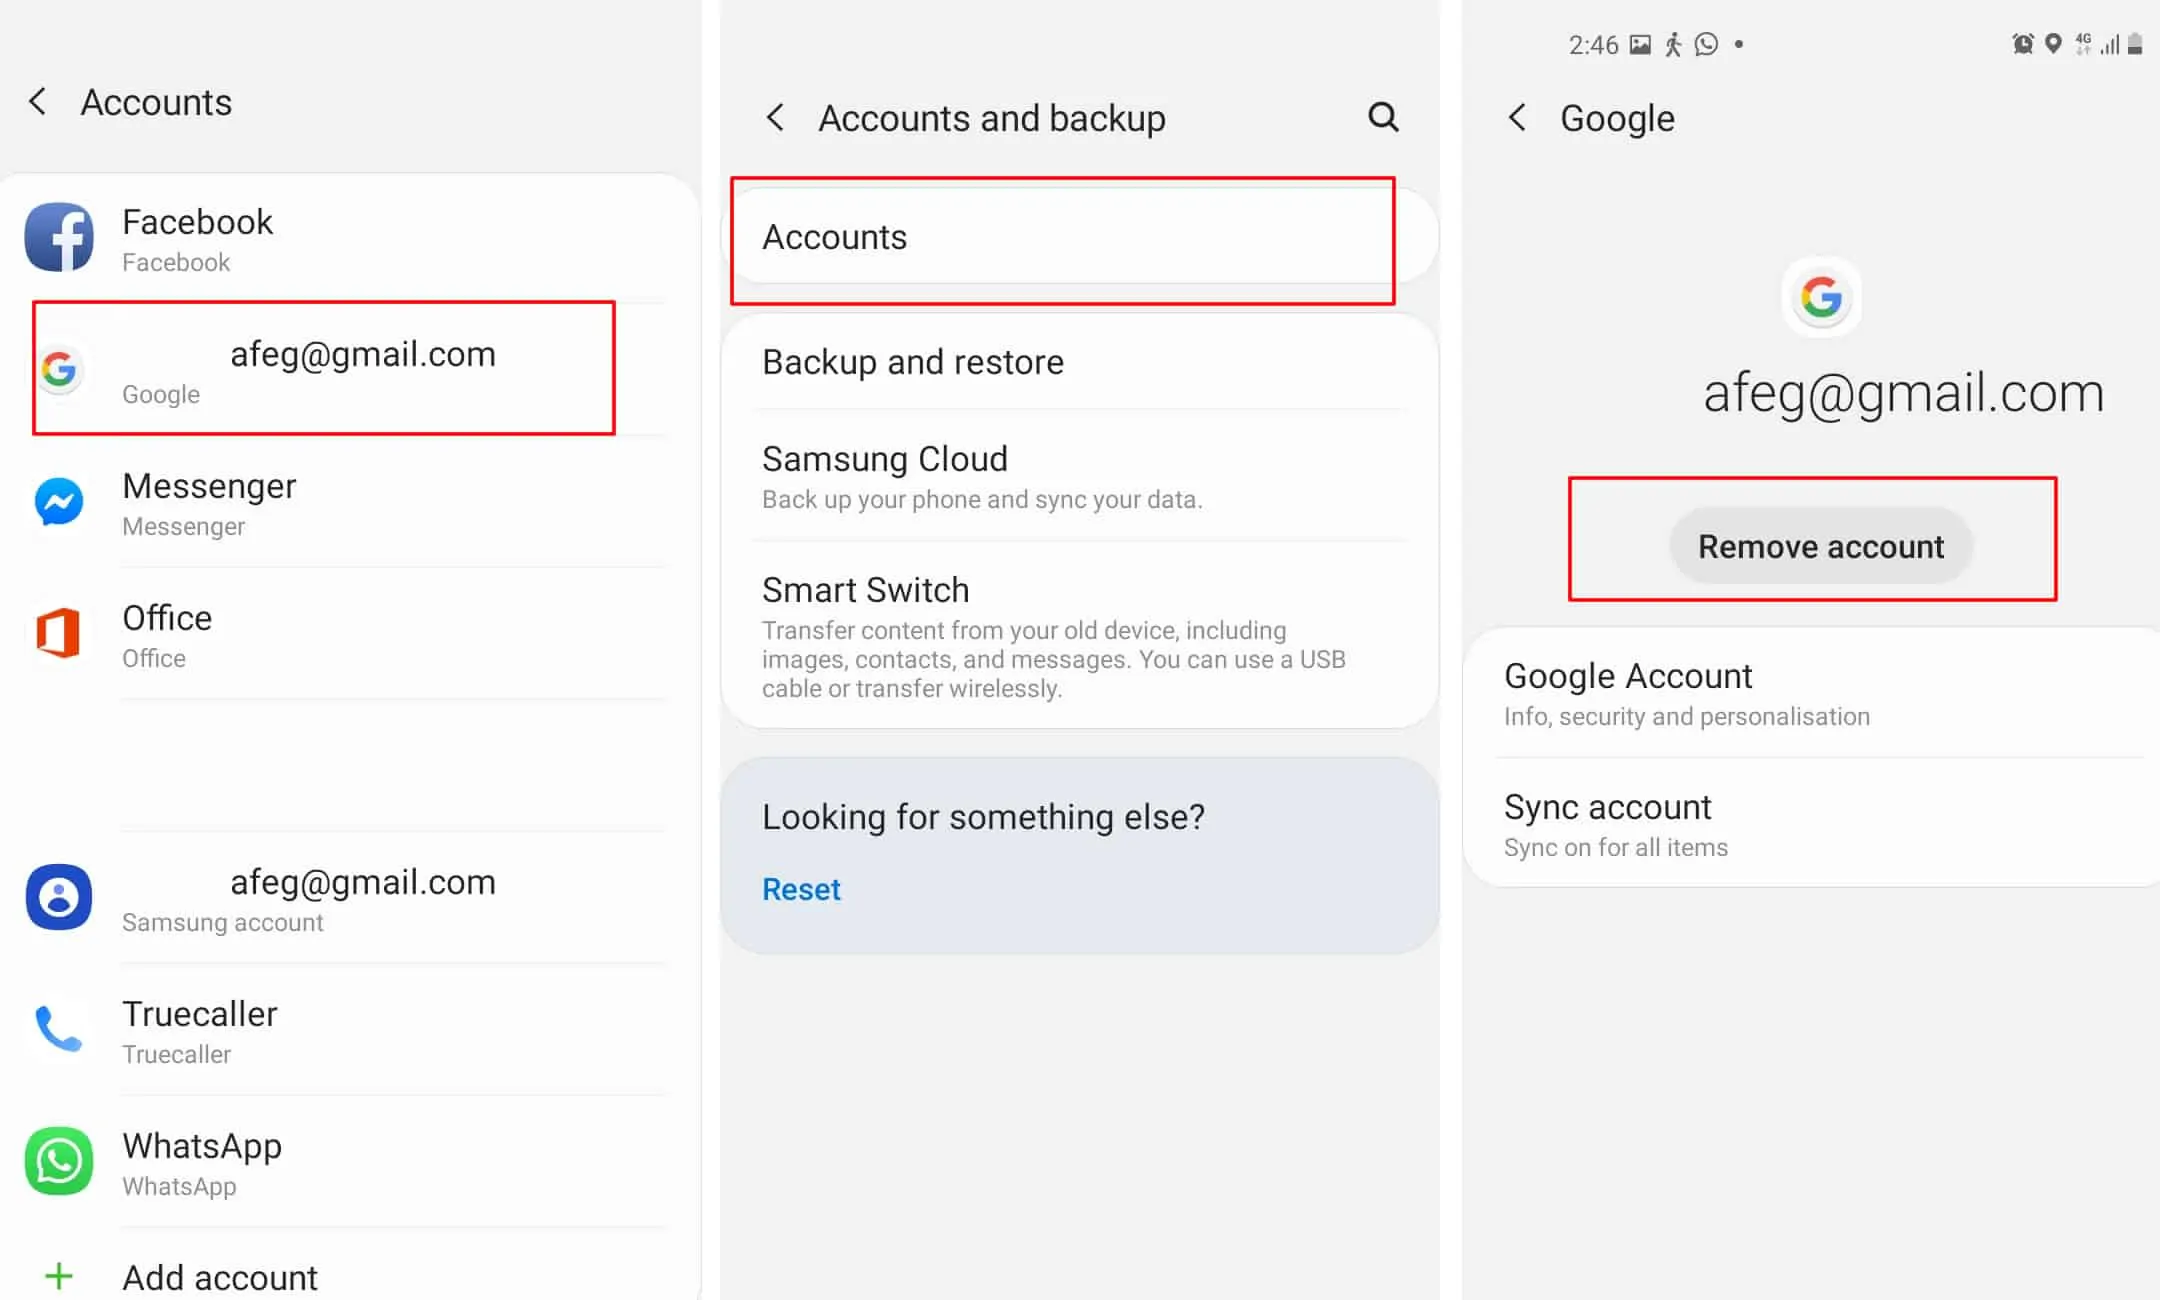
As part of the final preparatory process, you want to remove all your accounts configured on your device before doing a factory reset. A Factory reset will not remove your accounts from that device. Depending on the exact model of the Android phone or tablet, the steps to remove your Google account may differ slightly. For most phones, go to Settings >> Accounts >> Gmail Account >> Remove Account, as shown in Figure 2.0 below. You may also want to go through each app and service you’re signed into and sign out. Remove any other email accounts set up on your device.
The next step is to remove your SIM and memory card so that they don’t get erased or accidentally passed on to the next person. You can find the memory card either on the side of the phone or in the battery compartment. Make sure the phone is powered down, and then remove the memory card.
Perform factory reset
Finally, you are ready to perform a factory reset. When you do a factory reset on your Android device, it erases all the data on your device and returns the phone back to its original out-of-the-box state as it was from the factory.
First off, let’s start by removing the Factory Reset Protection (FRP). Google introduced FRP in Android 5.0 Lollipop as an extra layer of security to prevent anyone from being able to reset and sell your device if lost or stolen. When you factory reset a phone with FRP enabled and try to set it up as a new device, you’ll be required to provide the login credentials for the last Google account configured on the device. If you fail to provide those credentials, the device will remain locked, and you can’t gain access. This is obviously not okay, especially if you’re trying to sell or give it away.
Disabling FRP is easy. Before you begin, check if your phone has a “find my phone” app-enabled, and manually disable it. On most phones, FRP will be automatically removed whenever you choose to factory reset your phone through its settings. This will automatically remove all associated accounts, freeing the phone from FRP.
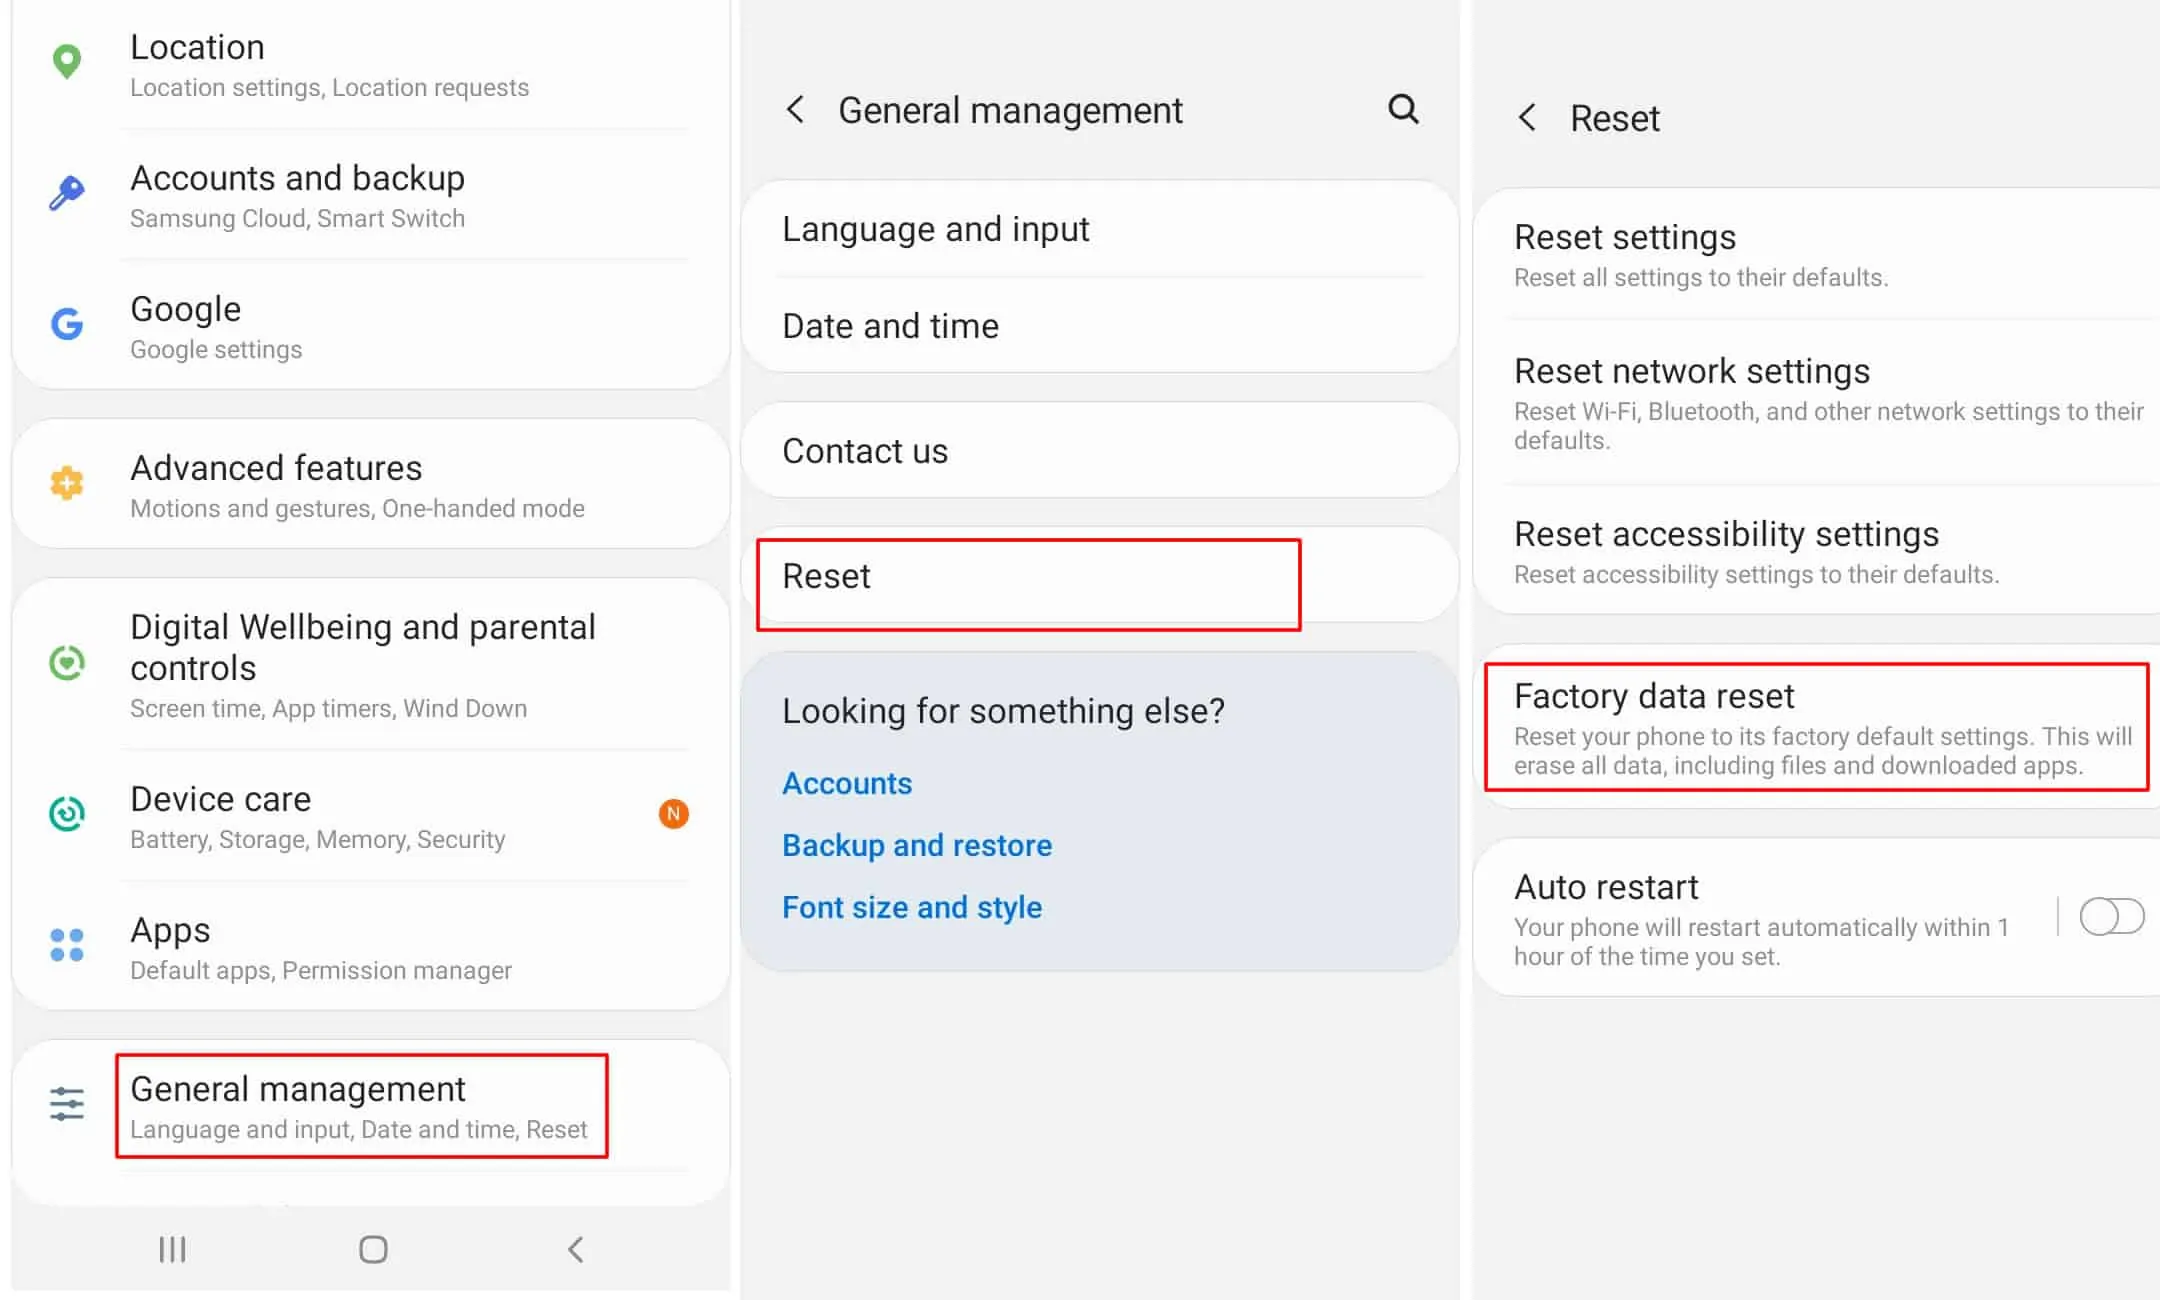
Once the FRP is removed, you can now proceed with a factory reset. The easiest way to factory reset your device is through the settings menu. The location of the factory reset option might vary slightly depending on your manufacturer. On most phones, you can factory reset your phone through the Settings app. Go to Settings >> General Management >> Reset >> Factory Data Reset, as shown in Figure 3.0 below. You may check your manufacturer’s support site for device-specific instructions. Otherwise, you can try factory resetting your phone using its power and volume buttons.
You can confirm that FRP is disabled by attempting to sign back into the device after a factory reset. If it asks for the previous username and password, it means FRP is still enabled. If it doesn’t, you’re good to go. You may now power it off and repackage it for the new owner.
Wiping your Android phone: FAQs
Can my data still be accessed even after resetting my device?
The data on most Android phones is encrypted, which means that it can’t be accessed following a factory reset. As such, you don’t need to worry about another person accessing this information if you sell your Android phone. While data that’s backed up on the cloud remains accessible, this requires signing in to an account (for example, signing in to Google to access Google Drive documents). So, as long as it’s only you who holds the passwords, this backed-up data is secure and inaccessible to others.
Can I remotely erase my Android device?
Yes, it is possible to erase your Android device remotely. This feature can be found in the native security settings of your device or through some third-party applications. By erasing your device remotely, you can help ensure that any sensitive information is not accessible by anyone else if it is lost or stolen. A remote erase will erase all data on the device and may not be recoverable. Make sure to back up any important information before proceeding. Enable a lock screen passcode or other security measures before performing a remote erase, as it will help prevent someone else from accessing your device after it has been erased.
See also:


Thanks for you simple, easy to follow instructions on Resetting to Factory settings. Worked a treat!
In the paragraph above re: resetting your Android-It should be clarified to all potential readers, a reset does not erase the basic operating system. In, the second part of the same sentnce, you tell the reader basically formatting and reseting are the same. They are not. A windows user often understands the concept of “formatting” wipes the drive completely and there is nothing left on the drive, or the partition, that you are formatting. They are correct. So the reader is now confused because you just inferred to “RESET” as a process that will totally erase their drive. How now are they to get back into their Android device?
That said, You need to explain, or correct the way you explained the processes. A windows “Format” process will erase everything and an Android “Reset” will erase all the pointers to their data.
Thanks MRWAdmin. Your feedback is much appreciated. The changes have been effected.
Sir I forgot my oppo a9 2020 (android 11) screen password so I format my phone through pressing power button and volume button and wipe all data ..After, i give it to the mobile to repair shop and my issue was solved but I have much fear because of i have some sensible data and photos in my mobile so, is? any to chance to they recover my data or stole my data? Please reply sir…..I have so much of worry about this 😣
I don’t think it’s anything to worry about. If you actually wiped your data through this method, then any data on the device will be permanently destroyed.
Thank you very much sir. 2 weeks much of depression now i relax for your answer
After the factory reset wkl the manufacturer/factory installed version apps be reinstated?
Easy Instructions to follow and accomplish the task. Well done IMHO.
“According to a recent study by the University of Hertfordshire in conjunction with Comparitech, it was found that it’s still possible to recover photos, emails, text and other documents from a reset Android device. ”
This is not really relevant, seeing as the Phones they found data on had not been reset….
A lot of these posts are misleading, nearly every site says a factory reset is not enough, that is presuming you are running Android 5.0 or below as 6.0 and above are now encrypted by default and google made that a requirement by manufacturers or they would not be illegible to use Android OS, and android running 5.0 most certainly no longer work as phones anymore as they are too sluggish given how old they are i am certain 95% of people have android 7+ minimum.
therefore any factory reset on a modern android device will permanently destroy any data on the device due to googles AES 256 bit encryption.
what the reset does is it does not ERASE the data it merely overwrites the encryption key which is used to unscramble your data, without that key it is essentially gone forever and anyone trying to read the data will just see the following as an example* ”69764y%$%834 24342~@@3432344232428324324£$%*£$””%” when trying to make sense of anything stored on the device prior to the reset. Think of a corrupted word document and it starts to look like ancient greek symbols and you are like? that isn’t right is it? well that is what your data will look like after a factory reset on all android devices running 6.0+
Lee
BSc Hons Computer Science Graduate.
Thanks for your contribution Lee. I actually pointed that out in the article and comment section:
Excerpt from article: “If your device is reasonably recent (Android 6.0 and above), it should almost certainly be encrypted by default. But if you’re getting rid of an older Android device, it might not be.”
Excerpt from comment section: “If your Android phone is reasonably recent, you should be fine as most are already encrypted by default.”
In any case, the whole goal is to ensure that your personal data is wiped clean before disposing your phone, so as to avoid accidentally passing on personal information to someone else.
Great article! I wish I would had read it BRFORE I performed the factory reset. Ii did not encrypt my data prior to the factory reset. Is there anything I can do now to protect my personal information prior to selling my phone?
If your Android phone is reasonably recent, you should be fine as most are already encrypted by default.
Thank you so much for all the info! Looks like good advice!!
Formating a hard drive erases all components including the Os.
Factory reset resets all user data back to its functioning state as is when bought.
Mixing these up is potentially dangerous as you could break your computer by formatting a hard drive. This should be made clear.
Thanks Robert for pointing that out
Good article!
I still have a question though.
I had already done the factory reset without all of the steps above.
Then I found this article…
So, is it still possible to do all of these steps if you have already done the factory reset?
Thanks!
I want to hard reset my
Android phone
THATS rather more promising! So factory reset hashes up everything on A10 Do I still need to remove a memory card/ SD card?