In this post, we’re going to provide a step-by-step guide on configuring a WireGuard “client” connection to a commercial VPN provider in OPNsense. WireGuard doesn’t use the typical client/server framework like OpenVPN. WireGuard instead uses the concept of nodes, where each member of the network is considered a node that can talk to the other nodes based on its ACL. In our scenario, the OPNsense node will be considered the “client,” and your VPN provider’s WireGuard node will act as the “server.”
About OPNsense
OPNsense is a fork of pfSense, both of which, hence, are based on FreeBSD. Netgate, the company behind pfSense’s development, has recently changed its business model and is now providing two versions of pfSense: pfSense CE and pfSense Plus. pfSense CE stands for Community Edition and is fully open source, while pfSense Plus is Netgate’s “premium” offering that contains proprietary code and extra goodies that don’t get ported to pfSense CE.
Because of this, many pfSense users fear that the open-source edition will either end up discontinued or languish without updates for extended periods. Many of those users have jumped ship to OPNsense, which remains fully open source. And while both firewalls are pretty similar, the development has taken a sufficiently different direction by now that their configurations no longer match. So they support many of the same features, but how you configure them is different on each system.
So it’s in that spirit that we’re going to provide tutorials on both pfSense and OPNsense. And in this post, we’re going to set up an “always-on” WireGuard connection to a VPN provider in OPNsense.
This guide assumes you already have OPNsense set up with working WAN and LAN interfaces.
Let’s get started.
Prerequisites
On top of having a machine running OPNsense with two network cards (one WAN, one LAN), you also need a subscription to a VPN provider that supports WireGuard and allows for router configurations. This is going to be critical because to get WireGuard working on OPNsense, you will need to upload your OPNsense tunnel endpoint’s (i.e., the server’s) public key to your provider’s network. Plus, your provider needs to assign you (and provide you with) a local IP address and a connection port for its WireGuard network. Your VPN provider will supply this information on its website.
Below are some recommended VPN providers that support (vanilla) WireGuard on routers:
There are others, but they all follow one of the three methods used by the above providers. This guide is “provider agnostic.”
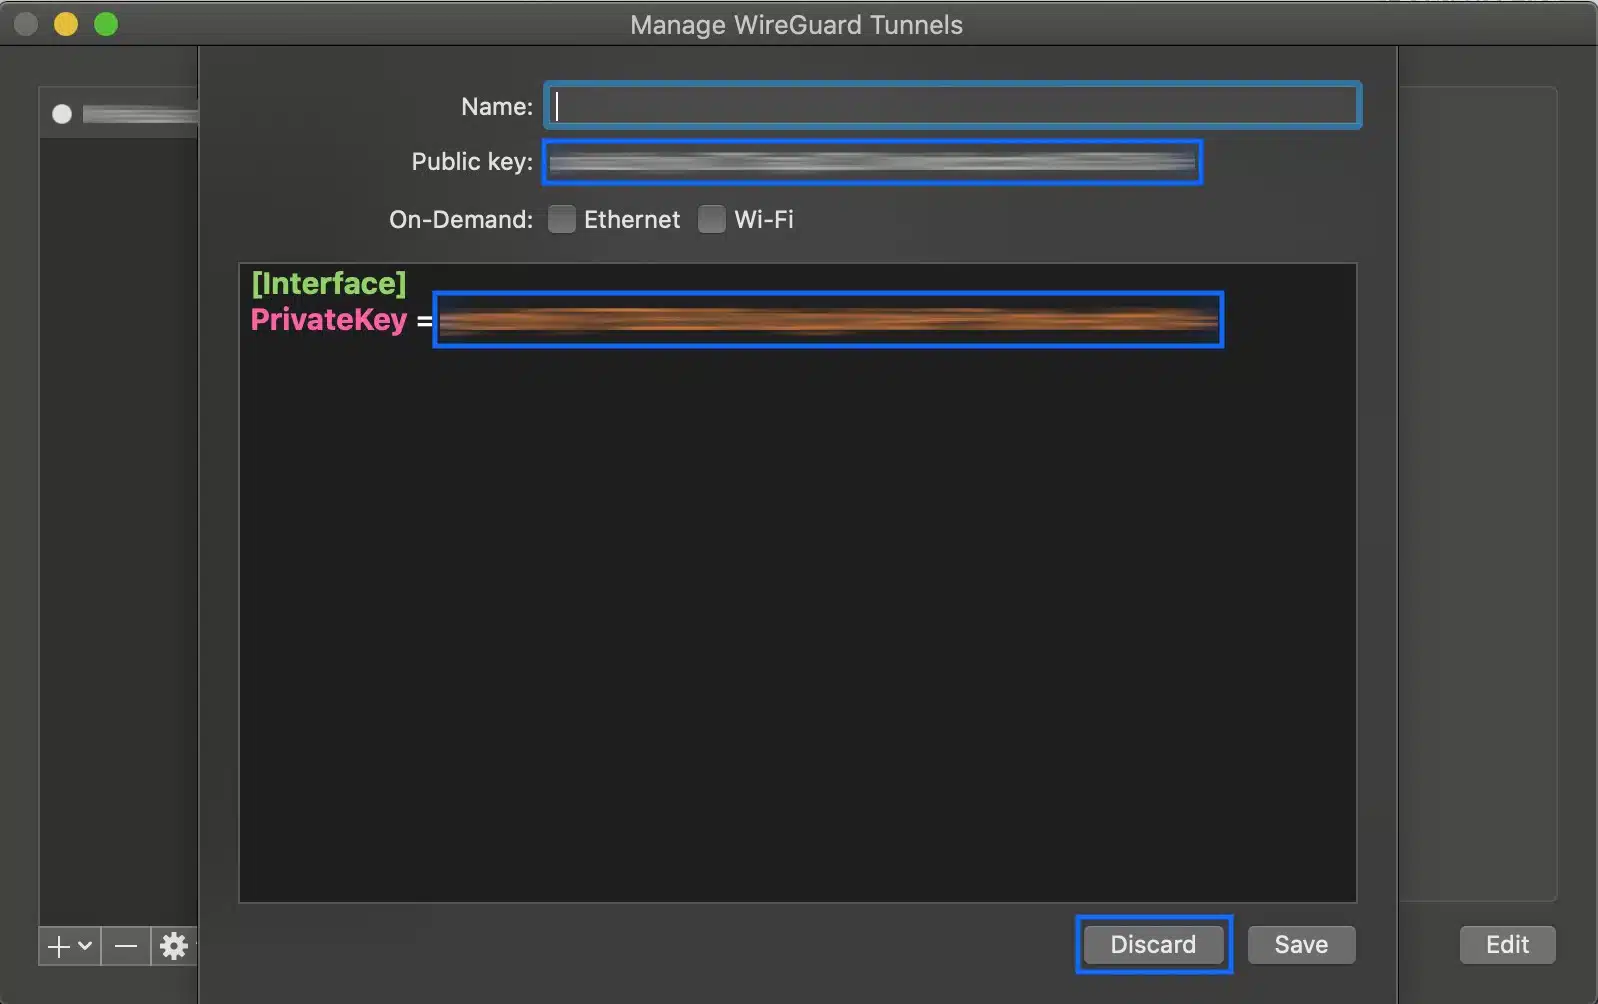
Generating our local WireGuard key pair
Because OPNsense doesn’t have a built-in key generator for WireGuard, we need to generate these using different means before configuring our tunnel. I did it by downloading the official WireGuard client app for my platform and creating a dummy configuration just for key generation. Once I copy the keys, I delete the configuration.
- From the WireGuard client app, click the + sign on the bottom left.
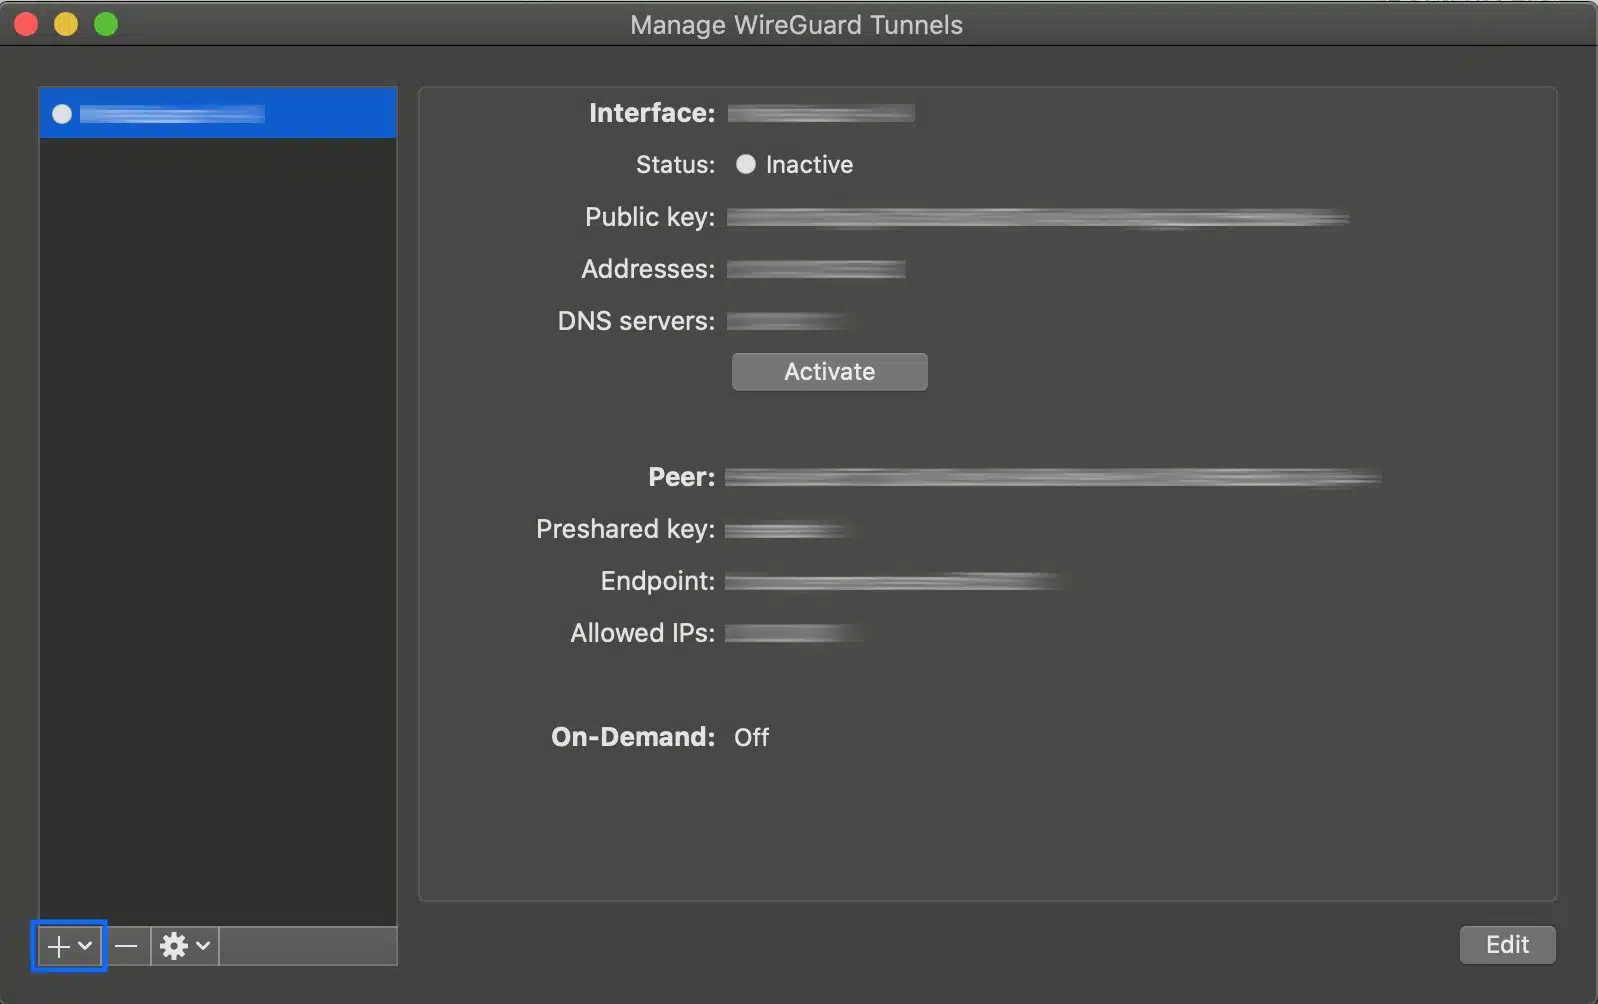
- Select Add Empty Tunnel… to create a new configuration. This automatically generates a new key pair.

- Copy and paste the public and private keys into a text file and discard the configuration.
Uploading your public key and obtaining an IP address
Uploading your public key and obtaining an IP address varies from provider to provider. Here are the basics of how to do this for each of the above VPN providers:
- With iVPN, you need to log into your account and manually upload your public key. Once uploaded, iVPN will provide you with your local IP address.
- With Mullvad, you can use the following command from a terminal window:
curl https://api.mullvad.net/wg/ -d account=0000000 —data-urlencode pubkey=YOURPUBLICKEY. Replace “0000000” with your account number and replace “YOURPUBLICKEY” with your public key. - With Windscribe, you’re provided with a WireGuard configuration generator that will assign you a public key and an IP address while providing you with the private key to use on your system.
From here on, this guide assumes you have generated your key pair, uploaded your public key, and obtained an IP address and connection port from your VPN provider.
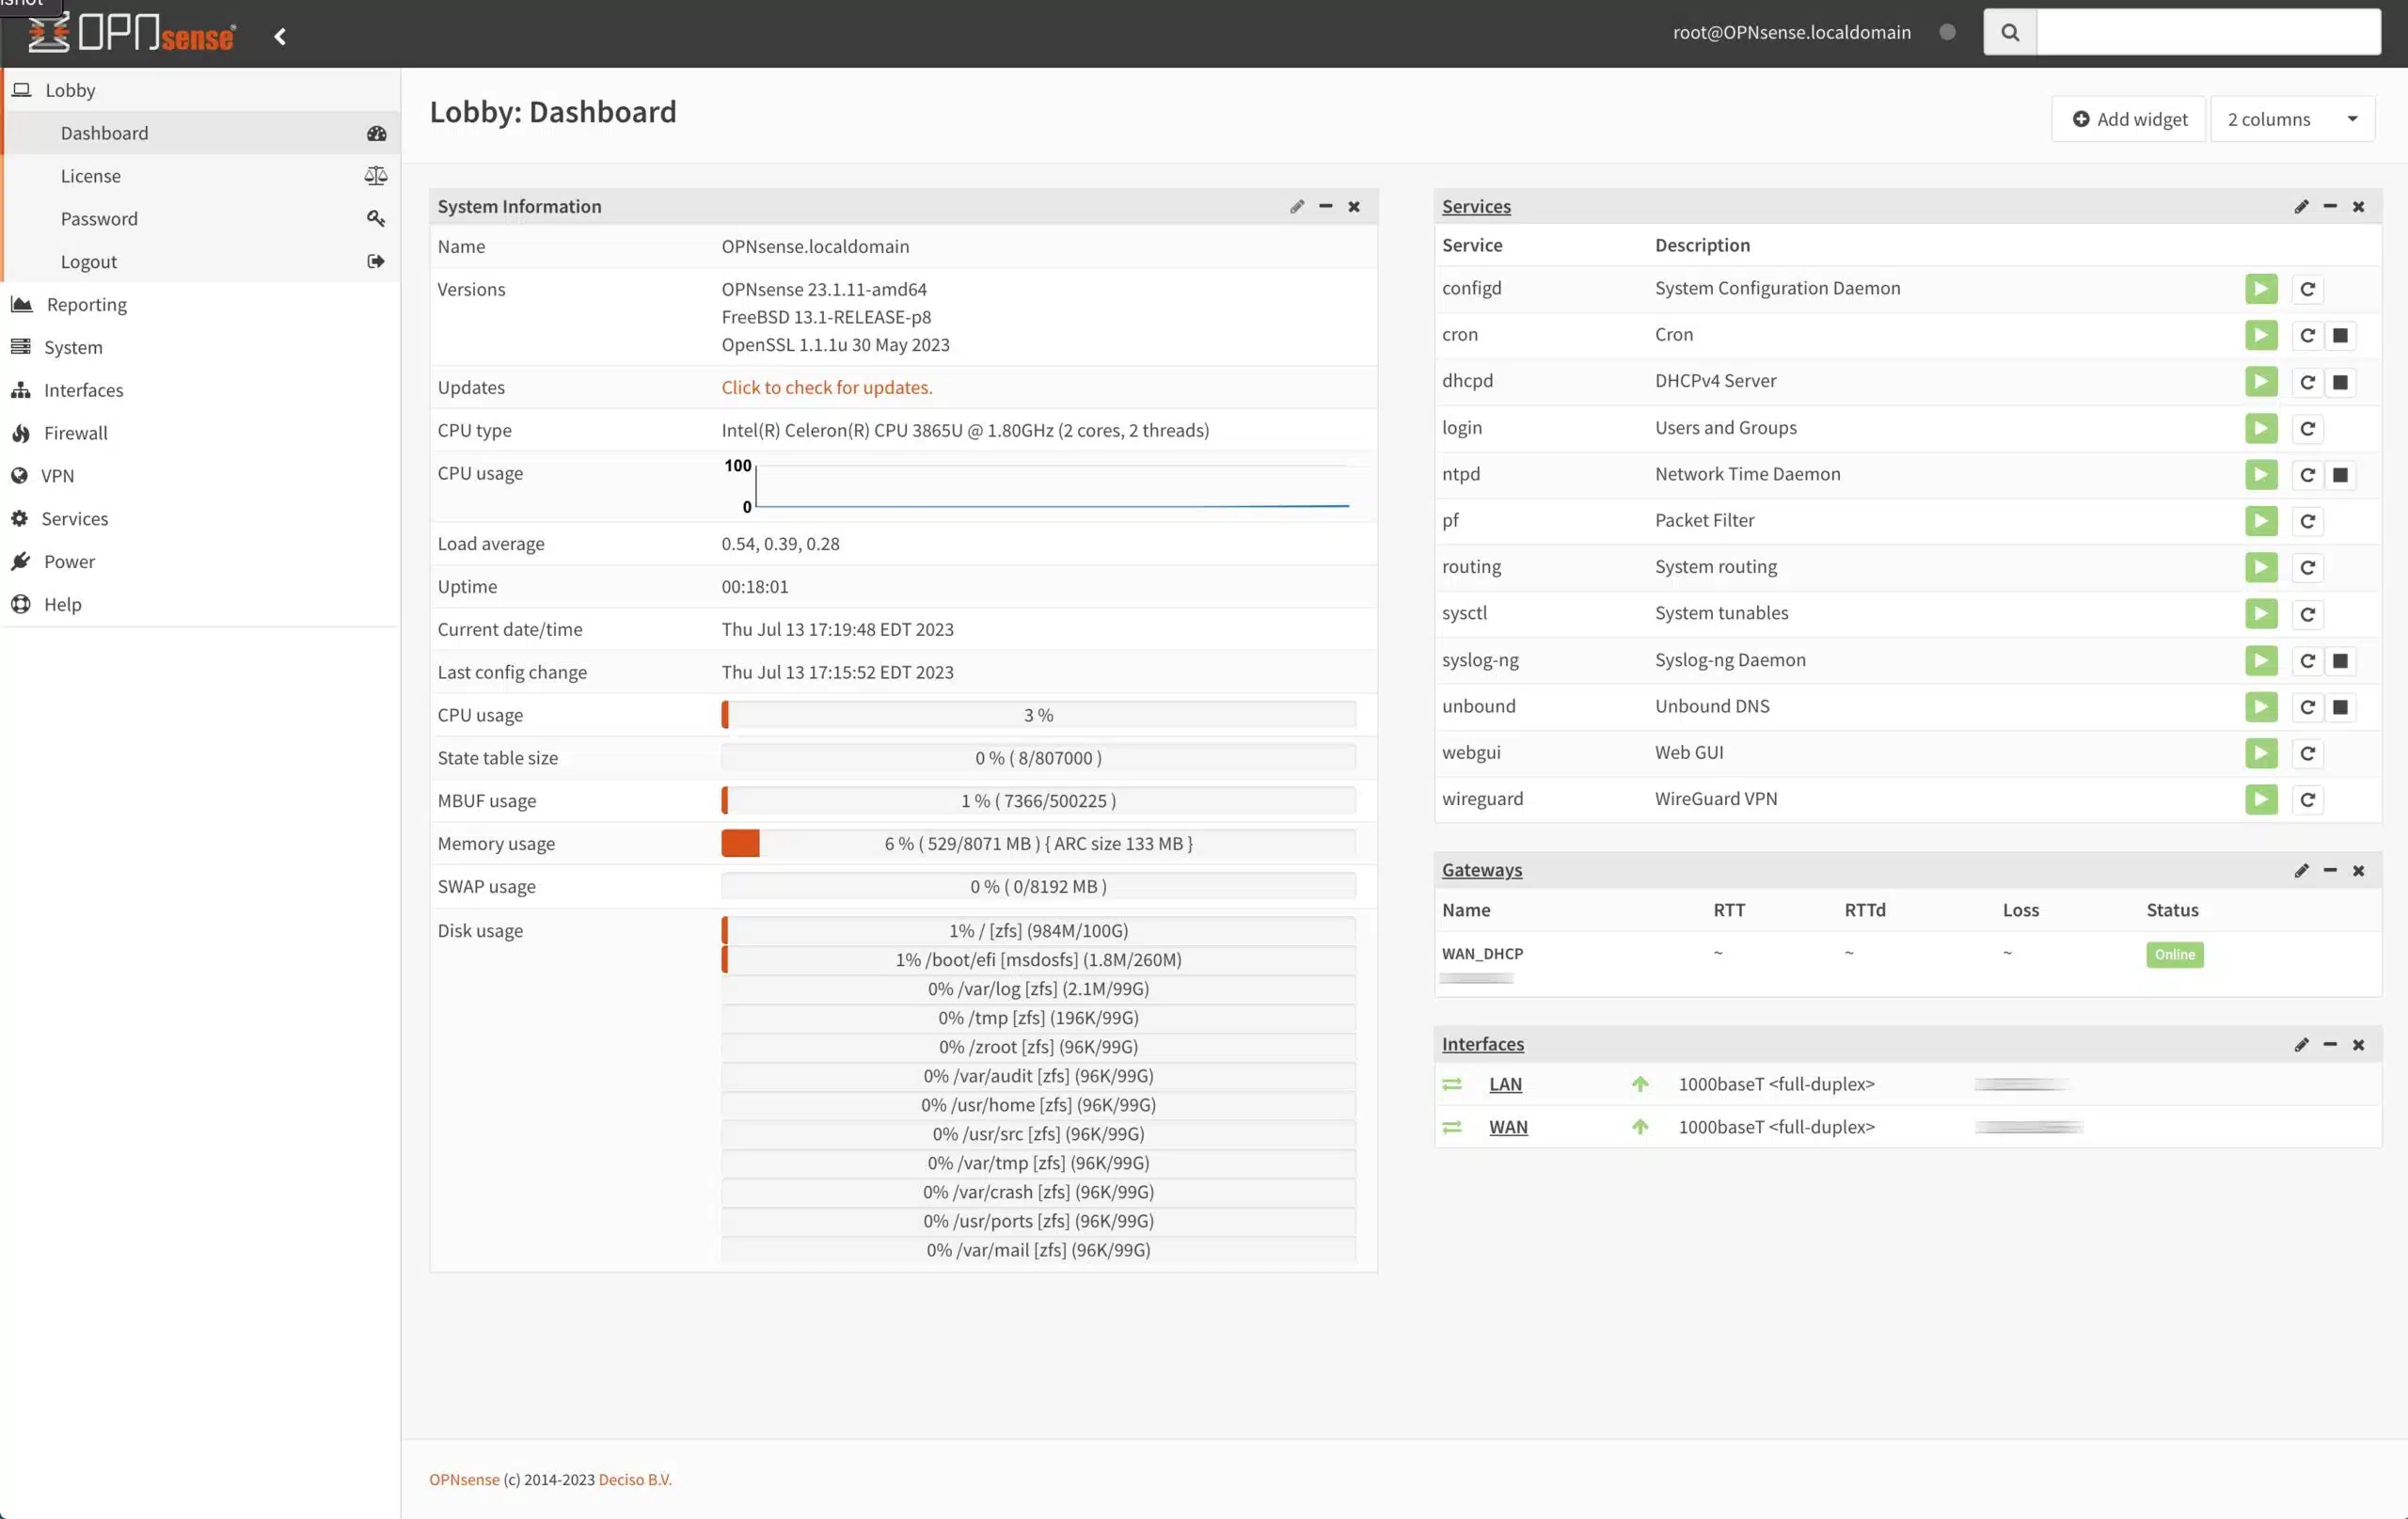
Installing WireGuard
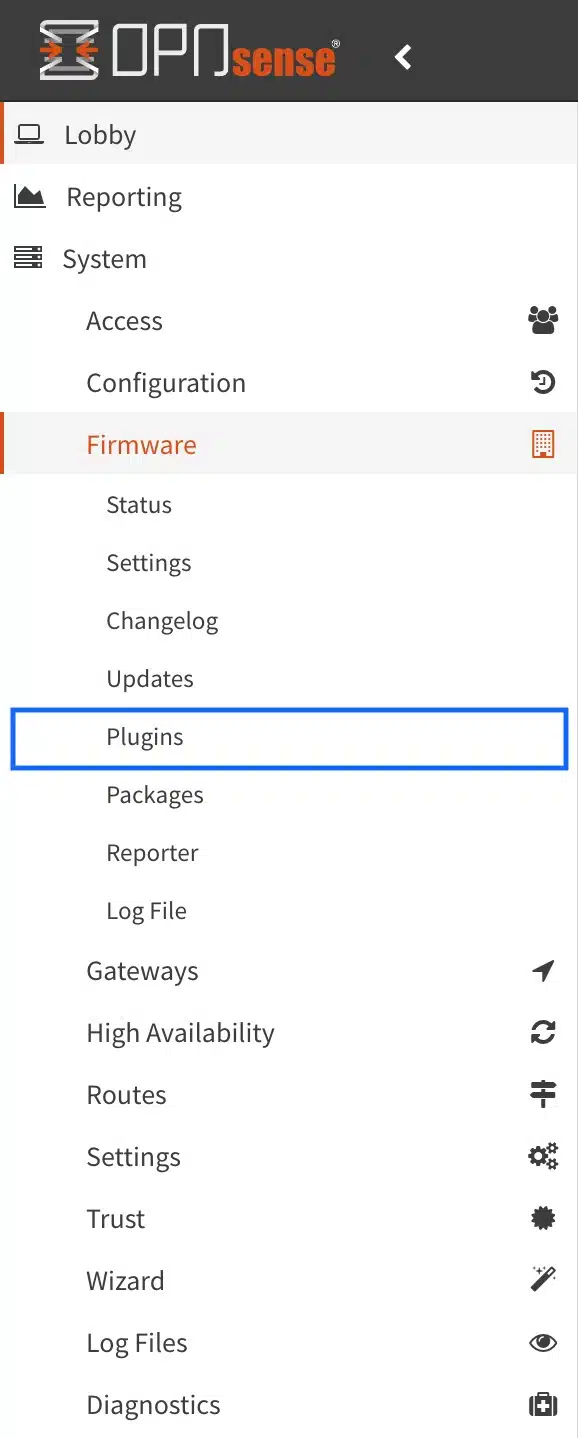
WireGuard in OPNsense is an add-on package (called a plugin in OPNsense). So we first need to install the plugin.
- From the side menu, select System > Firmware > Plugins. The Plugins page is displayed.
- Scroll down the page until you see os-wireguard, and click the + sign to its right. The installation begins.
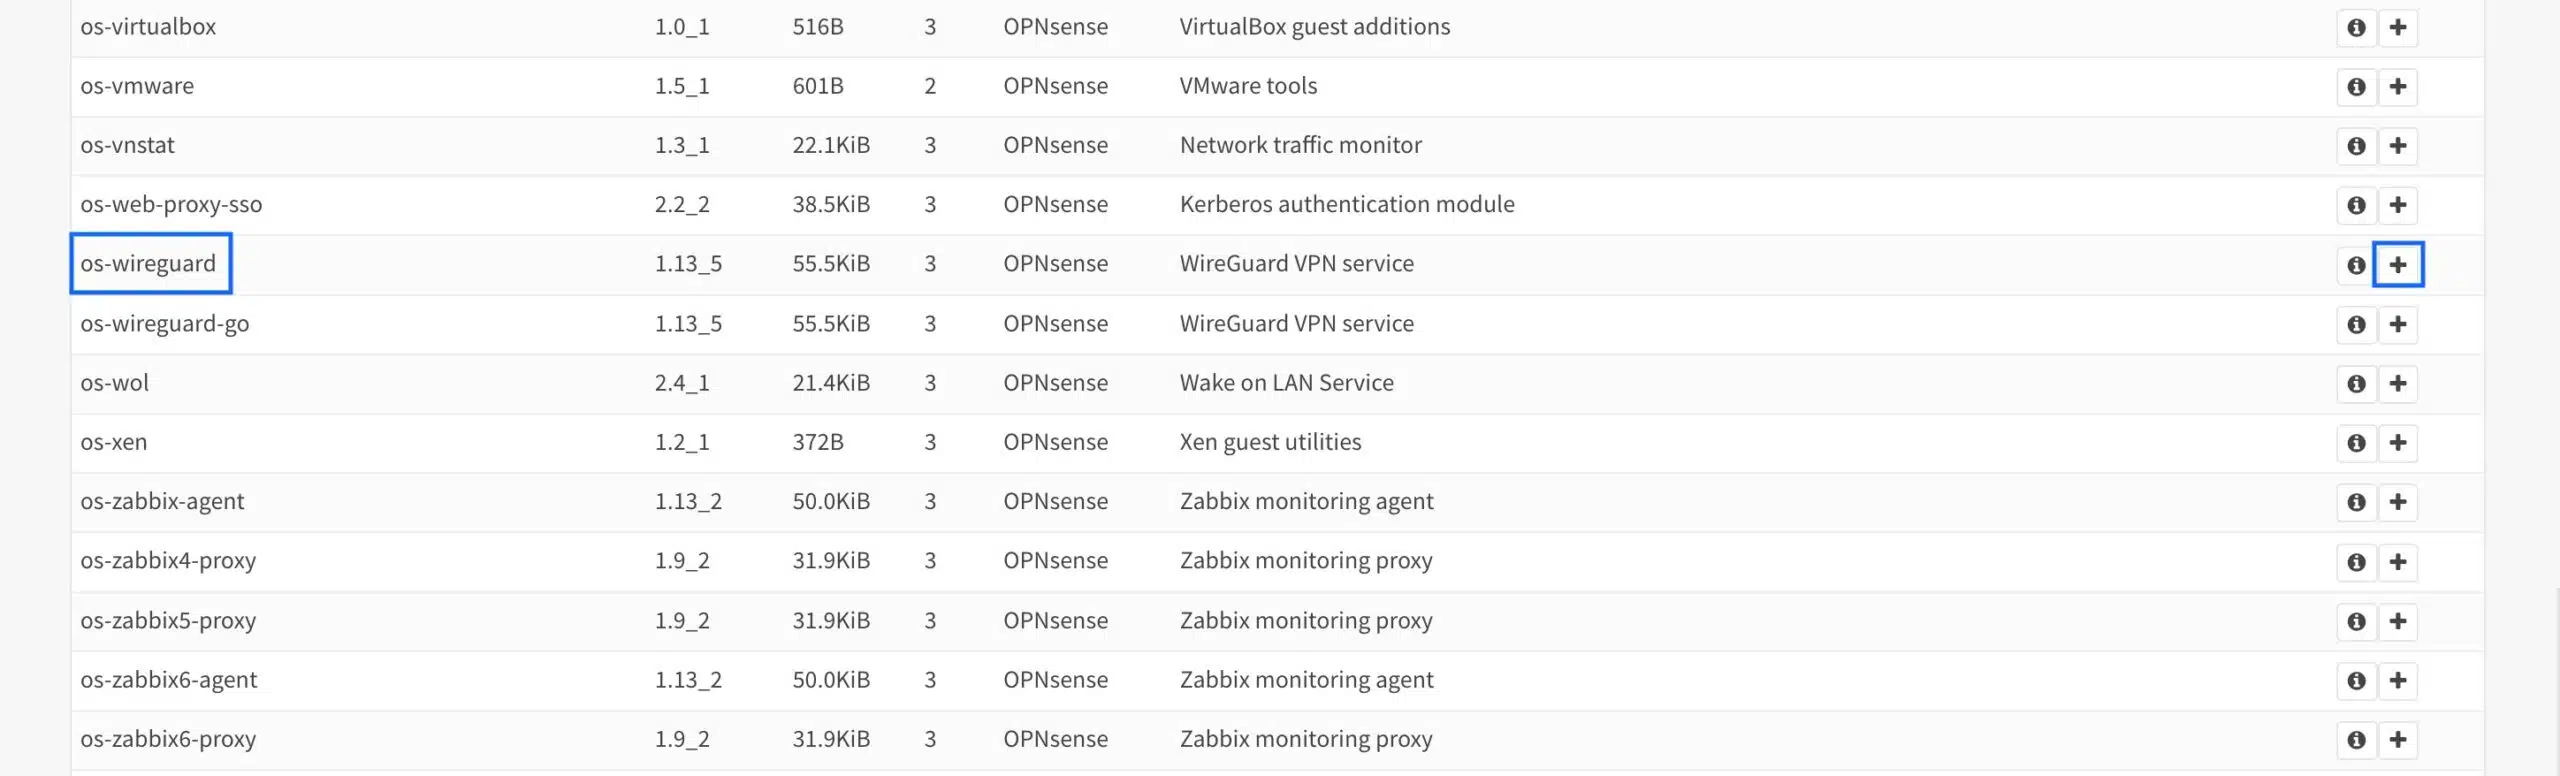
- Once the installation is complete, you should see ***DONE*** at the bottom of the installation window.

Creating the VPN provider’s WireGuard peer
We’re now ready to start configuring our VPN provider’s WireGuard peer (i.e., the “server”).
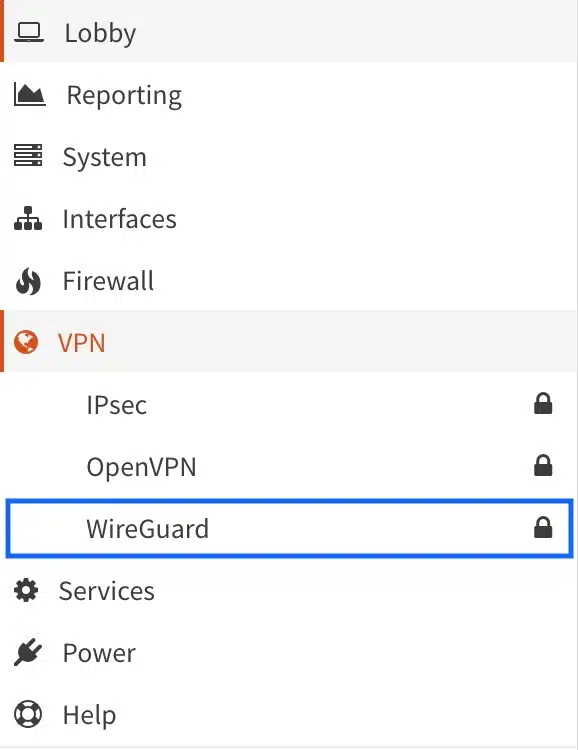
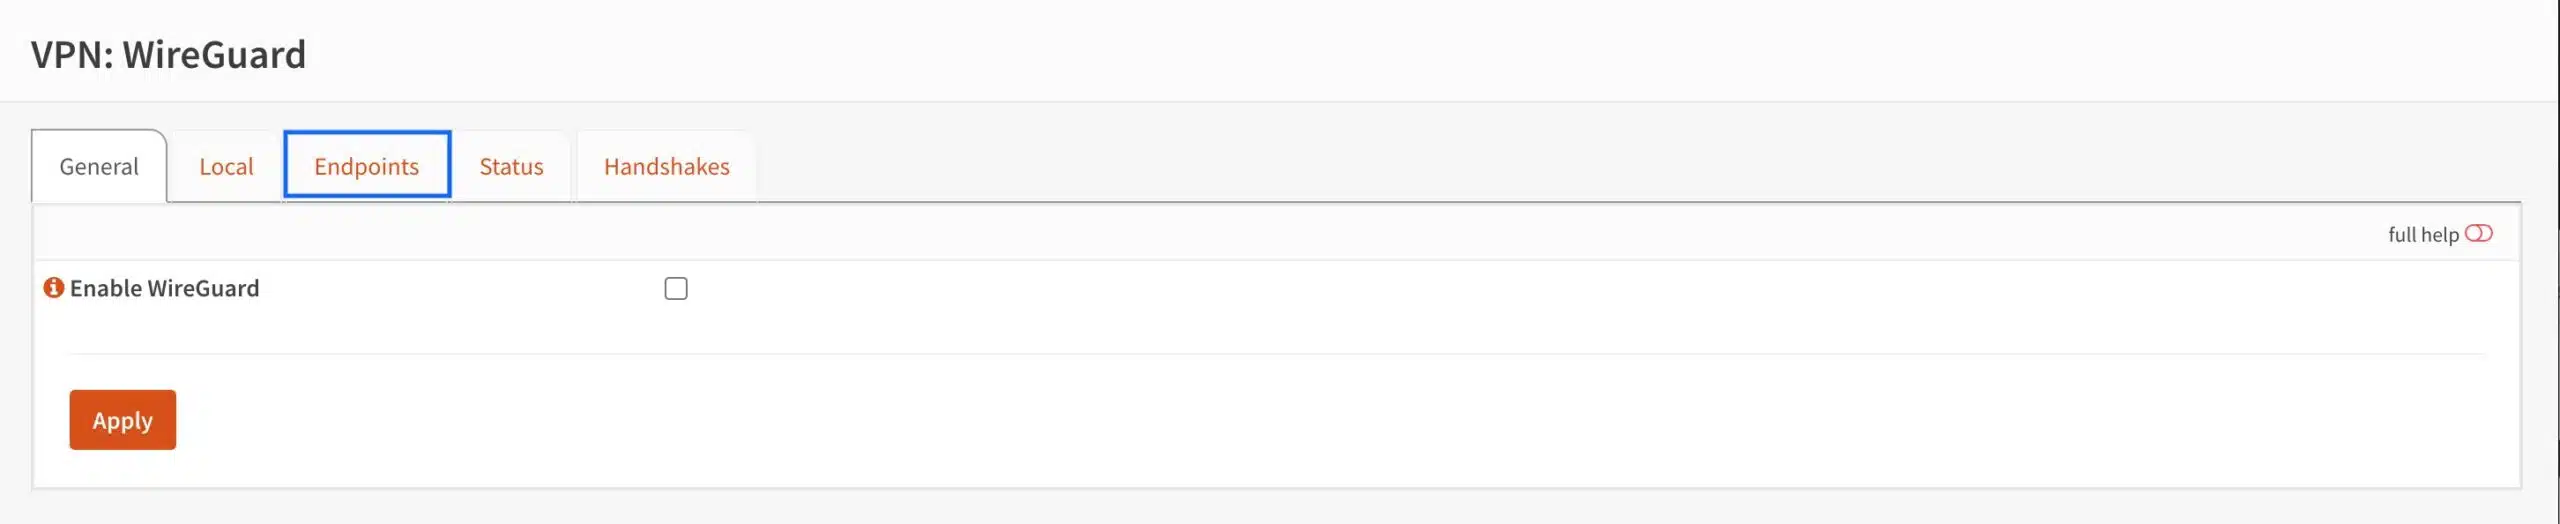
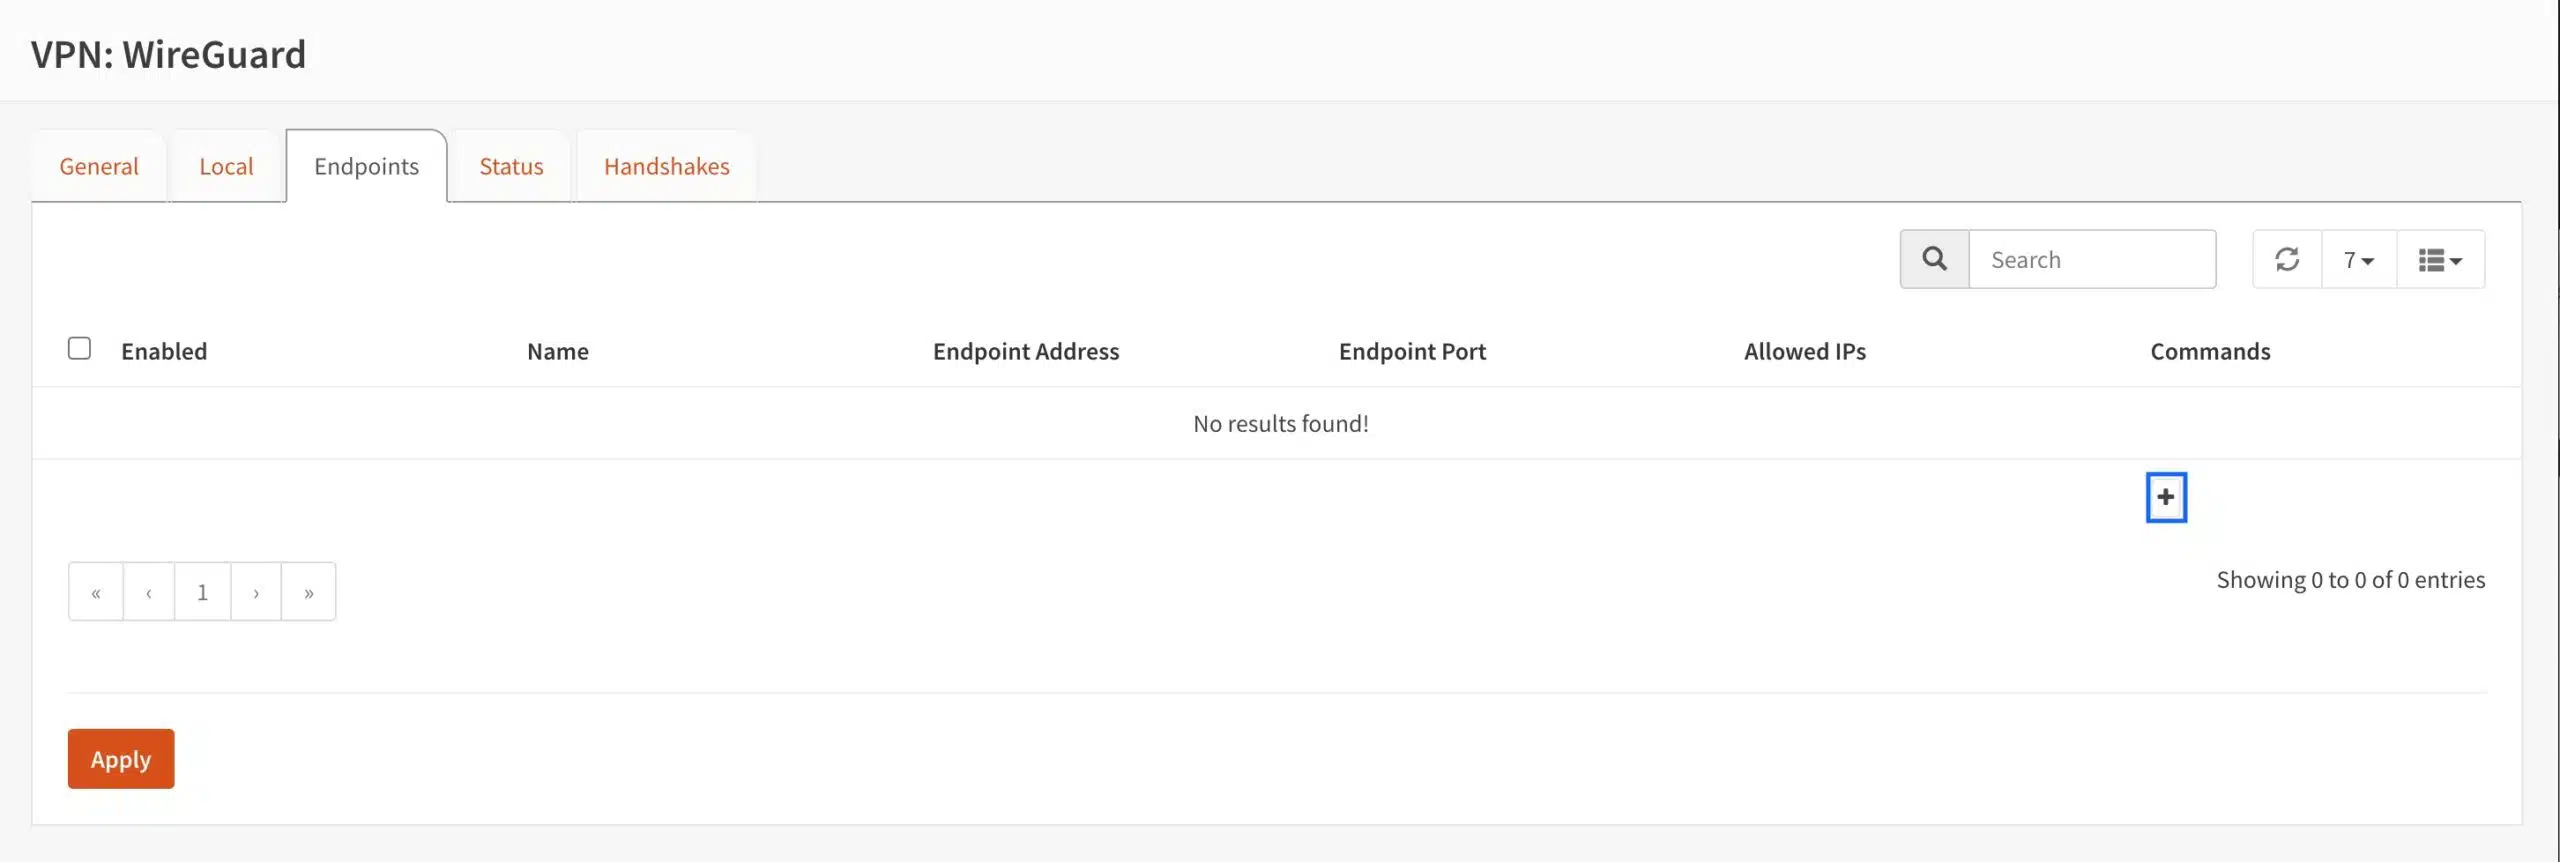
- From the side menu, select VPN > WireGuard. The main WireGuard page is displayed. We’re on the General tab by default.
- Select the Endpoints tab. The Endpoints page is displayed.
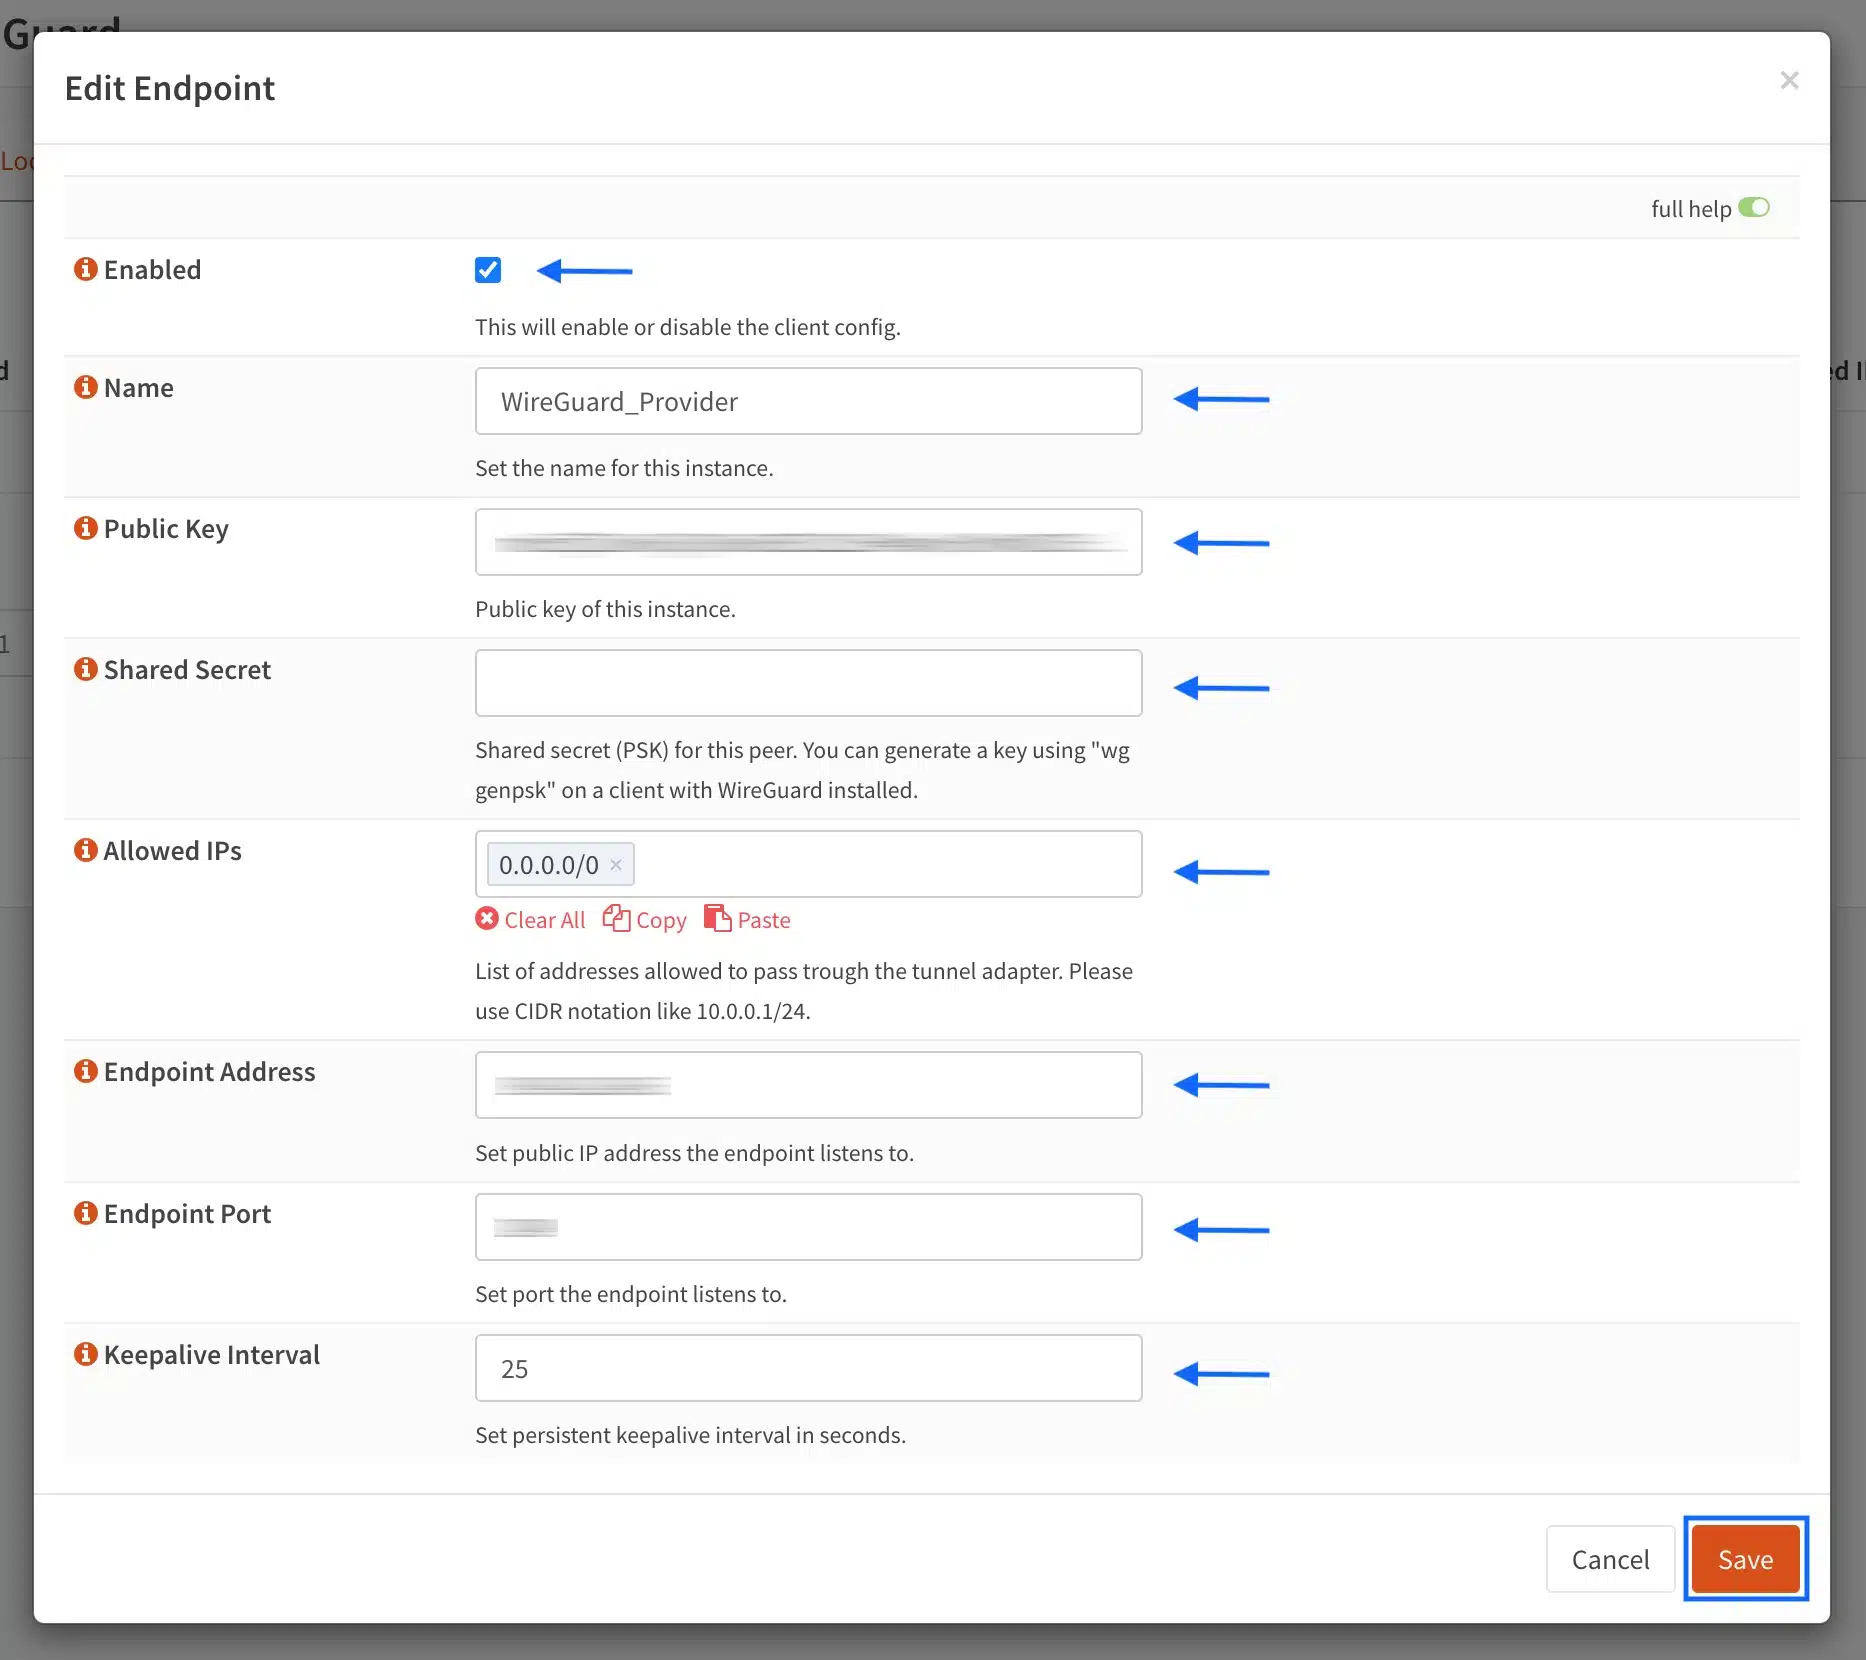
- Click the + sign to create a new endpoint. The Edit Endpoint page is displayed.
- Make sure the Enabled box is ticked.
- Enter a name for this peer in the Name field.
- Paste your VPN provider’s public key for your chosen WireGuard server in the Public Key field.
- Enter your provider’s shared secret in the Shared Secret field if required. My provider does not require this.
- Enter 0.0.0.0/0 in the Allowed IPs field. This will allow all traffic through the WireGuard tunnel.
- Enter the WireGuard server’s IP address in the Endpoint Address field.
- Enter the WireGuard server’s port number in the Endpoint Port field.
- If required, enter a keepalive value in the Keepalive Interval field. Mine is set to 25 seconds.
- Click Save at the bottom of the page. You’re taken back to the Endpoints page.
- Click Apply.

Configuring our local WireGuard peer
In this step, we’re going to create our local WireGuard peer (i.e., the “client”).
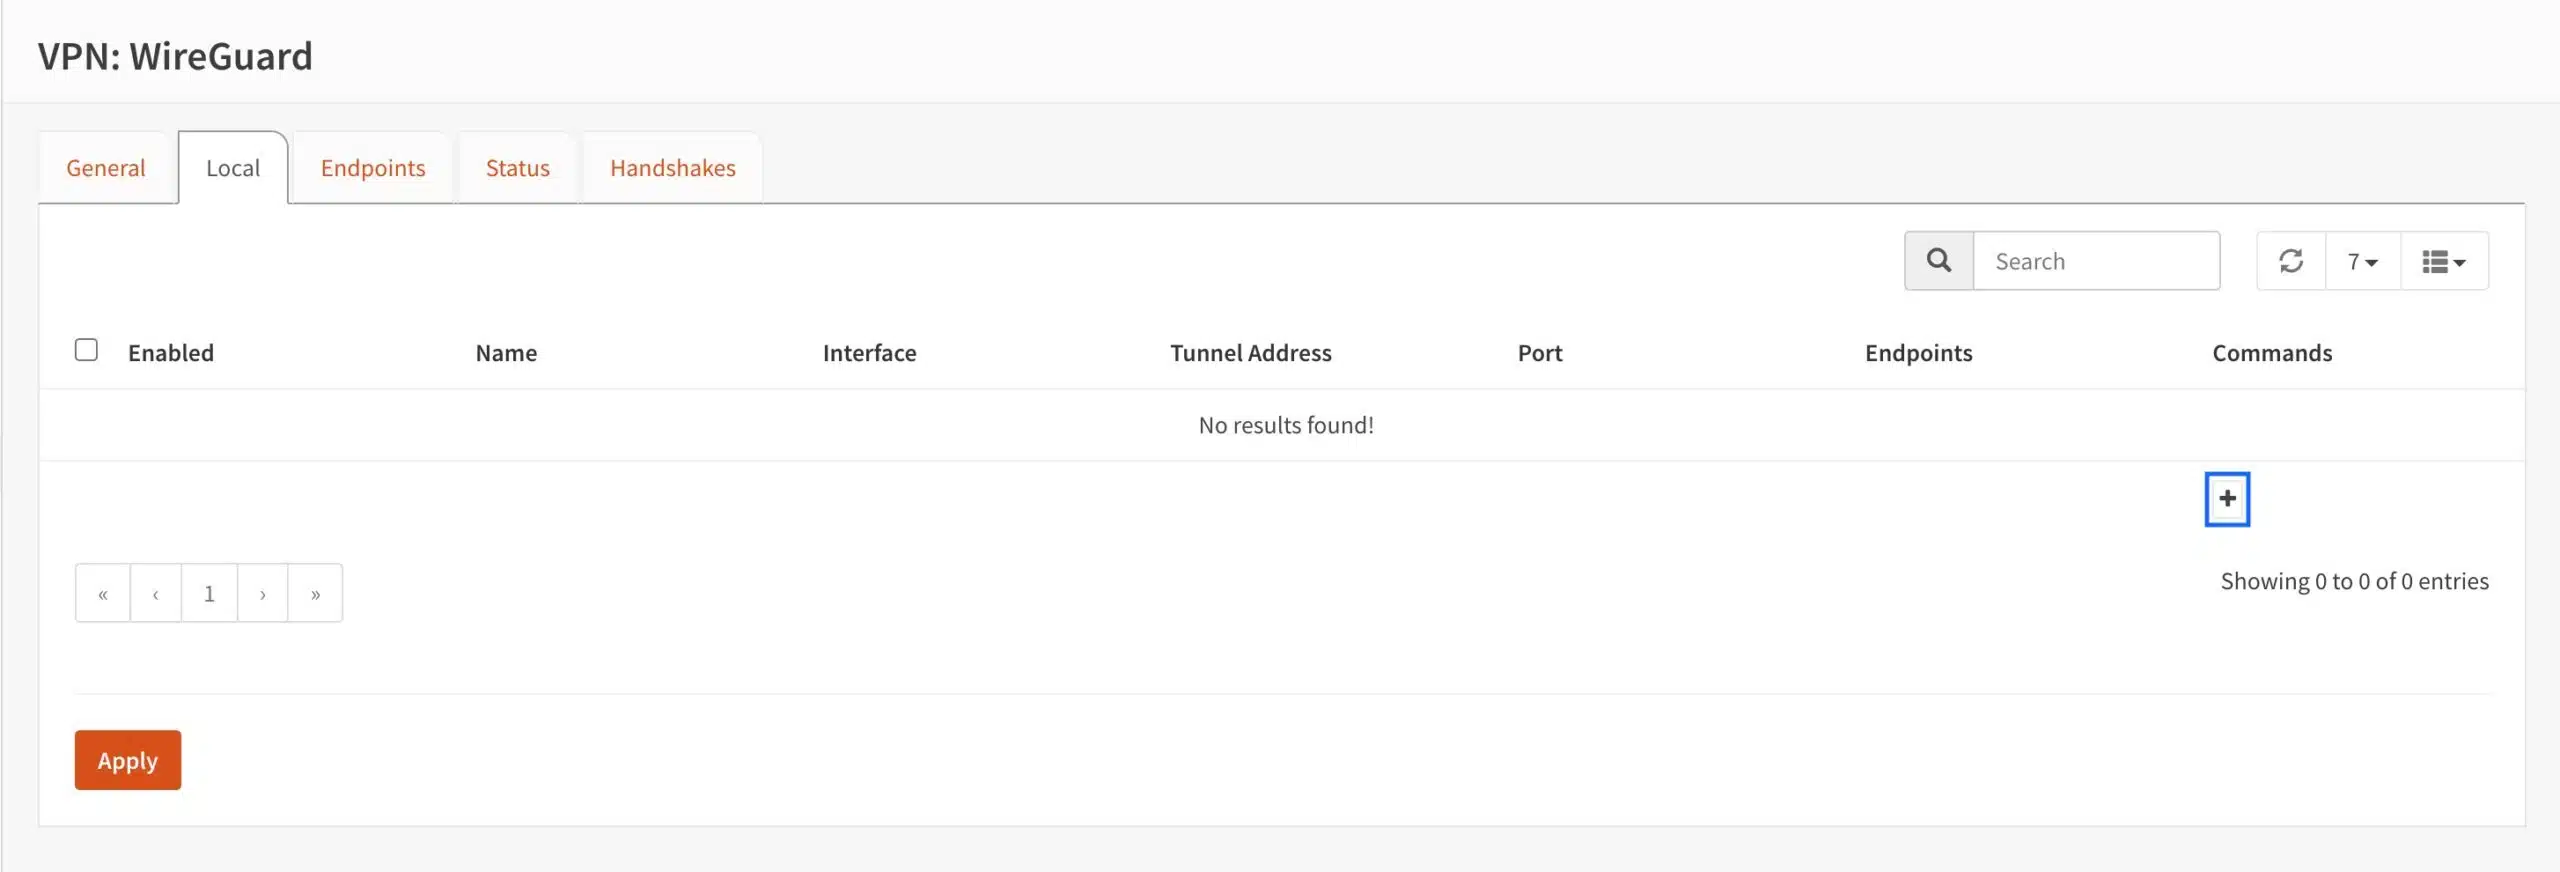
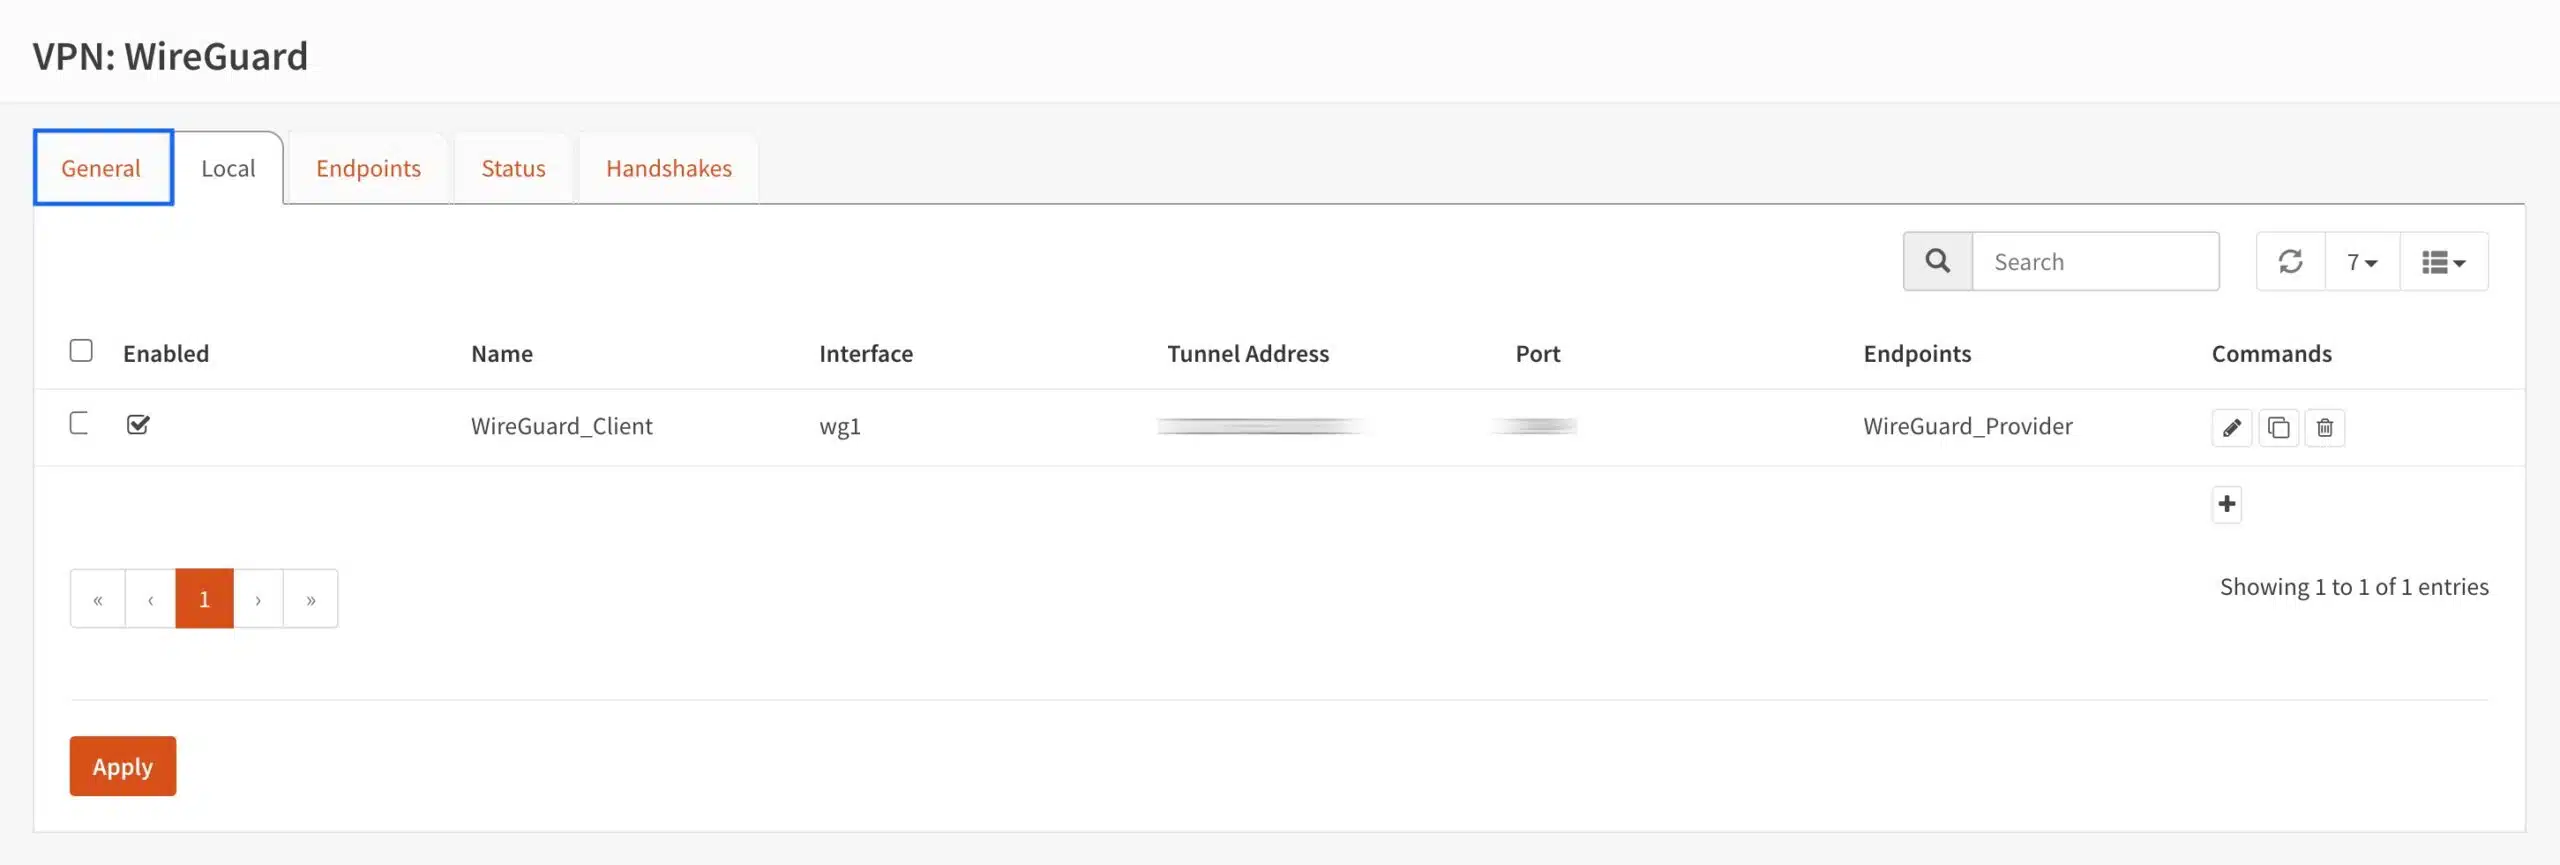
- Select the Local tab. The Local page is displayed.

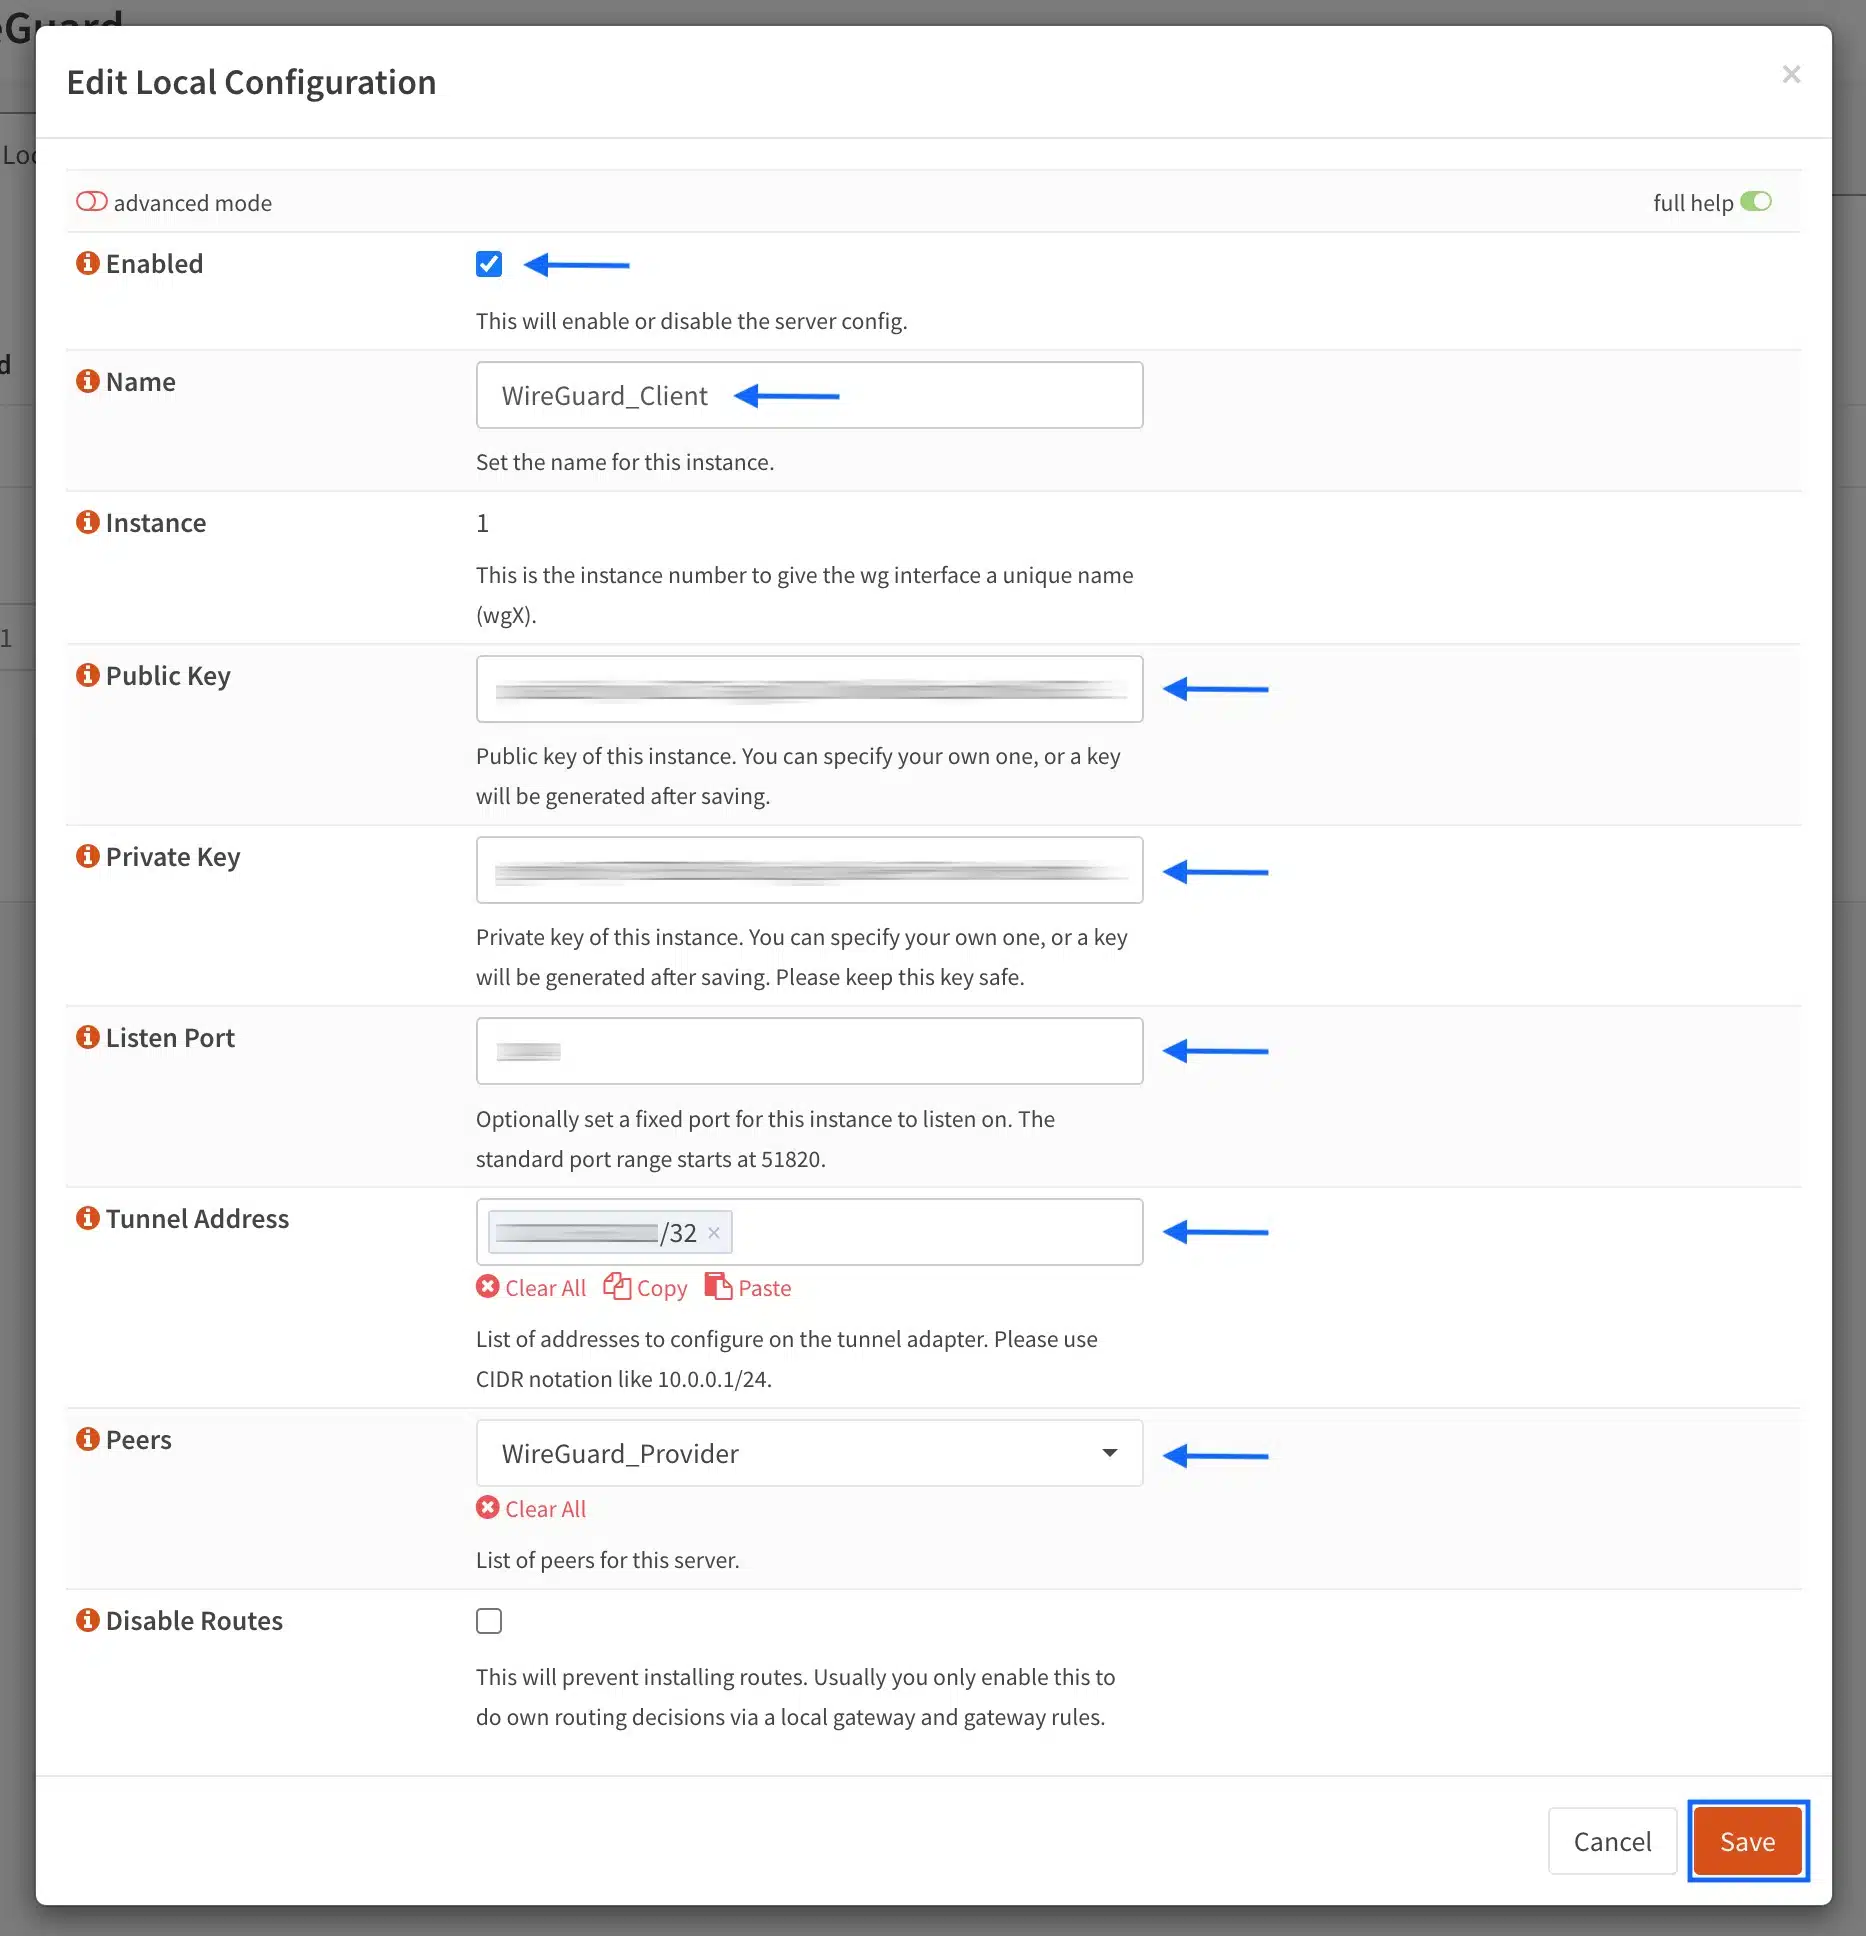
- Click the + sign to create a local peer. The Edit Local Configuration page is displayed.
- Make sure the Enabled box is ticked.
- Enter a name for your local peer in the Name field.
- Paste your public key in the Public Key field (generated from the WireGuard client app).
- Paste your private key in the Private Key field (generated from the WireGuard client app).
- Enter the port for your WireGuard connection in the Listen Port field.
- Enter the IP address assigned to you by your VPN provider in the Tunnel Address field. It’s important to enter it with a /32 subnet mask.
- From the Peers drop-down menu, select the peer we created in the previous step.
- Click Save at the bottom of the page. You’re taken back to the Local page.
- Click Apply.

Enabling the WireGuard service and checking its status
Now that our “client” and “server” nodes are configured, we can go ahead and enable the WireGuard service and check its status to make sure everything is running correctly.
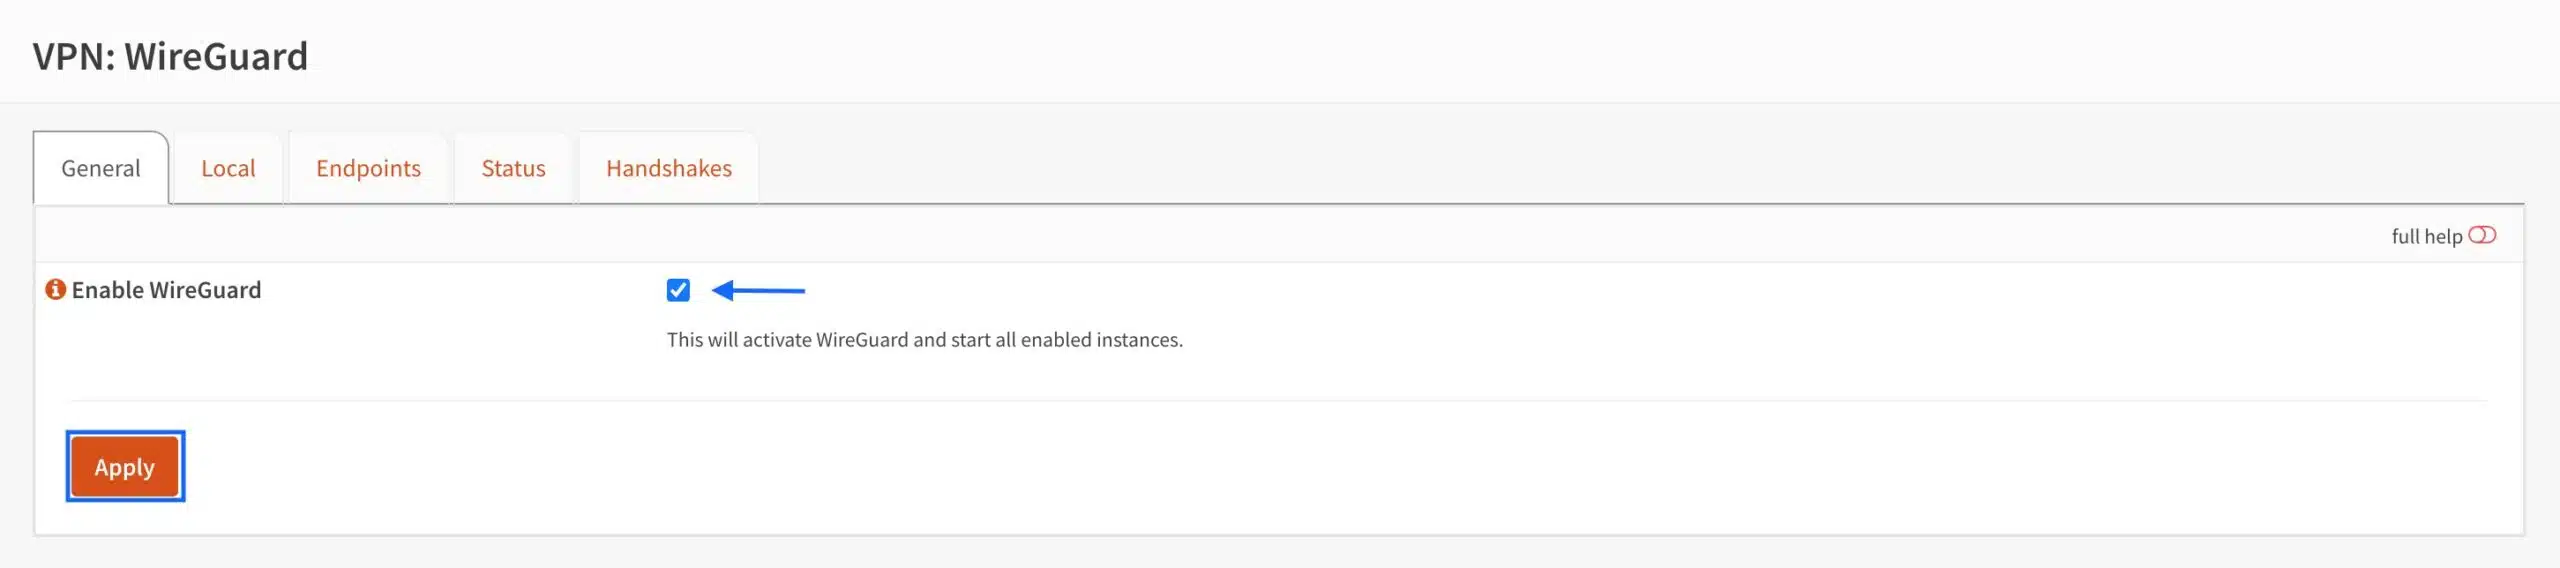
- Select the General tab. The General WireGuard page is displayed.
- Tick the Enable box and click Apply.
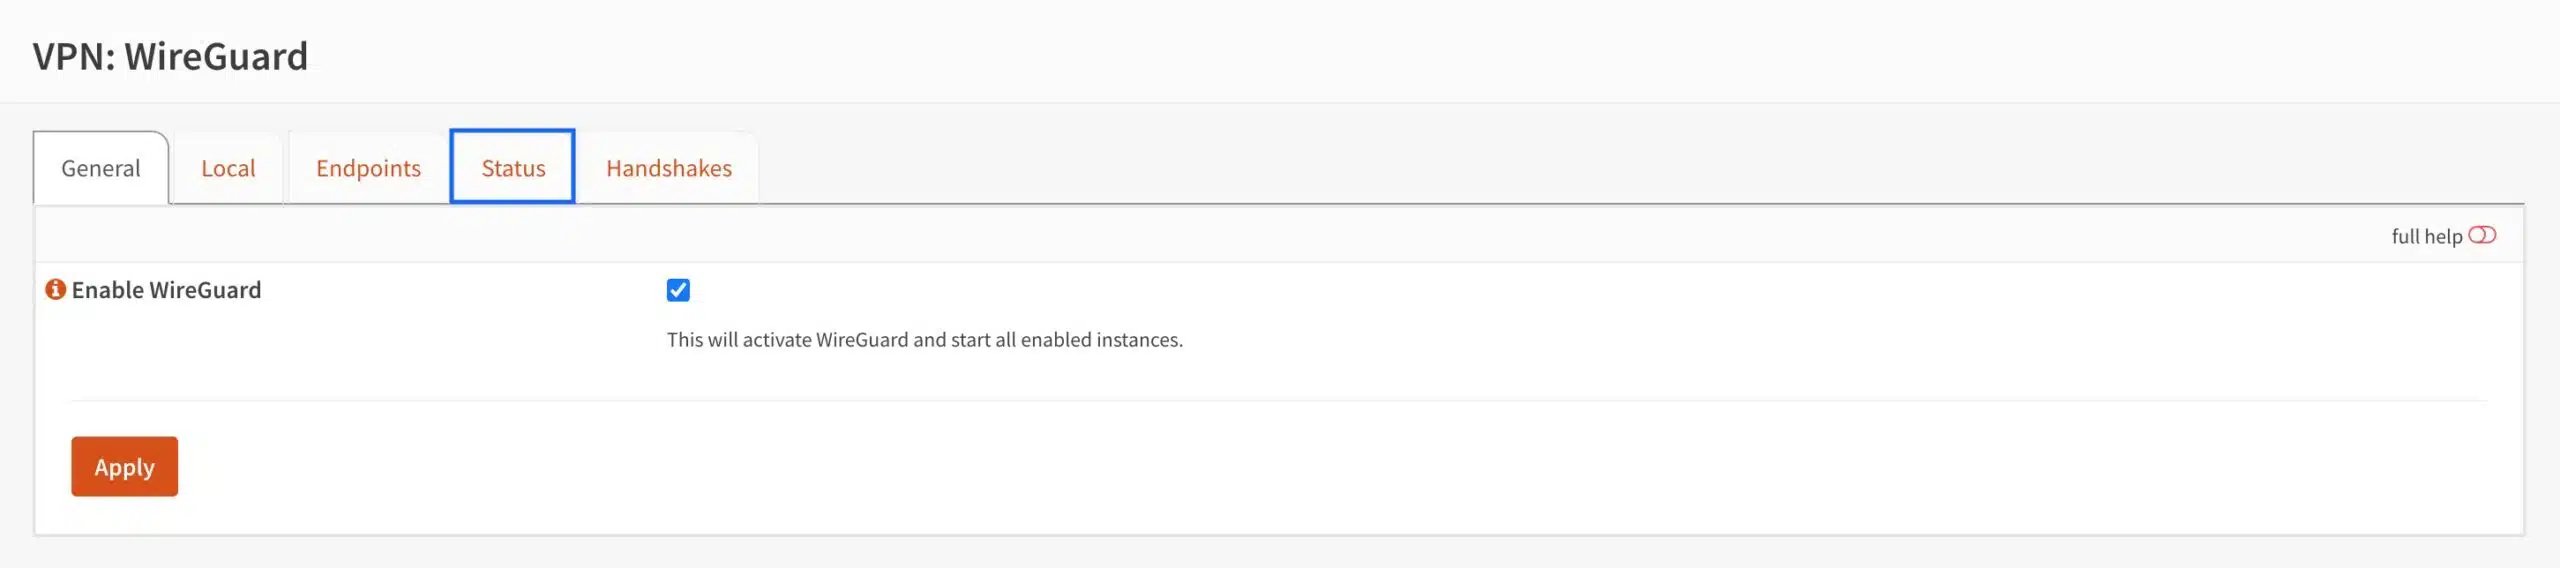
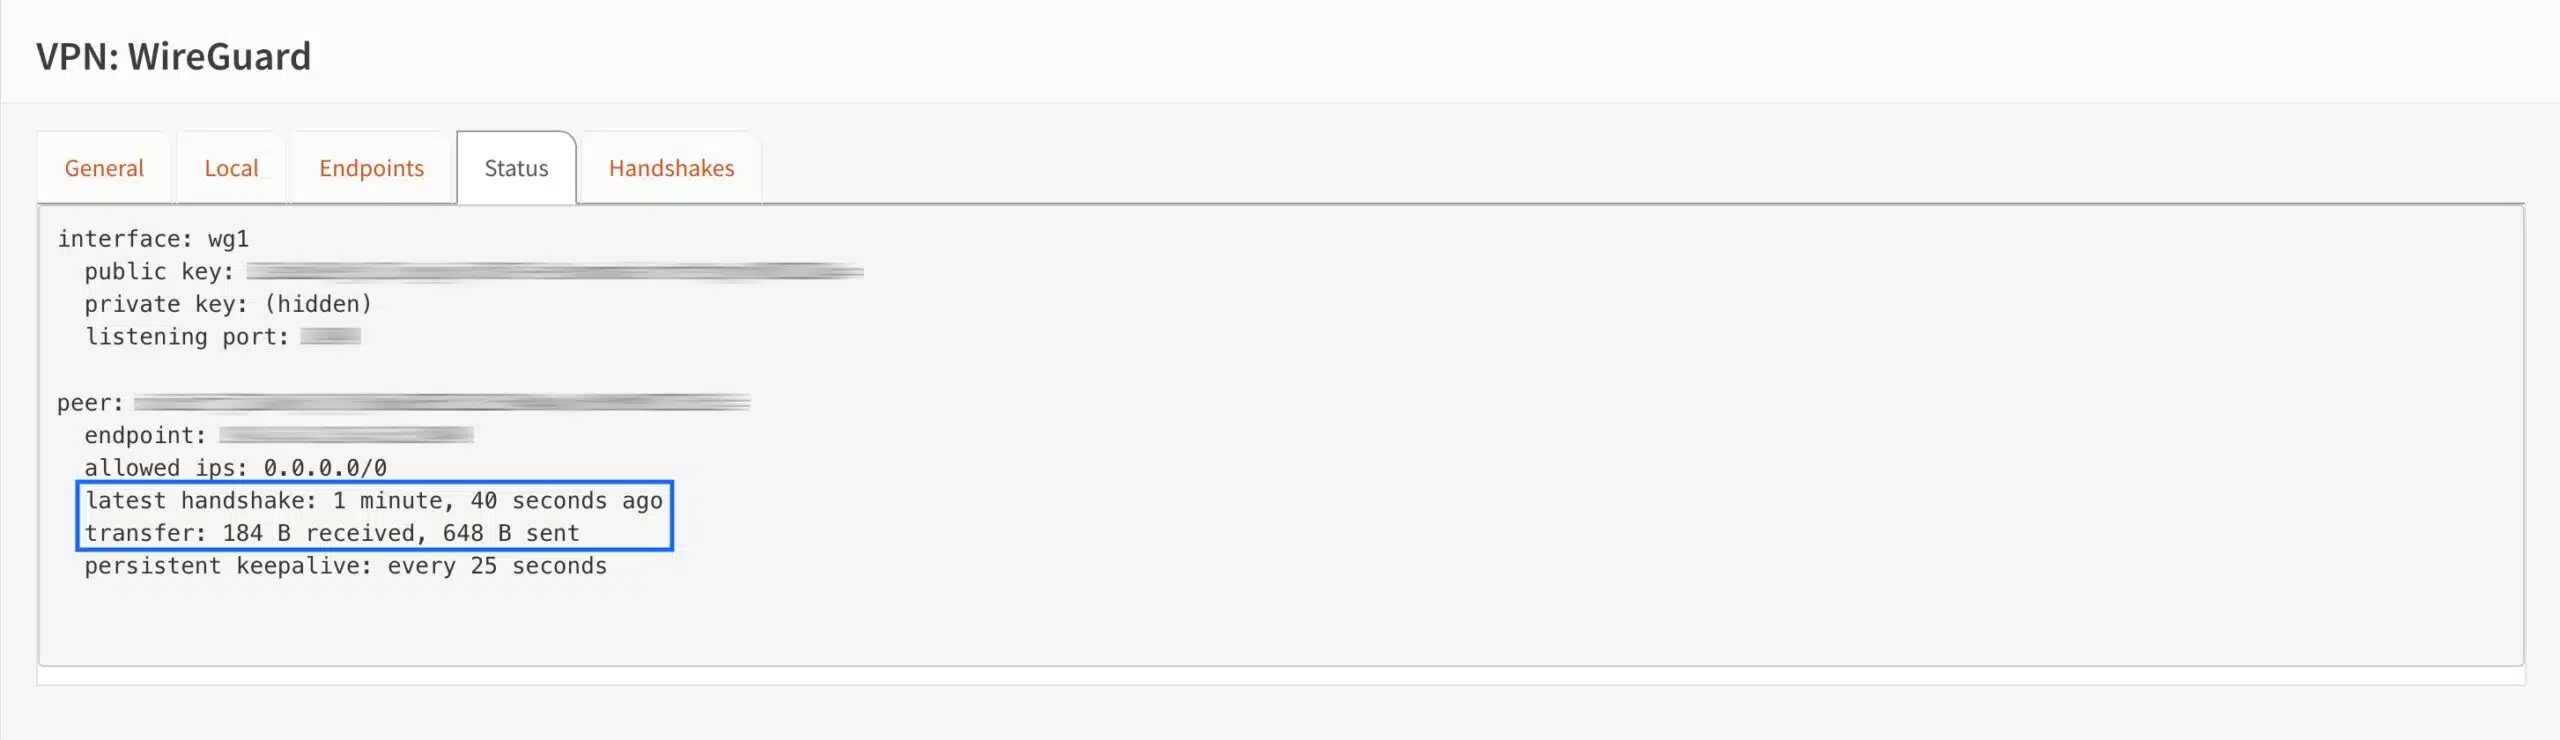
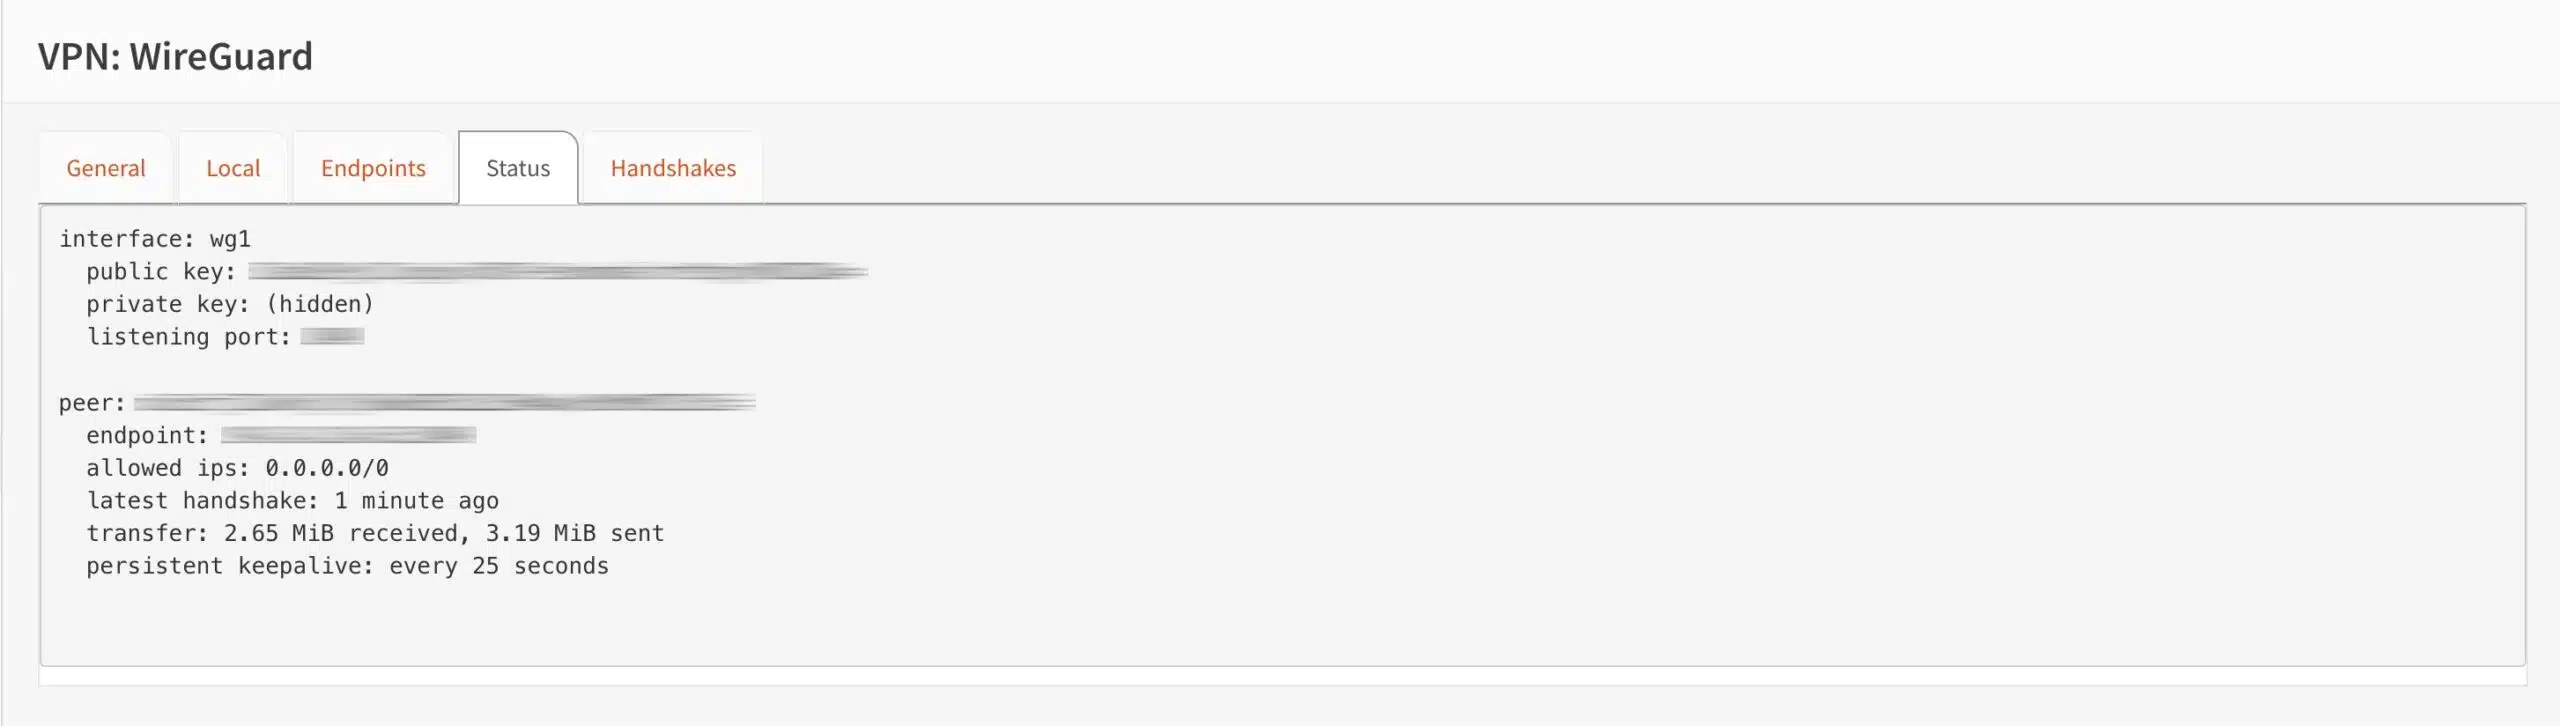
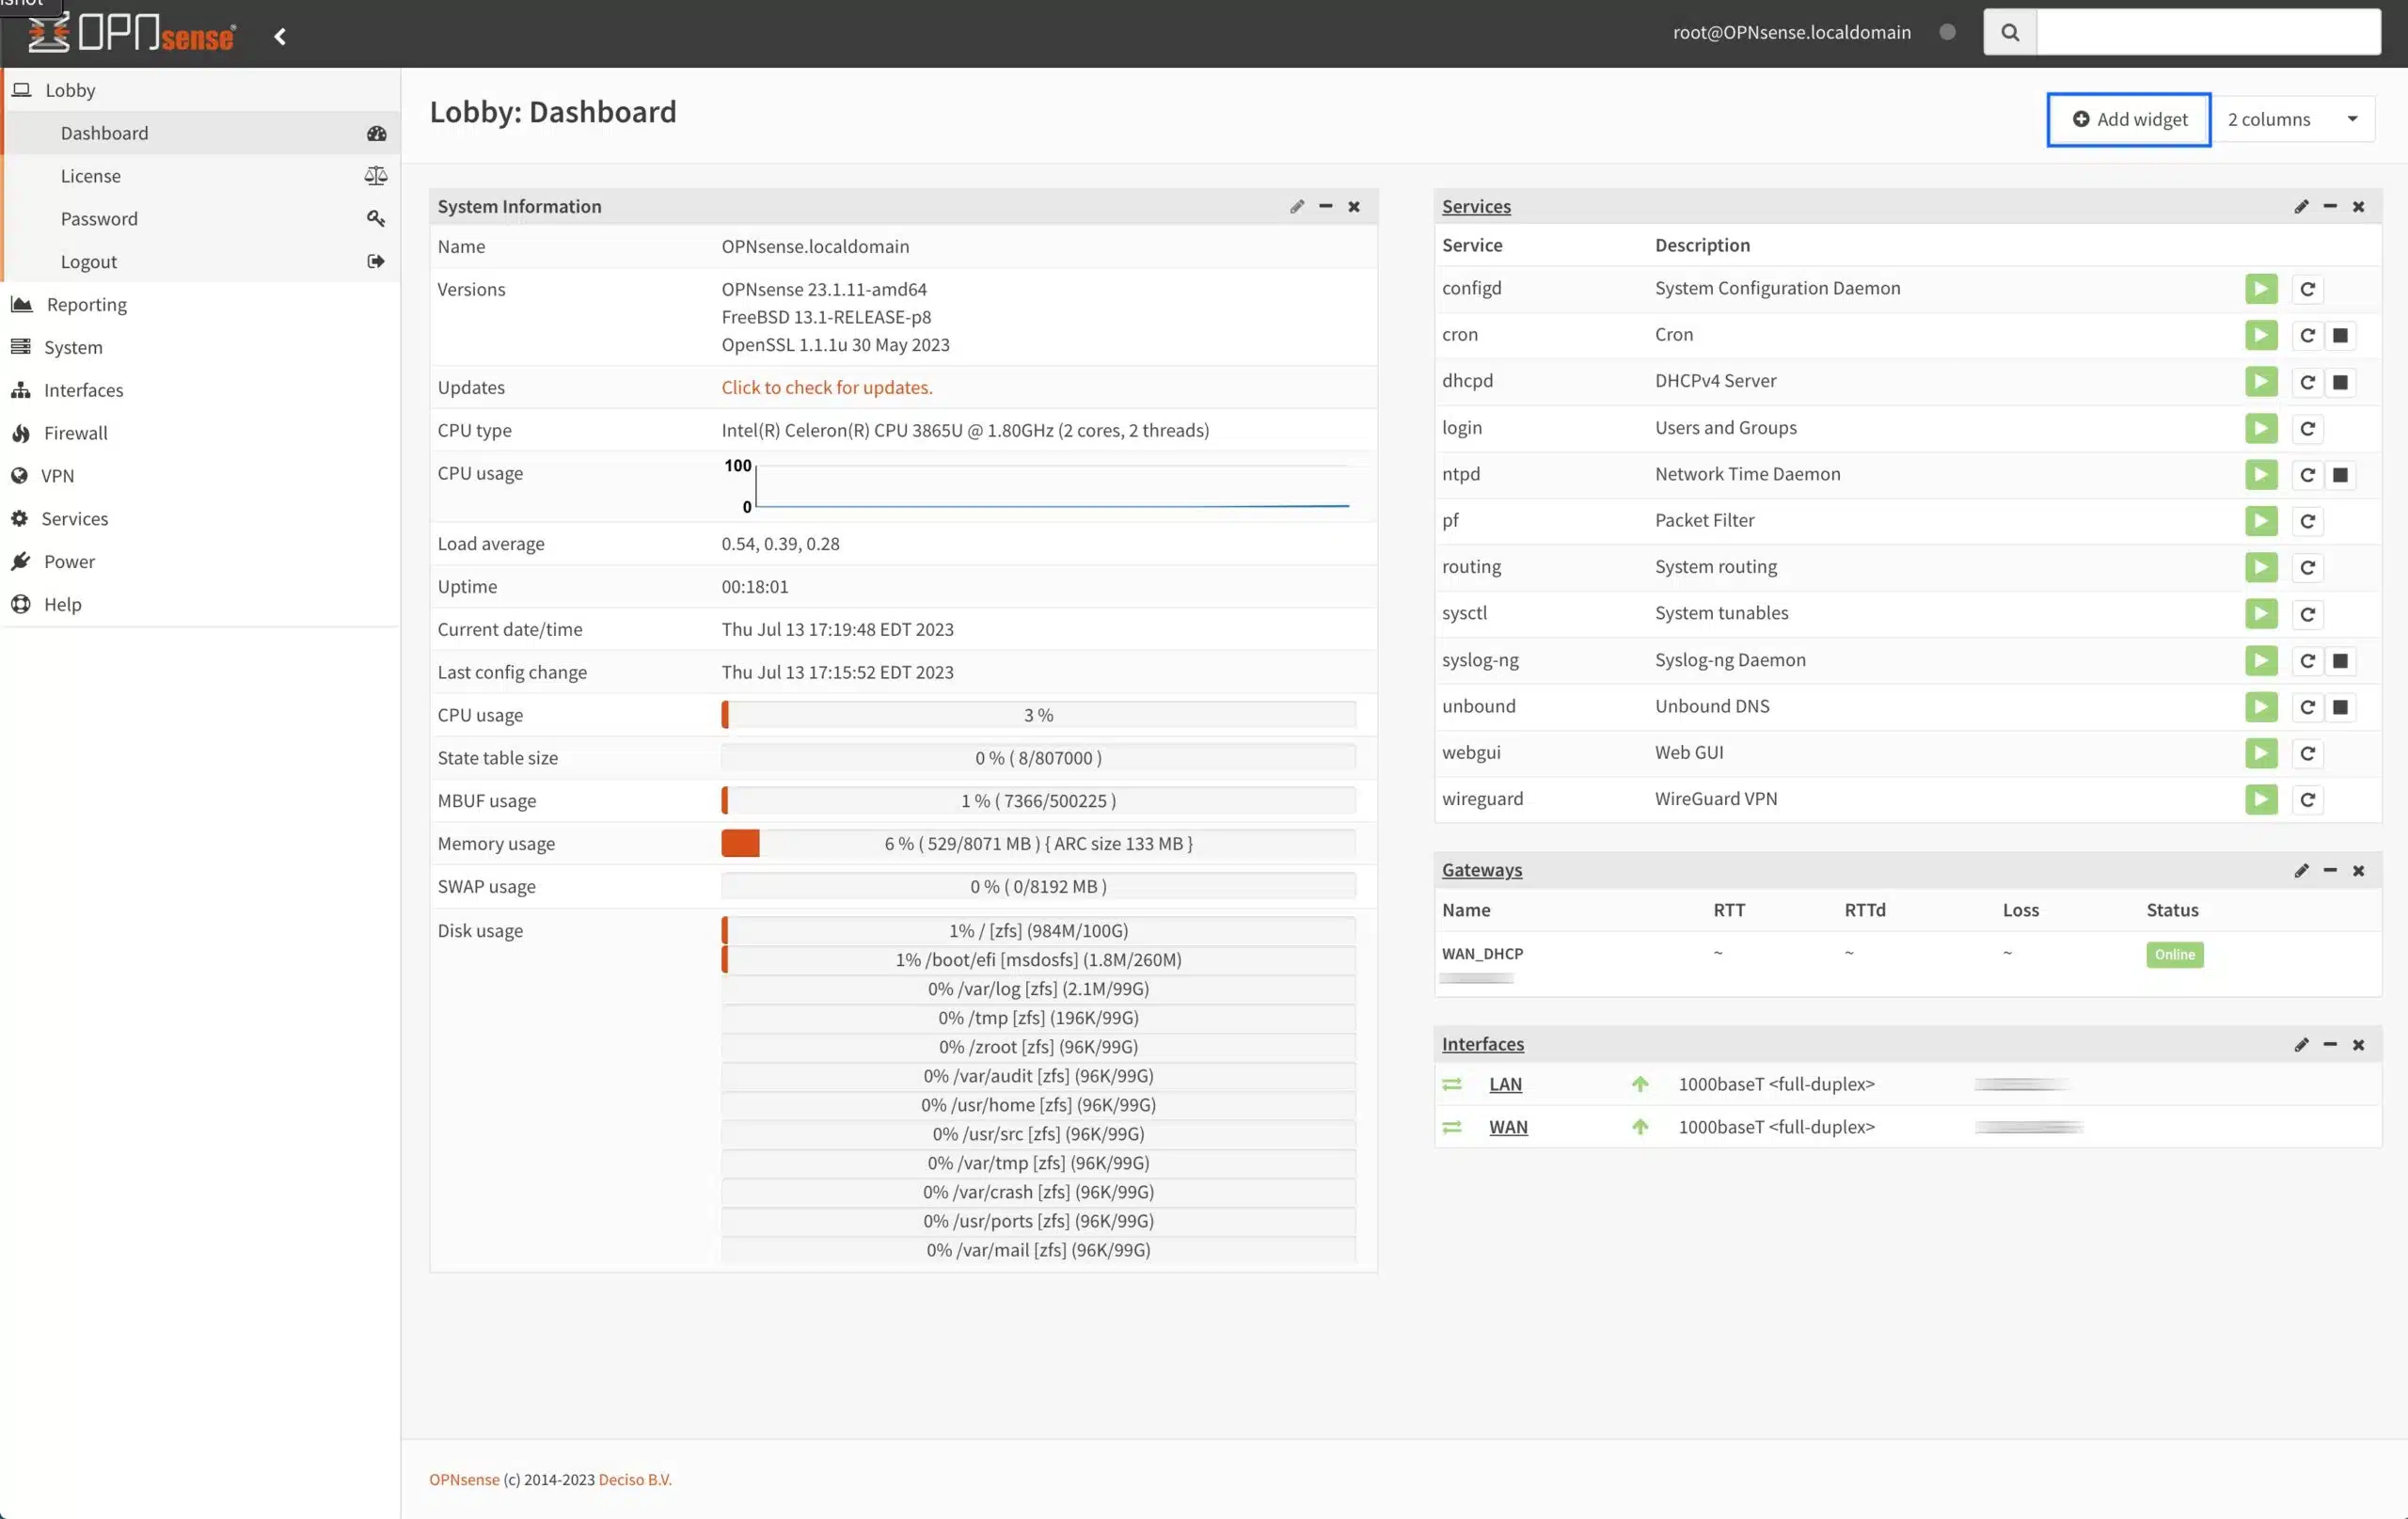
- Select the Status tab. The Status page is displayed, providing us with information on our WireGuard connection.
- The important information comprises the latest handshake and the transfer fields. These show us that the connection is live and packets are being transferred.
So we now have a functional WireGuard connection. But before we can actually use it, we need to change a setting on our LAN interface.
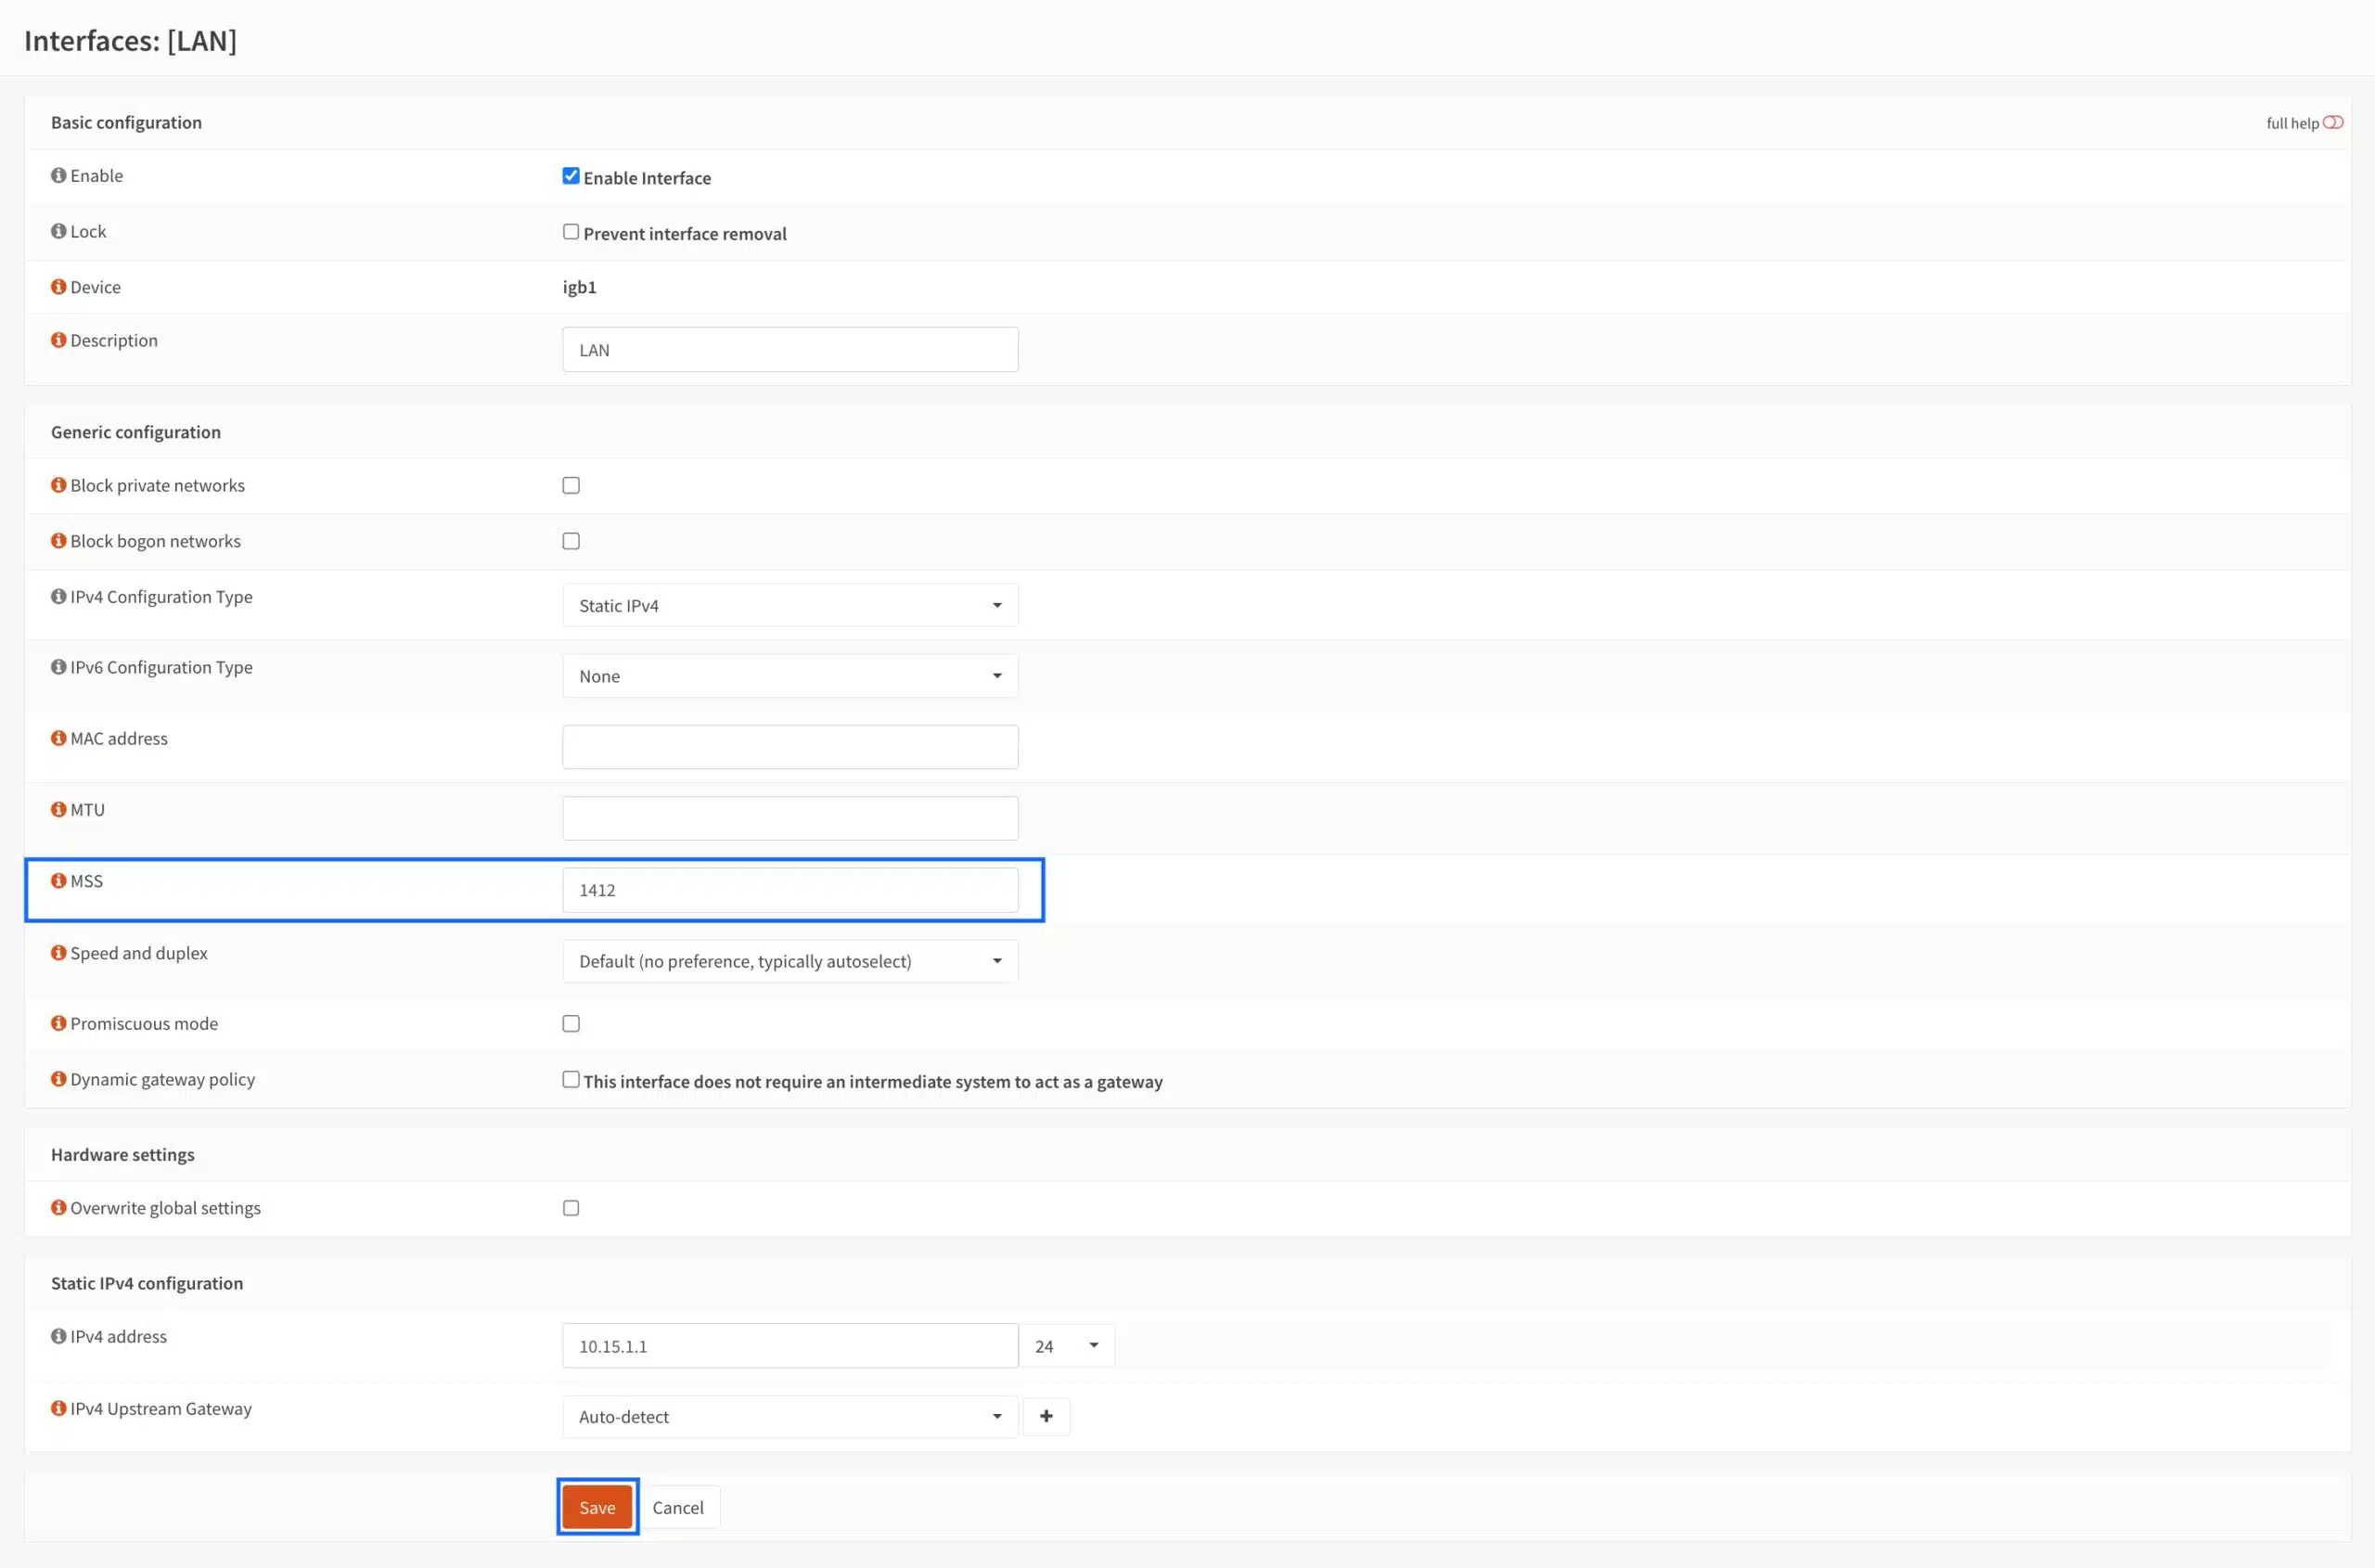
Setting up MSS clamping on the LAN interface
WireGuard has a maximum transmission unit (MTU) of 1420. So, as you send and receive data over the connection, if a datagram exceeds 1420 bytes, it will be fragmented, which can break the connection. If you experience MTU issues when using WireGuard, an obvious symptom will be that certain websites won’t load. And you could be running around in circles trying to find out why some sites won’t load while others come up just fine – it’s an odd symptom. When I first set up WireGuard on my router, I scratched my head with this issue for days before considering MTU issues and setting up MSS clamping.
MSS stands for Maximum TCP Segment Size and adjusts the size of the datagram being transmitted to “fit” the data link over which it’s being transmitted without fragmentation. So MSS clamping ensures your datagrams are small enough to fit through the WireGuard interface’s MTU.
In this step, we’re going to MSS clamp our LAN interface to make sure our WireGuard tunnel works properly.
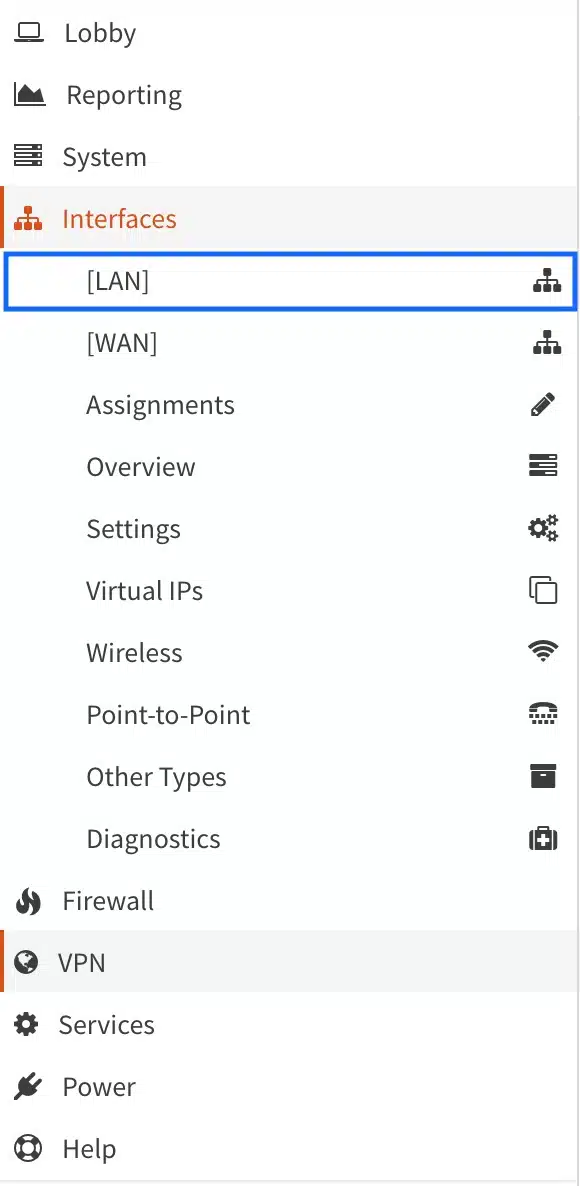
- From the side menu, select Interfaces > LAN. The LAN interface settings page is displayed.
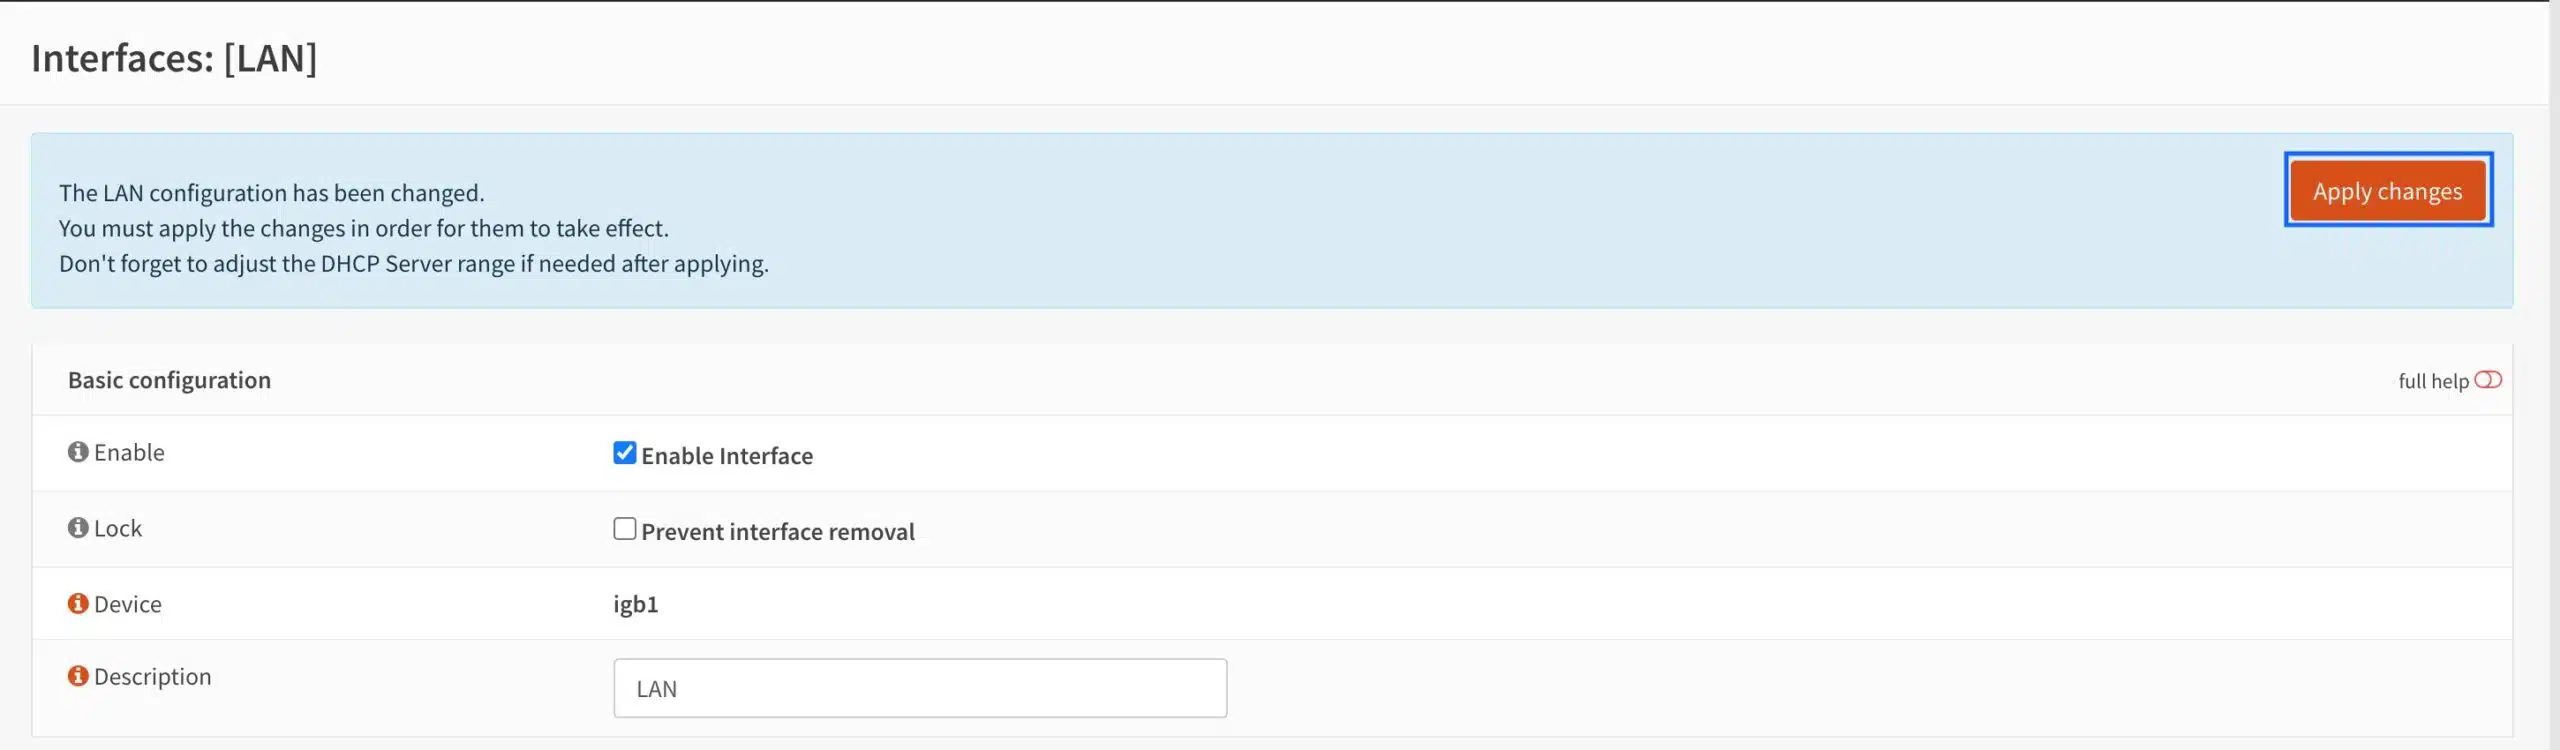
- In the MSS field, enter 1412 and click Save. Other values may also work, but I found that 1412 was a good value on my system. Typically, you’ll want to set this between 1380 and 1420. If you have any other LAN-type interfaces (OPT), set MSS clamping on those as well.
- Click Apply Changes.
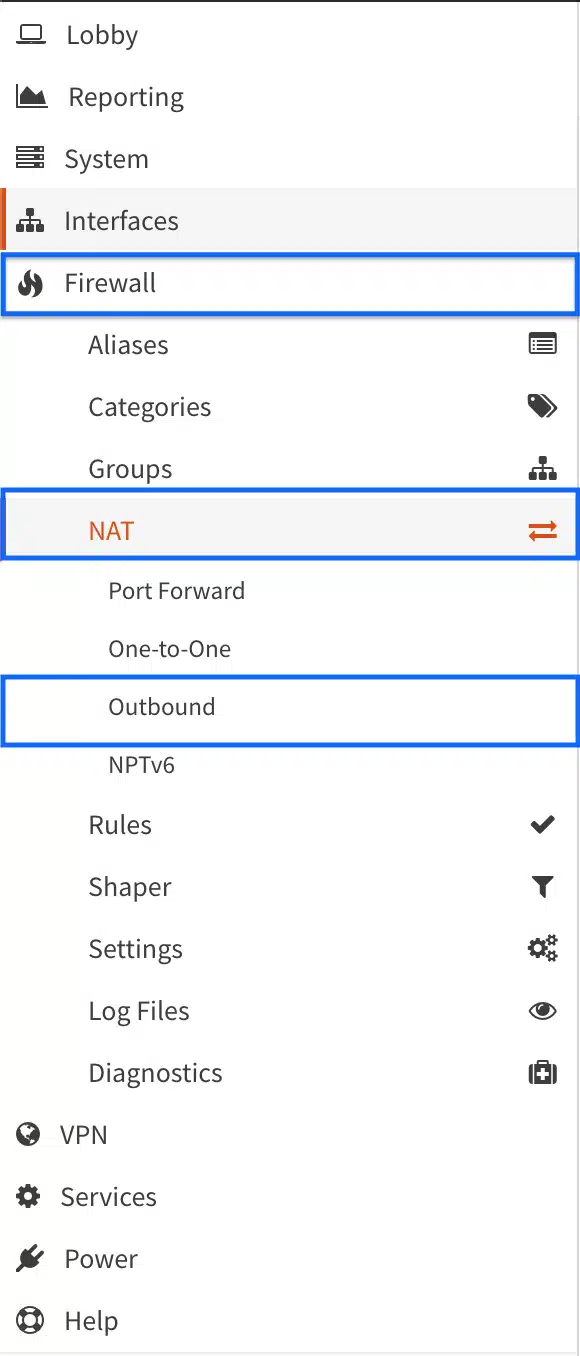
Configuring NAT rules
So we now have a working WireGuard tunnel, and we’ve applied MSS clamping on our LAN to align with WireGuard’s MTU. All that’s left before our LAN clients can pass traffic over the WireGuard tunnel is to set up an appropriate NAT rule.
- From the side menu, select Firewall > NAT > Outbound. The Outbound NAT page is displayed.
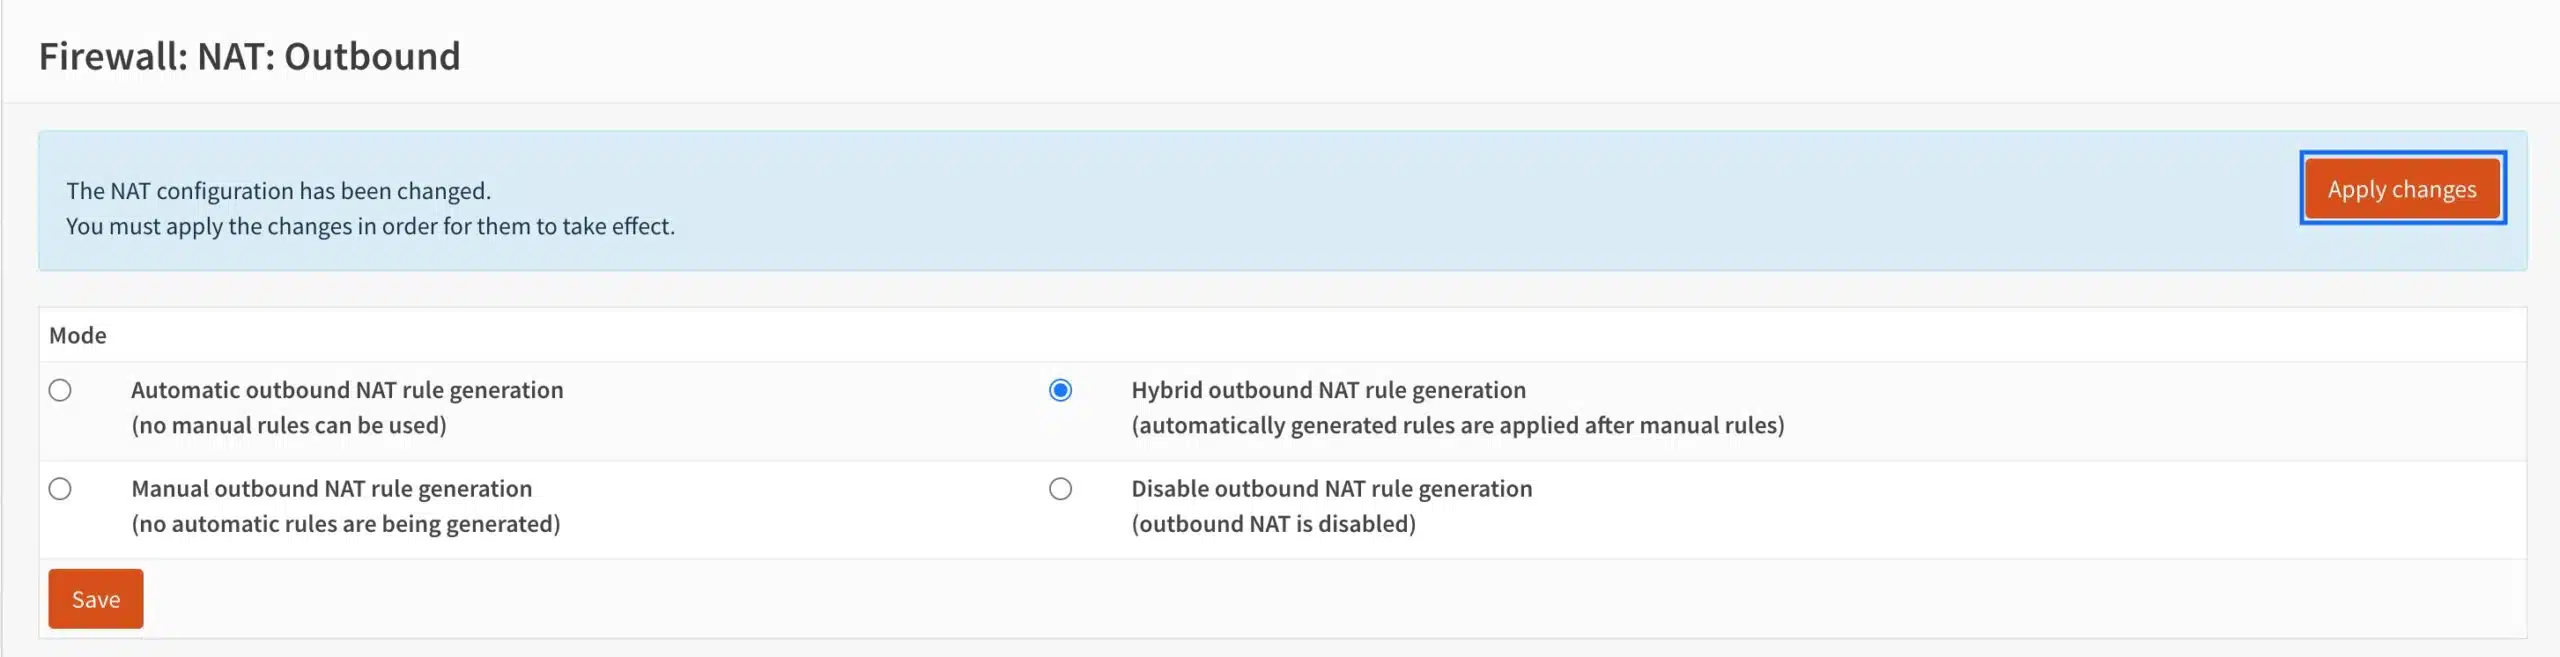
- At the top of the page, select Hybrid NAT instead of the default, Automatic NAT, and click Save.
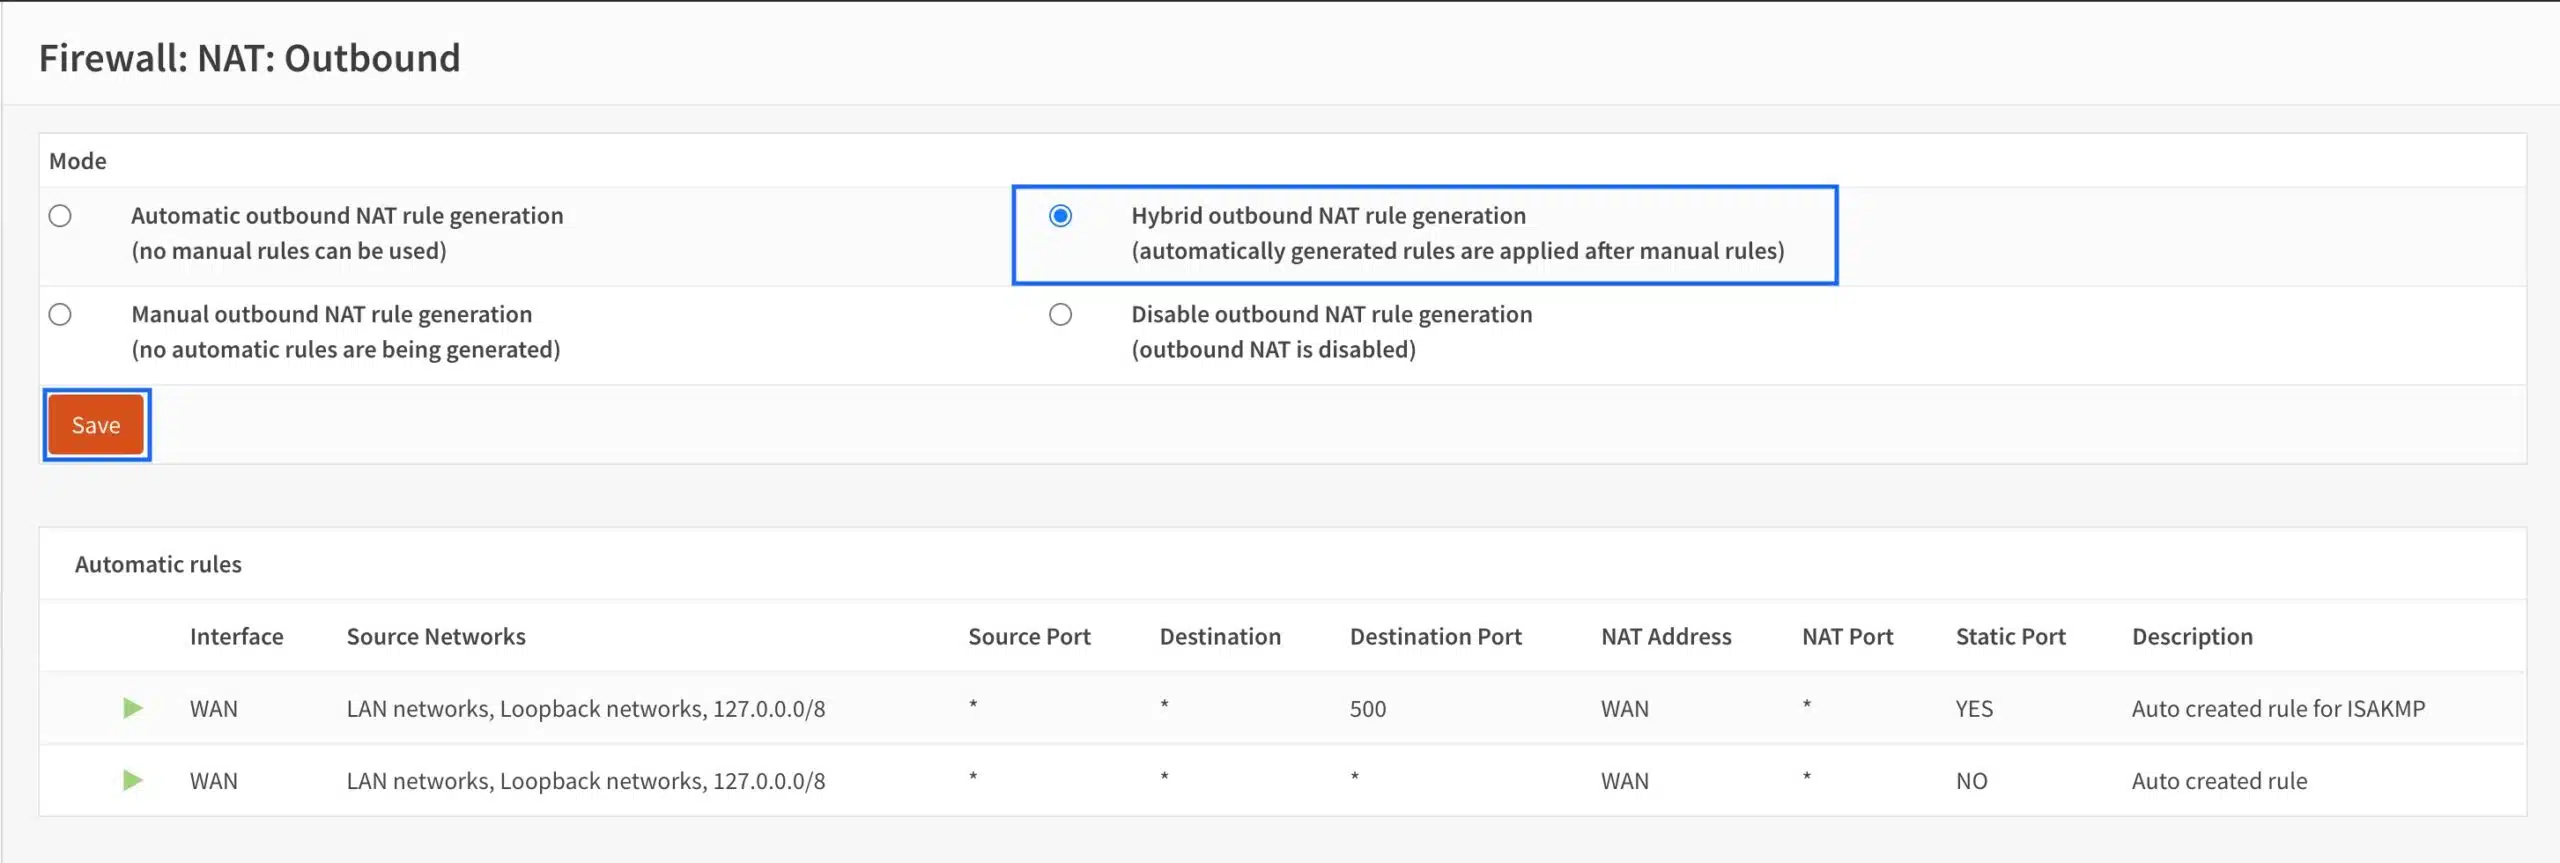
- Click Apply Changes.

- A new section for manual outbound NAT rules appears at the top of the page. Click the + sign to create a new NAT rule. The NAT rule configuration page is displayed.

- From the Interface drop-down menu, select WireGuard (Group).
- From the Source Address drop-down menu, select LAN.net.
- Enter a description for your rule in the Description field.
- Click Save.
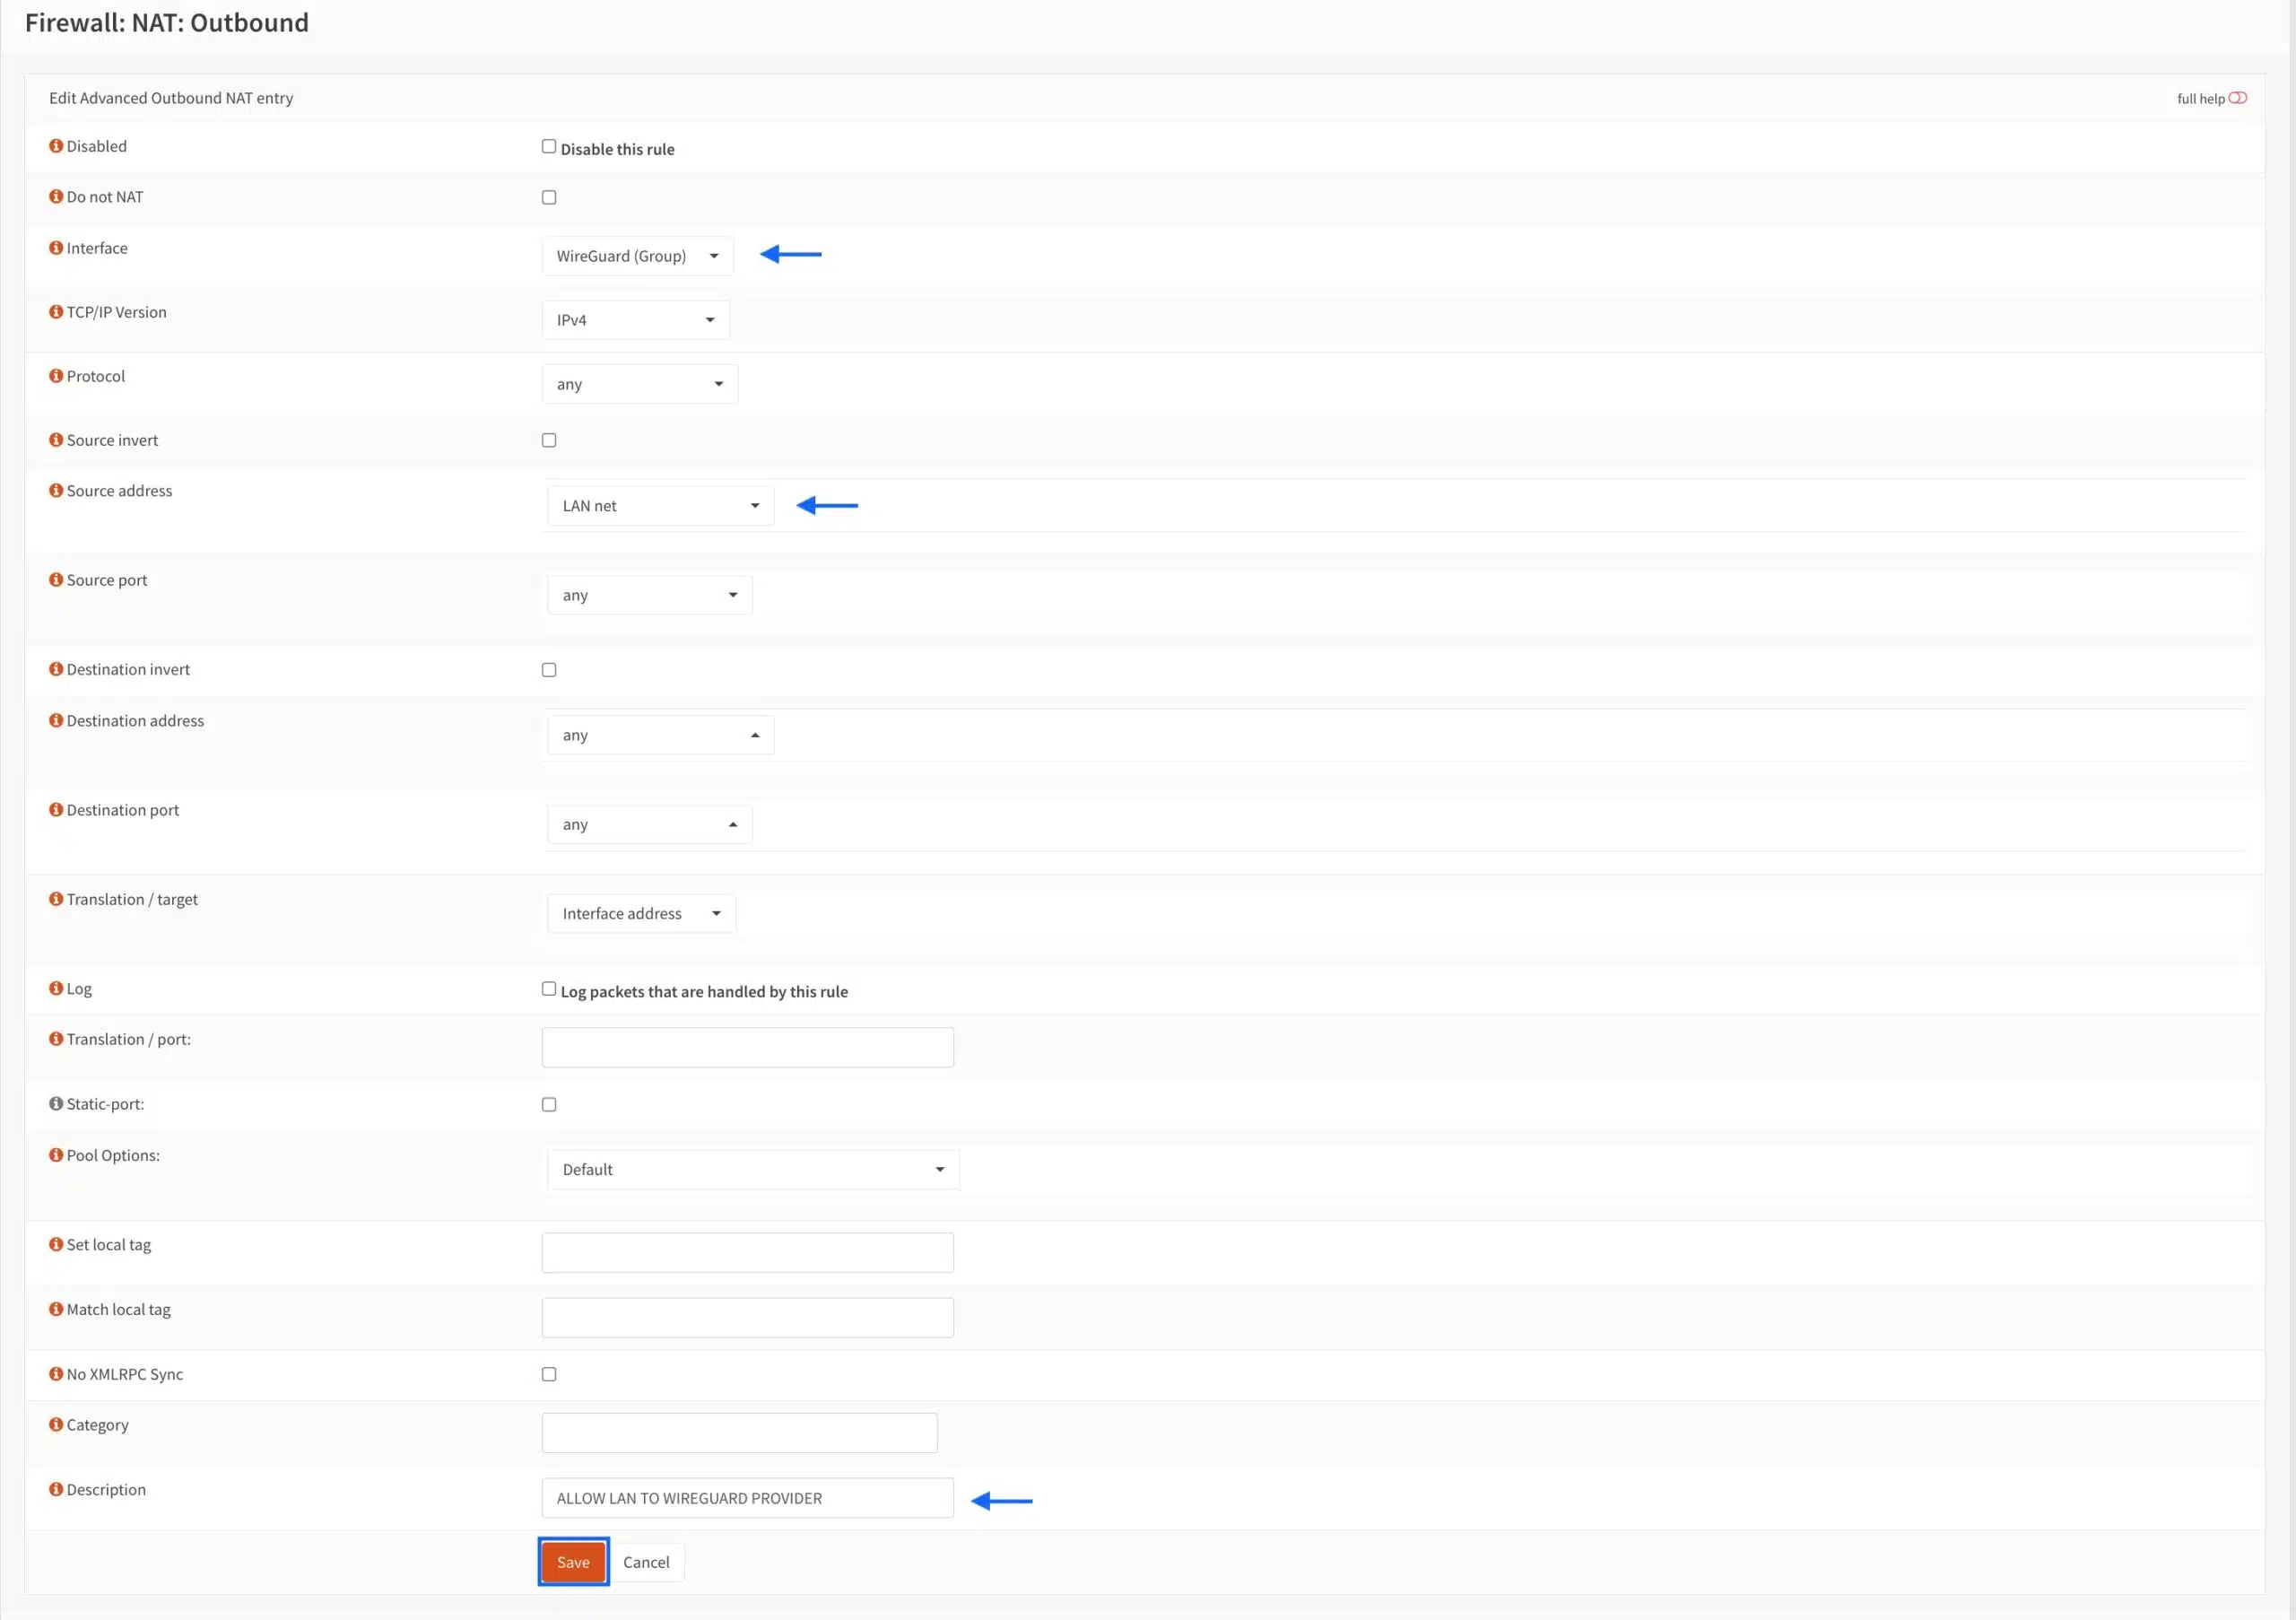
- Click Apply Changes.
Note that while I created this rule to have the entire LAN subnet go through the WireGuard tunnel, you could just send a single or a sub-group of LAN clients through the tunnel while having the rest use your WAN. You simply need to enter the ip address of the client(s) rather than LAN.net.
Congratulations. We’re now done configuring a WireGuard connection to a VPN provider on OPNsense. Let’s reboot the system before testing it out.
Testing our WireGuard connection
- Once rebooted, we can head back to the WireGuard Status page (from the side menu, VPN > WireGuard > select the Status tab) to make sure everything is still running smoothly.
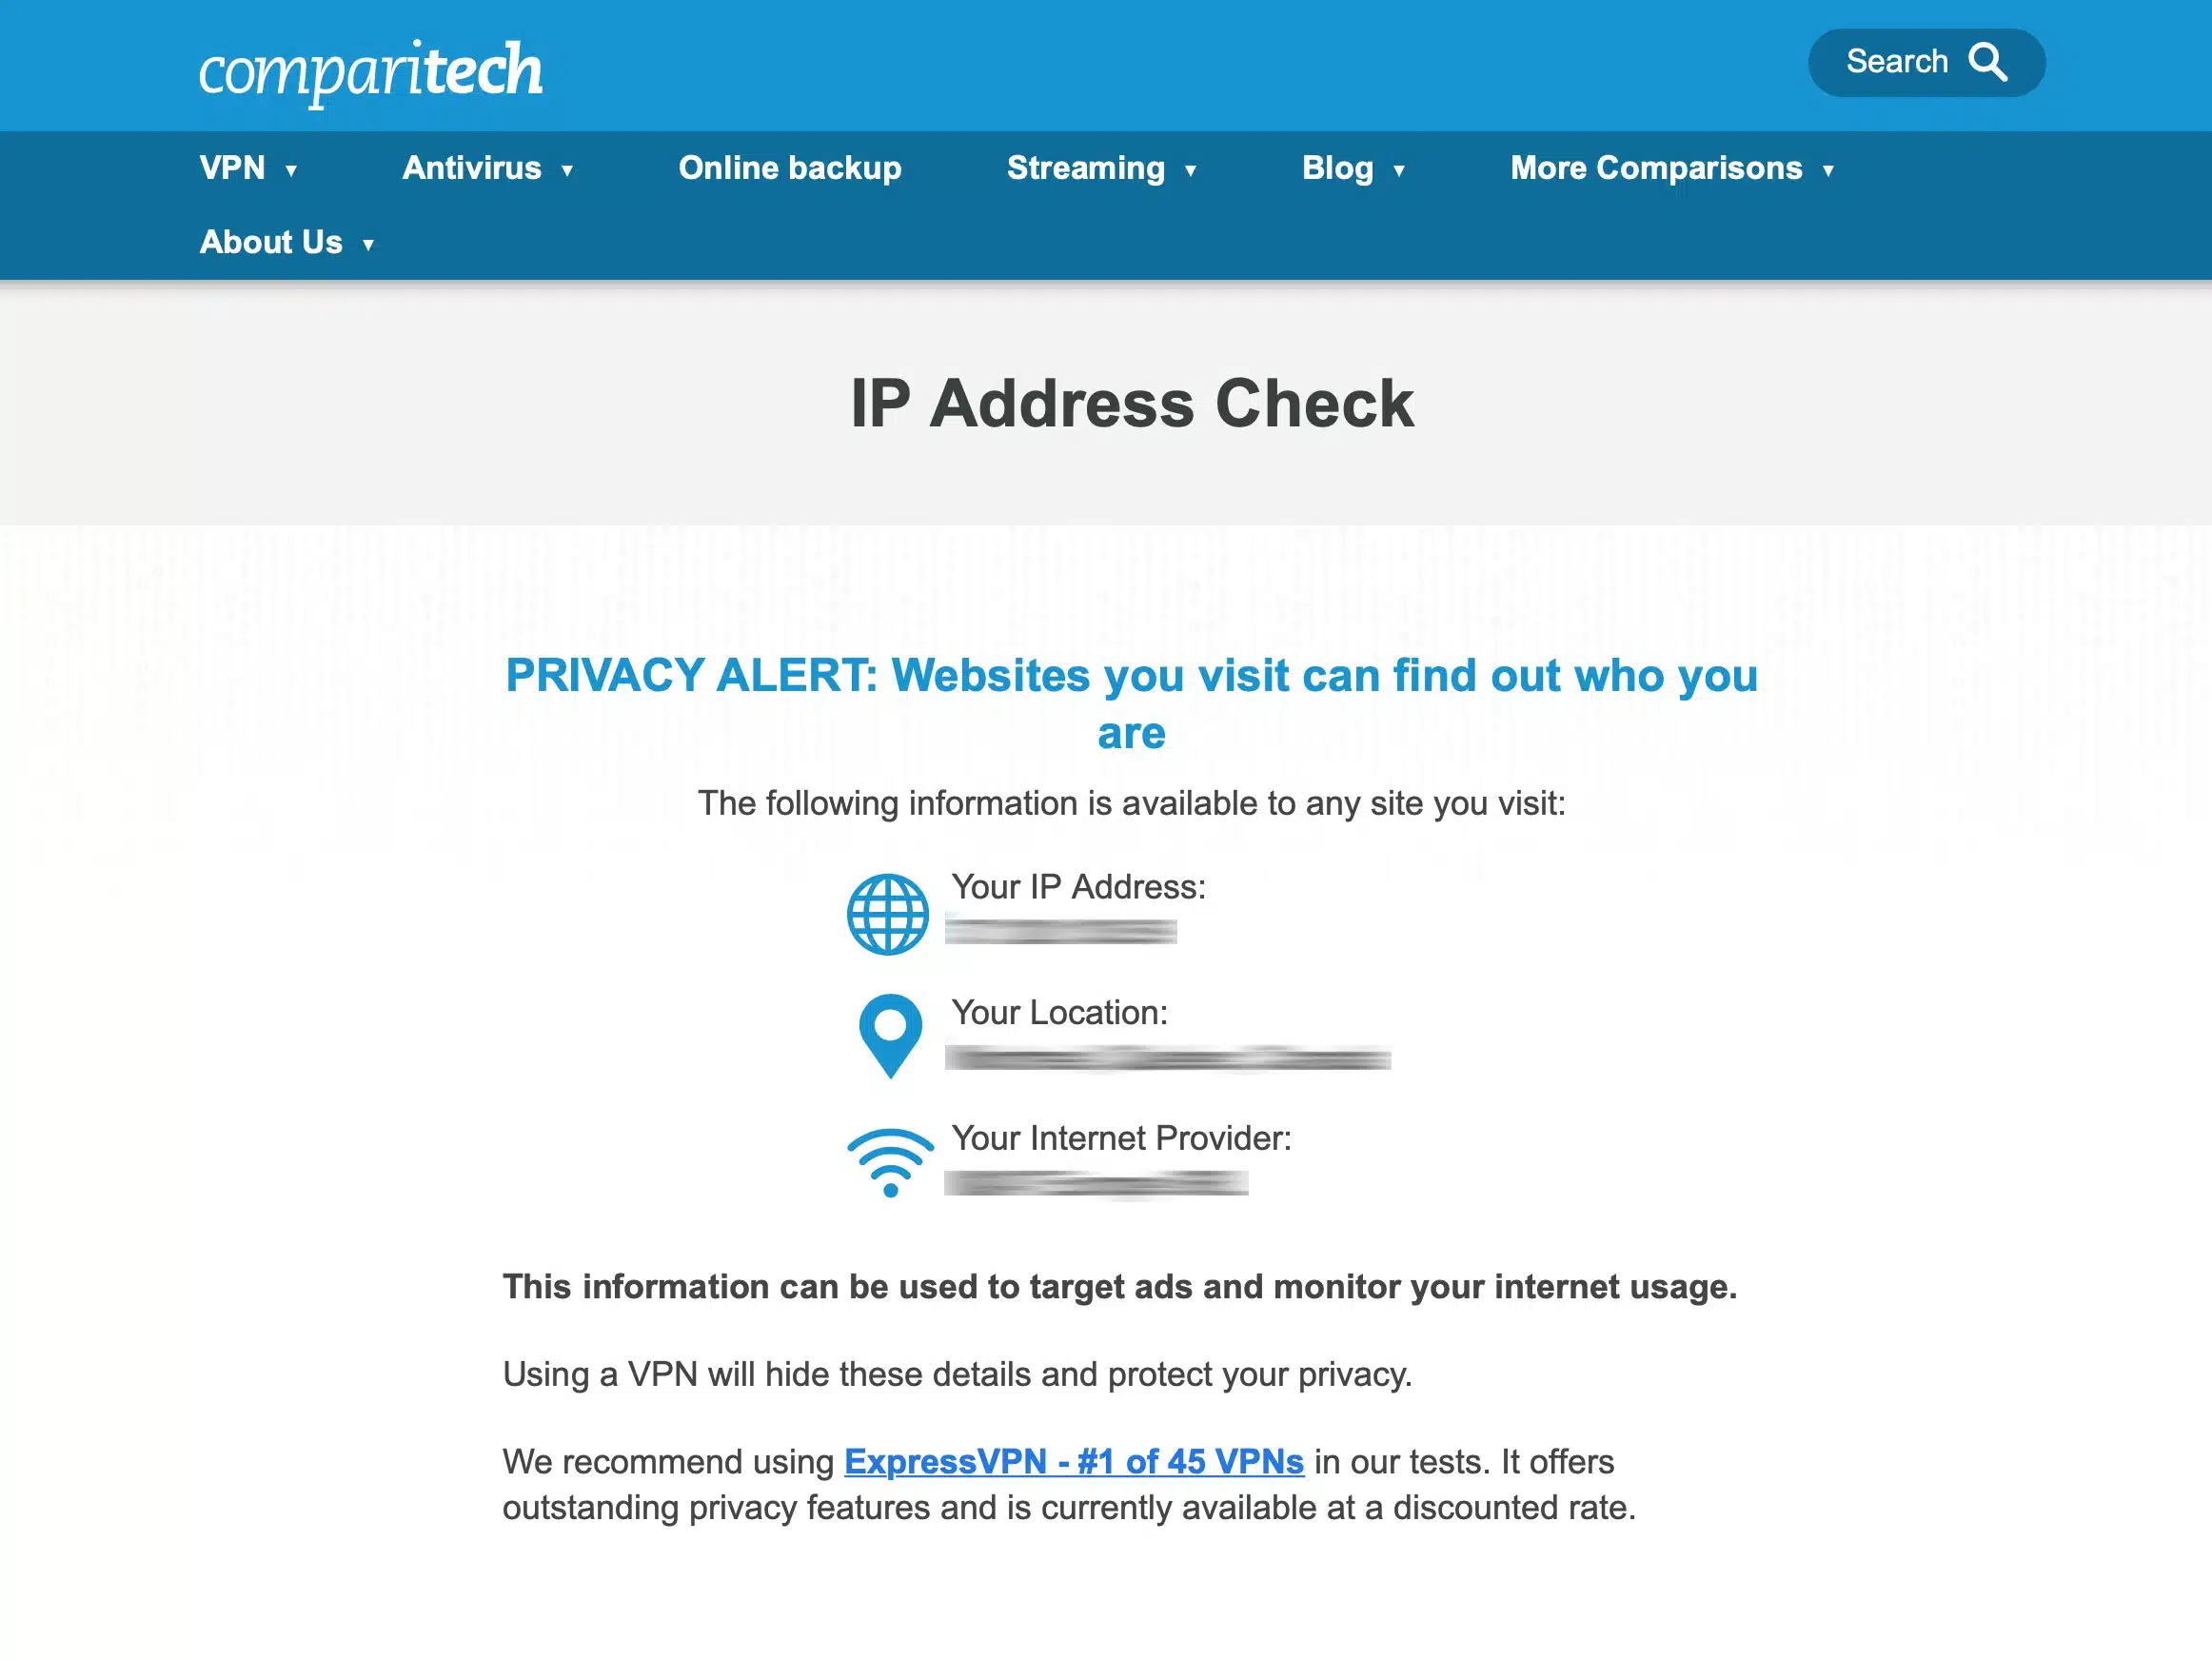
- Then go to the Comparitech’s IP address check page, and your VPN IP address should have replaced your ISP-assigned IP address.
Adding a WireGuard widget to the OPNsense dashboard
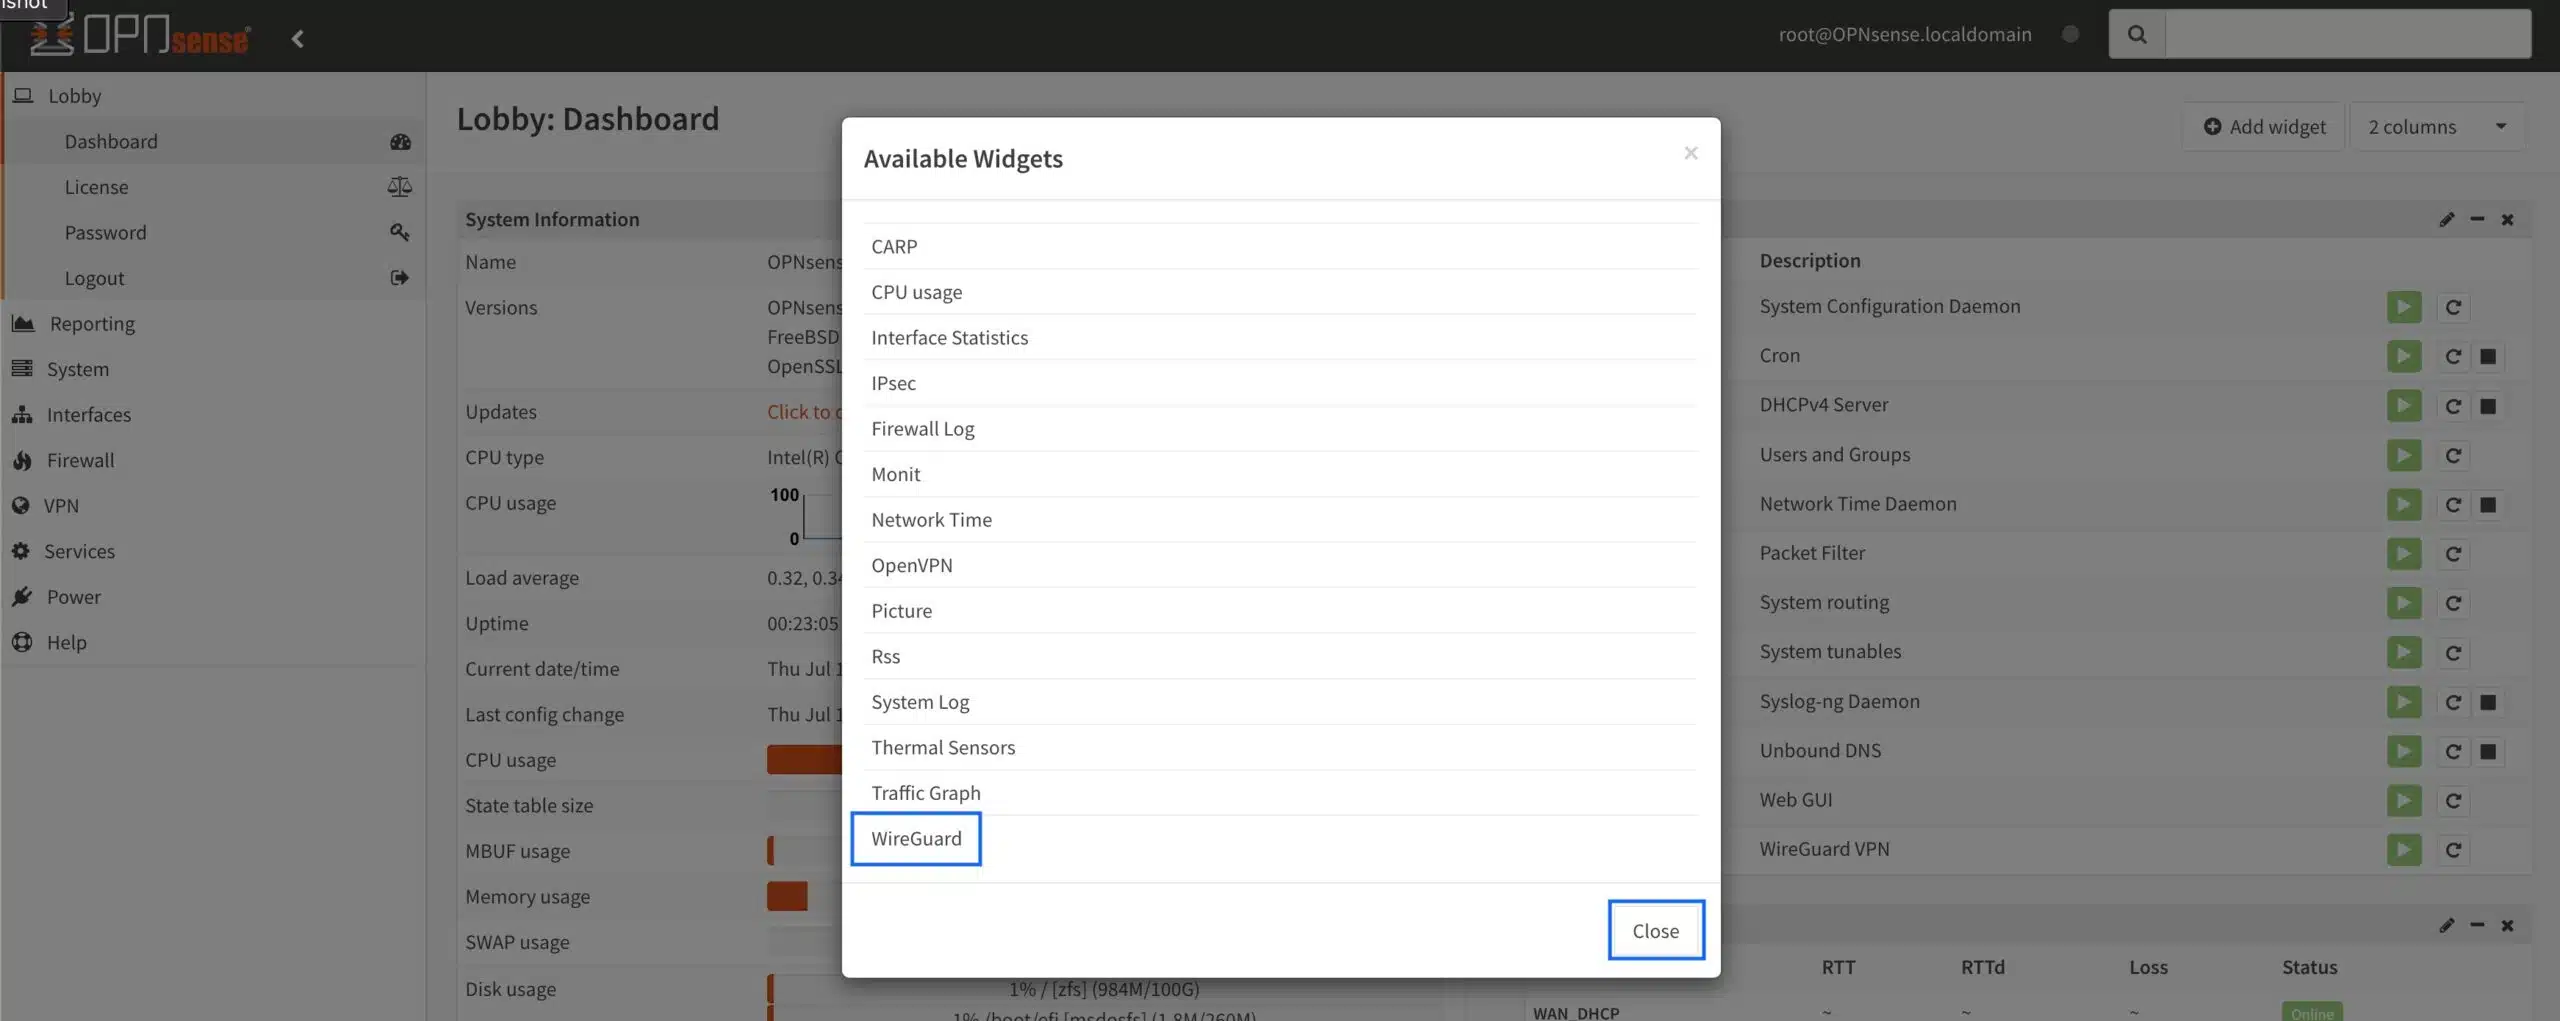
As a last little nice-to-have, you can add a WireGuard widget to your OPNsense dashboard.
- From the Dashboard, click Add Widget at the top right of the page. The Available Widgets window is displayed.
- Select WireGuard from the list and click Close.
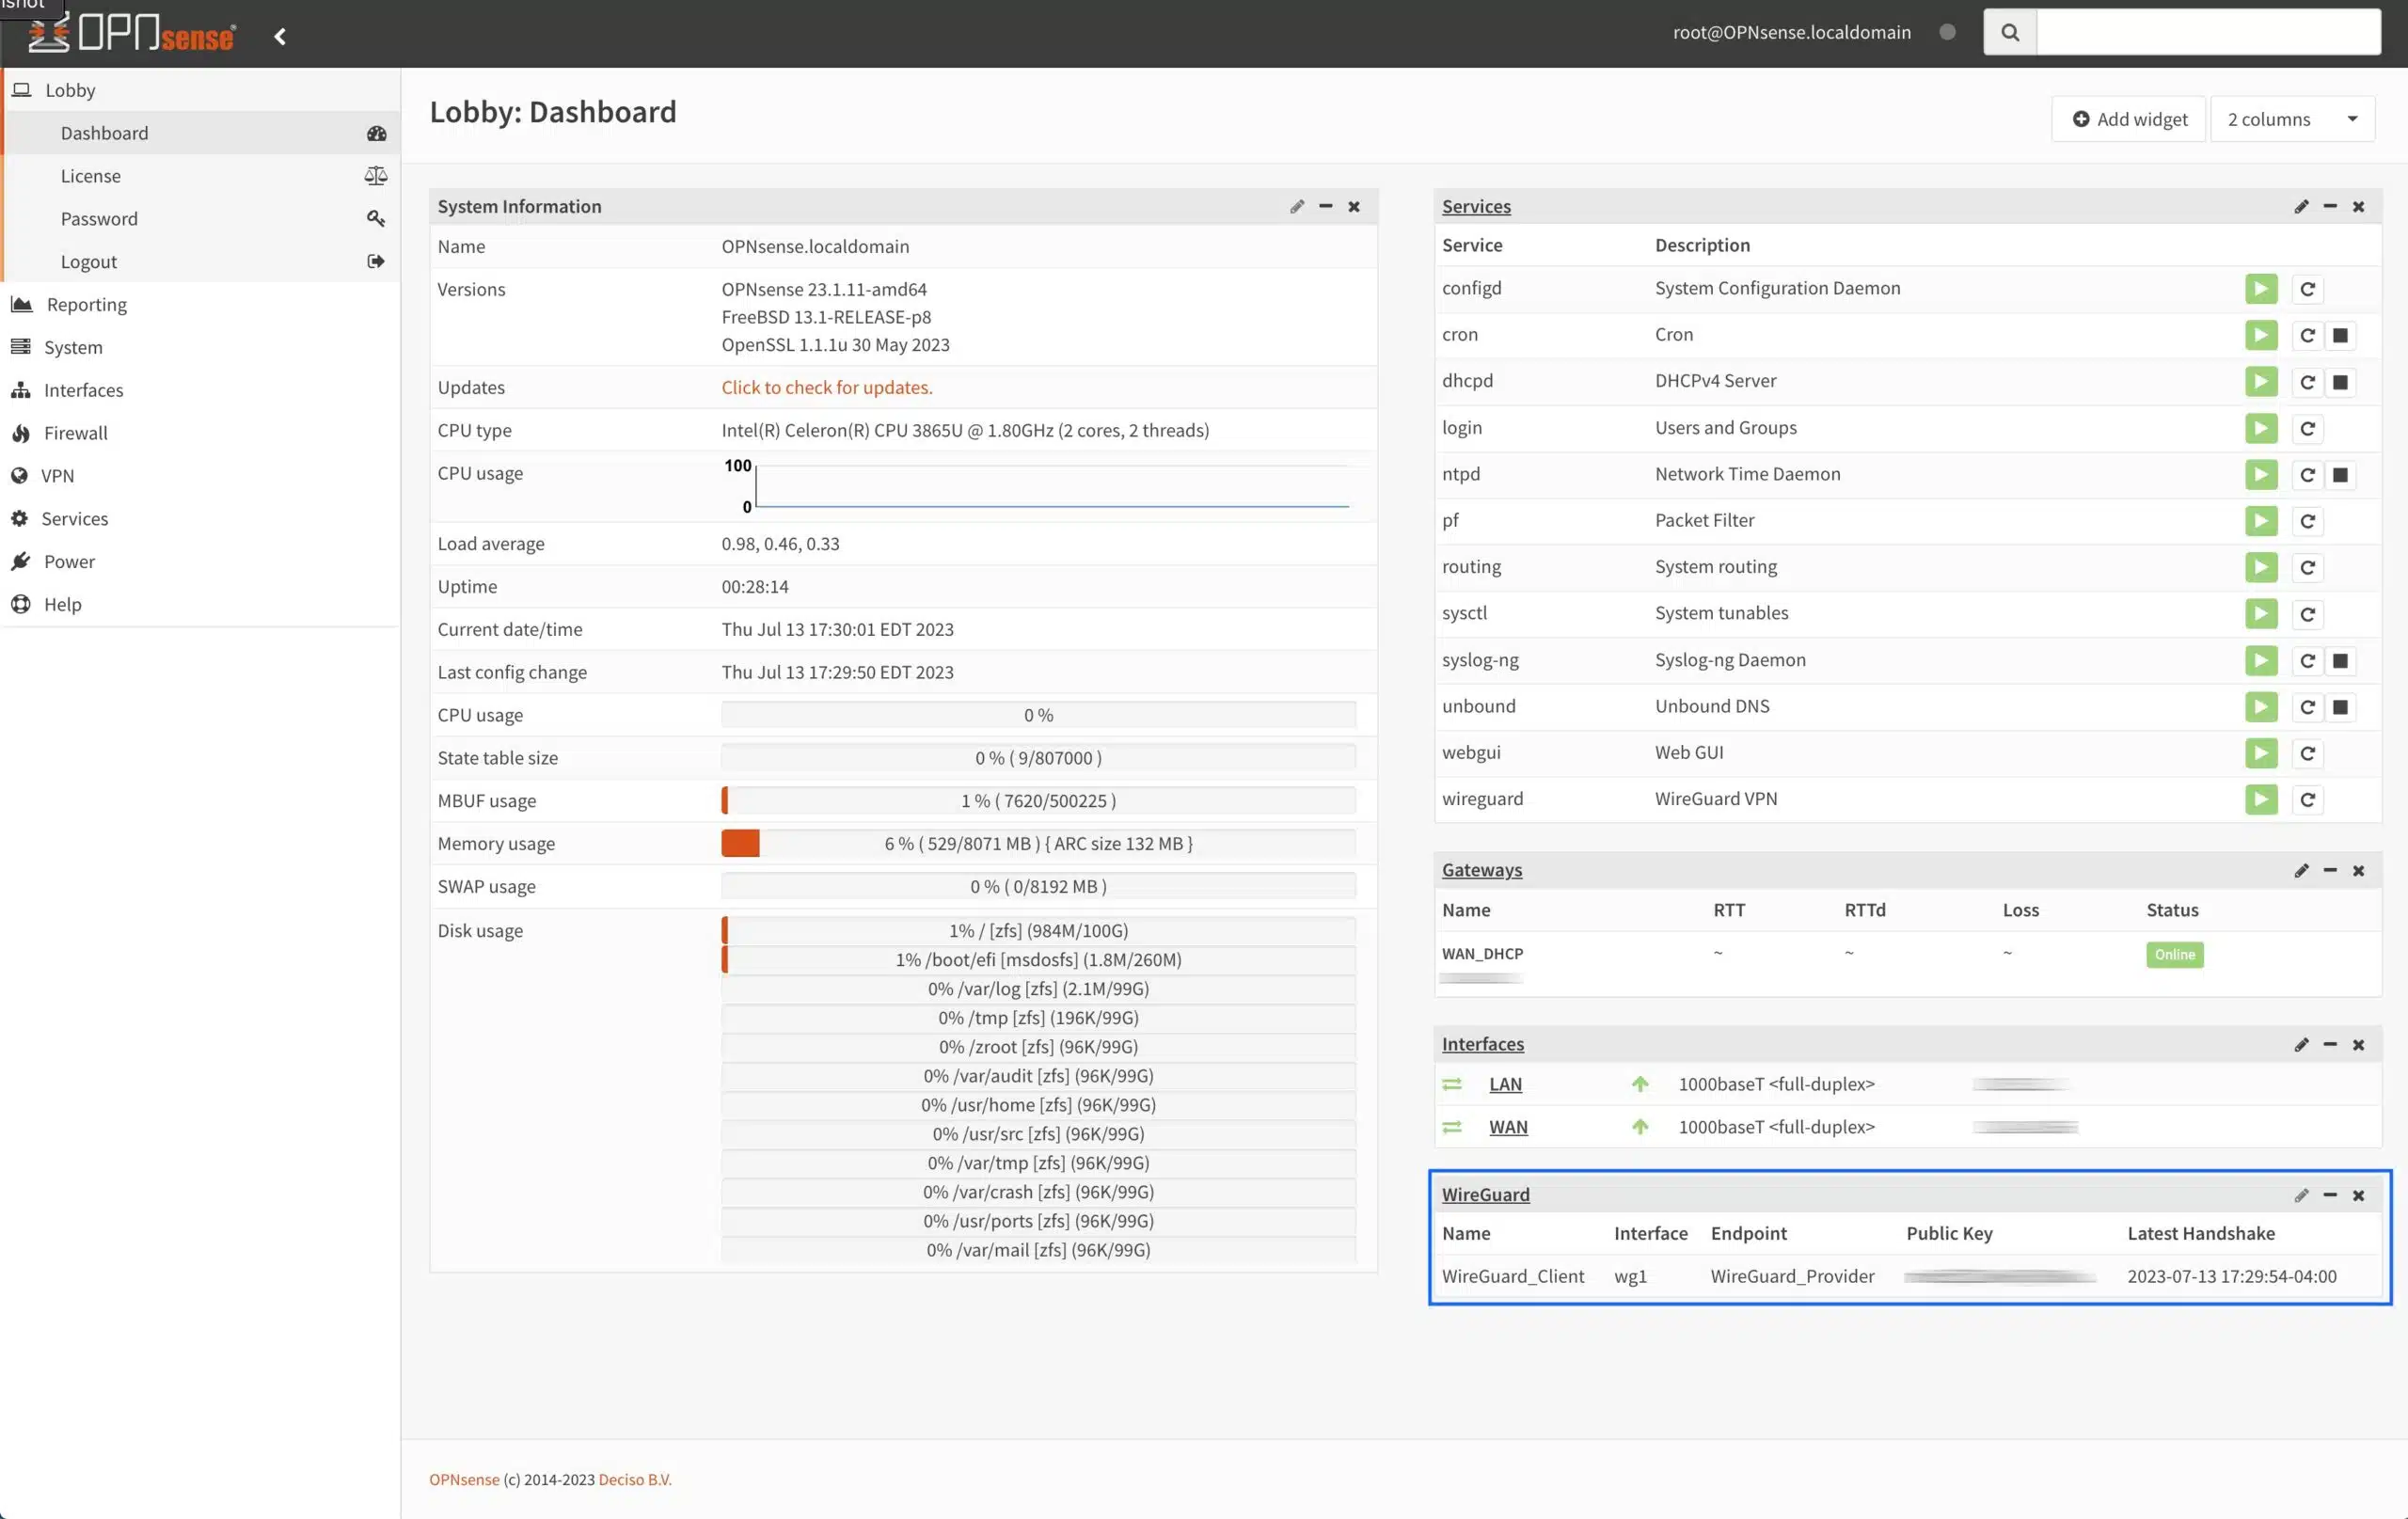
- Click Save Settings at the top right of the page to load the widget.

- Once loaded, the widget displays the name of your local peer (our WireGuard “client”), the interface, the endpoint name (our WireGuard “server”), the endpoint’s public key, and the time of the latest handshake.
Wrapping up
So that’s how you configure an “always-on” WireGuard connection to a VPN commercial VPN provider in OPNsense. OPNsense is a great alternative to pfSense (although both are excellent). And if the proprietary direction Netgate appears to be taking turns you off, it’s probably the easiest switch to make, seeing as how the systems are so similar. OPNsense also pushes updates out more frequently, and the devs that are active on the OPNsense forum are extremely nice and helpful.
In my first few weeks of using OPNsense, I filed a bug report, and I was sent a custom patch within a day, and the bug itself was patched through an update within a week. I was impressed.
As always, stay safe.
Related:


