
With billions of users globally, Facebook is obviously doing something right, offering a service that is very much in demand.
Like other sites on the web, Facebook comes with security and privacy concerns. However, with the volume of information Facebook collects about its users, it pays to be extra diligent with this app.
Many privacy experts would recommend deleting the app altogether, but this is simply not considered an option for many avid users.
Thankfully, there are steps you can take to make using Facebook more private and secure. Facebook has beefed up its privacy options with areas like Privacy Checkup and Privacy Shortcuts designed to make it easier for users to navigate. However, with the increase in the number of settings, things can get a little confusing.
With that in mind, here are 15 tips for protecting yourself and your sensitive information when using Facebook.
1. Control who can see what’s posted on your timeline from now on
There may be some special circumstances under which you are happy to share your content far and wide, with people you know and complete strangers. But for the most part, you will want to limit who can check you out on Facebook.
Facebook has an option that allows you to select exactly who can see your posts. This is available via the Privacy Checkup and Privacy Shortcut sections, but for the purposes of this post, we’ll stick with the regular privacy settings options.
To limit who can see what you post in the future, start by clicking on the arrow in the top right corner of the toolbar and select Settings & Privacy > Settings > Privacy.
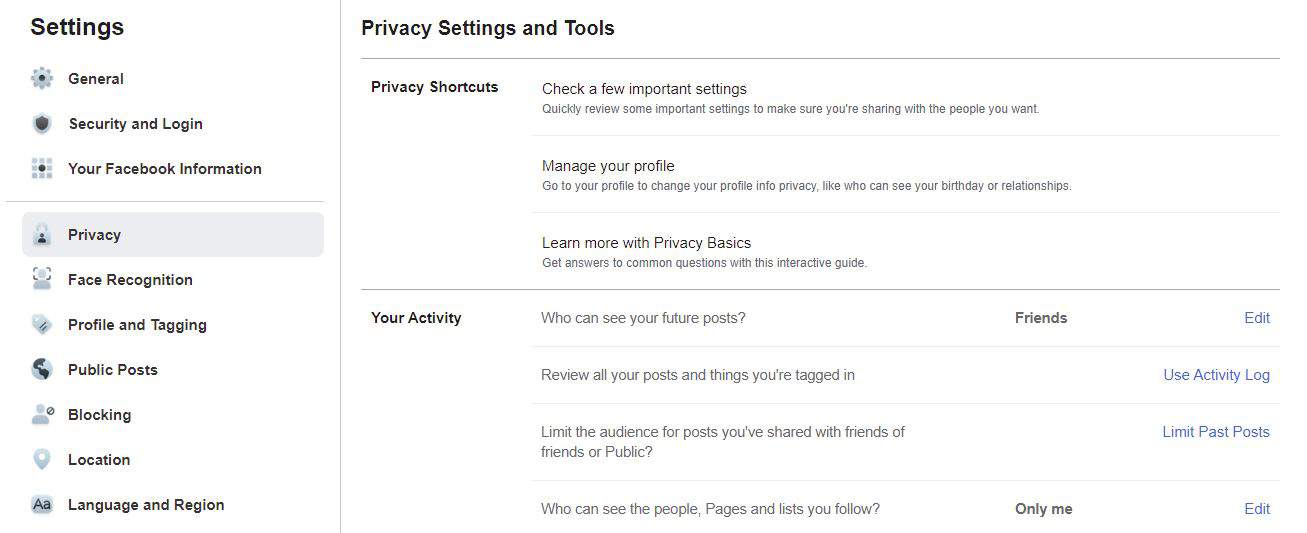
Under Your Activity, the first option is Who can see your future posts? Click on Edit next to this.
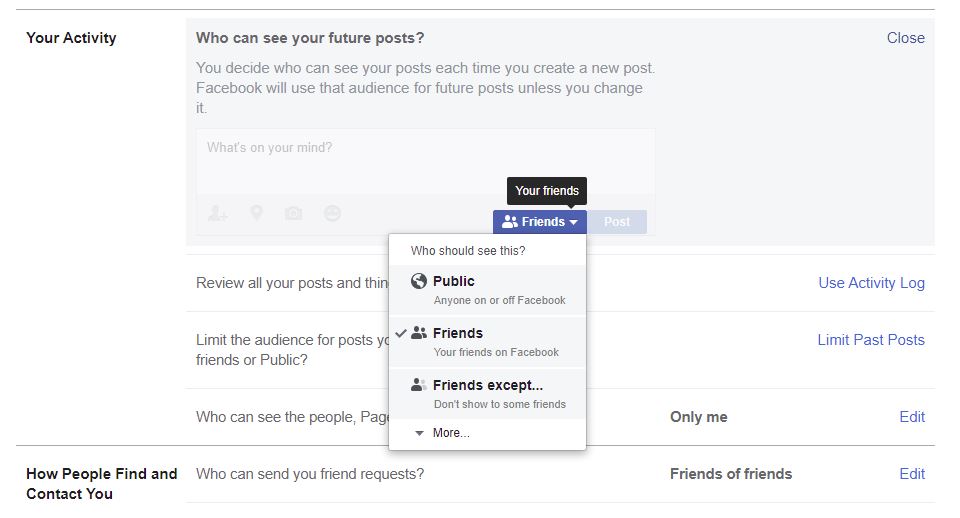
Now select from:
- Public (this means everyone)
- Friends (this is what we would advise)
- Friends except… (all of your friends except for any you purposefully omit)
- Specific friends (only those people you choose from your existing list of friends)
- Only me (your timeline is going to be a bit lonely!)
Pick whichever option works for you—Public should probably be avoided and Only me seems a bit pointless—and then that setting will apply for all your future posts.
2. Control who can see what you have previously posted on your timeline
Now that you have limited who can see your future posts on Facebook, you may want to add a level of control to determine who can see what has gone before.
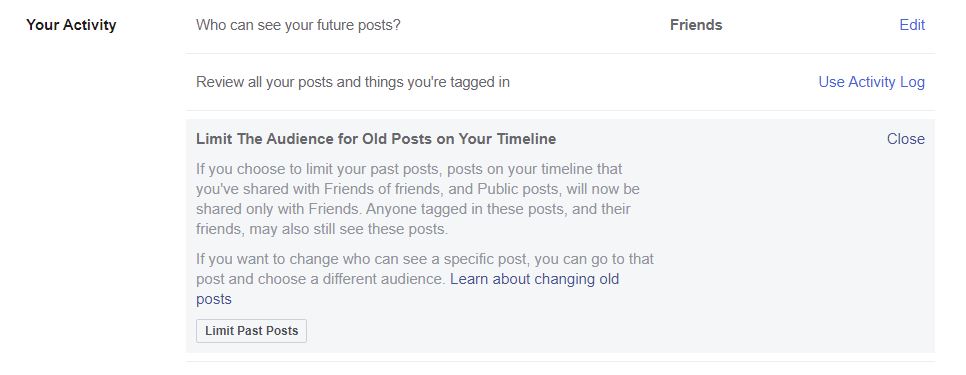
As before, go to Settings & Privacy > Settings > Privacy. Under Your Activity, find the entry for Limit The Audience for Old Posts on Your Timeline and click on Limit Past Posts.
You’ll see a popup explaining the action and you’ll need to click on Limit Past Posts again to confirm.
3. Limit the visibility of your ‘About’ section
Do you have something in your About section that you don’t want to share with the whole world? If so, you need to do something about that…
From your profile page, click on the Edit profile button.

Next to Customize Your Intro, select Edit. Toggle off any item you don’t want to share on your profile.
Better still, you can remove that information entirely. Click the pen icon next to the information you want to delete, then select the three dots icon and select Delete [Item Name].
Voila! Most of your private stuff is now exactly that, though you should be aware that some details, such as your name and cover photo, cannot be given limited visibility under any circumstances.
4. Limit who can contact you through Facebook
Limiting who can see your timeline on Facebook will go a long way to protecting your privacy but it won’t stop all those bizarre friend requests and other messages you get from people you don’t know.
To ensure random people on Facebook can’t get in touch with you, you’ll want to change the setting that allows anyone to make contact.
To do that, go to Settings & Privacy > Settings > Privacy and find the section titled How People Find and Contact You. There are several options here, the first one being Who can send you friend requests?
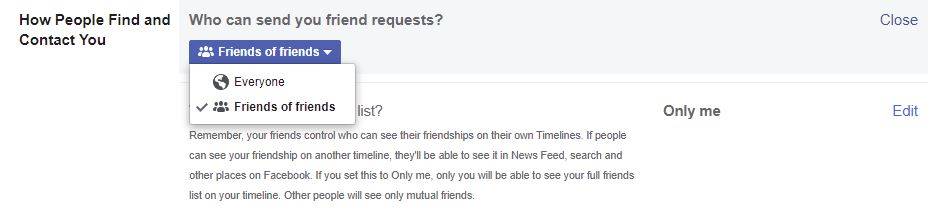
Select Edit next to this and a new drop-down menu will appear. You’ll want to change that from Everyone to Friends of friends. Unfortunately, there’s no option to completely disable friend requests, although you may want to choose who can see your friends list.
5. Control who can look you up on Facebook
While you’re here, you may also want to limit how people can find your Facebook profile with information they may already know about you.
Still in the How People Find and Contact You section, you can choose whether you want people to be able to look you up using your email address or phone number.
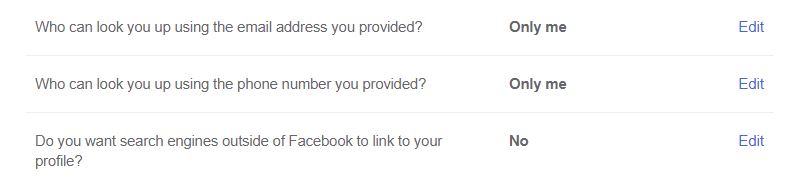
The choices are:
- Everyone (most people will want to change this)
- Friends of friends
- Friends
- Only me
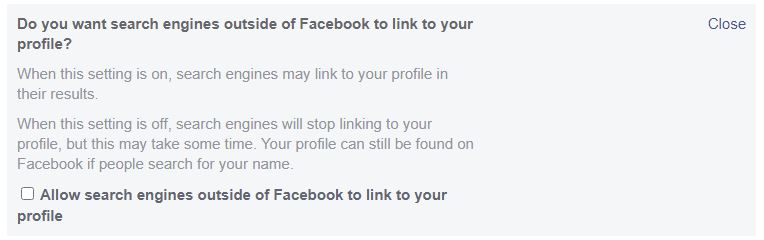
In this area, you can also control whether your Facebook profile will be found via a search engine query. Depending on the purpose of your Facebook account (for example, personal or business), you may or may not wish to change this setting by checking or unchecking the tick box.
6. Choose who can post on your profile
Want to prevent others from posting on your timeline. Go to Settings & Privacy > Settings > Profile and Tagging. Under the Viewing and Sharing section, click Edit next to Who can post on your profile? Decide if you want to allow friends or only you to post on your profile.
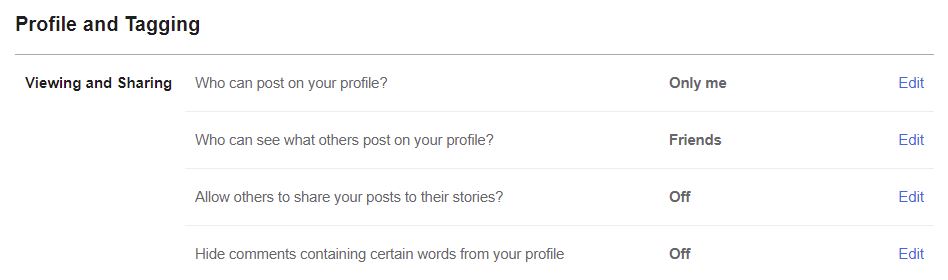
Here you can also choose who can see what others post on your profile and whether or not you want to allow other users to add your posts in their stories.
7. Check where you’re logged in
Now that we’ve looked at how you can take control of your Facebook privacy settings, it’s time to switch our attention to the security aspects of the social media behemoth.
Have you accidentally left yourself logged into your Facebook account on a device that can be accessed by your family, lost a device, or sold one on without logging out of Facebook?
If so, you’ll want to review which devices are logged in and do something about it!
On the Security and Login page, look for the Where You’re Logged In section, which may already be displaying one or two devices. Click on See More to see a full list of devices that are logged in.

You won’t be able to log out of the session you are currently using (in my case, the Mac I am using in the screenshot above) but you can do so for one or more other devices.
You can either select Log Out Of All Sessions or you can click the column of three dots next to a specific entry to log out of a particular session.
If you see any devices you don’t recognize here, you can notify Facebook that the device in question is not yours and you will be walked through steps to secure your account.
8. Change your password
While we are not advocates of changing a password regularly for the sake of it, there may come a time when you want to change yours anyway, hopefully because you have come up with a much longer and more complex alternative.
To do so, go to the Security and Login page. Under Login, click on the Edit button next to Change password.

If you’re not already using a password manager that auto-populates, you will need to re-enter your existing password, followed by your new one. Re-type the new password and then click on Save Changes.
9. Turn on two-factor authentication
Until a foolproof biometric alternative comes along, the password is here to stay, and that’s not a great option these days. We’ve previously written tips on creating strong passwords, and argued the merits of password managers, but the truth is, most people still end up using quite weak credentials.
The best solution to that problem, for now, is two-factor authentication (2FA) and you should enable it on your Facebook account right now.
To do so, go to the Security and Login page and locate the Two-Factor Authentication section. Next to Use two-factor authentication, click Edit.
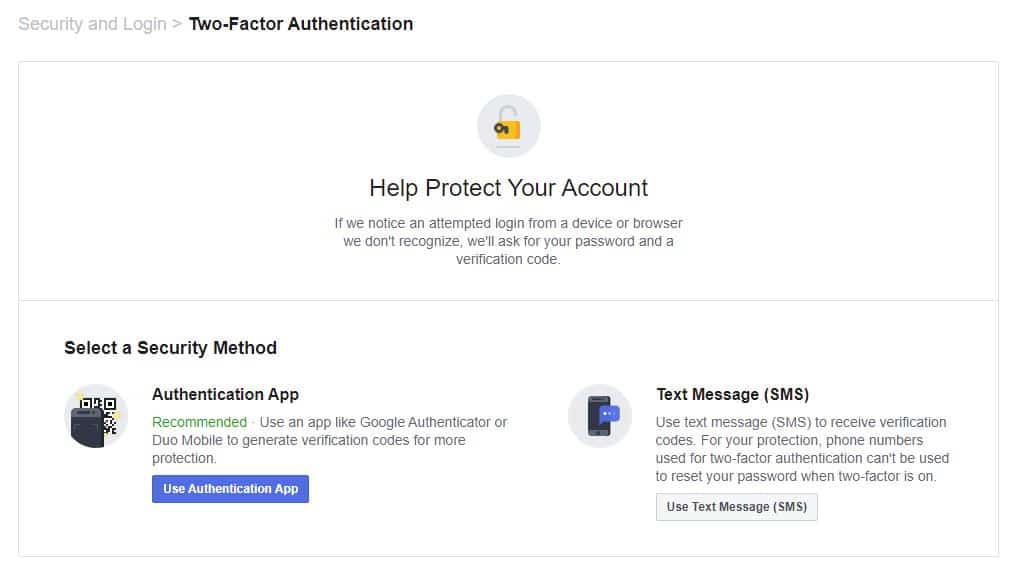
Here you will be presented with two methods of 2FA: using a text message or using an authentication app such as Google Authenticator or Duo Mobile.
Within the Two-Factor Authentication section, you can choose to exclude certain devices (for example, your home desktop) from having to use 2FA.
10. Set up unrecognized login notifications
Another important item you’ll want to address is unrecognized login notifications. From the main page, click on the drop-down arrow in the top right corner of the toolbar and select Settings & Privacy. Go to Settings > Security and Login.
Under Setting Up Extra Security, there’s an option called Get alerts about unrecognized logins. Hit Edit and you can choose to receive a notification whenever an unknown computer or other device attempts to access your Facebook or Messenger account. You can have notifications sent to the email Facebook has on file or add another email address.
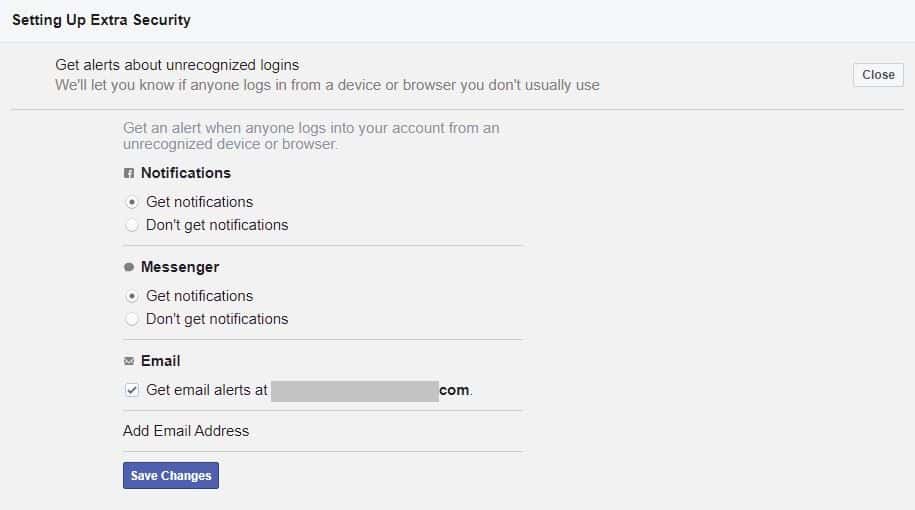
Just below this section, you also have the option to add three to five trusted contacts who can help you if you get locked out. Facebook will send them a code and URL to help you log back in. While this might sound like a good idea, from a security perspective, it’s better if you are the only person in control of logging into your account.
11. Encrypted notification emails <Advanced>
If you are extra careful about your security, you may have previously grabbed yourself a PGP public key so that you can send and receive encrypted communications. You can learn more about setting up PGP encrypted email in our tutorial.
If that is the case, Facebook allows you to enter that key so that your notification emails are also encrypted.
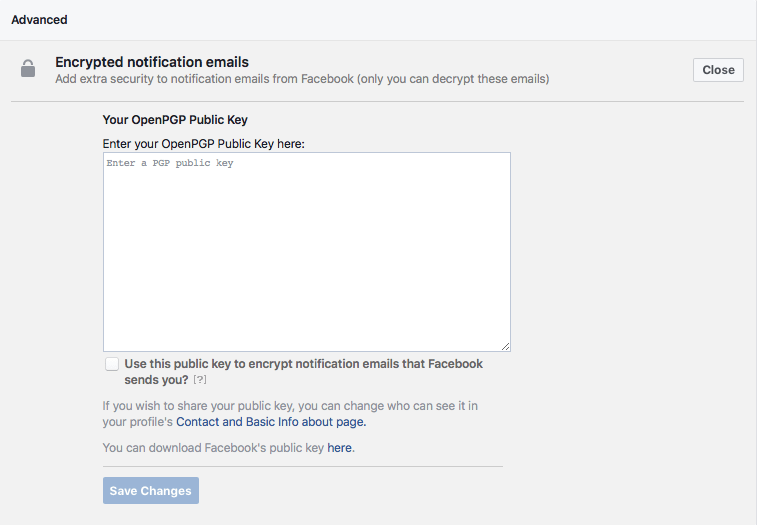
After entering your key, click the tick box and then Save Changes, remembering to consider whether you wish to share your public key (you can adjust this setting in the Contact and Basic Info page).
12. Block users
Now that you’ve locked down your privacy and security, how about blocking troublesome people, messages, and apps?
To get started, click on the arrow in the top right corner of the toolbar and go to Settings & Privacy > Settings > Blocking.
If for some reason you want to prevent someone from contacting you or viewing your timeline, you need to block them.
To do so, find the Block users section and simply add their name or email address into the box and click on the Block button.

You can also block a user by going to their profile page, selecting the three-dot menu icon, and choosing Block.
Don’t want to block someone entirely? Another option is to restrict select users. When you add people to your restricted list, they will only see items you share with everyone or on a mutual friend’s timeline. They won’t see items that you choose to only share with friends. This is a good way of limiting what a person can see while avoiding any awkwardness that could arise from removing them from your friend list. The Restricted list section can be found in the Blocking page.
13. Block messages
If you don’t wish to block someone from viewing your timeline, but do want to prevent them from messaging you, then Block messages is the appropriate section.

Simply type their name in the box and your mission is complete.
14. Block apps
If you have specific privacy or security concerns surrounding a Facebook-enabled app, it can easily be blocked.
Find Block apps and enter the name of the offending app.

From this Blocking area of Facebook, you can also block app invites, event invites, and pages, all in much the same way as explained above.
15. Beware of scams on Facebook
Now that your account is locked down tight, other areas you need to consider on Facebook are the messages you receive and the content you see on others’ timelines.
It’s worth remembering that malicious actors are always looking for a way to trick their victims. This can often be something benign, such as getting you to like a ridiculous post—celebrity death hoaxes are quite common on Facebook—or replying to a message containing fake news.
Such scenarios often don’t pose any real risk but can be incredibly frustrating, saddening, or simply annoying and a good reason to use the blocking settings!
That said, some messages on Facebook pose a real danger.
Much like with your email account, bad actors may sending malware links or phishing messages via Facebook. It’s common for hackers to take over Facebook accounts and send such messages to everyone in the victim’s friends list.
As ever, if a link looks suspicious, don’t click on it and remember that if something looks too good to be true, it probably is.
Final comments
Facebook is forever changing the way it operates to protect its users, so do remember that the above may change over time. If a new privacy or security feature becomes available, or you think we have missed something, please let everyone know via the comments section below.


