Email was one of the earliest forms of communication on the internet, and if you’re reading this you almost undoubtedly have at least one email address. Critics today decry the eventual fall of email, but for now it’s still one of the most universal means of communicating with other people that we have.
One of the biggest problems with this cornerstone of electronic communication is that it isn’t very private. By default, most email providers do not provide the means to encrypt messages or attachments. This leaves email users susceptible to hackers, snoops, and thieves.
So you want to start encrypting your email? Well, let’s start by saying that setting up email encryption yourself is not the most convenient process. Not only must the sender have the means to encrypt an email, but the recipient of your encrypted email must have the means to decrypt it. You don’t need a degree in cryptography or anything, but it will take a dash of tech savvy. We’ll walk you through the process in this article.
How email encryption works
Encryption, put simply, is no more than scrambling up the contents of a message so that only those with a key can decrypt it. Sort of like those puzzles you did in school where every letter of the alphabet had to be converted to some other letter of the alphabet so as to decode the final message. Computers make the scrambling far more complex and impossible for a human to crack by hand. When you encrypt an email, its contents are scrambled, and only the recipient has the key to unscramble it.
To make sure only the intended recipient can decrypt the message, email encryption uses something called public key cryptography. Each person has a pair of keys–the digital codes that allow you to encrypt and decrypt messages. Your public key is stored on a key server where anyone can find it, along with your name and email address. Conversely, you can find other people’s public keys on keyservers to send them encrypted email.
When you encrypt an email, you use the recipient’s public key to scramble the message. Due to the technology behind this type of cryptography, the public key cannot be used to decrypt it. The email can then only be decrypted by the recipient’s private key, which is stored somewhere safe and private on his or her computer.
Note that you cannot send encrypted email to someone without access to their public key. We’ll talk about a couple different types of email encryption and explain how key sharing works in each.
Types of email encryption
There are two main types of email encryption methods you need to know exist: S/MIME and PGP/MIME. In order for the recipient to decrypt an email encrypted by the sender, both parties must use the same type of encryption.
S/MIME is built into most OSX and iOS devices. When you receive an email sent from a Macbook or iPhone, you’ll sometimes see a 5-kilobyte attachment called “smime.p7s”. This attachment verifies the identity of the receiver so only he or she can read the email.
- Recipients must be in sender’s organization or have received at least one signed email from the sender in the past
- S/MIME relies on a centralized authority to choose the encryption algorithm and key size
- Easy to maintain
- Harder to set up with web-based email clients like Gmail
- More widely distributed thanks to Apple and Outlook built-in support
The other heavyweight in email encryption is PGP/MIME, which is what we’re going to focus on in the latter part of this tutorial.
- Recipient must have both public and private encryption keys, and the public key must be available to sender
- Relies on a decentralized, distributed trust model
- Fairly easy to use with web-based email clients
- Free to get a certificate, which S/MIME is usually not (you buy an S/MIME certificate when you buy an iPhone or Macbook)
- Choose how you encrypt and how well-encrypted the messages you receive must be
- Not widely supported by email clients, so requires third-party tools
This makes PGP/MIME cheaper and more flexible, but before we get into that, we’ll look at the S/MIME encryption features built into Outlook and Apple products.
Encrypting email with Outlook
Before you start sending secret admirer notes on Outlook, a couple requirements stand in your way. The first is that you must have a digital certificate. If you don’t already have a digital certificate, either one you created or from your organization, then you’ll need to create one:
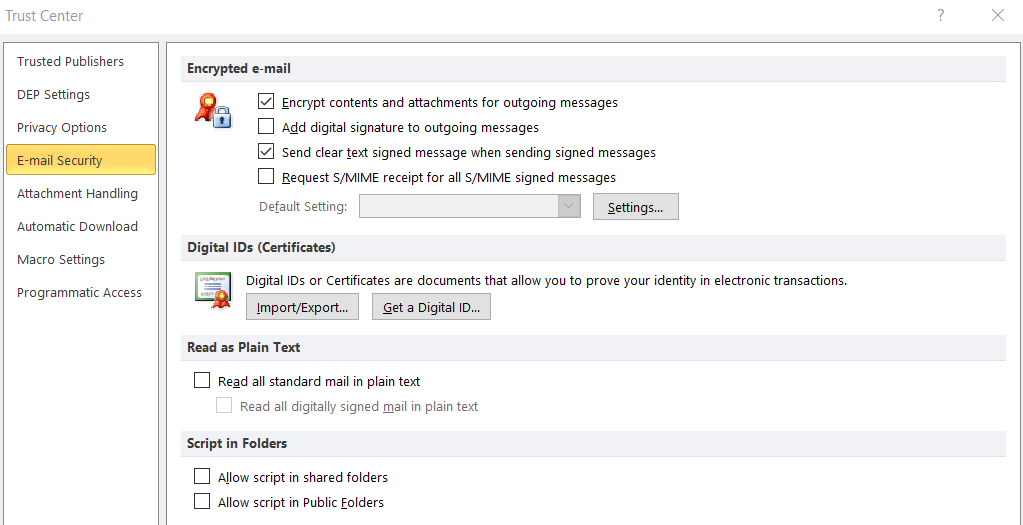
- Go to File > Options > Trust Center > Trust Center Settings > Email Security, Get a Digital ID.
- Choose which certification authority you want to receive a digital ID from (we recommend Comodo).
- You will receive your digital ID in an email.
Now that you have a digital certificate/ID, follow these instructions to get it into Outlook:
- Select Tools > Options and click the Security tab
- Input a name of your choice into the Security Settings Name field
- Make sure S/MIME is selected on the Secure Message Format box
- The Default Security Setting should be checked
- Under Certificates and Algorithms, go to the Signing Certificate section and click Choose
- In the Select Certificate box, choose your Secure Email Certificate if it hasn’t been selected by default
- Check Send these Certificates with Signed Messages
- Click OK to save your settings and return to Outlook
Okay, so now you’ve got a digital signature to put on your emails, but they won’t appear by default. To attach your digital signature:
- Click New Message
- Go to Tools > Customize and click the Commands tab
- In the Categories list, choose Standard
- In the Commands list, click Digitally Sign Message
- You can click and drag the listing onto your toolbar, so from now on just click that to add your digital signature
- While we’re at it, click and drag Encrypt Message Contents and Attachments onto the toolbar as well
At this point we want to remind you that digitally signing an email is not the same as encrypting it. However, if you want to send someone an encrypted message on Outlook, that person needs to have sent you at least one email with their digital signature attached. This is how Outlook knows it can trust the sender.
Conversely, if you want to receive an encrypted email from someone else, you’ll need to send them one unencrypted email first with your digital signature on it. This is a tedious downside to S/MIME. You can digitally sign your email just by clicking the new Sign button before sending.
Now that you have each other’s digital signatures and certificates saved into your respective key chains (address books), you can start exchanging encrypted emails. Just click the Encrypt button that we added before hitting send, and that’s all there is to it!
Encrypting email on iOS
S/MIME support is built into the default email app on iOS devices. Go into the advanced settings, switch S/MIME on, and change Encrypt by Default to Yes. Now when you compose a new message, lock icons will appear next to recipients’ names. Simply click the lock icon closed to encrypt the email.
iOS consults the global address list (GAL), a sort of keyserver for S/MIME certificates, to find contacts in your exchange environment. If found, the lock icon will be blue.

You’ll probably notice a red lock icon next to some recipients’ email addresses. This means they are either not in your exchange environment (e.g. you don’t work at the same company) or you haven’t installed that person’s certificate, and you cannot send them encrypted messages. In this case, the process is similar to Outlook above. That person needs to send you at least one email with a digital signature attached. The option to attach signatures to your emails by default is found in the same advanced settings menu as the encryption options.
When you receive that email, do the following:
- Click the sender’s address
- A red question mark icon will appear indicating the signature is untrusted. Tap View Certificate
- Tap install. When done, the install button will change colors to red and say “Remove.” Click Done on the top right corner.
- Now when you compose a message to that person, the lock icon will be blue. Tap it to close the lock and encrypt your message.
OSX email encryption
To send encrypted messages in the default mail program in Mac OSX requires the same condition as iOS and Outlook: you must first have the recipient’s digital signature stored on your device. When you compose a message and type in the recipient’s email, a checkmark icon will appear to show the message will be signed.
Next to the signature icon, a lock icon also appears. Unlike iOS where you can select which recipients will receive encrypted email and which don’t, OSX is an all-or-nothing affair. If you don’t have the certificate for all of the recipients, the email cannot be encrypted.
Remember to sign emails only after you’ve finished writing them. If it’s been altered, the certificate will show up as untrusted.
Android email encryption
On Android, you’ve got a couple options for how to encrypt your email. The CipherMail app allows you to send and receive S/MIME encrypted mail using the default Gmail app and some 3rd-party apps like K-9. It follows the same certificate rules as what we already discussed above.
The other option is to use PGP/MIME, which requires both an email app and a keychain to store certificates. PGP requires a bit more setup, but you don’t need to receive someone’s digital signature in advance to send them encrypted email.
OpenKeychain is a simple and free keychain tool for storing other people’s certificates and PGP public keys. It works well with K-9 Mail, but some other email apps might also be compatible.
In OpenKeychain, you can create your own public and private keys. Input your email address, name, and password, and it will generate these keys for you. If you have an existing key, you can import it. To use a generated key with other devices and apps, you may export it.
OpenKeychain also helps you search for other people’s public keys online so you can send them encrypted email. After you’ve added someone’s public key to your keychain, they will be saved for more convenient use later.
To use OpenKeyChain with an email app, go into the email app’s settings and make OpenKeyChain your default OpenPGP provider. This process varies from app to app, but it should just take a bit of digging through settings menus to find it. Not all email apps (including Gmail) will support encryption, however.
Webmail encryption (Gmail)
For web-based email clients like Gmail, we recommend a PGP/MIME encryption solution, as they are far easier to incorporate than S/MIME. For the purposes of this tutorial, we’re going to use a Chrome extension called Mailvelope with Gmail. Most browser extensions work in a similar manner, however, and follow the same basic principles. You can also consider EnigMail, GPGTools, and GNU Privacy Guard.
To get started, install the extension and open the options menu. Start by generating your own key: enter a name, email, and password and click Generate. Most email encryption extensions come with a built-in key generator and key ring. If you already have a key, just select the option to import it via copy and paste.

Now you’ve got an encryption key, but it doesn’t do much good if no one can find your public key to send you encrypted mail. You can upload your public key to a keyserver. We suggest MIT’s keyserver because it’s popular, free, and easy to use.
- In the Mailvelope settings, navigate to Display Keys and click on the one you just made.
- Go to Export to see the plain text of your public key. Copy it to your clipboard.
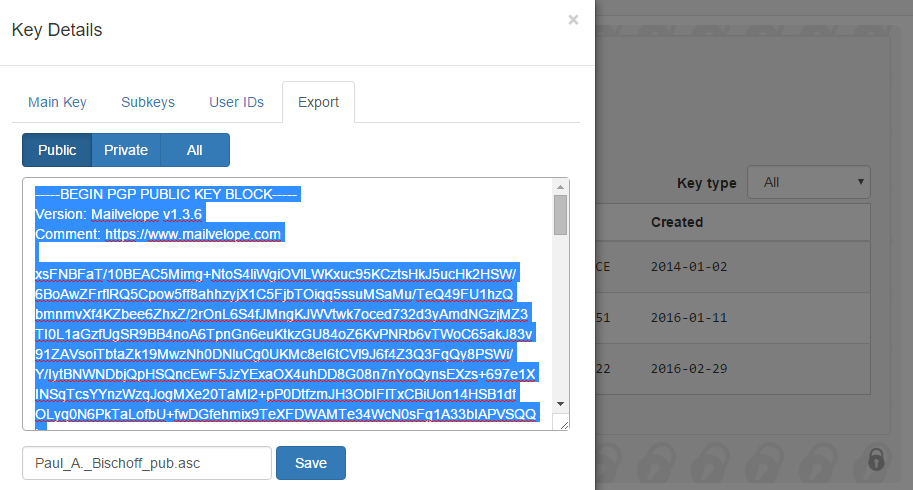
- Head to the MIT PGP Keyserver and paste your key into the “Submit a Key” field and hit submit. Now go back to the MIT keyserver homepage and search the name you entered. You should see your key listed.
 Take note of the key ID, which is displayed both in the Mailvelope settings and on the MIT listing. This is useful if you have the same name as someone else on the keyserver because it serves as a unique identifier. Journalists, for instance, often publish their key ID onto their online profiles and social media so sources know for certain that they are emailing the right person.
While we’re on the MIT keyserver site, you can use it to search for the public keys of others. Click on the key ID of the person you are searching for to display the plain text of their key. Copy it and paste it into the “import” section of Mailvelope to add it to your keyring.

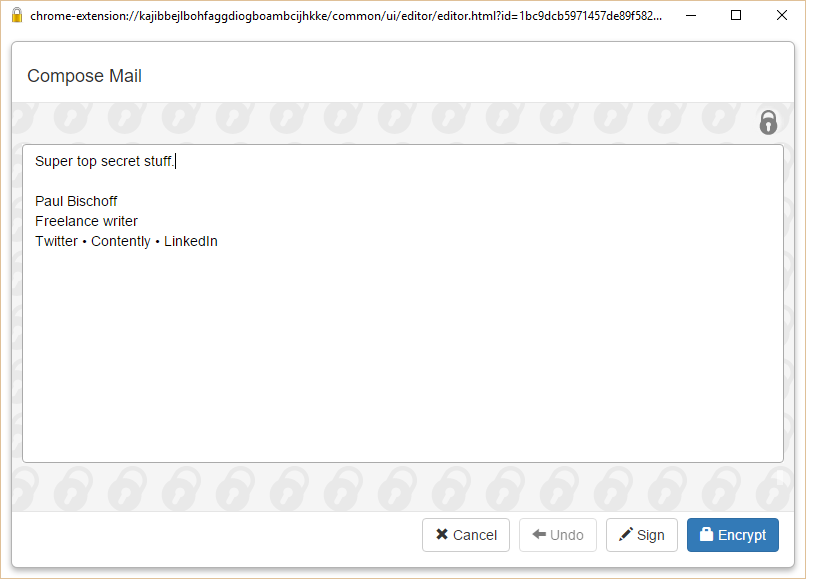
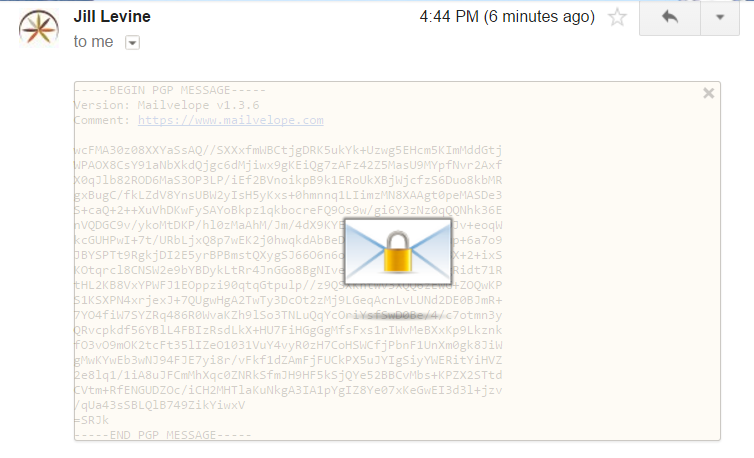
Now that you’ve added recipients to your key ring and made your own public key available to others, you can start sending and receiving encrypted mail. Mailvelope adds a button to the Gmail composer that opens another window where you can type out the message you want to encrypt. When you’re done, hit the encrypt button, choose the recipient, and transfer the encrypted text into the email. You can add unencrypted text in the email as well, but don’t tamper with the encrypted text.
When you receive an encrypted email, the browser extension you chose should automatically recognize it and offer to decrypt it. The recipient will need an extension or some sort of PGP decryptor app on their end. In Mailvelope’s case, I just click the icon that appears hovering over the encrypted text, enter my password, and voila!
The downside to Mailvelope, and indeed most web-based encryption extensions, is that they don’t encrypt attachments. You can use Gnu Privacy Guard to encrypt attachments with PGP before uploading them, which allows you to encrypt using the same key pair. Or you can opt for any one of these file encryption apps.
Burner email addresses
Encryption only hides the content of the message, not the sender’s email address. For any number of reasons, a time may come when you need to send an email anonymously to hide your identity. To do this, a few burner email services will give you a temporary “fake” email address.
Guerrilla Mail is our top choice. You can set up a disposable email address from which you can send and receive messages. It includes a password manager so you don’t have to memorize passwords for multiple burner accounts. Best of all, it’s completely web-based with no registration required, which makes hiding your identity that much more effective.
Zmail is another solid option for sending fake email if you prefer a desktop client rather than a web app.
Best practices for protecting your email
Nine out of 10 viruses that infect computers come from email attachments. No level of encryption will protect you from being careless. It’s therefore very important to scan all email attachments before opening them, especially from senders you don’t recognize. Viruses disguised as Microsoft Office documents are especially common. Many email clients, including Gmail, will automatically scan attachments for you, but others will require you do so manually.
Don’t click on links in emails from unreliable sources. In fact, just don’t open emails altogether if they don’t look trustworthy. A spam blocker will go a long way toward avoiding these.
If you email a large group of people, use BCC so spammers can’t get a hold of the list. Conversely, if someone includes you in a long list of CC’ed email addresses, don’t hit “reply all” without carefully considering the alternatives.
Finally, set a strong password on your email account. Read through our guidelines if you’re not sure what constitutes a strong password or use a password strength checker if you’re still unsure how strong yours is.
Related: Cyber security statistics
Alternative email encryption apps
If fiddling with certificates and key pairs sounds like too much trouble, you can use an off-the-shelf encrypted email client.
Tutanota is one such secure email service, with apps for mobile and a web mail client. It even encrypts your attachments and contact lists. Tutanota is open-source, so it can be audited by third parties to ensure it’s safe. All encryption takes place in the background.
Hushmail is a paid web-based email client that allows you to send encrypted email to anyone even if recipients don’t have any email decryption tools. Recipients will receive an email notification to let them know they need to visit the Hushmail site, enter the code provided in the notification, and then correctly answer your challenge question. Check out our full tutorial on how to use Hushmail.
While we can vouch for Tutanota and Hushmail, it’s worth mentioning that there are a lot of email apps out there that claim to offer end-to-end encryption, but many contain security vulnerabilities and other shortcomings. Do your research before choosing an off-the-shelf secure email app.
Be wary of encrypted email apps that don’t use S/MIME or PGP/MIME
Many apps and email services out there promise email encryption but don’t use S/MIME or PGP/MIME. These are indeed much easier and faster to set up, but be aware that they roll their own encryption and may not strive for the same privacy standards. SafeGmail and Virtru are examples of these, and we don’t recommend them.
We encourage you to upload your public PGP key to a keyserver, but it’s not required. Instead, you can just send the plain text of your public key to the person(s) that you want to receive encrypted emails from.
Email encryption provides a secure means of sending messages containing sensitive material as well as a means for others to send you sensitive material. Journalists use it to correspond confidentially with sources. Businesses use it to relay trade secrets and classified documents. Lawyers use it to keep sensitive client and case information safe. You get the idea.
In our opinion, email encryption is something you should have readily available when the need arises, but it’s not necessary for everyday communication.
Encrypted email FAQs
Can encrypted emails be decrypted?
No, encrypted emails can’t be decrypted without a key. Through encryption, an email message is scrambled up so that the contents can’t be cracked. This encryption is too complex for someone to bypass. Only the recipient of the email has the necessary private key to decrypt the email message. As long as the private key stays with the intended recipient of the email and isn’t obtained by someone with nefarious intentions, encrypted emails can’t be decrypted.
See also: Can your employer read your personal emails?
Related: Looking for a VPN to protect your privacy? See our list of the best VPN services.
It is remarkable, very useful piece
Very well constructed and useful to follow for our privacy.
or use tutanota.com
How many ways that we can encrypt email in outlook?
What is the best way beside to two above?
If use Digital certificate we need to request and install all the certificate on each clients. If we have 10K users we need to request 10K certificate right?
thanks fully explained and understood
Thank you Hope you work for a post published a list of encrypted emails and safest
Indeed an informational post for those folks who would like to hit the OpenPGP based services to protect their online privacy.
However, aside from mailvelope and other mentioned services in this post – I would like to highlight one of the most simplest and yet a pure OpenPGP based independent service http://www.mailfence.com – that offers Integrated Key Management, Interoperability and Digital Signatures (all of those in a single package) without compromising on the user-friendliness.
Other good services include scryptmail.com, riseup.org…
Nevertheless, it always drops down to one’s preferences and requirements (I personally use mailfence which is free, interoperable, without ads, completely locally hosted and provides an entire collaboration suite i.e. messages, contacts, calendar, documents, polls, tags ….)