Internet users are spoiled for choice when it comes to VPN services, but they either require a monthly subscription, aren’t secure, or are just plain slow. Thankfully, alternatives do exist. They require a bit more technical know-how, but if you want something done right, you have to do it yourself.
To learn how to make your own VPN, you can watch the video or read the article. Note that the article contains some useful commands and configuration text that you can copy and paste for your convenience. Update: the video uses an old version of easy-rsa that is no longer available. When you get to the 8-minute mark, please refer to this article for easy-rsa 3 configuration.
Getting started
Amazon Web Services offers one year of free virtual server space, provided you use less than predetermined amounts of bandwidth, time, and space. Even if you go over that limit, the cost of running a server image on Amazon’s Elastic Compute Cloud is probably less than you would pay for a VPN subscription.
Here we’ll explain two different ways to use Amazon’s Elastic Cloud service, also called EC2, to divert your connection through a private location of your choice: SSH Tunneling and OpenVPN. Each has advantages and disadvantages, so use the one you find more suited to your needs. No matter which you choose, you’ll require the following:
- An Amazon Web Services account. This requires a credit card, but you’ll only be charged for what you use, which will likely be nothing if you’re prudent about what you’re doing.
- PuTTy, if you’re on Windows. OpenSSH via Cygwin is another option, but I found it to be a pain. Linux and Mac computers already have SSH prompts built into their boxes and terminals. You’ll also need PuTTy’s sister key generation program, PuttyGen. You could also use a PuTTY alternative, some of which also incorporate SCP and FTP.
- WinSCP, or an equivalent FTP client to move files between your local computer and your EC2 instance.
- A basic working knowledge of Unix commands and how servers work with clients will be massively helpful in troubleshooting should something not go exactly as planned.
- OpenVPN GUI, installed in the default location and with the default settings on your PC
Setting up AWS
Once you’ve signed up for an Amazon Web Services account, here’s how to launch the server that we’ll use for our VPN::
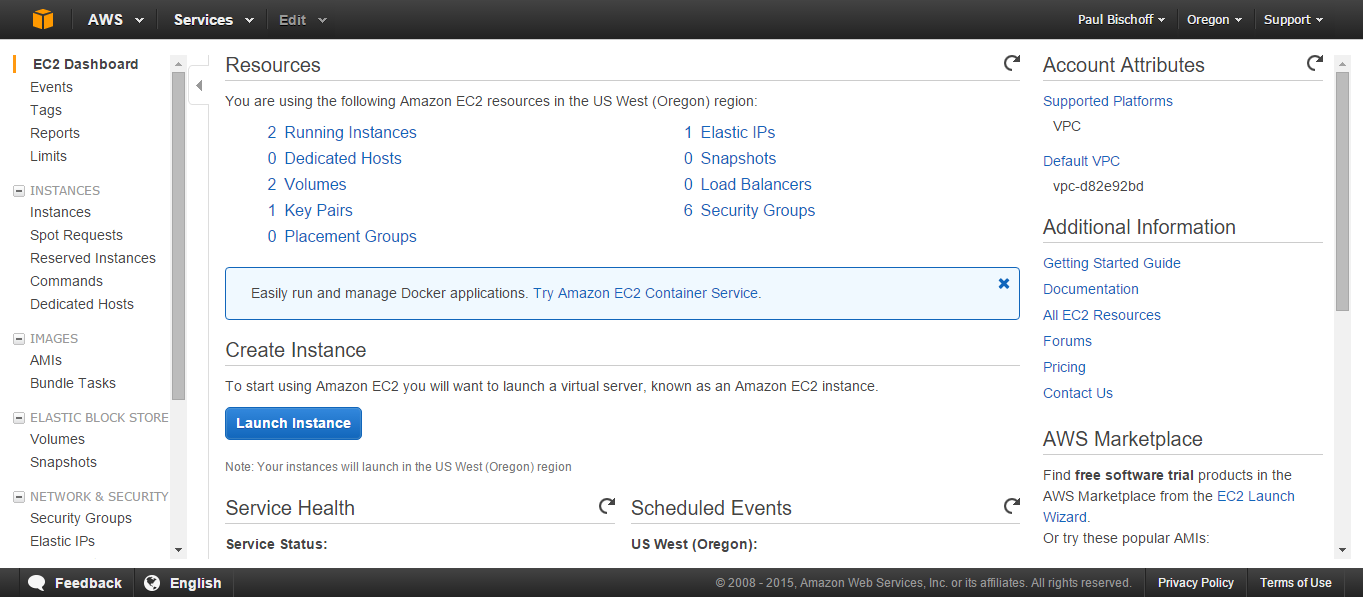
- Log into your Amazon Web Service account and head to the EC2 dashboard.
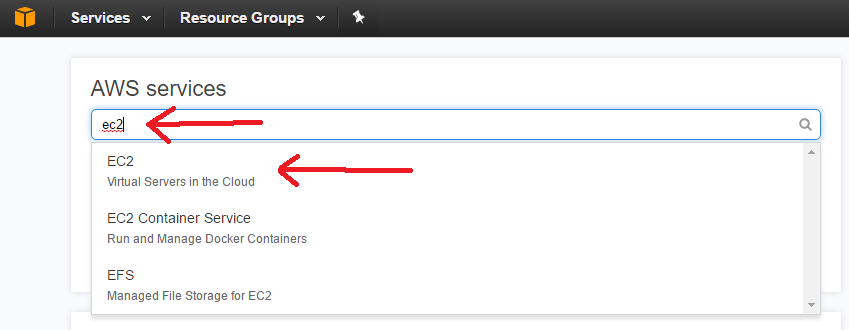
- On the top right, you can choose the location where we’ll be setting up your VPN. Click Launch Instance.

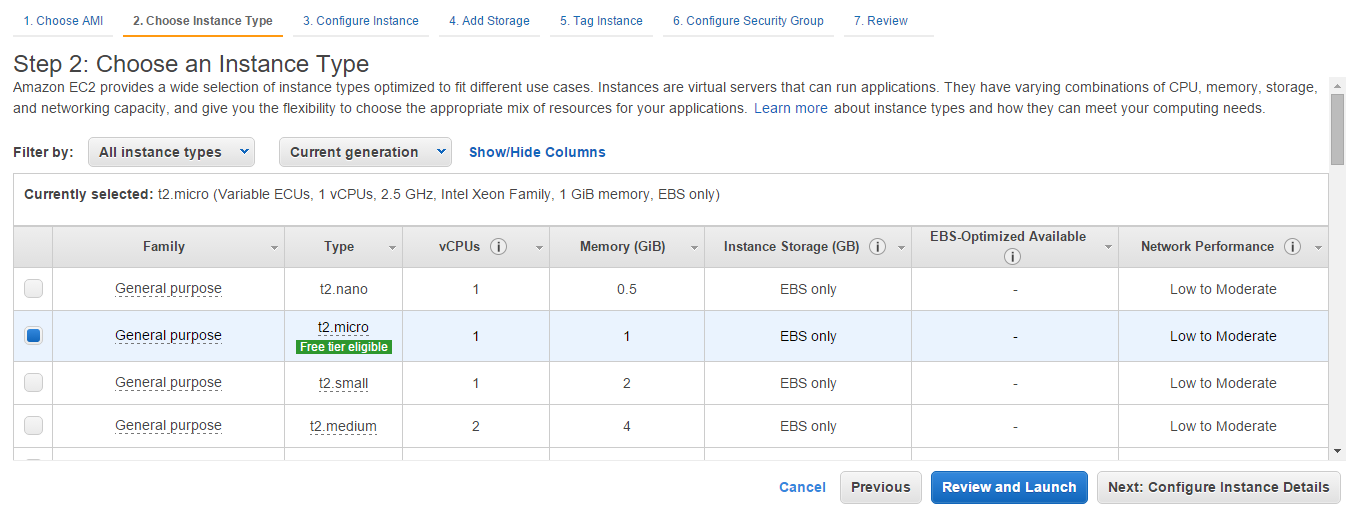
- Choose whatever Linux AMI is listed as “free tier eligible.” At the time of writing this article, that’s the Amazon Linux AMI. Go on to the next step.
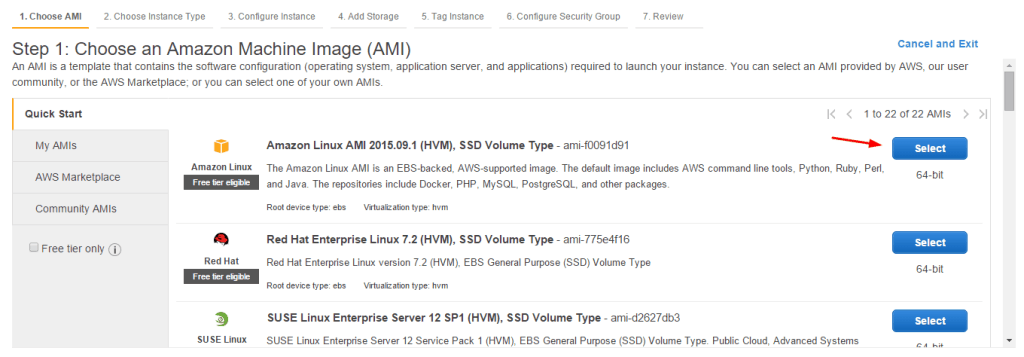
- Here choose a t2.micro instance that’s also free tier eligible. Click “Review and Launch.”

- On the next page, click Edit Security Groups.
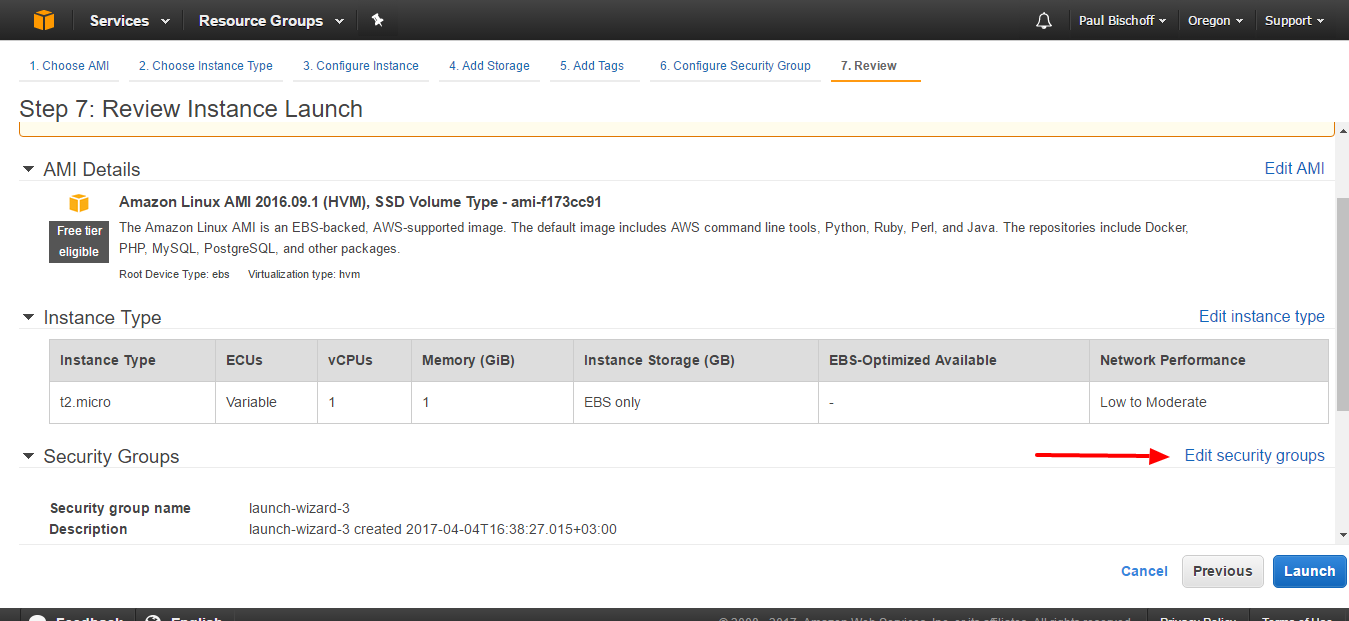
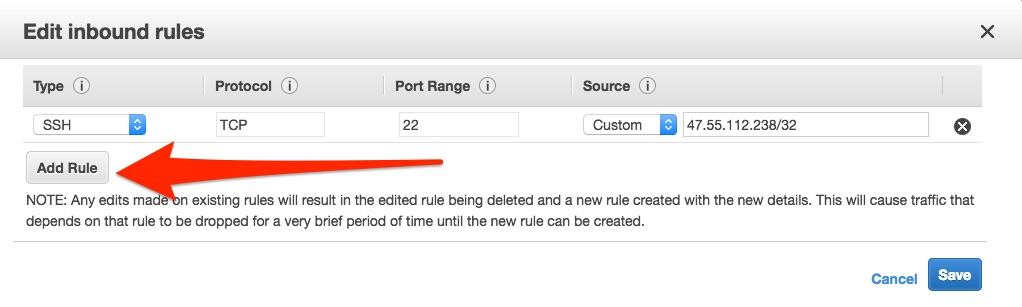
- You’ll need to edit the security group to only allow traffic from your computer to access the VPN or proxy. You should have one rule already in place for connecting to your server via SSH, which we’ll use later. We’ll need to add another to allow OpenVPN connections, which use port 1194 by default. For simplicity’s sake, under the Inbound tab, click the Add rule button. Set the Type to Custom UDP, the Port Range to 1194, and the Source to Anywhere.
- Hit Save.

- Click “review and launch,” then “launch” on the next page.
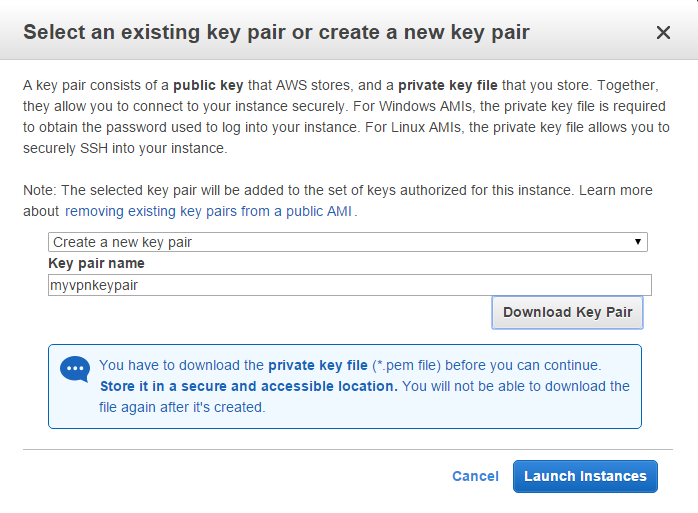
- Now you’ll want to create a key pair, which sort of works like a password that you’ll use to connect to the virtual server you’re creating. Select “create a new key pair” from the dropdown menu and name it whatever you like. Click the button to download the key pair. Store it somewhere safe.
- The next page should alert you that the instance is launching. Scroll to the bottom and hit “View instances.” Here you’ll see a list of any instances you’ve launched, which if this is your first time using EC2 will just be one.


Connect to the server with PuTTy
We can connect to our EC2 instance with PuTTy, but first we’ll need a proper key file to get connected. When you installed PuTTy, you should have also installed PuTTygen. Go ahead and run it now. PuTTy and PuTTygen both run right out of the box as .exe files with no need to install.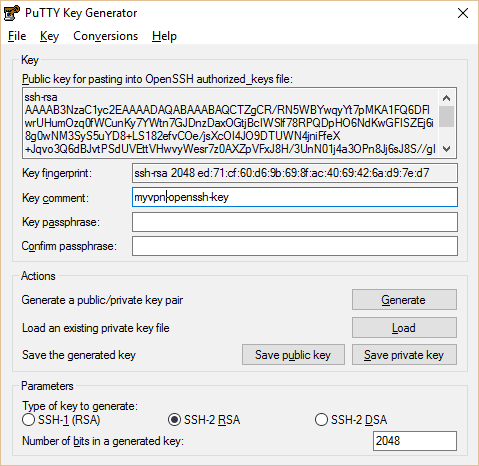
- Open PuTTygen, click Load.
- Navigate to the .pem key pair file you downloaded before and load it into Puttygen. You’ll have to select the option to show all file types for the .pem key to show up. Hit “Save Private Key.” The file name must be identical to the .pem key. You can create a passphrase for the private key if you want.
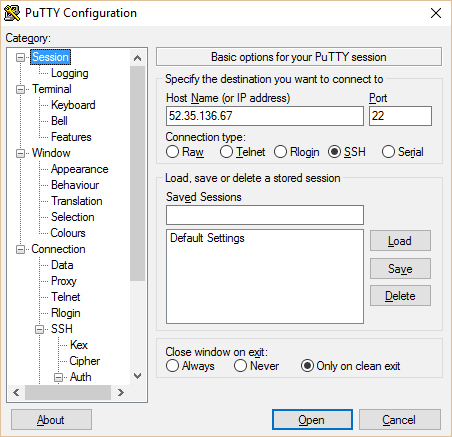
- Now close out of PuTTygen and open PuTTy. Copy your instance’s public IP from the EC2 console into PuTTy. Type in a name for your session and hit save.
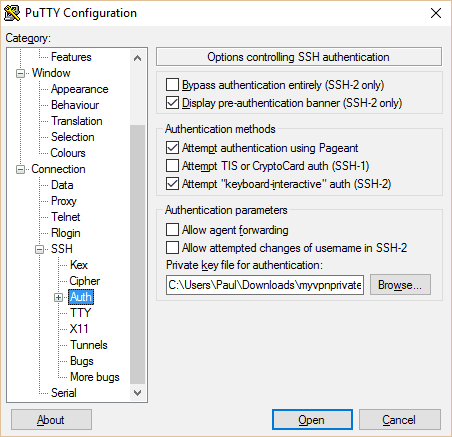
- In the left pane, navigate to “Auth” under SSH. Click the browse button at the bottom and navigate to the private key you just generated.
- Back on the main Session page, name and save your session profile so you can quickly connect the next time you use PuTTy. Then Click Open.
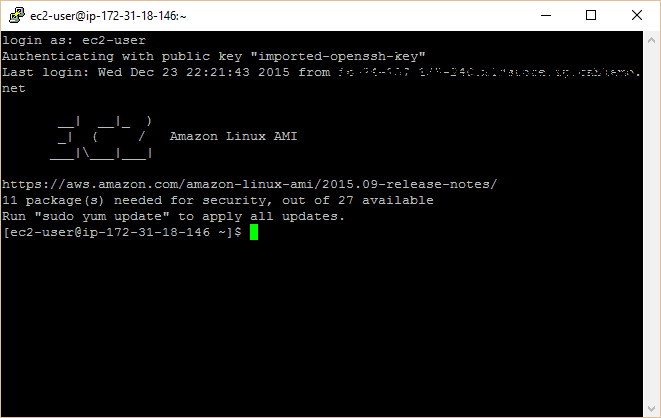
- A prompt will appear asking you for a username. This differs based on what type of server you set up at the beginning. For the Amazon Linux AMI, it’s “ec2-user”.
SSH Tunneling (optional)
To begin with, we’re just going to reroute web traffic through the instance we created using SSH tunneling and a proxy. This is a quick and dirty way to get around a firewall or geographic lockout. It’s not quite a VPN–it’s best for light web traffic and won’t work with everything–but it’s much more simple to set up. However, setting up SSH tunneling is entirely optional, so feel free to skip to the next section.

Open PuTTy and navigate to Tunnels in the left pain. Add port 8080 with Auto and Dynamic selected. Go back to the Session page and hit Save again so you don’t have to do all this over again. Then click Open.
Now you’re connected to your server, but you still need to route your web browser’s traffic through it. If you use Firefox, this can be done in your browser settings. If you use Chrome, download the Proxy Switchy extension. If you prefer to create a fully functioning VPN rather than just a proxy for your browser, skip to the next section now.
In Firefox:
- Go to Tools > Options > Advanced > Network > Connection > Settings > Manual proxy configuration
- Set SOCKS Host as 127.0.0.1 and the port as 8080 (or whatever you set the tunnel port to on PuTTy).
- Click OK to save
In Chrome Proxy Switchy
- A setup page should appear as soon as you install the extension, or click the icon in the top right of Chrome and click Options.
- Name the profile whatever you like. Under Manual Configuration, set the SOCKS host to 127.0.0.1 and the port to 8080 (or whatever you set the tunnel port to in PuTTy. Leave everything else blank.
- Hit Save, then click the icon again to select your proxy profile.
Voila! Your browser traffic is now being funneled through your EC2 instance. This will work fine for basic browsing, but some websites might run into problems and apps other than your web browser will still use the direct connection. To create a full-on VPN that reroutes all your internet traffic, read on.
Set up OpenVPN on the server and client
OpenVPN is a free open source tool that will let you run a full-on VPN through your Amazon EC2 instance. That means all your internet traffic goes through it, not just your web browser traffic like the proxy above. Desktop programs such as Steam or Spotify work better with this approach.
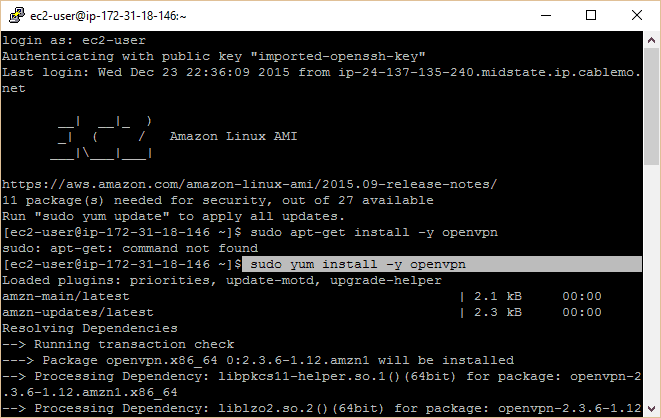
Connect to your EC2 instance using PuTTy according to the instructions above. You should have a command prompt in front of you that says Amazon Linux AMI. Run the following commands (type or copy/paste them and press enter):
sudo yum install -y openvpn
sudo modprobe iptable_nat
echo 1 | sudo tee /proc/sys/net/ipv4/ip_forward
sudo iptables -t nat -A POSTROUTING -s 10.4.0.1/2 -o eth0 -j MASQUERADE
sudo iptables -t nat -A POSTROUTING -s 10.8.0.0/24 -o eth0 -j MASQUERADE
Just a quick note here. You might have noticed in the screenshot that I incorrectly tried to download and install OpenVPN using the “apt-get” command instead of “yum”. Some other versions of Linux still use apt-get, so if yum doesn’t work for you, try this command instead:
sudo apt-get install -y openvpn
A bunch of text will flash on the command prompt while it installs OpenVPN. The other three commands set up IP forwarding, which is necessary for the VPN to work.
Method #1: Setting up PKI authentication with easy-rsa (recommended)
In the original version of this tutorial, we set up OpenVPN with static encryption and a .ovpn file. While that works, it only allows one device to be connected at a time, and the fact that you only ever use one key means it’s less secure. We now recommend readers use easy-rsa to set up authentication, which is more secure and allows for any number of devices to be simultaneously connected. However, if you want the old version with static encryption, skip to it by clicking here.
May 2018 update: This article has been updated for use with easy-rsa 3.
OpenVPN and easyrsa server setup
Ideally, you would generate all the keys and certificates you need on a separate device from the VPN server for maximum security. This can be quite tedious, however, so we’re just going to generate both client and server credentials on the server, then move the files where we need them from there.
- Easy-rsa is not available in the default yum package list, so we’ll need to enable the EPEL repo to install it. Type the following into the PuTTy terminal and hit Enter:
-
sudo yum install easy-rsa -y --enablerepo=epel
-
- Make an easy-rsa directory in your OpenVPN install directory. Copy the files from your easy-rsa installation (latest version is 3.0.3 as of time of writing) to the new directory:
-
sudo mkdir /etc/openvpn/easy-rsa
cd /etc/openvpn/easy-rsa
sudo cp -Rv /usr/share/easy-rsa/3.0.3/*
-
- Now we’re ready to set up our certificate authority. Start by initializing a new PKI (public key infrastructure) directory, then build a certificate authority keypair.
-
sudo ./easyrsa init-pki
sudo ./easyrsa build-ca
-
- Enter a PEM passphrase. This is not required but recommended. If someone gets a hold of your CA somehow, they will not be able to create keys or sign certificates without the password.
- You’ll be prompted to enter a common name. Call it whatever you want or just hit Enter to leave it as the default value.
- Next, we’ll generate a Diffie-Hellman key, which provides perfect forward secrecy:
-
sudo ./easyrsa gen-dh
-
- This command can take awhile. It will generate a file called dh.pem. Once finished, we move on to the server credentials. For convenience, we won’t password protect these, but you’re certainly welcome to do so if you want even harder security.
-
sudo ./easyrsa gen-req server nopass
-
- Hit Enter to leave the common name as server. Once the key pair is generated, sign the certificate:
-
sudo ./easyrsa sign-req server server
-
- Type yes to confirm and enter your CA password if you set one earlier.
- Now we’ll set up the client. Again, we won’t set a password on this but you are welcome to. Note that if you want to configure automated VPN startup, it’s best not to set a password.
-
./easyrsa gen-req client nopass
-
- Hit Enter to leave the common name as client. Now sign it:
-
sudo ./easyrsa sign-req client client
-
- Type yes to confirm and enter your CA password if you set one.
- Next, we’ll generate a TLS key for perfect forward secrecy in OpenVPN, which ensures past session data cannot be decrypted even if an attacker gets hold of our private key.
-
cd /etc/openvpn
openvpn --genkey --secret pfs.key
-
- We’ve now generated all of the credential files we need. Next, we’ll create an OpenVPN server configuration file. We’ve already got one written up for you below, so all you need to do is copy and paste if you’ve followed along from the beginning. Start by navigating to the OpenVPN directory and creating a new file:
-
cd /etc/openvpn
sudo nano server.conf
-
- You are now in the nano text editor. Copy and paste the following config, then hit CTRL+O to save, Enter to confirm, and CTRL+X to exit. (Hint: you can paste text from your clipboard into PuTTy just by right-clicking)
-
port 1194
proto udp
dev tun
ca /etc/openvpn/easy-rsa/pki/ca.crt
cert /etc/openvpn/easy-rsa/pki/issued/server.crt
key /etc/openvpn/easy-rsa/pki/private/server.key
dh /etc/openvpn/easy-rsa/pki/dh.pem
cipher AES-256-CBC
auth SHA512
server 10.8.0.0 255.255.255.0
push "redirect-gateway def1 bypass-dhcp"
push "dhcp-option DNS 8.8.8.8"
push "dhcp-option DNS 8.8.4.4"
ifconfig-pool-persist ipp.txt
keepalive 10 120
comp-lzo
persist-key
persist-tun
status openvpn-status.log
log-append openvpn.log
verb 3
tls-server
tls-auth /etc/openvpn/pfs.key
-
- The server is now configured. We just need to start up OpenVPN. We’ll start it as a service so that even after you close PuTTy, it will continue to run until the server is either shut down or you manually end the service.
-
sudo service openvpn start
-
Edit: Some readers have pointed out that their VPN servers stop working after a server reboot or maintenance. This happens occasionally with micro tier EC2 instances. To prevent this, we’ll use a command and bash script courtesy of Matt Doyle in the comments section. Start with this command:
sudo chkconfig openvpn onWhile you’re still in etc/openvpn, use nano server.sh to create a new text file and paste the following into it:
#!/bin/sh
echo 1 | sudo tee /proc/sys/net/ipv4/ip_forward
sudo iptables -t nat -A POSTROUTING -s 10.4.0.1/2 -o eth0 -j MASQUERADE
sudo iptables -t nat -A POSTROUTING -s 10.8.0.0/24 -o eth0 -j MASQUERADE
Use CTRL+O to save and CTRL+X to exit.
The command will ensure OpenVPN starts when the server boots, and the script will ensure the necessary routes are set up in iptables to allow OpenVPN traffic.
OpenVPN and easyrsa client setup
Now that the server is configured, we need to set up the client. To do that, we’ll have to move the necessary certificate and key files from our server to our client device. With PuTTy still open and running as root, we first need to change the permissions on these files so that we can access them. We’ll also put them all in one place to make things a bit easier.
- To access some of these files, we’ll need to be root user. To do that, type:
-
sudo su
-
- This will make you the root user and grant administrative privileges. Now enter the following commands. The last command lowers the required permissions to access these files. Note that it’s important to change them back when finished.
-
cd /etc/openvpn
mkdir keys
cp pfs.key keys
cp /etc/openvpn/easy-rsa/pki/dh.pem keys
cp /etc/openvpn/easy-rsa/pki/ca.crt keys
cp /etc/openvpn/easy-rsa/pki/private/ca.key keys
cp /etc/openvpn/easy-rsa/pki/private/client.key keys
cp /etc/openvpn/easy-rsa/pki/issued/client.crt keys
chmod 777 *
-
- To get the files off of our server and onto our PC, we’ll use a free program called WinSCP. Just use the default installation options. Once that’s done, a window should pop up prompting you to import your server authentication details from PuTTy. Select the one we made above and continue.
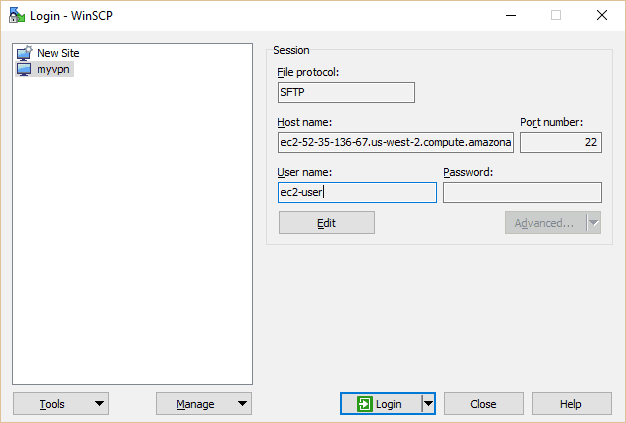
- Select myvpn (or whatever you named yours) and hit the Edit button. Type in ec2-user under user name. Click on Login.
- If this isn’t your first time using WinSCP, you can set the .ppk file you used in PuTTy by clicking Edit and Advanced. Go to SSH > Authentication > Private key file and navigate to your PPK file.
- In the host name field on the main page, you can enter either the IP address or domain of your EC2 instance. Be sure to save your settings, then hit Login.

- In the right pane, navigate to the directory containing your key files, in this case /etc/openvpn/keys

- Highlight the six files you’ll need: client.crt, client.key, ca.crt, dh.pem, pfs.key, and ca.key (not shown due to article update). Hit the green Download button. It doesn’t really matter where they go on the left pane so long as you don’t need admin privileges to access it. We put the files on our desktop for simplicity’s sake. However, you’ll want to store the ca.key file somewhere safe, such as a USB drive.
- The last loose end we need to do tie up is removing the ca.key file from the server. The CA, or certificate authority, is used to sign client certificates, and, if it is ever compromised, you can never trust certificates issued by that CA again. While this isn’t necessary for the VPN to work, we strongly recommend doing it, especially if you didn’t set up a password for the CA. Make sure you’ve all the keys and certificates for every device you want to connect before removing the file. If you want to add more at a later time, you will have to move the ca.key file back onto the server.
- Once you have the CA key safely stored somewhere other than the server, go into PuTTy and remove both the original ca.key and the copy we made from the server:
-
sudo rm /etc/openvpn/easy-rsa/pki/private/ca.key
sudo rm /etc/openvpn/keys/ca.key
-
- Once the files have downloaded, we need to restore their stricter permissions on the server so not just anyone can access them. Back in PuTTy:
-
cd /etc/openvpn/keyssudo chmod 600 *
-
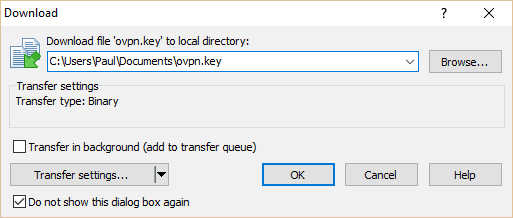
- On your PC, cut and paste those five files from wherever you downloaded them into your OpenVPN config folder. In this case that’s C://Program Files//Openvpn/config.
- Lastly, we need to create a client configuration file. Open your favorite plaintext editor (Notepad works fine) by right clicking and selecting Run as administrator and paste the following config, replacing YOUR.EC2.INSTANCE.IP with the IP address of your EC2 instance:
-
client
dev tun
proto udp
remote YOUR.EC2.INSTANCE.IP 1194
ca ca.crt
cert client.crt
key client.key
tls-version-min 1.2
tls-cipher TLS-ECDHE-RSA-WITH-AES-128-GCM-SHA256:TLS-ECDHE-ECDSA-WITH-AES-128-GCM-SHA256:TLS-ECDHE-RSA-WITH-AES-256-GCM-SHA384:TLS-DHE-RSA-WITH-AES-256-CBC-SHA256
cipher AES-256-CBC
auth SHA512
resolv-retry infinite
auth-retry none
nobind
persist-key
persist-tun
ns-cert-type server
comp-lzo
verb 3
tls-client
tls-auth pfs.key
-
- This is a Windows config file for the OpenVPN GUI, so we’ll save it as client.ovpn. Other OpenVPN clients might use the .conf extension instead. Whatever the case, make sure your text editor doesn’t add the .txt extension after saving. Save it into the same location as your key and certification files: C:\\Program Files\\OpenVPN\\config
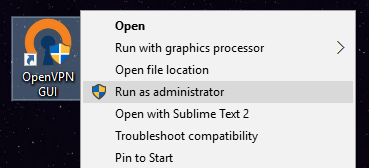
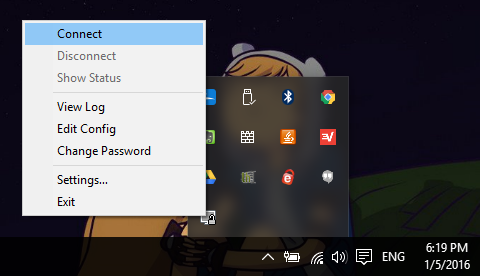
- Now run the OpenVPN GUI in administrator mode by right clicking it and selecting Run as administrator. Right click the icon in your system tray and connect with the client configuration we just set up. A status screen with loads of text will flash across the screen, and then the icon will turn green.
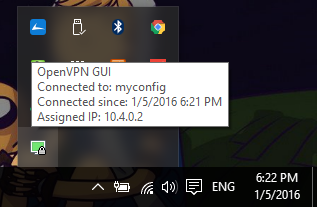
Congratulations! You are now connected to your homemade VPN.
Method #2: Static encryption (easier, but not recommended)
In this method, we’ll create a shared key for authentication. It’s sort of like a file that acts as a password. It’s easier to set up but only allows a single device to be connected to the VPN at any one time, and is less secure than the easy-rsa method above.
- In PuTTy Type in the following commands and hit enter:
-
cd /etc/openvpn
sudo openvpn --genkey --secret ovpn.key
-
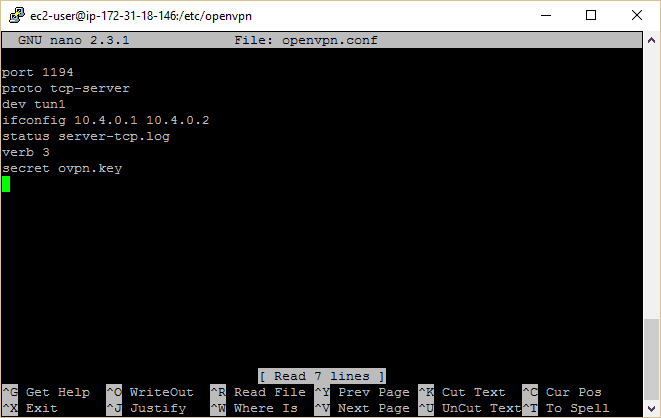
- Now we’re going to create a server config file for our VPN. Type the following command to create a blank text file in a very basic text editor inside the terminal:
-
sudo nano openvpn.conf
-
- Type in the following configuration. You can find more options on the OpenVPN website if you want to play around with this later, but make sure you know what you’re doing first.
-
port 1194proto tcp-serverdev tun1 ifconfig 10.4.0.1 10.4.0.2 status server-tcp.log verb 3 secret ovpn.key
-
- Now hit CTRL+O (that’s the letter ‘O’ not zero) and hit enter to save the file. Then hit CTRL+X to exit the text editor. Back at the command prompt, it’s time to fire up OpenVPN:
-
sudo service openvpn start
-
- Next we need to get the shared key from the server to your local computer. First we need to change the permissions on that file so we can access it using the following command:
-
sudo chmod 777 ovpn.key
-
- If at any point you accidentally close PuTTy or it just craps out, you can navigate back to your open VPN installation directory after reconnecting using this command:
-
cd /etc/openvpn
-
- To make this as easy as possible, download and install this free application, WinSCP (Mac users will have to find another FTP client. Don’t worry, there are lots of them). Just use the default installation options. Once that’s done, a Window should pop up prompting you to import your server authentication details from PuTTy. Select the one we made above and continue.
- Select myvpn (or whatever you named yours) and hit the Edit button. Type in “ec2-user” under user name. Click on Login.

- Now you can move files between your EC2 instance server and your local computer. On the right hand panel, navigate up as far as you can, then go to etc/openvpn. Here you’ll find the ovpn.key file that we need. Click and drag it into the folder of your choice, but remember where you put it as we’ll want to move it later.
- Now that you have the key, we need to re-apply the old permissions so not just anyone can grab it. Back in your PuTTy terminal, enter:
-
sudo chmod 600 ovpn.key
-
- It’s time to download the OpenVPN client and GUI for your local computer. Go to the OpenVPN downloads page and choose the appropriate version for your operating system. Install it with the default settings.
- Launch OpenVPN and it should appear as an icon in your system tray. Open up a file explorer and navigate to where you installed OpenVPN, probably in your Program Files folder. Move the opvn.key file we downloaded from the server to the config folder found here (C:/Program Files/OpenVPN/config … if you used the default installation directory on Windows).
- Next, we need to create a config file for the local machine to match the one we made on our server. Open up Notepad and paste the following, replacing the IP address after “remote” with the IP of your EC2 instance (if you’ve forgotten it, find it in your AWS Console under EC2 Instances). Also, double check that the full file path pointing to your key is correct.
-
proto tcp-client
remote <your EC2 IP here>
port 1194
dev tun
secret "C:\\Program Files\\OpenVPN\\config\\ovpn.key"
redirect-gateway def1
ifconfig 10.4.0.2 10.4.0.1
-
- Save it as myconfig.ovpn (make sure your text editor doesn’t append it as myconfig.ovpn.txt by mistake) in the config folder of your OpenVPN installation, the same place as your opvn.key file.
- Right click on the OpenVPN icon in your system tray and click Exit to quit. Now start it up again–either from the desktop shortcut or from the Program Files folder–but this time use right click and hit “Run as administrator”. If you don’t run OpenVPN as administrator on Windows, it probably won’t work.
- Right click the system tray icon and click Connect. The OpenVPN GUI should pop up showing you the connection status. Assuming it worked, the system tray icon will turn green. Go to Google and type in “What’s my IP?”, and it should return the IP address of your Amazon EC2 Instance.

Congratulations, you just made your own VPN!
Additional notes
If you want to protect your VPN from deep packet inspection, a technique used by censorship regimes in places like China and Syria to block OpenVPN connections, check out our tutorial on setting up Obfsproxy. Note this tutorial was written as a sort of sequel to the older Method #2 in this article, so if you used easy-rsa, it will require some additional configuration.
Remember to keep your bandwidth within Amazon’s free tier limits. The easiest way to do this is to right click on your instance in the AWS Console and click on the “Add/Edit Alarms” link. You can set your server to stop or even terminate after a few hours of inactivity. The free tier allows for 750 hours per month (which covers the whole month), so you shouldn’t need to do this. Those users past their initial free year of service or doing more with their server, however, can prevent unnecessary charges for unused server time.
Somewhere in this tutorial, something will probably go wrong for you. If you really want a VPN but aren’t willing to do your fair share of troubleshooting, it’s probably best to opt for a paid VPN service. They also allow you to channel your internet traffic through multiple geographic locations, whereas an EC2 instance is limited to just one. Check out our VPN reviews here!
Hardcoding DNS servers into your VPN
If you need to set specific DNS servers to use with your VPN, there are a couple of options.
To “push” the DNS server to the client, add this line to the server config. This will affect all of the devices that connect to your VPN (quotes included):
push "dhcp-option DNS 45.56.117.118"
Alternatively, you can set the DNS in an individual client config using:
dhcp-option DNS 45.56.117.118
In these examples, I used an OpenNIC public DNS server with anonymous logging located in the US. You can find a OpenNIC server in the country of your choice and filter by features like anonymous logging and DNSCrypt here.
Jon Watson (no relation, I think) contributed to this article.


I just love those “make your own tech” tutorials! Weird thing though: when I follow through with all the steps the Firefox built-in IP in the search results pane gives me a different result from tools like https://whatismyipaddress.com/ or https://satoristudio.net/my-ip/. Might it be something with the settings on step 13…
I believe statement below needs to add a “.” at the end of this command. I’m new to Linux so apologies if I’m wrong.
sudo cp -Rv /usr/share/easy-rsa/3.0.3/* .
I am having an issue with the 2nd method, after executing everything correctly, I’ve tried multiple times. This is what I’m getting
TCP: connect to [AF_INET]13.127.253.169:1194 failed, will try again in 5 seconds: Connection timed out (WSAETIMEDOUT)
Any help?
Hello there,
thank you for the tutorial, there is a lot of great effort I can tell.
I would like to ask you for a help, in the may update while following preciesly (at least I hope) your instructions when I paste the following commands:
sudo ./easyrsa init-pki
sudo ./easyrsa build-ca
The terminal displays a message that the “command not found” which is disabling me to move forwards.
Your help would be really appreciated on this, thank you.
Tomas
I’m guessing you’re either logged into the root user account, making the “sudo” part of the command redundant, or you’re in the wrong directory.
Hi Paul!
I have been waiting for this update for a while.. I followed your setup and successfully built a VPN last year, but I shut it down and terminated it . Now I am trying to build again. I have followed every step very carefully (several times) but get this error when trying to setup the certificate authority.
[ec2-user@ip-172-31-15-88 easy-rsa]$ sudo ./easy-rsa init-pki
sudo: ./easy-rsa: command not found
Ideas? Did I miss something?
make sure you’re in the /etc/openvpn/easy-rsa directory when you run those commands. Also ensure that if you use “sudo” in the command that you are not already logged in as the root user (should be ec2-user).
Amazing. You saved so much time for me and my colleagues.
Thanks
Hi Paul. This is a tremendously helpful guide and I used it in the past with the static encryption but just spun up a new server with the EasyRSA but with it. I’m able to get the server up and running and connect with OpenVPN client, but can’t get to any web sites and can’t ping 8.8.8.8. I don’t see any failures in the log file. Where should I start troubleshooting?
Thanks
Hi Andy,
It sounds like the server firewall might be blocking outbound connections to the internet. Run the POSTROUTING commands again and see if it will let you ping Google. Sometimes when an EC2 server gets restarted, those routing tables get reset.
I am not sure Amazon would like their virtual servers going to illegal sites; I’m sure it’s not a use case they would like. A paid VPN non-logging service is probably better since they’re intention is to hide your usage.
Setting up a Streisand server on AWS with Ansible is even easier than this tutorial.
Some yum installs require getting rpm installs on AMI??
[ec2-user@ip-172-31-29-189 ~]$ sudo yum install easy-rsa -y –enablerepo=epel
Loaded plugins: langpacks, priorities, update-motd
Error getting repository data for epel, repository not found
[ec2-user@ip-172-31-29-189 ~]$
Not sure… it works for me no problem
Thanks for the elaborate and helpful post. (Maybe you need to update this post. Not sure if this is for only EC2 i picked). I am still trying to get the openvpn installed.
ec2-user@ip-XXXXXX ~]$ sudo yum install -y openvpn
Loaded plugins: langpacks, priorities, update-motd
No package openvpn available.
Error: Nothing to do
if you picked a different distro, try “apt-get” instead of “yum”. If that doesn’t work, you may need to install a repo with OpenVPN in it or download directly. Remember to run an update on the whole server as well.
Well I have successfully managed to follow the tutorial including navigating the use of easy-rsa 3.0.3 and got the VPN up and running using the local open vpn client.
Now I would like to get the same service running on my DDWRT router using the built in Open VPN client, but I am failing. I have copy pasted into the Open VPN client in DDWRT the TLS auth key (pfs key), the CA certificate the unique client key and certificate, set all the settings to the same as in the text for the .ovpn file above and launched the client. On the Status Open VPN page, I see that is is trying to connect but the TLS Handshake fails after 60 seconds. I cannot see what I am doing wrong. The client certificate and key have no password. For info the DDWRT router is on a different subnet (192.168.2.x) to the PC that connected successfully (192.168.1.x) and this router has previously connected successfully to other commercial VPN providers using this integrated Open VPN client. I’m guessing somewhere along the line I have a setting issue or i’m missing some complementary commands in the client that are automatically handled in the installed client on the PC. Can anyone help?
Thanks
Euan
A great article. One discrepancy I have noted is the `server.sh` file does not run when the openvpn service starts. The openvpn service starts when the machine boots, but Matt Doyle’s premise that the “init script will run a .sh file for each .conf file” is not correct (at least not anymore at the time of writing this!). I need to manually run the file (`/etc/openvpn/server.sh`).
This posting is tremendously helpful, but please update to Easy-RSA 3.0. The official instructions are so terse, they are not terribly helpful. Thanks!
Hi,
This a great tutorial, thank you for posting. I am having some trouble with easy rsa 3.0. When I get to point 5 in the VPN – howto link you provided :
./easyrsa import-req /path/to/received.req UNIQUE_SHORT_FILE_NAME
I use the path /pki/reqs/request.req… and I keep getting the following error message
The input file does not appear to be a certificate request. Aborting import.
Offending file: /pki/reqs/request.req
What am I doing wrong?
We are working on the easyrsa 3.0 update. It’s coming soon!
Thank you guys and Good luck, really waiting for the update, hopefully, you will finish it soon.
the instructions have been updated for Easy RSA 3!
FYI: If you decide to follow the instructions for “Method #2: Static encryption”, you’ll have to choose “Custom TCP” instead of “Custom UDP” when you add the rule in “Edit Security Groups” for your EC2 instance as your recipe instructs you to configure the OpenVPN server using “proto tcp-server” in /etc/openvpn/openvpn.conf.
That was a head scratcher.
Hi,
getting this when i try to connect
Fri Feb 23 14:40:43 2018 TCP: connect to [AF_INET]18.218.52.217:1194 failed: Unknown error
Fri Feb 23 14:40:43 2018 SIGUSR1[connection failed(soft),init_instance] received, process restarting
how do fix this?
instead of
./easyrsa gen-req client nopass
try
sudo ./easyrsa gen-req client nopass
Since the error is unknown, it’s difficult to tell just from this what went wrong.
In the NAT tables there are two networks referenced:
10.4.0.1/2 and 10.8.0.0/24.
It looks like the 10.8.0.0 is the VPNCLIENT network, but what is the 10.4.0.1 and where did it come from?
How many client connection can be done simultaneously ?
As many as you create keys and certificates for, bandwidth pending.
how many connection can be done simultaneously ?
Can you update your tutorial to include easyrsa 3? some commands aren’t working
Yep I will look into updating this tutorial with easy-rsa 3. Hopefully this will help in the meantime: https://community.openvpn.net/openvpn/wiki/EasyRSA3-OpenVPN-Howto
Seems like 3.0 changed the api completely.
just run easy-rsa and check out help.
you have to do pki-init
gen-dh
gen-server
gen-client
something among those flags.
When I installed easy-rsa, it installed version 3.0.3 and can’t find the vars.bat in the same directory. Is there a workaround?
Hi Doug et al, I’ll look into updating this for easy-rsa version 3.0.3. For now, here’s a guide: https://community.openvpn.net/openvpn/wiki/EasyRSA3-OpenVPN-Howto
Hi Doug, I ran into the same problem as you. Here is the tutorial page for the 3.0.3 version of easy-rsa, It won’t be a simple one to one translation of the tutorial, but the same functionality is possible.
Ran into the same problem. Dan I think you meant to post a link but it’s not there. Anyone got some clarification on that? maybe a slight update to the tutorial
Same here 🙁
Ive come up with the same problem. doesnt create any of these
source ./vars
./clean-all
./build-ca
./build-key-server server
./build-dh 2048
Same problem here, did you find a solution?
same issue here
Useful and concise tutorial, Paul! Thank you!
Just an FYI, on this step:
sudo yum install easy-rsa -y –enablerepo=epel
sudo cp -via /usr/share/easy-rsa/2.0 CA
If the user is in their home directory, it creates the folder CA in the home directory, not in the 2.0 folder where it should be.
Other than that I followed it word for word and everything worked great! Thank you!
In my case the version of easy-rsa that was installed was 3.0.3 so the scripts differs than version 2.0. Tutorial is not working for me 🙁
Hello Paul!
Thanks for such a great tutorial! I am having a hard time to conclude it because I am a really newbie in Linux, but I am enjoying it because I am learning.
Well, I’d like ask for your help or from someone’s here. When I try to start the service on server it fails. I looked into the log and the message I receive is:
Options error: –ca fails with ‘etc/openvpn/keys/ca.crt’: No such file or direc$
Options error: Please correct these errors.
Use –help for more information.
The ca.crt file is in the keys directory, as show below:
[ec2-user@ip-XXX-XX-XX-XXX openvpn]$ ls -lhi keys
total 24K
394704 -rw-r–r– 1 root root 1.8K Dec 9 01:27 ca.crt
394705 -rw-r–r– 1 root root 424 Dec 9 01:27 dh2048.pem
394709 -rw——- 1 root root 636 Dec 9 01:27 pfs.key
394600 -rw-r–r– 1 root root 5.5K Dec 9 01:27 server.crt
394703 -rw——- 1 root root 1.7K Dec 9 01:27 server.key
Can anyone please help me to understand what is going on?
I’m having trouble getting this working on multiple machines. Once I go through the entire tutorial and get it working on one machine, then what do I have to do to get in working on another machine? Which steps do I have to implement? Which steps can I skip? Do I have to rename some things?
Windows10 and Android openvpn works ok,But Ubuntu 16.04 doesn’t work using openvpn –config, Thanks for help~
neat guide, but it fails for me at the “cd /usr/share/easy-rsa/2.0/CA” step.
The server helpfully informs me that the Directory doesn’t exist.
Any thoughts?
Hi David,
Apologies, there’s a typo in there. Just remove the “CA” from that path. Fixed in the tutorial now.
What is the purpose of the “sudo cp -via /usr/share/easy-rsa/2.0 CA” line above it, then? You’re telling the user to copy a bunch of files into a directory with a relative path, but not telling them what directory they should be in when running the command (so it could end up in a variety of locations, depending on what the user has done beforehand). And then this CA directory is never referenced again in any of the instructions.
Great tutorial. Very thorough and complete! I couldn’t get it to work using the static method unless I also added a custom TCP rule for port 1194 in the Security Group. I saw at least one other commenter found this necessary. Should this be of any concern? Thanks.
Paul,
I’m planning to attempt this tonight. I have a pfSense router that I plan to use as the client so that all of my home Internet traffic goes through the VPN so the ISP can’t collect and sell my data.
I also plan to setup my Android phone to do the same. It would be greatly helpful if you could clarify how to setup additional client keys.
Also, should the VPN server have some sort of firewall software installed on it to prevent hacking?
Hello Paul!
First of all great tutorial, it is really detailed and is incredibly easy to follow. I run into a problem when trying to connect through openvpn in my windows machine. I get some text on the console but it gets stuck and is unable to connect, I’m pasting the output if it helps.
Wed Oct 11 19:45:47 2017 OpenVPN 2.4.2 x86_64-w64-mingw32 [SSL (OpenSSL)] [LZO] [LZ4] [PKCS11] [AEAD] built on May 11 2017
Wed Oct 11 19:45:47 2017 Windows version 6.2 (Windows 8 or greater) 64bit
Wed Oct 11 19:45:47 2017 library versions: OpenSSL 1.0.2k 26 Jan 2017, LZO 2.10
Wed Oct 11 19:45:47 2017 MANAGEMENT: TCP Socket listening on [AF_INET]127.0.0.1:25342
Wed Oct 11 19:45:47 2017 Need hold release from management interface, waiting…
Wed Oct 11 19:45:47 2017 MANAGEMENT: Client connected from [AF_INET]127.0.0.1:25342
Wed Oct 11 19:45:47 2017 MANAGEMENT: CMD ‘state on’
Wed Oct 11 19:45:47 2017 MANAGEMENT: CMD ‘log all on’
Wed Oct 11 19:45:47 2017 MANAGEMENT: CMD ‘echo all on’
Wed Oct 11 19:45:47 2017 MANAGEMENT: CMD ‘hold off’
Wed Oct 11 19:45:47 2017 MANAGEMENT: CMD ‘hold release’
Wed Oct 11 19:45:47 2017 WARNING: –ns-cert-type is DEPRECATED. Use –remote-cert-tls instead.
Wed Oct 11 19:45:47 2017 Outgoing Control Channel Authentication: Using 512 bit message hash ‘SHA512’ for HMAC authentication
Wed Oct 11 19:45:47 2017 Incoming Control Channel Authentication: Using 512 bit message hash ‘SHA512’ for HMAC authentication
Wed Oct 11 19:45:47 2017 MANAGEMENT: >STATE:1507769147,RESOLVE,,,,,,
Wed Oct 11 19:45:47 2017 TCP/UDP: Preserving recently used remote address: [AF_INET]13.59.200.33:1194
Wed Oct 11 19:45:47 2017 Socket Buffers: R=[65536->65536] S=[65536->65536]
Wed Oct 11 19:45:47 2017 UDP link local: (not bound)
Wed Oct 11 19:45:47 2017 UDP link remote: [AF_INET]13.59.200.33:1194
Wed Oct 11 19:45:47 2017 MANAGEMENT: >STATE:1507769147,WAIT,,,,,,
Wed Oct 11 19:46:48 2017 TLS Error: TLS key negotiation failed to occur within 60 seconds (check your network connectivity)
Wed Oct 11 19:46:48 2017 TLS Error: TLS handshake failed
Wed Oct 11 19:46:48 2017 SIGUSR1[soft,tls-error] received, process restarting
Wed Oct 11 19:46:48 2017 MANAGEMENT: >STATE:1507769208,RECONNECTING,tls-error,,,,,
Wed Oct 11 19:46:48 2017 Restart pause, 5 second(s)
Any pointers as to what I’m missing would be deeply appreciated. Thanks!
Jorge.
Thanks for the super helpful article, Paul! I wanted to leave a few comments on things that tripped me up and/or would help others who run into the same issues.
1) When running `./build-key-server` and `./build-key`, either do not change the default common name or ensure they’re unique across all keys you create. I wasn’t sure what I was doing and I ended up overriding the defaults for both the server and client to have the common name; this resulted in an empty server.crt and obviously the openvpn server failed to start.
2) It’s in your server.conf, but I want to explicitly point out that the OpenVPN log is at /etc/openvpn/openvpn.log. This was crucial to realizing I had an empty server.crt.
3) `systemctl` is not available as part of the Amazon Linux AMI (at least not in the current version, amzn-ami-hvm-2017.09.0.20170930-x86_64-gp2). To ensure openvpn started up when the server rebooted (I don’t keep it on all the time) I used chkconfig and the pre-installed openvpn script: “sudo chkconfig openvpn on”
That command will start openvpn on boot but we still need to set up the port forwarding stuff. Instead of modifying that script (/etc/init.d/openvpn) or saving iptables, I created a bash script and put it in the openvpn directory on the server. That init script will run a .sh file for each .conf file, so since our conf is `server.conf` I put the following in `/etc/openvpn/server.sh`:
#!/bin/sh
echo 1 | sudo tee /proc/sys/net/ipv4/ip_forward
sudo iptables -t nat -A POSTROUTING -s 10.4.0.1/2 -o eth0 -j MASQUERADE
sudo iptables -t nat -A POSTROUTING -s 10.8.0.0/24 -o eth0 -j MASQUERADE
I did not need to change file permissions to make the file executable. After rebooting the server I was able to connect as usual and it worked just fine. For those without systemctl it would be worth mentioning the chkconfig route.
4) I use Tunnelblick on my Mac and OpenVPN connect on my phone(s). For simplicity I prefer to have to only move a single file to my phone instead of all the crt and key files (I do create different keys for each device, though). If anyone else is interested I figured it’s worth mentioning that you can combine all these into the single .ovpn file. Instead of each line specifying the crt or key file you can just add the certificate or key inline as follows:
Instead of `ca ca.crt` You can do:
—–BEGIN CERTIFICATE—–
copy and paste this whole block
including BEGIN and END
from ca.crt, which you can open
in any text editor
—–END CERTIFICATE—–
You can do this for ca, cert, key and tls-auth and then you’ve only got one file to put onto a thumb drive or something.
Whether the cert & keys are in one file or all the same directory as the .ovpn file, loading the configuration into Tunnelblick is as easy as double-clicking the .ovpn file (or dragging and dropping it over the Tunnelblick icon).
Thank you so much for this post! Been struggling getting the “easy” solution to work for over a day losing all my sanity until I came across this comment and realized I needed to do some iptables trickery.
To anyone struggling with the problem when the OpenVPN server does not forward requests, those 3 lines from step 3) solved it for me.
Hello,windows 10 can connect openvpn,But Ubuntu 16.04 openvpn –config ***
doesn’t work,thanks for help~
Hi Matt,
When creating the ‘server.crt’ it is blank.. I have tried the method you mentioned, but to no avail. Any ideas?
Thanks for the feedback Matt! I’ll work on incorporating your comments to improve the tutorial.
Amazing tutorial mate. Thank you, it saved me a lot of time ! 🙂
Dear Paul,
I think my IT knowledge is slightly above the average but there is no chance that I can do the above myself. Can you recommend who could set up the EC2 for me for a suitable fee of course?
Thanks!
Paul,
Using your push dhcp parameter in server.conf:
push “redirect-gateway def1 bypass-dhcp”
push “dhcp-option DNS 8.8.8.8”
push “dhcp-option DNS 8.8.4.4”
However, when we run a test at http://dnsleak.com we see a message:
Looks like your DNS might be leaking…
The IP address is reported as the openvpn server IP we configured. But the DNS IP and Hostname are not the ones defined in the server.conf file.
Is there additional configuration we should do?
Paul,
so sorry, I addressed you as “Patrick” in my initial comment. Bad
Patrick,
Did you update this excellent tutorial with instructions on how to issue additional keys for separate clients?
When I tried ./build-key client2 I got the following:
Please edit the vars script to reflect your configuration,
then source it with “source ./vars”.
Next, to start with a fresh PKI configuration and to delete any
previous certificates and keys, run “./clean-all”.
Finally, you can run this tool (pkitool) to build certificates/keys.
I am reading this how to:
https://openvpn.net/index.php/open-source/documentation/howto.html#pki
But found your instructions easier to following initially.
Sir, what is the procedure to use both user name as well as password during connection establishment ?
Sorry, you can cancel that question about missing client.crt and client.key.
Figured that out. My mistake – missed a line.
However, the “systemctl: command not found” problem persists.
Hi Yale,
Sorry about that, seems systemctl is not available in the Amazon Linux AMI. I’ll fix this later but for now check out Matt Doyle’s helpful comment.
Thanks for the detailed tutorial.
However, I ran into two problems:
Though I’m doing this on my AWS account exactly as in your screenshots, when doing: “sudo systemctl start openvpn@server.service” I get error: systemctl: command not found. I skipped this step for now, but would like to know how to perform this in case a server reboot problem should occur.
Secondly, and crucial, when getting to “for file in client.crt client.key ca.crt dh2048.pem pfs.key ca.key; do sudo chmod 777 $file; done”, the terminal tells me that the client.crt and client.key files are not there, and indeed they aren’t. I went through the tutorial again and again, but fail to see in which step these two files were supposed to be created? All other mentioned files are there.
Thanks for any clarifications.
Will this helps to create multiple VPN connections to a number of clients accessing my EC2 cloud instance? my OS is lunix if this has any impact?!
“Some other versions of Linux still use apt-get, so if yum doesn’t work for you, try this command instead”
This made my day! I think that before starting to set up something, you need to know the OS you are working on? Also, I suggest that you never do chmod 777 on a private key.
Glad to hear it! The chmod is just temporary so you can access the files from your PC. I wouldn’t suggest this for a business or professional, but for a first time home made VPN there’s relatively little risk if you switch back the permissions when you’re done. The alternative is to generate the key on your PC using the windows version of easyrsa, then moving those files onto your ec2 instance.
hello.. thanks for detailed tutorial!!
i was able to set up the vpn server, connect the client using windows and with my iphone too.
everything was working fine until i stopped the instance and started it again.
when i started, i used ‘sudo service openvpn start’ command and I can connect with my both clients, i got the ip, but dont have internet traffic and cant open google website for example.
any idea?
thanks in advance
Check to make sure your server IP address or domain name didn’t change. When you restart the server, I think you are assigned a new IP address. If it’s changed, you may need to make changes as appropriate in your server config, client config, and/or AWS security groups, so check all those. You can get around this by getting an elastic IP address, but it may cost you a bit more.
thanks for quick answer!!
actually i forgot to mention that i already had an elastic ip to this instance before the server restart… the ip remains the same!
i can connect to the vpn using the client, but can not open any website
any idea?
finally i found how to solve that… when you reboot your instance you should run the commands:
echo 1 | sudo tee /proc/sys/net/ipv4/ip_forward
sudo iptables -t nat -A POSTROUTING -s 10.4.0.1/2 -o eth0 -j MASQUERADE
sudo iptables -t nat -A POSTROUTING -s 10.8.0.0/24 -o eth0 -j MASQUERADE
sudo service openvpn start
i was trying to start the open vpn service and then the iptables commands
now it is working!! thanks one more time for step by step tutorial!!
it saved me tons of hours!
thanks for sharing!
Hi Paul,
You’ve pulled out a very detailed article here that will be helpful to your readers – it’s long (which I really understand) yet it was not boring. In the end, if implemented correctly, it will help any user to have their own custom VPN using Amazon. I remember myself documenting a related topic while I was in China for a one-year project. It was very hard to bypass the so-called Great Firewall of China. However, thanks to Amazon and with a little research I was able to build also a simple VPN to bypass Internet censorship using AWS and shadowsocks. Quite fulfilling. Again, more power!
Hi Paul,
This is exactly what I was looking for. I got it set up , but am getting
“Connection reset by peer (WSAECONNRESET) (code=10054)” error. Googling for that led me down a rabbit hole. Any suggestions on how to troubleshoot this ?
I tried :
– disabling ufw
– changing to TCP after changing the inbound rules
– a bunch of other stuff
at a dead end !
hello thank for your guide. It is very helpful. I have a problem, i follow the 2nd methode (Static encryption ), when i try to connect via openvpn gui(run as admin), this is the error code ”SIGUSR1[connection failed(soft),init_instance] received, process restarting”
Any idea? thank you
Hello i follow the Static encryption method. When i attempt to connect via openvpn gui there is this error message : SIGUSR1[connection failed(soft),init_instance] received, process restarting
Any idea?
Thank you so much
A few recommendations:
1.) Where the 10.8.0.0/24 subnet is referenced, it should be stated, explicitly, what this is for. After reading a few other notes that I found on the Web, I came to realize that this was for the “VPN network”, if you will, that is to be established between VPN clients and the new host. Not being clear on this, a person could easily place info for their client-local LAN in here, which would not be good, of course.
2.)
In the “Setting up PKI authentication with easy-rsa (recommended)” section, you don’t say what the current directory should be, when the yum-install and cp commands are run. The screen shot that you posted makes it look like that folder is “/bin”.
You mention “/usr/share/easy-rsa/2.0”, at one point, then “/usr/etc/easy-rsa/2.0”. Frustrating.
3.) On the command-calls for dropping a “1” into /proc/sys/net/ipv4/ip_forward and for inserting the iptables entries, steps need to be included for making these persist, beyond server reboots. I may have missed this, but I don’t think it was covered and it isn’t covered, either, in any of the other notes that I found out in the wild.
I rebooted my new OpenVPN server, to burn an image of it, then, many hours later, fell into a long troubleshooting session: not sure of what had happened, but just finding that I suddenly couldn’t reach hosts other than my server, after connecting to it. It took me a while to realize that it was the instance stop/start that had caused the “failure”.
Thanks for the feedback Anthony. I’ll look into incorporating your suggestions soon.
I followed every single instruction from begining until I hit sudo service openvpn start
command, openvpn simply does not start and returns [FAILED] response.
Can you help me on this issue?
Hi, when I write cd /usr/share/easy-rsa/2.0/CA says this: no such file or directory
what is the solution?
maybe you didn’t create the CA directory. try “cd /usr/share/easy-rsa/2.0/” then “ls” to see what directories and files are there.
This is pretty clearly the best writeup for this process that currently exists.
I am running into a bit of trouble with forwarding, though. My client is able to connect to the server, but is unable to pass through to any other host.
“`
>tail /etc/openvpn/openvpn.log
Sat Jul 15 17:56:47 2017 {SANITIZED_CLIENT_IP}:41154 TLS: Initial packet from [AF_INET]{SANITIZED_CLIENT_IP}:41154, sid=5f649215 d7cb2211
Sat Jul 15 17:56:48 2017 {SANITIZED_CLIENT_IP}:41154 VERIFY OK: depth=1, C=US, ST=CA, L=SanFrancisco, CN=Fort-Funston CA, name=EasyRSA, emailAddress=me@myhost.mydomain
Sat Jul 15 17:56:48 2017 {SANITIZED_CLIENT_IP}:41154 VERIFY OK: depth=0, C=US, ST=CA, L=SanFrancisco, O=Fort-Funston, OU=MyOrganizationalUnit, CN=client, name=EasyRSA, emailAddress=me@myhost.mydomain
Sat Jul 15 17:56:48 2017 {SANITIZED_CLIENT_IP}:41154 peer info: IV_GUI_VER=net.openvpn.connect.android_1.1.17-76
Sat Jul 15 17:56:48 2017 {SANITIZED_CLIENT_IP}:41154 peer info: IV_VER=3.0.12
Sat Jul 15 17:56:48 2017 {SANITIZED_CLIENT_IP}:41154 peer info: IV_PLAT=android
Sat Jul 15 17:56:48 2017 {SANITIZED_CLIENT_IP}:41154 peer info: IV_NCP=2
Sat Jul 15 17:56:48 2017 {SANITIZED_CLIENT_IP}:41154 peer info: IV_TCPNL=1
Sat Jul 15 17:56:48 2017 {SANITIZED_CLIENT_IP}:41154 peer info: IV_PROTO=2
Sat Jul 15 17:56:48 2017 {SANITIZED_CLIENT_IP}:41154 peer info: IV_LZO=1
Sat Jul 15 17:56:48 2017 {SANITIZED_CLIENT_IP}:41154 Control Channel: TLSv1.2, cipher TLSv1/SSLv3 ECDHE-RSA-AES256-GCM-SHA384, 2048 bit RSA
Sat Jul 15 17:56:48 2017 {SANITIZED_CLIENT_IP}:41154 [client] Peer Connection Initiated with [AF_INET]{SANITIZED_CLIENT_IP}:41154
Sat Jul 15 17:56:48 2017 client/{SANITIZED_CLIENT_IP}:41154 MULTI_sva: pool returned IPv4=10.8.0.6, IPv6=(Not enabled)
Sat Jul 15 17:56:48 2017 client/{SANITIZED_CLIENT_IP}:41154 MULTI: Learn: 10.8.0.6 -> client/{SANITIZED_CLIENT_IP}:41154
Sat Jul 15 17:56:48 2017 client/{SANITIZED_CLIENT_IP}:41154 MULTI: primary virtual IP for client/{SANITIZED_CLIENT_IP}:41154: 10.8.0.6
Sat Jul 15 17:56:48 2017 client/{SANITIZED_CLIENT_IP}:41154 PUSH: Received control message: ‘PUSH_REQUEST’
Sat Jul 15 17:56:48 2017 client/{SANITIZED_CLIENT_IP}:41154 SENT CONTROL [client]: ‘PUSH_REPLY,redirect-gateway def1 bypass-dhcp,dhcp-option DNS 8.8.8.8,dhcp-option DNS 8.8.4.4,route 10.8.0.1,topology net30,ping 10,ping-restart 120,ifconfig 10.8.0.6 10.8.0.5,peer-id 0,cipher AES-256-GCM’ (status=1)
Sat Jul 15 17:56:48 2017 client/{SANITIZED_CLIENT_IP}:41154 Data Channel: using negotiated cipher ‘AES-256-GCM’
Sat Jul 15 17:56:48 2017 client/{SANITIZED_CLIENT_IP}:41154 Data Channel Encrypt: Cipher ‘AES-256-GCM’ initialized with 256 bit key
Sat Jul 15 17:56:48 2017 client/{SANITIZED_CLIENT_IP}:41154 Data Channel Decrypt: Cipher ‘AES-256-GCM’ initialized with 256 bit key
“`
I suspect I need to modify something in `iptables`, but I’m really not sure what those commands you suggested we enter even do.
I had this problem as well, I could connect to the vpn server but not get to traffic beyond. I had to remove a default rule from my iptables FORWARD table
REJECT all — * * 0.0.0.0/0 0.0.0.0/0 reject-with icmp-host-prohibited
This was dropping all of the traffic on the floor before it could get NATed and routed out to the world. Once I deleted that rule, it worked like a charm
Try running these commands again:
echo 1 | sudo tee /proc/sys/net/ipv4/ip_forward
sudo iptables -t nat -A POSTROUTING -s 10.4.0.1/2 -o eth0 -j MASQUERADE
sudo iptables -t nat -A POSTROUTING -s 10.8.0.0/24 -o eth0 -j MASQUERADE
Very good tutorial, I was able to use it to get a simple server going. I just discovered that amazon is offering a simple VPS service called lightsail, a scaled back version of ec2. It’s only free for the 1st month, but $5.00 per month for their cheapest package, which includes 1tb of data. ec2 is free for the server but the cost per GB can add up quickly if you are using it as a vpn server. Cheers.
Hello, i try to connect, but I have this error.
the requested name is valid but does not have an ip address.
it could be that your EC2 instance changed IP addresses. check your EC2 dashboard and update your client config accordingly.
Hello, thank you very much for the guide, we are using it with no problems at all, just have one question, will it be possible to add a “dhcp pool” of address to auto-assign addresses ? We need like 6 or more concurrent users. Thank you
i’m not sure about a DHCP pool, but we are working on publishing a tutorial in the near future on how to set up easyrsa. That way you can assign certificates to multiple users instead of a single connection using the .ovpn key.
But Amazon AWS free tier has only 15GB of internet bandwidth right?
that’s correct, or about 750MB per day
Excellent tutorial, I was wondering and have always kind of wondered, could implementing a process like this prevent your ISP from throttling your data or seeing how much data is being used? It seems that technically you are using Amazon’s data and that it would be kind of blocked behind Amazon, with the ISP only seeing the original connection. Am I interpreting this correctly? If not, is there anything I could do to get a setup that achieves this? Thanks a ton!
so long as you route your DNS requests thorugh the VPN, your ISP can only see that traffic is being transmitted, but not its destination or contents. there’s no way to avoid the ISP seeing how much data you’re using, as you’re still using their pipes and data centers to get traffic to Amazon.
Hi, thanks for the tutorial
I have successfully completed your instructions, until http://www.whatsmyip.org/ returns the IP of my remote server.
But I do not know how to scan the remote server’s folders. I have opened all udp and ucp ports, but still “\\ public-remote-ip” returns me that windows can not access
Hi, thanks for the tutorial
I successfully completed the connection, but I do not know how to scan the remote server folders from windows.
“\\ ip-server” returns me that windows can not access the folder
Any idea what this is and how to fix it? Can’t find any good info on how to set the key direction.
Options error: Unknown key direction ‘Files\OpenVPN\config\ovpn.key’ — must be ‘0’ or ‘1’
Use –help for more information.
I’ve not seen that before. Tried just regenerating the key file?
Hi Paul,
I am following the steps exactly as you mentioned. openvpn service is running under amazon linux. However I am getting “Missing External PKI” error when I try to connect to it. I know this is due to the key has been generated. is there any steps that I am missing here?
Hi Paul
can i you this to mobile Clients?
if yes,
please help on that.
This might help: https://www.comparitech.com/blog/vpn-privacy/hide-openvpn-traffic-with-ssh-tunnel/ you can ignore the SSH parts if you want.
VPN is a bit slow, i tried switching to UDP rather than TCP which improved the speed but its still alot slower than my connection.
Any ideas?
Paul,
I am new to AWS and is trying to make below setup, Could you please let me know your view if it’s possible.
1. I have created Window Virtual Machine in AWS.
2. I have an server installed on AWS EC2 which need to fetch some data from my laptop(Client) via SSH.
3. As i am home user, is that a possibility that AWS Virtual Machine can ssh my home laptop. Which is connected to ISP router.
Is there a possibility to ssh my machine without having public IP.
Looking forward to hear from you. Thanks
Sagar
Thanks Paul,
However, I made the mistake of “stopping” the instance once I was done. When I came back the next day and started it again VPN would no longer work. Obviously, I need also to Putty into it and tell it to start OpenVPN. OpenVPN thinks it’s working, but no web pages would load on my browser, so apparently a few more of the setup commands are needed. Not a problem while I’m in the free period, but I’ll want to be able to stop it when I won’t be using it for long periods. Can you point to how to easily put these all in a script that runs whenever the instance is started?
Also, is this a case where we should be using “elastic IPs”? When I restarted the assigned IP address is different, so had to modify the settings in the openvpn config file.
Thanks much,
Jim
Yes the elastic IPs are helpful if you’re frequently starting/stopping. To make it work on startup, look into setting up OpenVPN Access Server. That will give you a web GUI to control things from and can be configured to run whenever the instance is running. A tutorial for this is in my queue but might be awhile before I get to it.
Great, thanks much.
Well done, Paul, thank you so much. Was able to get it up and running relatively easily even though I’m a novice at this. I did have to add an entry to the security group for custom TCP to port 1194, but that was it. Now I’ll have to dig into RSA so I can get it working on multiple devices.
Can you include instructions for configuring using UDP rather than TCP transport? Why? Because TCP encapsulated within TCP can have horrible interactions when the ecapsulated TCP suffers timeouts (see http://sites.inka.de/bigred/devel/tcp-tcp.html).
Thanks,
Eric
Ok here is the problem and solution:
http://unix.stackexchange.com/questions/292091/ubuntu-server-16-04-openvpn-seems-not-to-start-no-logs-get-written
Shorter version:
run this:
sudo systemctl start openvpn@[CONFIG FILENAME WITHOUT EXTENSION HERE].service
Now if we run above command with status instead of start we see status is:
Active (Running)
Instead of:
Active (Exited)
Because the actual openvpn.service in Ubuntu servers is just a dummy service!
The vpn connection should be able to establish even after instance reboot.
Thanks for sharing!
Thanks. This is the only article online that covers exactly what I need. But unfortunately it doesn’t work. It missed some command somewhere and anyone must have found a way to fix it but forget or didn’t find time to mention it somewhere on the internet.
So here’s the problem:
TCP: connect to [AF_INET]XX.XX.XX.XX:1194 failed, will try again in 5 seconds: Connection refused
I got UDP/TCP for 1194 from anywhere open on my aws ec2 security group open.
I checked the security group is assigned to the EC2 instance.
I can ssh to the server so server is up and running.
What I understood is that when we start the service on the server, there is no way to tell the service where to look for the conf file. I put random characters in the conf file and service was able to restart successfully! I even removed the conf file from the server and server was still able to restart successfully. Status says it is active and green.
I’m sure the port 1194 is open. Because if I remove rules on aws security group the error is connection timed out. If I add them the error is connection refused. So the rules work. There is no server on the port to listen to the input. There is no log file created with name server-tcp.log anywhere on storage of the server. It apparently ignores the config file. Any idea?
Thanks in advance.
Paul,
Great document. Just a couple things on feedback.
OpenVPN gives a warning about the cipher being too weak
Suggest including the line
cipher AES-256-CBC
Can you also include how to configure multiple certs so you can run VPN on 2 or more computers?
Best,
Hi Rob,
Multiple certs has been on our agenda for awhile now but haven’t had a chance to write up a tutorial yet. Noted about the cipher, thanks.
Best,
Paul
Hello paul,
Am very grateful for the time taken to put the write up together..
I followed the process as described but after the setup on my putty connect while the other things like browsers refused to connect…
What might be the cause of that please.
I have two Win10 x64 Pro desktops behind my ISP NATing router/firewall. According to google they both have the same IP. I’ve setup identical OpenVPN client configs on each. They both can establish a connection to an ec2 OpenVPN server configured per your instructions, but not simultaneously (the second one just hangs establishing the connection). I’ve looked through the OpenVPN server config but nothing’s jumping out at me. Do I need to config the server to listen on as many ports as I’ll have simultaneous client connections and then config each client to connect to one of those different ports each? Some other secret sauce?
Followed your year old recipe and I think it worked like a champ (the ec2 gui changed a bit but it was easy enough to figure out). I say I think because when I check https://www.iplocation.net/find-ip-address before and after, the after shows the EC2 IPv4 address. But if I type “What’s My IP” into Google before and after, it’s the same IPv6 address.
Is it working??? It doesn’t seem right that it should be the same IPv6 address
Hi Mark,
Unfortunately, IPv6 leaks are a common issue with OpenVPN on Windows 10 (not sure about other Windows versions). Windows sends out DNS requests on both IPv4 and IPv6 and uses whichever comes back faster to improve page load times. What most commercial VPNs do to get around this is disable IPv6 altogether and just use IPv4. You can do this in your network settings.
Best,
Paul
That did it. Thanks! (who needs HomeGroup, it’s very hit/miss anyway).
BTW, I’m running the OpenVPN GUI without Admin priv under up-to-date Win10 x64 Pro and Home and it works Just Fine. It’ll be interesting to see once the free year runs out how much it costs to keep it running. Does it cost anything for the ec2 instance to run idle/unused?
Thanks again for the walk-through.
If I leave an instance running but don’t use it, it usually adds a $5 or less onto my bill. I’m running a few other instances as well and haven’t looked at the exact breakdown for how much an idle one costs.
This process obfuscates internet activity from your ISP, but not from Amazon, correct?
Technically that’s correct but Amazon has pretty strict rules about accessing customer’s data. It wouldn’t be practical or beneficial for them to snoop on your EC2 instance.
Hi,
Before I invest time in this, one question. With Netflix’s aggressive VPN blocking, are you able to watch Netflix when using this VPN?
I’ve had mixed results. I think Netflix has banned a range of EC2 IPs but not all of them. Luckily, unless you have an elastic IP set up, you can just reboot the instance to get a new IP and try again. Make sure you change you config as necessary.
What is the security structure like once the VPN connection to my Linux instance on AWS is up? At home I’m “protected” by NAT and Firewall of my router. How does that work with this VPN solution ?
May I ask why not simple use the OpenVPN Access Server on the free tire?
It is free isnt it?
Yes, it’s just more work to set up. But if you want a web-based GUI, then go for it.
Thanks for this easy to follow guide. I’m able to setup the VPN and connect to it using my windows client. I require two more things:
1) How to access the OpenVPN admin interface via browser
2) How to connect using Linux Client
Thanks in advance
The admin interface is a separate installation called OpenVPN Access Server. It’s not included in this tutorial but I’ll look into a separate tutorial for that later. As for your Linux client, it should be more or less the same thing but with your Linux terminal instead of PuTTy. Make sure you allow your Linux device to connect in your AWS security groups.
vpn client unable to forward their port.
How can I solve this problem?
Port forwarding is probably best done in your router.
Great white paper. I have not installed the OpenVPN yet. I was wondering your vpn test did not prompt for username and password
No, because in this example I use the key file in lieu of a password+username.
how do I do this for linux.. I have a raspberry pi I want this for.
Can I make a Point to Site VPN with AWS that uses AWS managed VPN connection?
hi
how can i connect to it using my mobile ?
thank you
This is a tutorial for VPN over SSH but it includes instructions on how to connect with Android: https://www.comparitech.com/blog/vpn-privacy/hide-openvpn-traffic-with-ssh-tunnel/
Hi, thanks for the tutorial! I’ve been looking to get a VPN started because of the Snooper’s charter that came into play in the UK (which is something I heavily dislike) but paid vpns seem to have quite a bit of problems, running from sites blacklisting their ips to speed and privacy issues. As such, I want to ask how safe is it to use Amazon as a server provider considering it is a US company (5 eyes and whatnot)? Is it possible that Amazon could keep logs of what website I visit if I have a VPN set up with AWS? Alternatively, what VPNs would you recommend which have a good mix of privacy and speed and which aren’t blacklisted from tons of site?
Thanks
I suppose it’s always possible that Amazon could be logging activity but I highly doubt it. Unless you’ve included some mechanism that logs traffic on your VPN, then there won’t be anything other than some metadata in the server logs for them to see. You can even minimize this by lowering the verbosity in your server config.
As for what VPNs to use that aren’t blacklisted, NordVPN has been pretty reliable for me lately, and ExpressVPN is also good. You have to contact customer service to ask which server can unblock which sites.
Hey Paul! It seems that everything was fine until I tried to connect to the OpenVPN. Here’s the log:
Wed Nov 23 18:56:47 2016 Attempting to establish TCP connection with [AF_INET(myip):1194 [nonblock]
Wed Nov 23 18:56:57 2016 TCP: connect to [AF_INET](myip):1194 failed, will try again in 5 seconds: Connection timed out (WSAETIMEDOUT)
I even created a rule for the port on the firewall but it didn’t seem to work.
Double check your AWS security group and make sure your current IP/port is allowed.
Im facing the exact same issue. I’m running an unbutu instance tho, not Amazon Linux. Everything works and service is up, also the security group was checked several times. I even tried opening everything to anywhere.
Didn’t work. Any suggestion?
I can’t help you without seeing log files.
Hi,
I can connect to the client and my IP is the same as ec2, open vpn is connected, but I still can not get on to the sites that are blocked in my location i.e. China. I am wondering where did I go wrong?
Any thoughts?
Best,
Naman
Hi Paul,
first and foremost – thanks so much! Very mich appreciated.
I have a little problem though. I can connect to the server, but can’t connect from there to the outside world. I’m probably making an obvious mistake.
Any ideas?
Best,
Declan
——————————————————————-
2016-11-10 23:04:42 /sbin/route add -net 54.81.225.179 192.168.0.1 255.255.255.255
add net 54.81.225.179: gateway 192.168.0.1
2016-11-10 23:04:42 /sbin/route add -net 0.0.0.0 10.4.0.1 128.0.0.0
add net 0.0.0.0: gateway 10.4.0.1
2016-11-10 23:04:42 /sbin/route add -net 128.0.0.0 10.4.0.1 128.0.0.0
add net 128.0.0.0: gateway 10.4.0.1
2016-11-10 23:04:42 Attempting to establish TCP connection with [AF_INET]54.81.225.179:1194 [nonblock]
2016-11-10 23:04:42 MANAGEMENT: >STATE:1478815482,TCP_CONNECT,,,
2016-11-10 23:04:43 TCP connection established with [AF_INET]54.81.225.179:1194
2016-11-10 23:04:43 TCPv4_CLIENT link local: [undef]
2016-11-10 23:04:43 TCPv4_CLIENT link remote: [AF_INET]54.81.225.179:1194
2016-11-10 23:04:53 Peer Connection Initiated with [AF_INET]54.81.225.179:1194
2016-11-10 23:04:54 *Tunnelblick: No ‘connected.sh’ script to execute
2016-11-10 23:04:54 Initialization Sequence Completed
2016-11-10 23:04:54 MANAGEMENT: >STATE:1478815494,CONNECTED,SUCCESS,10.4.0.2,54.81.225.179
2016-11-10 23:05:34 *Tunnelblick: After 30.0 seconds, gave up trying to fetch IP address information using the ipInfo host’s name after connecting.
——————————————————————-
Judging from your log it looks like a TunnelBlick problem. Unfortunately I don’t have a Mac to test this on myself.
Great post. Have you tried to create a layer 3 site to site tunnel using OpenVPN. I have using the openvpn access server web portal. However, where the server can talk(ping) to the client and vice versa, I can’t figure out how the server can talk to any other computers on the clients subnet. You don’t happen to know do you? Or at least the AWS side? Another tutorial perhaps. OpenVPNSite to Site with AWS tutorial?
No, I haven’t done any site to site tunneling. We’ll make a note of it for future tutorials.
How can I change cipher to AES-256
https://docs.openvpn.net/under-the-hood/change-encryption-cipher-in-access-server/
Hi Paul,
Could you please provide the link or input how to login to the openvpn client using with users name and password more then 2 users.
Thanks,
bheema.
Hi Bheema,
You could try using easyrsa to configure multiple clients, but it’s pretty complicated in my experience. You might consider using SoftEther instead of OpenVPN. I’ve just published a tutorial on how to do that here: https://www.comparitech.com/blog/vpn-privacy/how-to-set-up-your-own-free-vpn-with-softether-and-amazon-web-services/
Best,
Paul
How can I hardcode DNS servers into the server-side configuration? Thanks.
Hi Jeff,
Haven’t tested this myself but I think you can add this to your server config to “push” the DNS server to the client:
push "dhcp-option DNS 10.11.12.13"Alternatively, you can set them in the client config using:
dhcp-option DNS 10.11.12.13Best,
Paul
Hi, I tried this and I used 2 different FTP clients (FileZilla and WinSCP)
When i try to connect i get this
https://gyazo.com/04bbf817a7bd34ba9a041f2b4c079369
I don’t know how to fix this.
Under settings on FileZilla there is a place to put the putty ssh key. Once you import that you can login with the username ec2-user and just make sure your port is 22
Hi Paul,
It seems that I encountered the same warining as Jackson Wolf’s, why our connection is failure? Can you help fix?
Looking forward to your response.
Cheers,
Jesse
Thank you. I have been looking around for a good tutorial, yours is the one.
Hi,
I followed the tutorial step by step but did not worked!!
is there a way to discover the reason using the openvpn output?
Hi Belhassen,
There is a client log and a server log for OpenVPN. You should be able to diagnose the problem using one or the other or both.
Best,
Paul
Great tutorial!!! Thank you, Paul. After following OpenVPN instructions above, my public IP address is now my EC2’s IP address. I’m primarily using this when I am traveling abroad. When I go to http://www.whatismyipaddress.com, the EC2’s IP address is indicated but it shows my current foreign location. Any settings I can tweak to have the IP detected as within the US? My EC2 instance is in “N. California”.
Hi Alonzo,
It could be a DNS leak, which this tutorial does not account for. Try changing to Google DNS or OpenNIC DNS servers and see if that helps.
Excellent article Paul. Do you know if it is possible to have username and password authentication from the client in static key mode? I am trying to convert your config to add username/password as a secondary check.
-Steve
I’m not positive but OpenRSA might support this. In any case it will boost your security and allow you to connect multiple simultaneous devices.
Great tutorial, thanks.
I managed to get connected (green icon) but still get my own WAN ip when i check against WhatsMyIP. Any thoughts where i could be going wrong?
Thanks
Could be a DNS leak. Try setting your computer to a public DNS server in the US like Google or OpenNIC.
I got everything setup (including using openvpn to tunnel everything on my pc) and it works good. Thank you for this tutorial. It’s one of the best on the Web, very good for beginners too.
Now, I was wondering. Is it possible to tunnel my whole router traffic, including wifi?
So that when I connect to WiFi it also is “tunneled” connection using static ip from amazon?
Hi Haris,
I would imagine there is a way to do it, though I haven’t tried myself and it really depends on your router’s firmware. Alternatively, most laptops support virtual routers, where you would just connect to your VPN, turn on the virtual router, and connect whatever other devices you have to the wifi signal coming from your laptop. You can find instructions on how to do that here: https://www.comparitech.com/blog/vpn-privacy/how-to-stream-us-netflix-on-chromecast-roku-amazon-fire-or-apple-tv/
Best,
Paul
Any chance you might consider doing a parallel article for setting up in Azure? I have come very close, but some of the networking defaults on an Azure Linux VM seem to be different that Amazon and I’m not getting the packets forwarded from Azure to the destination site.
Hi Ken,
We’ll look into an Azure VPN setup tutorial but we’ve got quite a backlog of articles to get to so I don’t want to promise anything.
Let us know if you figure it out!
Best,
Paul
I’m working within the free tier of AWS with a t2.micro instance. When I attempt to install OpenVPN, I get the following:
sudo yum install -y openvpn
Loaded plugins: amazon-id, rhui-lb, search-disabled-repos
rhui-REGION-client-config-server-7 | 2.9 kB 00:00
rhui-REGION-rhel-server-releases | 3.5 kB 00:00
rhui-REGION-rhel-server-rh-common | 3.8 kB 00:00
(1/7): rhui-REGION-client-config-server-7/x86_64/primary_d | 5.5 kB 00:00
(2/7): rhui-REGION-rhel-server-releases/7Server/x86_64/gro | 699 kB 00:00
(3/7): rhui-REGION-rhel-server-rh-common/7Server/x86_64/gr | 104 B 00:00
(4/7): rhui-REGION-rhel-server-rh-common/7Server/x86_64/pr | 110 kB 00:00
(5/7): rhui-REGION-rhel-server-rh-common/7Server/x86_64/up | 29 kB 00:00
(6/7): rhui-REGION-rhel-server-releases/7Server/x86_64/pri | 26 MB 00:00
(7/7): rhui-REGION-rhel-server-releases/7Server/x86_64/upd | 1.4 MB 00:00
No package openvpn available.
Error: Nothing to do
It looks like the installer does not exist. What am I missing, or is OpenVPN not available on the free tier?
problem resolved,
I succeded to setup the vpn using ubuntu 16 by opening the TCP port as following:
sudo ufw allow 1194/tcp
sudo ufw allow OpenSSH
sudo ufw disable
sudo ufw enable
I found that using openvpn in this way, while having IPv6 enabled on your local client, will leak lots of traffic locally over ipv6.
to solve this i added these lines to my client config:
tun-ipv6
route-ipv6 2000::/3
ifconfig-ipv6 2001:db8:0:123::2 2001:db8:0:123::1
I still have to solve how to forward ipv6 traffic on the server side.
But it does solve the ipv6 data leakage, basically by just dumping all ipv6 traffic in a black hole.
I think that `/2` in `10.4.0.1/2` is a typo, you probably meant to type `/24`.
I agree. On the 10. subnet (which is class A) the minimum mask is /8 not /2.
Thanks for the tutorial however I have a Mac so what do I do once I get to SSH tunneling? Also is there a tutorial to configure the client to use DNS on my AWS instance to prevent lookups on my client environment?
Hi Justin,
We don’t have tutorials for Mac or setting up DNS with OpenVPN at this time. Once you get to SSH tunneling, you can choose to use a simple port forward+SOCKS proxy or set up the full VPN. Because Macs have a proper Unix terminal, you should be able to connect directly to the server through that instead of something like PuTTy.
Best,
Paul
I added this to the server config:
push “dhcp-option DNS 172.31.0.2”
where 172.31.0.2 is the address i found in /etc/resolv.conf.
I am not sure if that is the same for all ec2 instances.
Maybe there is a way to tell openvpn to use whatever address it finds in /etc/resolv.conf?
Greate work,
but i see there is DNS configuration is missing or not include ,
so where we can add DNS for client DHCP
thank you,
Hi Khaled,
We have a brief tutorial on setting up a smart DNS client here: https://www.comparitech.com/blog/vpn-privacy/netflix-vpn-unblock-proxy-error/
We do not yet have a tutorial for making your own smart DNS server.
Best,
Paul
Paul,
Great write up, thank!
I got it working with a windows client. Can you point me in the direction of getting it to work with the linux client?
Hi Will,
We’re working on a tutorial that should be finished in the next week or two for Linux users. If you need something before then, Google is your best friend. You could also try the OpenVPN forums.
Best,
Paul
Wow! Used this to set up a single-user VPN server.
Just spent a couple days finagling with openrsa, using a couple websites, and was able to install it and start making keys, but cannot figure out how to tie that in to openVPN for multiple users.
Any chance of a write-up or other help for us noobs looking to set up VPN servers for multiple (home, fair use, single-family) clients?
Hi Bartholomew,
I’ll look into writing an openrsa tutorial, but I’ve got a queue of other articles to get to first. In the meantime, I would recommend checking out the official OpenVPN forums for tips and setup help.
Best,
Paul
Hi,
I am behind a fortiguard firewall, could this be the reason I am getting:
TCP: connect to [AF_INET] (my ip) failed, will try again in 5 seconds: Connection timed out (WSAETIMEDOUT)
while trying to connect through OpenVPN?
Let me know,
Thanks
Hi Ben,
Yes, that could be the reason. You might try a different port and see if that helps.
Best,
Paul
Hi Paul,
Thanks for the quick reaply!
I changed the port to 443, and now I get this:
TCP connection established with [AF_INET](my ip):443
TCPv4_CLIENT link local: [undef]
TCPv4_CLIENT link remote: [AF_INET](my ip):443
read TCPv4_CLIENT: Connection timed out (WSAETIMEDOUT) (code=10060)
Connection reset, restarting [-1]
SIGUSR1[soft,connection-reset] received, process restarting
Any suggestions?
Thanks
Hey Ben,
443 is often reserved for HTTPS web traffic, so it might not work with OpenVPN. Try 119, 563, 1080, 1194, and 8080. You may need to install a special program to see what TCP ports are open in the firewall if those don’t work.
Best,
Paul
I spoke too soon. Shortly after it connected, it disconnected again. I could only get it to work by restarting the OpenVPN server on the AWS instance. Here are the logs. Any ideas?
TCP: connect to [AF_INET]:8080 failed, will try again in 5 seconds: Connection timed out (WSAETIMEDOUT)
TCP connection established with [AF_INET]:8080
TCPv4_CLIENT link local: [undef]
TCPv4_CLIENT link remote: [AF_INET]:8080
Peer Connection Initiated with [AF_INET]:8080
Initialization Sequence Completed
write TCPv4_CLIENT: Connection reset by peer (WSAECONNRESET) (code=10054)
read TCPv4_CLIENT: Connection timed out (WSAETIMEDOUT) (code=10060)
Connection reset, restarting [-1]
SIGUSR1[soft,connection-reset] received, process restarting
WARNING: INSECURE cipher with block size less than 128 bit (64 bit). This allows attacks like SWEET32. Mitigate by using a –cipher with a larger block size (e.g. AES-256-CBC).
WARNING: INSECURE cipher with block size less than 128 bit (64 bit). This allows attacks like SWEET32. Mitigate by using a –cipher with a larger block size (e.g. AES-256-CBC).
do_ifconfig, tt->ipv6=0, tt->did_ifconfig_ipv6_setup=0
open_tun, tt->ipv6=0
TAP-WIN32 device [Local Area Connection 14] opened: \\.\Global\{F17B3899-247A-4916-BF49-E2BA19FEDC7B}.tap
Notified TAP-Windows driver to set a DHCP IP/netmask of 10.4.0.2/255.255.255.252 on interface {F17B3899-247A-4916-BF49-E2BA19FEDC7B} [DHCP-serv: 10.4.0.1, lease-time: 31536000]
Successful ARP Flush on interface [105] {F17B3899-247A-4916-BF49-E2BA19FEDC7B}
Attempting to establish TCP connection with [AF_INET]:8080 [nonblock]
TCP: connect to [AF_INET]:8080 failed, will try again in 5 seconds: Connection timed out (WSAETIMEDOUT)
TCP: connect to [AF_INET]:8080 failed, will try again in 5 seconds: Connection timed out (WSAETIMEDOUT)
It’s difficult to say without seeing the server logs. Since it was working and then not working, it might be that your computer was assigned a new IP address which isn’t allowed on the AWS security groups. You can change your AWS security settings to allow all traffic on whatever port you want from any IP to avoid this.
Hi Paul,
Thank you SO much for this wonderful and delightful tutorial. It was so easy to follow.
At first, the OpenVPN client wouldn’t connect on port 1194. I decided to change it to 8080 and that did the trick.
Thanks again!
Hi Paul,
Thanks for the replies!
I tried different ports, none work.
I realized that the port on the server aren’t accessible. I used http://www.yougetsignal.com/tools/open-ports/ to check if the ports are reachable, but the only open port is 22. How can I port forward another port?
Thanks a lot
Well, you could try port 22 but it probably won’t be very fast as it’s usually just for SSH to a server. Without being able to control the firewall, I’m not sure what else to suggest. You could try a UDP setup, which would give you access to more ports, but that will require a different configuration and I’m not sure if it would even solve your problem.
Also, make sure the necessary ports are open on your EC2 instance. You can change them using iptables from the command line or under Security Groups on the AWS Dashboard.
Great article, everything worked smoothly, introduced to WinSCP too!, thanks for posting
Nice tutorial. However, when I attempt to connect to VPN, OpenVPN shows “TCP: Connect to [AF_INET](MY EC2 IP ADDRESS) failed.
What should I do to deal with it?
Hi Vincent,
That’s a pretty vague error, so I can’t diagnose it without more details. Find the server log and see if it gives you any more details. It should either be in the same directory as the config file as server-tcp.log or in /var/log/syslog or /var/log/openvpn.log
Best,
Paul
How can i make a config file for other devices. for ex. iphone , android, mac.
Hi Anas,
You can just import the same config file that you use on your PC, along with the associated key file, to whatever OpenVPN client you are using on those devices. Make sure to allow the IP addresses for those devices through the firewall using AWS security groups or iptables. However, if you want to connect multiple devices at the same time, you’ll need to create certificates for each, which gets more complicated. I don’t have a tutorial for that yet, but you can look into easy-rsa for generating these certificates.
Best,
Paul
I’m running into an issue where OpenVPN isn’t giving my workstation a DNS address. I followed the guide and can’t see if I missed anything. Manually set the adapter to Google Dns and it works. Any ideas?
Hi Quinn,
It’s hard to tell without seeing your config and log files. Are you able to connect to the internet through the VPN with Google DNS?
-Paul
Paul,
Thanks for your guide. Unfortunately, it seems like my ISP blocking everything except traffic via 80/443 ports. Is there any way to overcome this limitation? Even if I set up source port 80 or 8080 in Putty it does not allow me to connect (timed out).
Thanks.
Hi Mike,
Have you check the security groups on AWS to make sure traffic through those ports are open?
-Paul
Hey Paul,
Thanks for your help. Actually, I’ve tested my setup using mobile internet from my phone – everything was working smoothly (if I tried to connect on 8080 port), but didn’t work with my regular ISP. So, I assumed that 8080 port is also blocked or filtered. However, OpenVPN refused to connect on 80/443 (I think these ports accept only specific traffic). So, do you have any idea how deal with this issue?
PS: I could connect my work laptop to the corporate network using Cisco Any.. vie the same wifi, which I use for my personal laptop. I tried to use port 4500 (UDP, usually used by Cisco) in my OpenVPN setup but it did not play well.
Hey Mike,
Try port 1080!
Best,
Paul
Bingo!
I triple-checked that firewalls weren’t blocking communication on port 1194 on either end and was confused why OpenVPN was stuck at “connecting”…until Paul’s comment.
I added UDP 1194 to the security group for my instance, and it connected with no problem. Thanks Paul.
Very useful! Thank you!
Hi Paul, great tut.. Out of curiosity I’m looking to have amazon act as a backup VPN service in the event our corp connection dies. Using your defined method is it possible to allow multiple users to connect to the new VPN service and from said service connect to our various VPC’s? on amazon?
Hi Austin,
Yes, it is possible, but ideally you would use tls-auth instead of the pre-shared private key (ovpn.key in this tutorial) for multiple simultaneous users. You’ll need to generate different authentication credentials for each simultaneous user and make sure the appropriate ports are opened up so they can connect from their respective IP addresses. You can look into installing easy-rsa to generate TLS certificates.
Best,
Paul
I followed the directions and was able to VPN to my AWS server. What I would like to do now is create an ssh tunnel from AWS server to a linux server at my home. I put a hole in the firewall and can create a tunnel, however I can’t seem to pass RDP traffic accross that. i created tunnel like this “ssh -N -f -L3389:localhost:3389 “. when i try to run “telnet localhost 3389” i get this error on the remote computer “error: connect_to localhost port 3389: failed.” On the server in my home i ran this rule “firewall-cmd –add-forward-port=port=3389:proto=tcp:toport=3389:toaddr=192.168.1.225”. however the trafic seems to die at the end of the tunnel.
Hi Jim:
We actually have a separate tutorial just for that: https://www.comparitech.com/blog/vpn-privacy/hide-openvpn-traffic-with-ssh-tunnel/
As far as the ports go, you probably need to poke holes in the server firewall using either iptables or the AWS Dashboard security groups.
Best,
Paul
Hi Thanks for the guide.
I have successfully connected to my EC2, however there is no connection coming in.
I tried both the SSH tunnel and openVPN both yield the same result.
Any idea what I am missing?
Hi Shin,
It’s hard to tell without any server logs or config files to look at. Did you open the right ports in your AWS security groups?
Best,
Paul
Is ok, I figured that out 😀
Thank you so much .. it was helpful .
but as you the internet speed within the server is about 750 Mbps !
how can i use that high speed to download files to my pc !
tnx in advance
Hi alpionscop,
A VPN doesn’t change the maximum download speed allocated by your ISP, which is probably much less than 750 Mbps. On top of that, the encryption and re-routing of internet traffic that takes place with a VPN will slow your download speed down, usually by about 10 percent.
-Paul
Paul, im getting very slow speed through the VPN.
I tried switching to UDP to see if that helps, it did but only for a short while. Seems to be an odd issue where it speeds up and slows down.
I disconnected the VPN and did a speed test, which was working fine.
Any ideas?
This a great tutorial, thanks! The only thing I’m stuck on is trying to get the VPN service to start automatically every time I restart my EC2 instance. I’d like it to run without having to login through SSH and manually start the openvpn service. Any suggestions?
sudo chkconfig –levels 3 openvpn on
I found this here: https://linuxconfig.org/how-to-check-a-current-runlevel-of-your-linux-system
that is the wrong link, i mean this one: http://konradpodgorski.com/blog/2011/12/22/services-autostart-on-amazon-ec2/
Hi Dan,
Glad the article was helpful. This link might help you: http://ubuntuforums.org/showthread.php?t=1609579
Thanks for this extremely helpful article. I followed the instructions to the letter and it worked perfectly!
Do you know how to make the OpenVPN client configuration file work with an Asus Router (I have an RT-AC87U)? I want to route all traffic in my home through the VPN server.
I have basic technical knowledge, and I know how to navigate the Asus interface, but I’m not sure how to use the config file to “point” to the opvn.key file that I uploaded to the the router.
Hi Chris,
I’m glad the article was helpful. I’m not sure how to help you with your router, though, as I don’t have a similar one on hand. If you know what type of firmware your router uses–DD-WRT, Tomato, etc–then that should point in the right direction with a Google search.
-Paul
proto tcp-client
remote
port 1194
dev tun
secret “C:\\Program Files\\OpenVPN\\config\\ovpn.key”
redirect-gateway def1
ifconfig 10.4.0.2 10.4.0.1
daemon
The client config is wrong, you can’t run daemon on Windows.
Thanks Kevin, made the correction.
Hello Paul, you know if we can get a pool of addresses to assign on the server side? Thank you
Well I definitely don’t like the idea of having to watch my data usage on my PC like I do on my mobile… but… I suppose it might be worth it protecting your online privacy, and it’s awesome that getting a free VPN is even possible at all! It looks pretty complicated but this guide should make it pretty easy, even for those of us that aren’t so tech savvy.