
There are a variety of privacy-focused operating systems available. Most of them are Linux-based and, much like Linux itself, it can be hard to figure out the differences between such a wide variety of options. In general, there are two main types of security/privacy operating systems: those that focus on providing anonymity and those that contain penetration tools for computer research. This article focuses on the privacy aspect and will explore three main ways of achieving this: two that use virtualization to create isolation, and the old tried-and-true method of using Live CDs.
A Live CD is a bootable CD (or USB drive) that you stick into a computer before booting up. Live CDs do not install anything on the host system and it leaves no documents or other traces behind when it is shut down. This ensures that there is no way for any malware or tracking software to survive multiple sessions. We will use the TAILS Live CD in this article.
For virtualization, we will be looking at Qubes OS and Whonix. Qubes OS creates a series of increasingly trusted virtual machines so that activities taking place in an untrusted virtual machine cannot affect applications in others. Whonix has a two-part system whereby you perform all your work in a virtual machine workstation. It routes all of your network traffic through the other virtual machine gateway which connects to the Tor network.
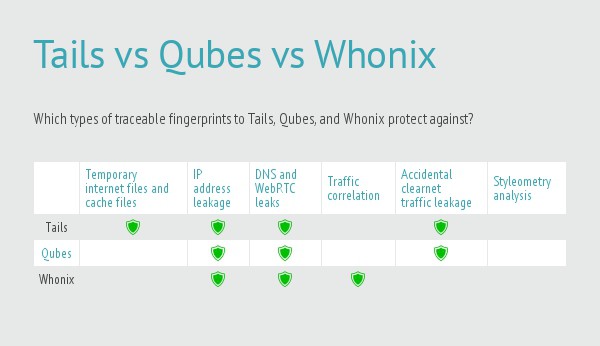
All three methods have their pros and cons.
Qubes OS – A reasonably secure operating system
Qubes OS is best described as a Xen distribution running virtual Linux domains. Xen is a very stable and mature bare-metal
type 1 hypervisor. This type of virtualization is analogous to what you may be picturing when using a product like VirtualBox with one important difference. A type 1 hypervisor has has no operating system running below
it which can be compromised. Xen is installed on the bare metal
and can then create and manage virtual machines.
This architecture allows Qubes to create separate virtual machines (domains
, in Xen parlance) in which to run applications. This ensures that risky applications can’t affect trusted applications, or even write to the underlying file system. This degree of separation doesn’t provide much anonymity in itself, but it does provide a significant degree of protection from malware spread. If you end up being infected with malware from a bad website, or by falling prey to an email phishing scam, it would be hard for that malware to spread outside of the domain it is in.
Qubes calls these Xen domains qubes. It creates a number of qubes in which to assign application instances. For example, surfing miscellaneous websites that you have no reason to trust is probably best done in the untrusted qube. Work related activities on trusted websites and applications may be done in the trusted zone. The point being that each qube only has the potential to affect applications in the same qube.
To make it easy to keep the qubes straight as you use them, each window has an “unforgeable”
coloured window border that indicates the security level of each qube. The Qubes team indicates that the window borders are unforgeable because they are constructed at the Xen domain zero (dom0)
level, which is the privileged domain Xen starts at boot time, and it manages all the other domains, or qubes in this case. The qubes are unable to interact with dom0 and qubes are unprivileged
meaning they cannot access low level system functions themselves.

The window border coloring provides a fairly instant way to see the trust level of each window. In this screenshot we can see red (untrusted), green (trusted) and yellow (somewhere in the middle) window borders. It’s also easy to see that the password prompt is from an application in the trusted (green) domain even though it happens to be overlaid on an untrusted (red) application. A very common phishing technique is to use a website to create a very realistic login box for some service and attempt to get people to enter their credentials. If that were the case here, the password box would have a red border which would be your signal that something risky may be happening.

An excellent way to tack a good anonymity layer onto the already robust security model is to use Whonix, discussed later, with Qubes. Because Qubes OS runs each application in a separate qube, the Whonix gateway and workstation will run in separate qubes. This further abstracts them from each other. If the Whonix gateway or workstation are run in their own qube and are somehow compromised, they would be unable to access any other application on the computer. There are instructions here on how to create the necessary Qubes OS templates for Whonix.
QubesOS pros
- Application separation through the use of sandboxed virtual machines ensures that an exploited app, or malicious javascript, can’t be passed to other applications or to the host operating system.
- The use of Whonix within QubesOS provides a further level of separation from the internet by forcing all your internet traffic through the Whonix Tor gateway
QubesOS cons
- Qubes OS is difficult to test because it does not perform well, or at all, in a virtual machine.
- There is an unsupported Live CD on the download page. It may or may not work for your system. And, since it is unsupported, it doesn’t really fulfill the job of a Live CD by allowing you to use it to gain confidence as to how a full installation will work. Therefore, you’re pretty much stuck with an all-or-nothing install of Qubes onto your machine to see how it fares.
Whonix – Anonymity in two parts
Whonix is designed specifically to provide anonymity while using the internet. It consists of two virtual machines, the gateway and the workstation. The workstation can only talk to the gateway and the gateway connects to the internet via Tor. Both are VirtualBox virtual machine appliances, so you can run it on any operating system that runs VirtualBox.
The Whonix workstation and gateway are configured to use a private network on your host computer. The workstation routes all of its traffic to the gateway, which uses the Tor network to access the internet. All network activity performed on the workstation is done through Tor.
The host machine does not participate in the Whonix private network and therefore continues to use its normal internet connection.

In addition to simply proxying all workstation requests through Tor, the Whonix gateway also protects against being identified by using Tor circuits for different applications. The gateway implements Stream Isolation to ensure that different applications on the workstation take different paths through Tor. While this is configured by default, you can learn more about Tor isolation on the Whonix wiki.
Download the two appliances from the Whonix website here, and then import them one-by-one into VirtualBox.
Select File -> Import Appliance:

VirtualBox will take a few minutes to read the appliance and then display its settings. Click the Import button to finalize it, and then click the Start button to launch the gateway virtual machine.

Whonix Gateway
The gateway can be run from the command line. If your system has less than 2GB RAM, it may be painful to run two full-blown desktops, so you can opt to run the gateway headless
. I will use the desktop for both the workstation and the gateway for this article as it is easier to demonstrate the concepts.
The first run wizard displays two screens full of warnings about how Whonix should not be relied upon to provide anonymity:
Whonix is experimental software. Do not rely on it for strong anonymity.
That’s a little disconcerting because the main page of the Whonix website specifically states it provides fail-safe
anonymity:
It makes online anonymity possible via fail-safe, automatic, and desktop-wide use of the Tor network.
I think the underlying message here is that there are many ways in which you can betray your identify that have nothing to do with technical safeguards.
The next step is to configure how the gateway should connect to the Tor network. The options here mimic the normal Tor setup options regarding bridges and proxies. When you hover over any of these options, Whonix will display the changes that are needed in your torrc file to achieve that change. It will not make any changes automatically for you.

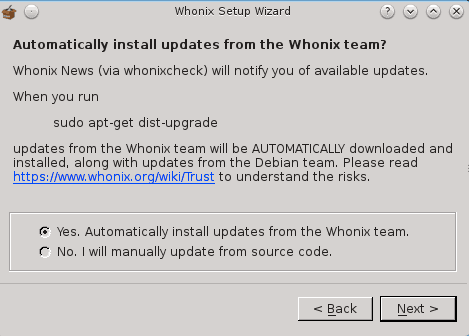
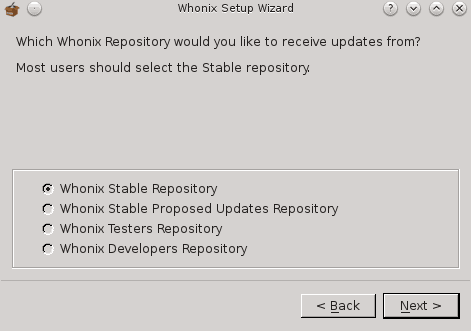
The next step is to configure how you’d like updates to be done.
And finally, an admonishment that this is the Whonix gateway and should not be used as the workstation.

Whonix Workstation
Now that your Whonix gateway is installed and connected to Tor, it’s time to launch the workstation. Import the workstation virtual machine as you did the gateway and boot it. The same Terms and Conditions doom-and-gloom are displayed. You can then configure your update preferences.
Let the first update complete and the workstation is ready to use:

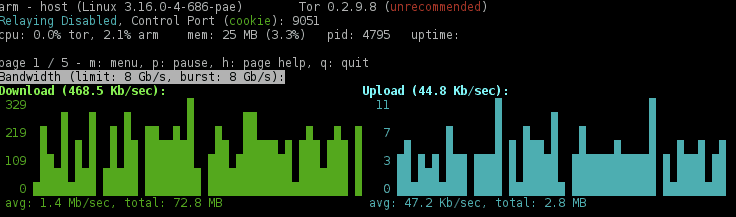
If you want to see your gateway in action, launch the Tor browser in the workstation, then launch the Tor Anonymizing Relay Monitor (ARM). You’ll see the traffic from the workstation going through your gateway.
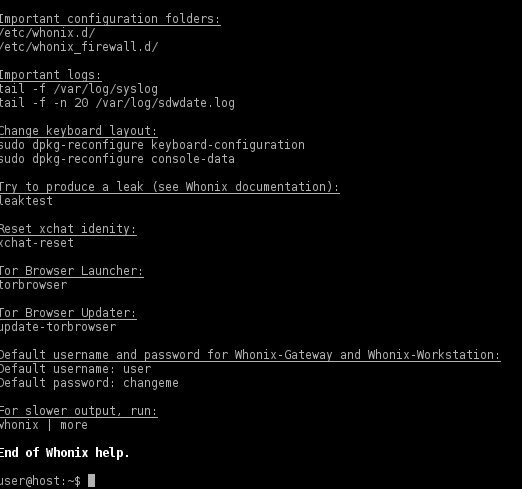
For some basic help, open a terminal window and just type whonix by itself. A help screen will appear that includes the default user credentials. You can use those to sudo to root in order to see your network interfaces.
A quick check of the network interfaces shows that the workstation is using a private IP address as expected and is routing all of its traffic through the gateway.

Shutting down the gateway stops the workstation from being able to connect to the internet at all.
Whonix pros
- Using the VirtualBox technology ensures that the widest range of people can use Whonix. VirtualBox is available for every major operating system and is free.
- The default installation and use is extremely easy. No special knowledge or configuration is required to get to work.
Whonix cons
- While the Whonix workstation is separated from the host computer, there is no further separation. Performing both risky and non-risky behaviours in the workstation is just as dangerous as doing both on the host computer.
- Since the anonymity is provided only in the workstation virtual machine, it can be easy to forget to use it, and end up using the host machine by accident.
Tails – The Amnesic Incognito Live System
Tails is a live
operating system built off Debian GNU/Linux. There is no installation process. You boot your computer with it, and it runs from the temporary media you booted from. When you shut it down, it forgets
(amnesic) and helps keep you anonymous while using it (incognito).
All network connections are routed through the Tor network and applications attempting to access the internet directly are blocked. Tor is set up by default, but Tails can also be configured to use the I2P anonymous network.
Start here to kick off the download process: https://tails.boum.org/install/index.en.html. The instructions seem to be a little involved; I am not sure why they include the need for multiple USB sticks or a mobile phone to read instructions. I simply downloaded the Tails ISO file and loaded it into VirtualBox as I would any other. If you’re going to use Tails properly you will need to burn that ISO to some media that you can boot from; usually a CD/DVD or a USB stick.
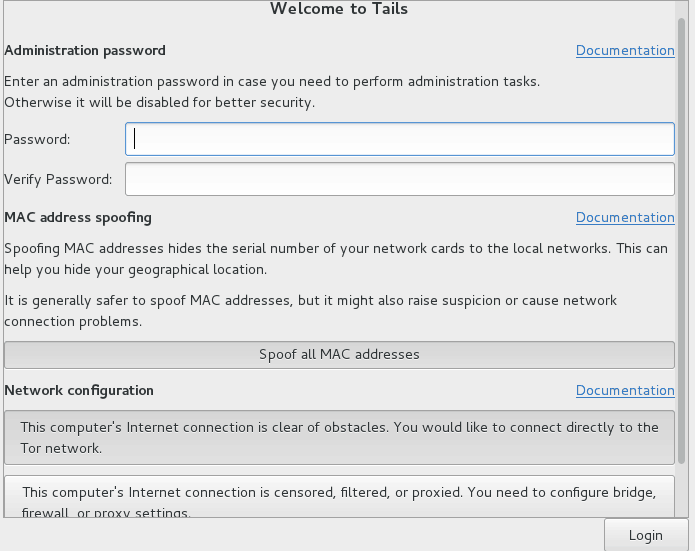
The first boot will display the Tails Greeter where you can optionally configure some options before the desktop loads.


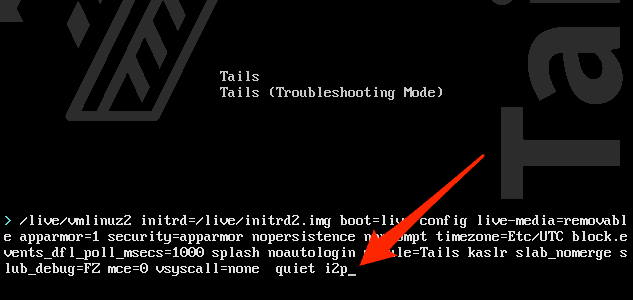
To use Tails with I2P instead of Tor, you will need to reboot. When the boot loader menu appears, press the Tab button to display the current boot options. Press the Spacebar and then add i2p to the existing options. Press Enter to continue booting.
The notification panel at the bottom of the desktop will tell you whether Tor or I2P is configured:

Launch the I2P browser to see the status of your I2P connection by selecting the Application -> Internet menu option.

Wait while it loads:

Much like Tor has internal sites that use the .onion extension, I2P has its own hidden services that use the .i2p extension.

Unlike Tor, the I2P router will not allow you to access clear net sites by default. You will need to configure an Outproxy in order to access regular internet sites while using I2P.

There are only HTTP, HTTPS, and email Outproxies available. If you need a SOCKS outproxy to do more with, then you should stick with Tor.
Tails Pros
- Live CDs in general are very easy to use. You can
burn once, use anywhere
which is very handy if you’re on multiple untrusted computers. - The default configuration to use Tor provides out-of-the-box anonymity, to the extent that Tor provides it.
Tails Cons
- Tails does not encrypt documents created during its session by default, but has an encrypted persistent volume feature you can use for this.
- All Live CDs don’t address the monolith problem; the operating system has no segregation so risky activities in one application can affect others.
Other Live CD distros
The Live CD is seen as one of the easiest ways to provide some security and anonymity. For that reason, there is a wide variety of Live CDs available. A few others that caught my eye while writing this article are IprediaOS and TENS.
IprediaOS
Ipredia OS uses the I2P anonymizing network instead of the Tor network which is prevalent among the other distros. I2P is available for Windows, Linux, macOS, and Android. IprediaOS is available as an installable Live CD download using the Gnome desktop or the Lightweight X11 Desktop (LXDE).
Anonymity comes from the use of the I2P network as well as from the pre-installed applications. The provided applications support anonymous BitTorrent, email, IRC and web browser. Much like Tor has internal onion sites, I2P has internal I2P sites named eepSites with the .i2p extension.
TENS – Trusted End Node Security
TENS was created by the U.S. Department of Defence (DoD). Interestingly, the U.S. DoD signs its own SSL certificates. Your browser most likely does not have the DoD listed as a trusted Certificate Authority, so you will likely see SSL errors when you try to visit the site. It seems safe to do so based on my research, but your level of paranoia should rule your actions.
TENS boots into RAM, does not write anything to disk, and therefore creates a trusted, temporary end node on almost any computer. Note that the purpose of TENS is to create a trusted END node; it was created to protect the computer that you’re connecting to; it’s not designed to protect you, per se.
There are a few different versions, two of which are available to the public. Public Deluxe
comes with Libre Office, whereas the standard Public
version does not. The Professional version is only available to U.S. government personnel. Individual departments can request custom builds and it is the only approved method to connect to DoD systems on non-government equipment.
See also: What are the best Linux VPN services?


I use all distros of linux, tails, qubes, whonix all the time.
My experience:
*Tails is best when travelling overseas and using untrusted wifi routers.
*Qubes works well day to day browsing but chucks a wobbly when I try and use my printer. At first I hated this then I realized it actually is safer. Excellent for keeping emails in their own VM.
*Virtual Box changes stopped me using whonix workstation and gateway. Bit of a nuisance to reload everything because virtual box not configured, and accept that was my lazyness.
*Also use Veracrypt on Fedora where I want to use a standard untrusted operating system.
Final experience that helped a lot was using a withdrawable HDD caddy to change between operating systems.
OMG I can even use Windoze on one of my systems if I change hard disks over.
Found the article very helpful even though from 2017
whats mean styleometry analysis ?
does it mean even if behind cubes or whonix governement can get to you?
It means your writing style can give you away:
https://en.wikipedia.org/wiki/Stylometry
not only that, the way you use your computer will also leak information that help them find you, like browser window size, monitor size when you full screen and other tiny information.
when it looks too good to be true: it usually is…….I have been looking at Qubes, and I tend to research a thing until nothing else can come up, and do you folks in Linux Land know who is behind and who is backing it????… the very ones we are trying to keep out of our business; so then, how can it be safe and secure?…. yeah right…. you really aren’t so naive to think that these jerks who have been creating cyber-stalking are now just turning over a new leaf and are there to help us, now are you…..wake up….Qubes… exactly… a great way to stick you into their little boxes… well, not me.
Care to develop? I thought Qubes was developed by am Eastern European duo who work in web security. If you don’t provide a clearer picture, such as links, or explanation, your point goes much beyond reasonable skepticism and gets lost in crazed paranoia zone.
Skepticism should be the MO when it comes to web security, so I doubt there’s anyone reading this article who trusts any kind of tool 1000%, whether In “Linuxland”, or anywhere else (you don’t assume “Windowsland” to be safer, do you? Maybe that word is the giveaway to ignore your comment…) So please, when disparaging an article that is at least trying to address web security, kindly explain your claim, so that others can follow. Otherwise, why bother posting at all?
And if your claim is that “no tool works, so why bother?”, then why are you reading this article? If there’s one thing not to be trusted, is being told that “one is better off unprotected anyway.” In a time every web service and company is likely building databases of everyone’s web activity, even a little bit of shade is a stone cast in the name of privacy rights and against unconstitutional Big Brother surveillance. Just saying.