
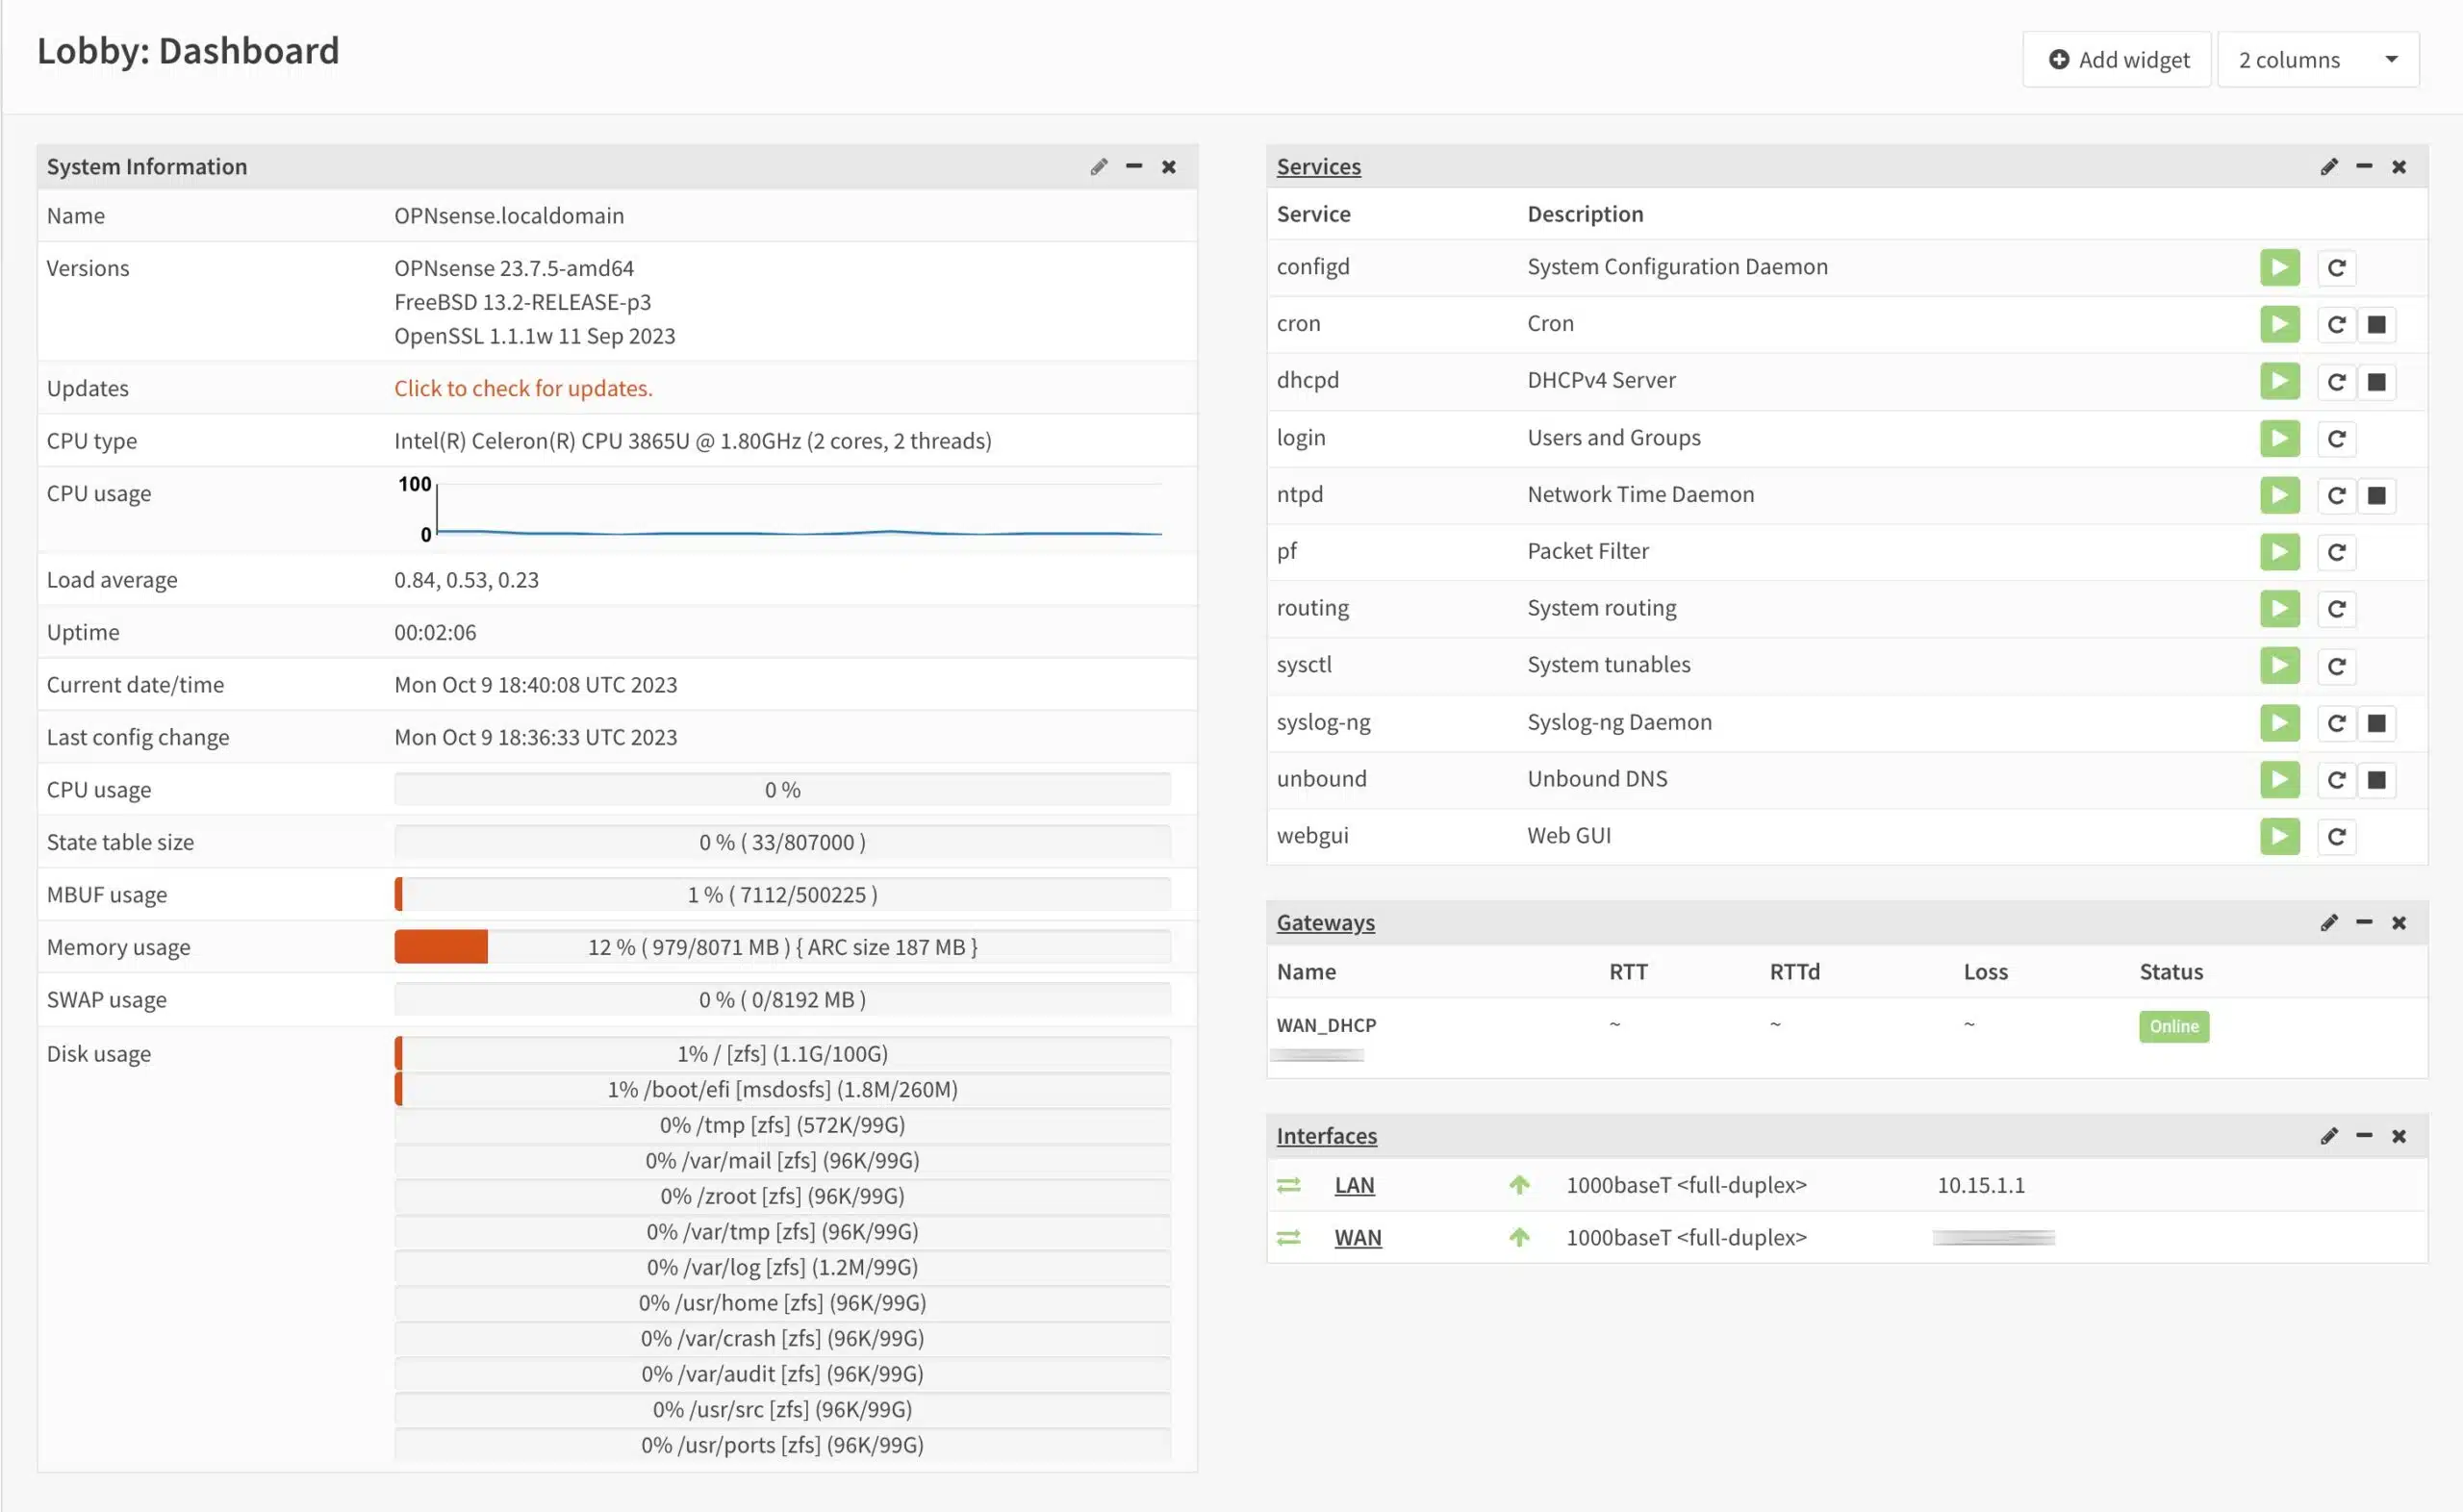
OPNsense is an open-source firewall/router that’s actually a fork of pfSense, so like the latter, it’s also based on FreeBSD. You can install OPNsense on older (or newer) hardware, as long as the system has two network cards (WAN & LAN), and use OPNsense as your router. It provides more power, control, and security than most commercial routers you can buy and benefits from frequent OS updates. It’s also got an easy-to-use web-based interface through which you can configure every aspect of your router/firewall.
One thing many users do in OPNsense is configure a client OpenVPN connection to a commercial VPN provider. Doing that allows you to route all the traffic of all connected devices (PCs, tablets, smartphones) through the VPN connection. This enables you to:
- Connect as many devices as you want to the VPN and bypass the limits on simultaneous connections that your provider may enforce.
- Connect devices that do not natively support VPN connections, such as gaming consoles and smart TVs
- Connect to the VPN without using a dedicated VPN application on individual devices
In this post, we’re going to look at how to set up an OpenVPN client connection to a commercial VPN provider in OPNsense. This guide assumes that you have a working OPNsense installation with at least one LAN interface and one WAN interface.
VPN providers
Not all commercial VPN providers support OPNsense – though many do. When a VPN provider officially supports OPNsense, it’s quite easy to find all the files you need to set it up.
Other VPN providers don’t officially support OPNsense but still put the configuration files you need on their websites. Providers that support Linux usually make the necessary configuration files available. The files you need to set up an OpenVPN client connection in Linux are the same ones you would need to set it up on OPNsense.
Here’s a list of providers known to work with OPNsense (officially or unofficially). The list is not exhaustive, so there may be others.
- AirVPN
- ExpressVPN
- Surfshark
- hide.me
- Hide My Ass
- iVPN
- Mullvad
- NordVPN
- OVPN
- Private Internet Access
- ProtonVPN
- PureVPN
- TorGuard
- VyprVPN
- Windscribe
There are different ways to connect to a VPN provider on OPNsense. For this guide, I chose the most straightforward way that works well with a basic OPNsense installation.
What you’ll need
To get this working on OPNsense, you’re going to need to obtain the following from your VPN provider’s website. VPN providers that support OPNsense (officially or unofficially) will make their configuration files available for download.
- Your credentials: This would be a username & password, a client identifier, an account number – whatever they call it. It varies by provider. It can be any of the above. You simply need your means of identification and authentication for your account.
- The CA certificate: The VPN provider has a Certificate Authority that validates connections to its VPN servers. To configure OPNsense as a VPN client, you’re going to need your provider’s CA certificate. It looks like this:

- The CA certificate private key: Some providers require you import the private key of the CA certificate. Not all do. It looks like this:

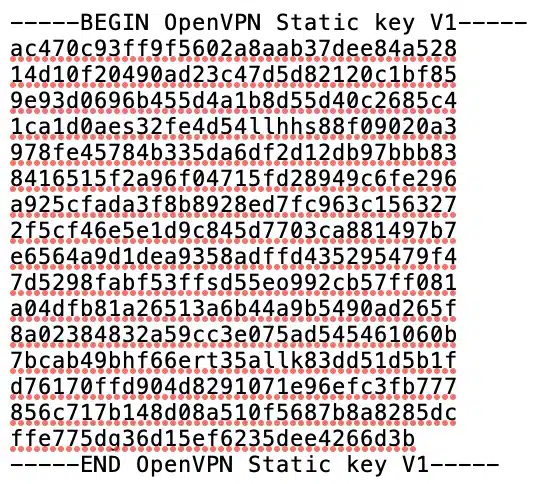
- The TLS key: Some VPN providers also require a TLS key to create a client connection to their servers. It is often referred to as a static key. If your VPN provider requires a static key to establish an OpenVPN connection, you’re going to need that as well. It looks like this:
First, obtain the OpenVPN configuration files from your VPN provider. Once you’ve got them all, then you’re ready to start configuring the client connection in OPNsense.
Importing the CA certificate and (optionally) the key
We’re going to start by importing our VPN provider’s CA certificate.
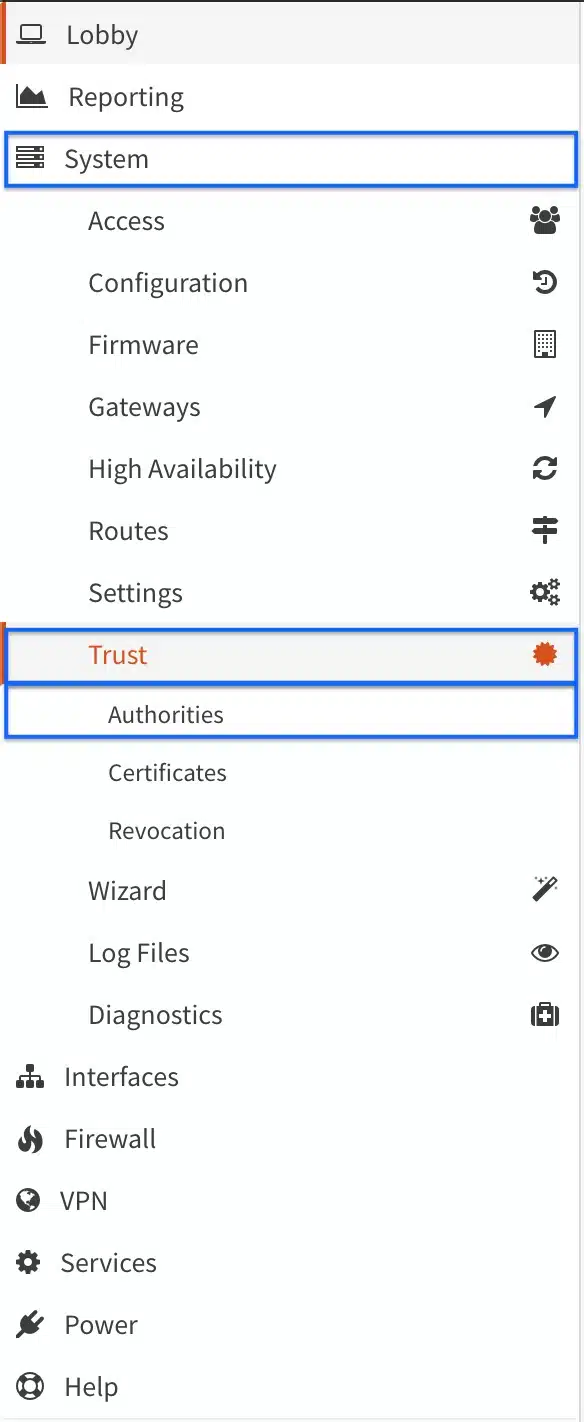
- From the side menus, select System > Trust > Authorities. The Authorities page is displayed.
- Click the + sign to create a new Certificate Authority. The Certificate Authority configuration page is displayed.

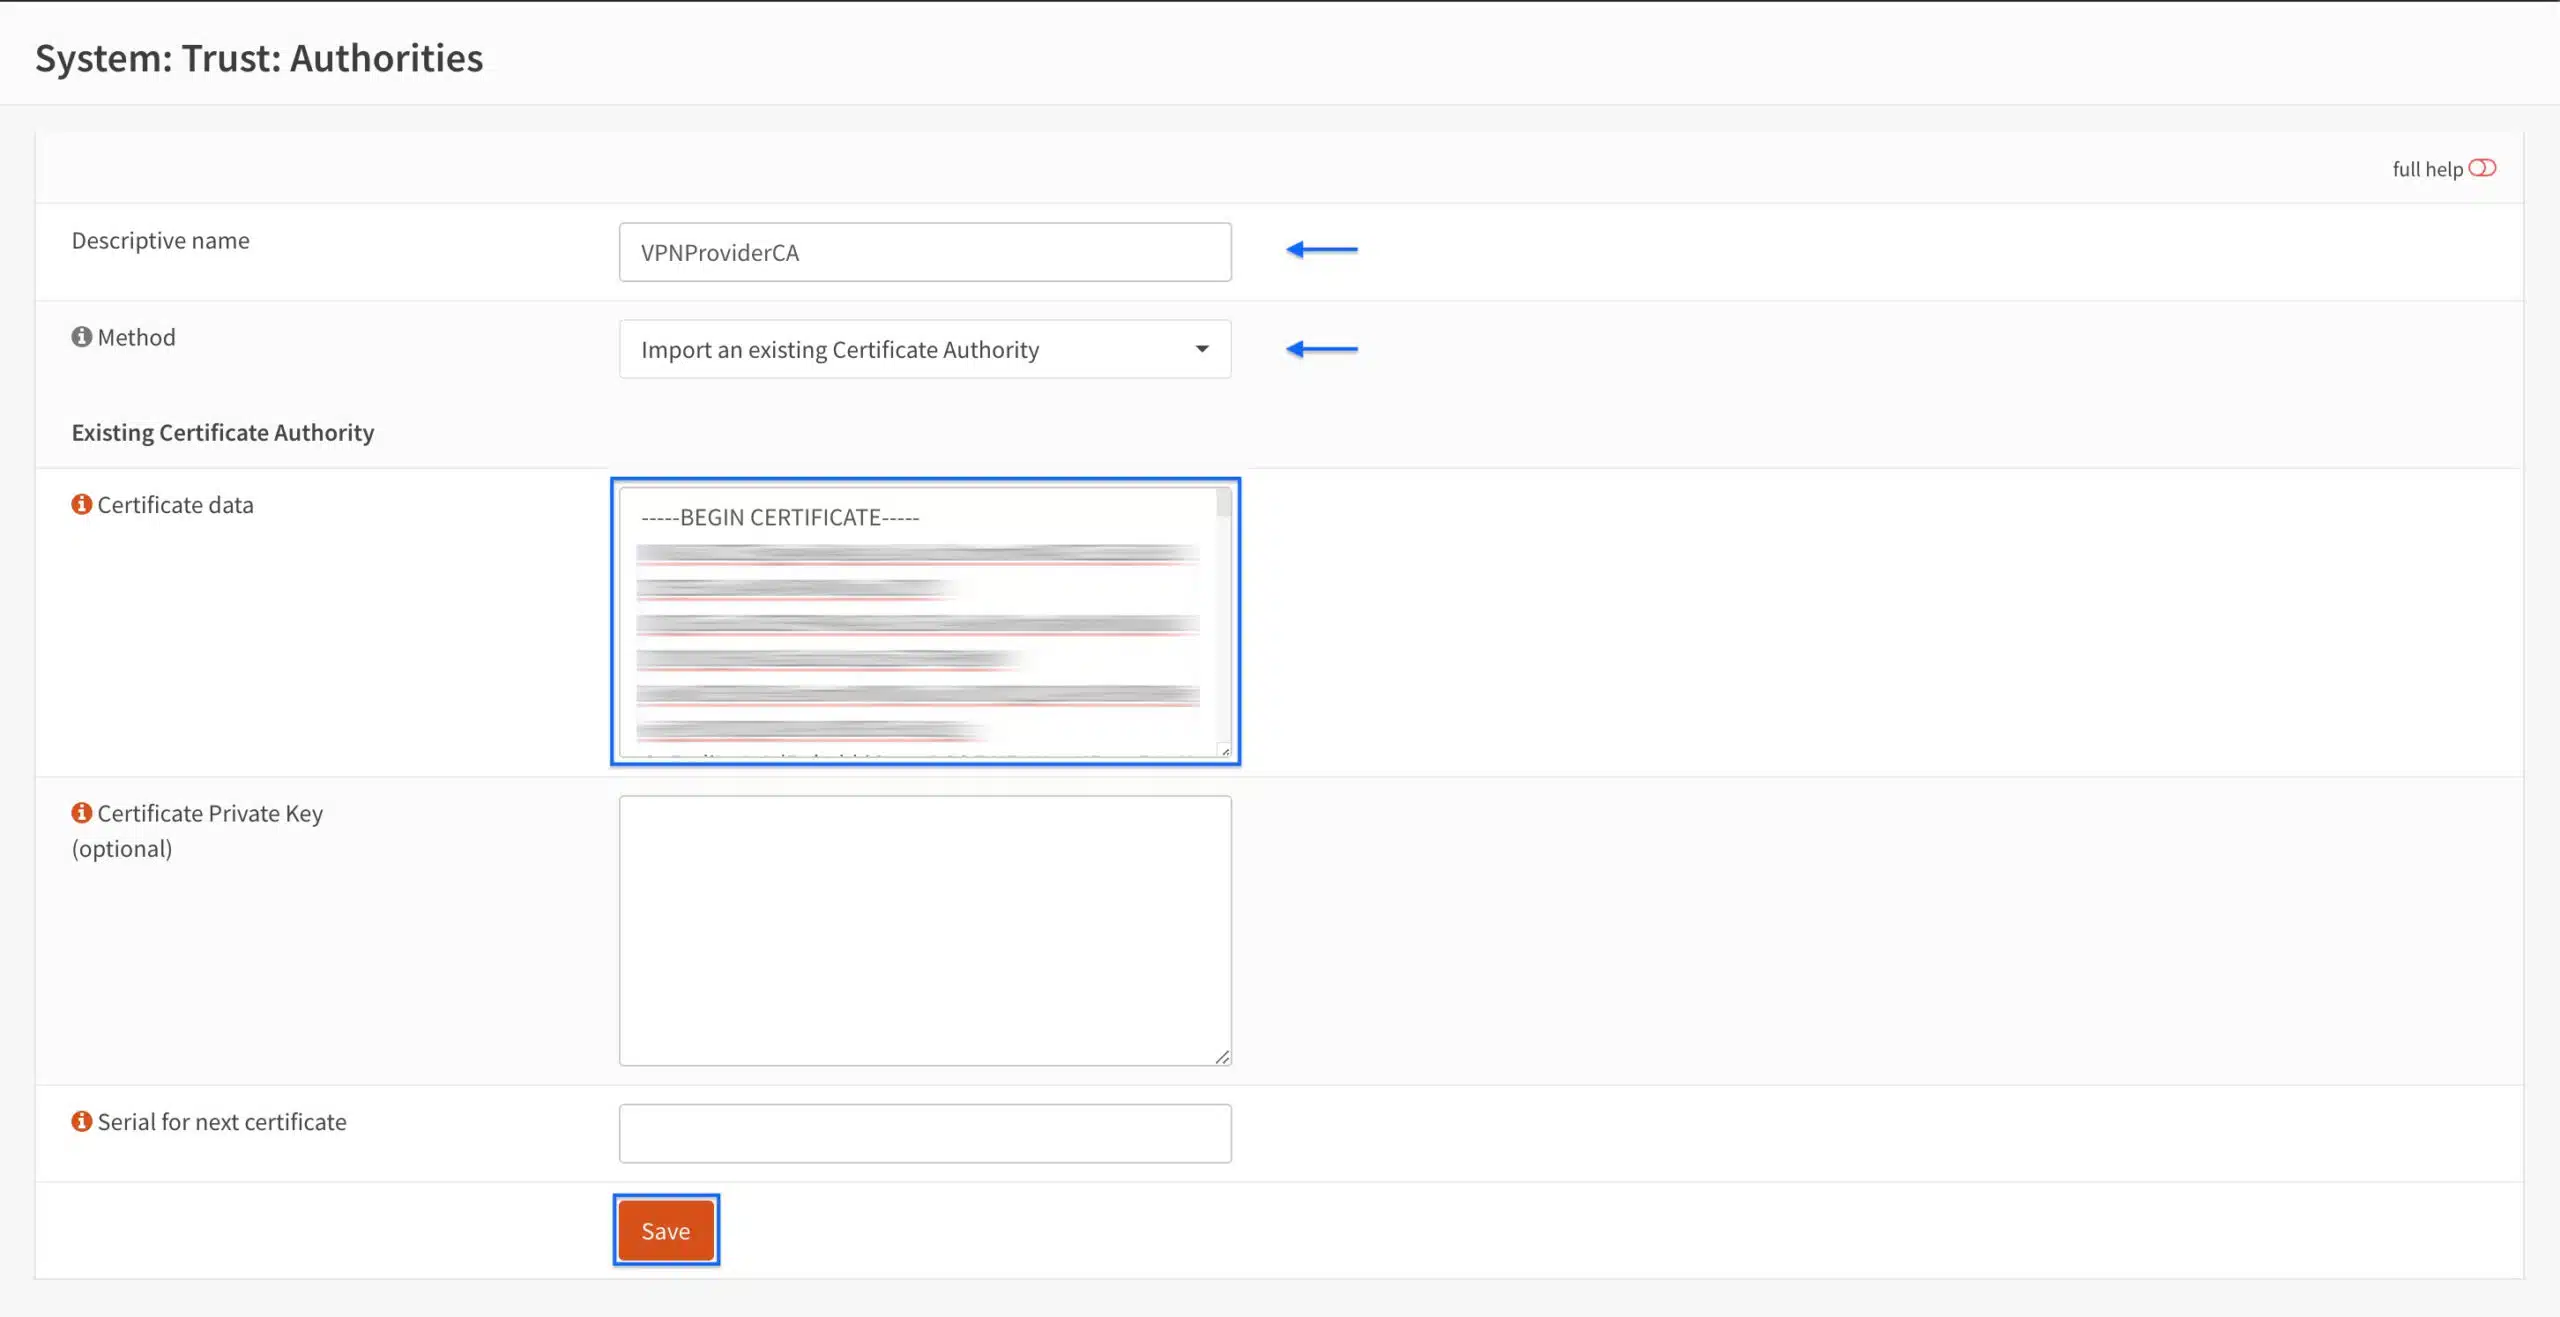
- Enter a name for the CA is the Descriptive name field.
- Select Import an existing Certificate Authority from the Method drop-down menu.
- Paste your VPN provider’s CA certificate in the Certificate data field.
- If your VPN provider also includes a CA private key, you can paste it in the Certificate Private Key field. Mine does not, so I left it empty.
- Click Save.
- You’re taken back to the Authorities page and we can see that our CA has been imported.

Adding an OpenVPN client connection
Now that we’ve imported our CA certificate, we can start configuring our VPN connection.
If your VPN provider explicitly supports OPNsense, the information you need to set it up will be easy to find. If your VPN provider “unofficially” supports OPNsense by supporting Linux, you can find the required information in one of the .ovpn or .conf files made available for Linux. These can be opened using a standard text editor. It will look something like this (the certificate and key have been shortened for the screenshot):
- From the side menus, select VPN > OpenVPN > Clients. The VPN Clients page is displayed. We’ll be configuring our OpenVPN connection section by section.
- Click the + sign to create a new client connection. The Client Configuration page is displayed.

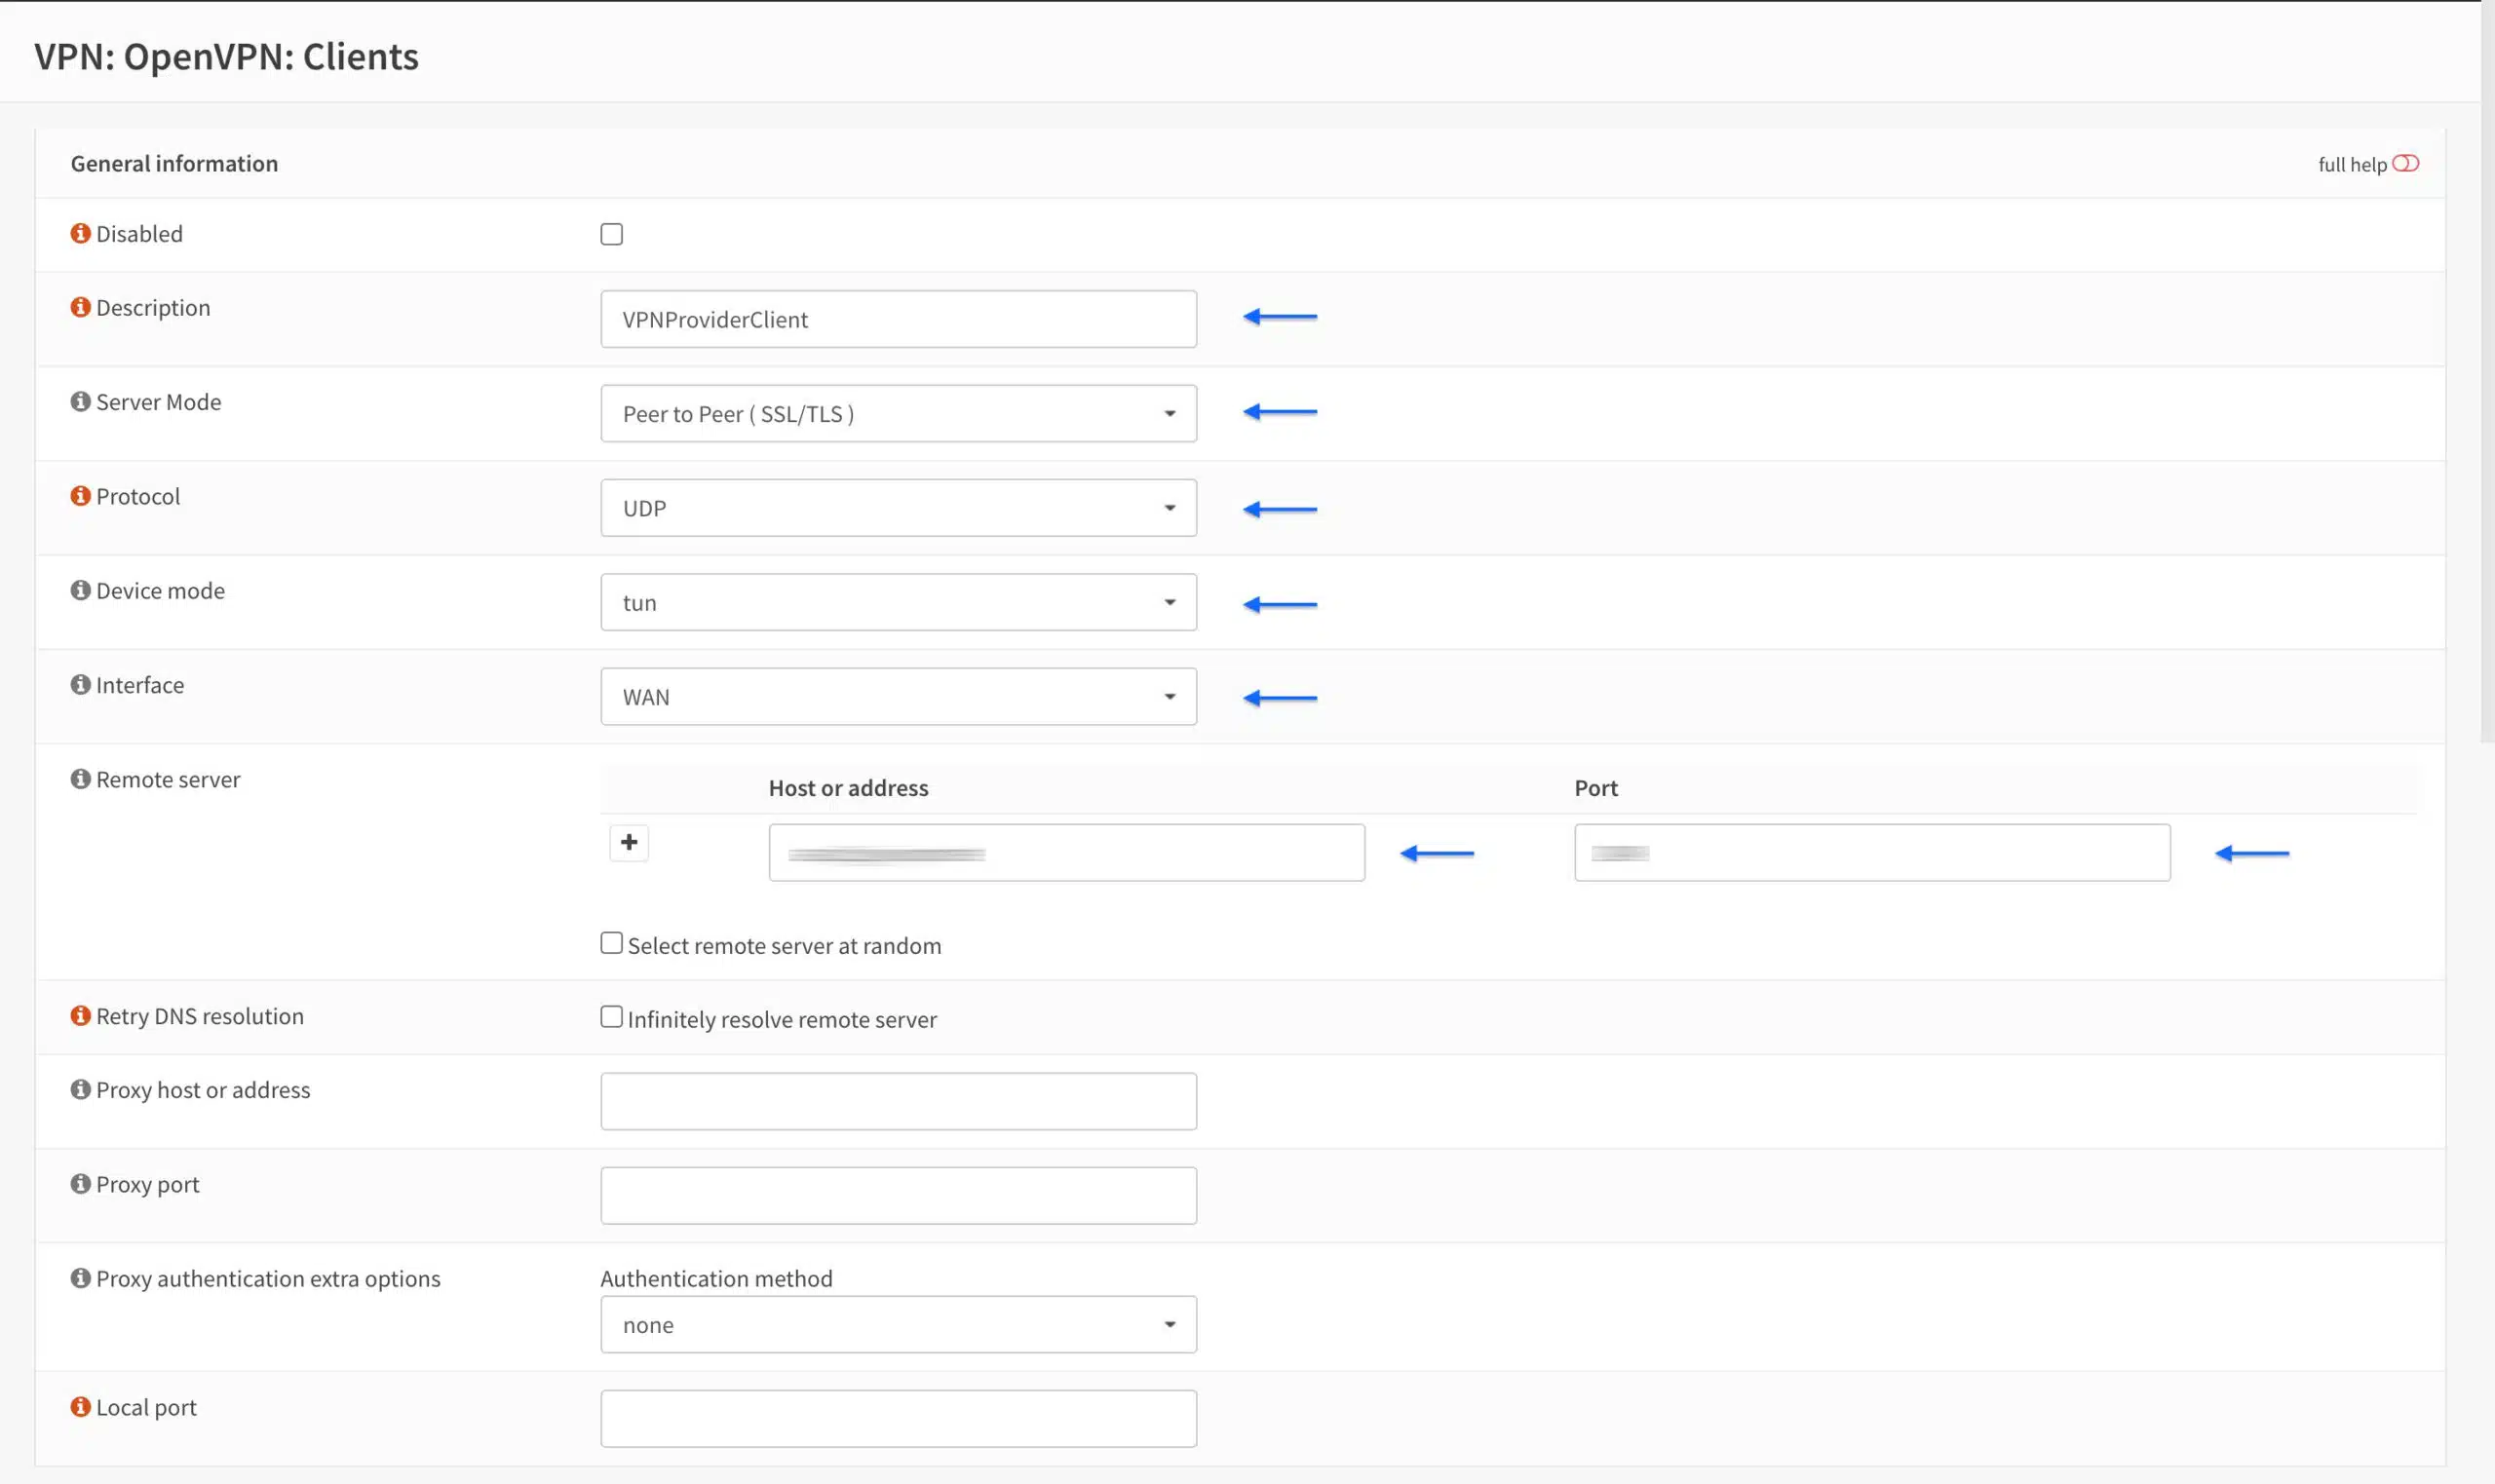
General Information
- Enter a name for your connection in the Description field.
- Select Peer to Peer (SSL/TLS) from the Server Mode drop-down menu.
- Select UDP from the Protocol drop-down menu. This can also be set to TCP if your provider supports TCP connections. UDP is usually faster and is the preferred choice for OpenVPN.
- Make sure the Device mode is set to tun.
- Select WAN from the Interface drop-down menu.
- Enter the VPN server’s hostname or IP address in the Remote server Host or address field.
-
Enter the port number for your connection in the Remote server Port field.
User Authentication Settings
- Enter your username in the Username field
- Enter your password in the Password field. If your provider does not require a password, enter anything in the password field, as OPNsense does not accept empty password fields.

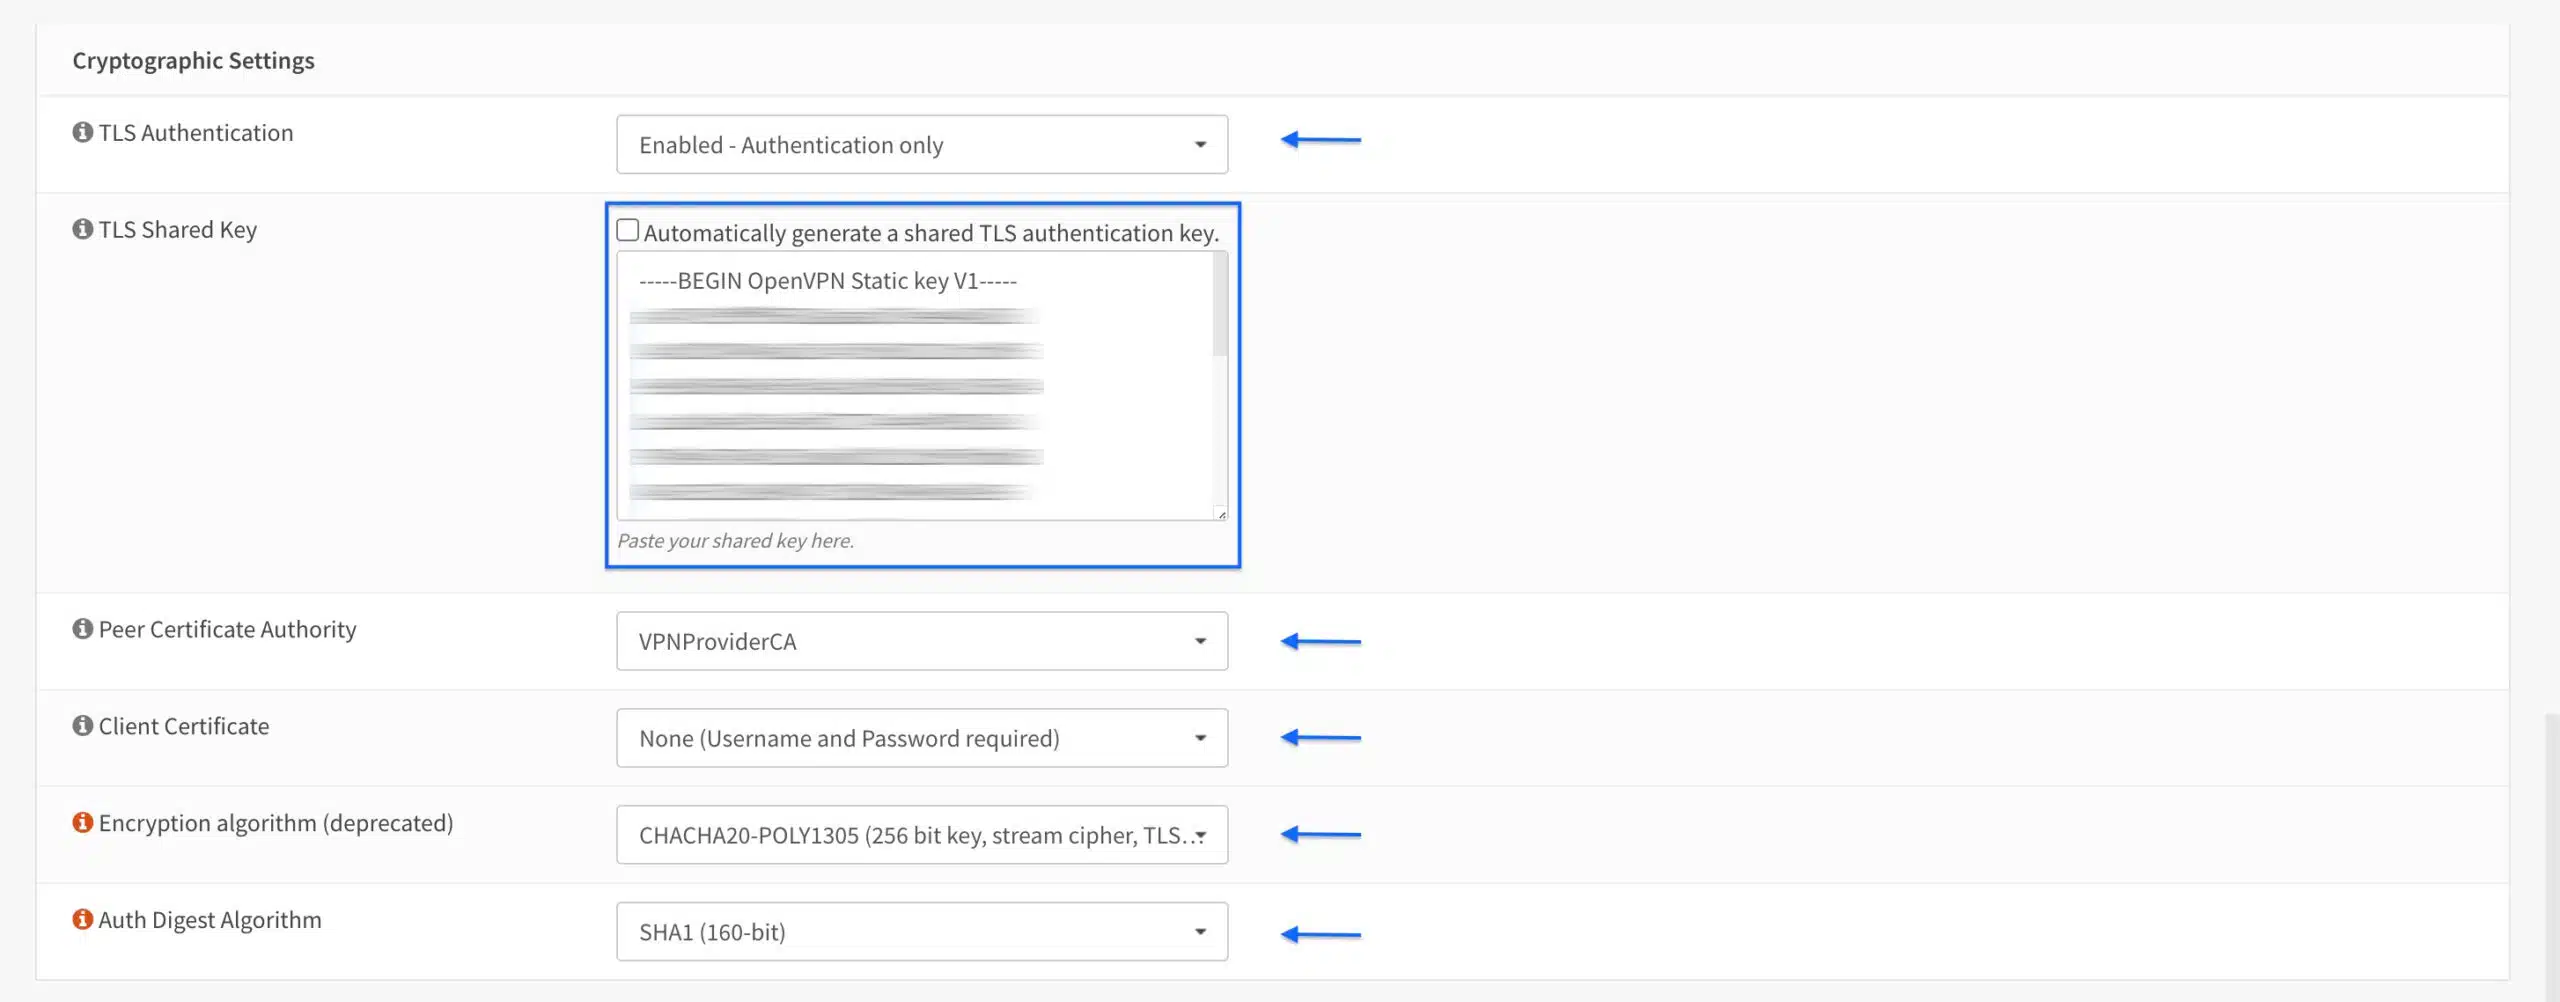
Cryptographic Settings
- Select Enabled – Authentication only from the TLS Authentication drop-down menu. Your VPN provider may support TLS authentication and encryption. If that’s the case, select Enabled – Authentication & encryption.
- Paste your provider’s TLS key in the TLS Shared Key field.
- Select the CA you imported earlier from the Peer Certificate Authority field.
- Select None (Username and Password required) from the Client Certificate drop-down menu.
- Select an encryption algorithm that your VPN provider supports from the Encryption algorithm drop-down menu. Common algorithms are AES-CBC, AES-GCM, and CHACHA-POLY1305.
- Select the auth digest algorithm supported by your provider from the Auth Digest Algorithm drop-down menu. In my case, this is SHA1.
Tunnel Settings
- Select Legacy – Disabled LZO algorithm (–comp-lzo-no) from the Compression drop-down menu. If your VPN provider explicitly supports a different option, you can select that instead.
That’s all we need to do in this section, but I want to highlight two additional settings:
Don’t pull routes: This setting bars the VPN server from pushing routes to the client. Some providers include the routing information in the client configuration and may ask you to enable this option (such as ExpressVPN). If this is specified by your provider, tick this option. Otherwise, leave it unticked.
Don’t add/remove routes: This option can be used to enable selective routing, sending some traffic through the VPN tunnel while sending the rest out of the ISP gateway. This requires setting the VPN interface (which we will create below) as a gateway in OPNsense and specifying some additional firewall and NAT rules to get it working. This is outside the scope of this guide. Also, in your typical commercial VPN scenario, you want all your traffic tunneled through the VPN connection. Leave this setting unticked.
2. Click Save. 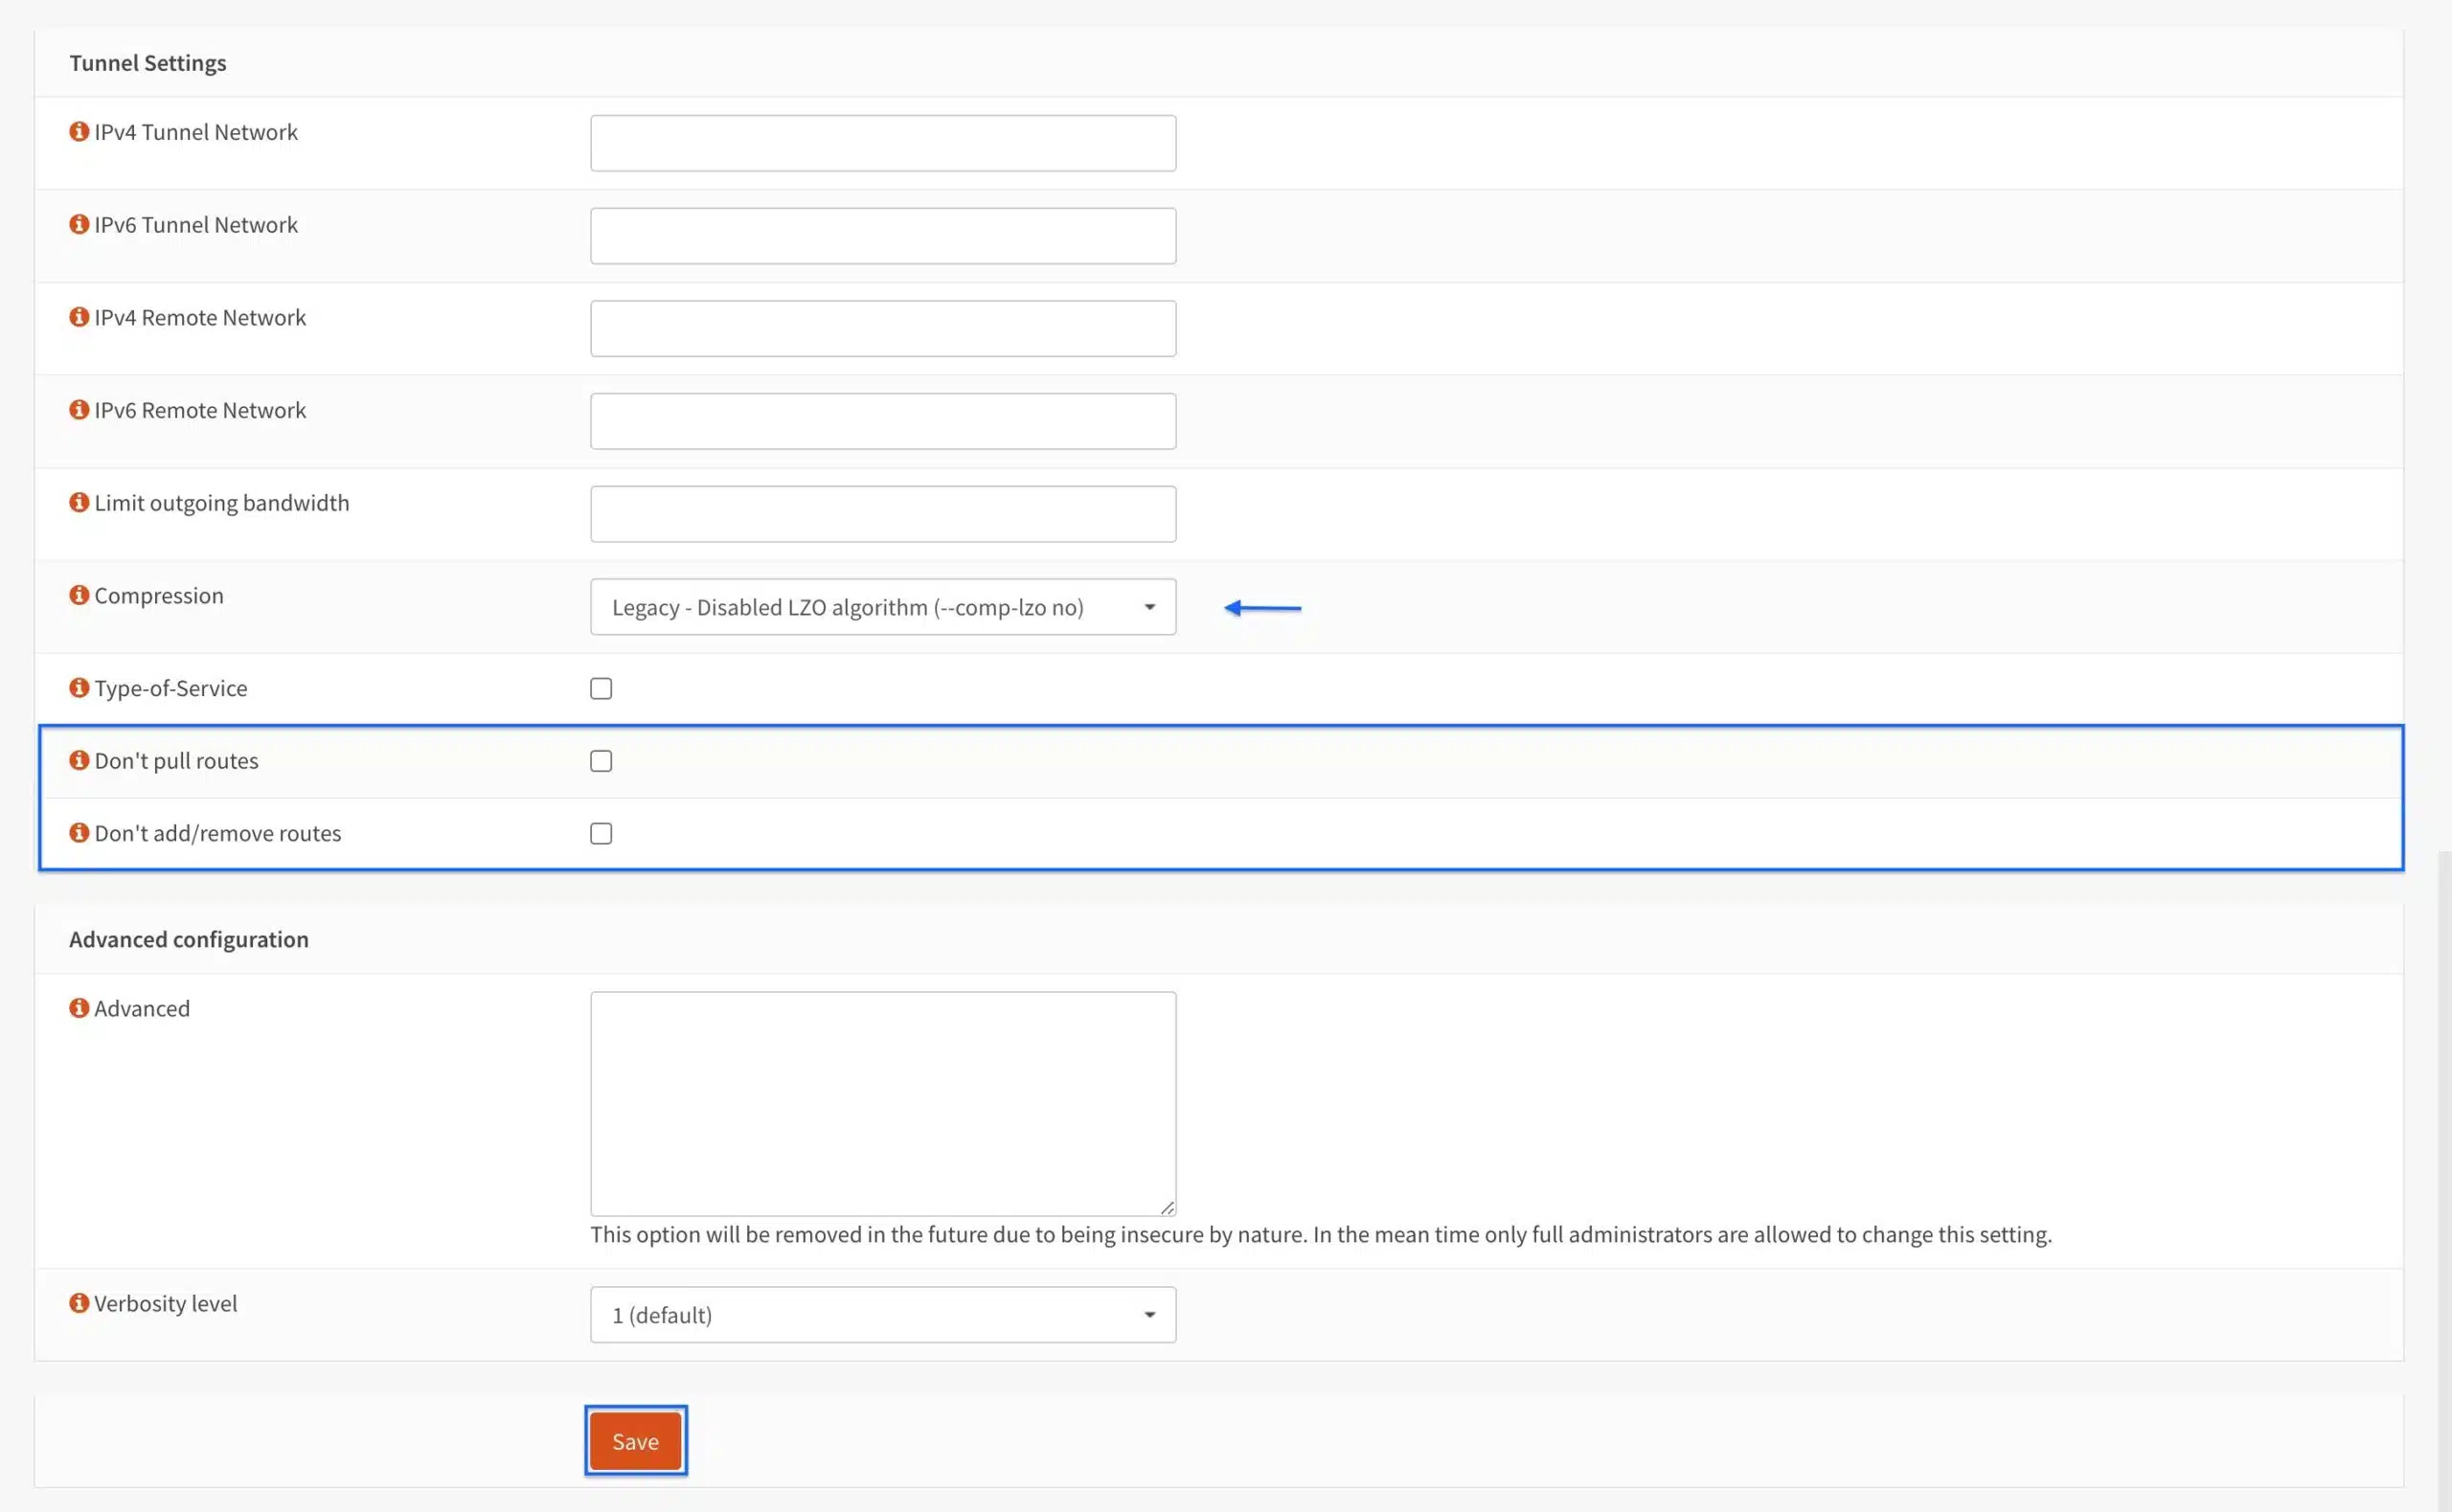
Creating the VPN interface
The next thing we need to do is create the virtual interface that will host the VPN network segment-–the subnet you become a part of after a successful VPN connection—on our OPNsense box.
The interface was automatically created by OPNsense when we hit save after configuring our connection earlier. But we still need to assign and configure it.
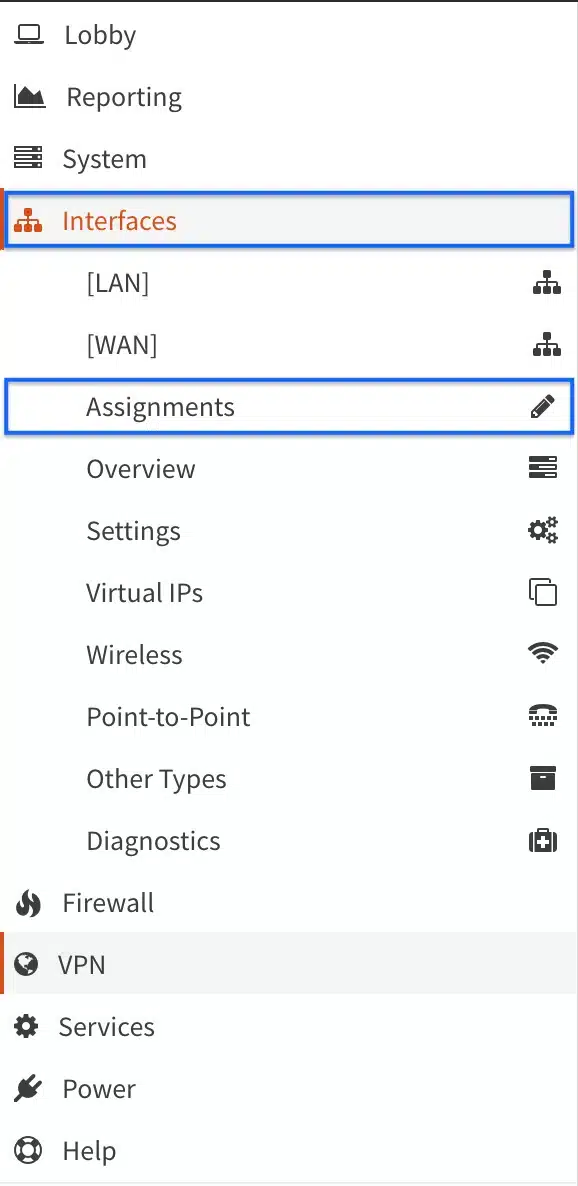
- From the side menus, select Interfaces > Assignments. The Interface Assignments page is displayed.
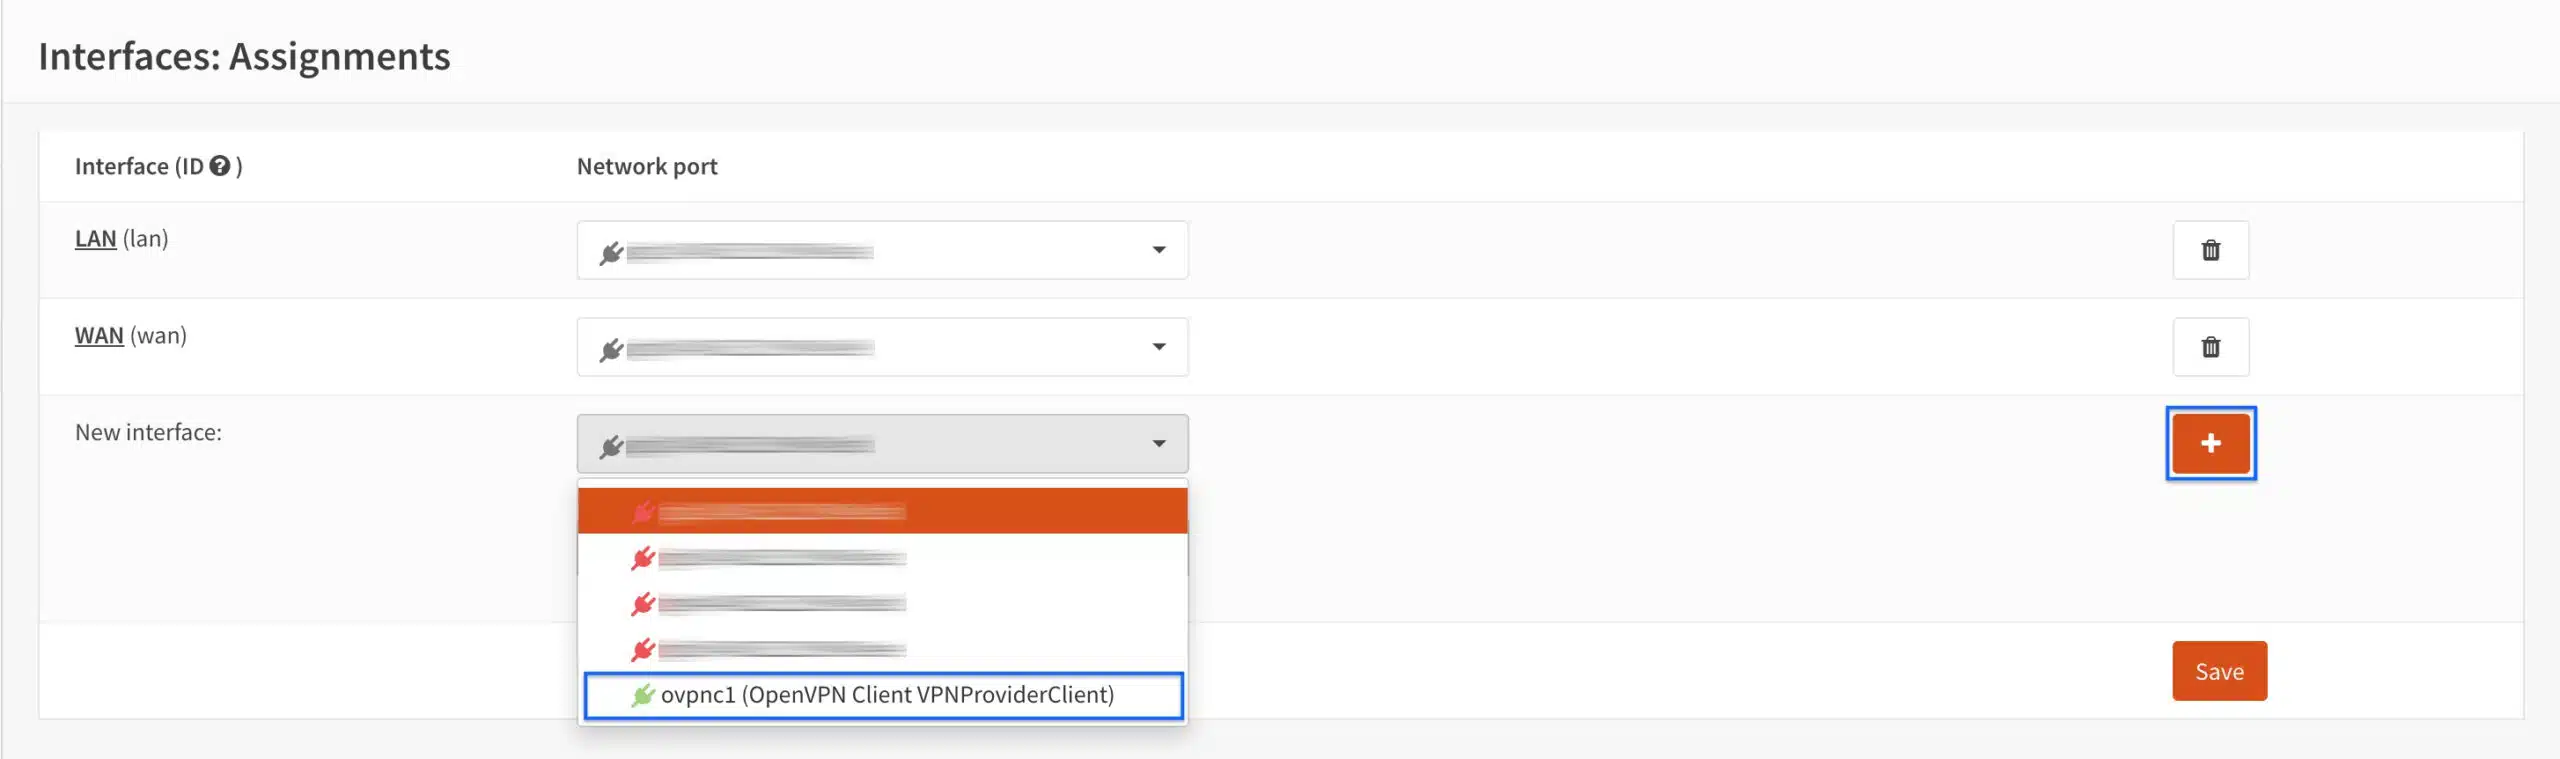
- From the New Interface drop-down menu, select ovpnc1 and click the + button to its right.
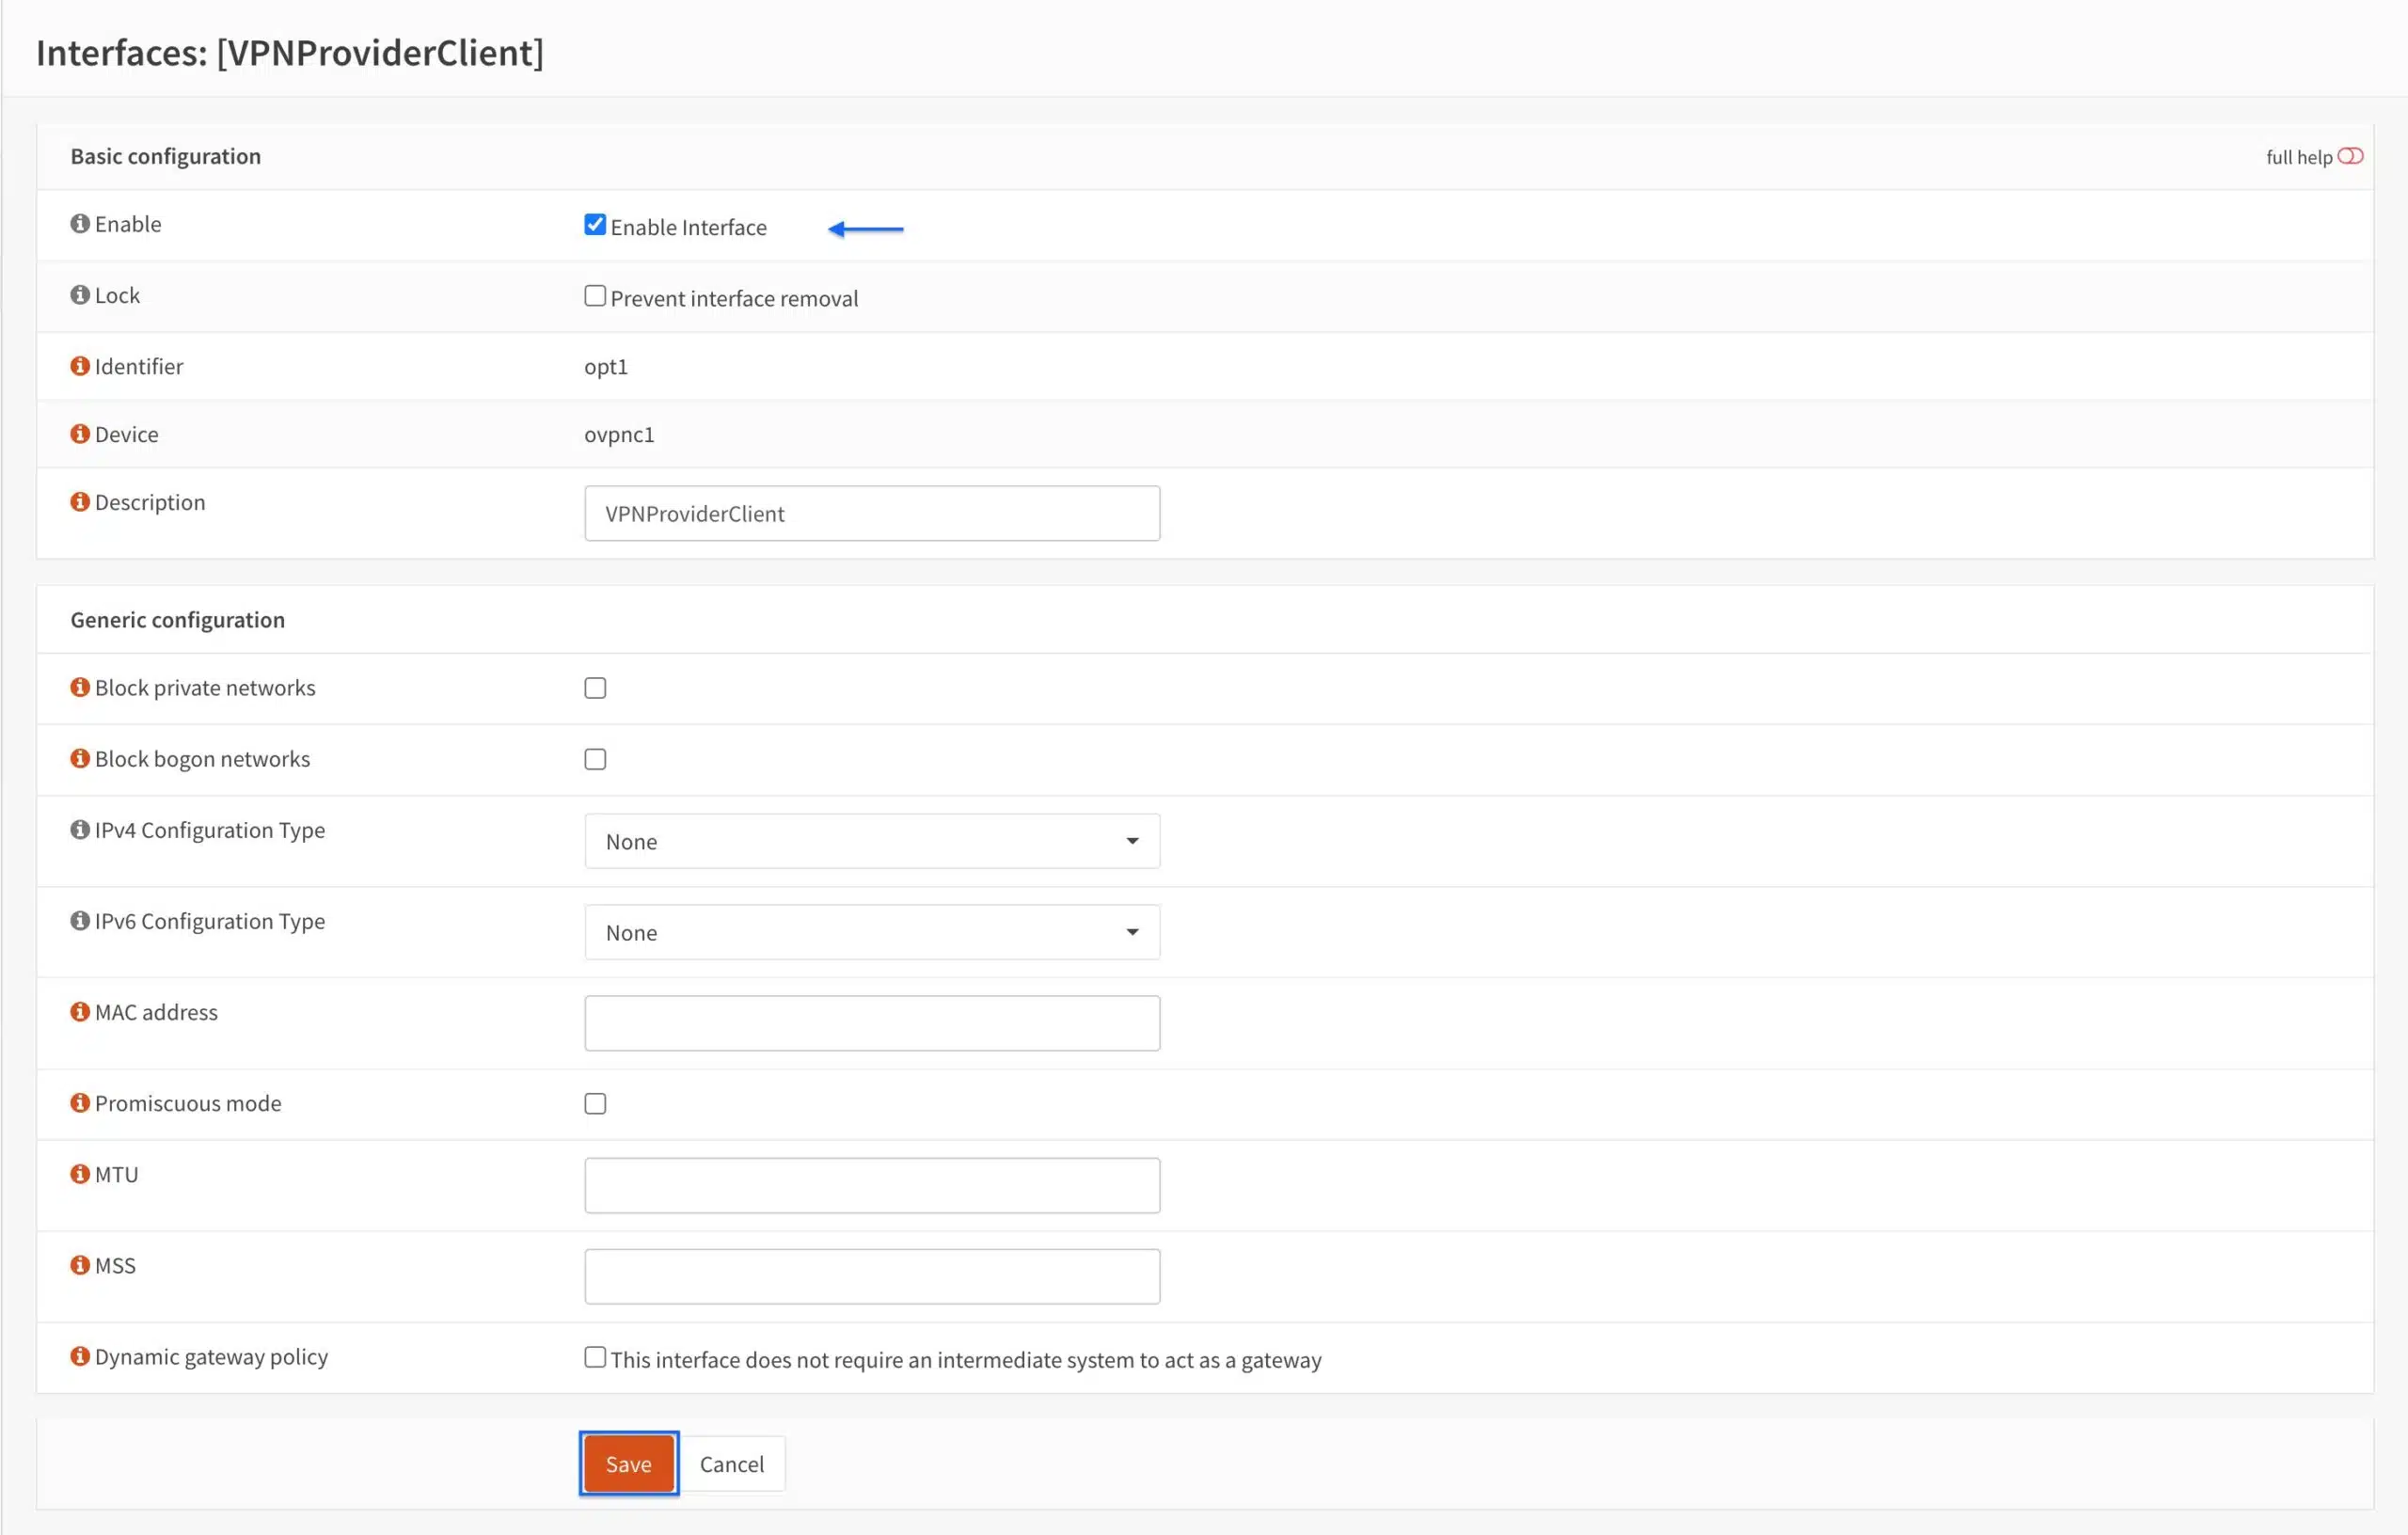
- The new interface is added to the list. Click the new interface name to enable it.
- Tick Enable interface. Leave all of the other settings untouched.
- Click Save.
- Click Apply Changes. The OpenVPN interface is now enabled.

Configuring NAT rules
The next thing we need to do is to configure our Network Address Translation (NAT) rules to properly route our traffic through the VPN.
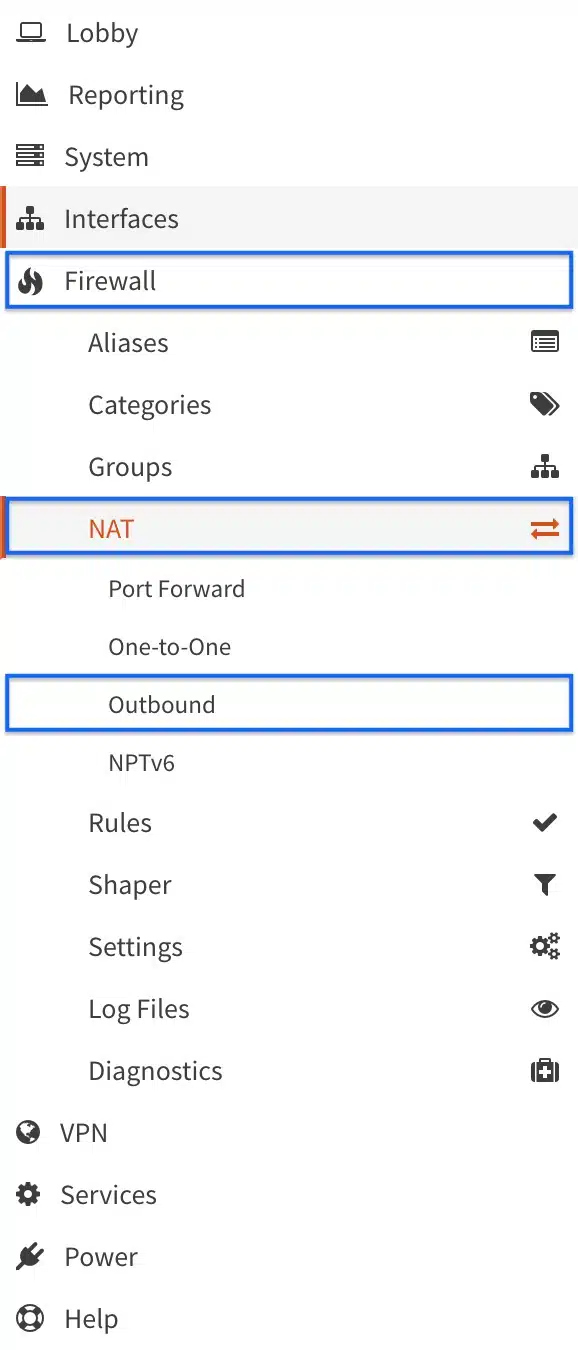
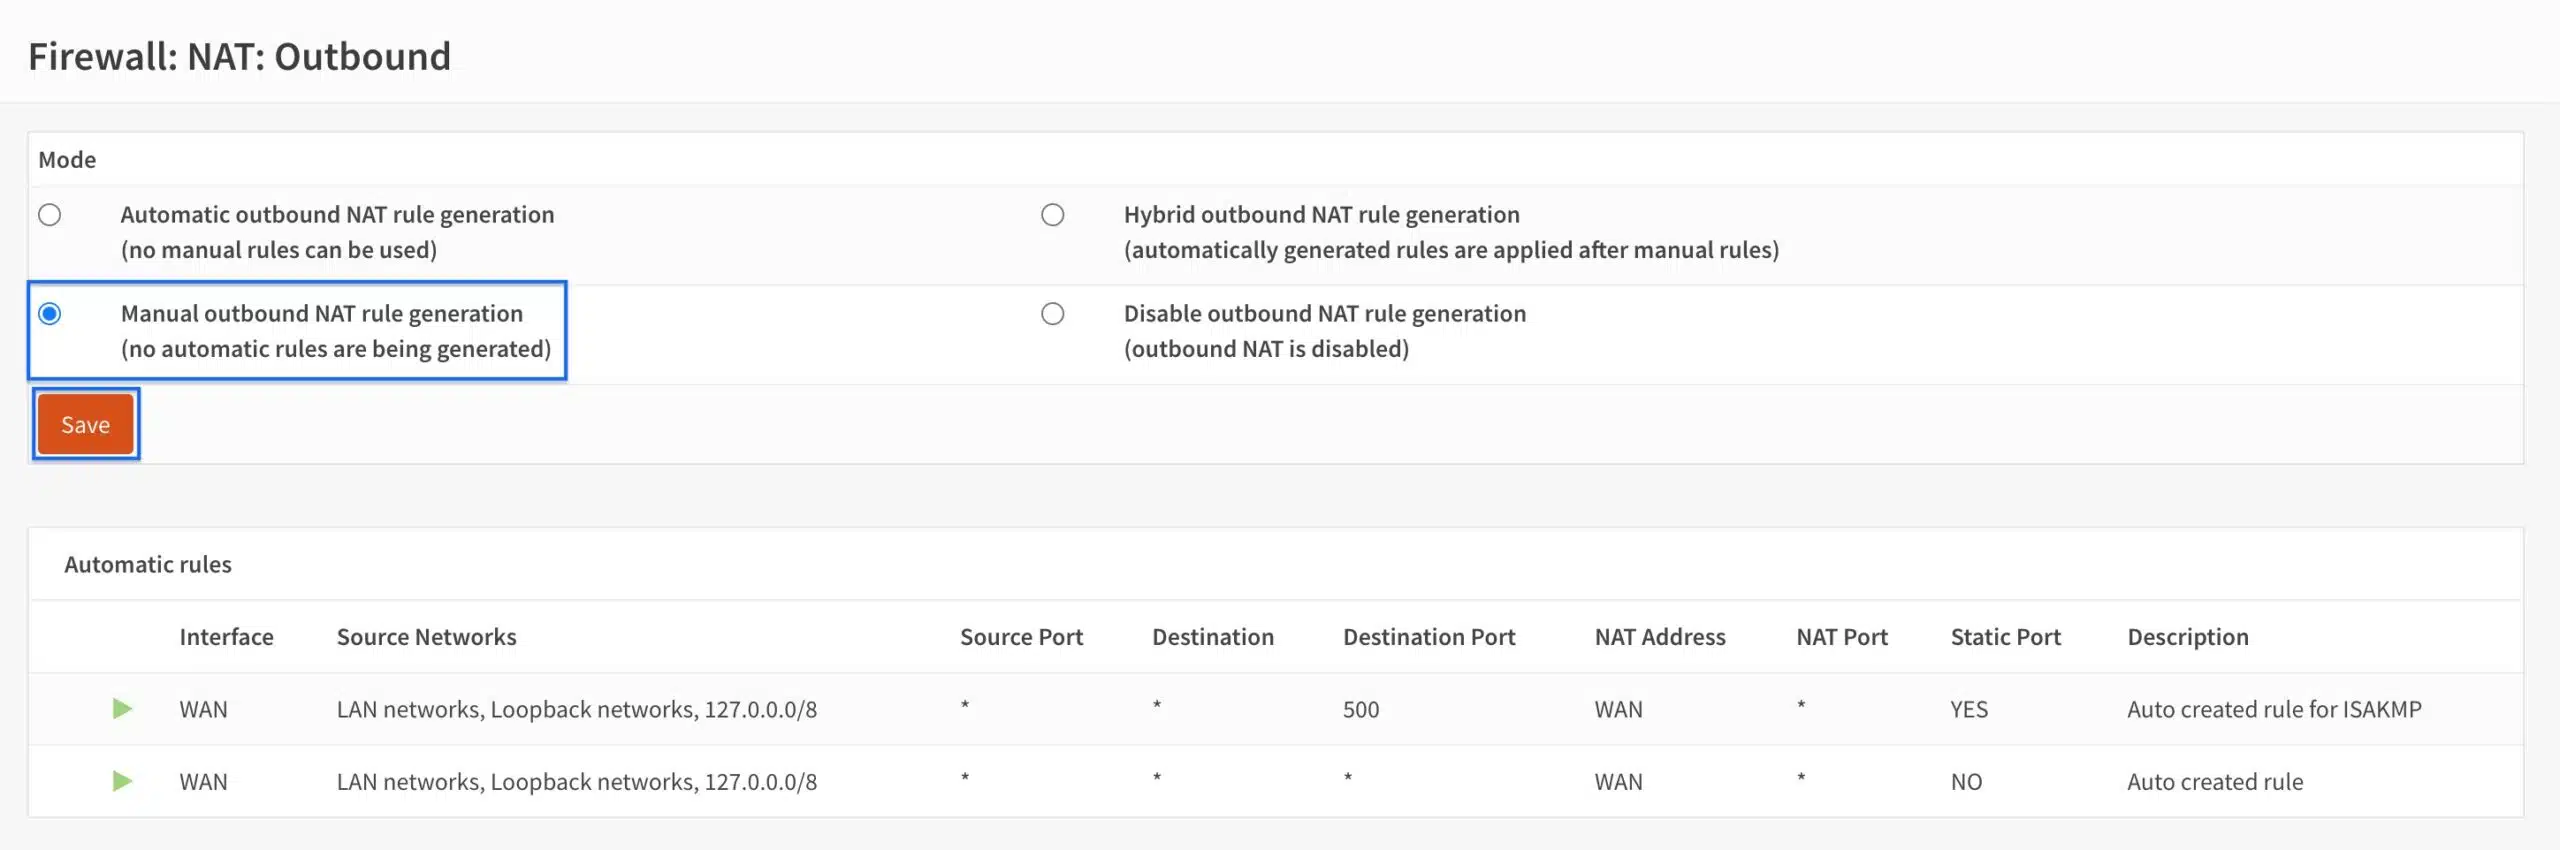
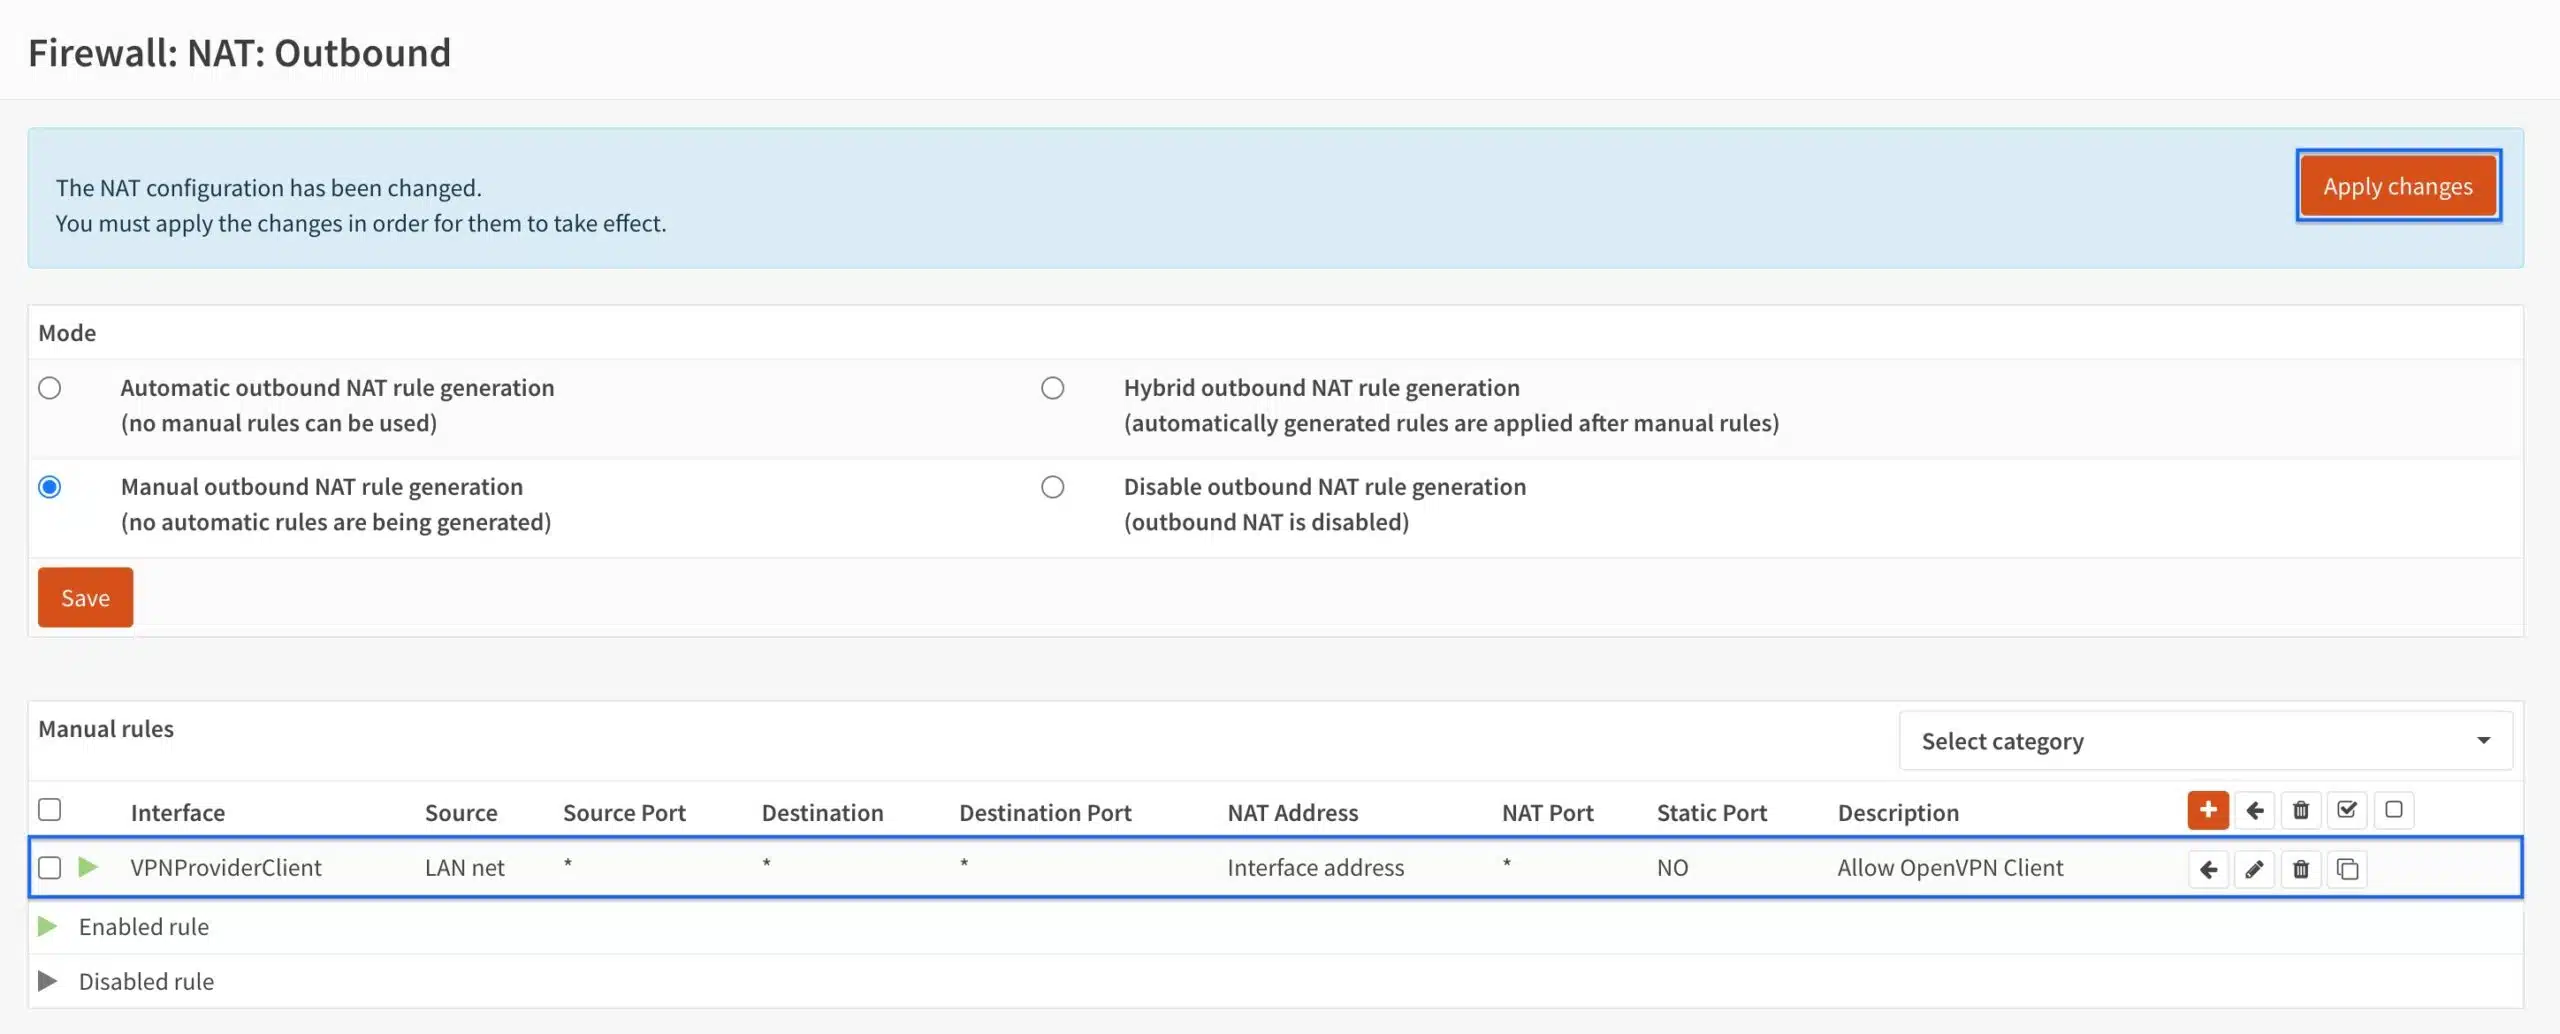
- From the side menus, select Firewall > NAT > Outbound. The Outbound NAT page is displayed.
- Set the Mode to Manual outbound NAT rule generation, and then click Save.
- Click Apply Changes.
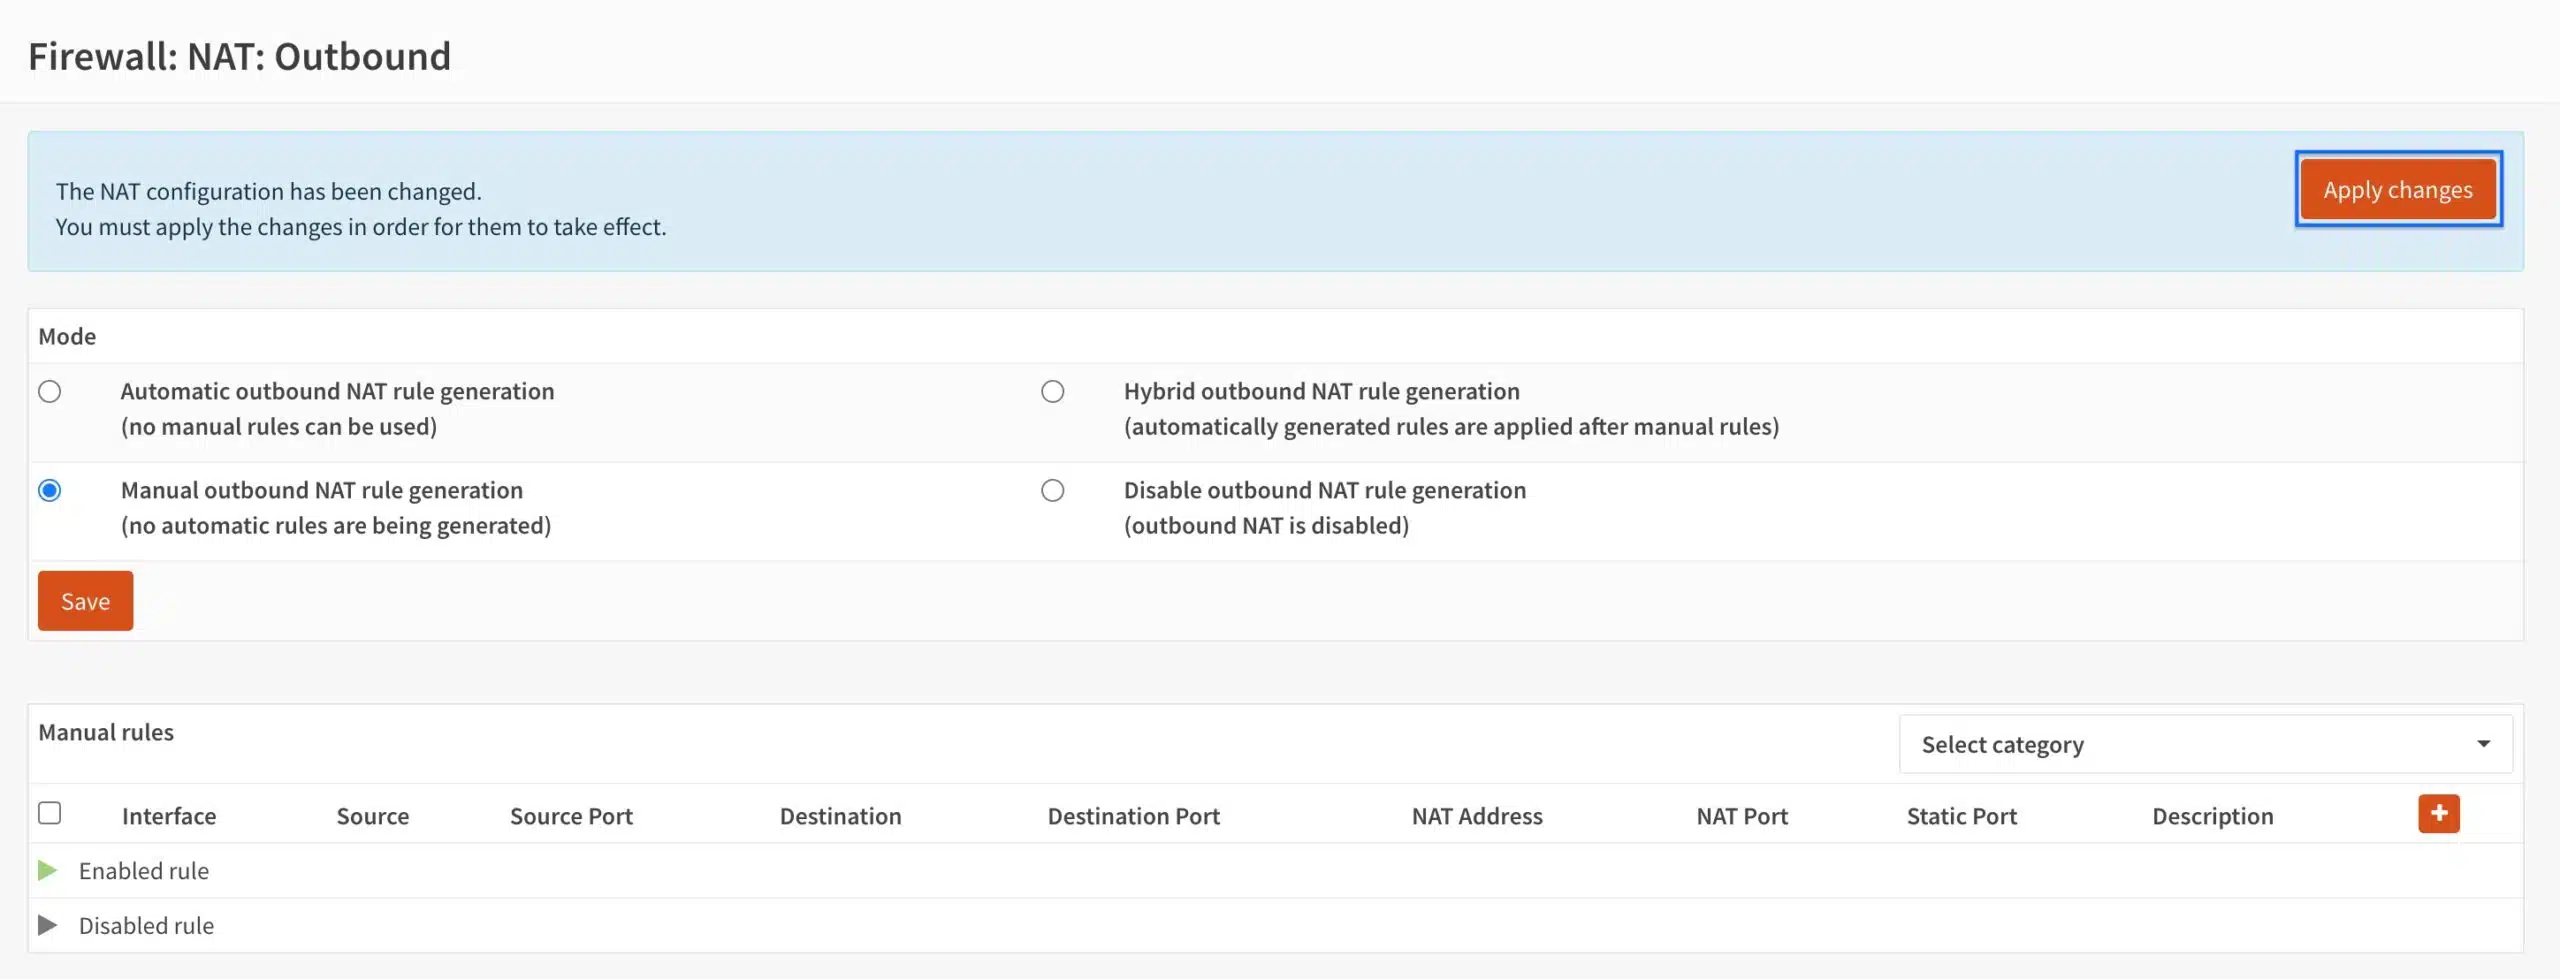
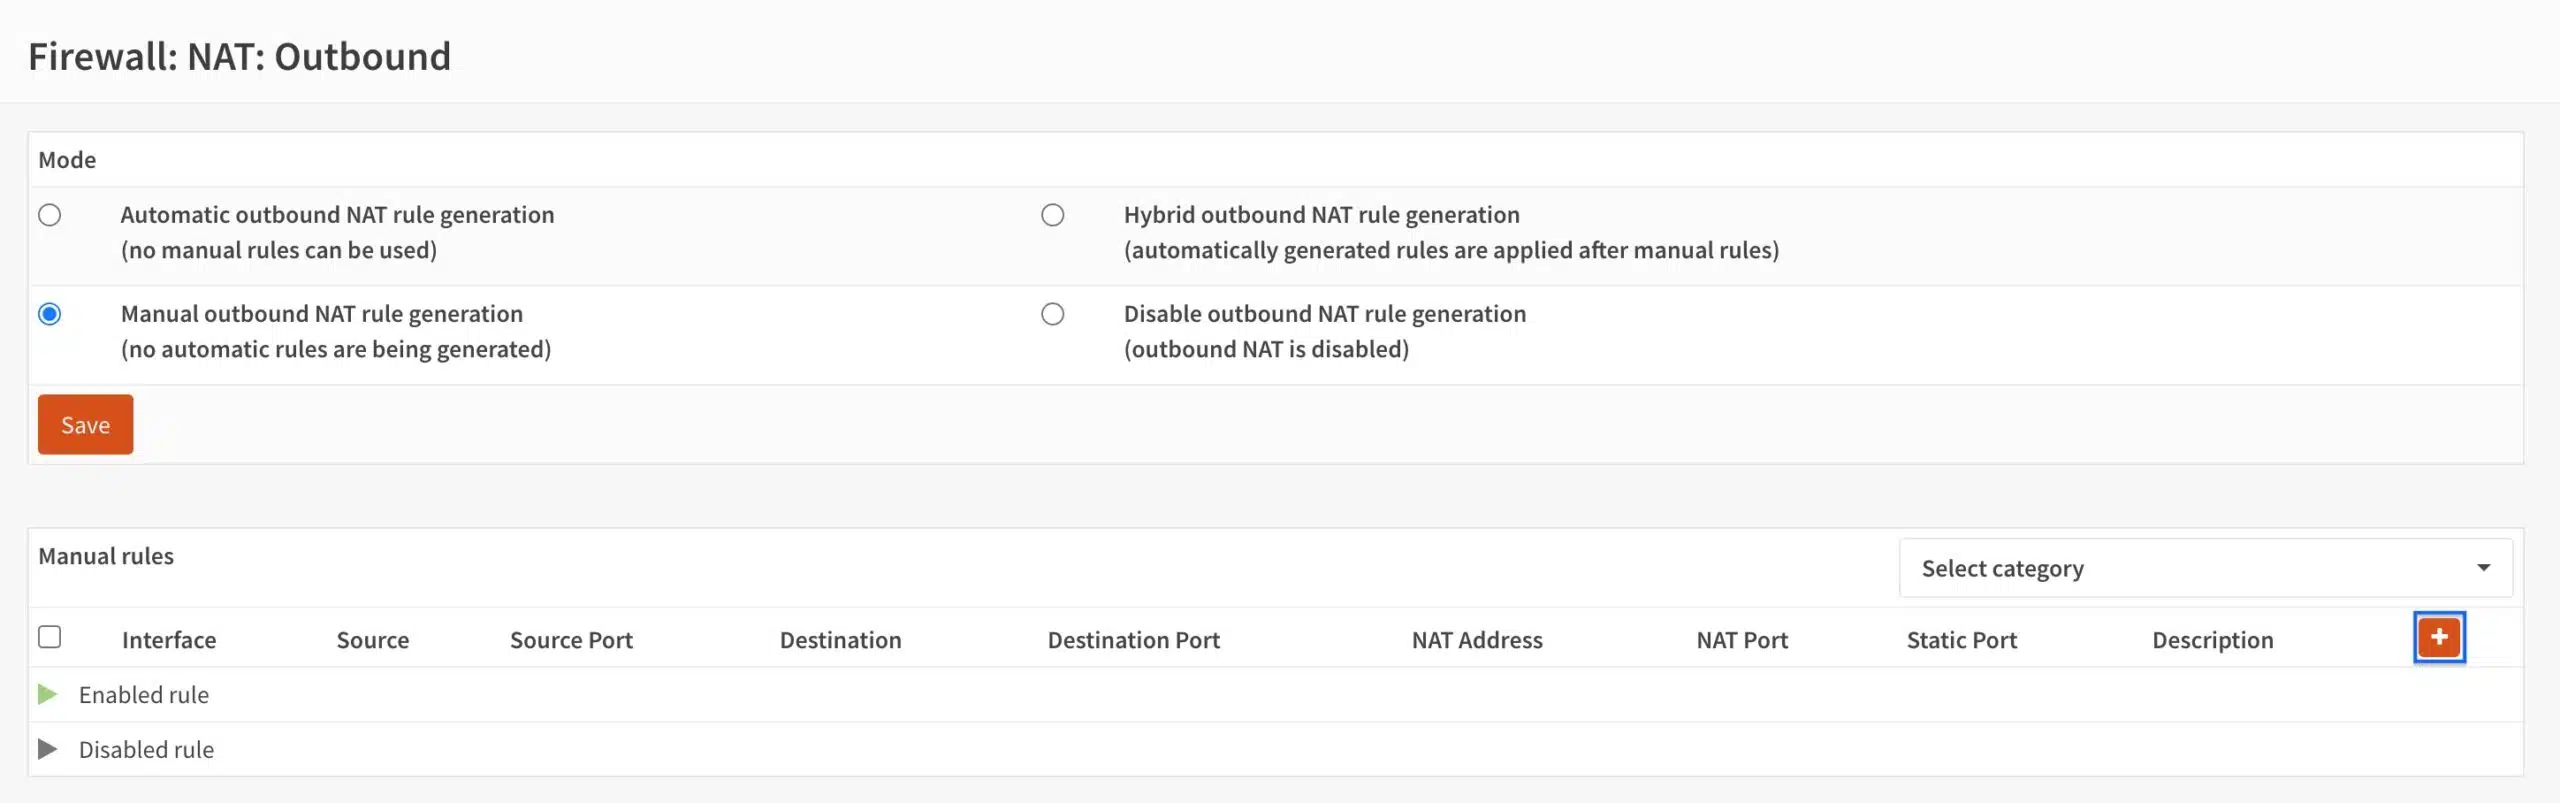
- Click the + sign to add a new outbound NAT rule. The Outbound NAT Rule Configuration page is displayed.
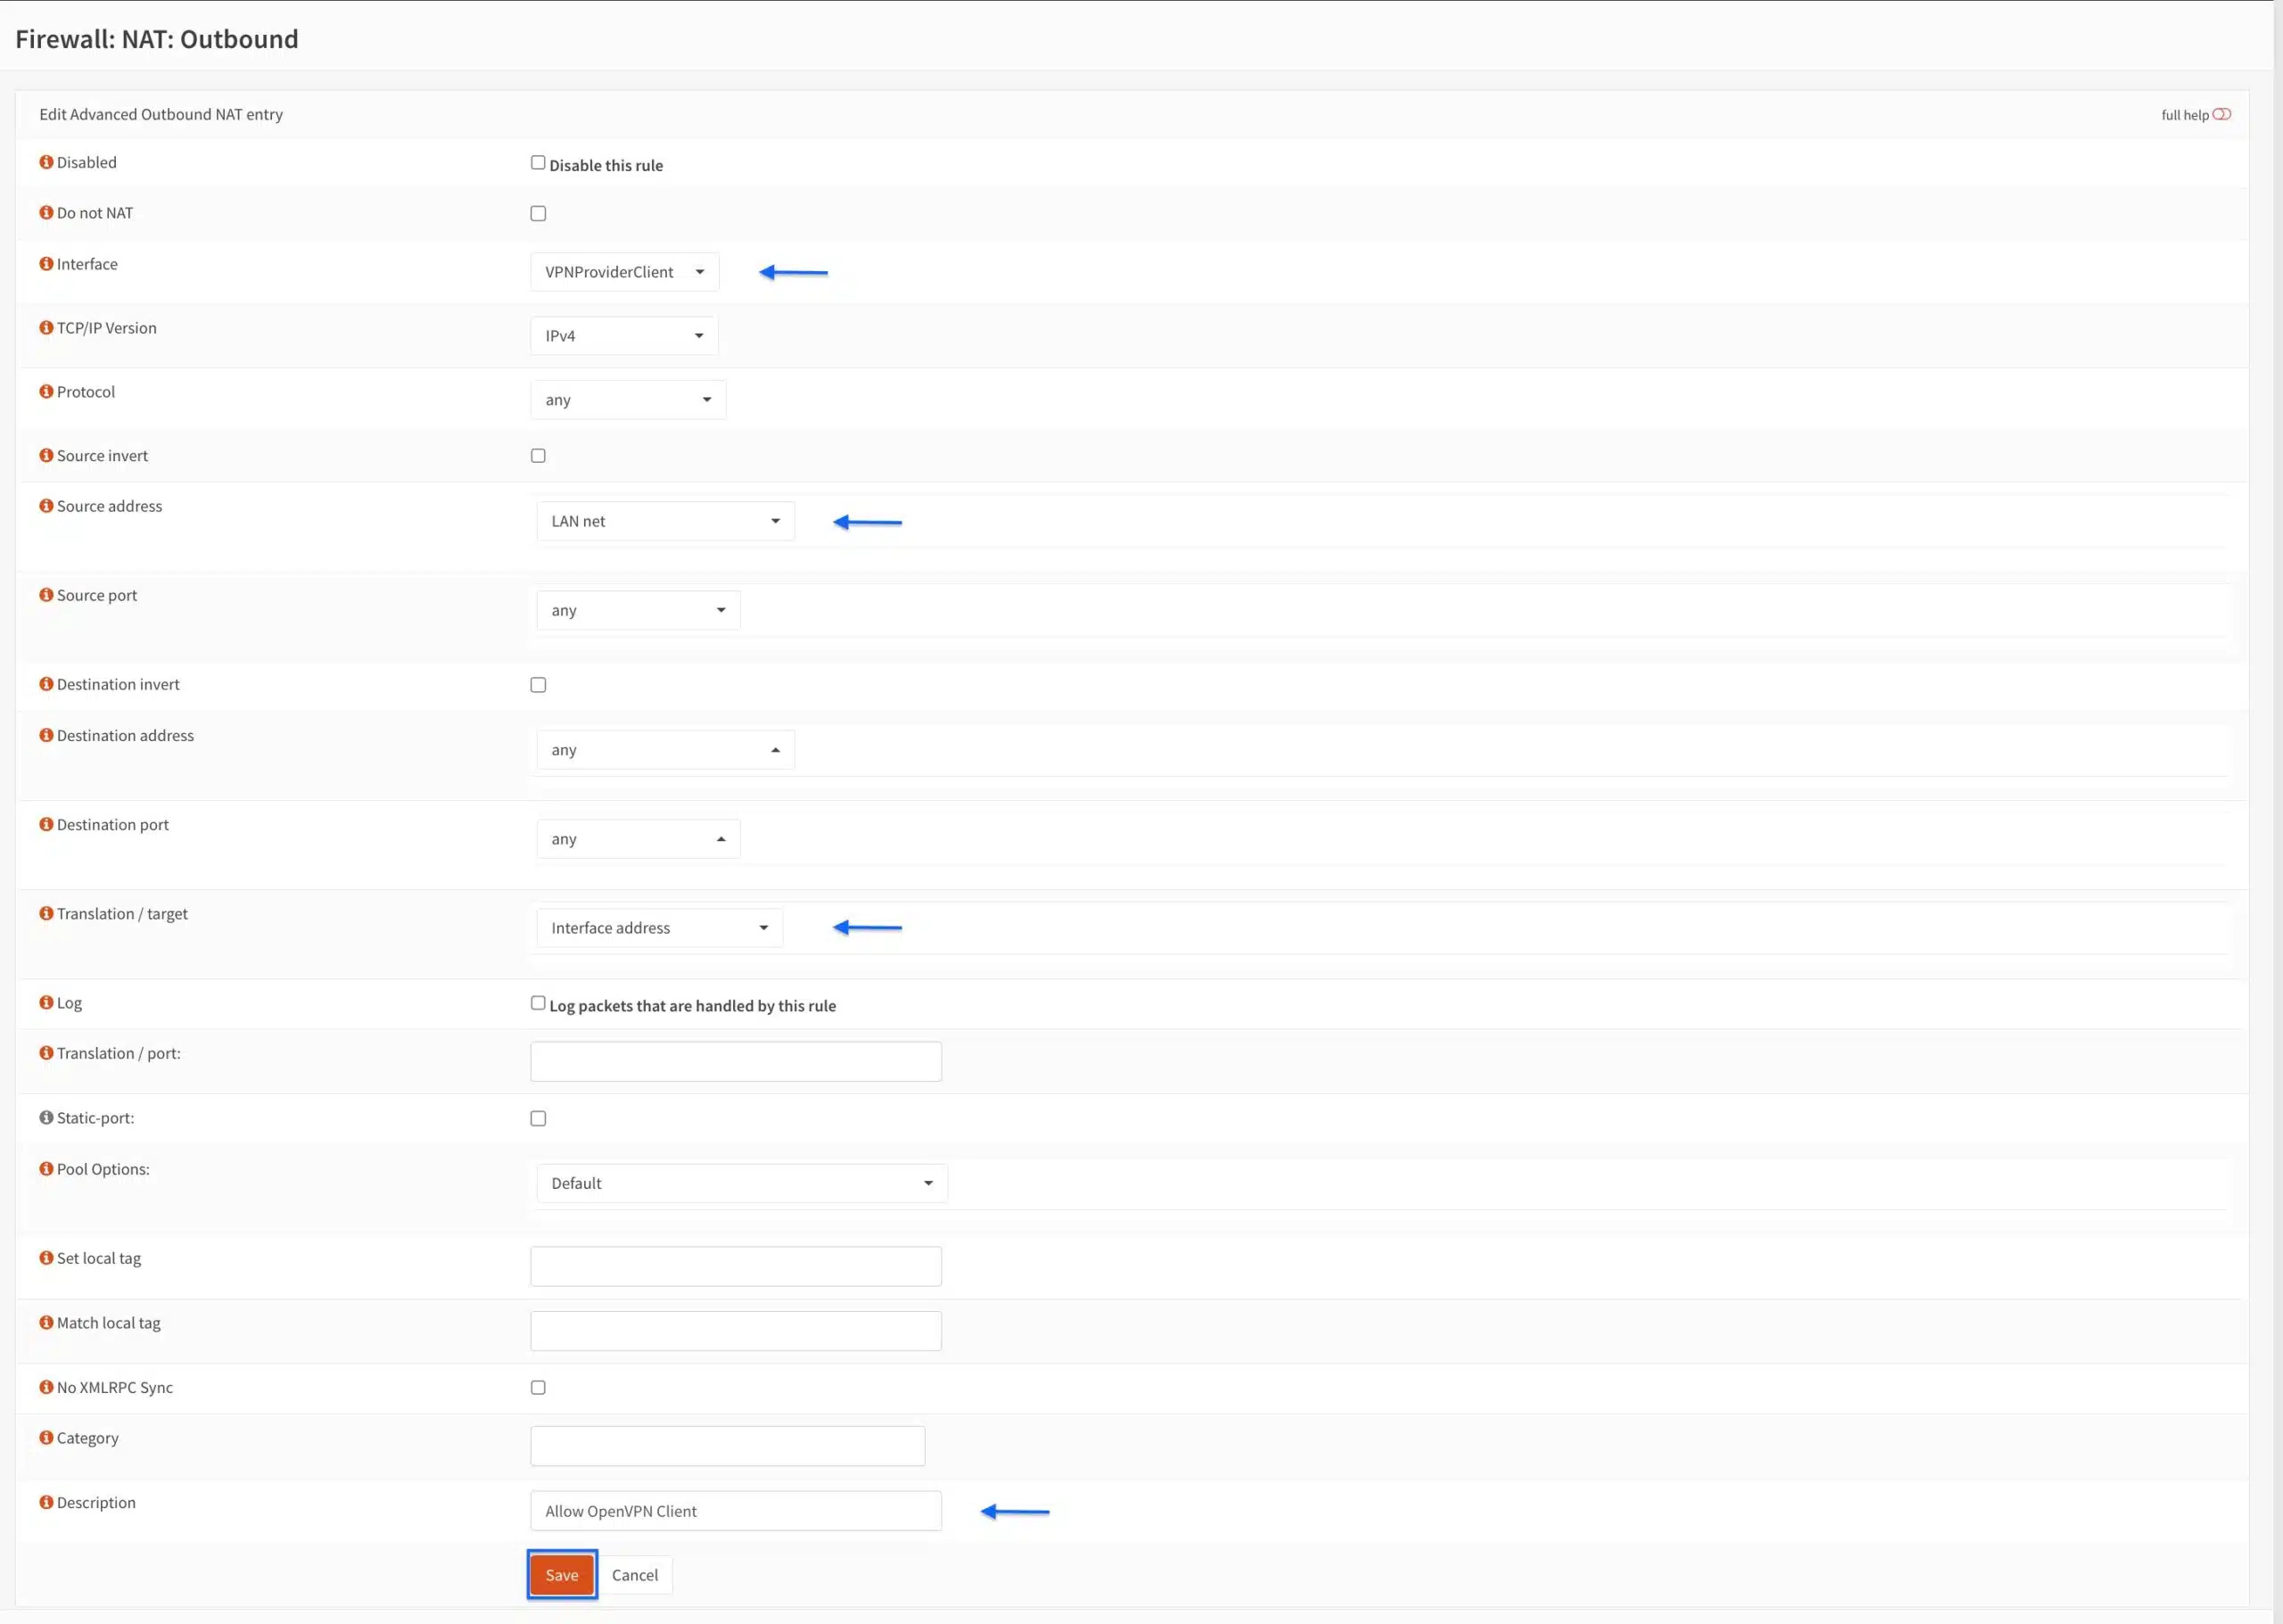
- From the Interface drop-down menu, select the OpenVPN interface we created earlier.
- From the Source address drop-down menu, select LAN.net.
- Make sure the Translation/target drop-down menu is set to Interface address.
- Enter a name for your NAT rule in the Description field.
- Click Save.
- Click Apply Changes. Our NAT rule has been created and is now listed.
DNS
The last thing we need to configure is DNS for your VPN client.There are different ways to do this depending on your OPNsense configuration. Even if your VPN provider hardcodes its DNS servers in their .ovpn configuration file, OPNsense still needs to be aware of the DNS servers to be used. We’ll be using the LAN DHCP server to push the VPN provider’s DNS servers to our LAN clients, because this method works in any scenario.
DHCP
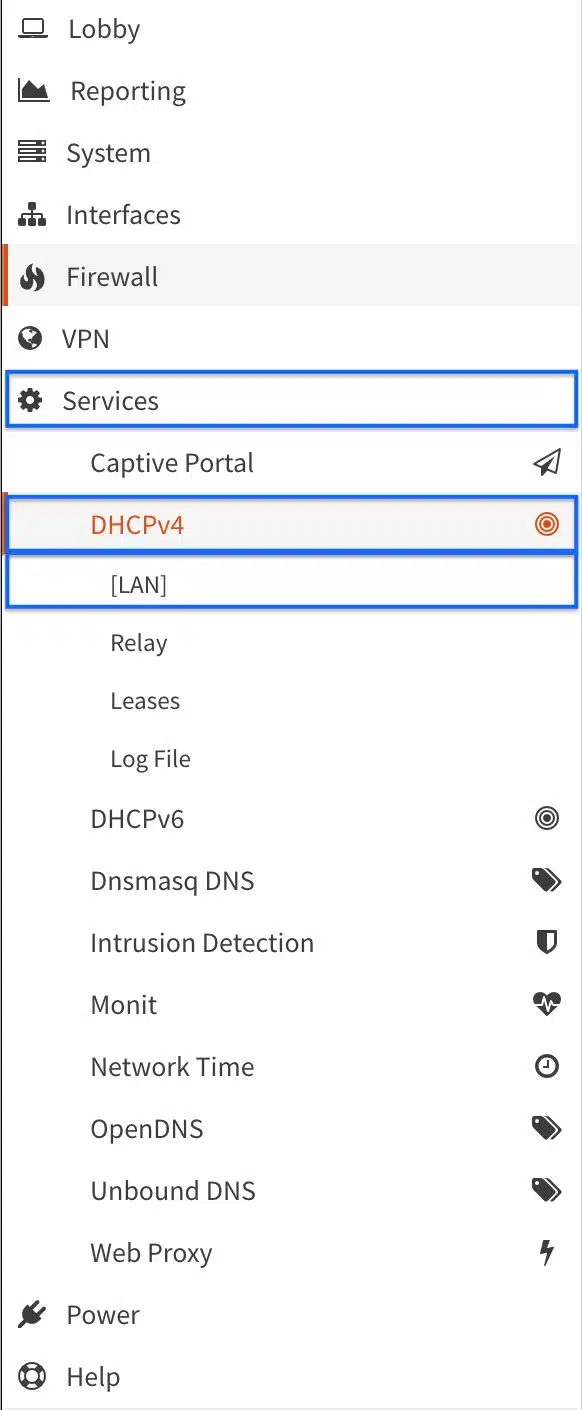
- From the side menus, select Services > DHCPv4 > LAN. The LAN DHCP Server page is displayed.
- Enter your VPN provider’s DNS server IP(s) in the DNS Servers field(s).
- Click Save at the bottom of the page.

Checking the connection
OK, we now have our OpenVPN client connection configured. We’ve created our VPN interface as well as our NAT rules to route our traffic through the VPN tunnel, and we’ve configured our DNS settings to use the VPN provider’s DNS servers. We simply need to check that everything is working correctly and test our connection.
Checking the connection status
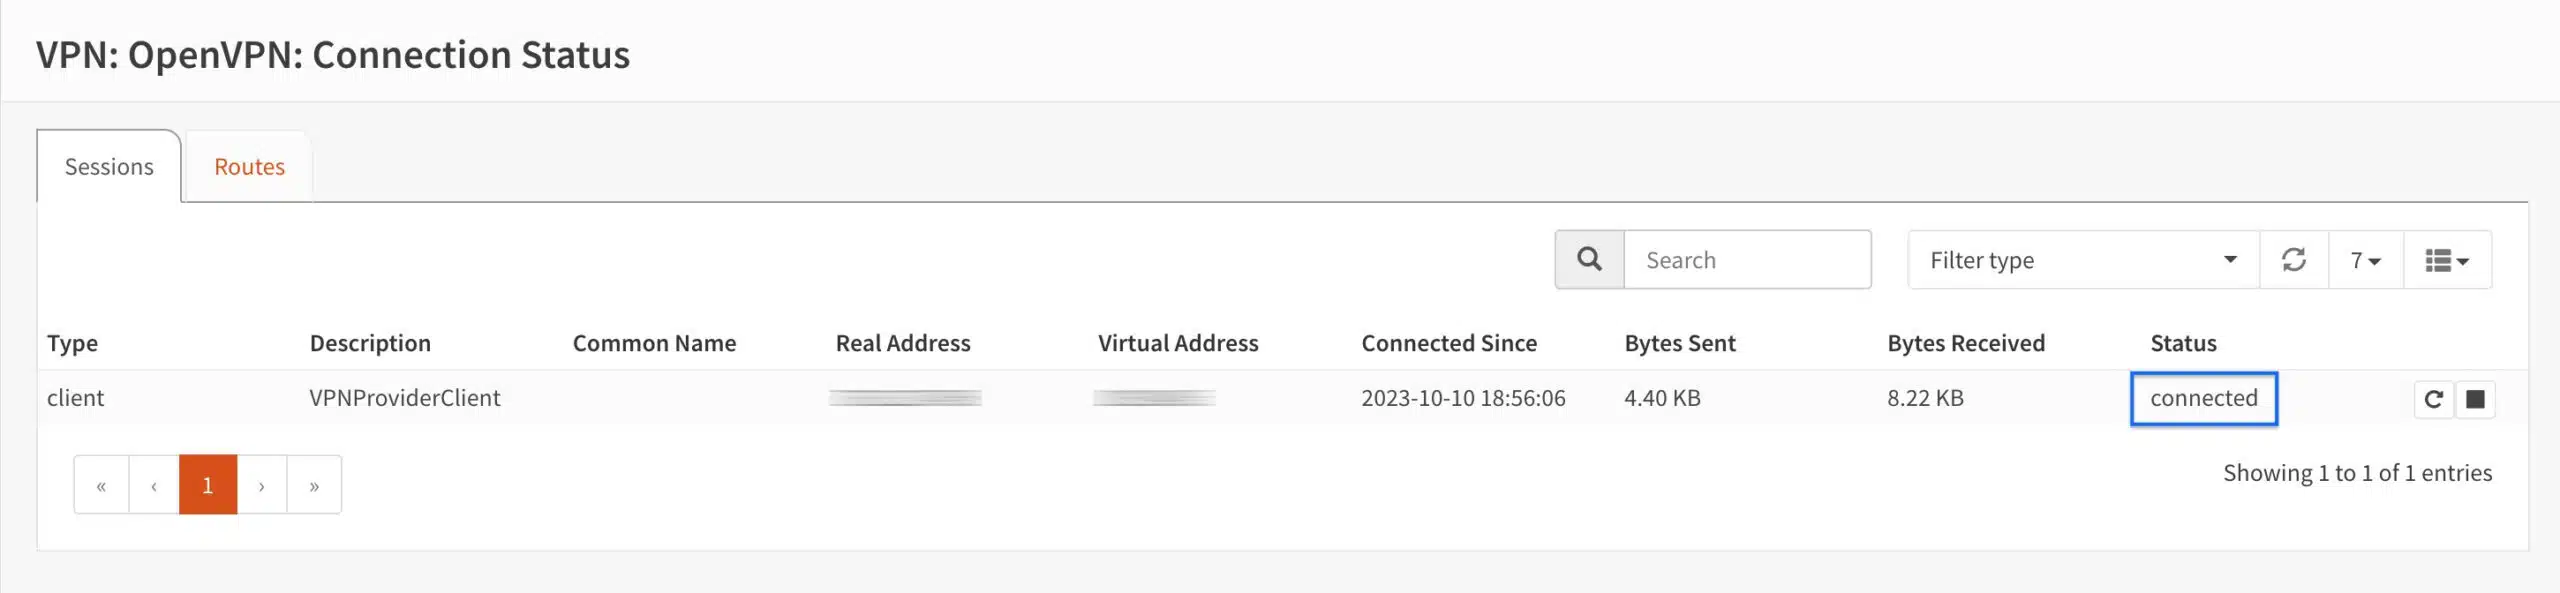
- From the side menus, select VPN > OpenVPN > Connection Status. The OpenVPN Connection Status page is displayed.

- We can see Connected, under the Status header. That’s what we want. So far, so good.
Checking the logs
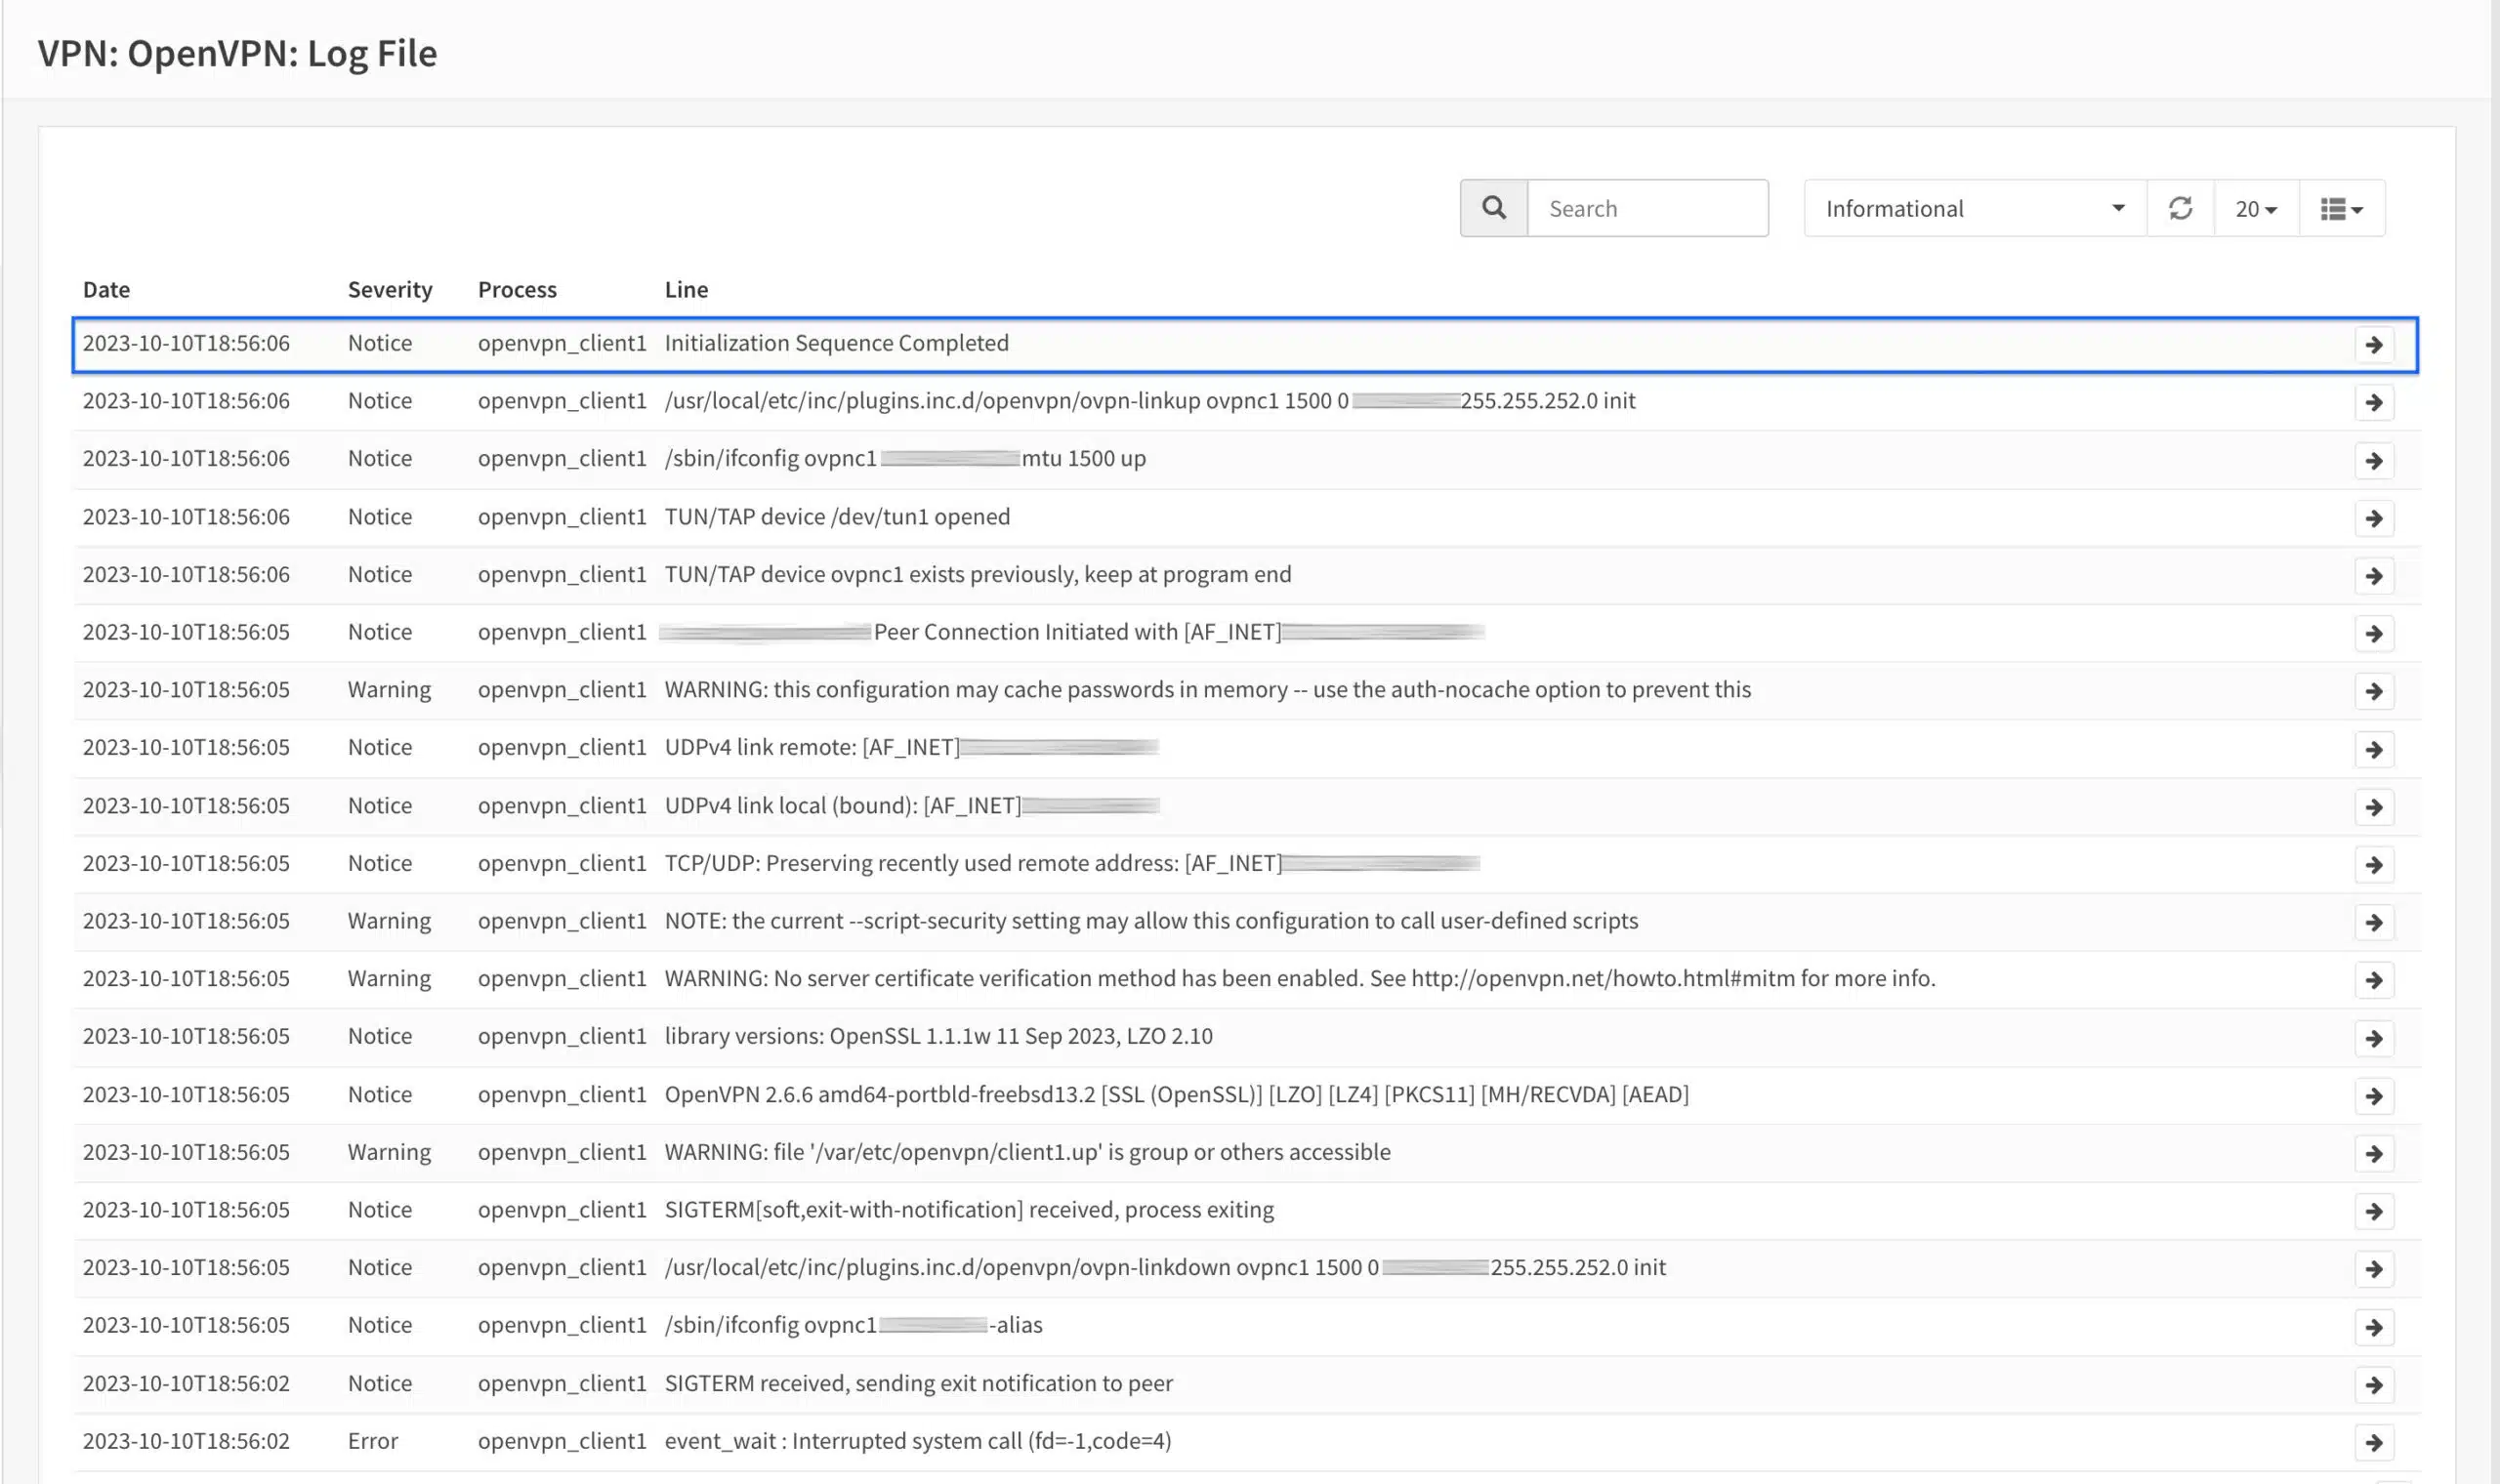
- From the side menus, select Log File (we’re already in the OpenVPN section). The OpenVPN Logs page is displayed.
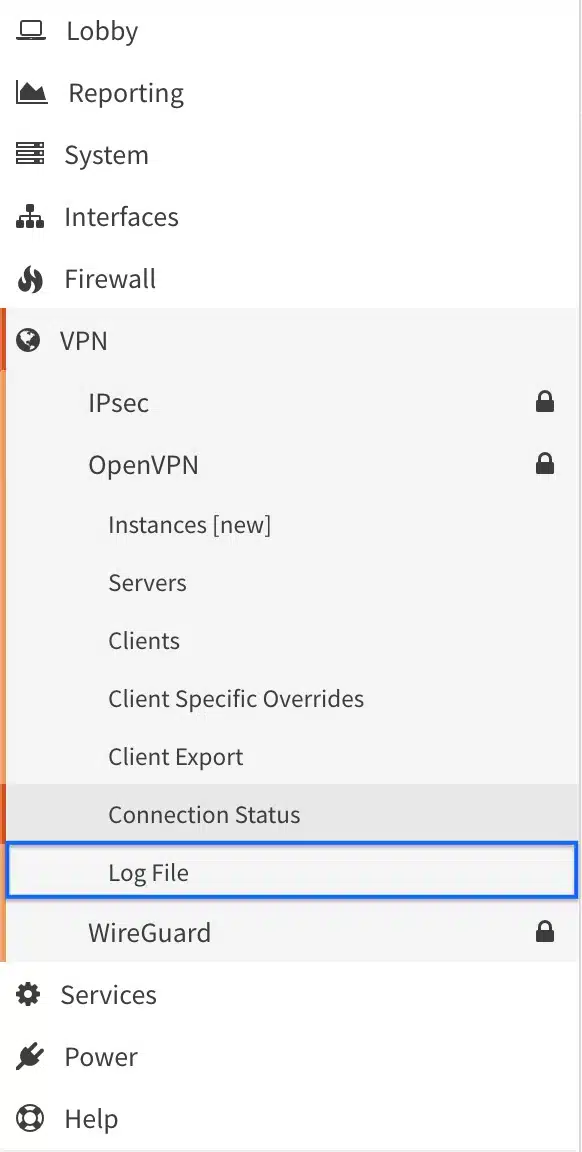
- If the OpenVPN client is set up correctly, you should see Initialization Sequence Completed, somewhere near the top of the OpenVPN logs. We’re good.
Making sure our IP address is changed
- To make sure your IP address is changed to the IP address of the VPN server, you can use Comparitech’s IP address check tool.
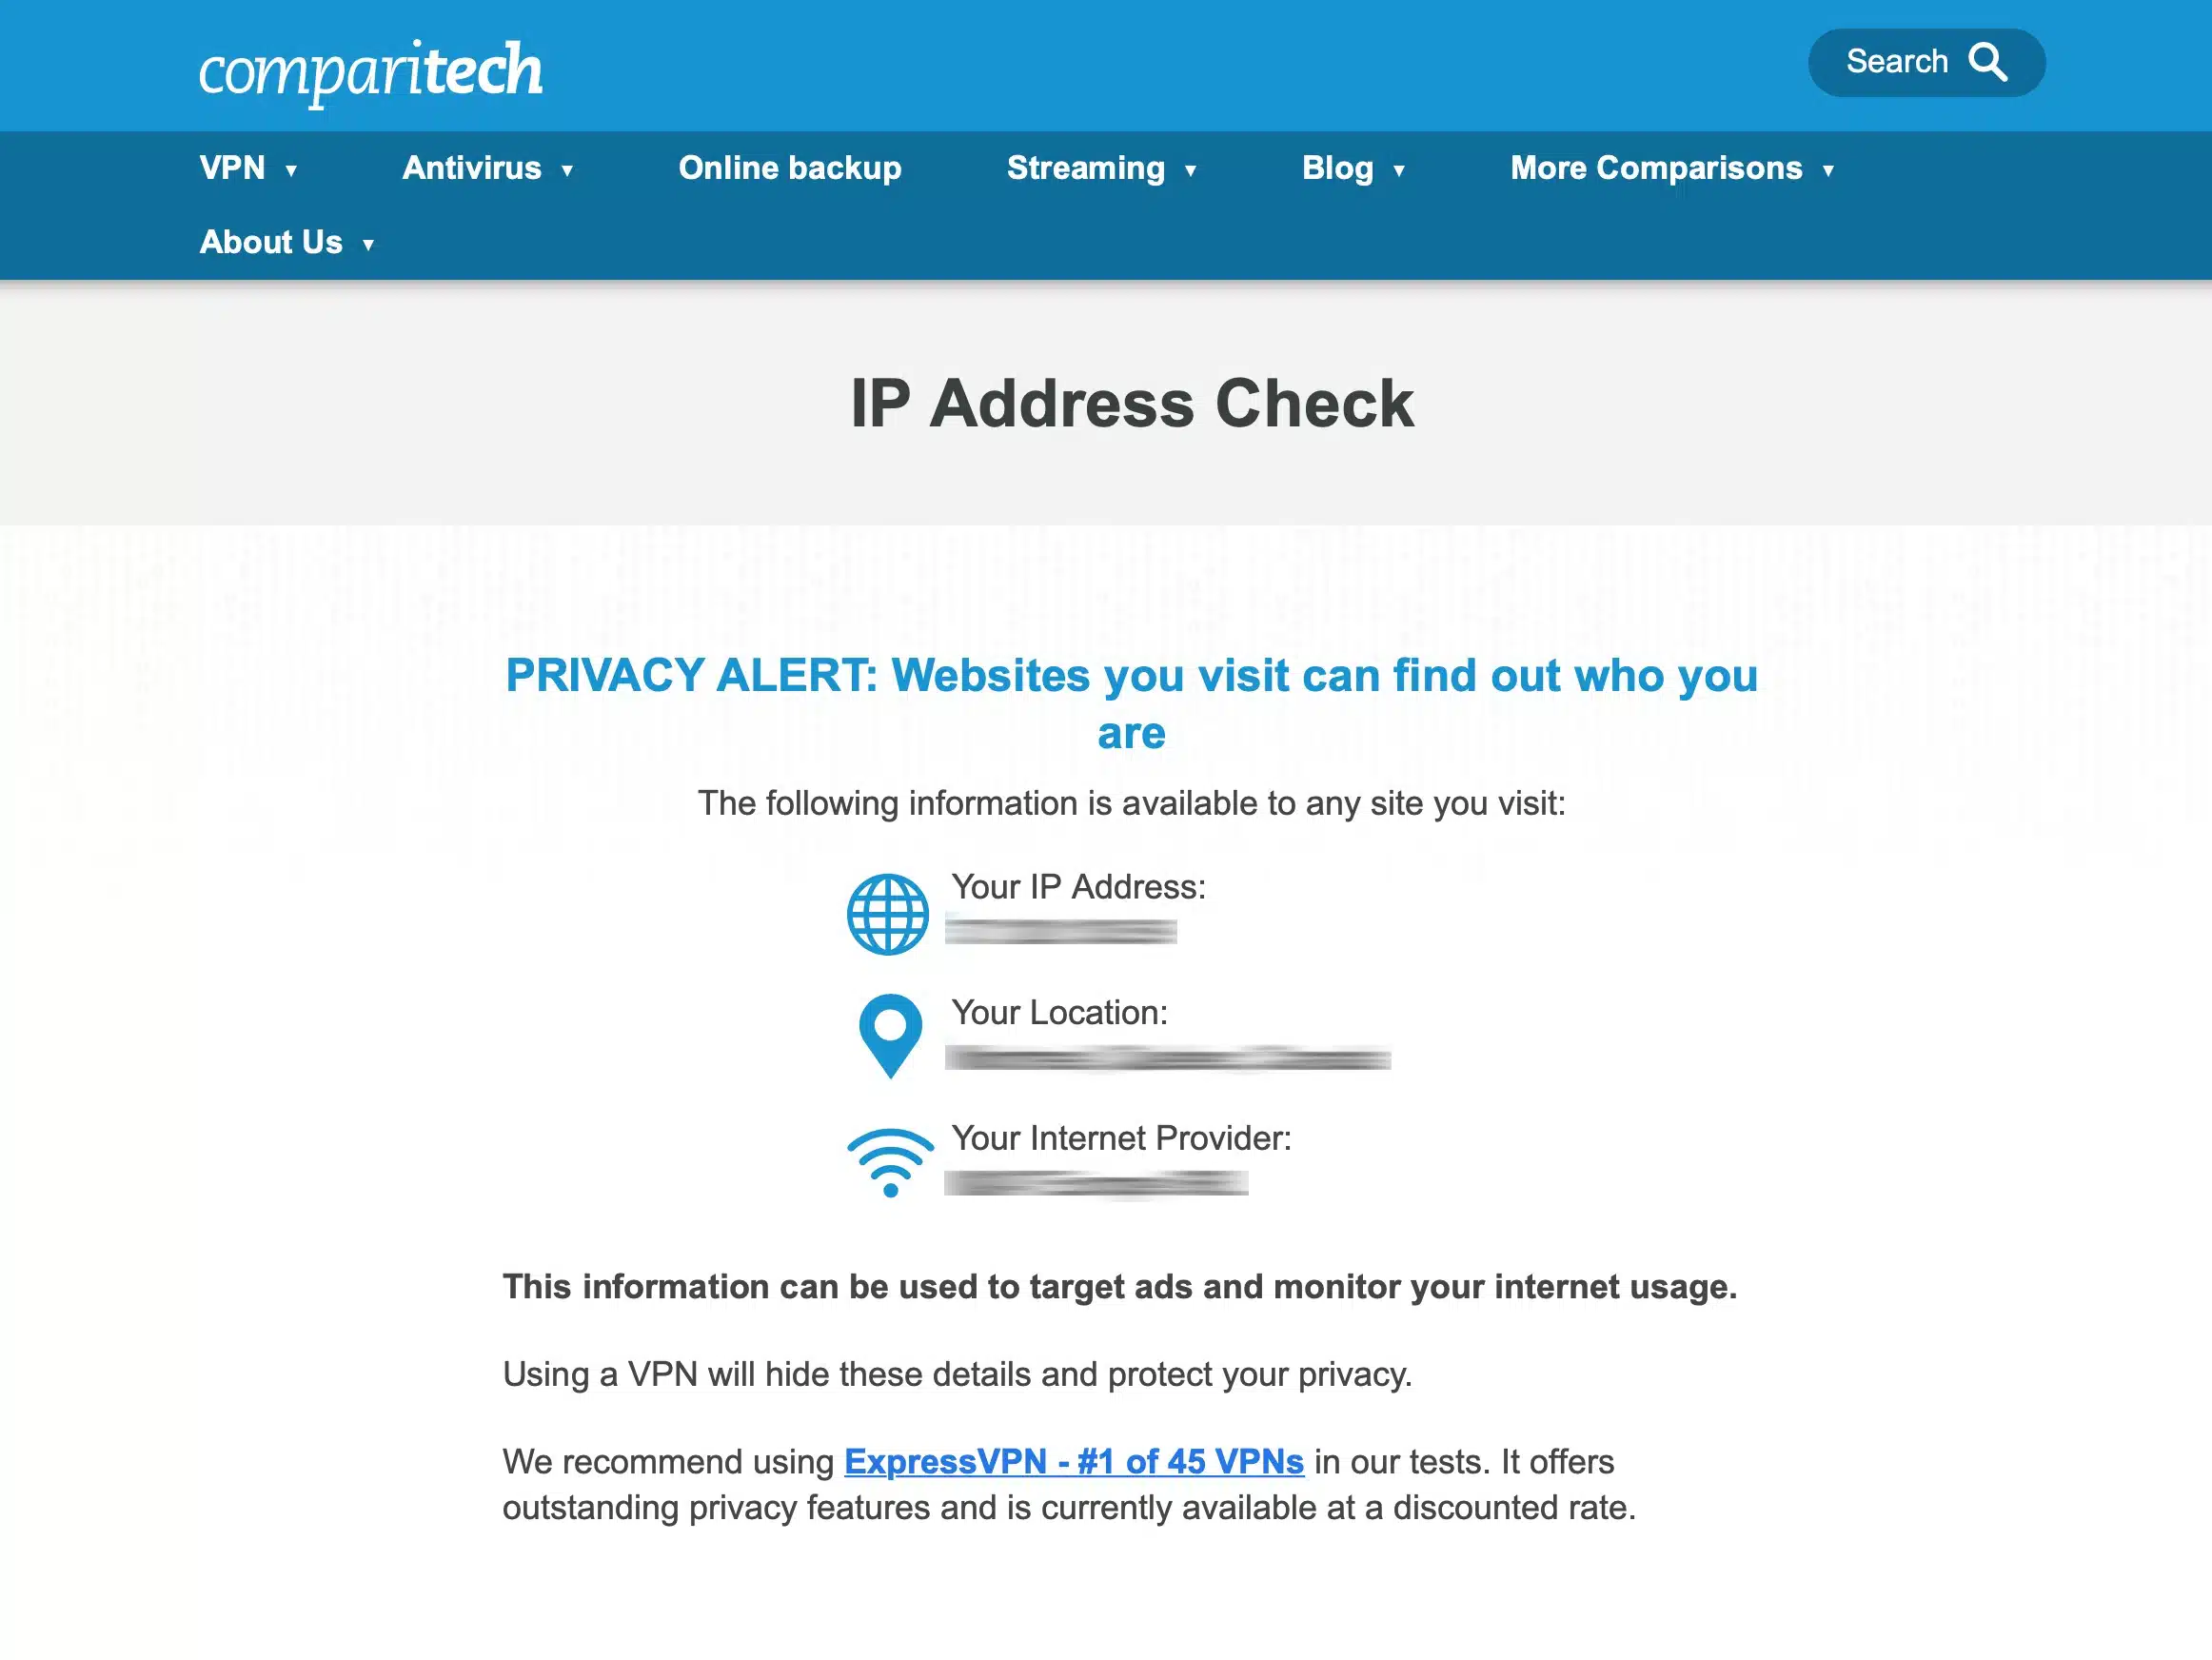
- My IP address has been changed to the VPN server’s IP. You can also check for DNS leaks at dnsleaktest.com.
Wrapping up
Congratulations, you’ve successfully configured an OpenVPN client connection on OPNsense.
You can now use your commercial VPN with any device connected to your OPNsense box without a dedicated VPN app. And because you’re not relying on a VPN client app, your chances of randomly disconnecting from the VPN are much smaller. Also, regardless of the limit your VPN provider places on the number of simultaneous connections, your router only counts as one device as far as your VPN provider is concerned. So you can connect as many devices as you like this way.
As always, stay safe.


