
In this post, we will explain how to configure a WireGuard “client” connection to a commercial VPN provider on pfSense. WireGuard does not use the client/server dichotomy as OpenVPN does. In WireGuard, each member of the network is a node. In our scenario, the pfSense node will essentially act as the “client,” and your VPN provider’s WireGuard node will act as the “server.
This guide assumes you’ve already got pfSense setup with working WAN and LAN interfaces.
Prerequisites
Beyond a machine running pfSense with two network cards (one WAN, one LAN), you will also need a VPN provider that supports WireGuard and allows its users to configure it on their router. This is critical because to get WireGuard working on pfSense (or any other router), you’ll need to upload your pfSense’s tunnel endpoint’s (i.e., the server’s) public key. Your provider needs to assign you (and provide you with) a local IP address from its WireGuard network. You also need to know which port(s) your provider uses to establish the WireGuard tunnel. You can find all of this on your VPN provider’s webpage.
Here are some recommended VPN providers that support WireGuard on routers:
It may not be the most extensive list, but it’s bound to grow.
Uploading your public key and obtaining an IP address
The way to upload your public key and obtain an IP address varies from provider to provider. Here are the basics of how to do this for each of the above VPN providers:
- With iVPN, you need to log into your account and manually upload your public key. Once uploaded, iVPN will provide you with your local IP address.
- With Mullvad, you can use the following command from a terminal window:
curl https://api.mullvad.net/wg/ -d account=0000000 —data-urlencode pubkey=YOURPUBLICKEY. Replace “0000000” with your account number and replace “YOURPUBLICKEY” with your public key. - With Windscribe, you’re provided with a WireGuard configuration generator that will assign you a public key and an IP address while providing you with the private key to use on your system.
From here on, this guide assumes you have uploaded your public key and have obtained an IP address from your VPN provider.
About pfSense
pfSense is an open-source firewall/router application that’s based on FreeBSD. pfSense is used by many organizations as the backbone of their network infrastructure. But it can also be installed on old PC hardware (or modern and powerful machines) and used as a router for home use.
Using pfSense instead of an off-the-shelf commercial router is a good idea for many reasons. A big one is frequent OS updates to patch vulnerabilities. Most commercial router manufacturers never push firmware updates to their users, while most people use their router for close to a decade before upgrading. That’s a long time to go without security updates. But beyond better security, pfSense is much more customizable and provides many networking tools in one package that can easily accommodate almost any network configuration. And it can all be done through an intuitive GUI.
Installing WireGuard
WireGuard, on pfSense, is an add-on package. So the first thing we need to do is install the WireGuard package.
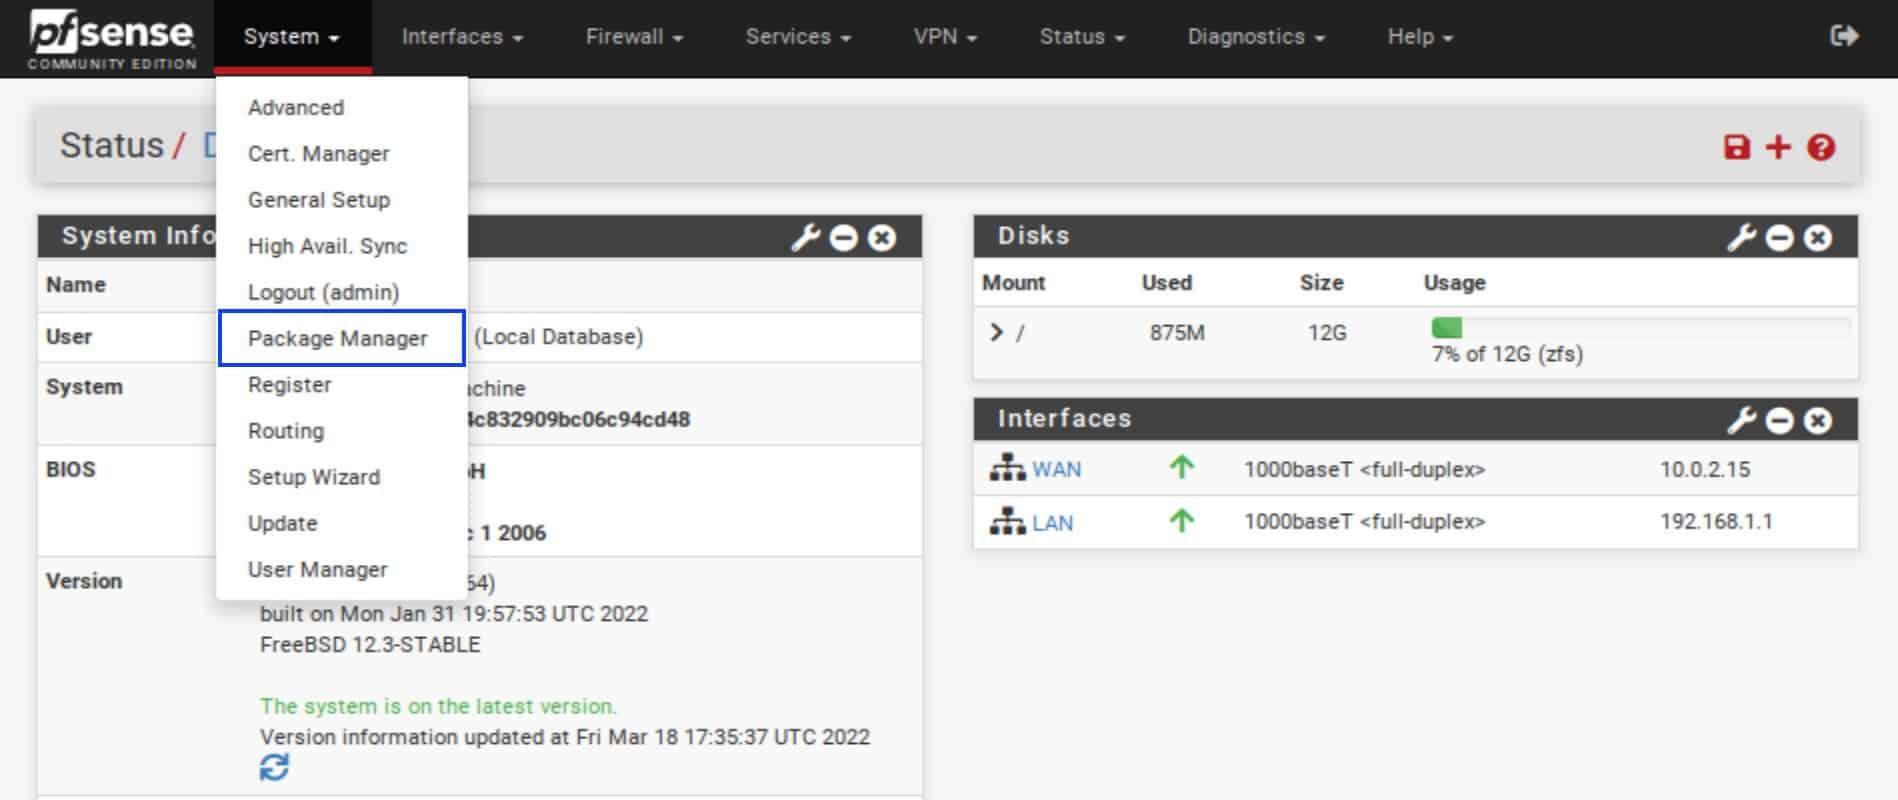
- From the top menu, select System > Package Manager. The Package Manager is displayed.
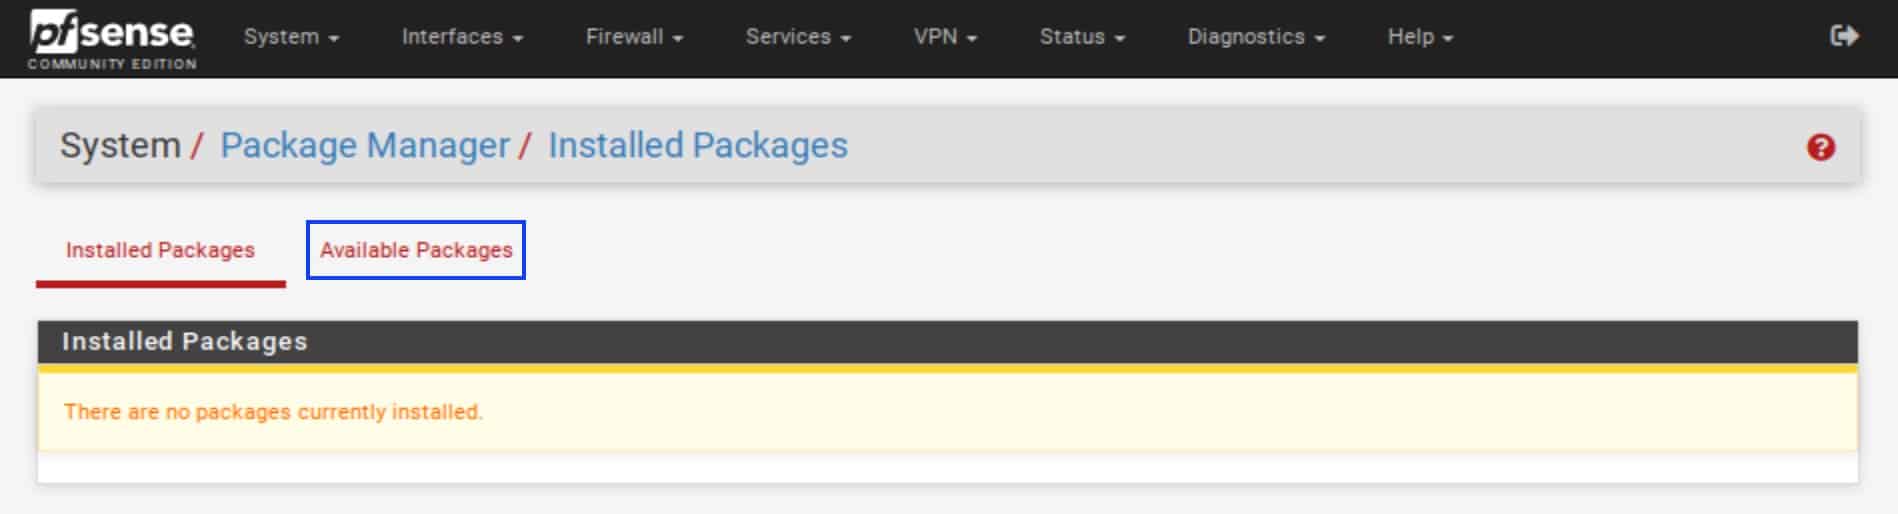
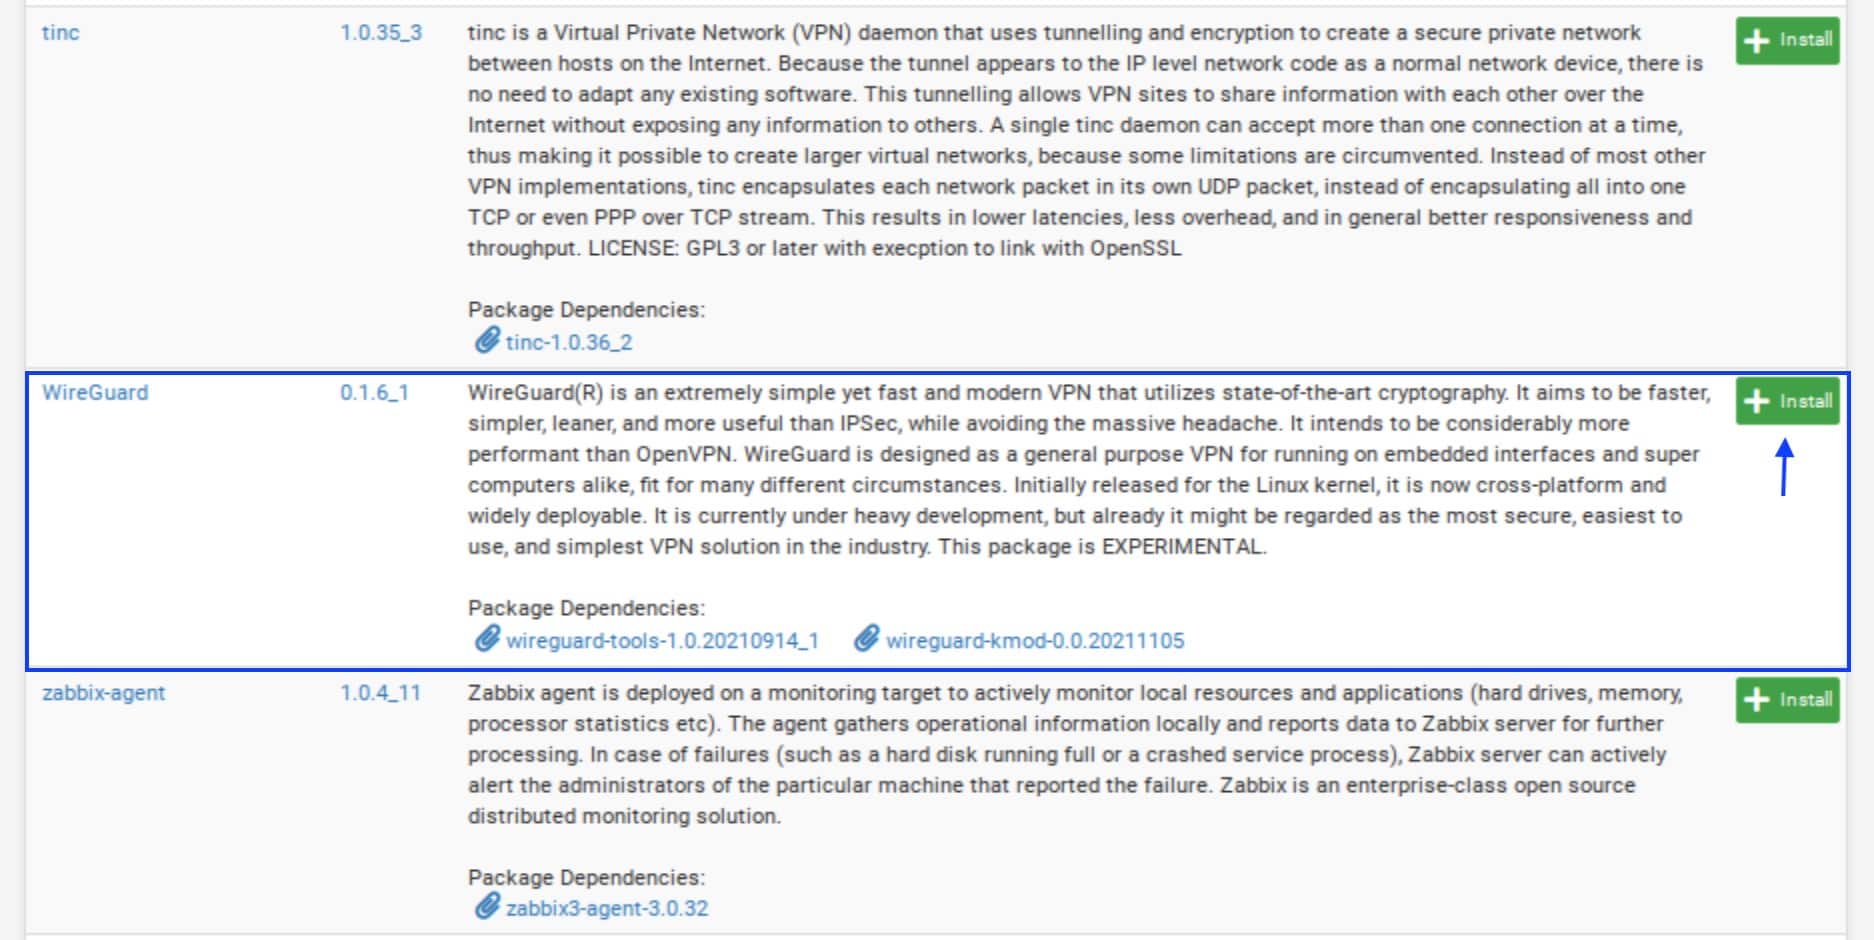
- Click Available Packages to display the list of available packages.
- Scroll down until you see WireGuard. Click Install.
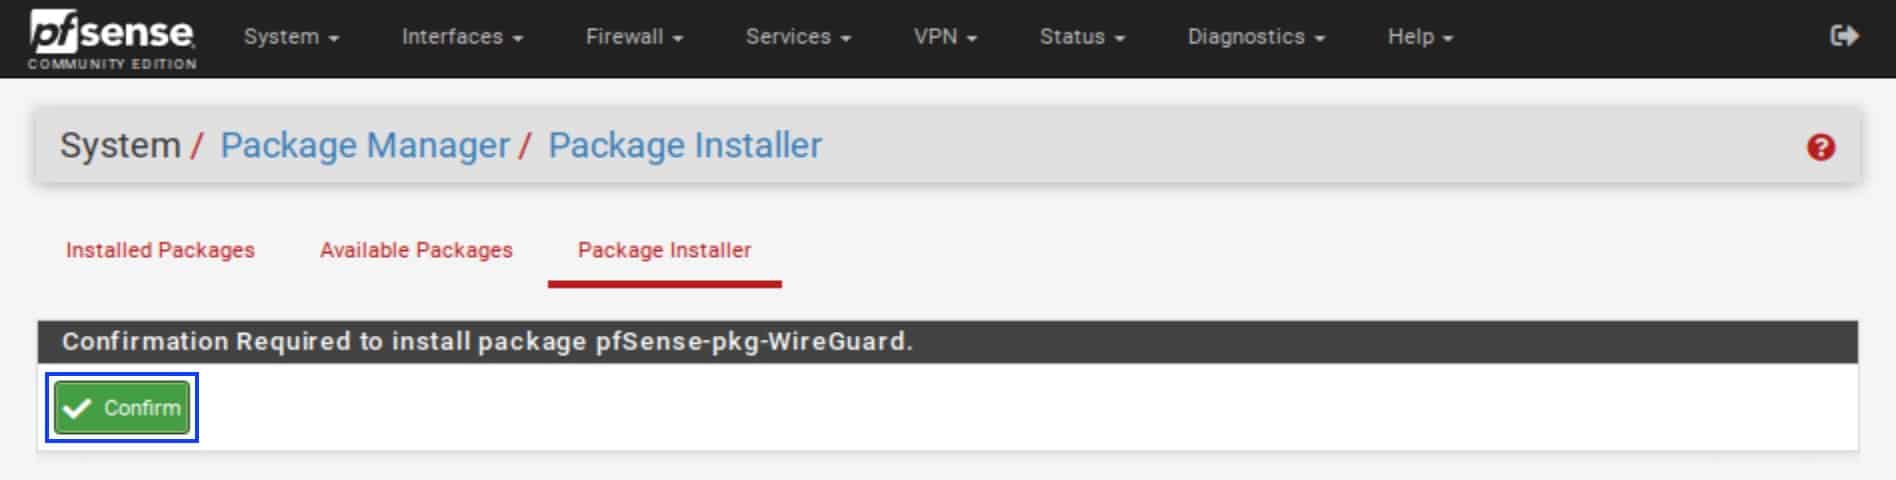
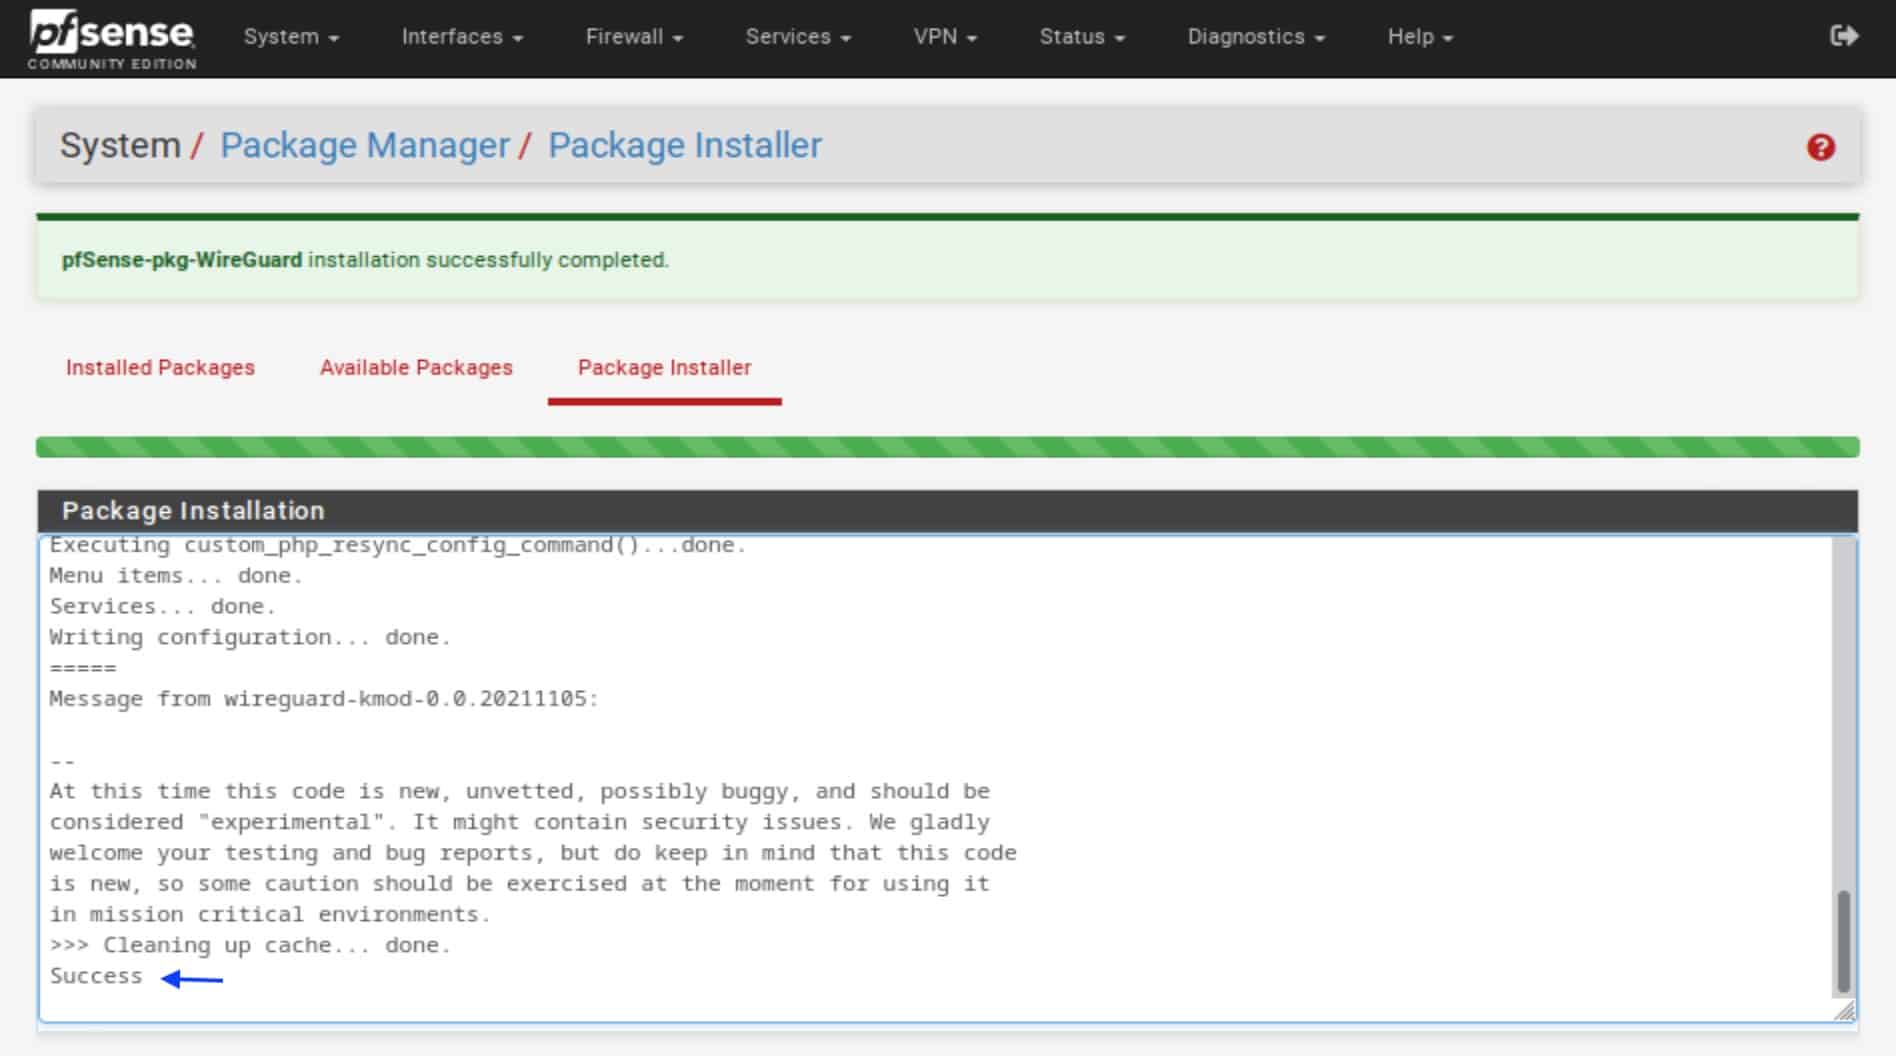
- You’re prompted to confirm the installation. Click Confirm. The installation begins. When complete, you should see Success at the bottom of the installation window.
Configuring the tunnel
In this step, we’re going to start configuring our WireGuard tunnel to our VPN provider.
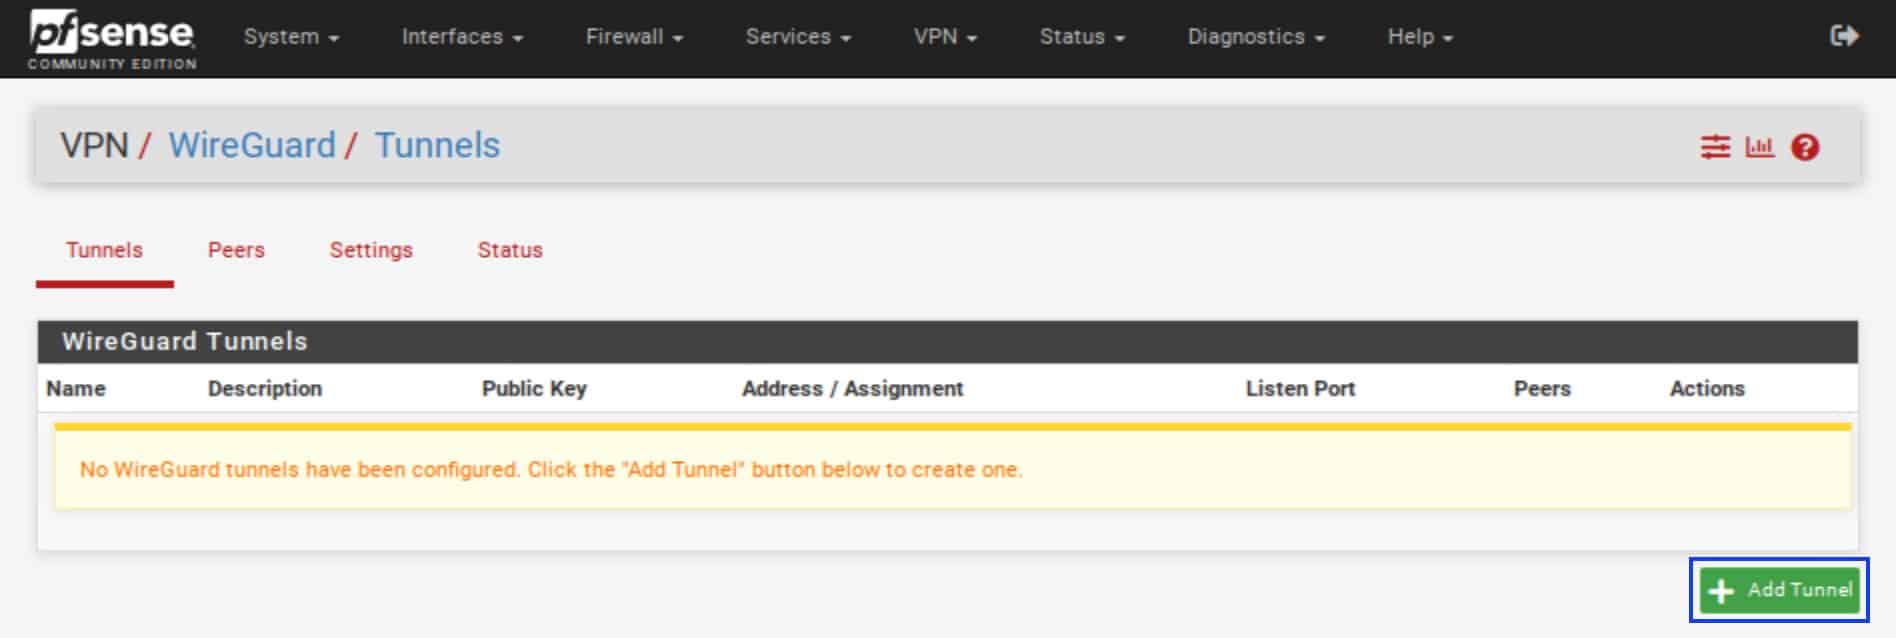
- From the top menu, select VPN > WireGuard. The WireGuard options are displayed. We’re on the Tunnels tab by default.

- Click Add Tunnel. The WireGuard Tunnels page is displayed.
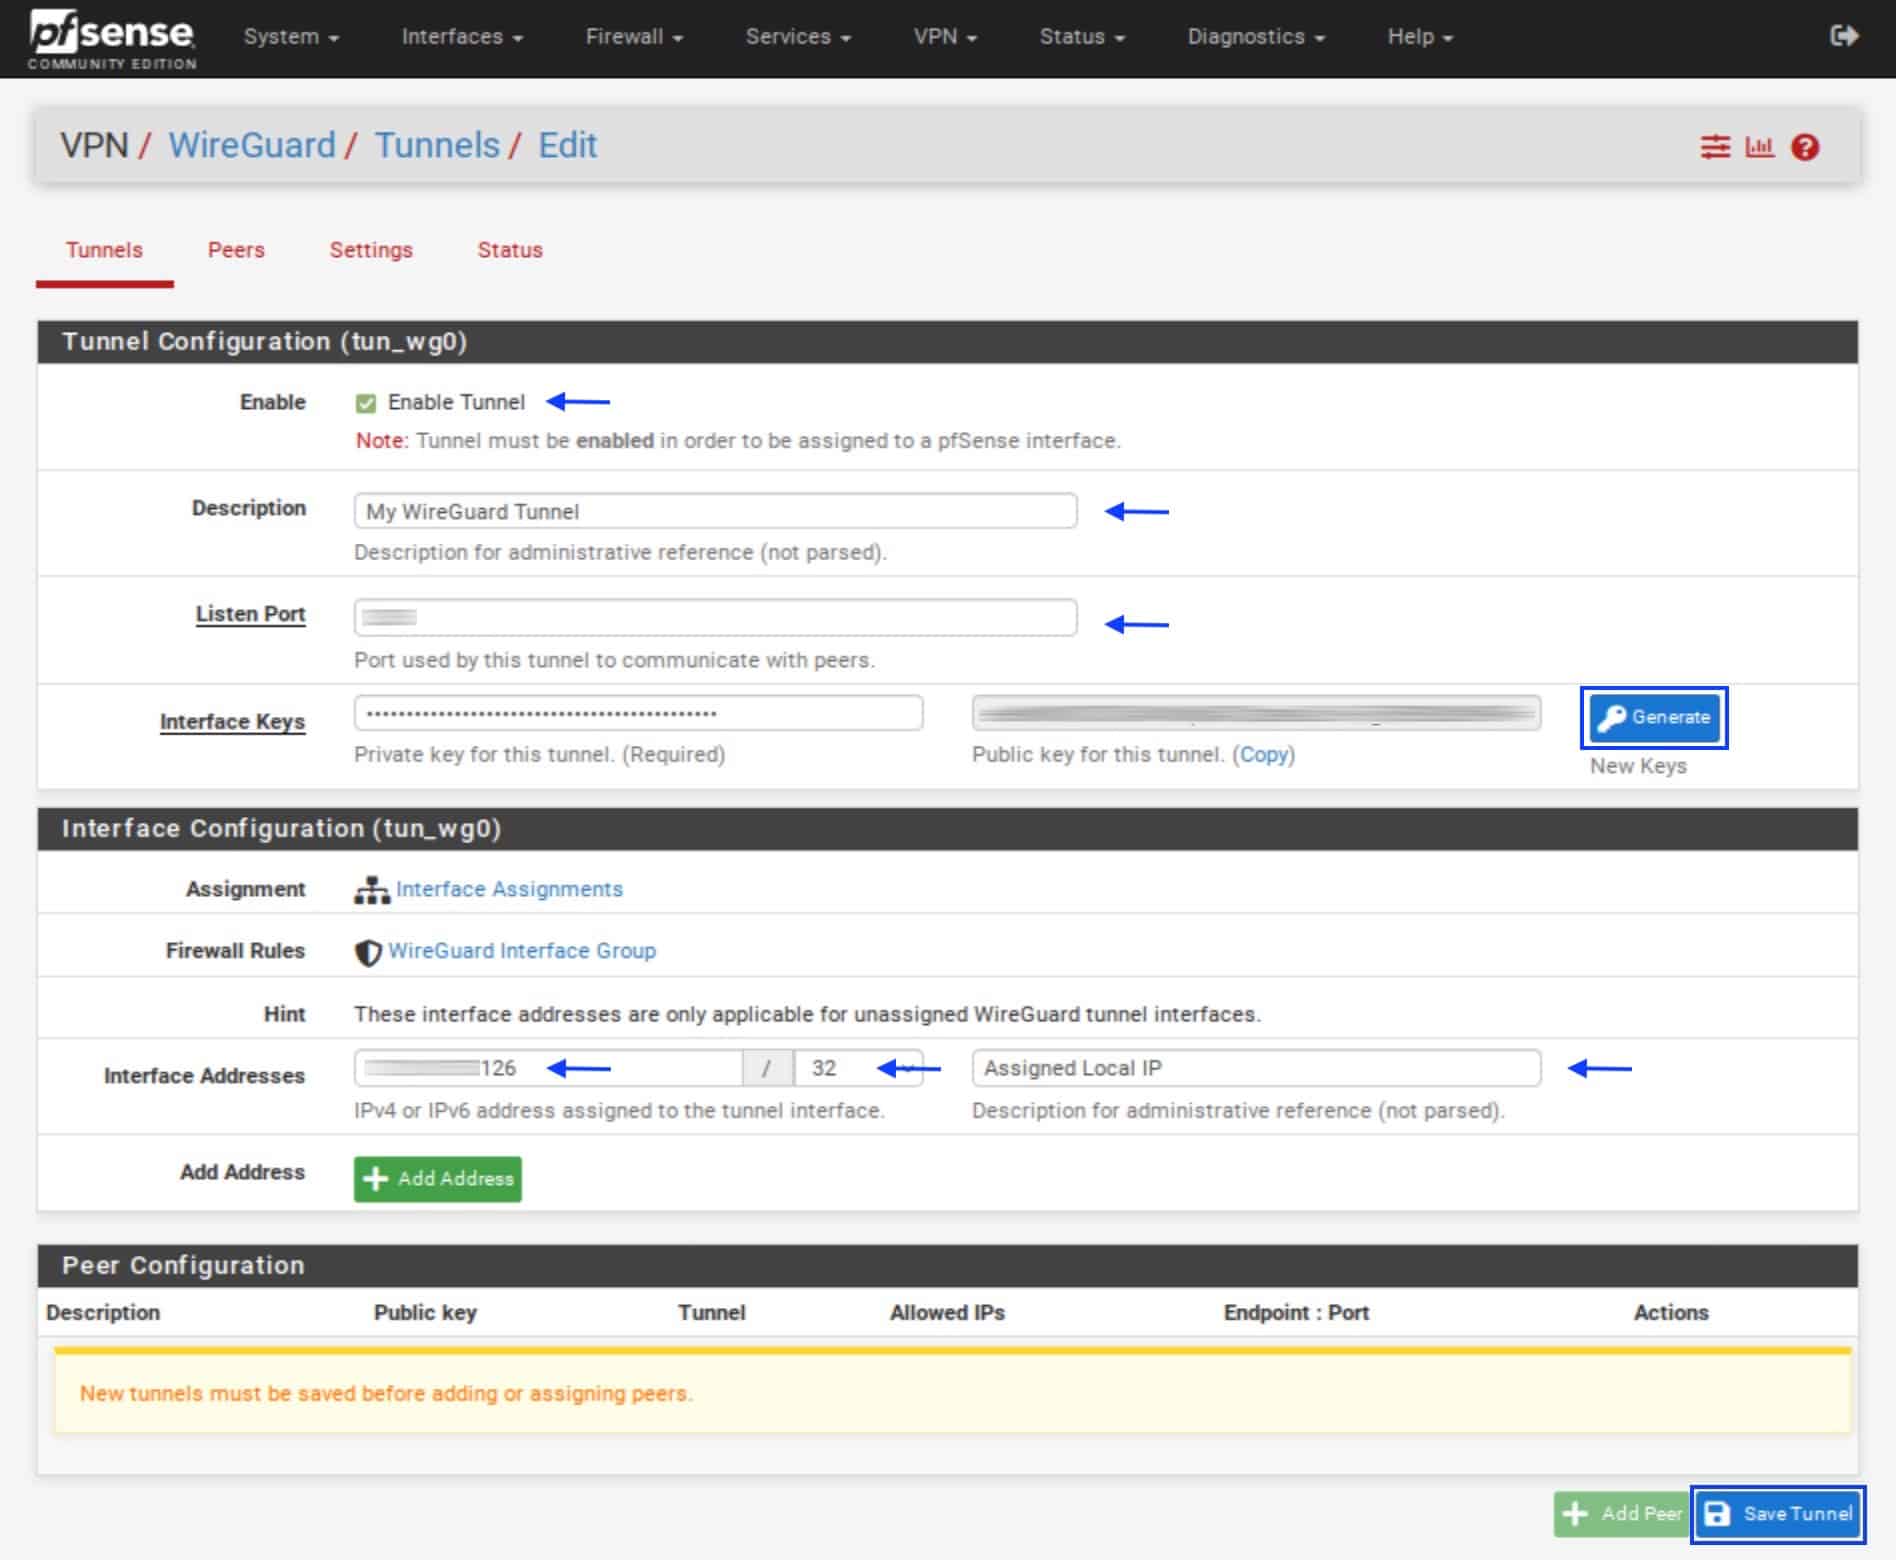
- Make sure Enable Tunnel is ticked (it should be by default).
- Fill in a description for your tunnel.
- Set the Listen Port.
- Click Generate next to the Interface Keys boxes and copy the public key. You will need to upload this to your VPN provider.
- *For Windscribe, paste the private key you obtained from the config generator in the Private Key box. Your public key will be automatically derived from the private key.
- In the Interface Addresses field, paste the IP address assigned by your VPN provider, setting the subnet mask to /32. This guide assumes most people will configure only an IPv4 WireGuard tunnel. However, if your provider offers IPv4 and IPv6 and you want to use both, you can click Add Address and add the IPv6 address assigned by your provider.
- Add a description (optional).
- Click Save Tunnel. You’re taken back to the Tunnels page.
Configuring the peer
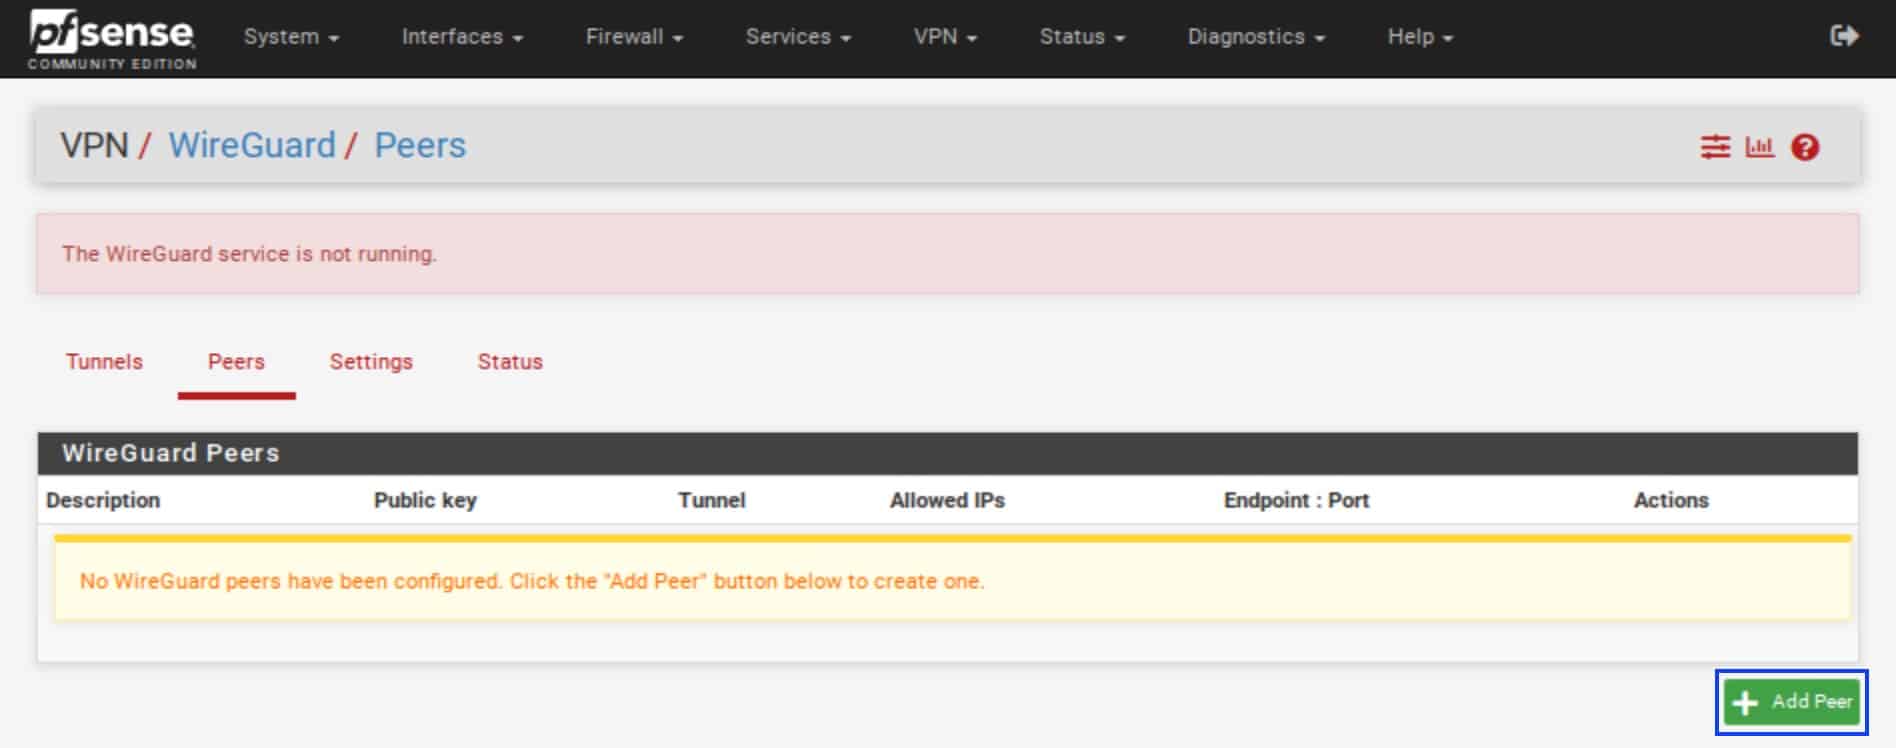
- Click the Peers tab.
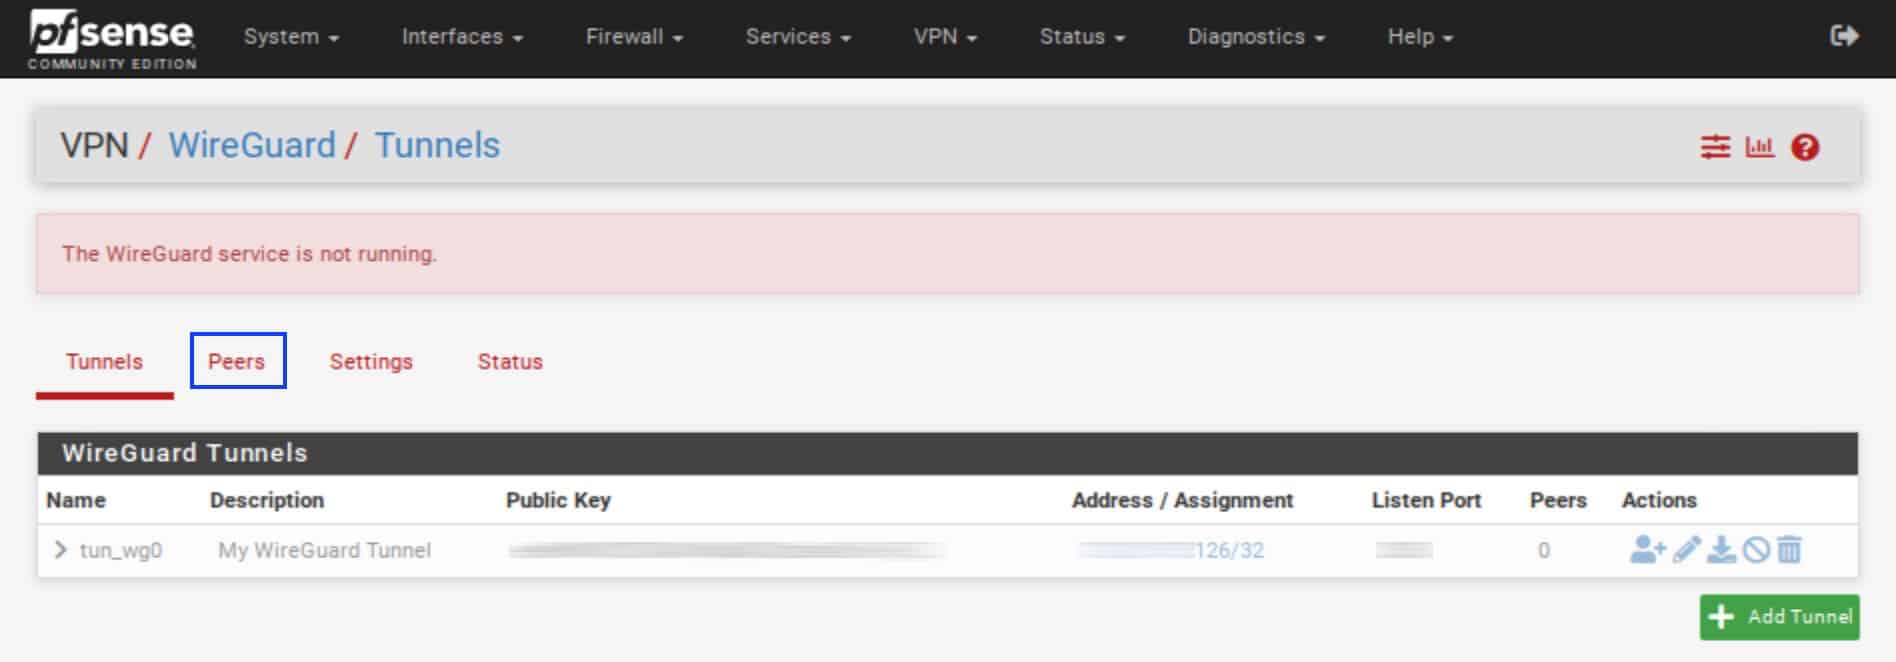
- Click Add Peer. The Peers page is displayed.
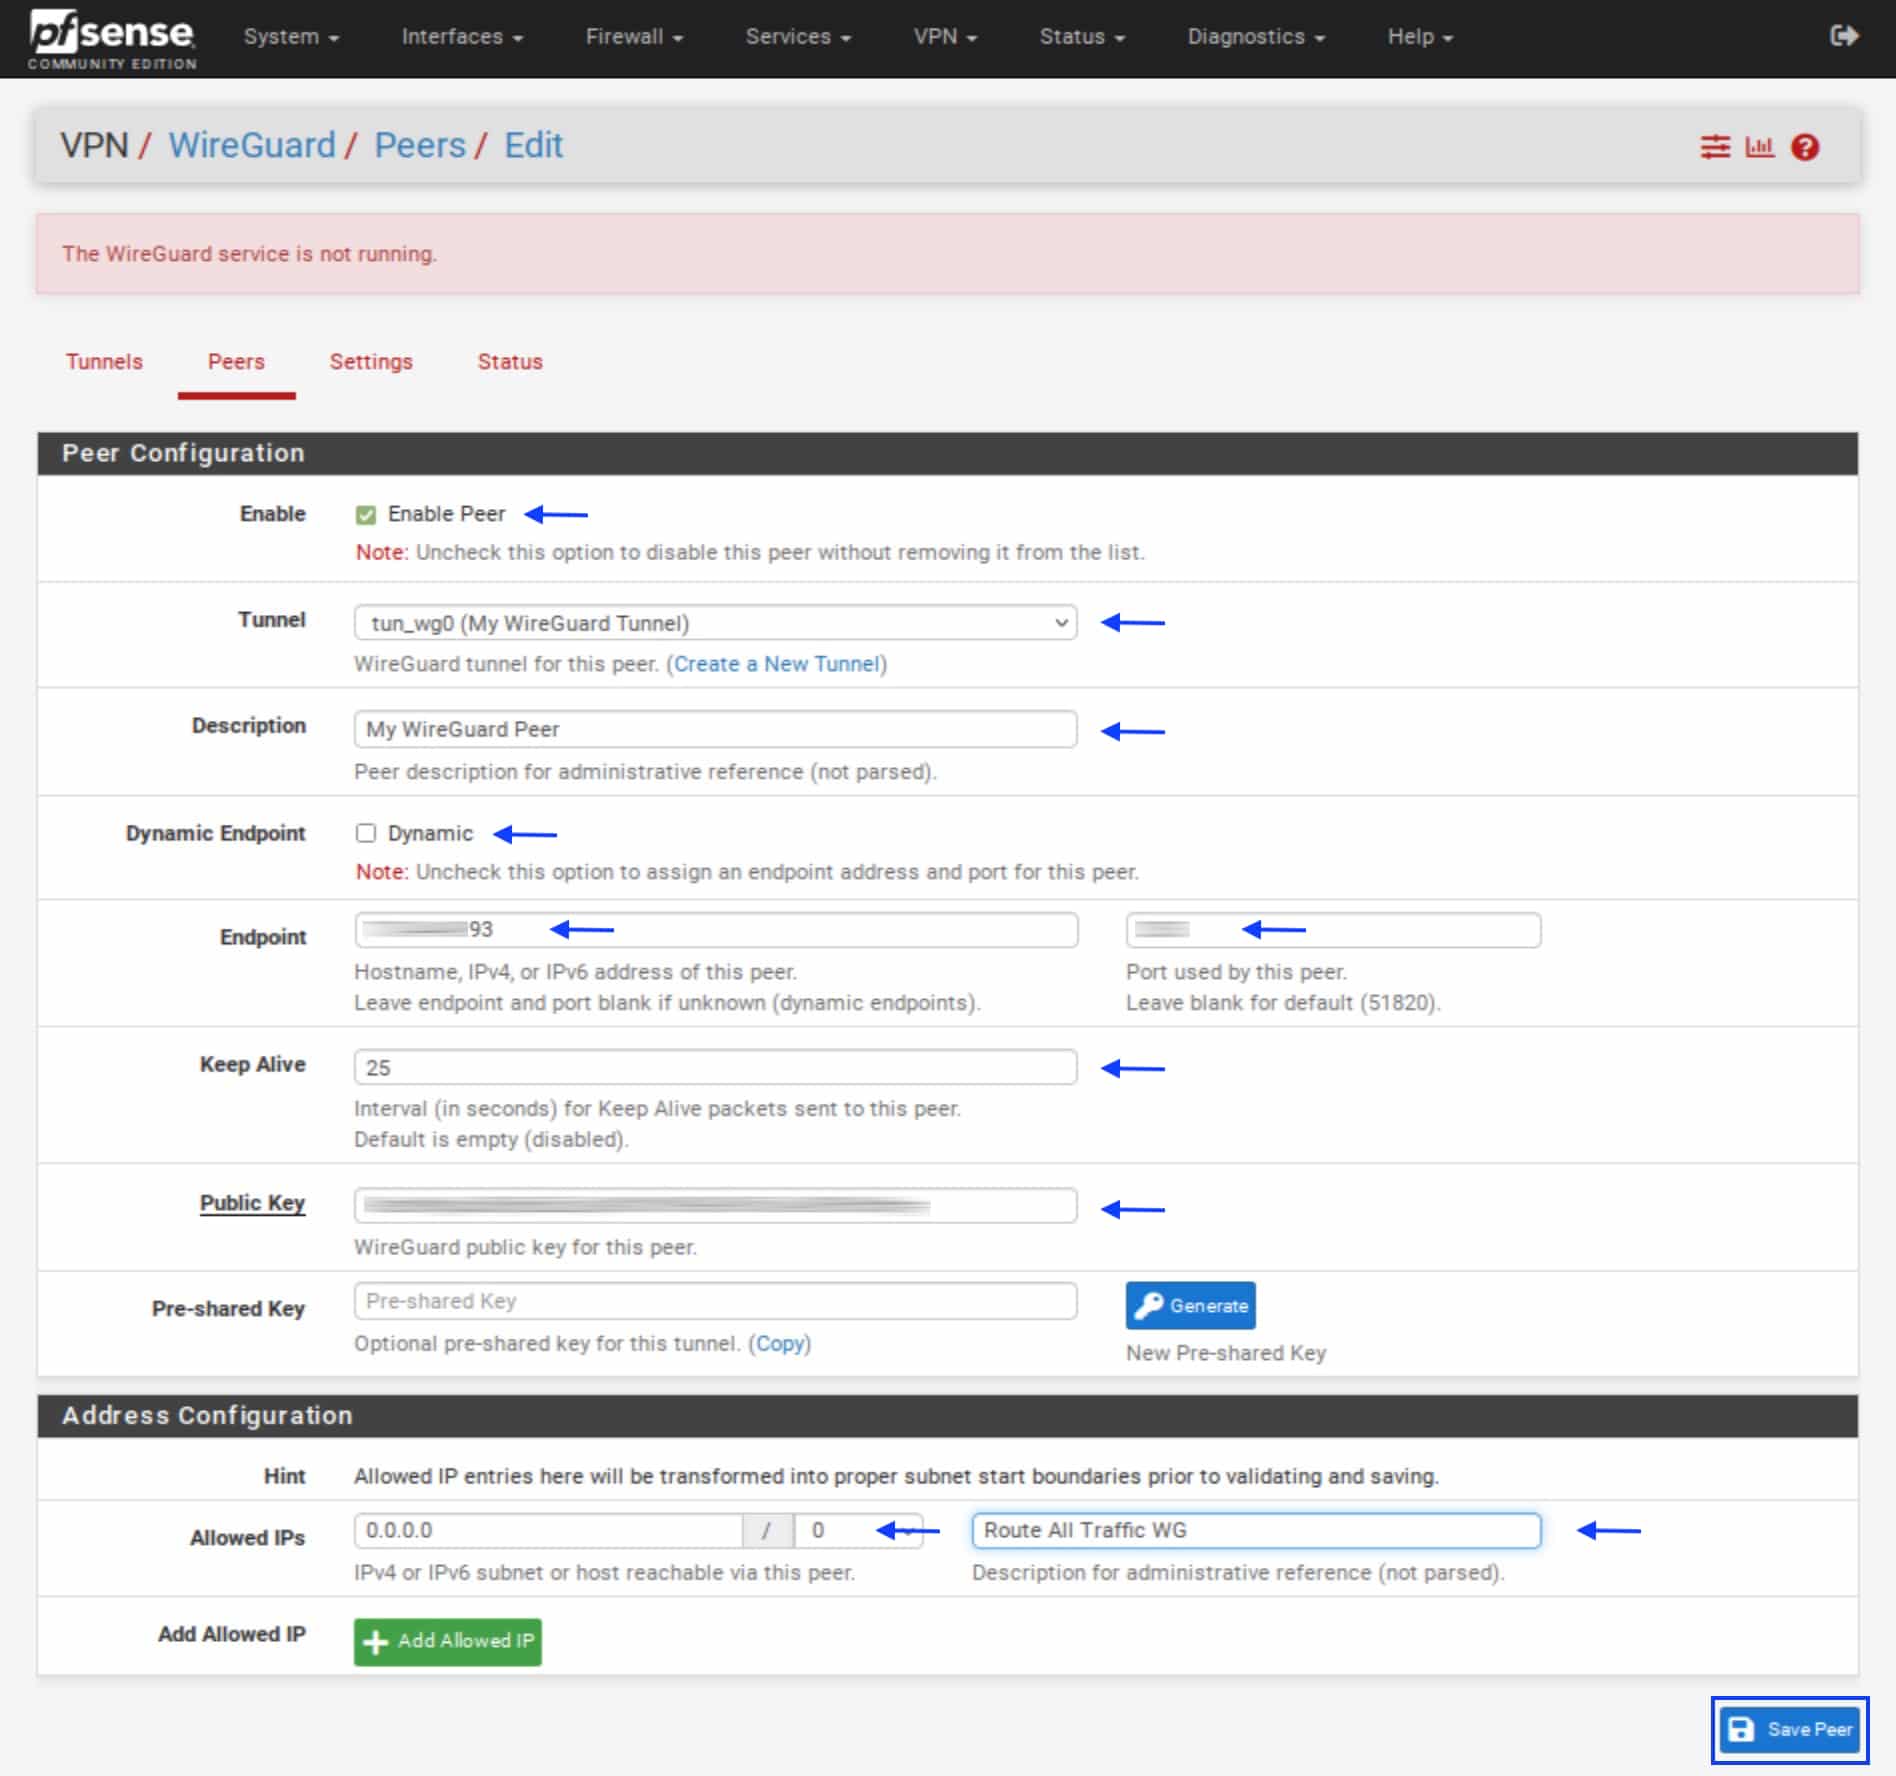
- Tick Enable Peer.
- From the Tunnels drop-down menu, select the WireGuard tunnel you just configured.
- In the Description box, add a description for your peer.
- Untick Dynamic Endpoint. The Endpoint and Port boxes appear.
- Enter the IP address of your VPN provider’s WireGuard “server” (endpoint) and the port used to connect. You can find this on your VPN provider’s web page.
- You can optionally set a Keep Alive interval. 25 is usually fine.
- Enter the WireGuard “server”‘s public key in the Public Key field. Again, you can find this on your VPN provider’s web page.
- Under Address Configuration, enter 0.0.0.0/0 in the Allowed IPs field. That configures all traffic to go through the WireGuard tunnel.
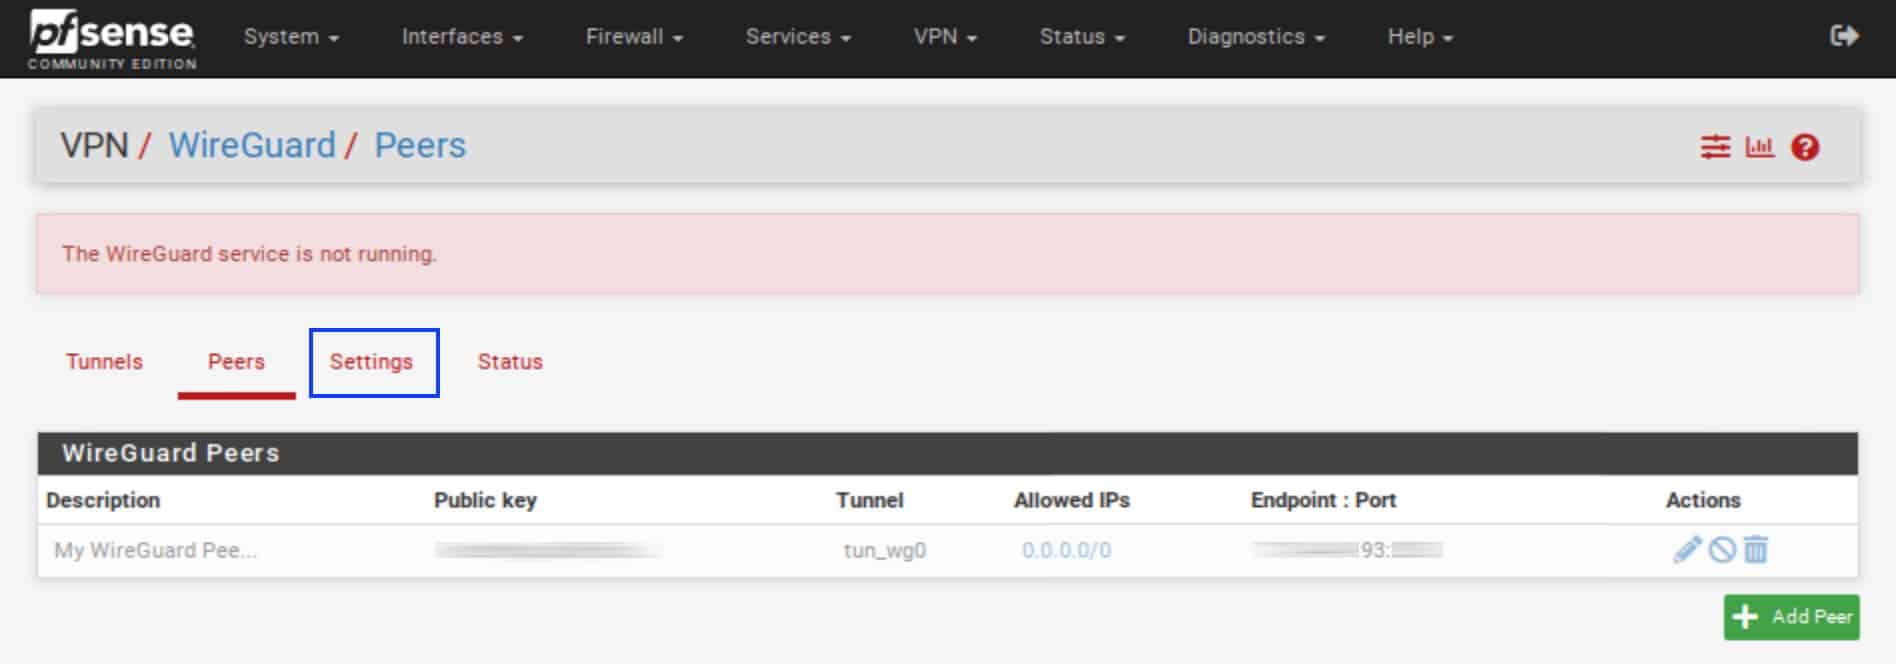
- Click Save Peer. You’re taken back to the Peers page.
Enabling the WireGuard service
Now that we’ve set up our tunnel and our peer, we can enable the WireGuard service on pfSense.
- Click the Settings tab. The Settings page is displayed.
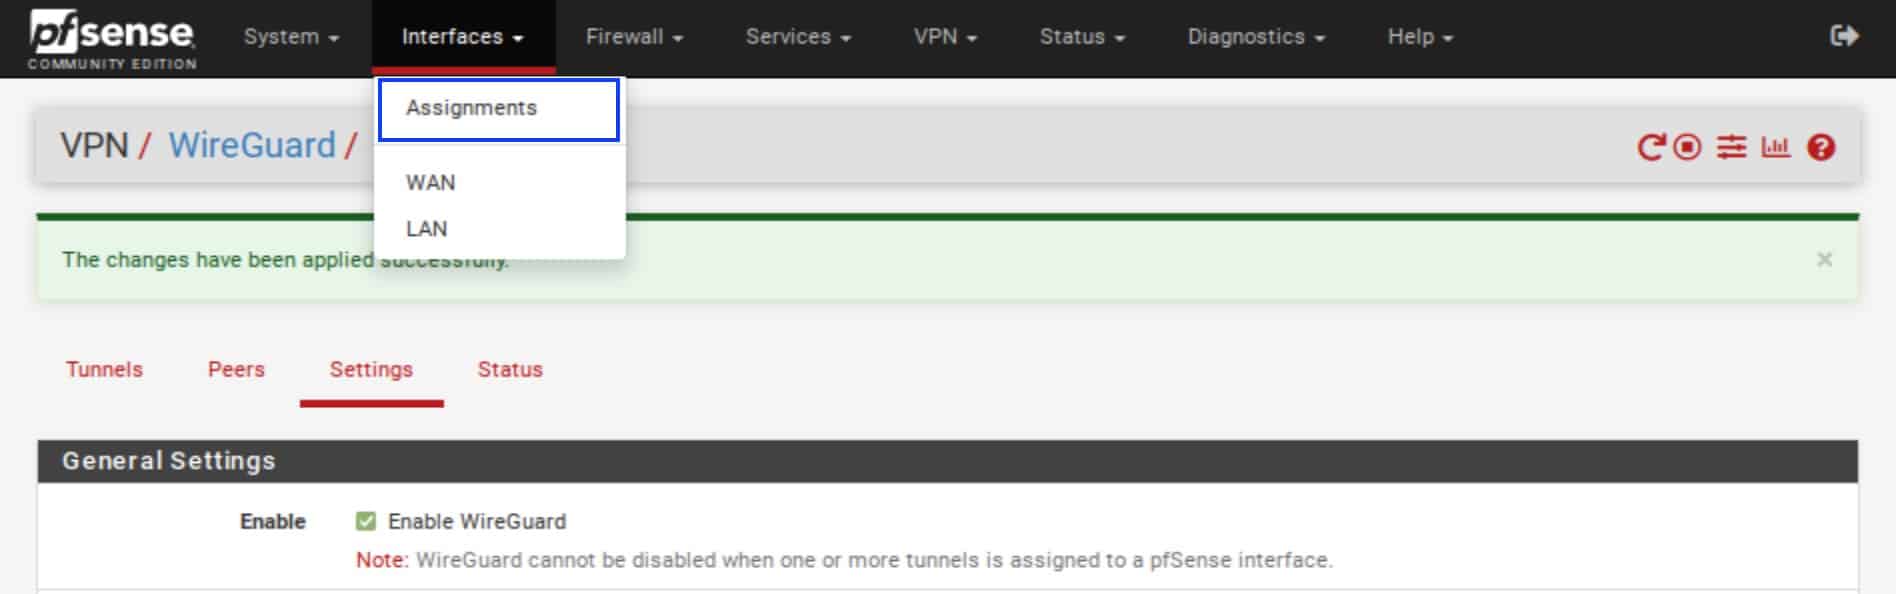
- Tick Enable WireGuard, at the top.
- Click Save. The WireGuard service is now running. You should see a green banner at the top indicating this.

Creating the WireGuard interface & gateway
We now need to create an interface and a gateway that pfSense will use to establish and push traffic through the WireGuard tunnel.
Interface
- From the top menu, select Interfaces > Assignments. The Interface Assignments page is displayed.
- Click the green Add button.
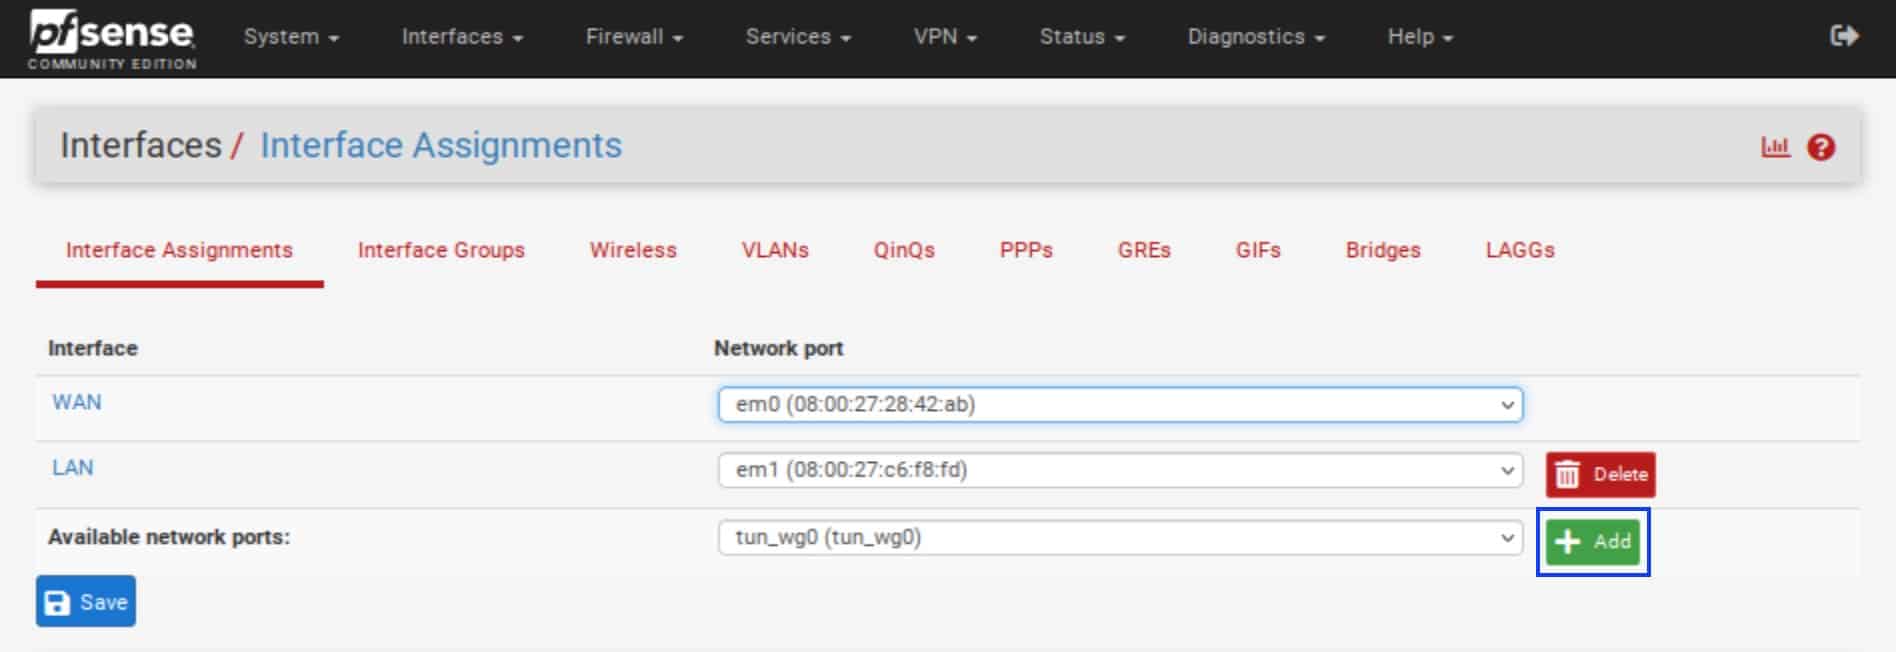
- OPT1 (optional interface 1) is now listed as an interface. Click OPT1.
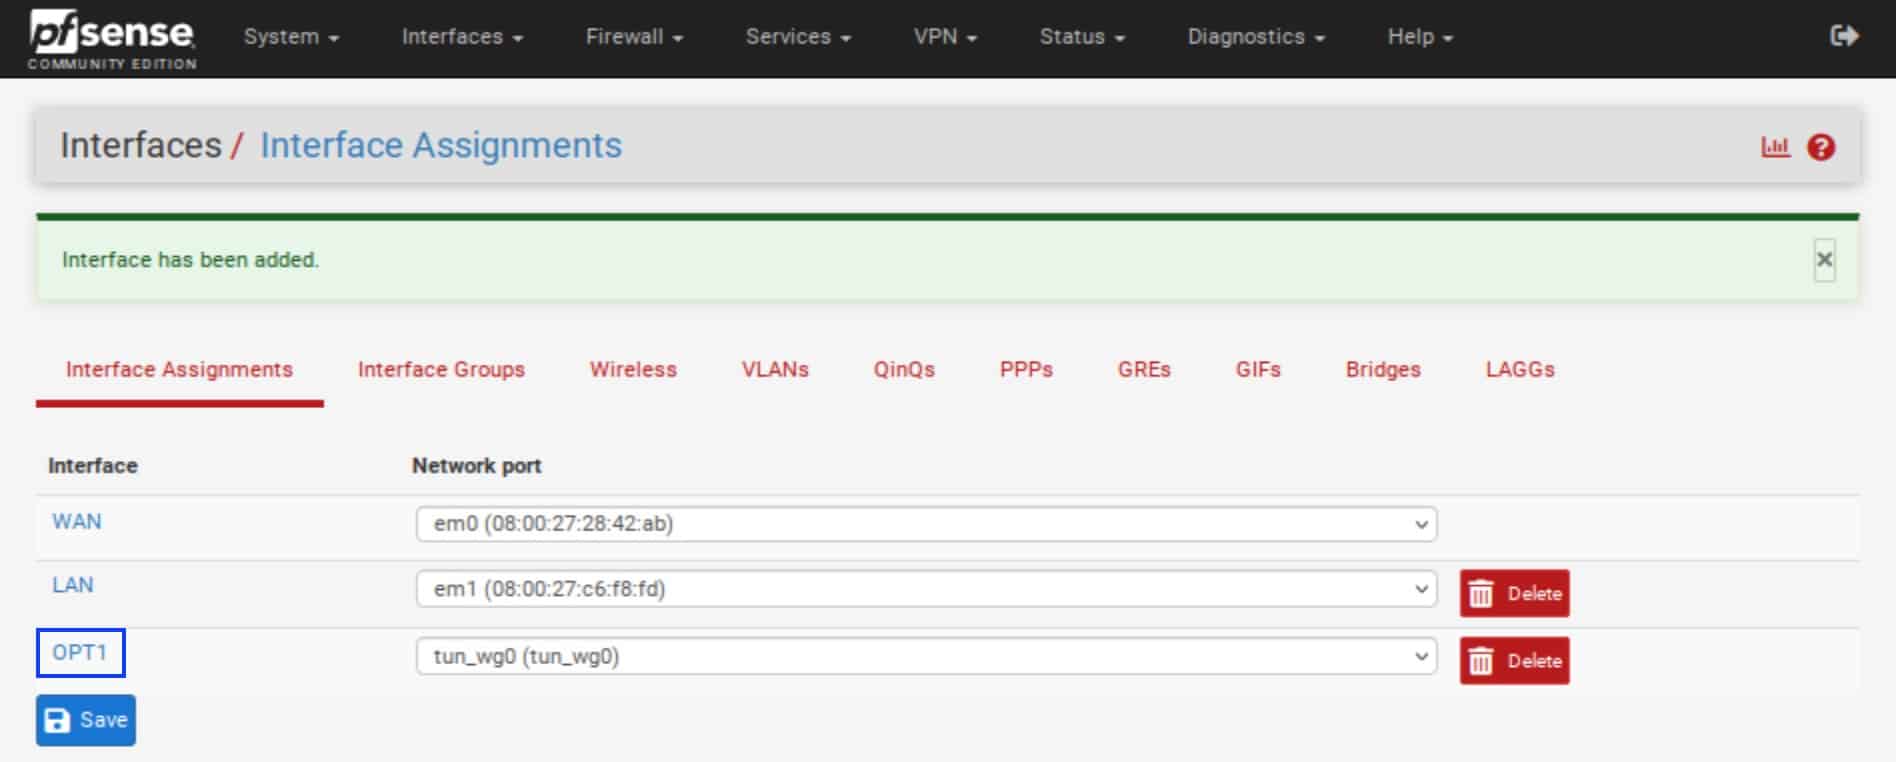
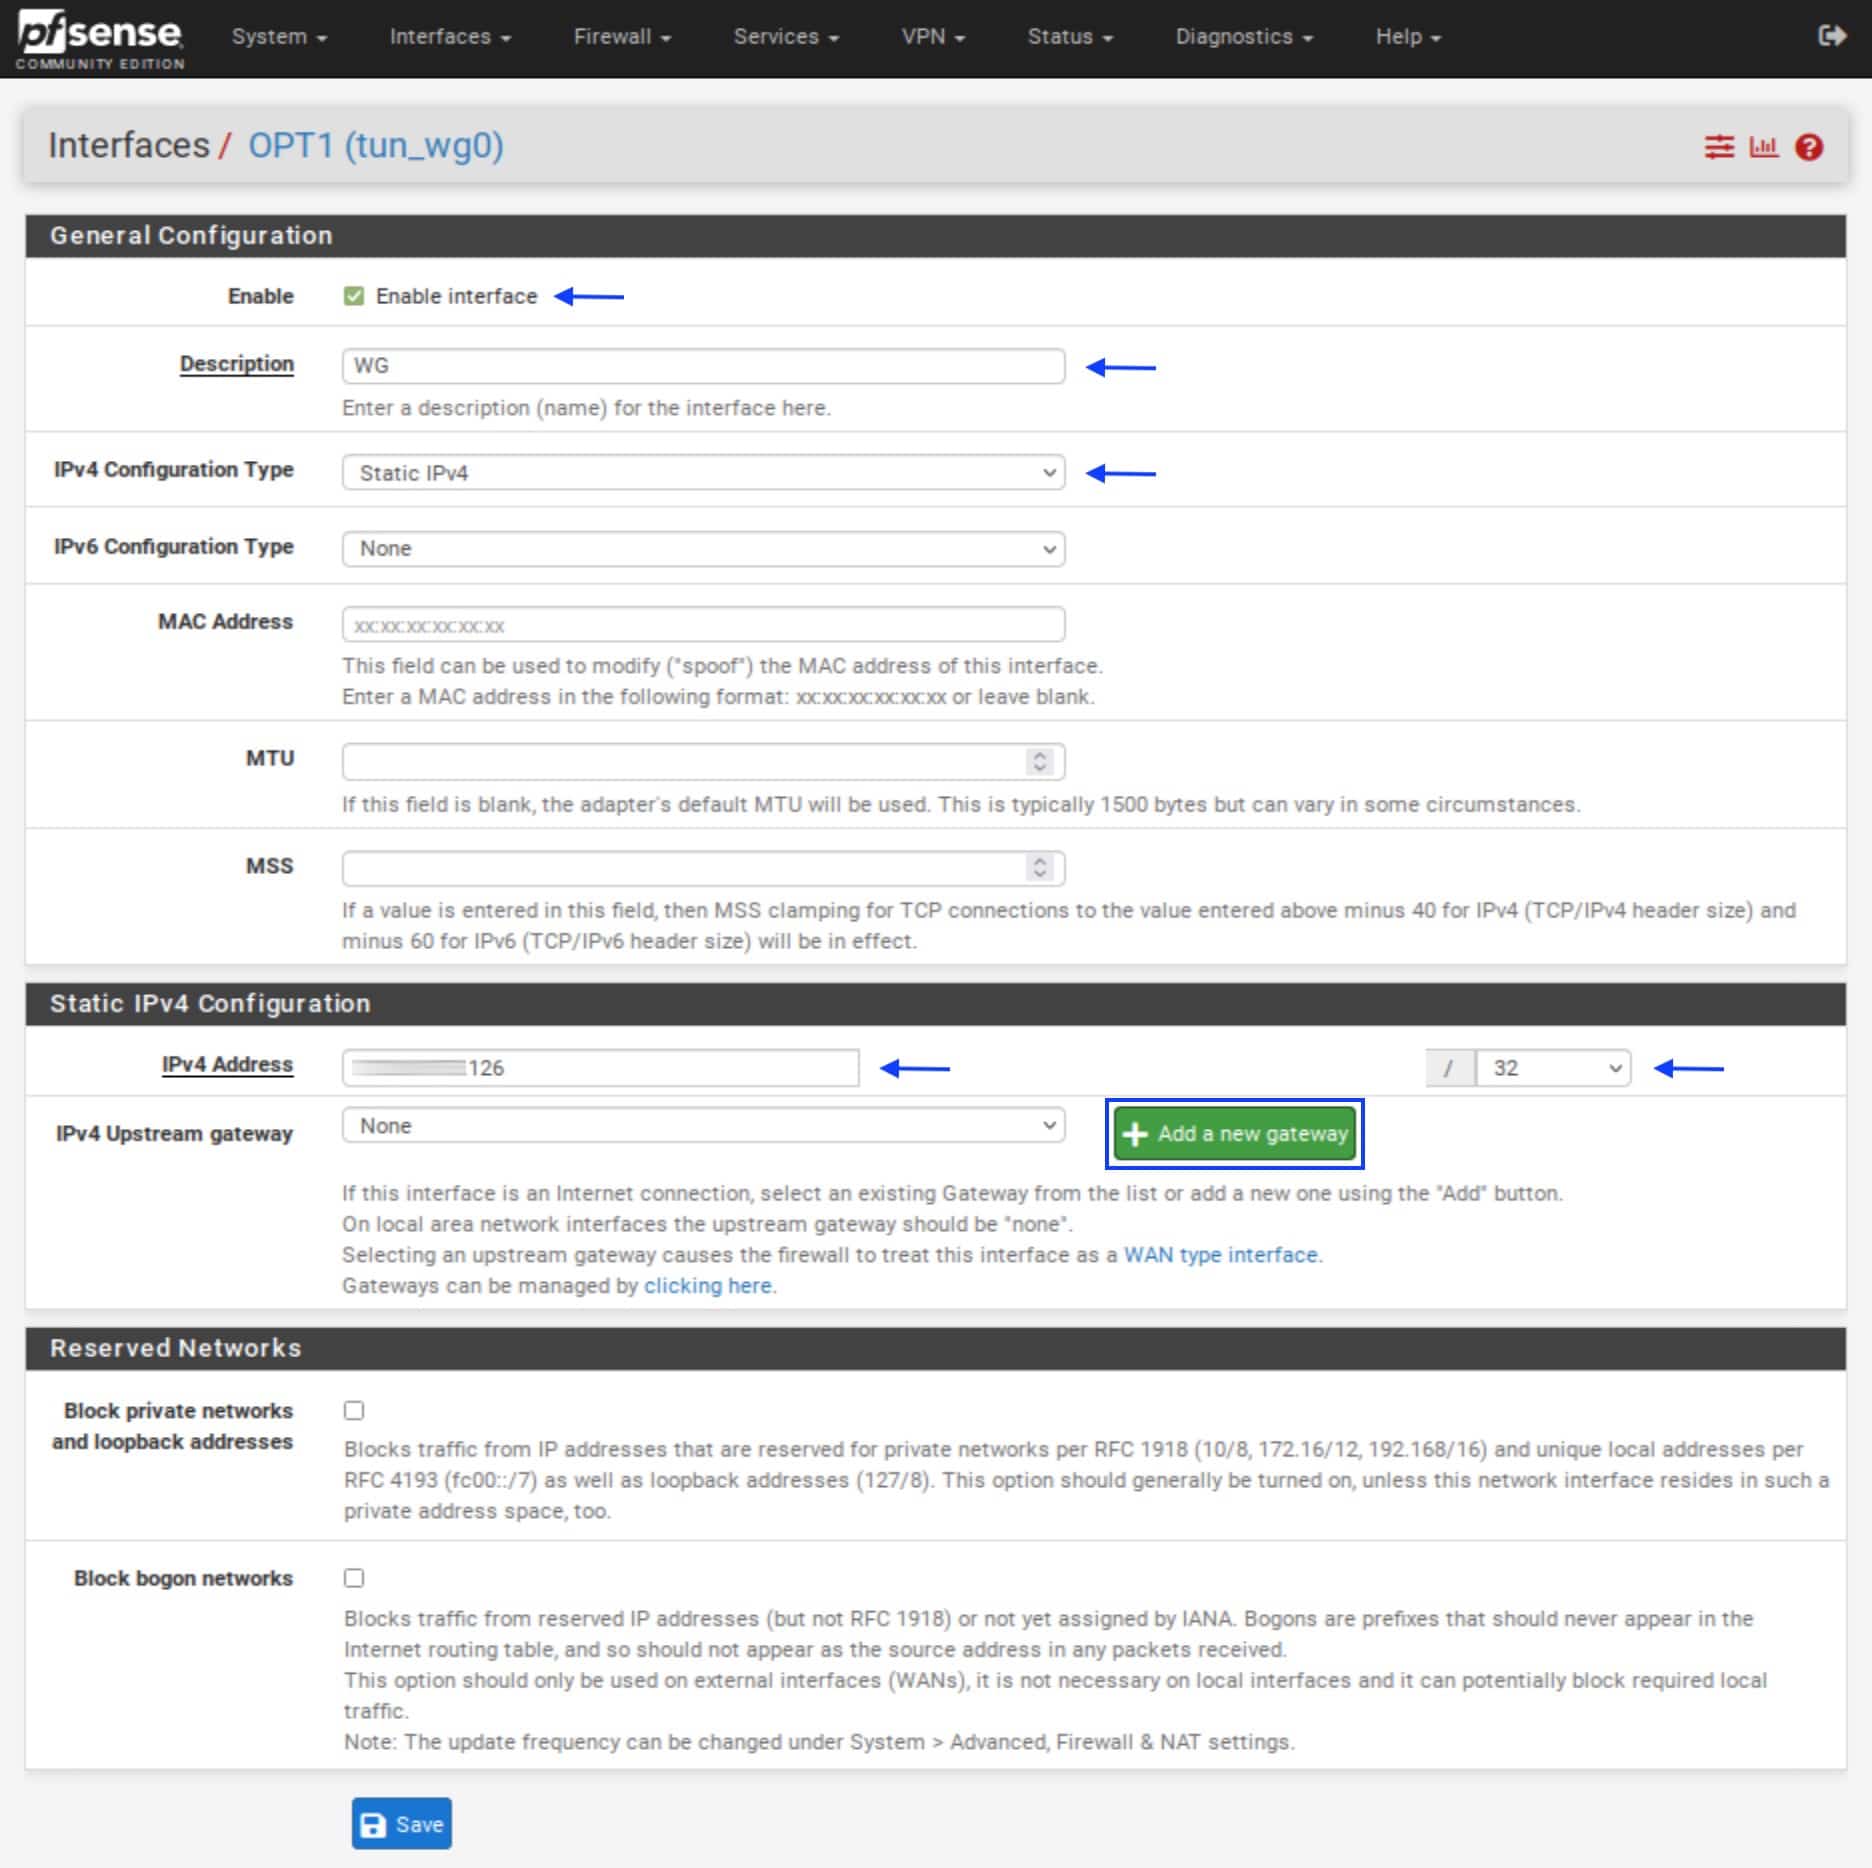
- The OPT1 interface page is displayed.
- Click Enable interface.
- In the Description box, name your interface.
- From the IPv4 Configuration Type drop-down menu, select Static IPv4.
- Under Static IPv4 Configuration, in the IPv4 Address box, paste the IP address your VPN provider assigned to you and set the /32 subnet mask.
- Repeat the steps for IPv6 if you want to use both IPv4 and IPv6. Select Static IPv6 from the IPv6 Configuration Type drop-down menu and paste the IPv6 address assigned by your VPN provider in the IPv6 Address box (with a /128 subnet mask).
Gateway
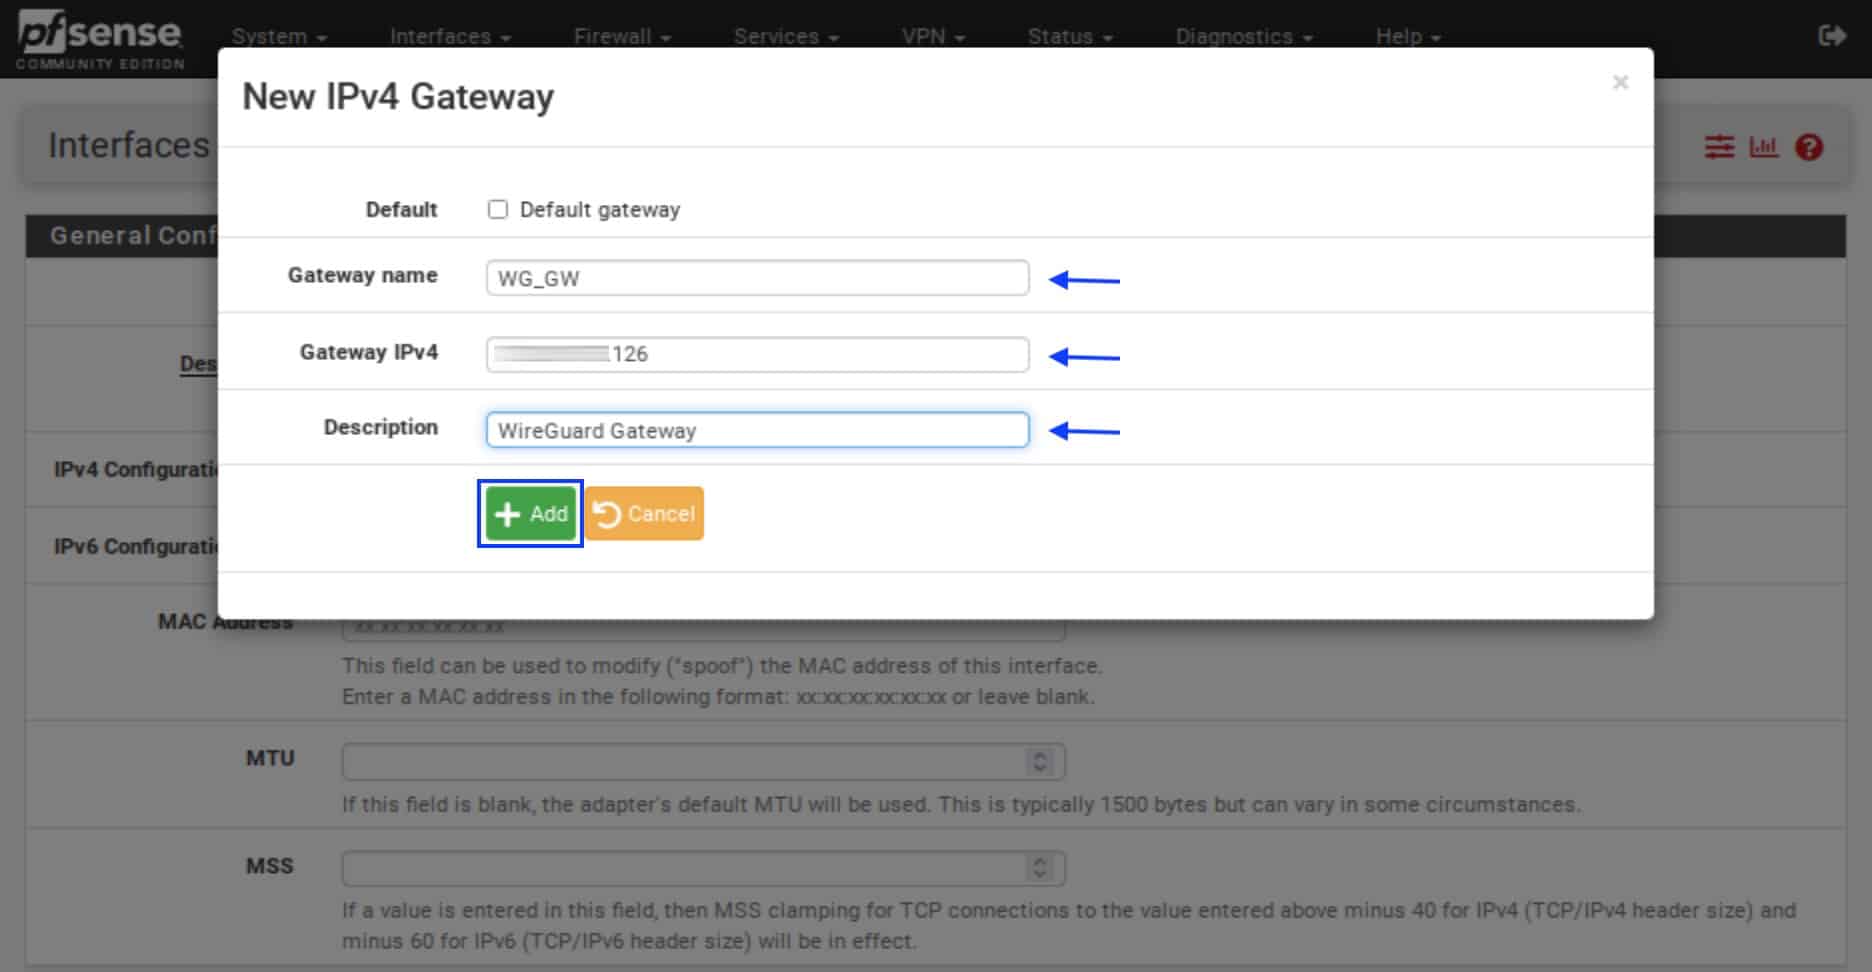
- Next to the IPv4 Upstream gateway drop-down menu, click Add a new gateway. The New IPv4 Gateway menu is displayed.

- In the Gateway name box, provide a name for your gateway. It must be different from the interface name.
- In the Gateway IPv4 box, paste the IP address assigned to you by your VPN provider, as we did with the interface above.
- In the Description box, type in a description (optional).
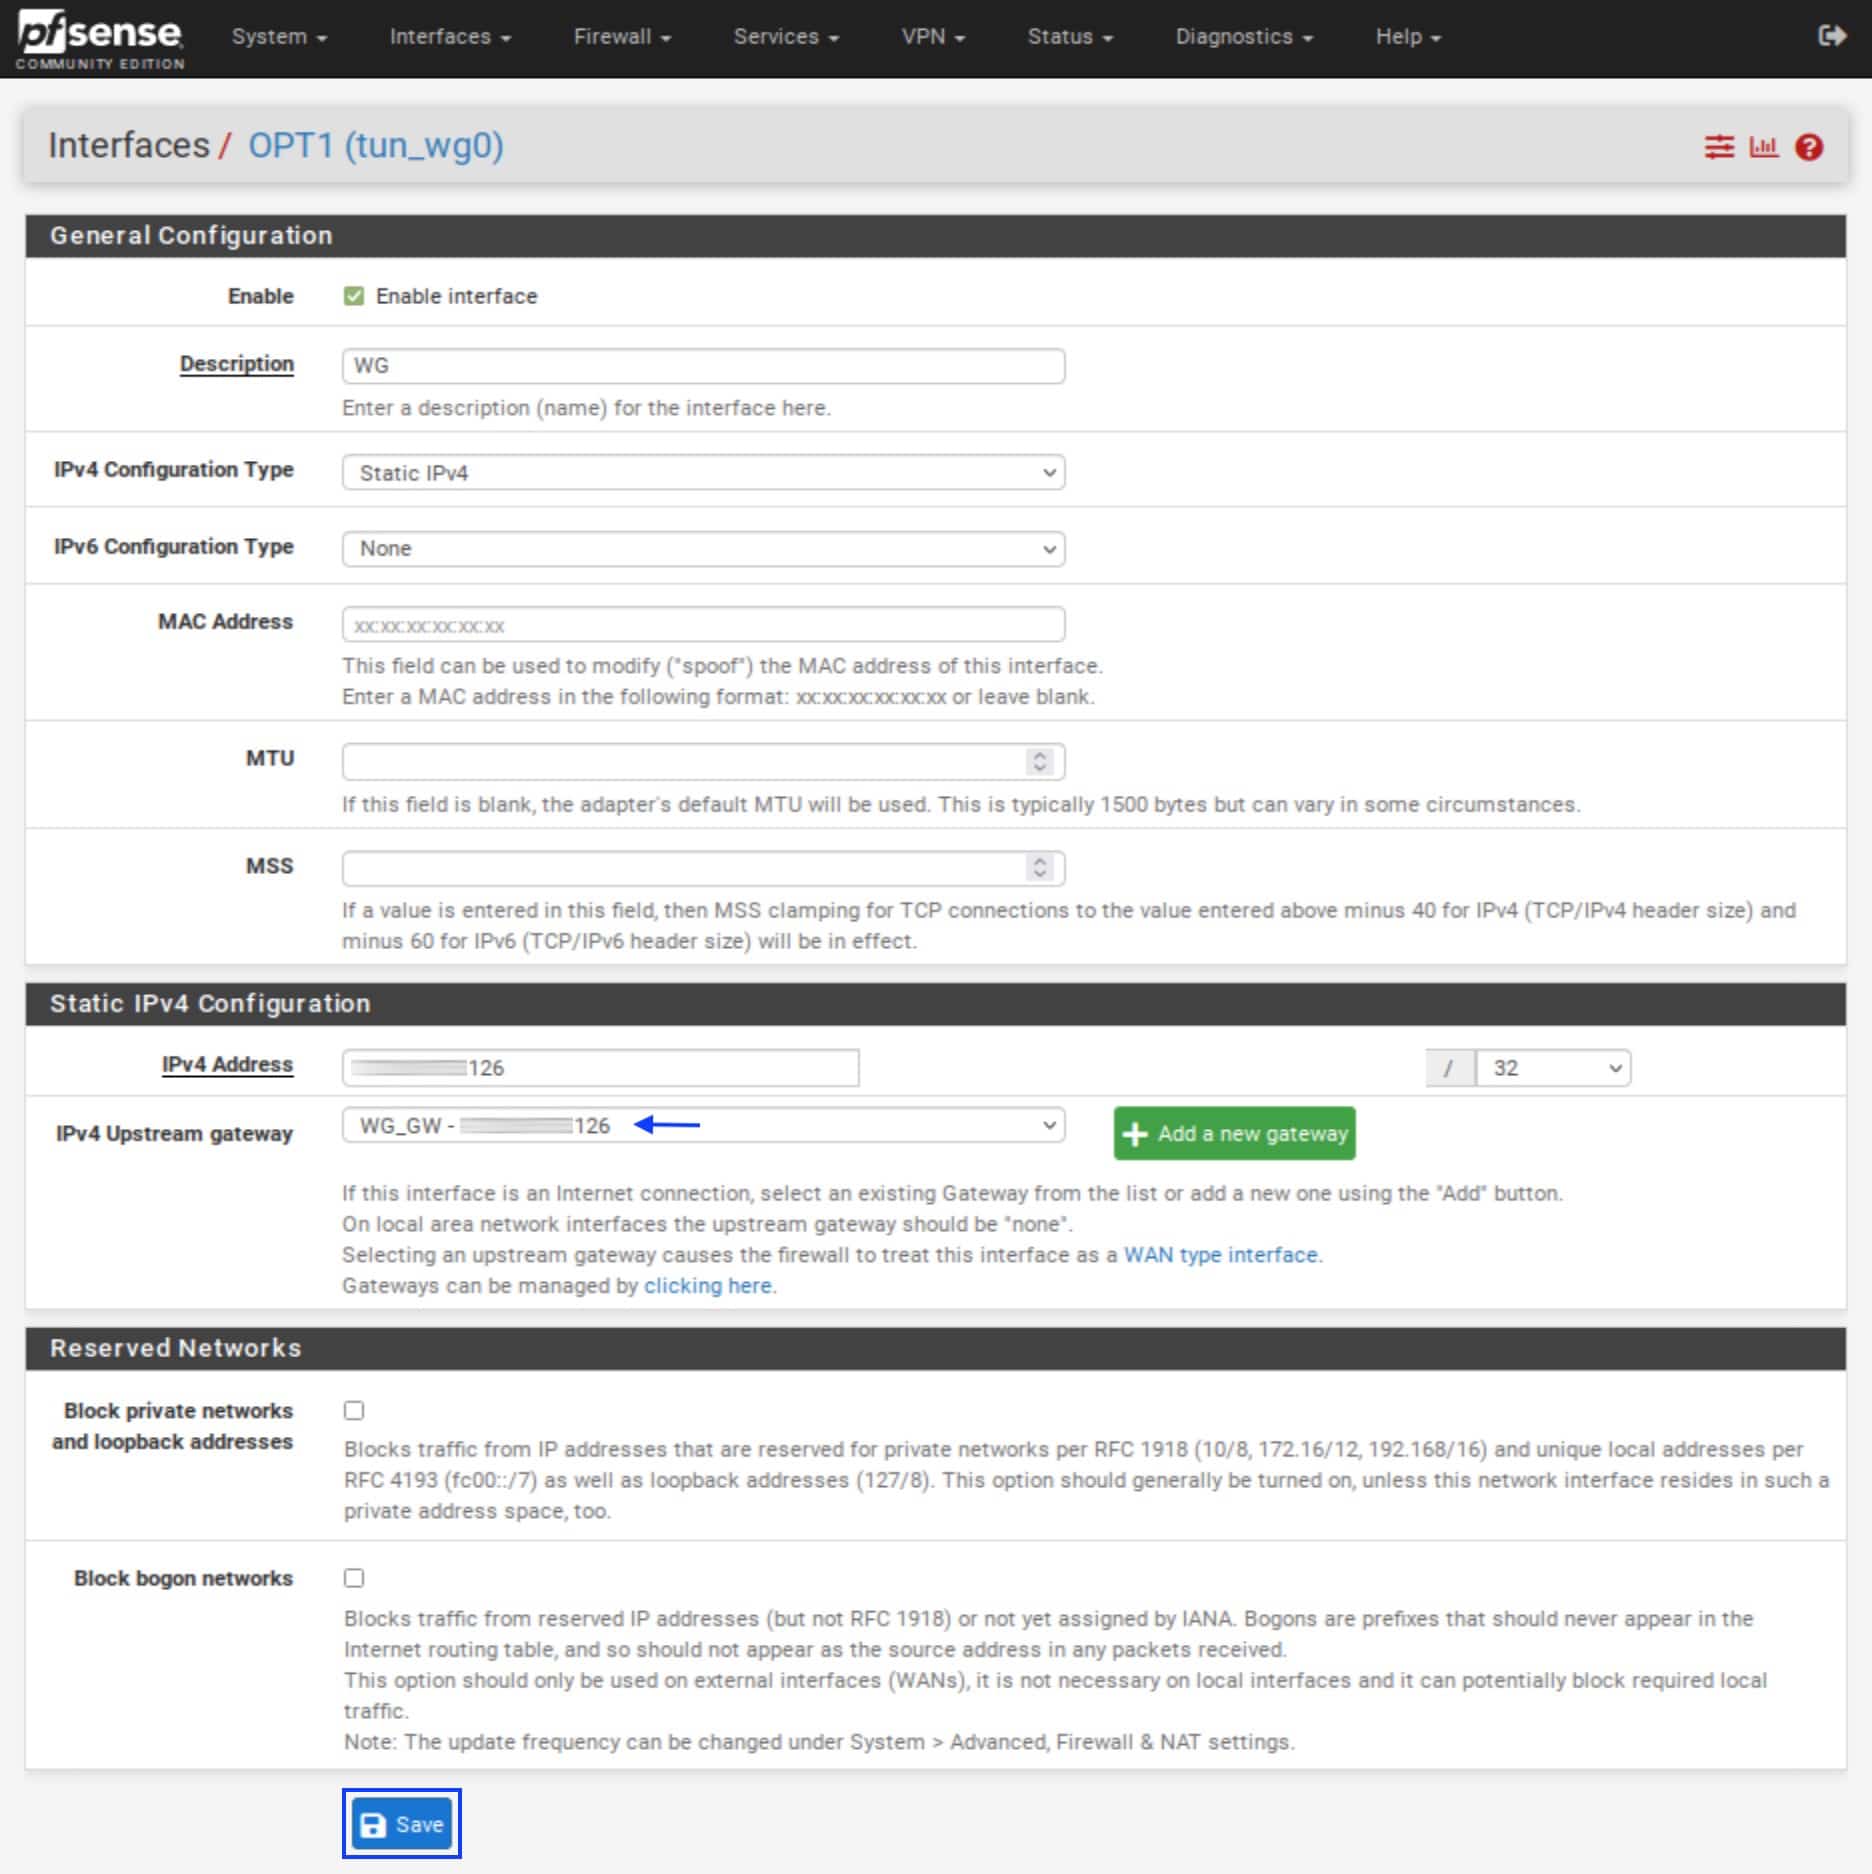
- Click Add. You’re back on the OPT1 interface page.
- Under Static IPv4 Configuration, from the IPv4 Upstream gateway drop-down menu, select the gateway we just created.
- Click Save.
- Click Apply Changes at the top. We’ve created the WireGuard interface and gateway.
- Repeat these steps for IPv6 (using the IPv6 address assigned by your VPN provider) if you want to use both IPv4 and IPv6.
Setting the LAN MSS clamping
WireGuard’s maximum transmission unit (MTU) is 1420. What that means is that if a datagram exceeds 1420 bytes, it will be fragmented, which may break the connection. If you have MTU issues while using WireGuard, one symptom will be that certain websites won’t load. And you’ll be scratching your head trying to figure out why some sites load just fine while others do not. When I first set up WireGuard on my router, I scratched my head with this issue for days before considering MTU issues and setting up MSS clamping.
MSS stands for Maximum TCP Segment Size and adjusts the size of the datagram being transmitted to “fit” the data link over which it’s being transmitted without fragmentation. In other words, MSS clamping makes sure it is small enough to fit through the transiting interface’s MTU.
We will MSS clamp our LAN interface to make sure our WireGuard tunnel works smoothly.
- From the top menu, select Interfaces > LAN.
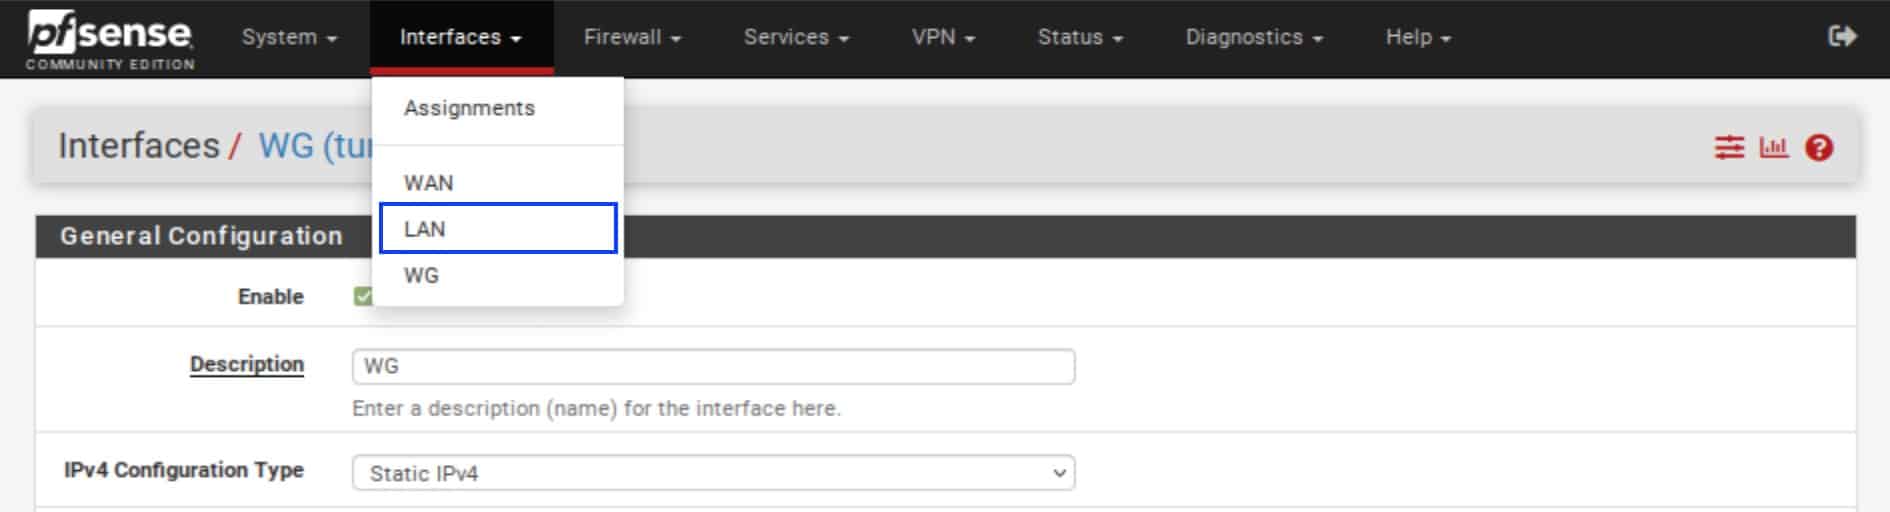
- Under General Configuration, in the MSS field, enter 1380. 1380 is a good value that should work on most systems. Other values may work too. Feel free to experiment; just remember to stay under 1420. Repeat these steps for any other OPT interfaces you want to add.
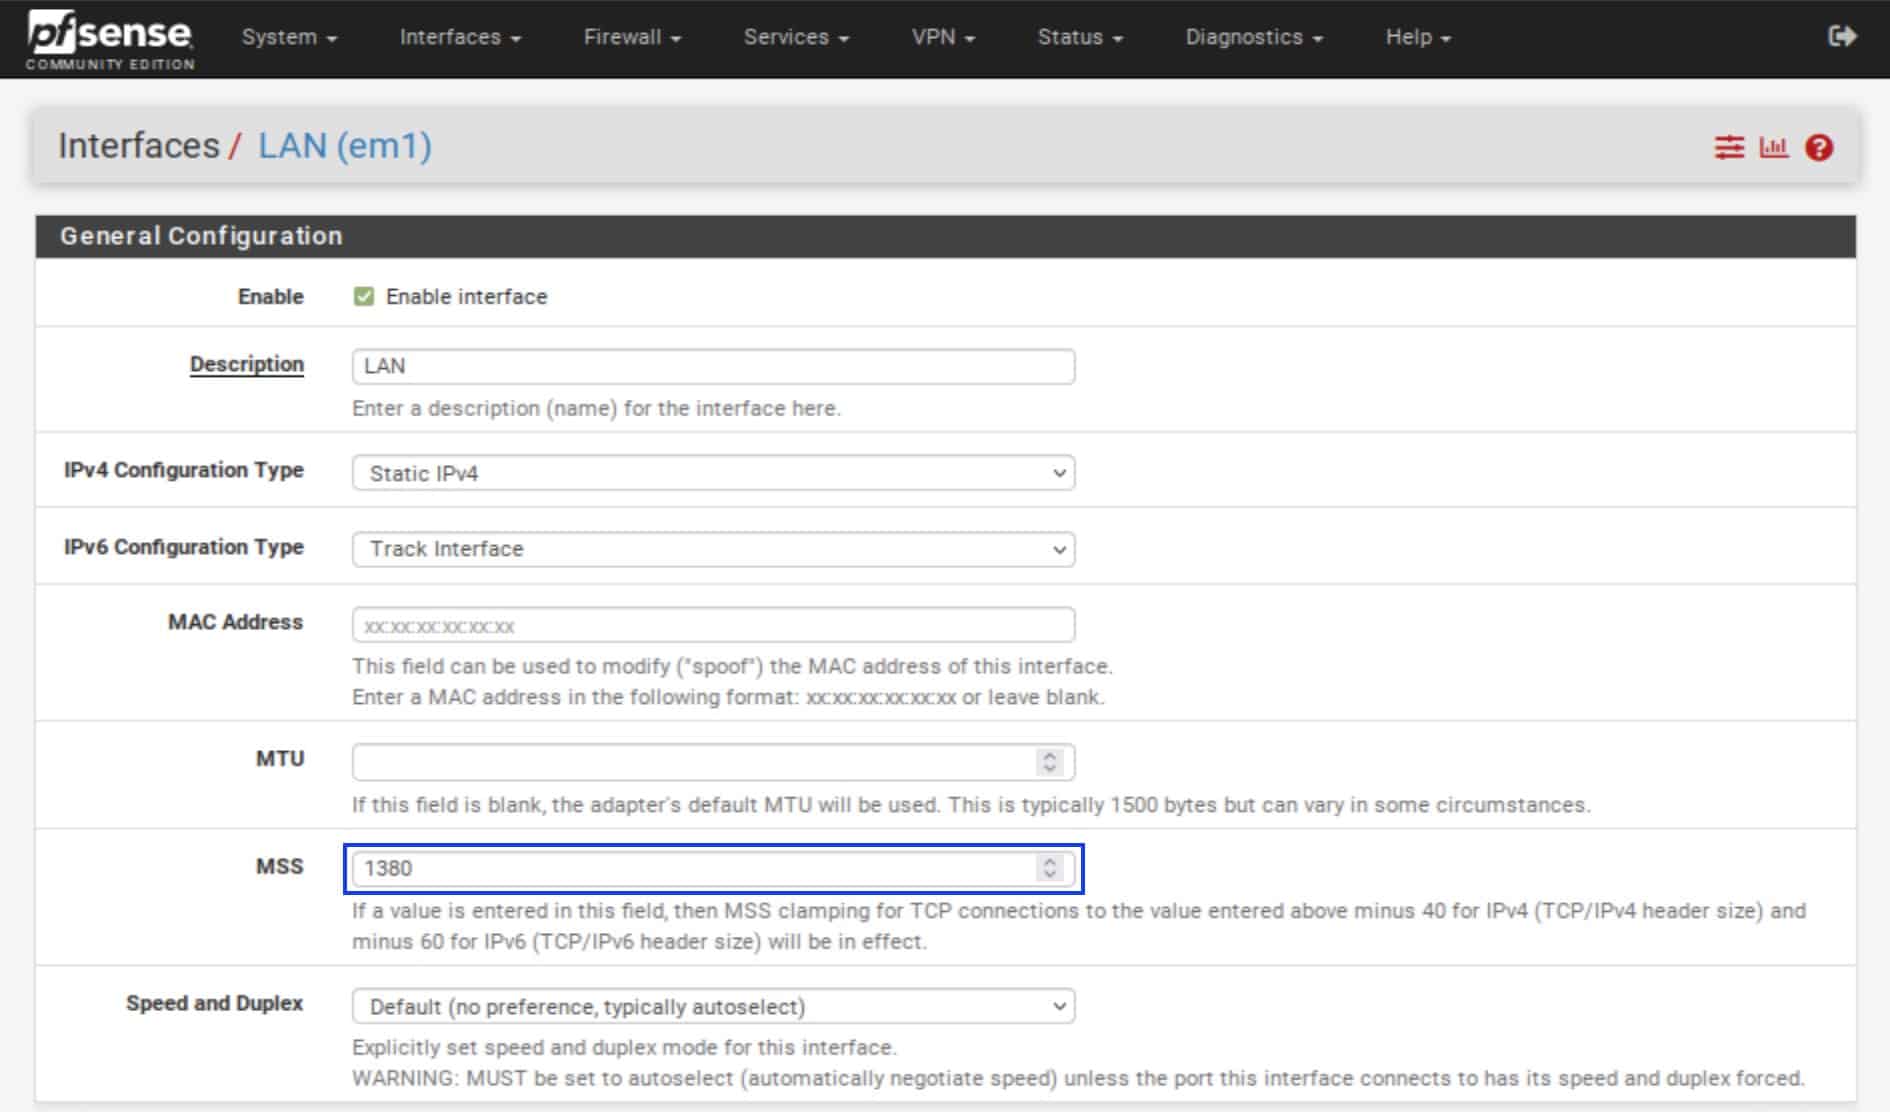
- Click Save at the bottom of the page and Apply Changes.
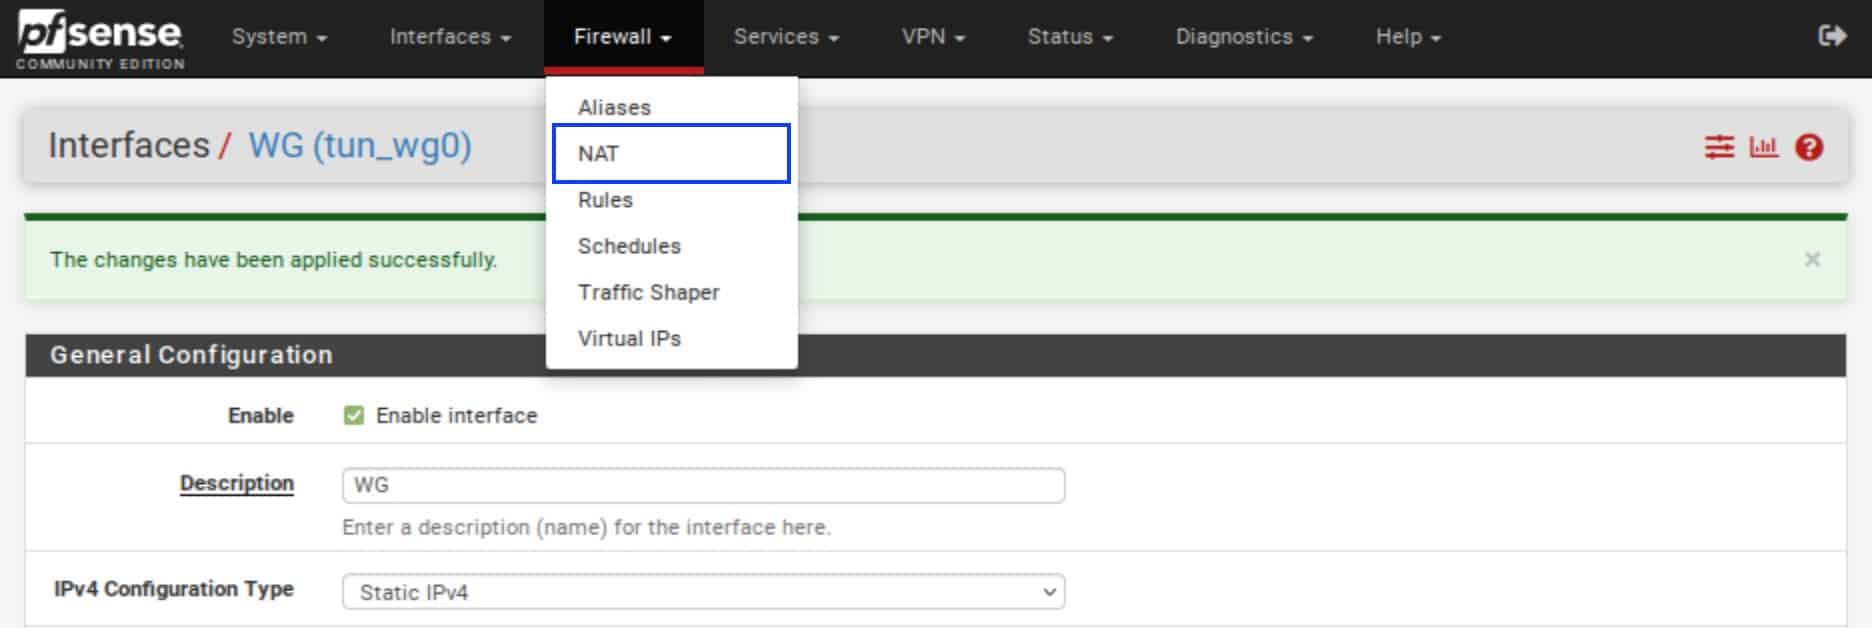
Configuring NAT
We now need to configure Network Address Translation for our WireGuard tunnel.
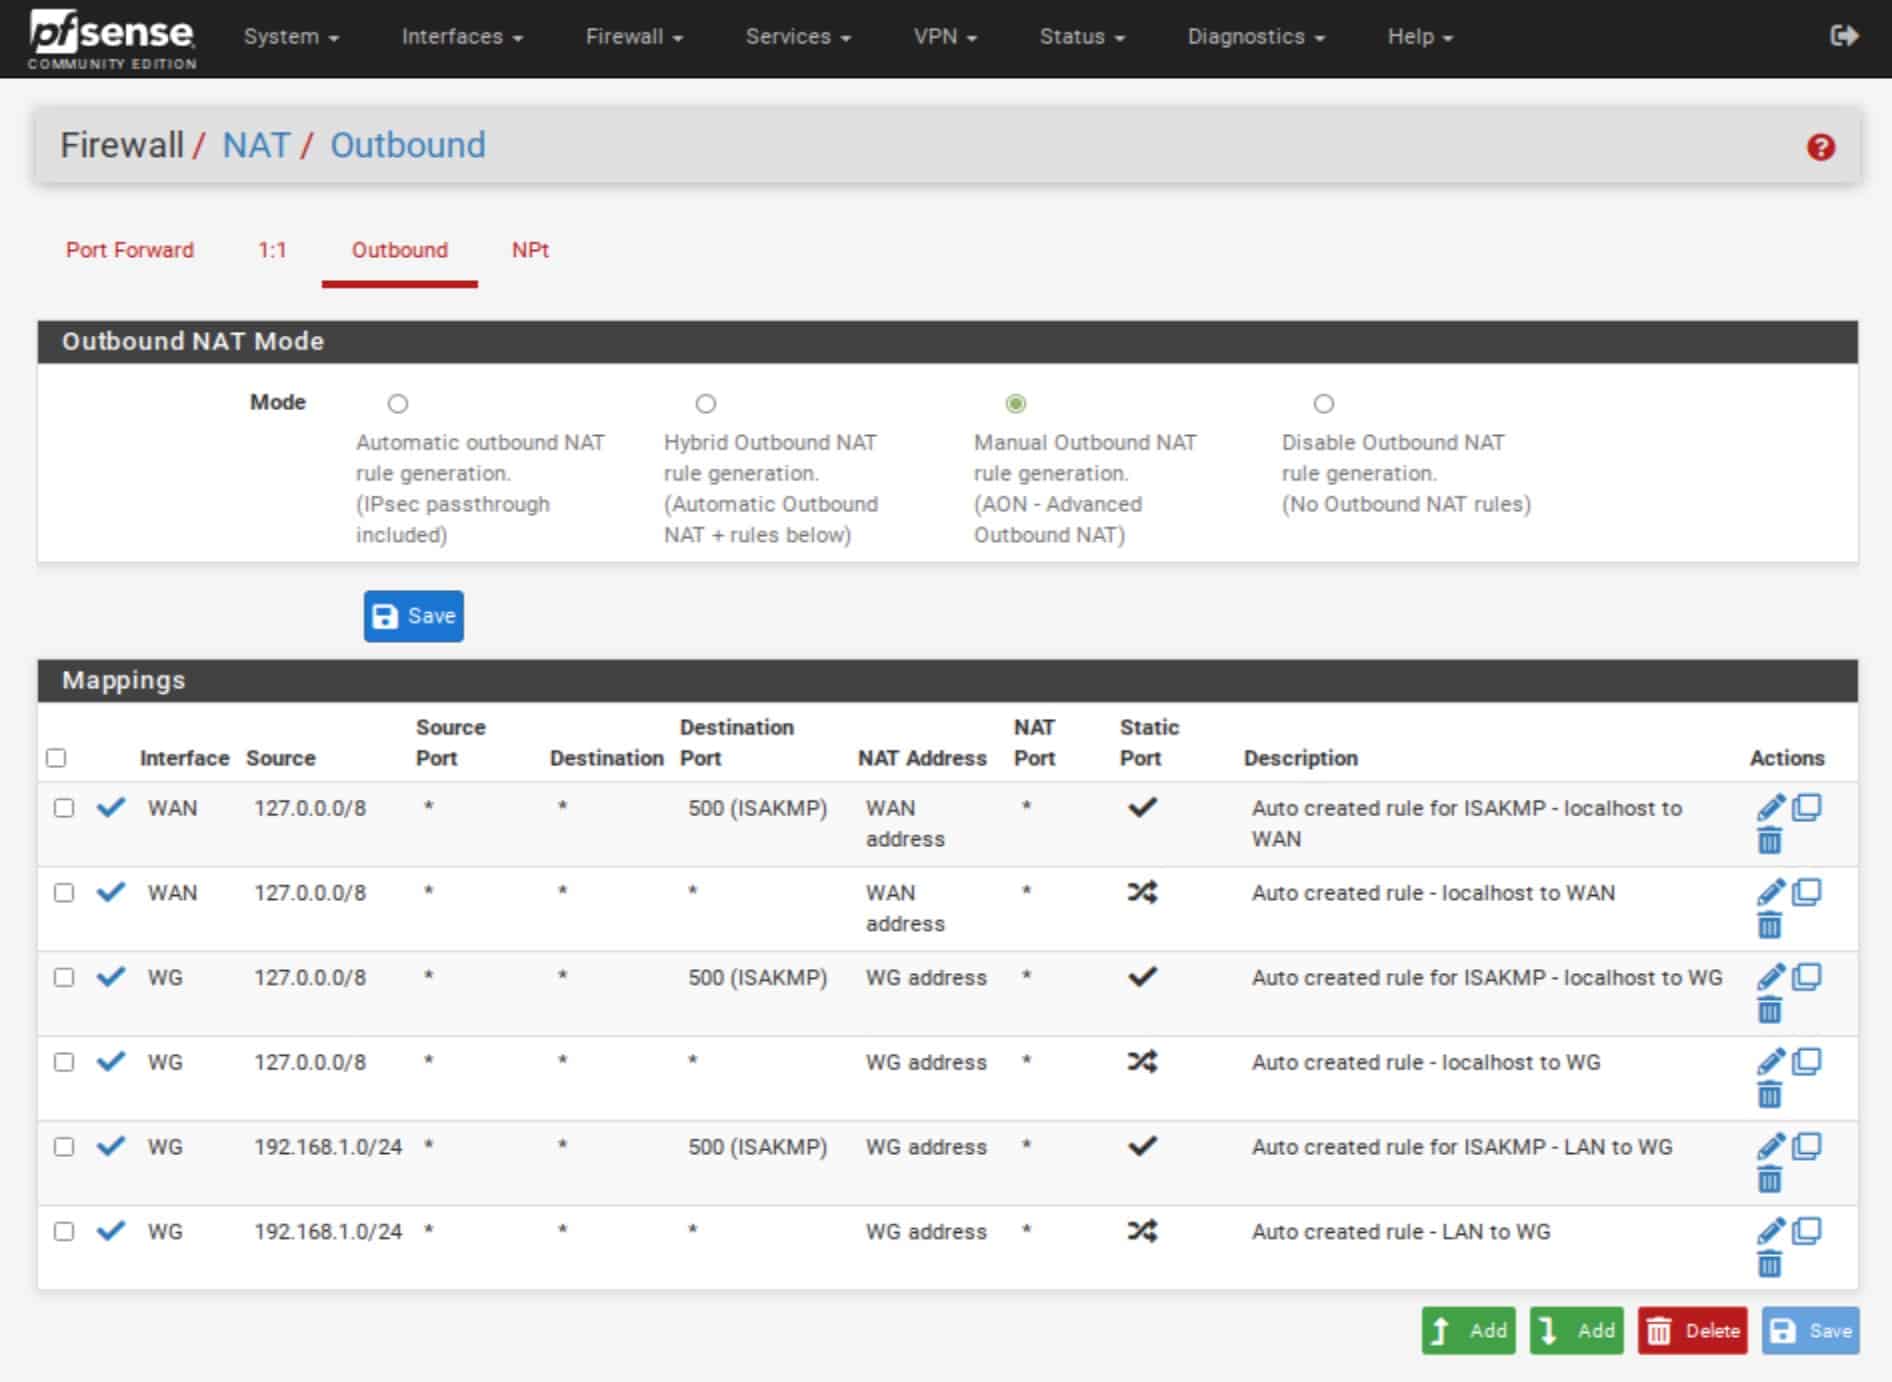
- From the top menu, select Firewall > NAT.
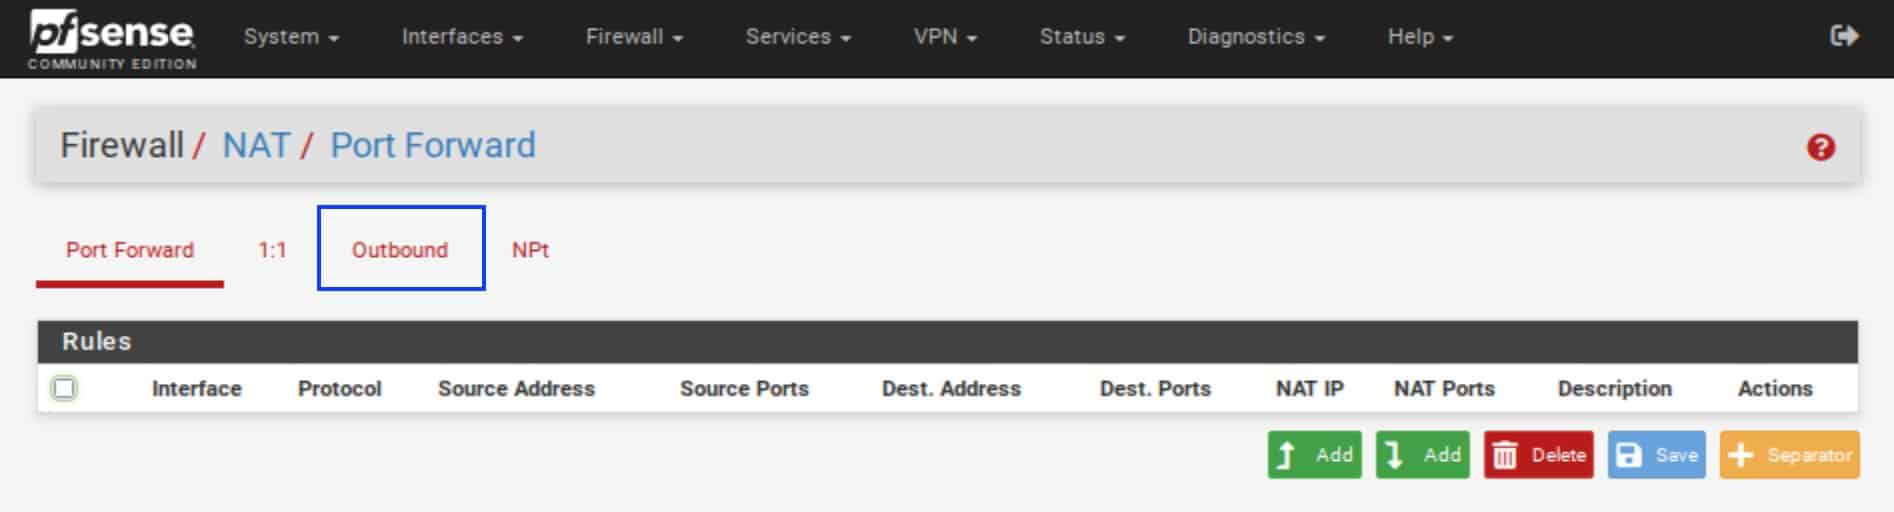
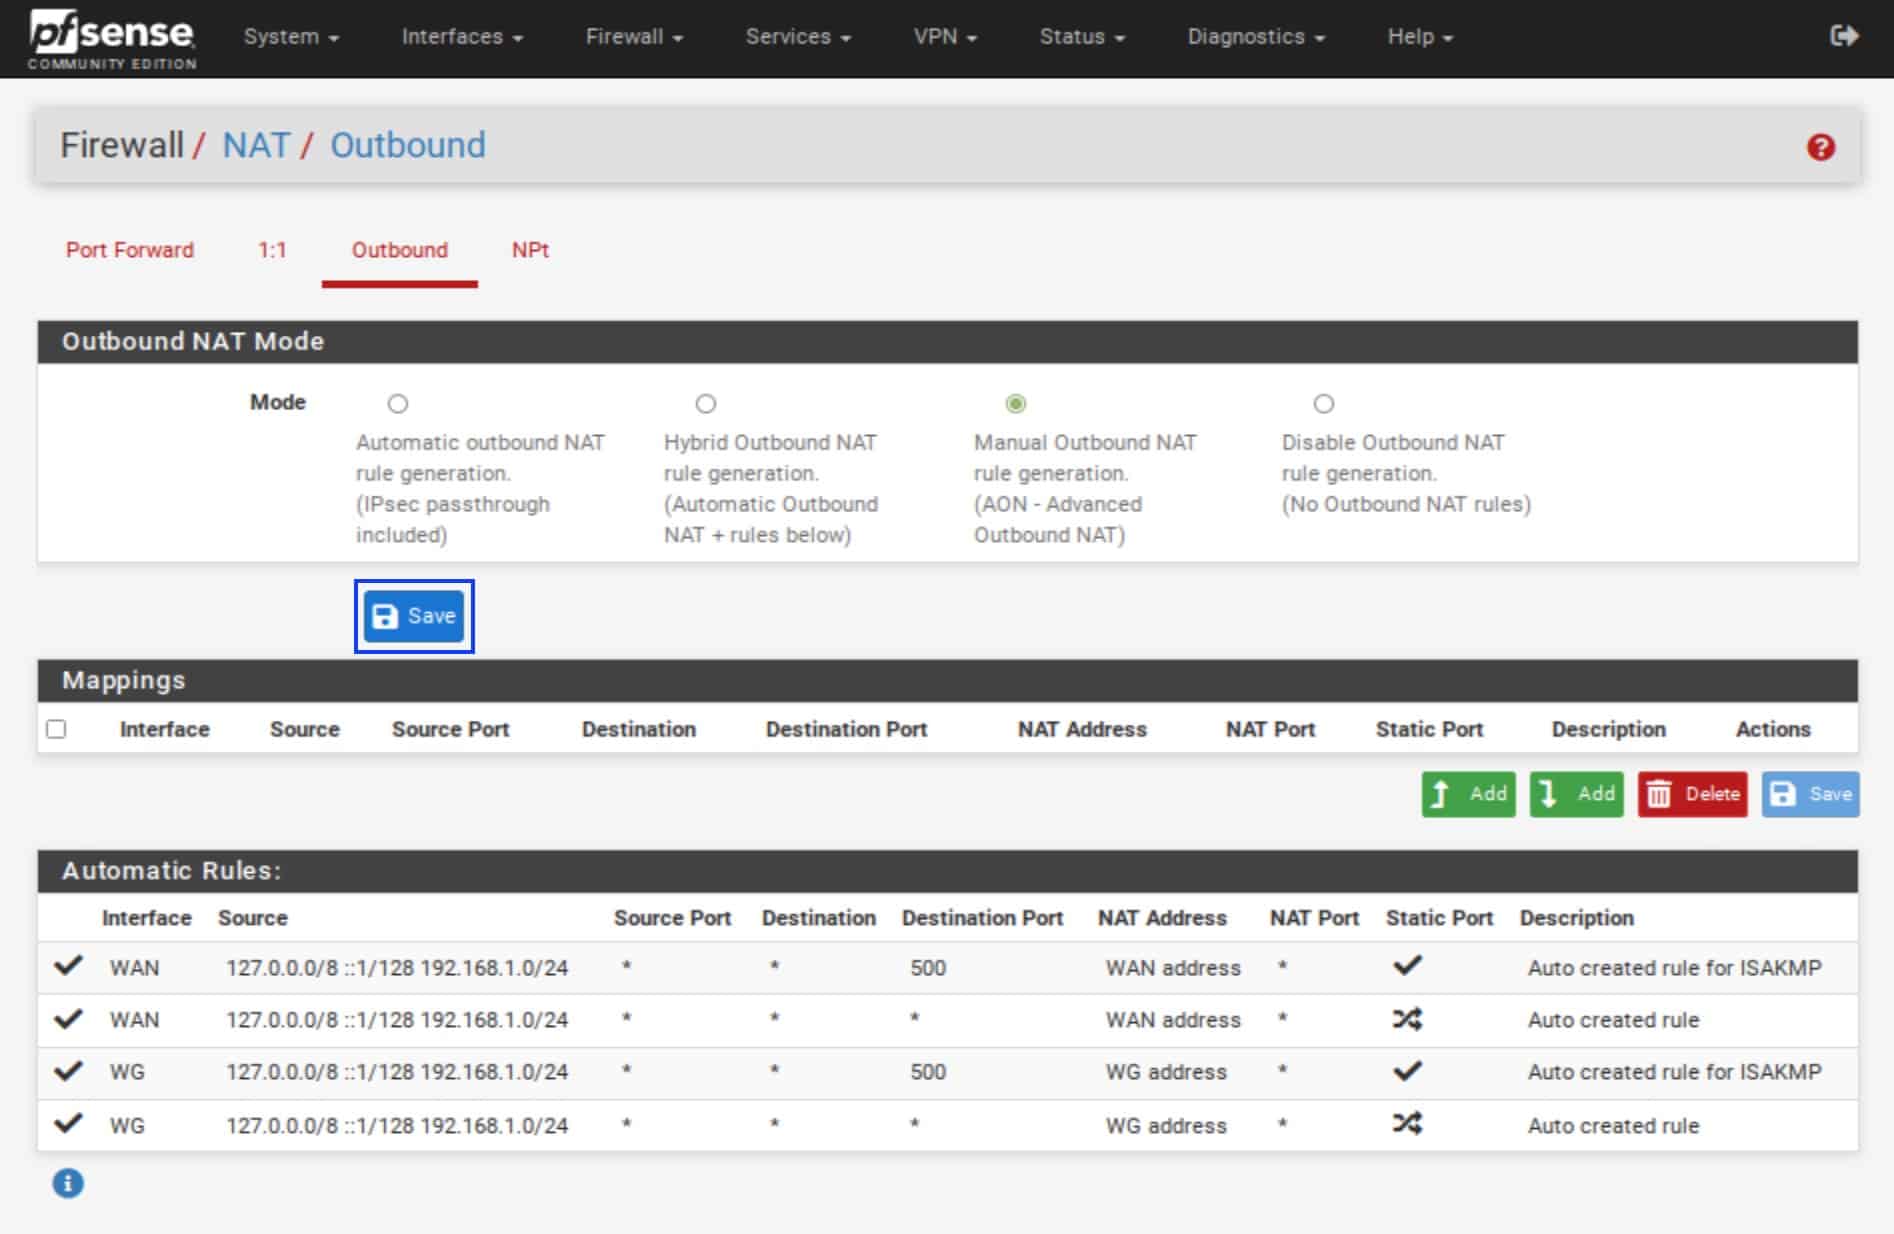
- Select the Outbound tab.
- Under Outbound NAT Mode, select Manual Outbound NAT rule generation. We need to set this because we want to create our own NAT rules to route our traffic through the WireGuard tunnel.
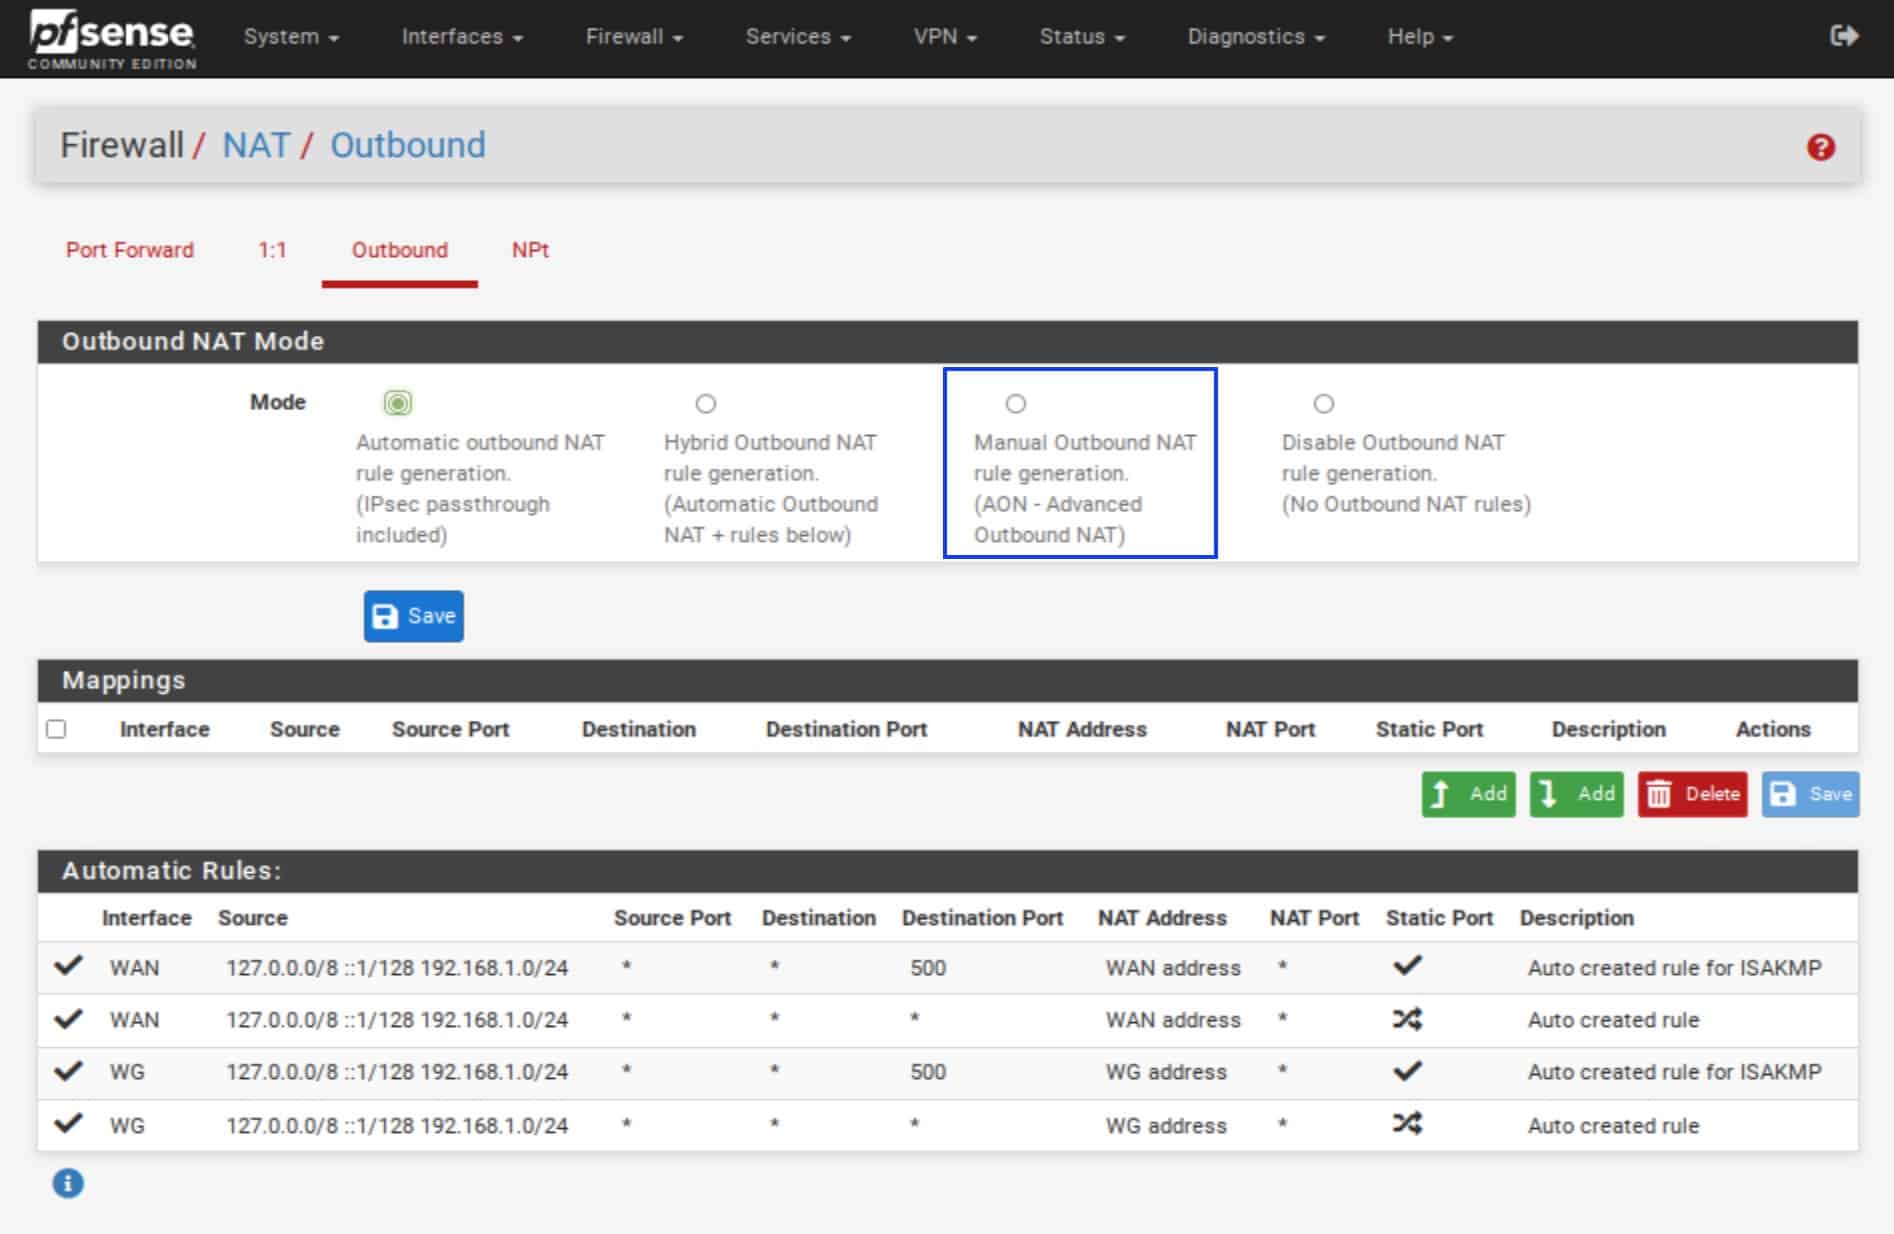
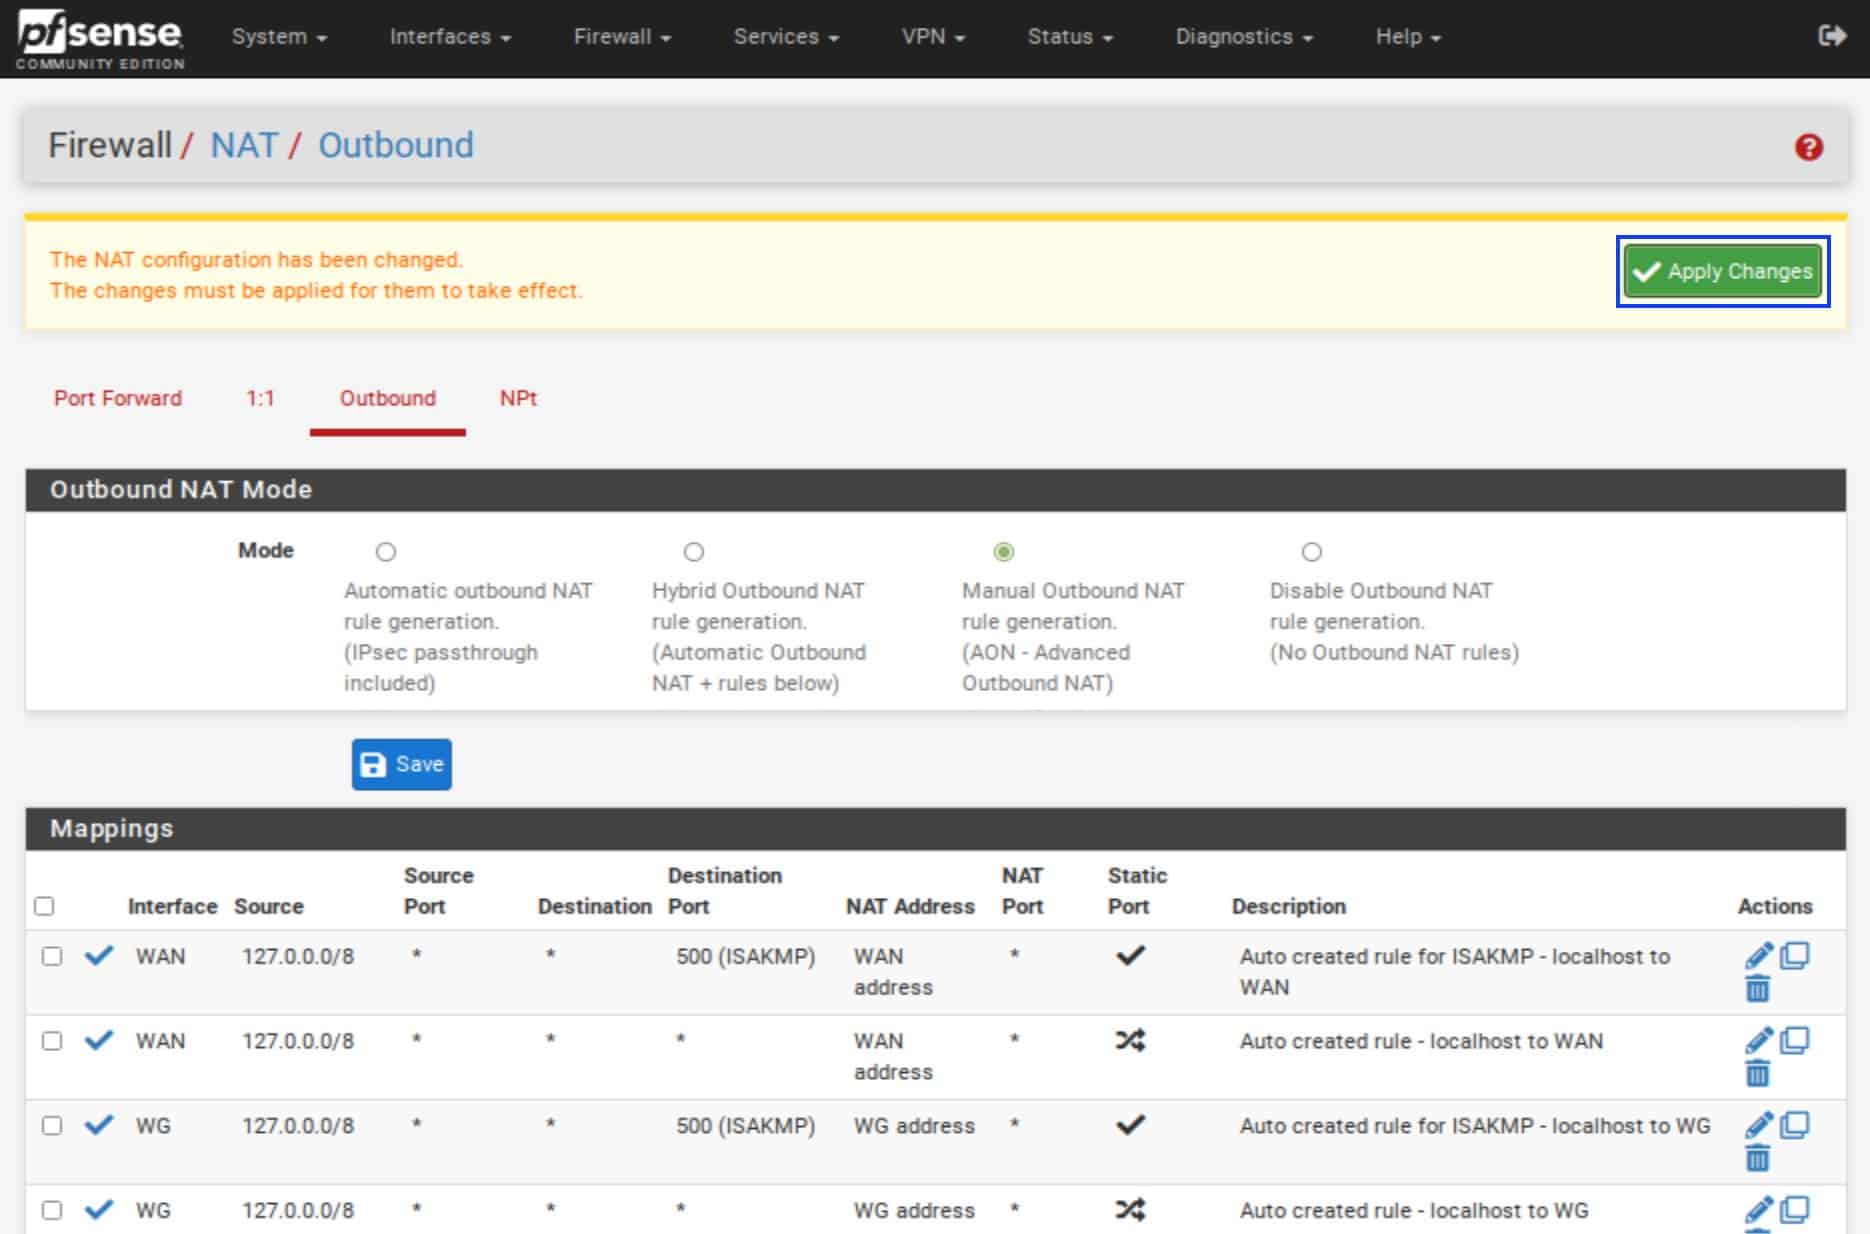
- Click Save.
- Click Apply Changes at the top.
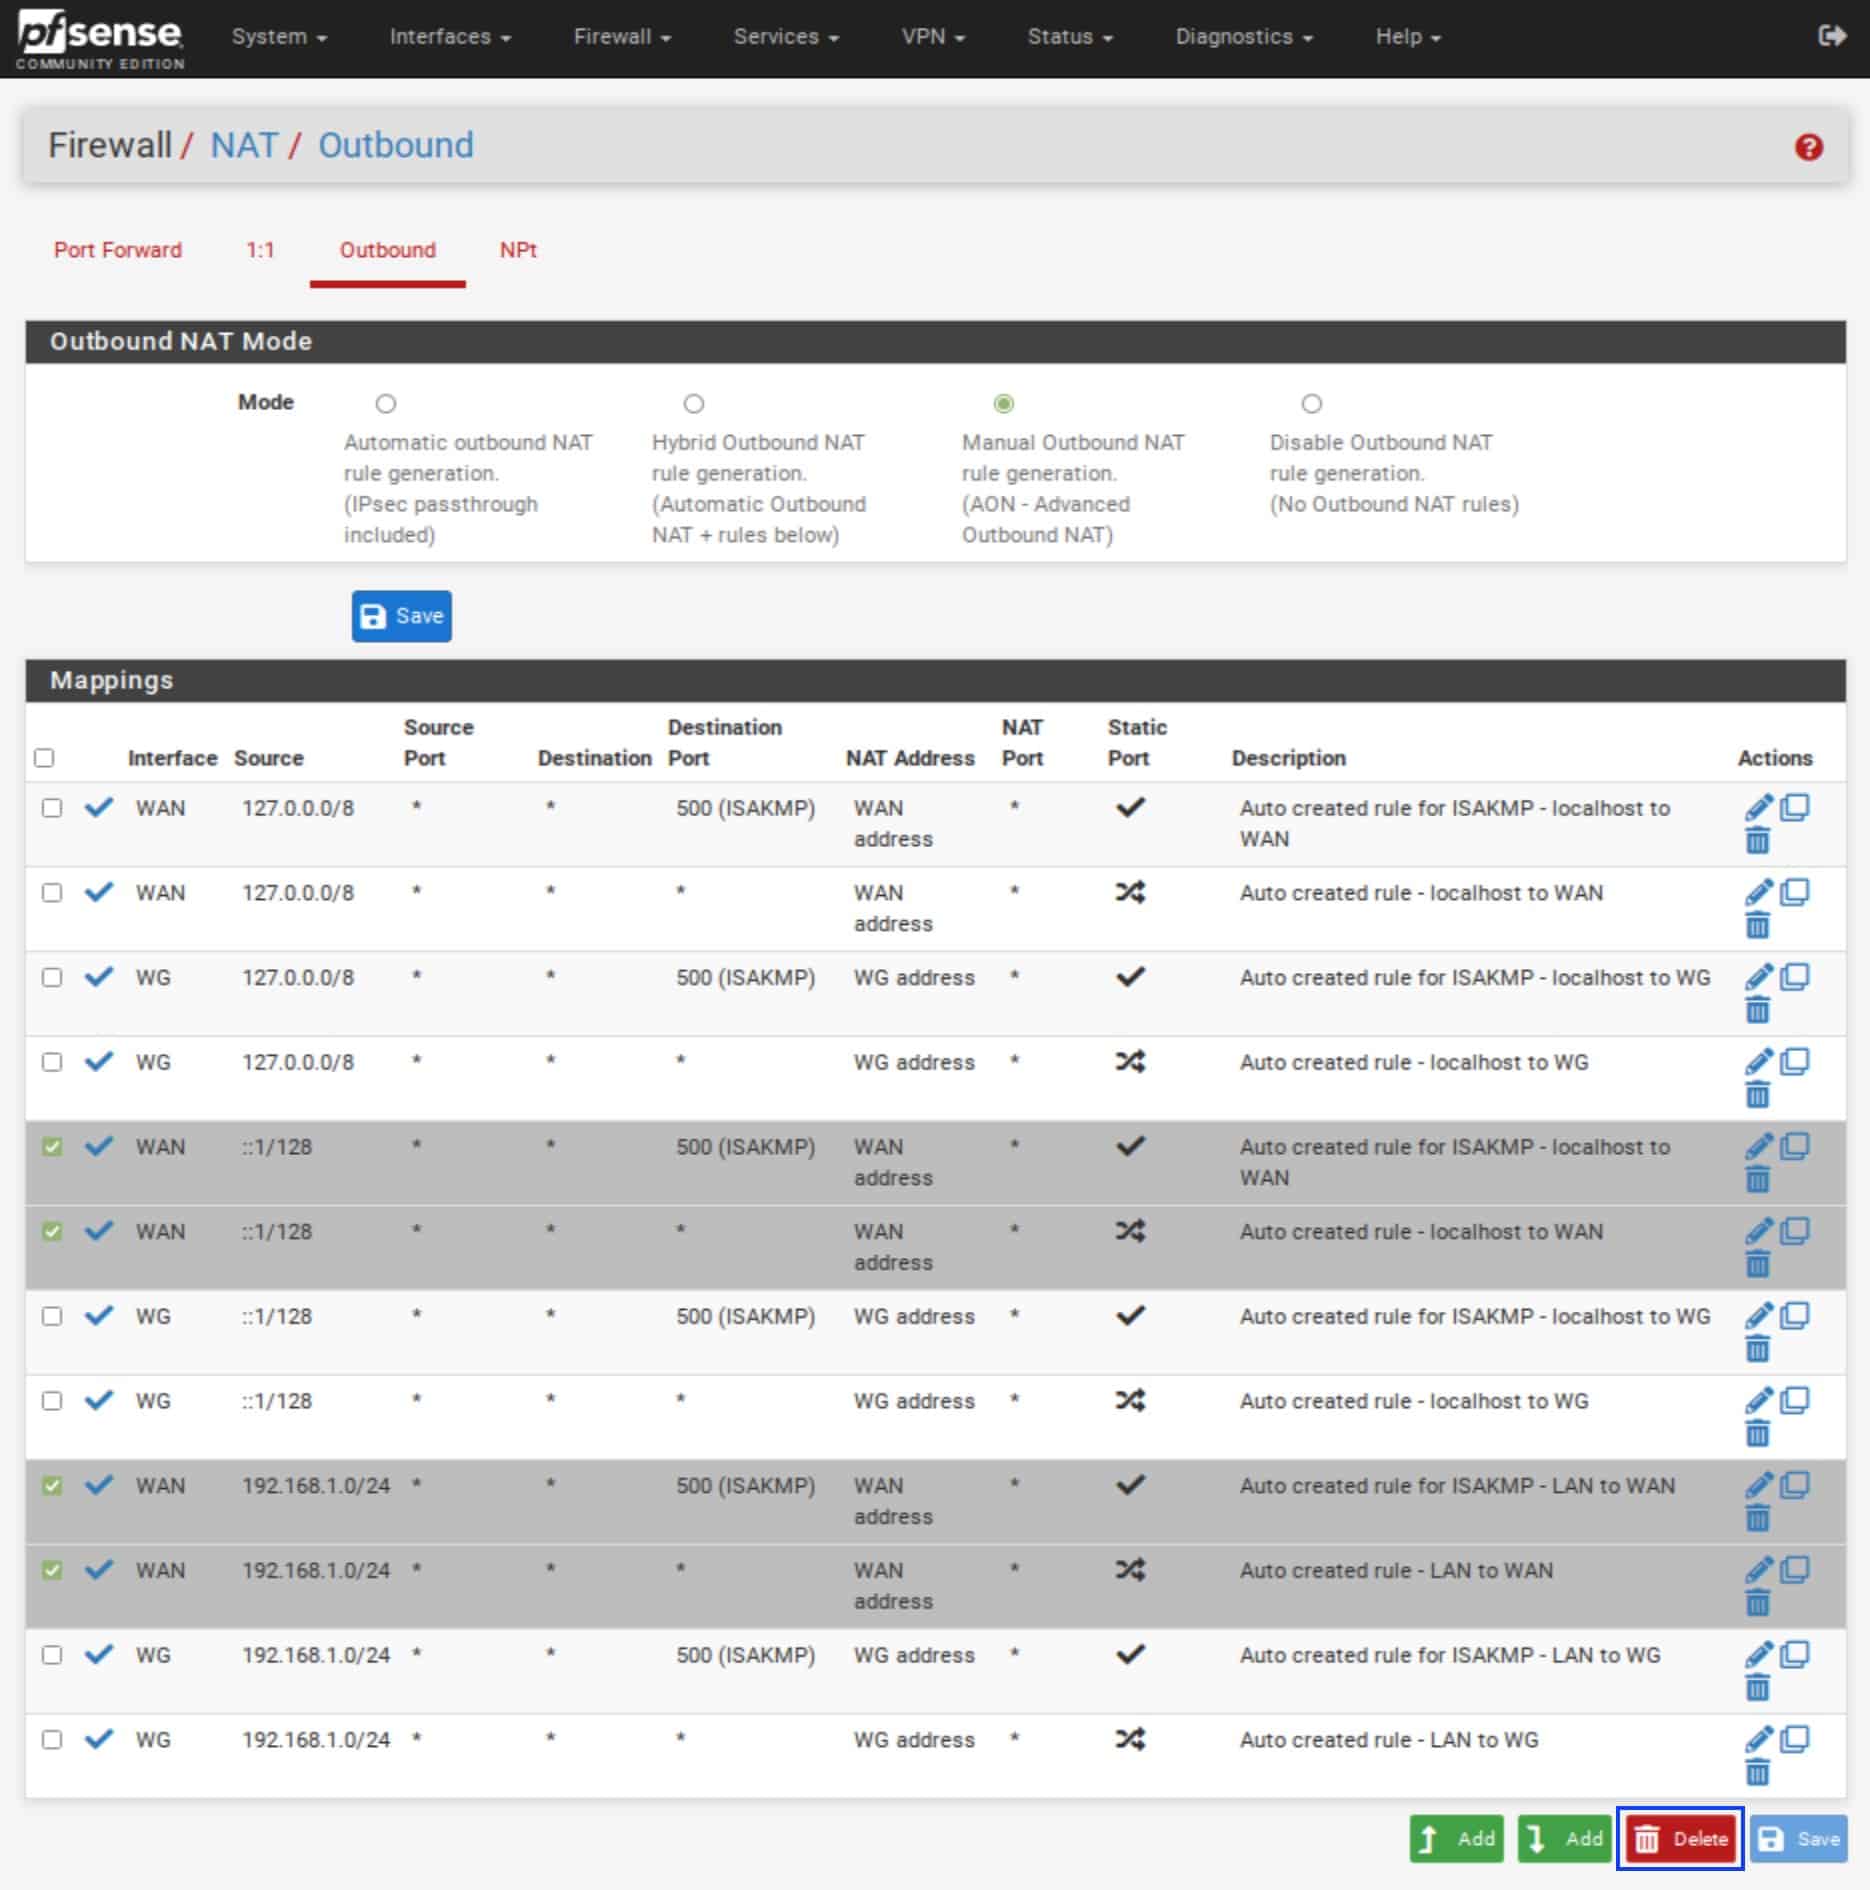
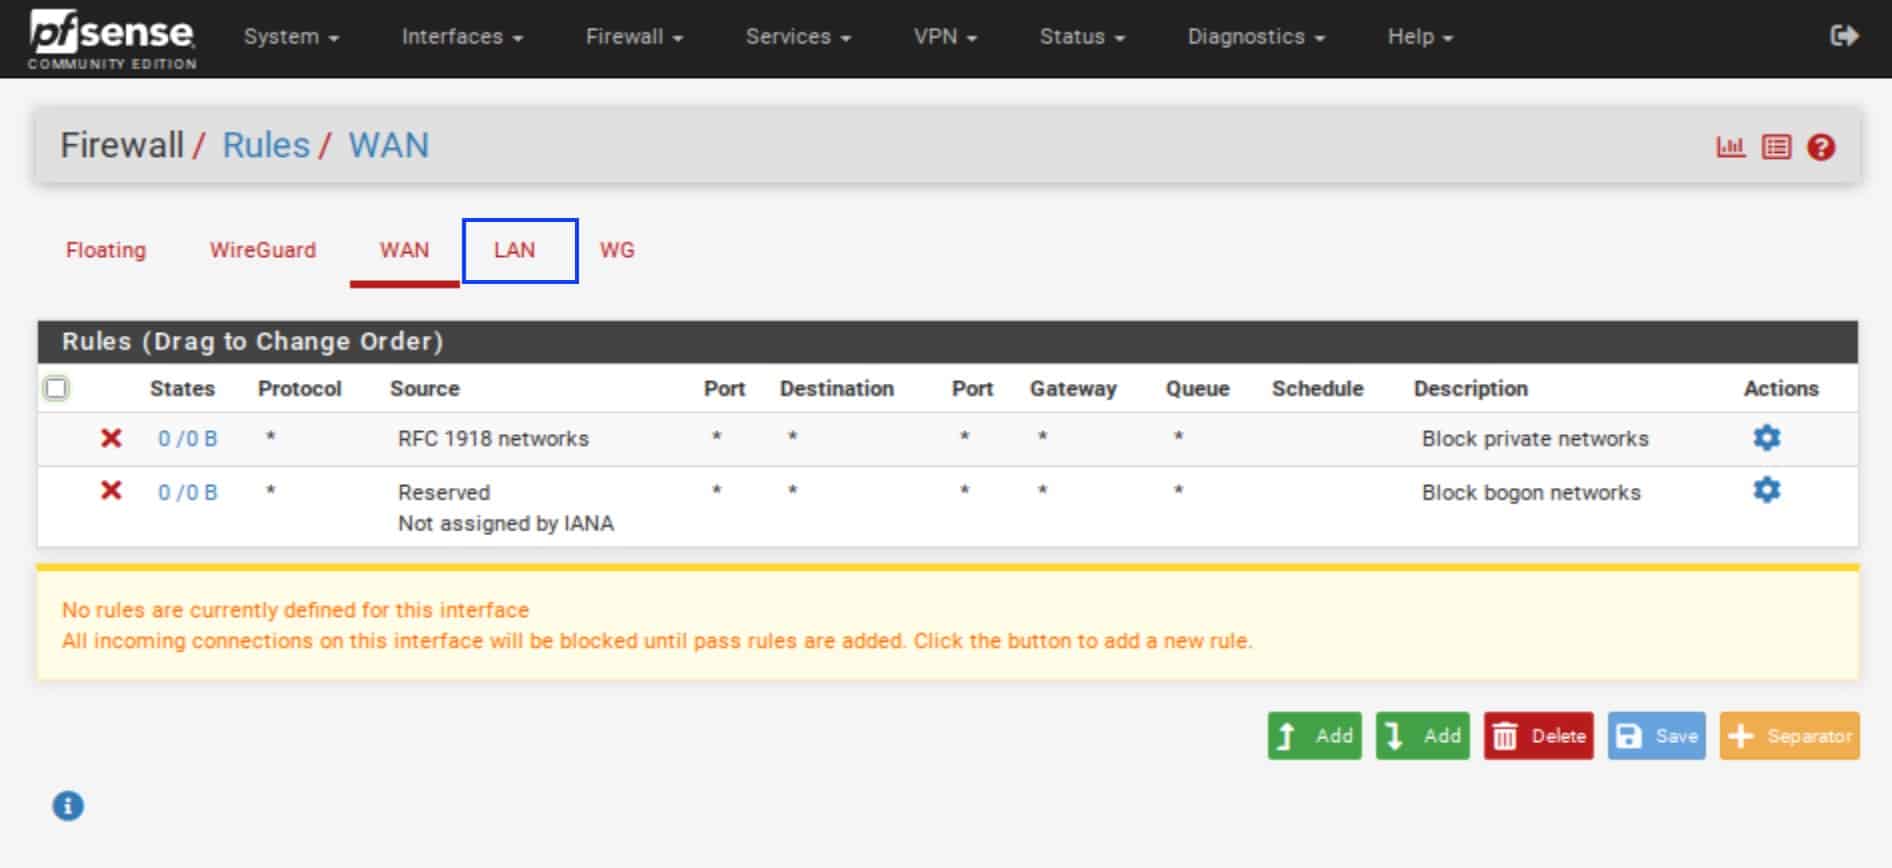
- Because we want to force all LAN traffic through the WireGuard tunnel, we want to delete any NAT rules that allow LAN traffic to go out through the WAN interface. Select the rules as shown below for your LAN interface and click Delete.
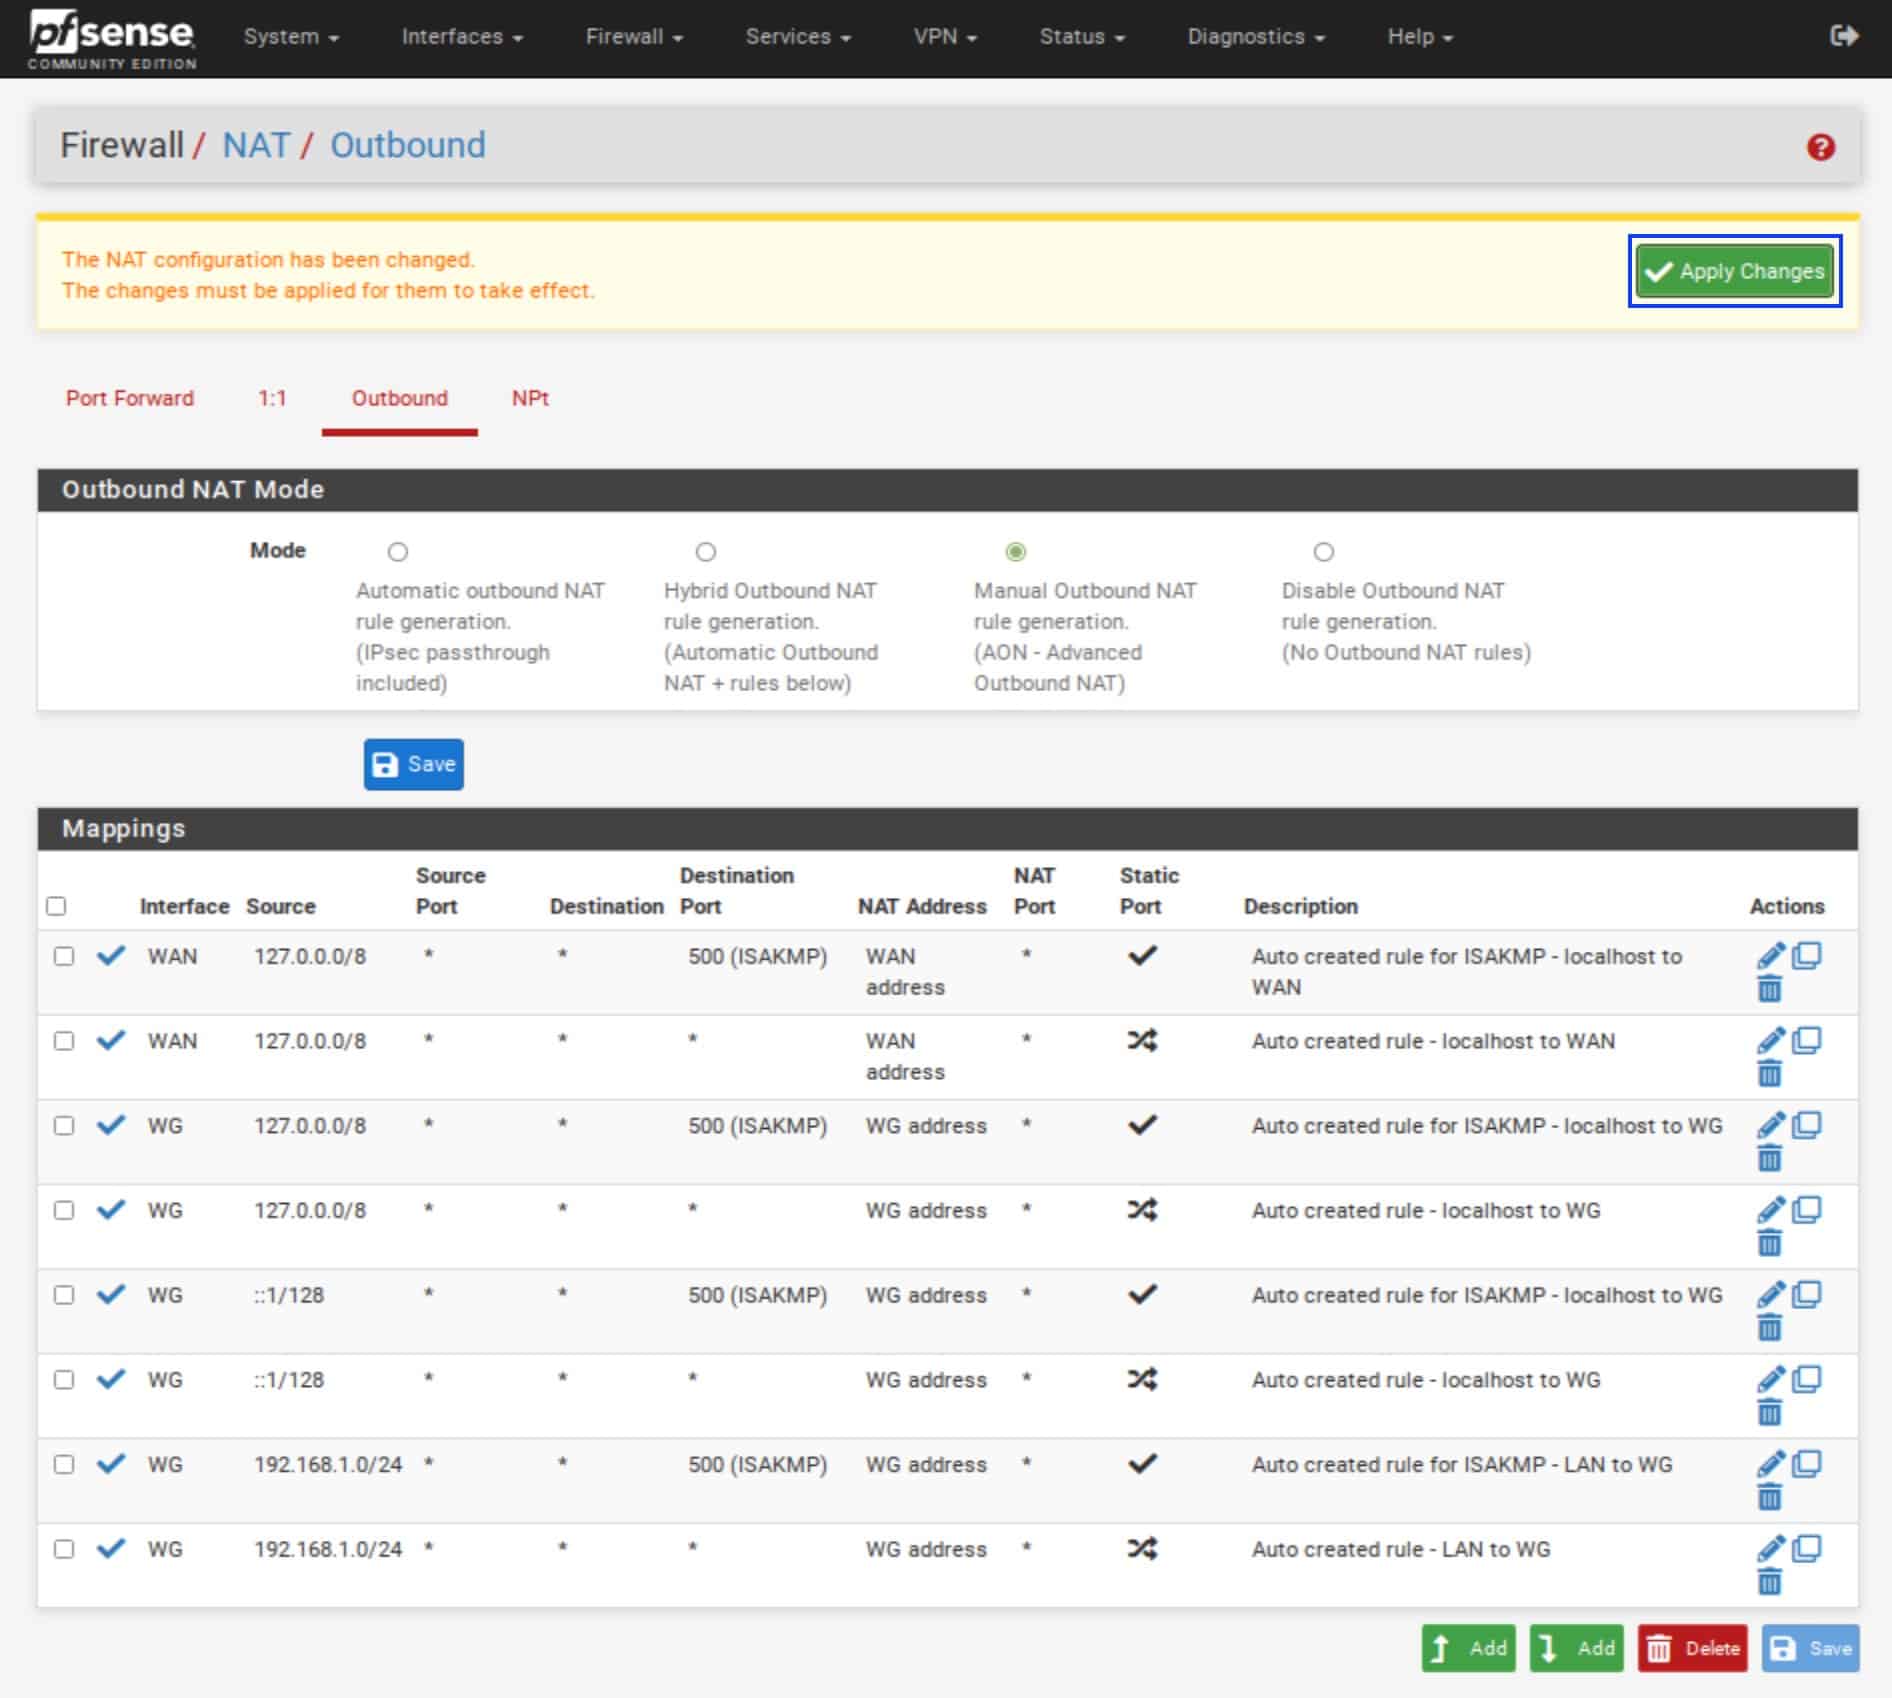
- Click Apply Changes. Your rules should look like the screenshot below.
- Note: If you only want to use IPv4, you can also delete the IPv6 rules.
Configuring firewall rules
We’re now going to create firewall rules to route our LAN traffic through the WireGuard tunnel.
- From the top menu, select Firewall > Rules. The Firewall Rules page is displayed.
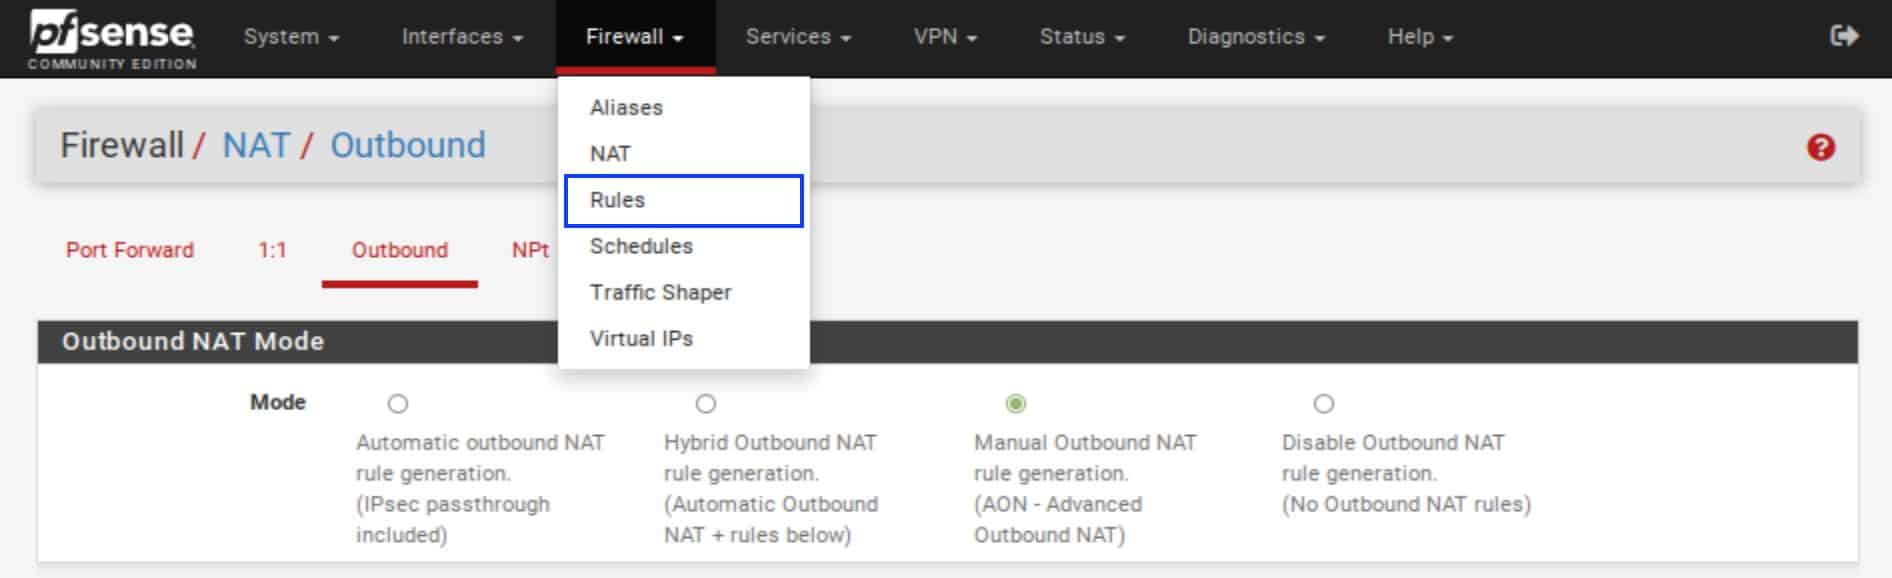
- Select the LAN tab. The LAN firewall rules are displayed.
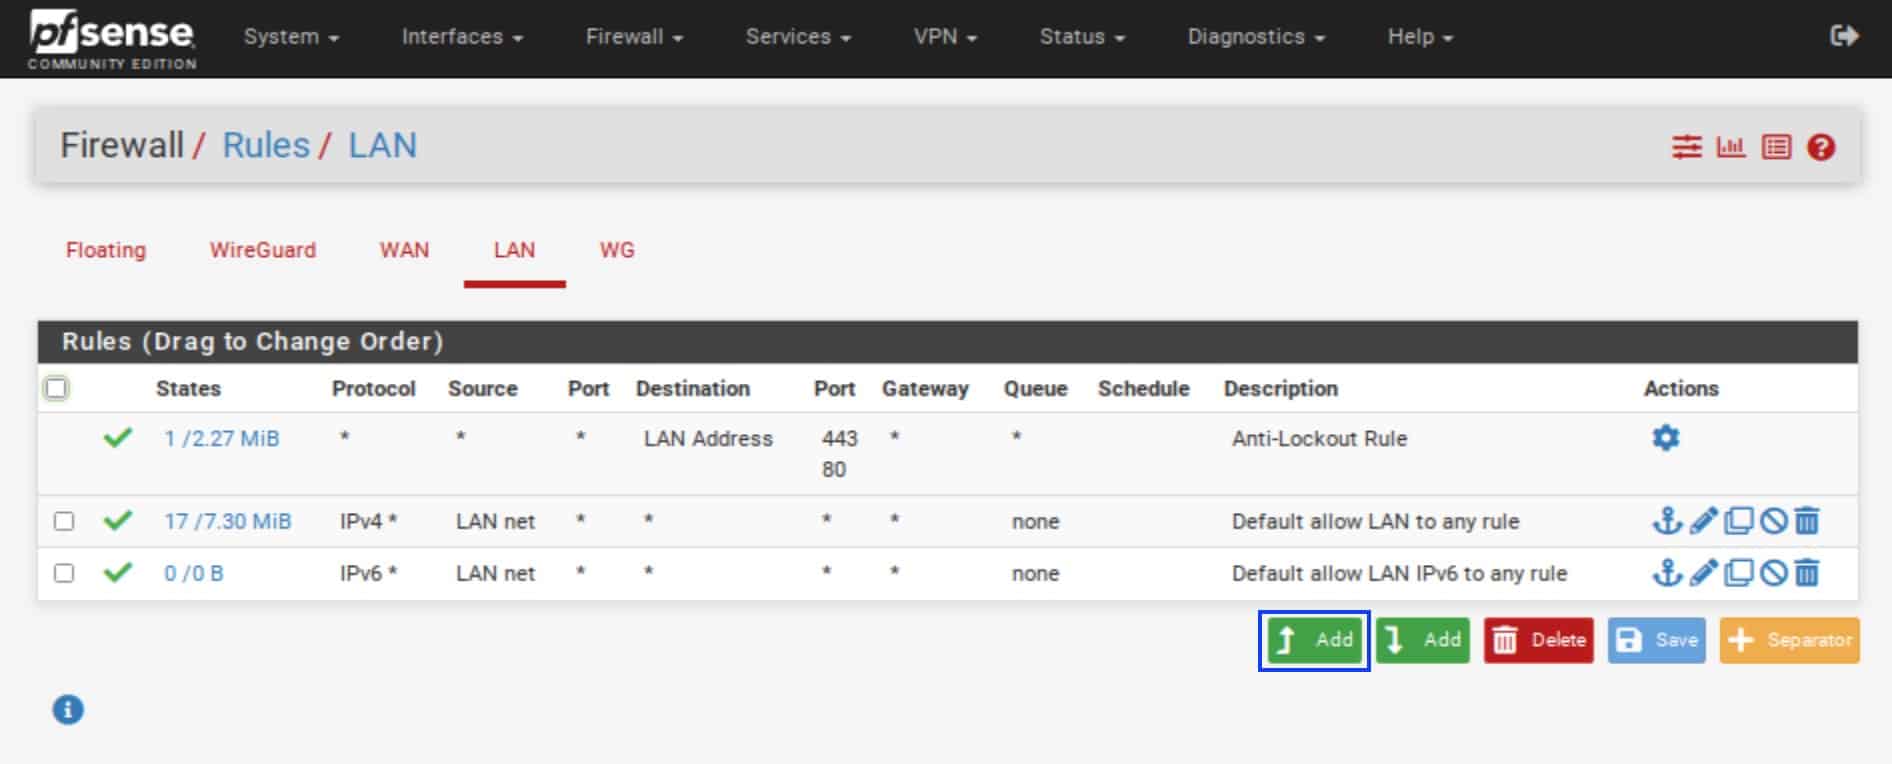
- Click the Add (top) button. An empty firewall rule is displayed.
- Set the Action field to Pass.
- Make sure the Interface field is set to LAN.
- Set the Address Family field to IPv4.
- Set the Protocol to Any.
- Under Source, set the Source drop-down menu to LAN.net.
- Under Destination, set the Destination drop-down menu to any.
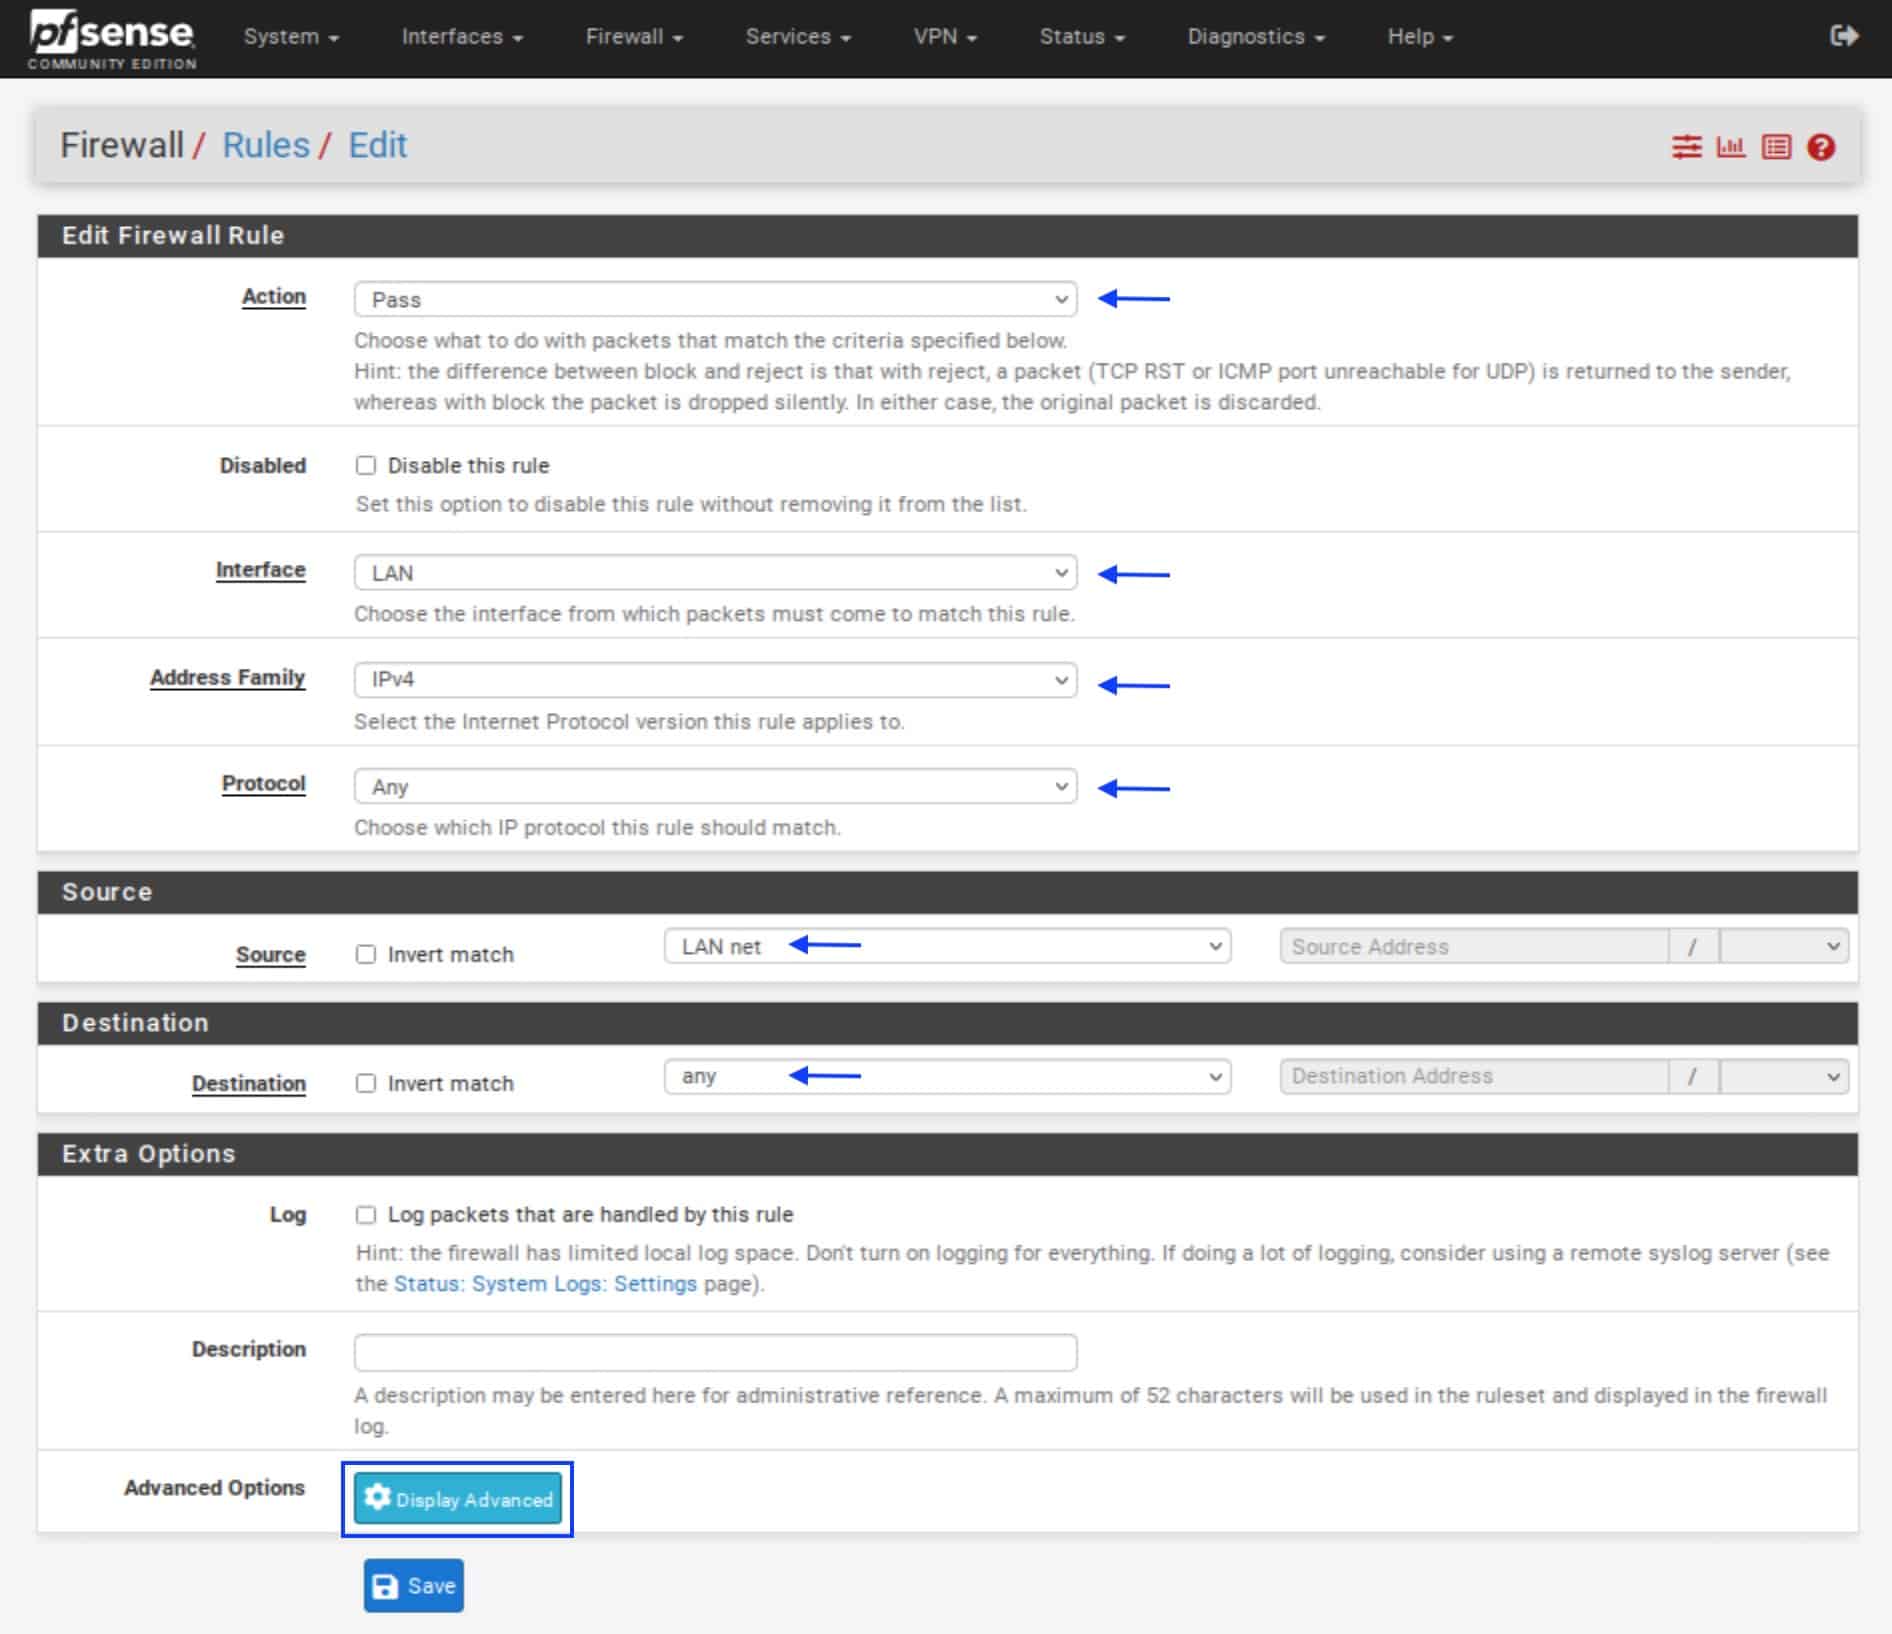
- Under Extra Options, next to the Advanced Options field, click the Display Advanced button. The Advanced Options are displayed.
- Scroll down to the Gateway field and select the WireGuard gateway we configured earlier from the drop-down menu.
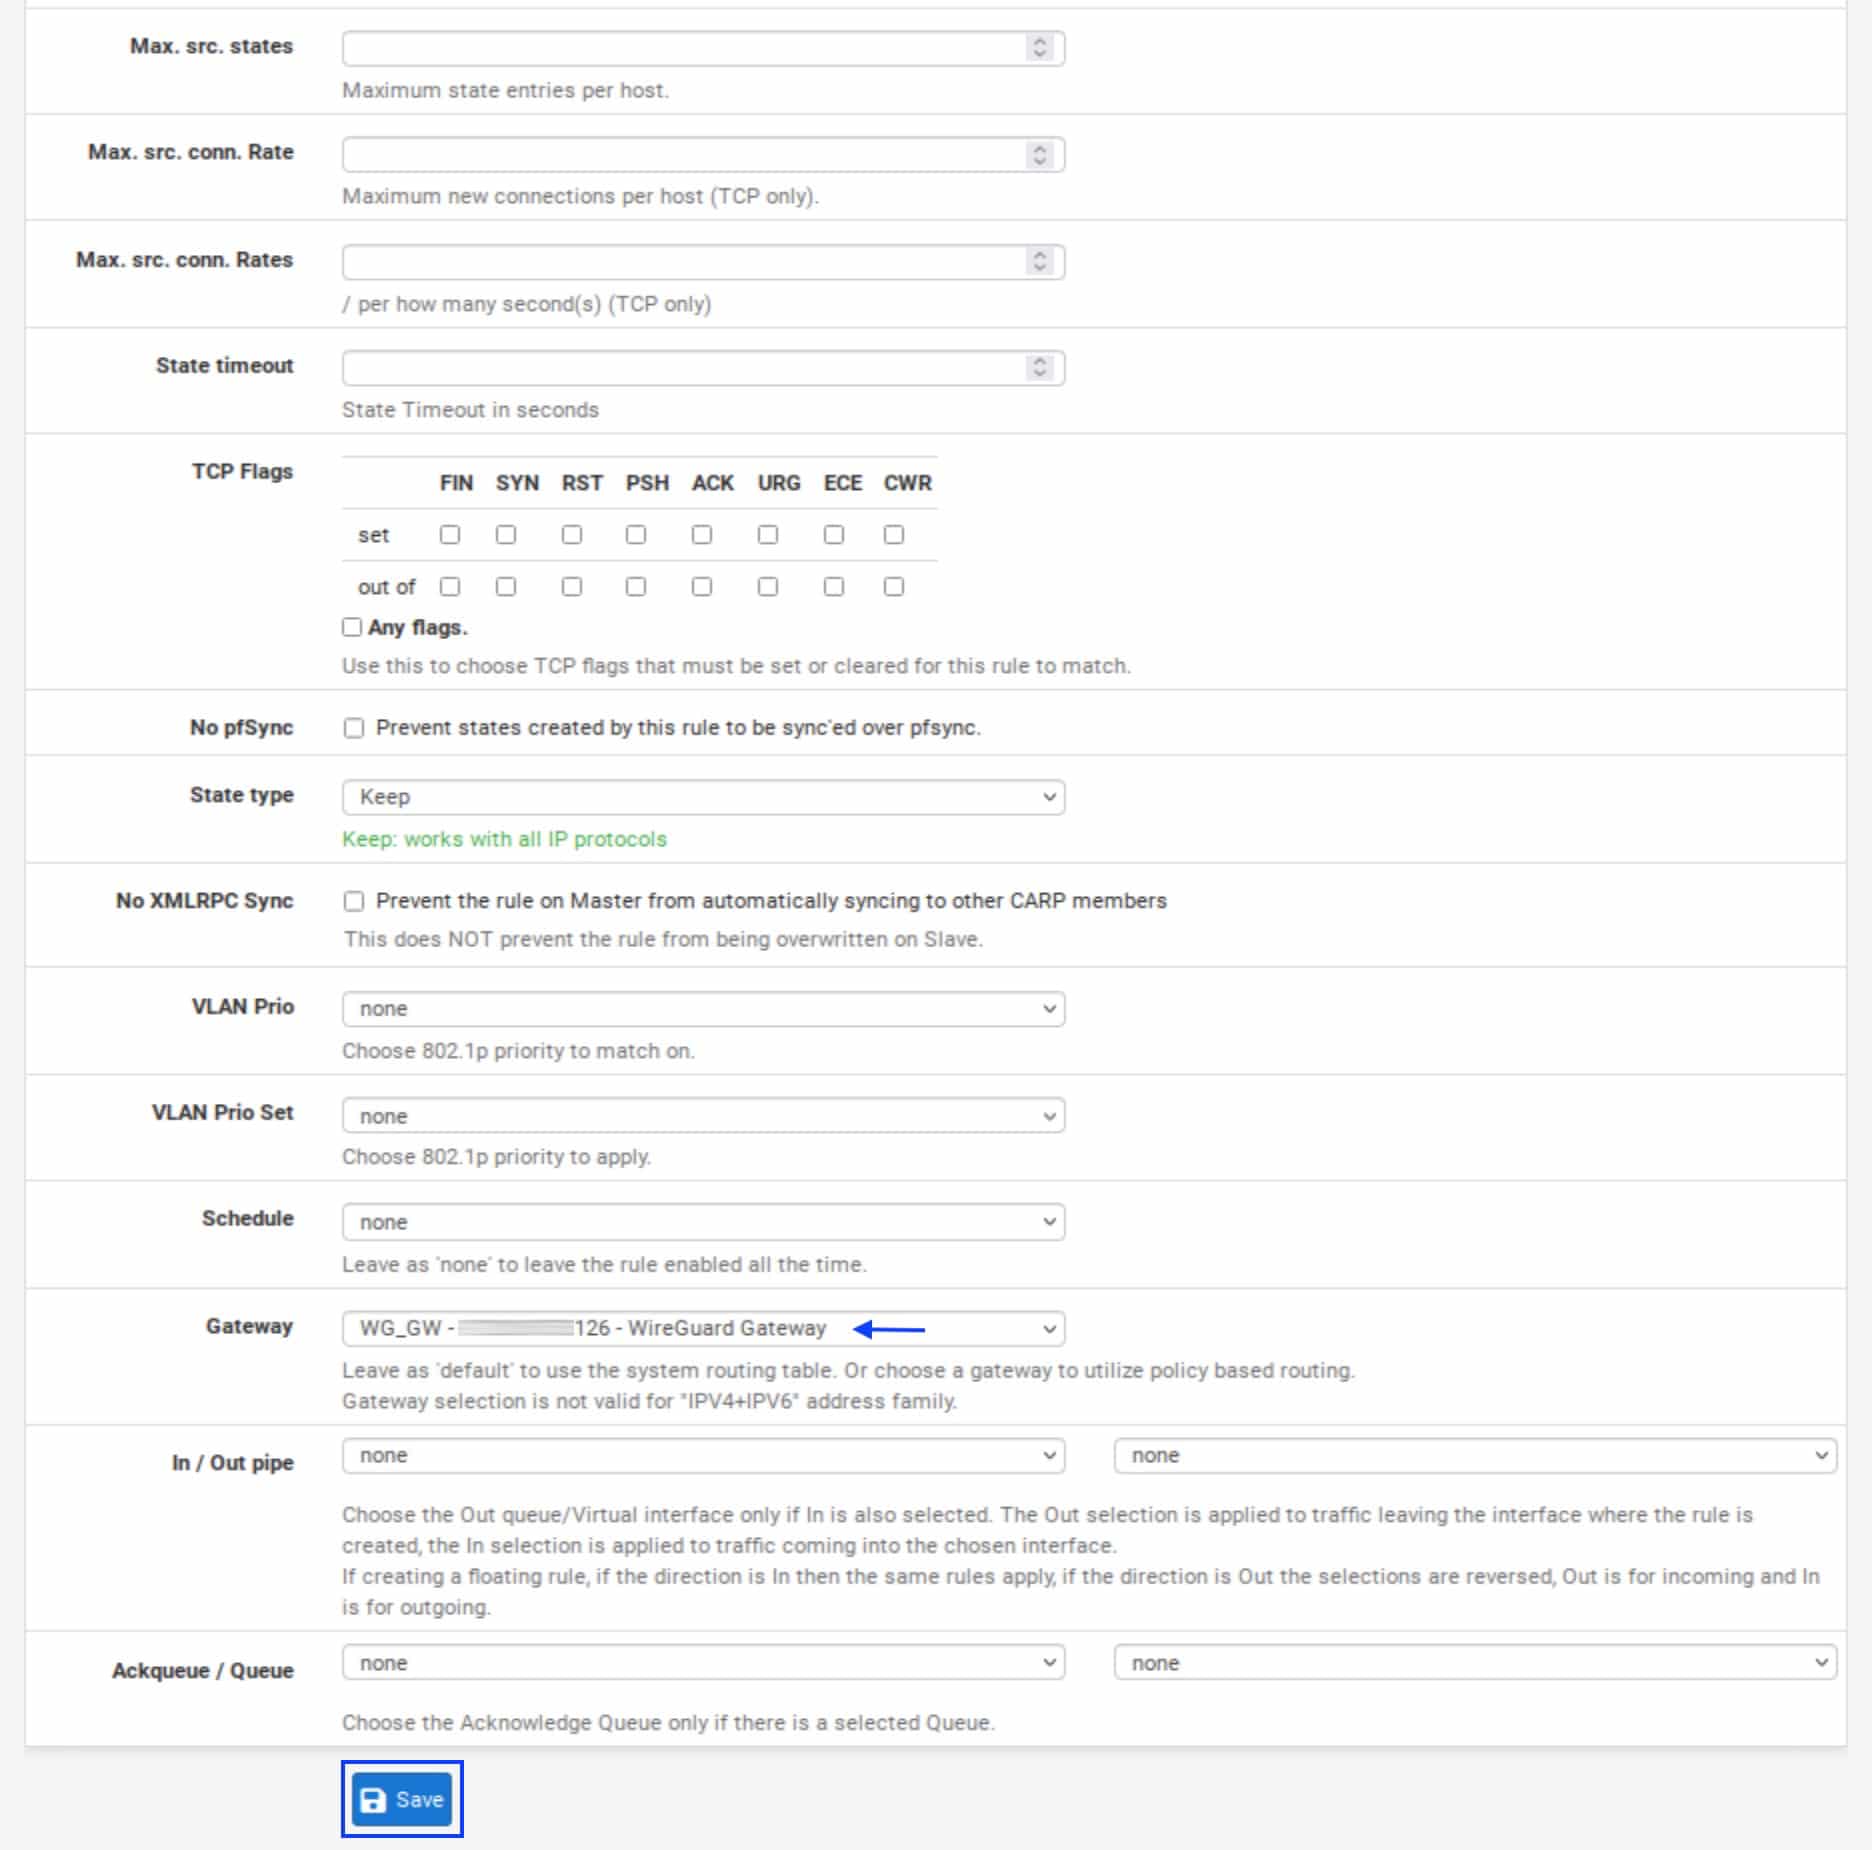
- Click Save.
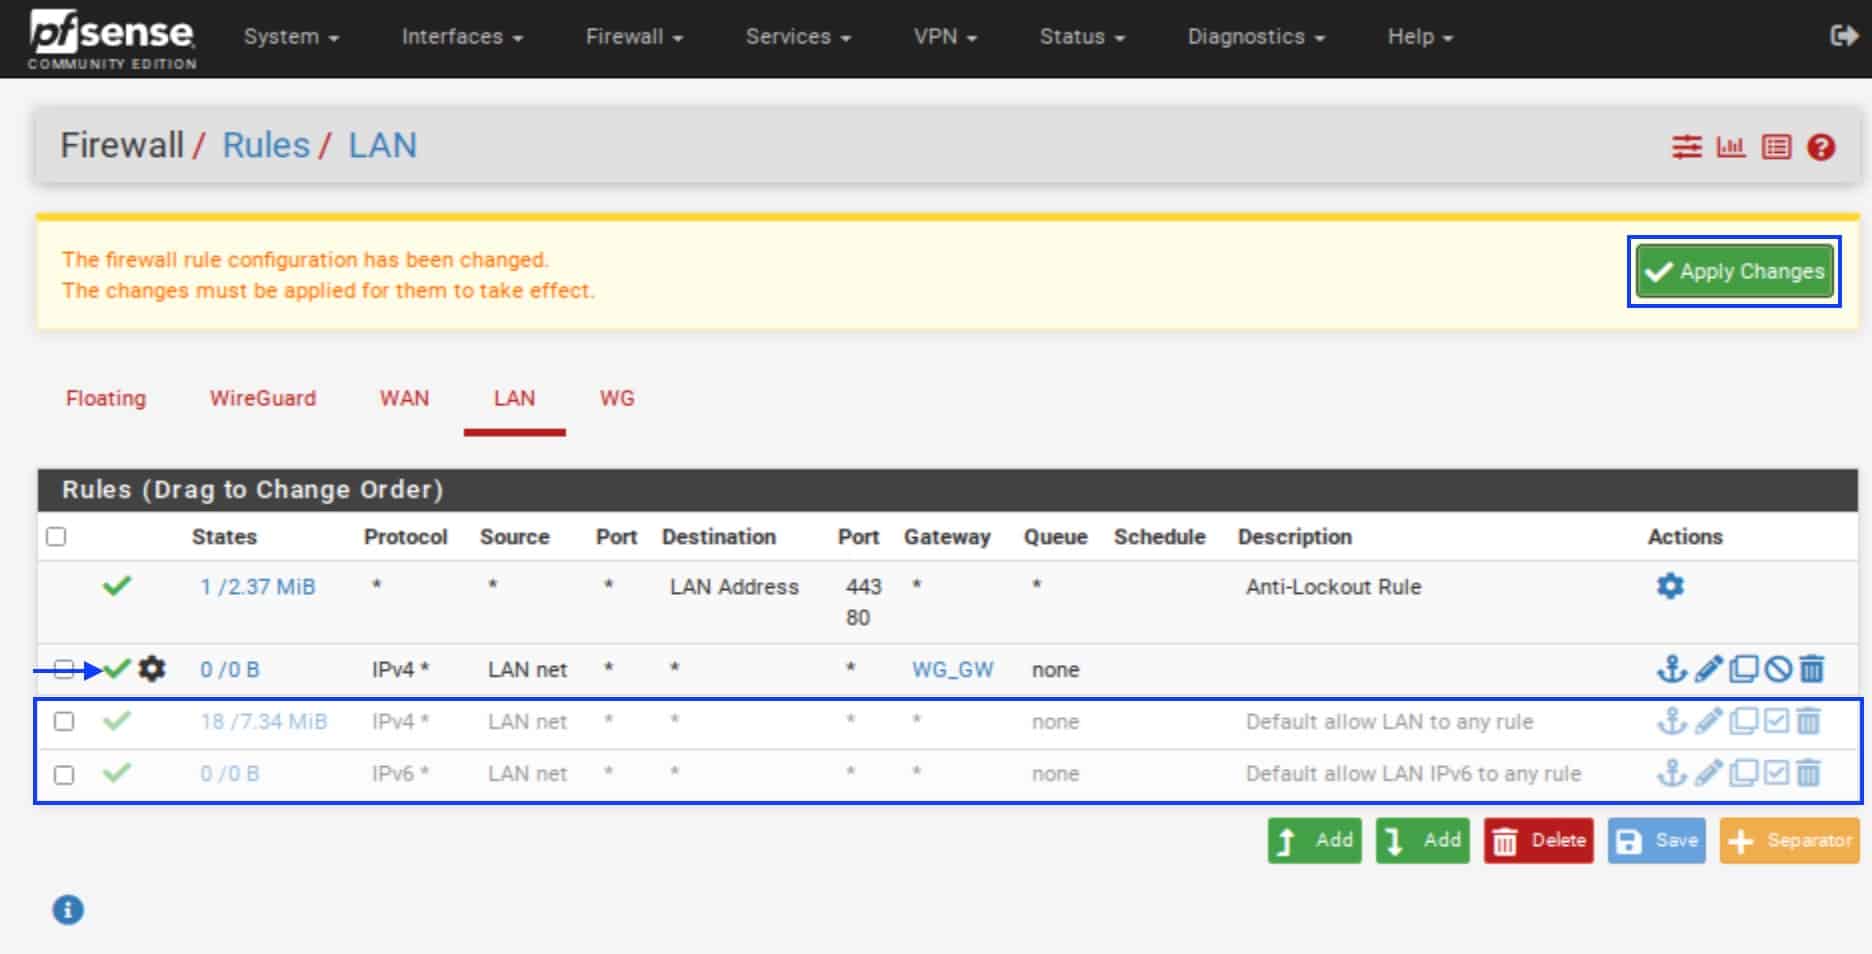
- Click Apply Changes. The new rule is displayed under the Anti-Lockout Rule. If you want to use both IPv4 and IPv6, repeat these steps for IPv6.
- Click the green arrow next to two default LAN rules to disable them. Now our LAN traffic can only go out through the WireGuard gateway.
Static routes
In a few steps, we’re going to set our WireGuard gateway as the default gateway for our pfSense box. To make sure that there are no errors when booting up pfSense (where it would try to initiate the tunnel through the WireGuard gateway itself), we’re going to set up a static route for pfSense to use the WAN interface to initiate the tunnel.
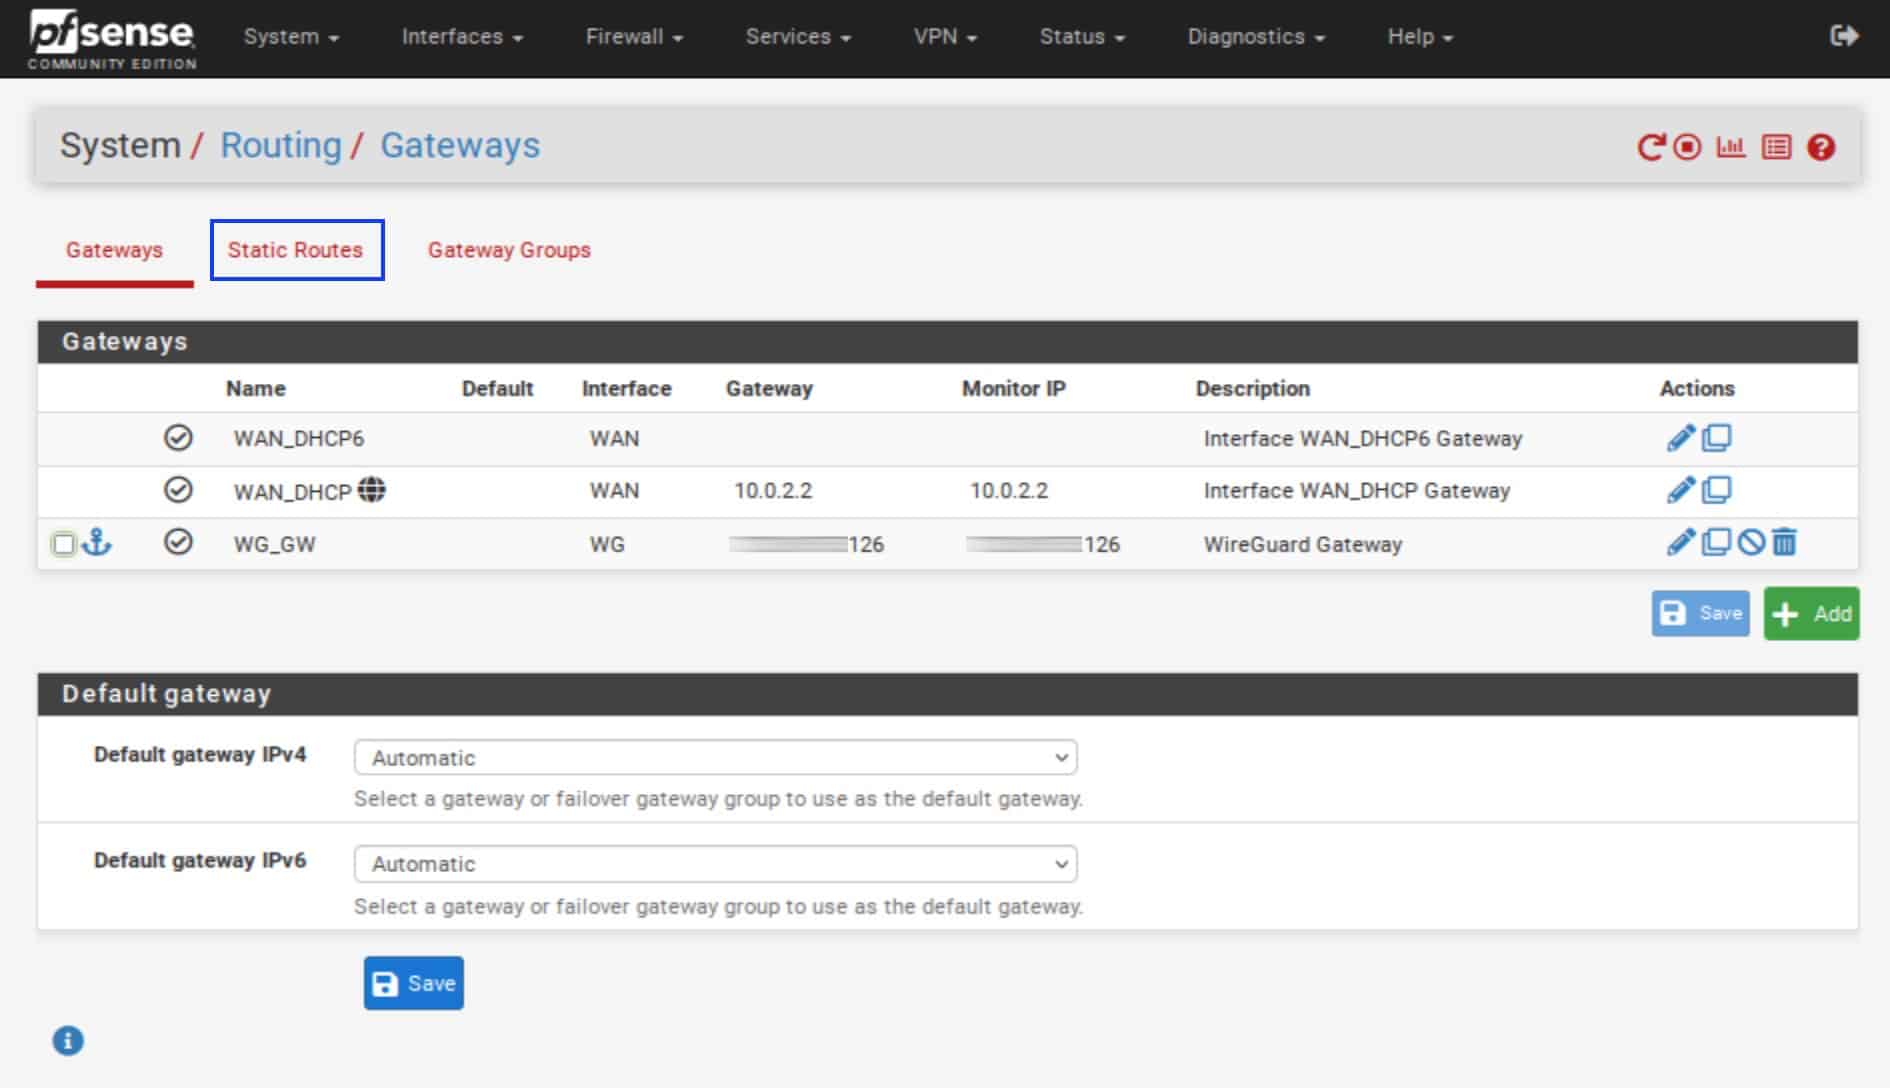
- From the top menu, select System > Routing. The Routing page is displayed.
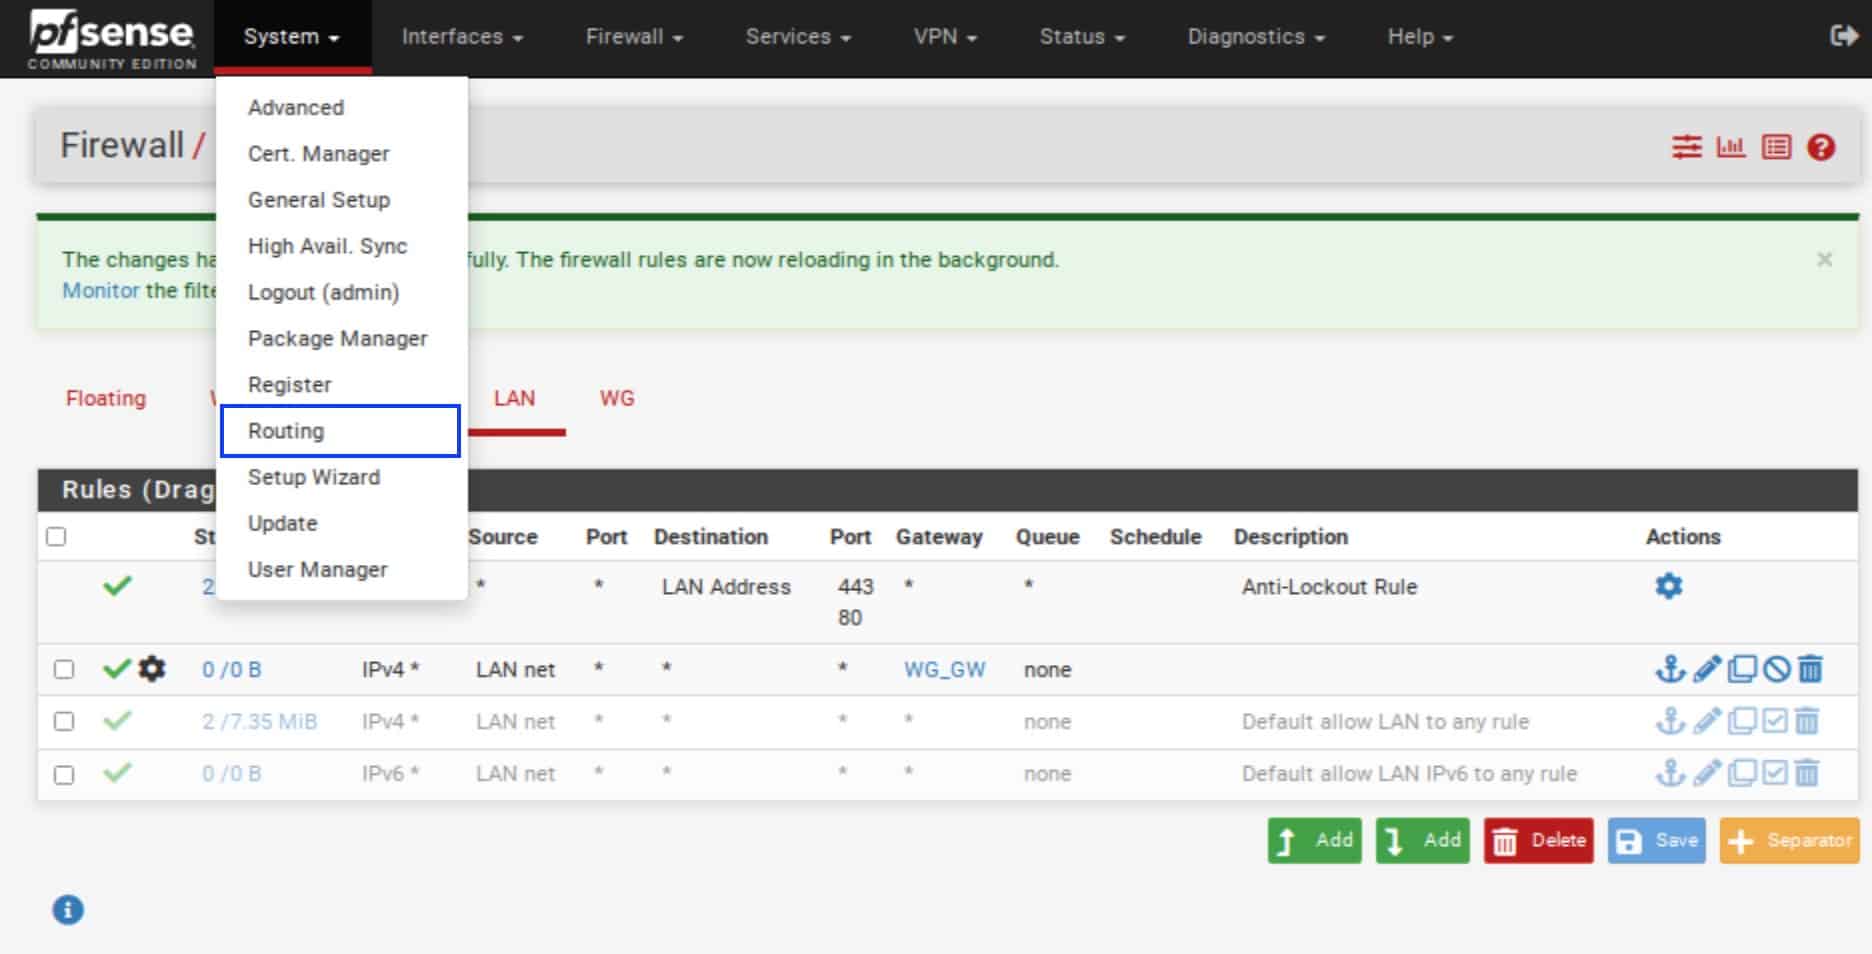
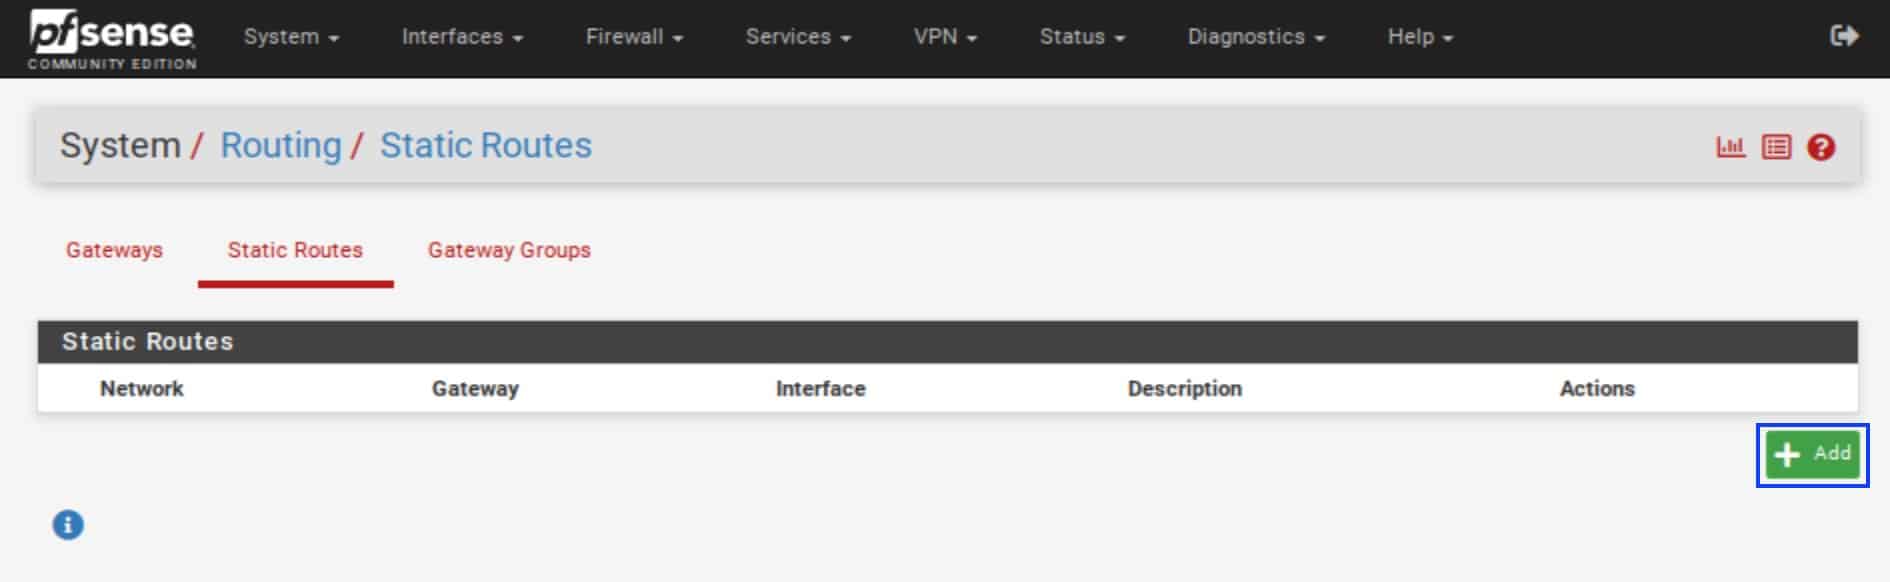
- Select the Static Routes tab. The Static Routes page is displayed.
- Click the Add button.
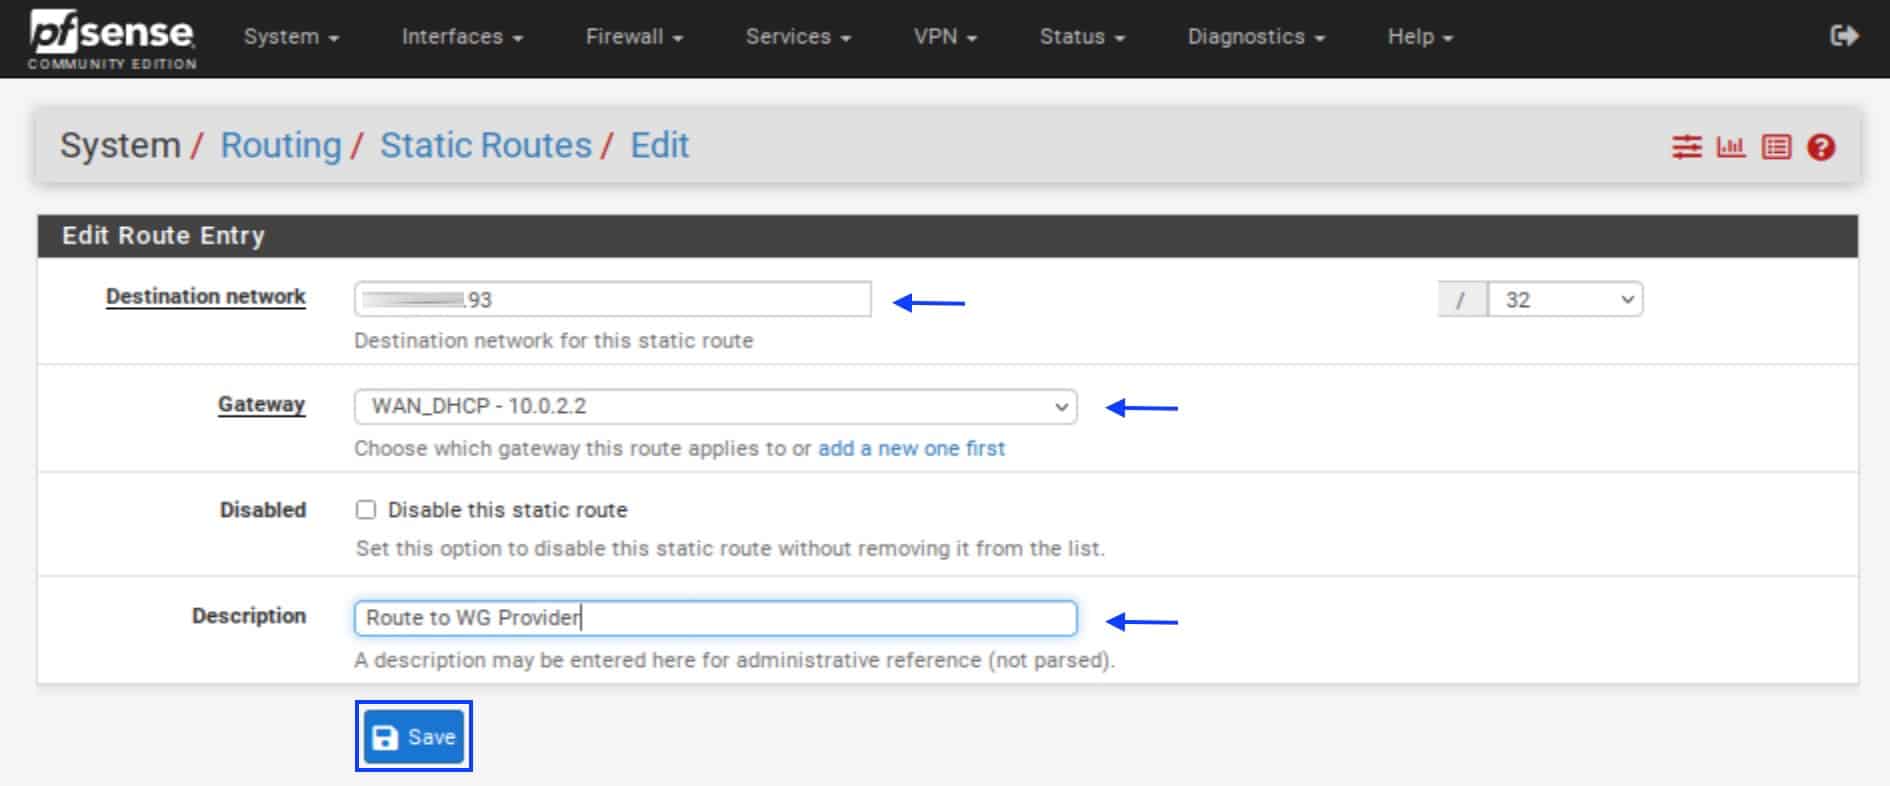
- In the Destination network field, enter the IP address for the WireGuard “server” you’re connecting to. That is the same address used when configuring our WireGuard peer.
- From the Gateway drop-down menu, select the WAN gateway.
- In the Description field, enter a description for your static route (optional).
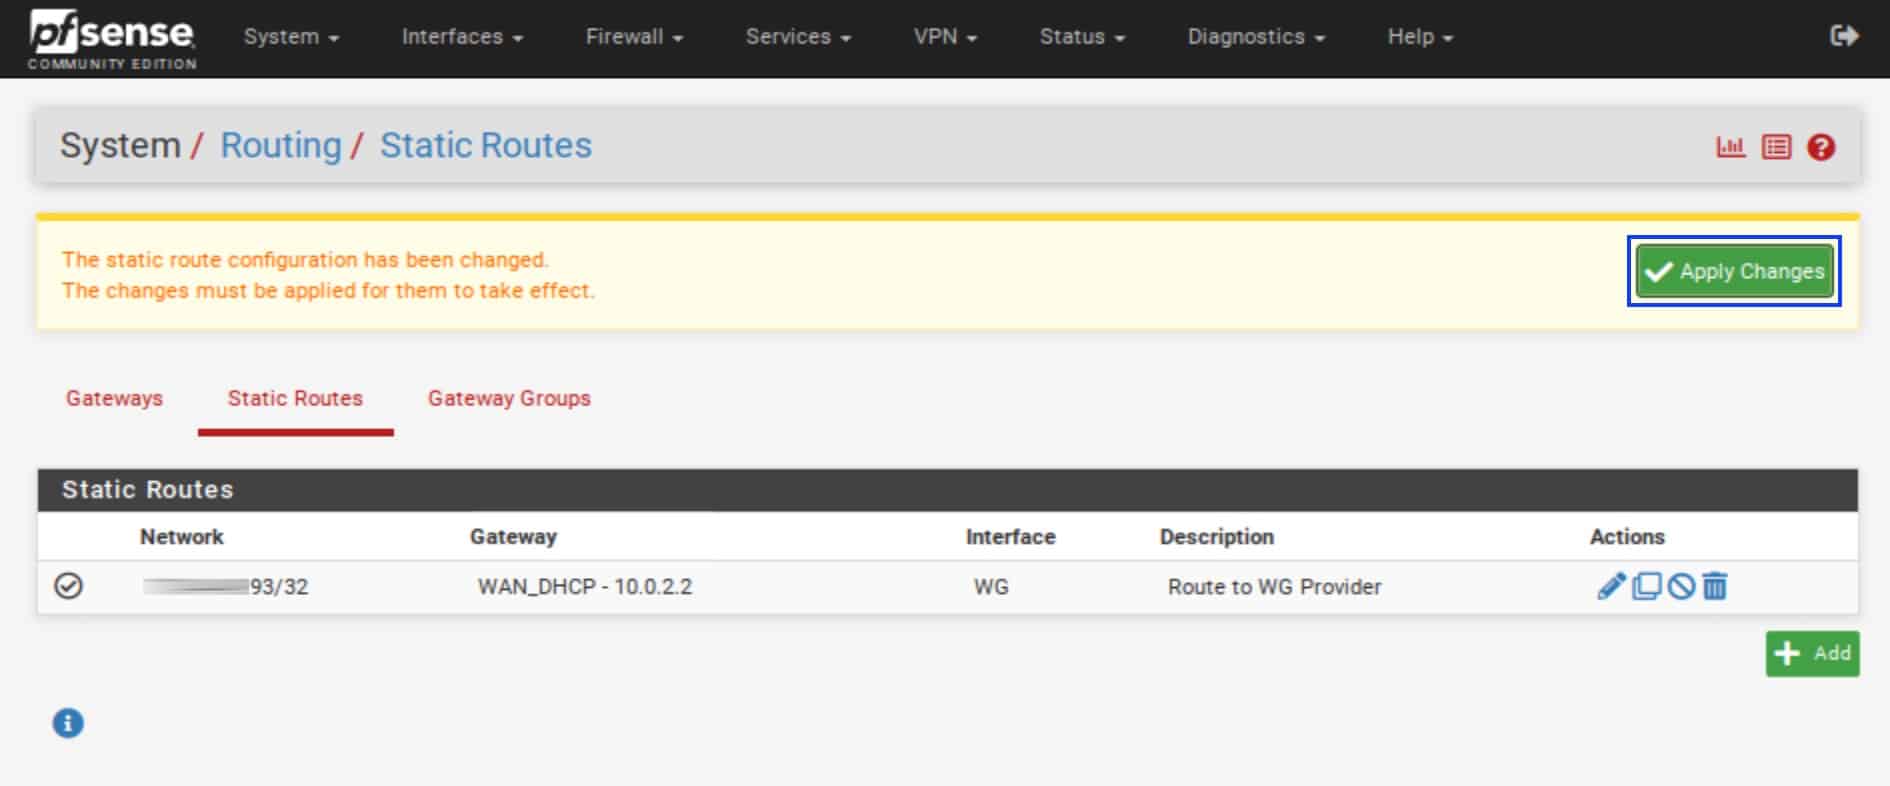
- Click Save. You’re taken back to the Static Routes page.
- Click Apply Changes.
Setting the default gateway
We’re now going to set our WireGuard gateway as the pfSense box’s default gateway.
- Select the Gateways tab.

- Under Default gateway, from the Default gateway IPv4 drop-down menu, select your (IPv4) WireGuard gateway.
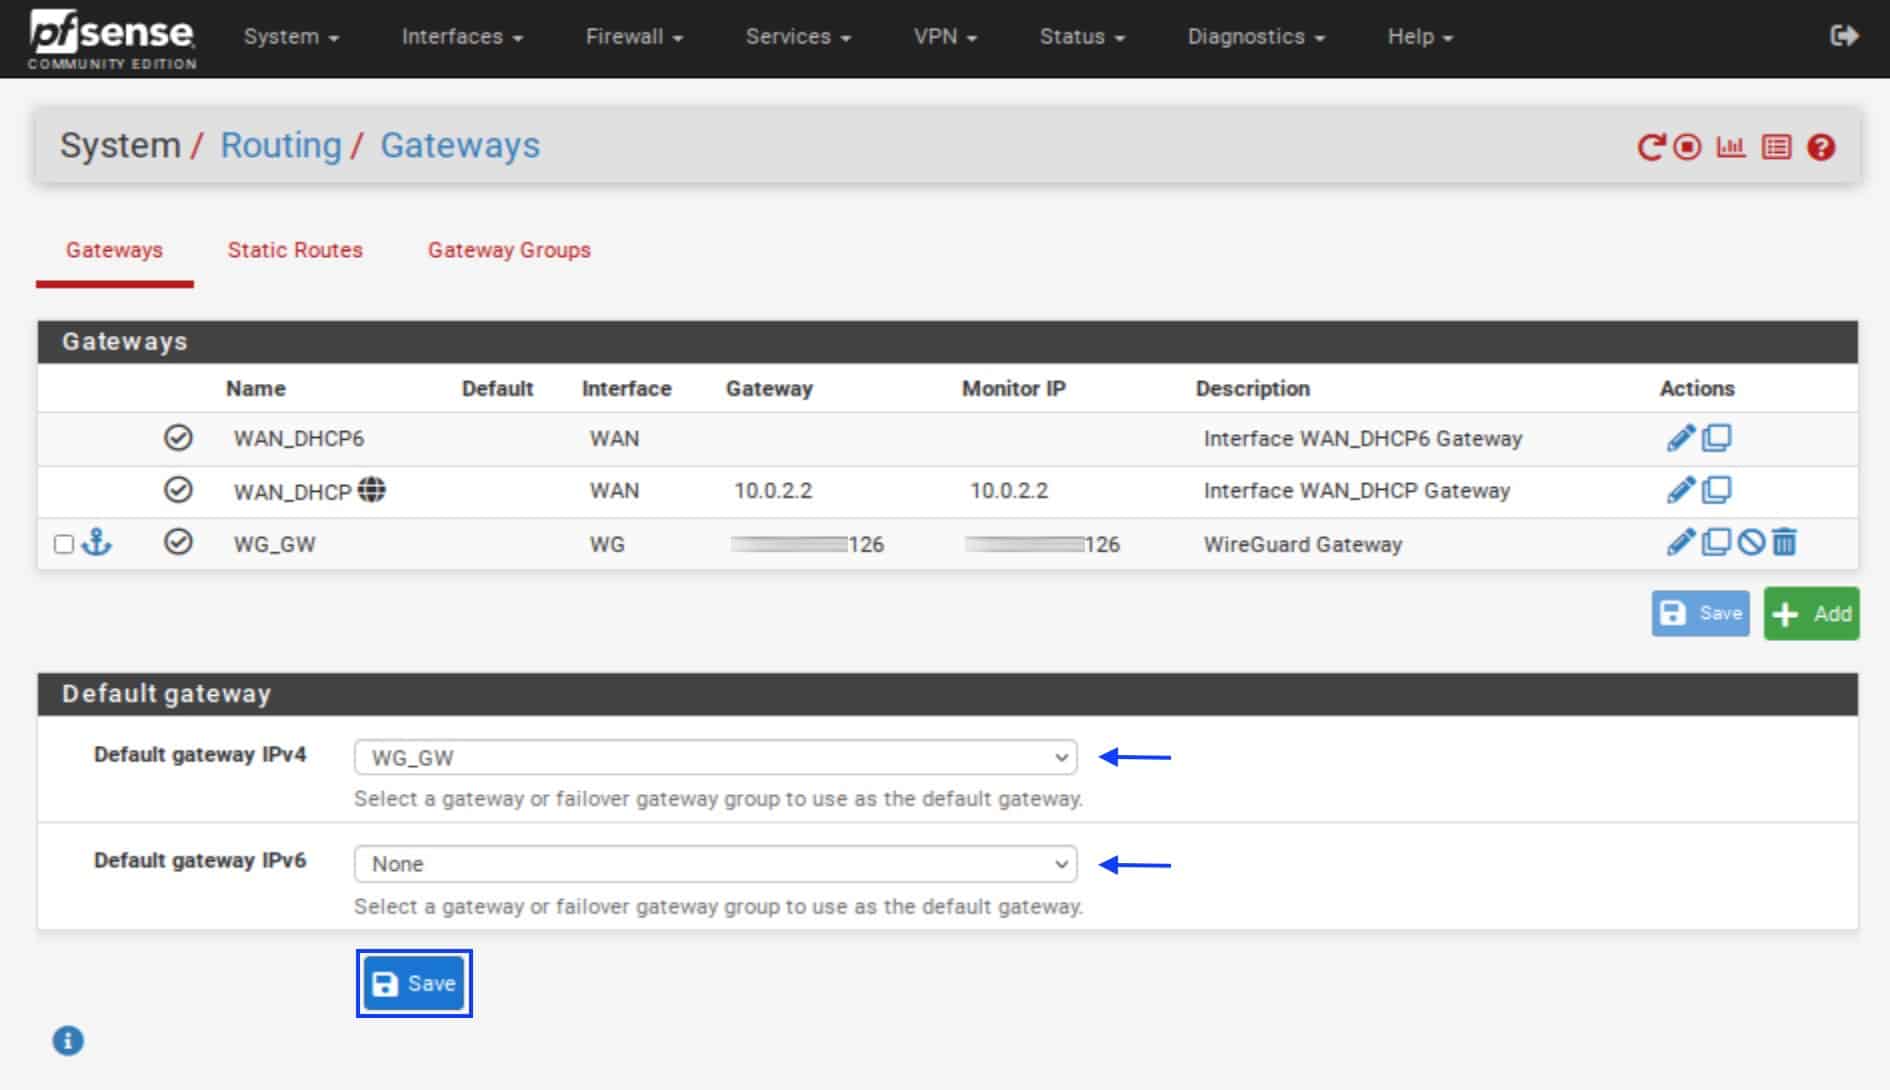
- If you want to use both IPv4 and IPv6, repeat the above steps for Default gateway IPv6.
- Click Save and Apply Changes.
Configuring DNS
In the following steps, we’re going to configure our DNS settings for our WireGuard tunnel.
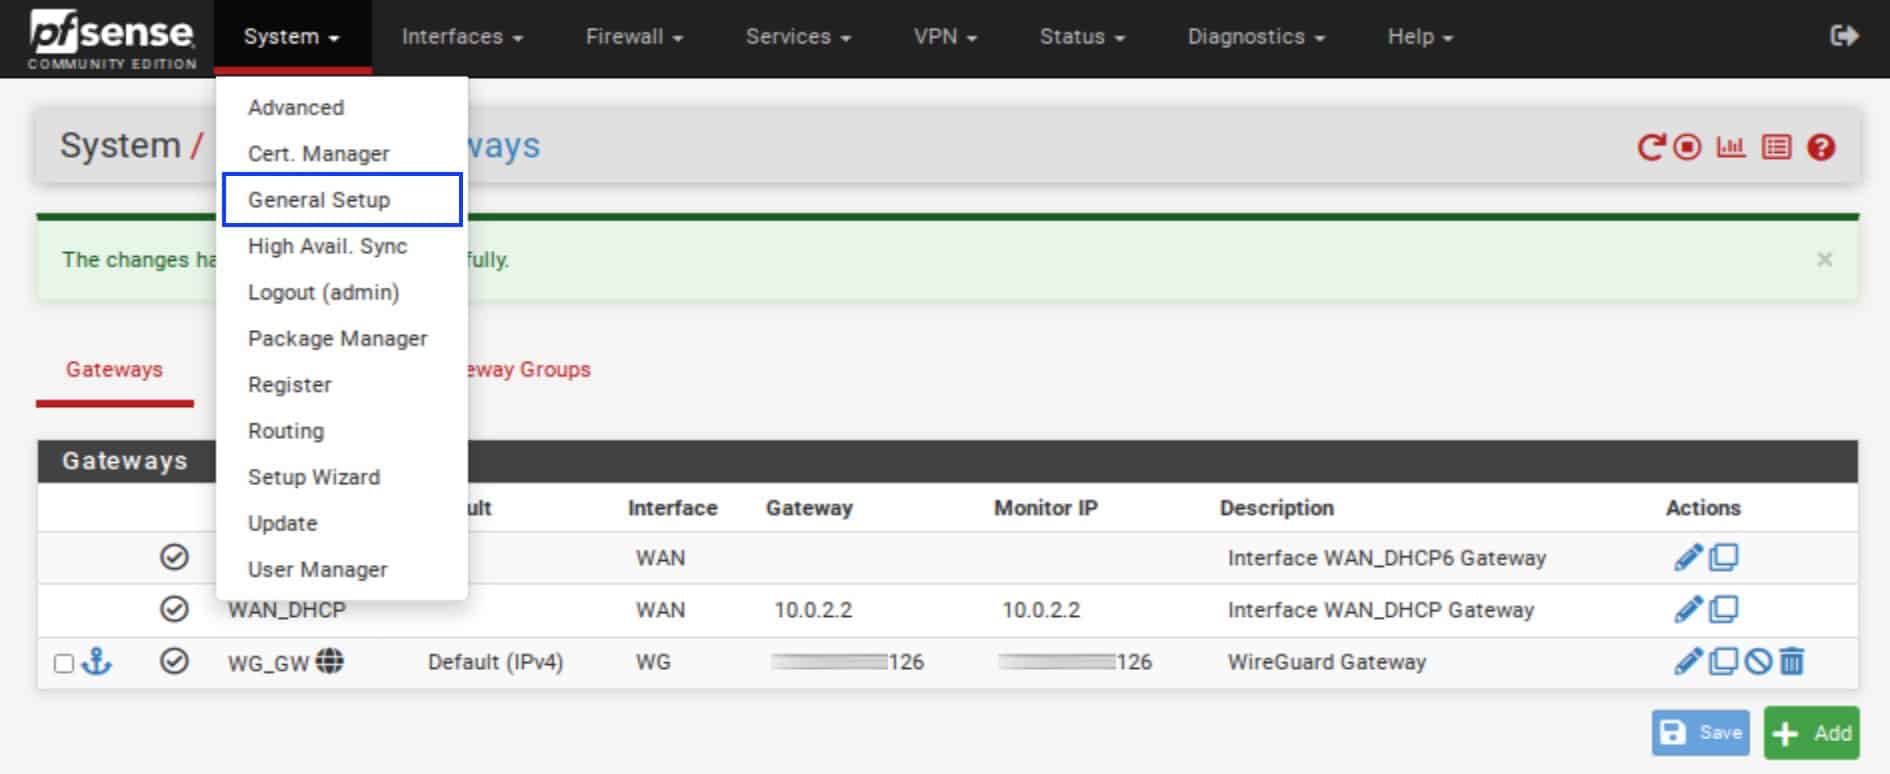
General Setup
- From the top menu, select System > General Setup. The General Setup page is displayed.
- Under DNS Server Settings, in the DNS Servers field, enter your VPN provider’s DNS server IP address.
- In the Gateway field, select the WireGuard gateway.
- Uncheck the DNS Server Override box.

- Scroll down to the bottom of the page and click Save.
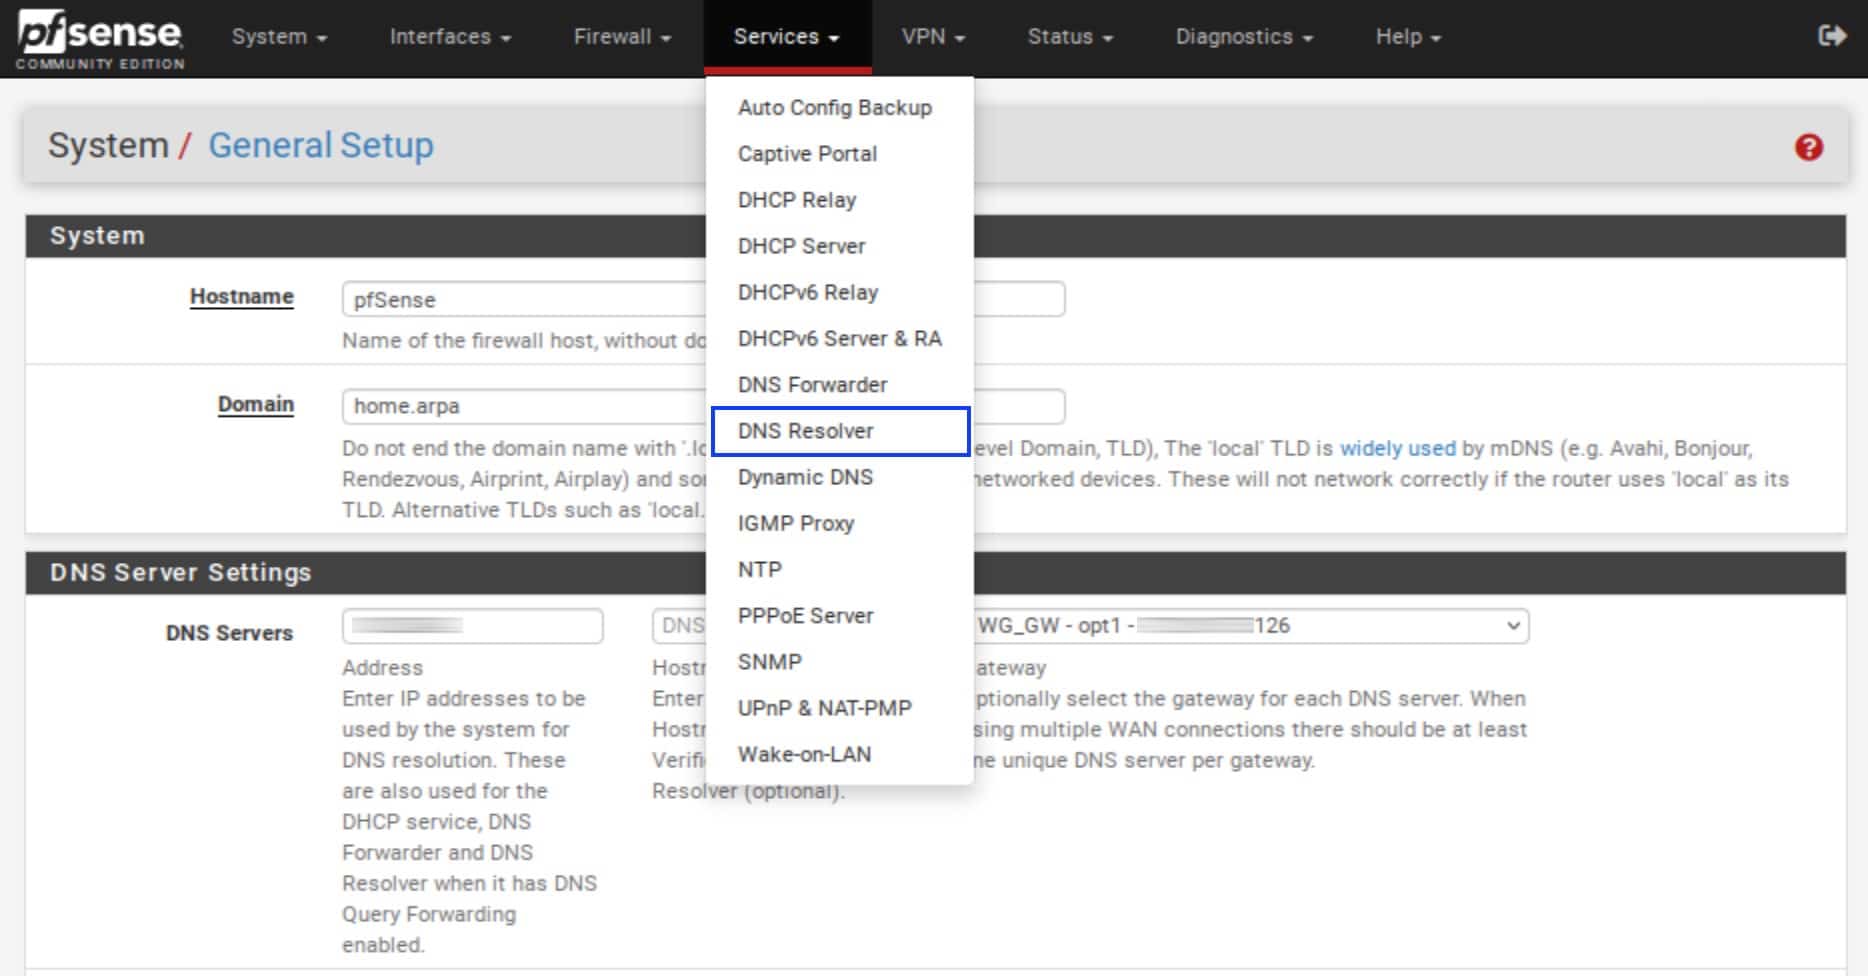
DNS Resolver
- From the top menu, select Services > DNS Resolver. The DNS Resolver page is displayed.
- If your VPN provider supports DNSSEC, enable it by ticking the box. That provides a small enhancement in the security (authentication) of your DNS requests.
- Next to DNS Query Forwarding, tick the Enable Forwarding Mode box. This forwards your DNS queries to the DNS server we configured in the previous step, in System > General Setup.
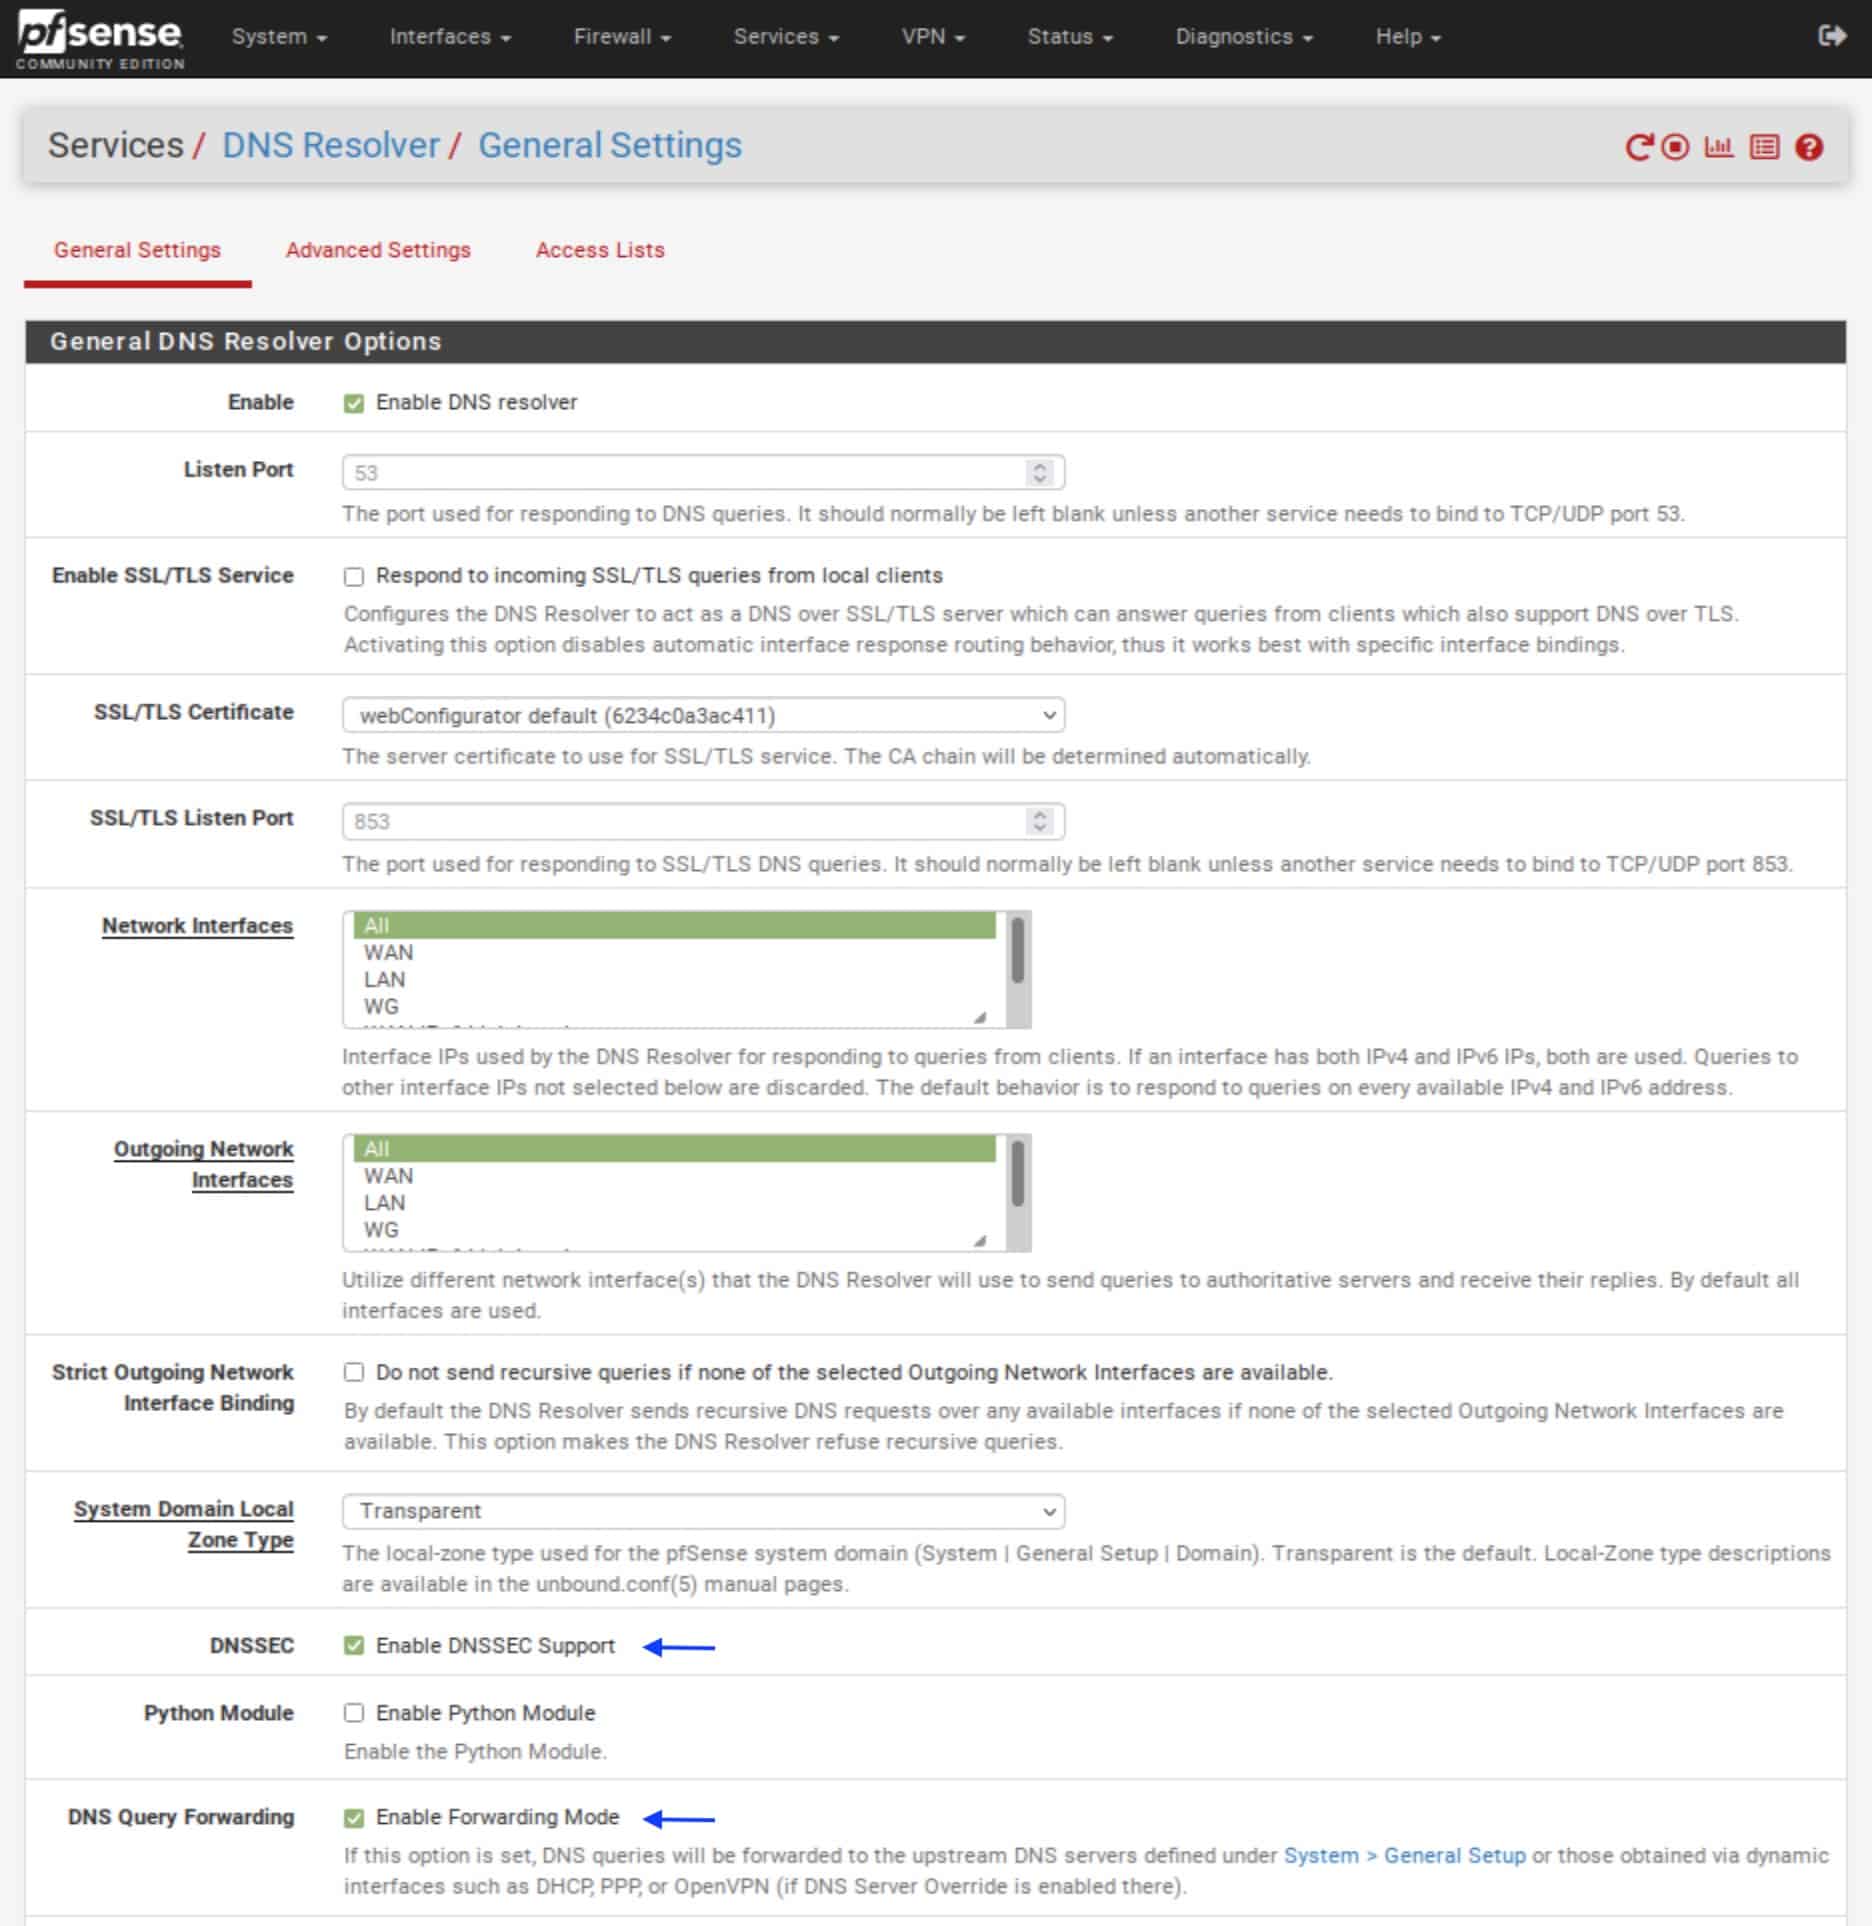
- Scroll down to the bottom of the page and click Save and Apply Changes.
DHCP DNS settings
- From the top menu, select Services > DHCP Server. The LAN DHCP Server page is displayed.
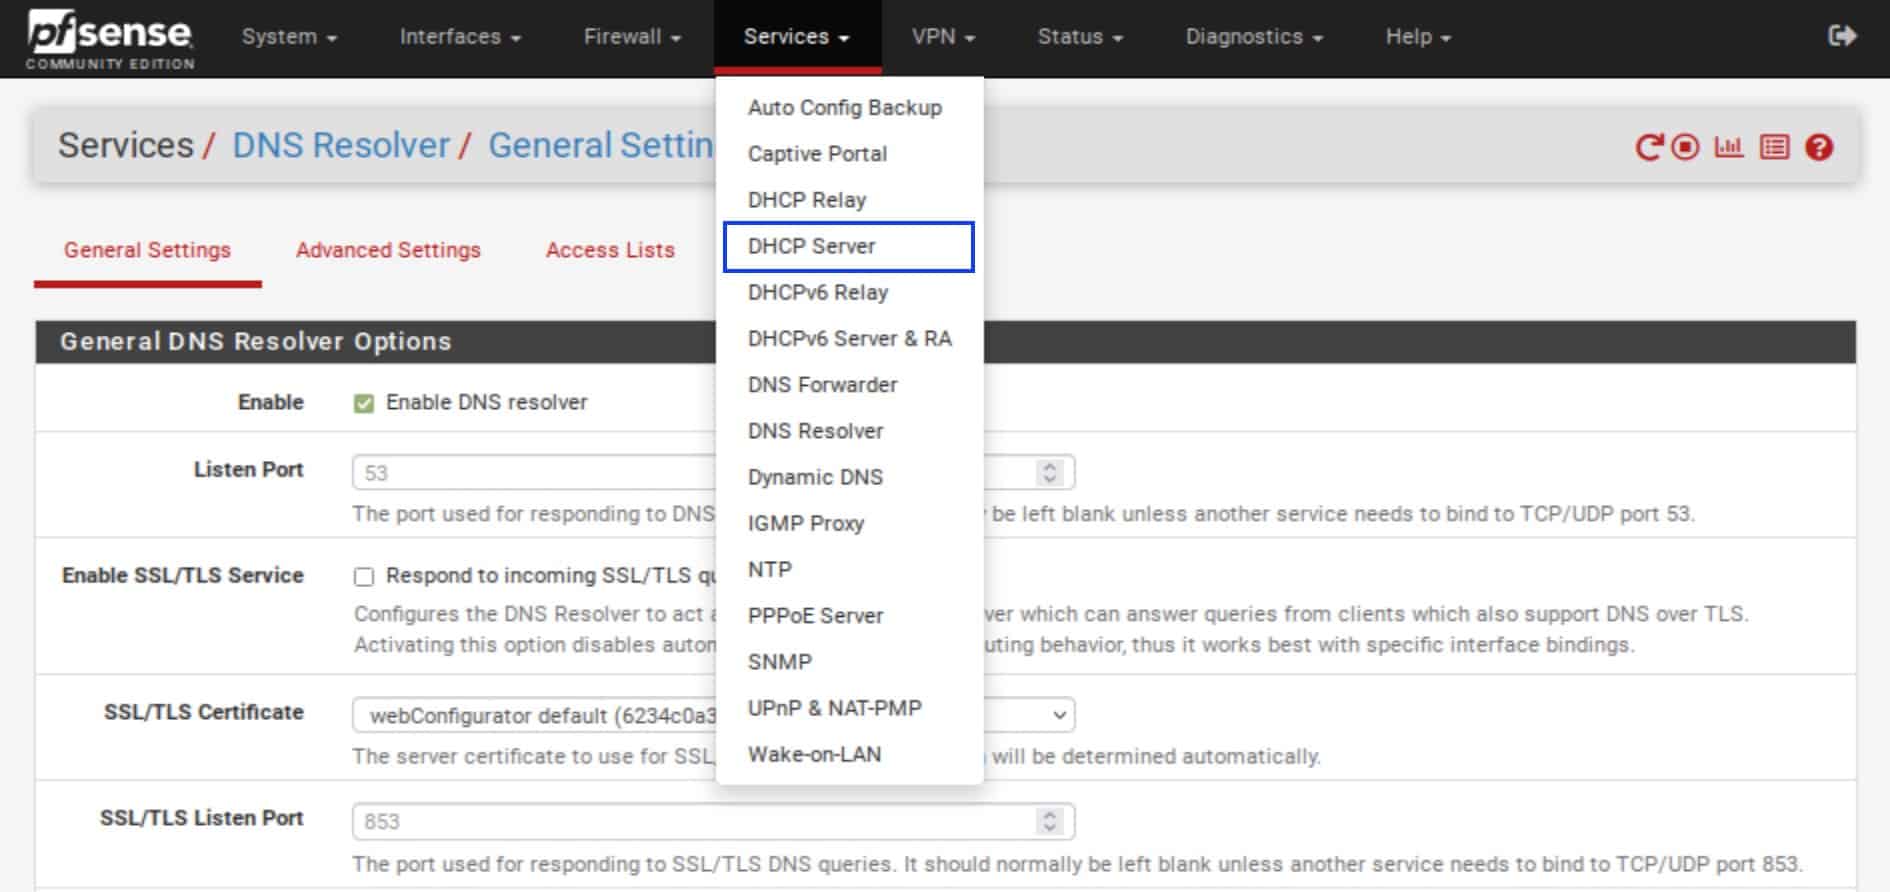
- Under Servers, in the DNS Server 1 field, enter your VPN provider’s DNS server IP address (the same server that we set in System > General Setup).
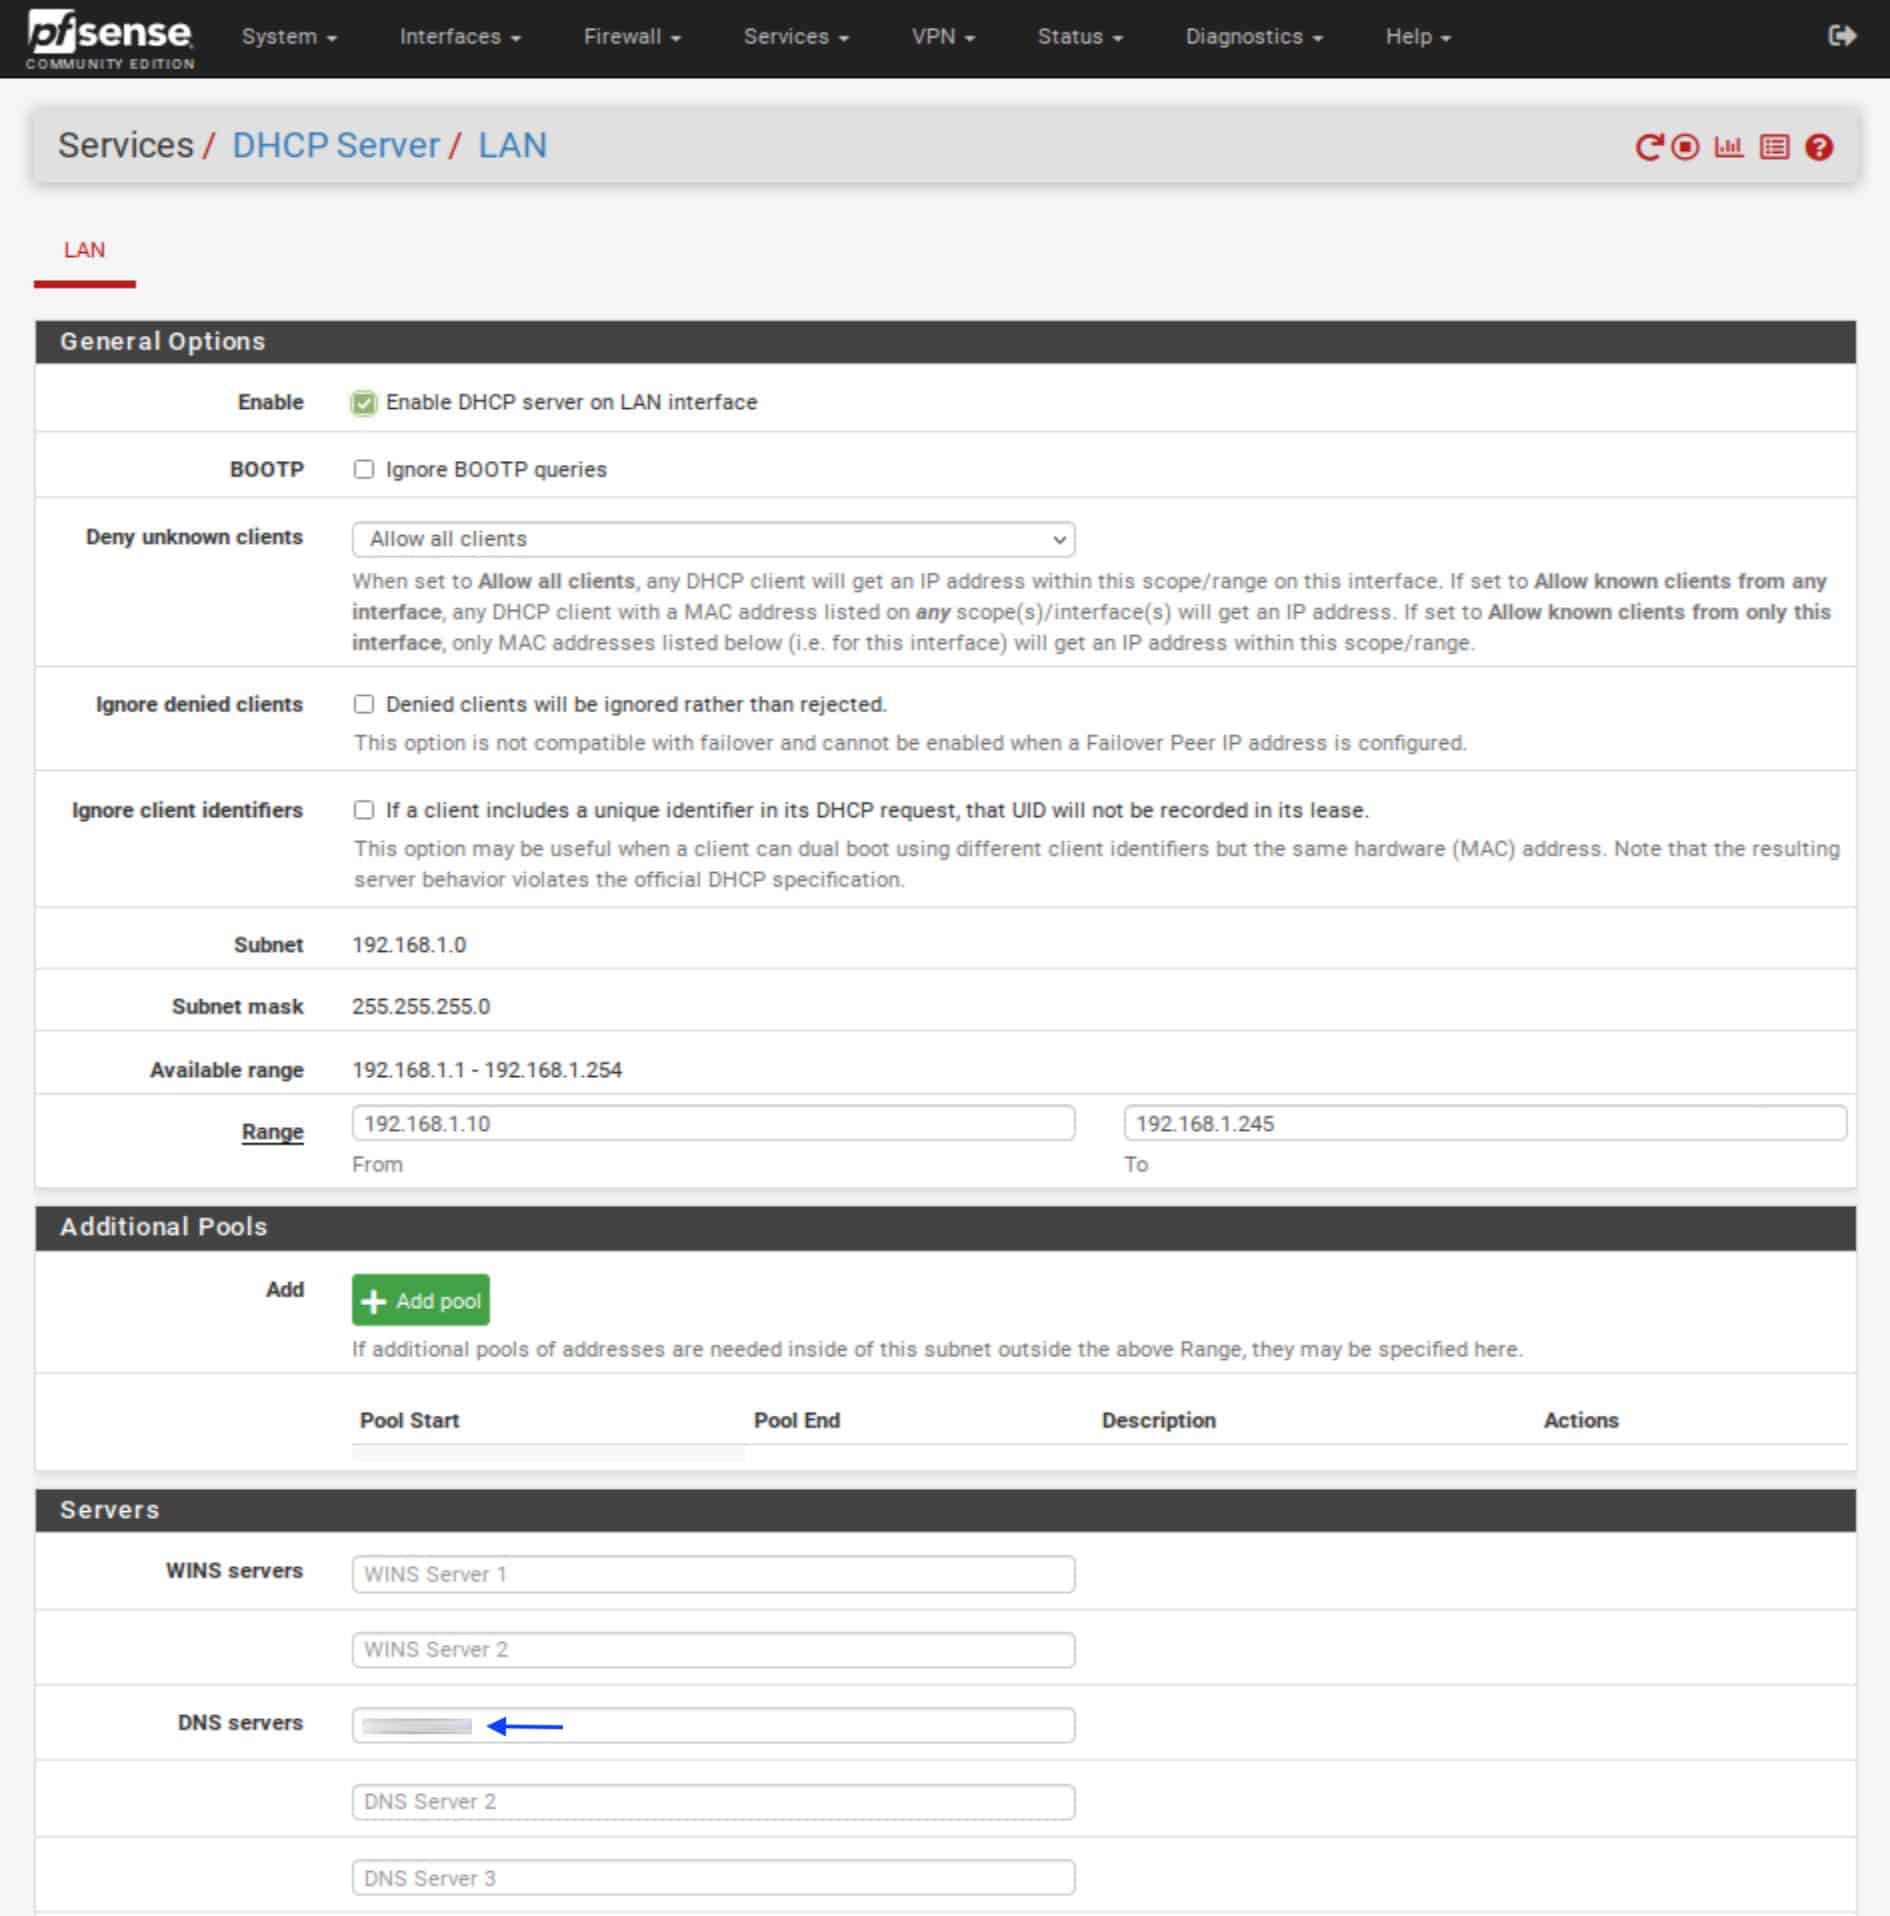
- Scroll down and click Save and Apply Changes.
So the DHCP-assigned DNS server is for our LAN clients, while the DNS Resolver is set to be used by the pfSense box itself and any other OPT interfaces that you may add in the future. Both are configured to use your VPN provider’s DNS server, only accessible through the WireGuard tunnel.
Extra – Configuring a kill switch
Most decent VPN apps include a kill switch. A kill switch cuts off your traffic from the internet if your VPN connection ever goes down. This ensures that packets don’t go out through your regular ISP gateway – the WAN interface on a router.
While we don’t need a dedicated app to connect to our VPN provider when it’s set up on the router (hooray), we can still configure a kill switch using floating firewall rules. Floating rules differ from regular firewall rules in that they’re applied first and that they can apply to multiple interfaces at once – though it’s the former that interests us here.
We will use pfSense’s floating rules to set up a kill switch for our WireGuard tunnel.
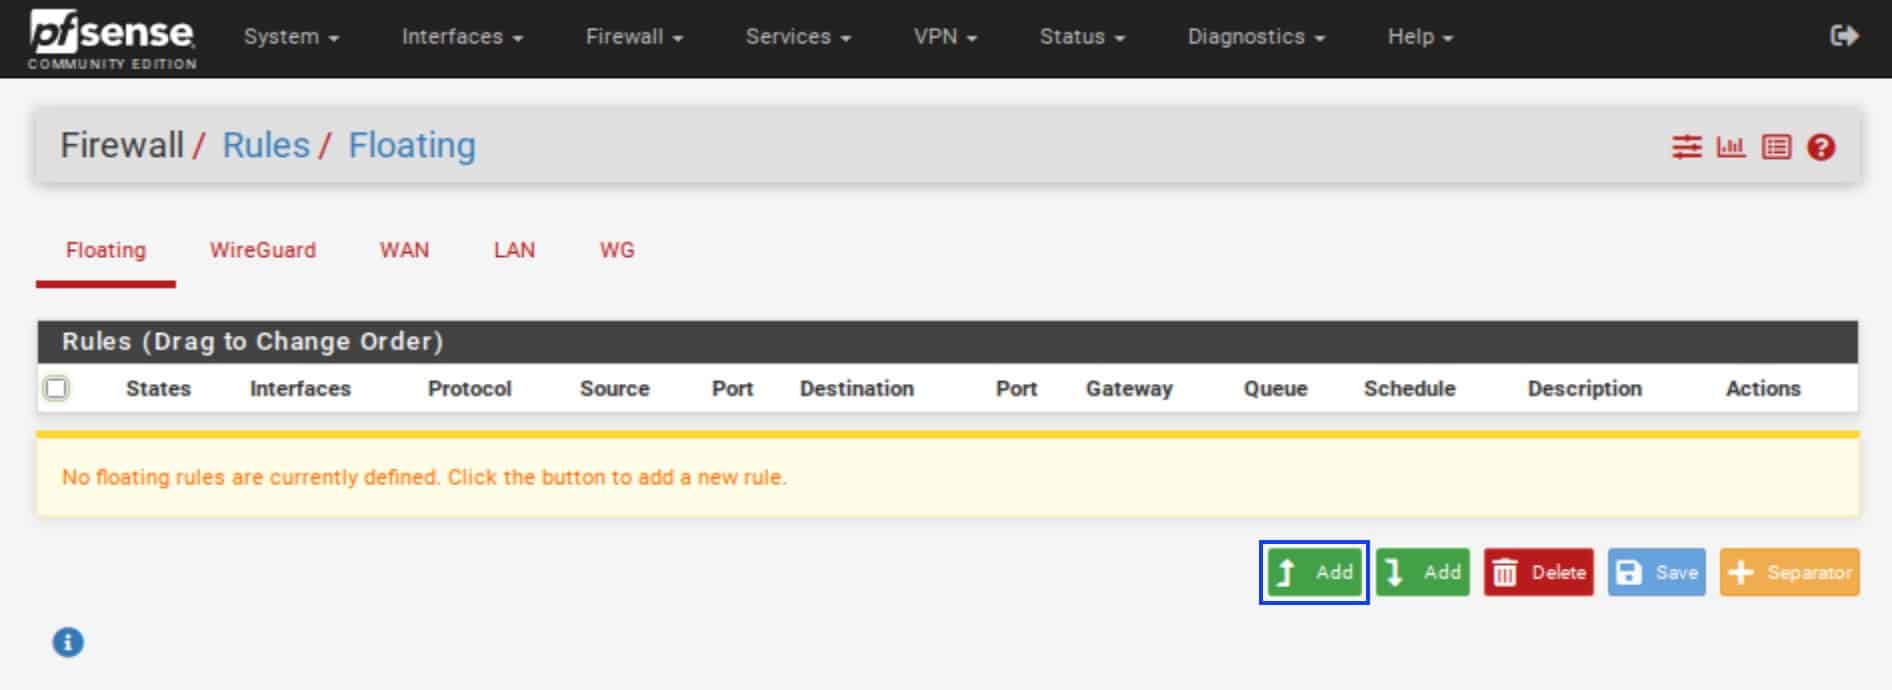
- From the top menu, select Firewall > Rules. The Firewall Rules page is displayed.
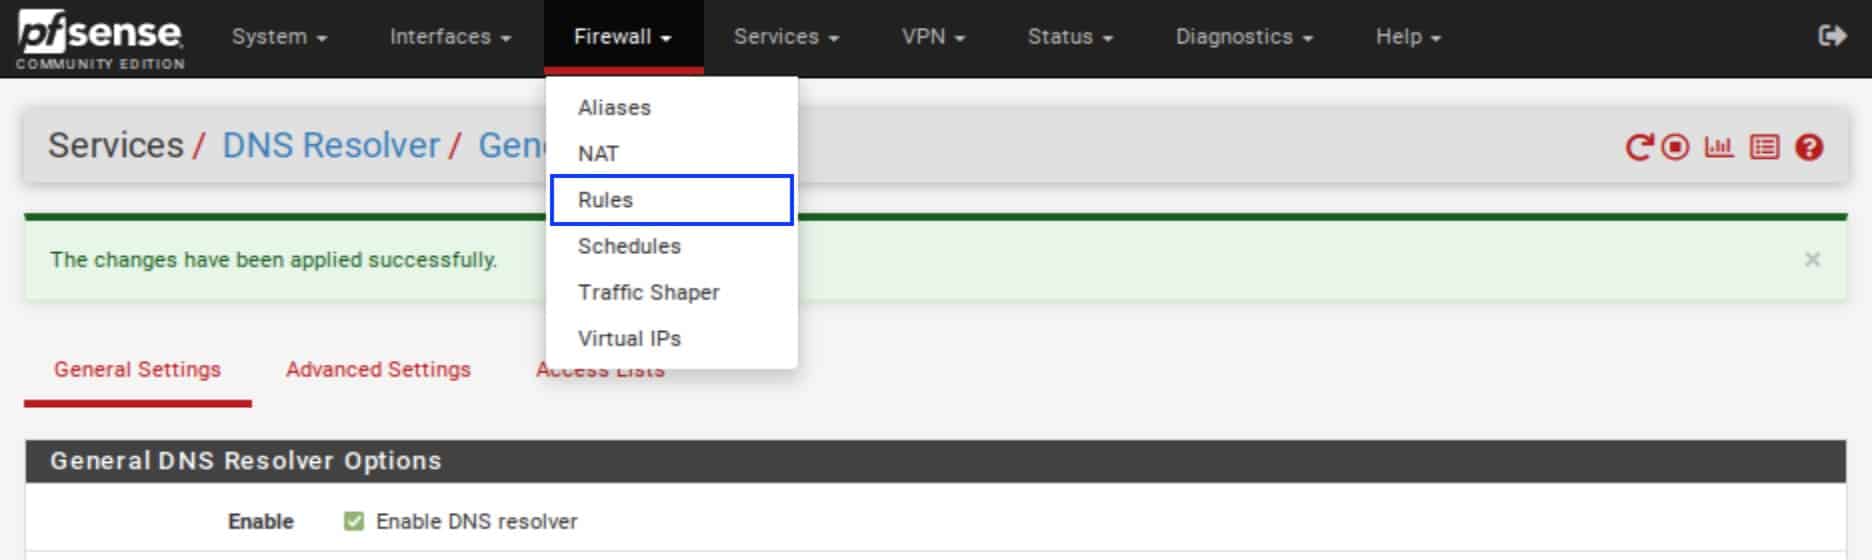
- Click on the Floating tab. The Floating Rules page is displayed.
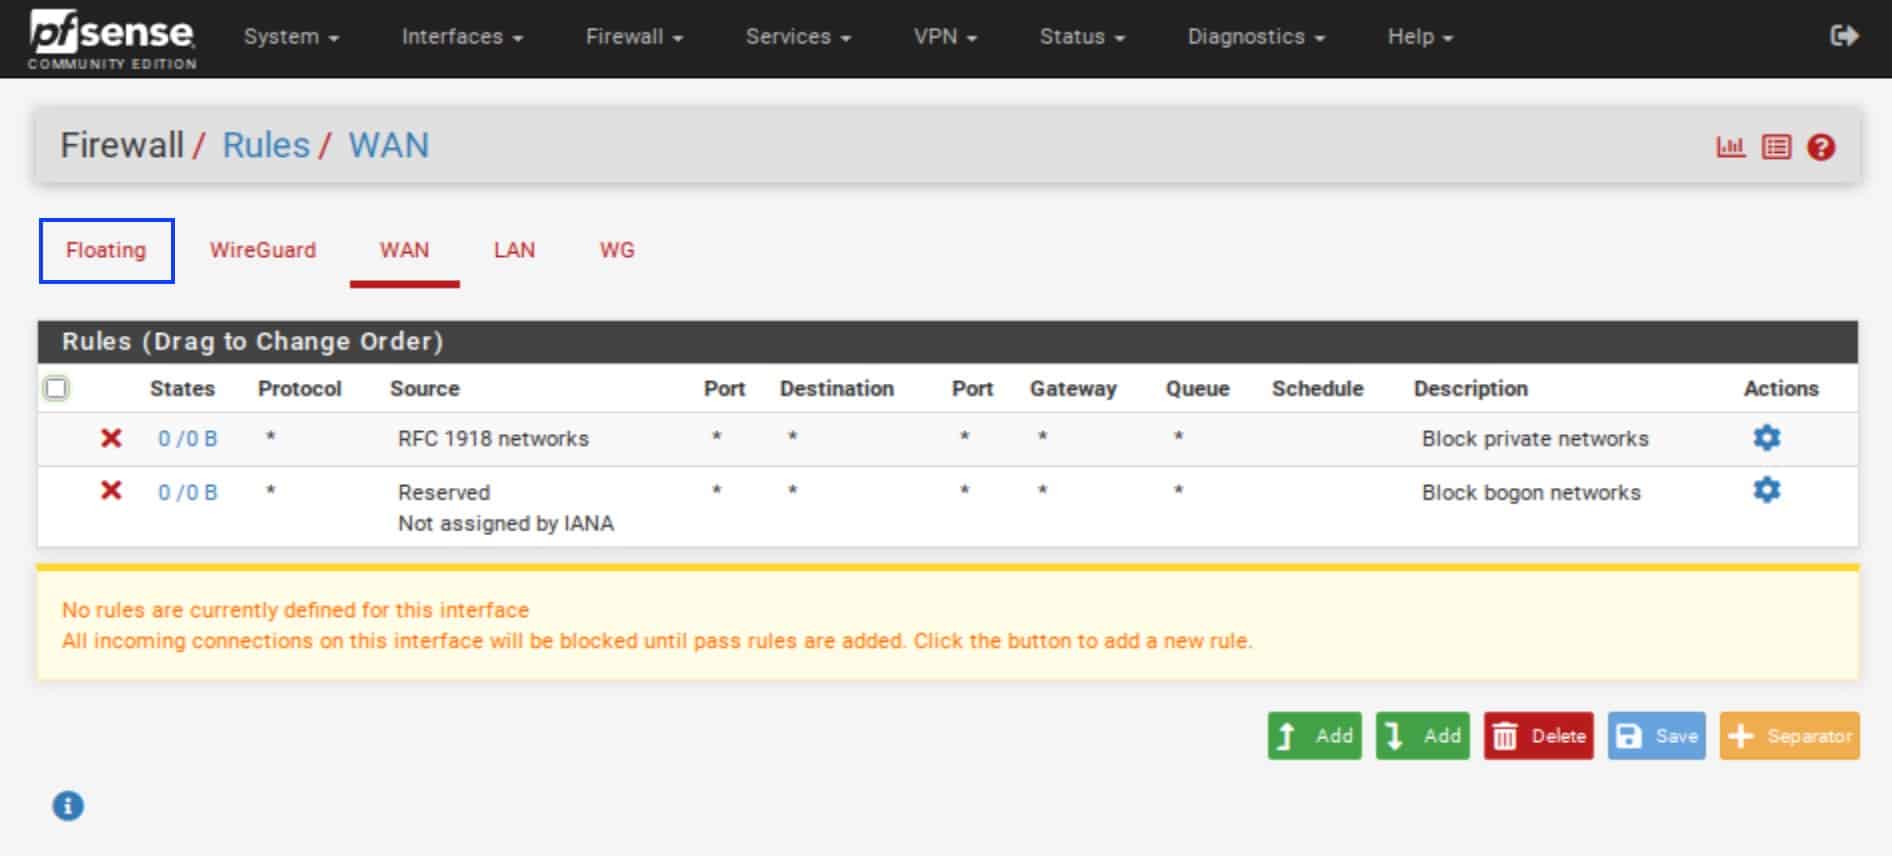
- Click the Add (top) button.
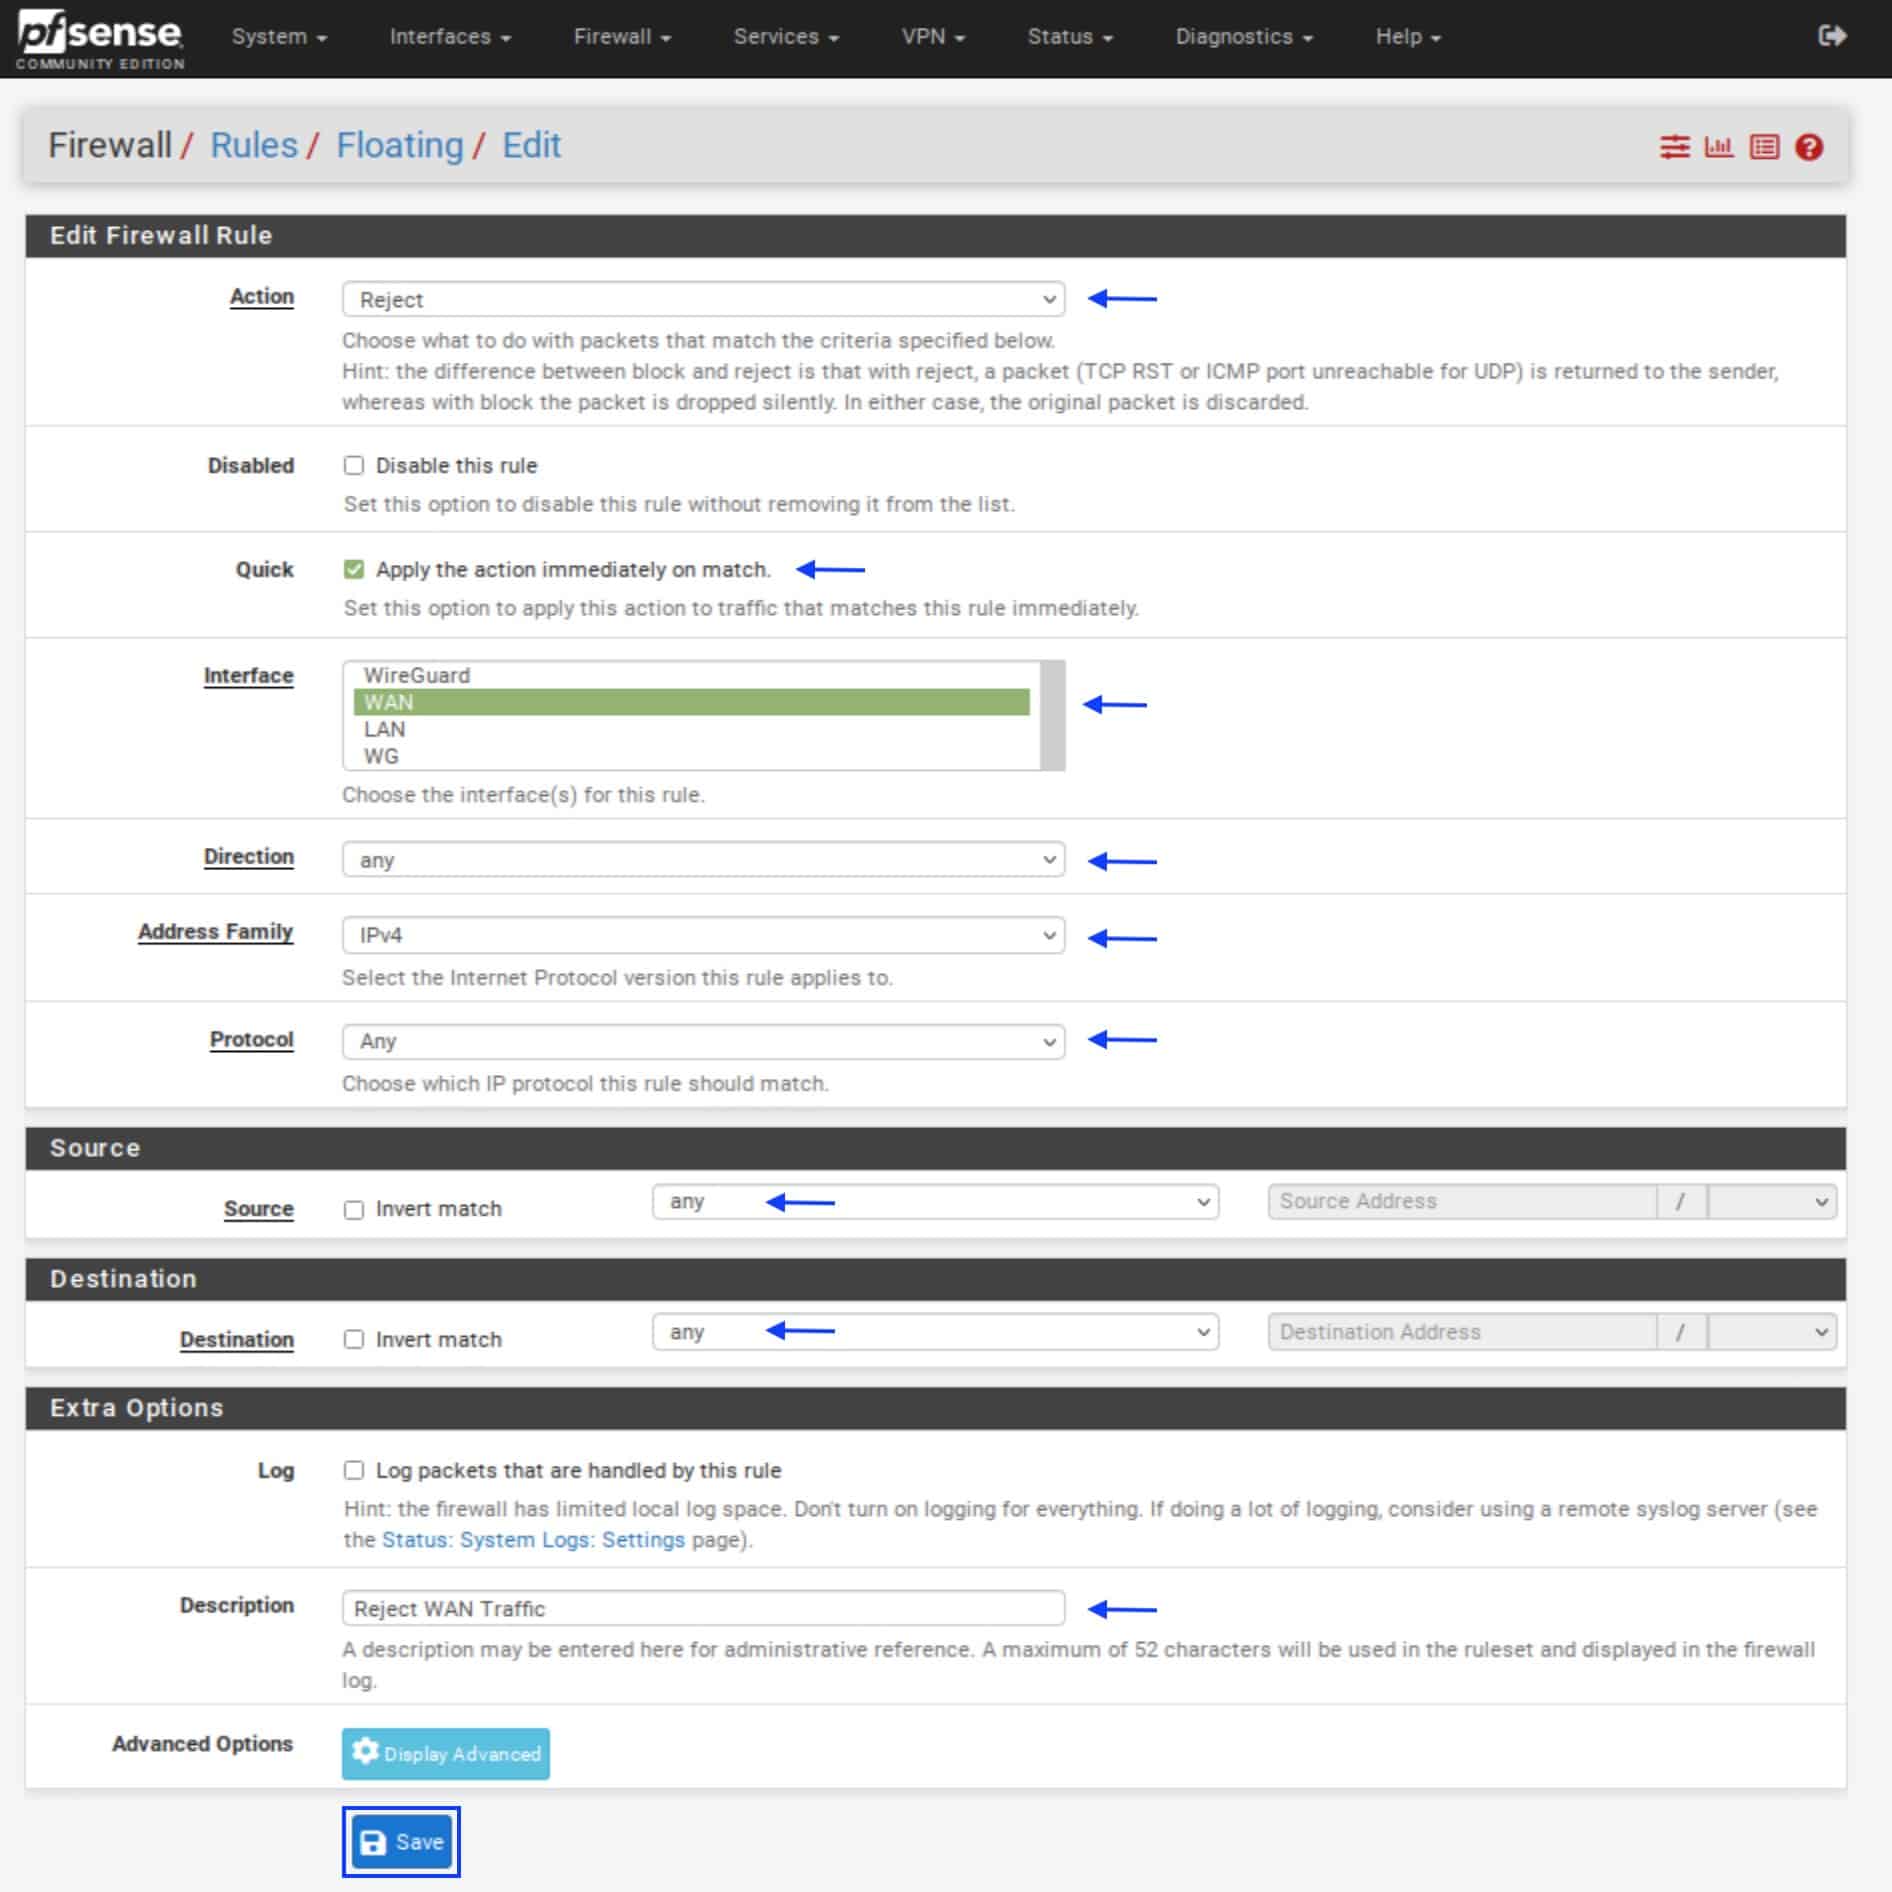
- Set the Action field to Reject.
- Tick the Quick box.
- Make sure the Interface is set to WAN.
- Set the Direction to any.
- Set the Address Family to IPv4 (or IPv4 + IPv6 if you are using both).
- Set the Protocol to Any.
- Set the Source to any.
- Set the Destination to any.
- In the Description field, enter a description for your rule (optional).
- Click Save. You’re taken back to the Floating Rules page.
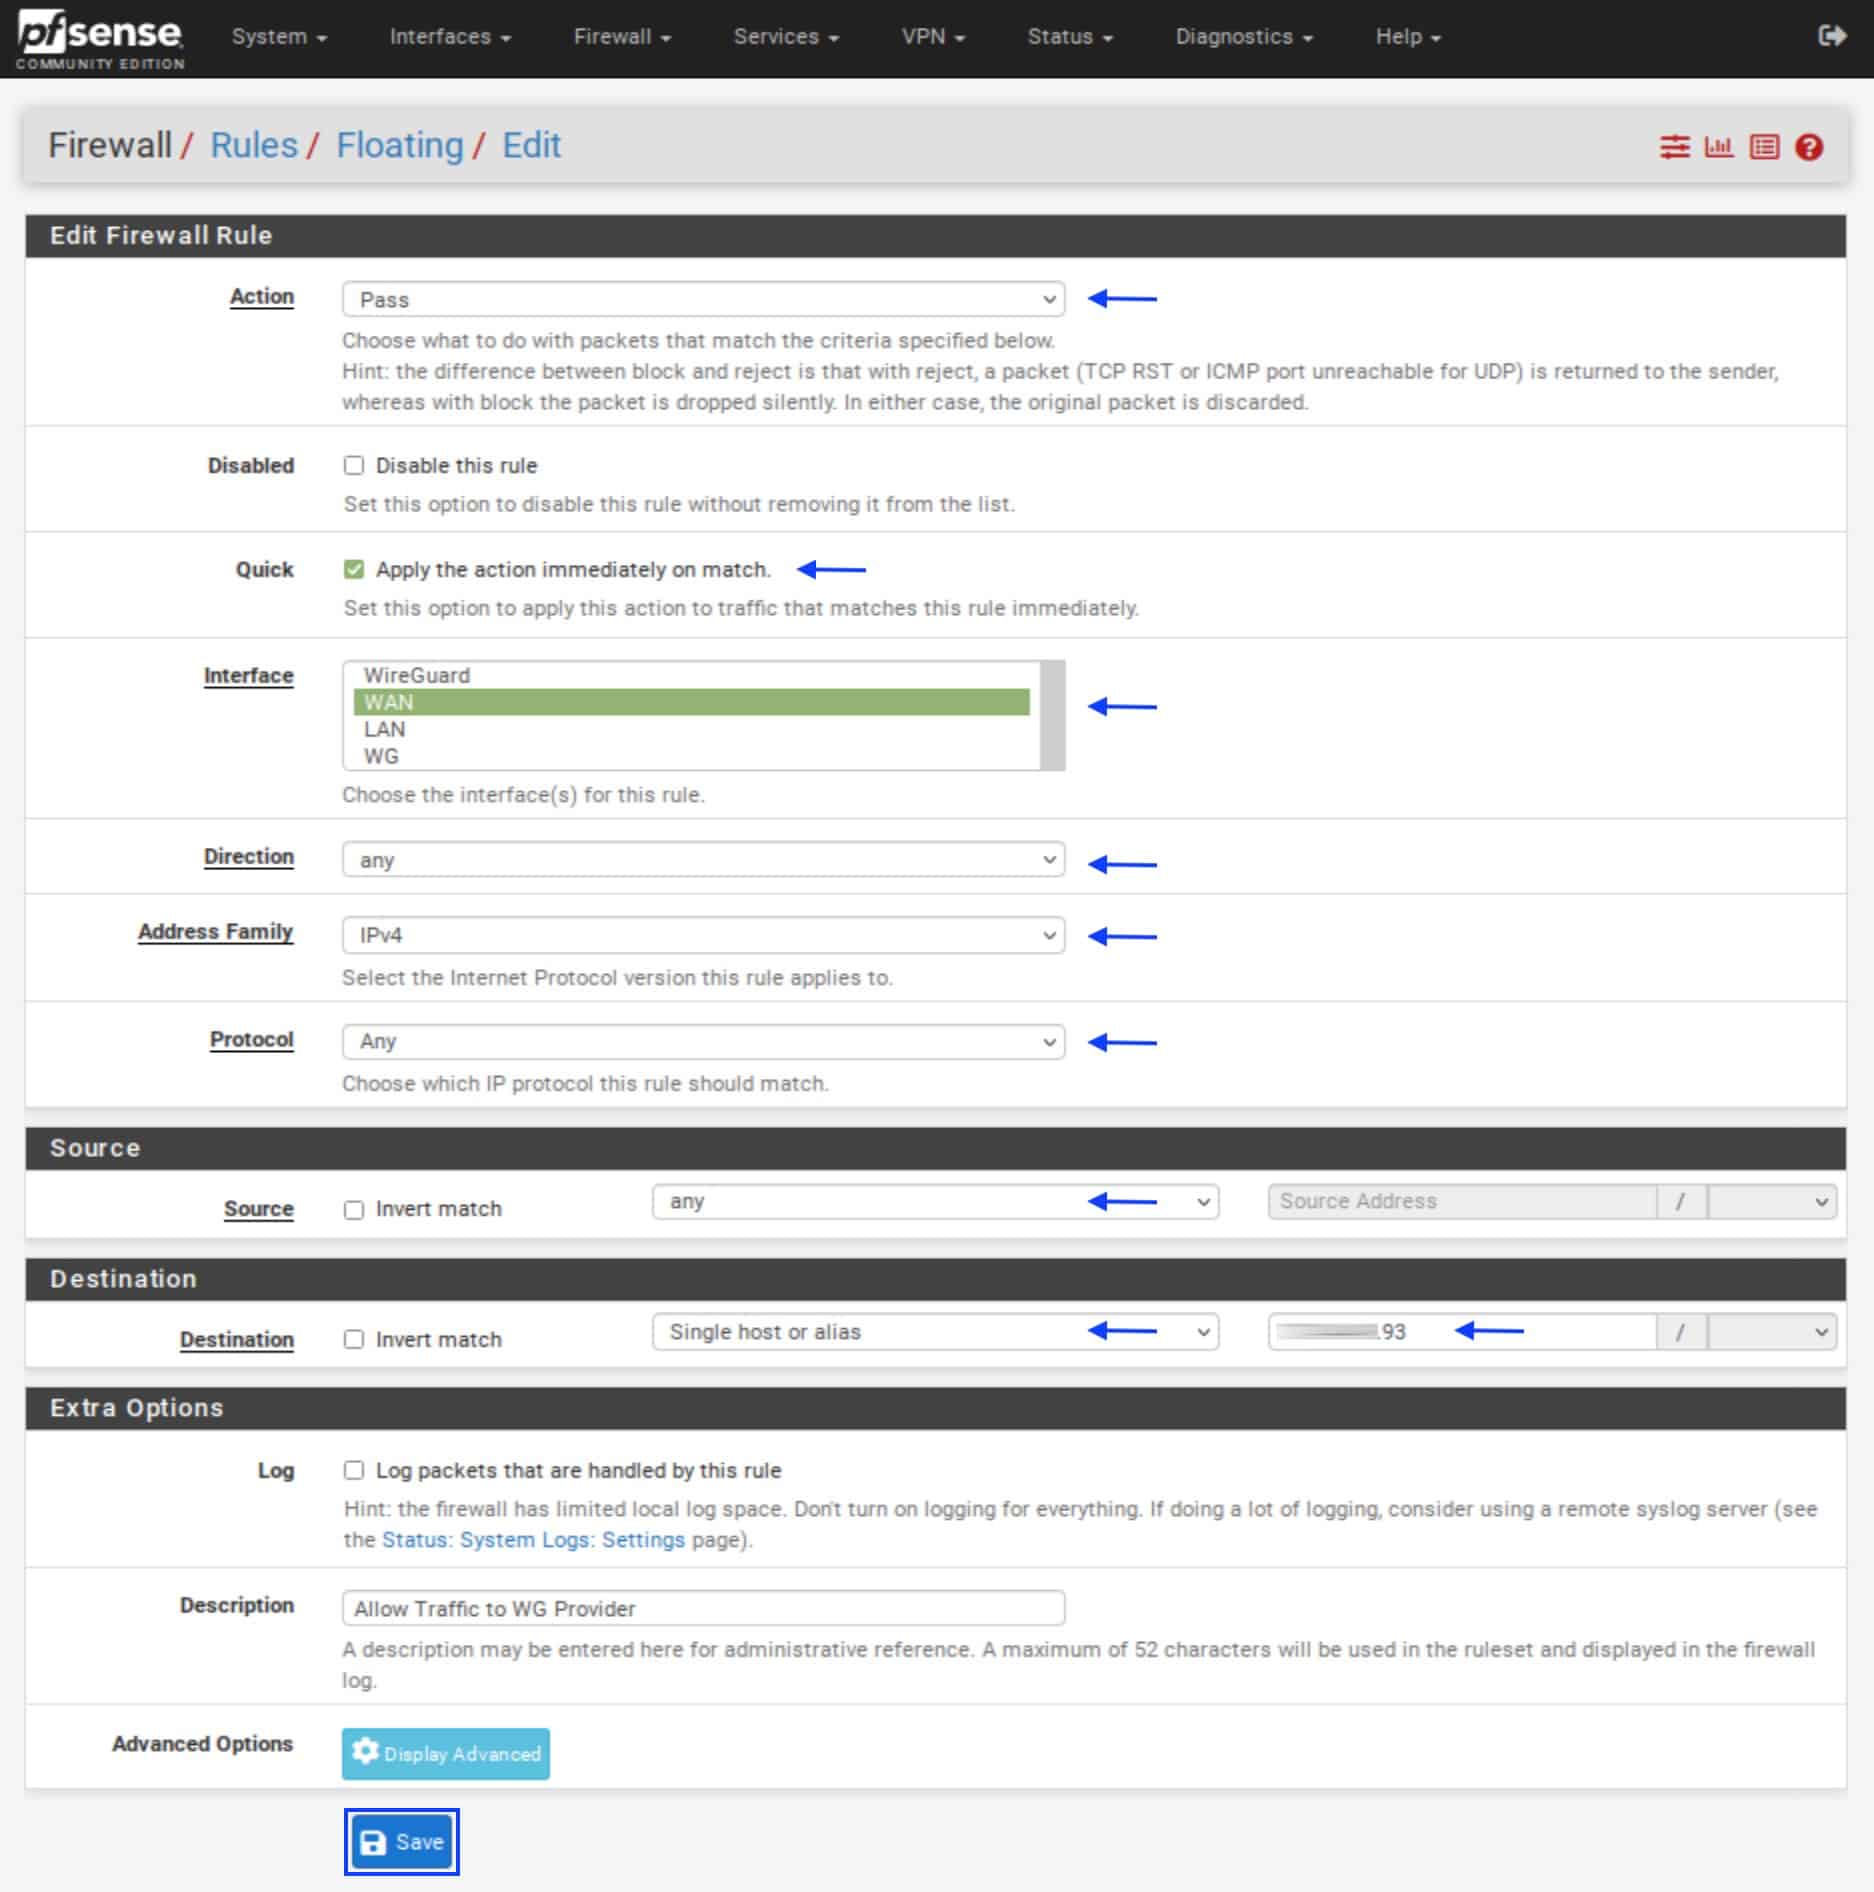
- Click the Add (top) button again.
- Set the Action field to Pass.
- Tick the Quick box.
- Make sure the Interface is set to WAN.
- Set the Direction to any.
- Set the Address Family to IPv4 (or IPv4 + IPv6 if you are using both).
- Set the Protocol to Any.
- Set the Source to any.
- Set the Destination drop-down menu to Single host or alias.
- Enter the IP address of your WireGuard “server” in the box to the right of the
- Destination field.
- In the Description field, enter a description for your rule (optional).
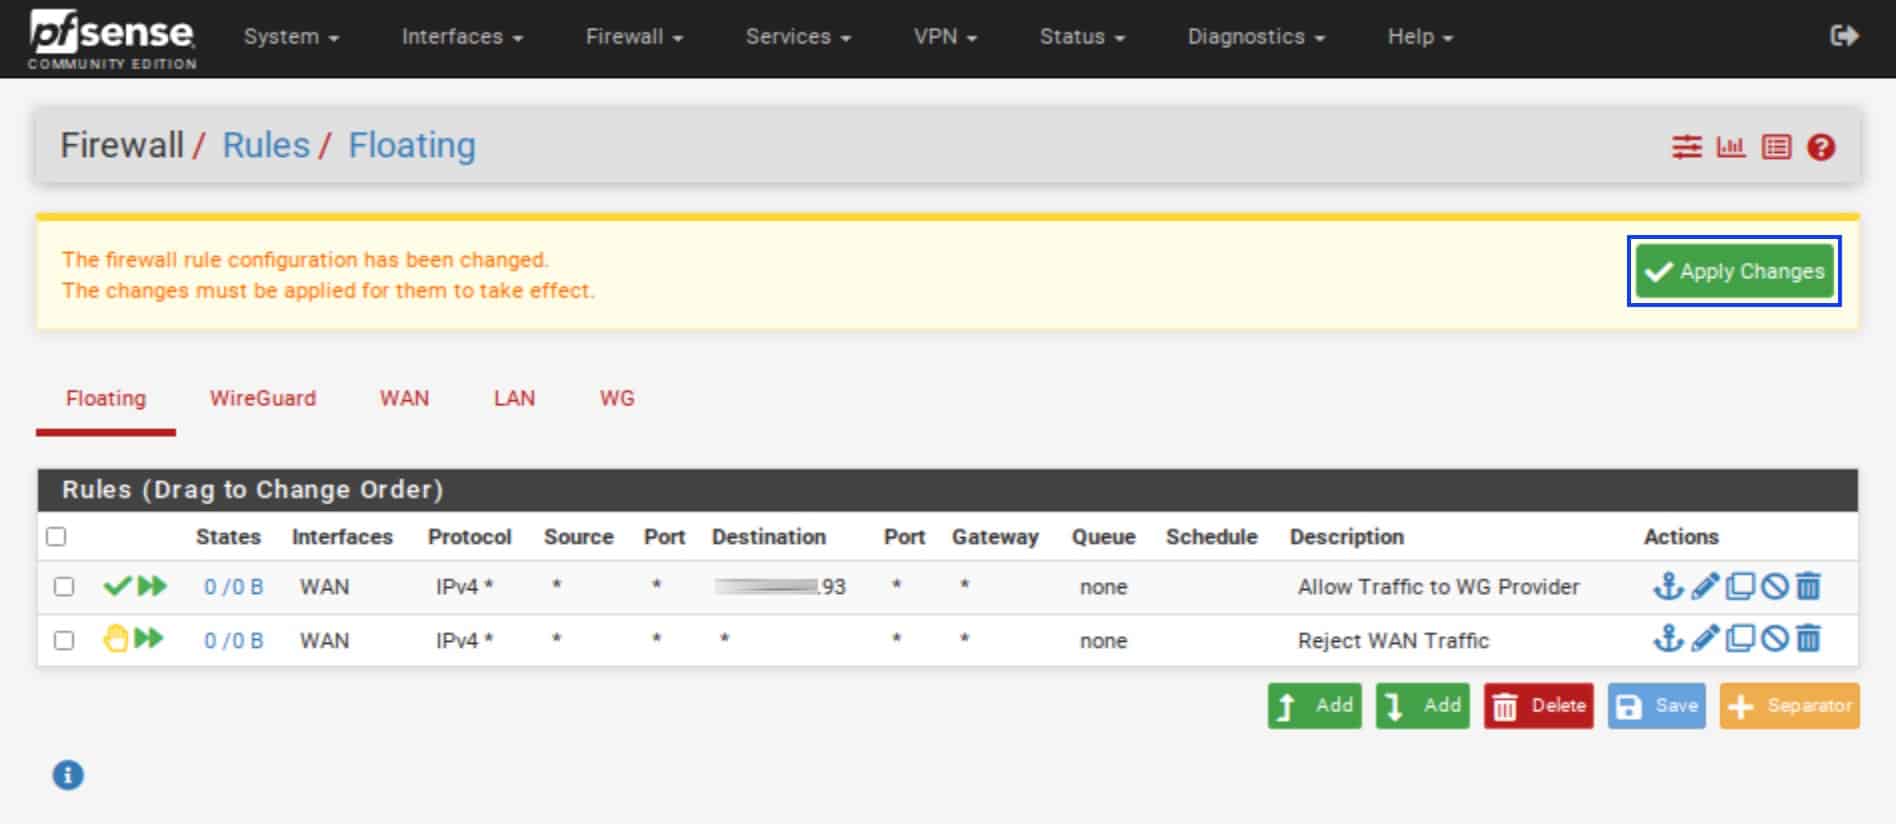
- Click Save. You’re taken back to the Floating Rules page.
- Click Apply Changes.
Last steps
OK, so we’ve configured our WireGuard tunnel & peer. We’ve configured NAT, DNS, and our firewall rules. And we’ve also configured a kill switch to boot. We’re now going to reboot our pfSense box. After the reboot, we’ll confirm that everything is up and running as expected.
Rebooting
- From the top menu, select Diagnostics > Reboot.
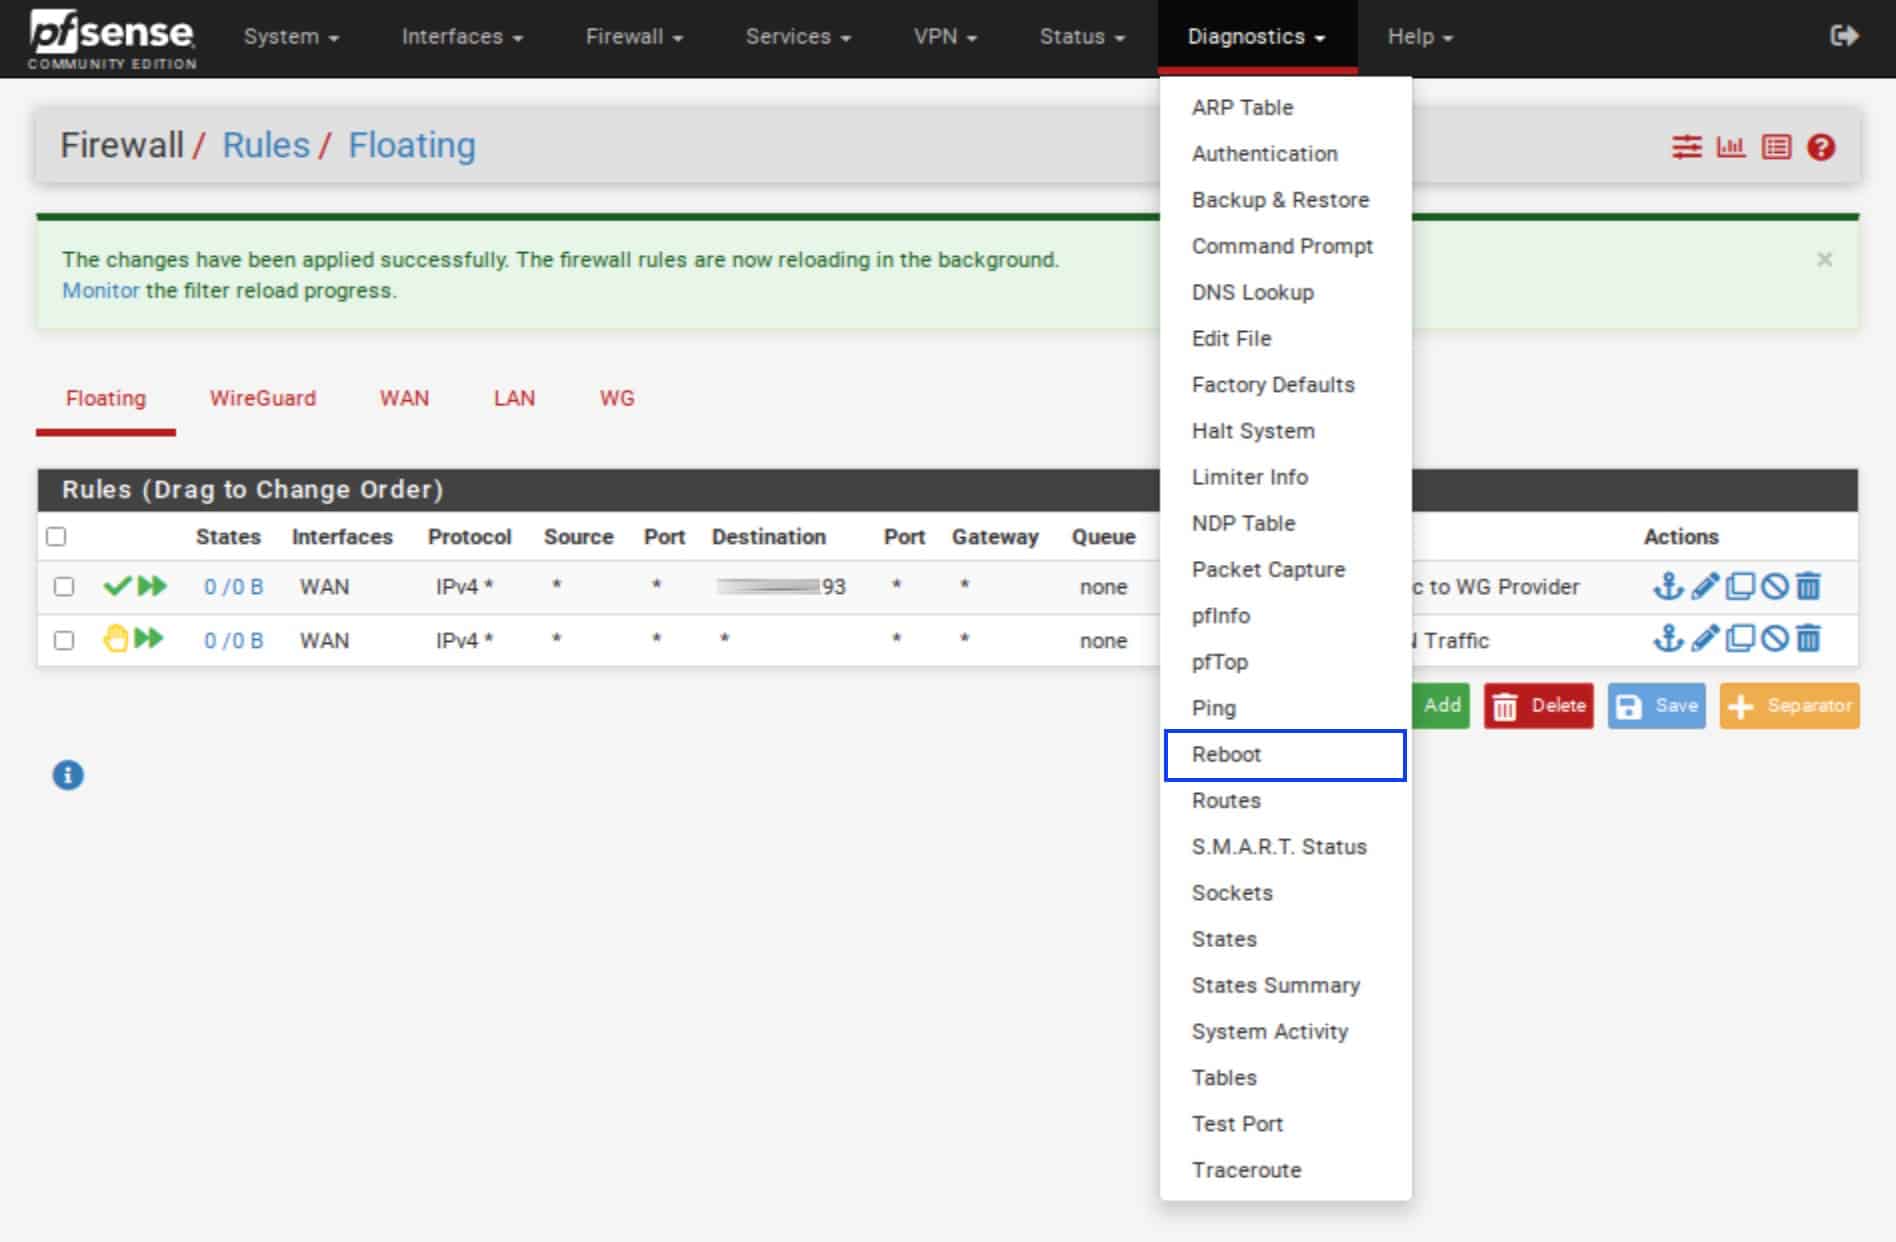
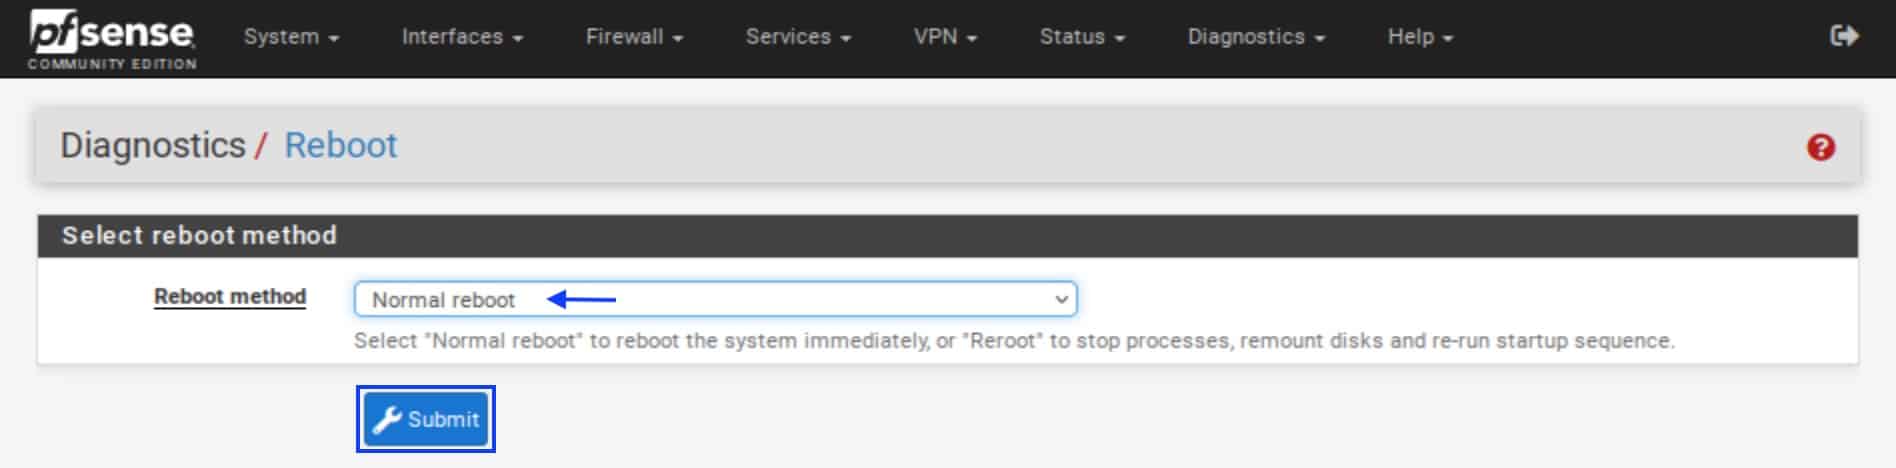
- Make sure the Reboot method is set to Normal reboot.
- Click Submit. pfSense will reboot. Once rebooted, log back into pfSense.
Final checks
Checking the WireGuard tunnel status
We can check the status of our WireGuard within pfSense.
- From the top menu, select VPN > WireGuard. The WireGuard options are displayed.
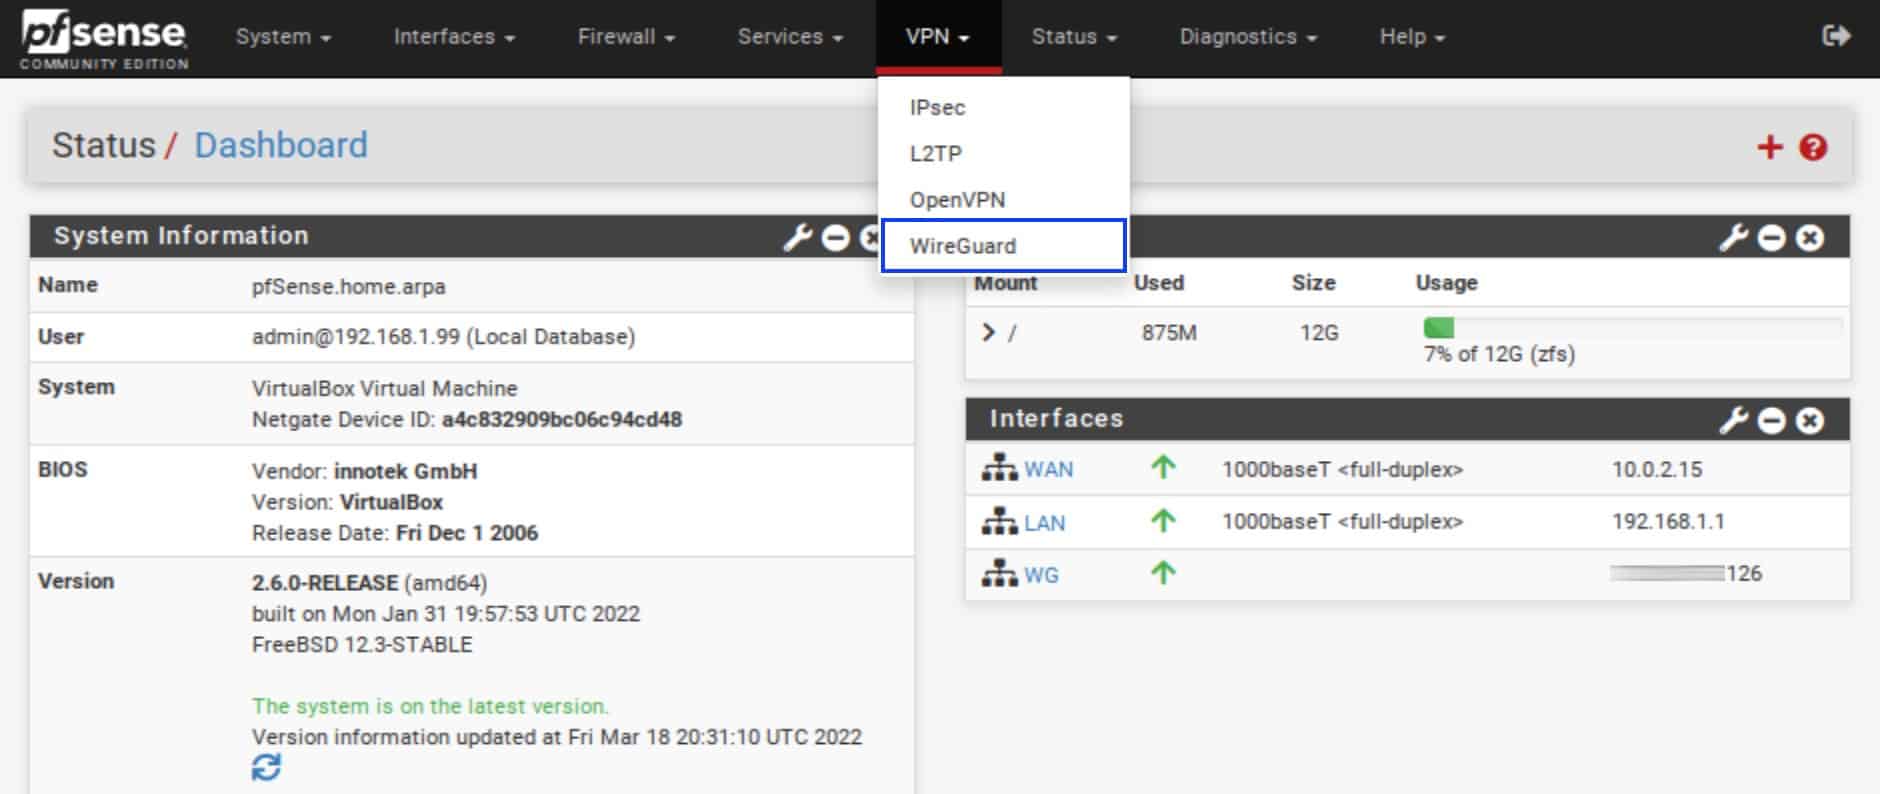
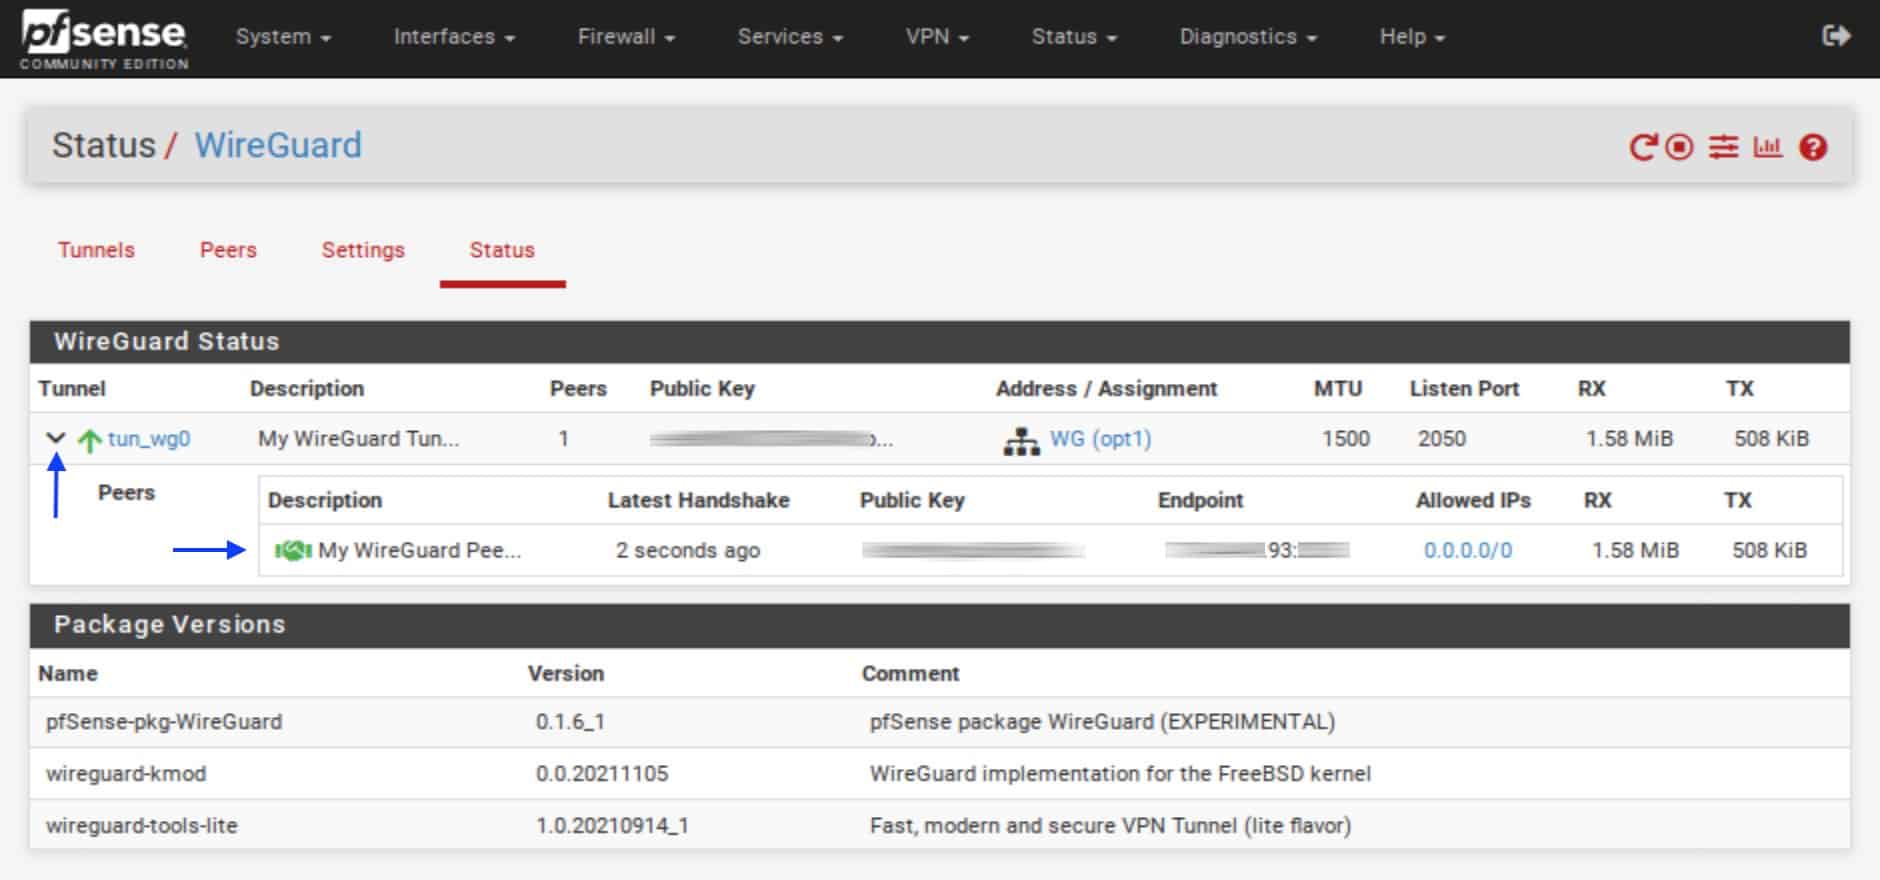
- Click the Status tab. The Status page is displayed.
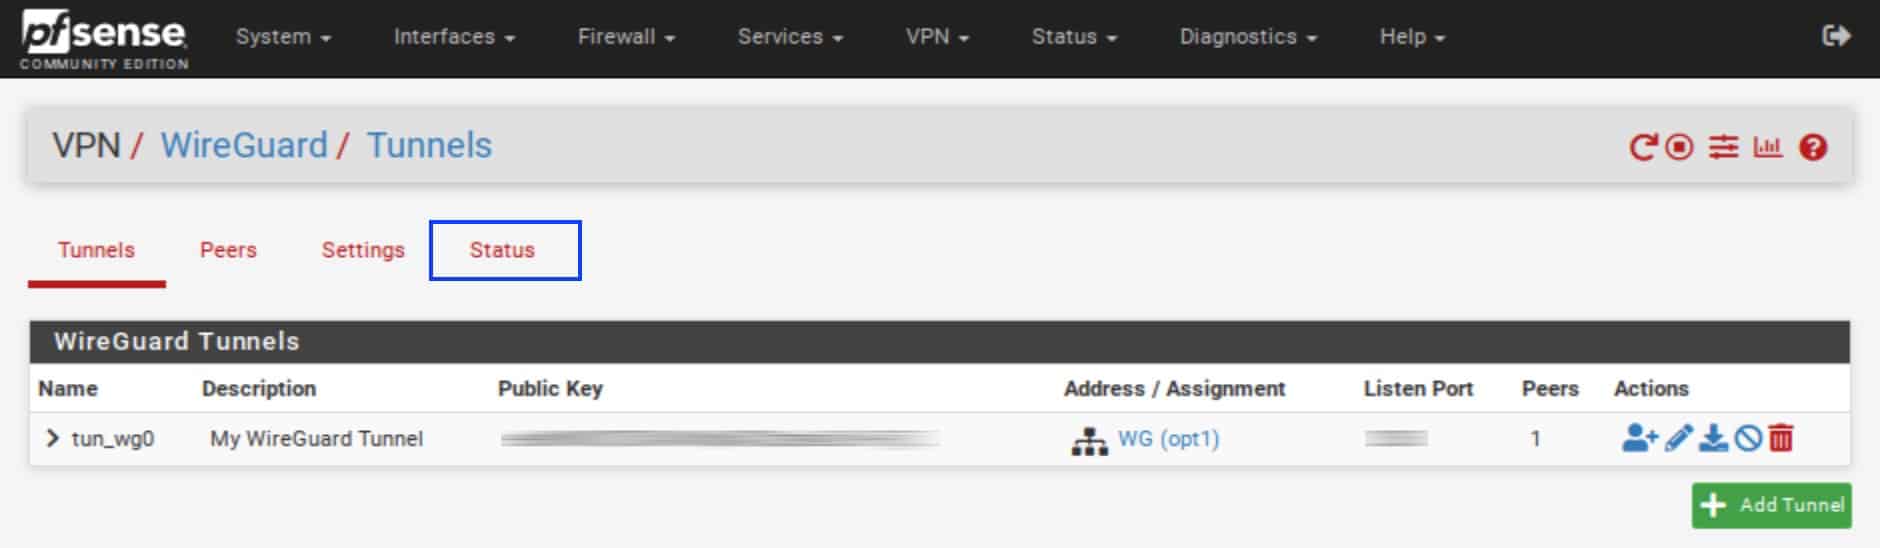
- Click the small arrow to the left of the tunnel’s Name field. This displays your peer’s connection status. Green is good.
Testing the WireGuard tunnel
We can use curl on pfSense to test whether or not our traffic is being routed through the WireGuard tunnel.
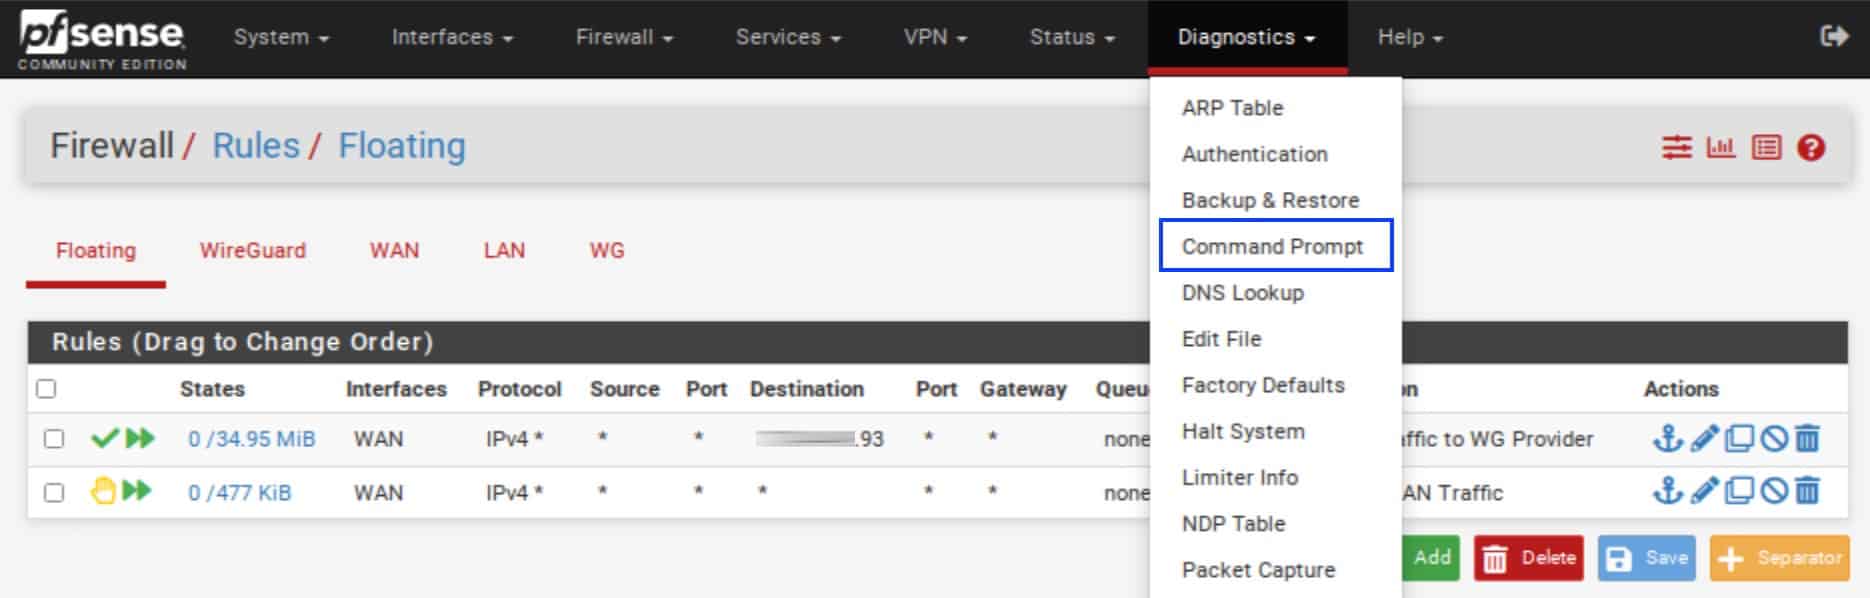
- From the top menu, select Diagnostics > Command Prompt.
- In the Execute Shell Command box, enter:
curl -4 ifconfig.co - for IPv4curl -6 ifconfig.co - for IPv6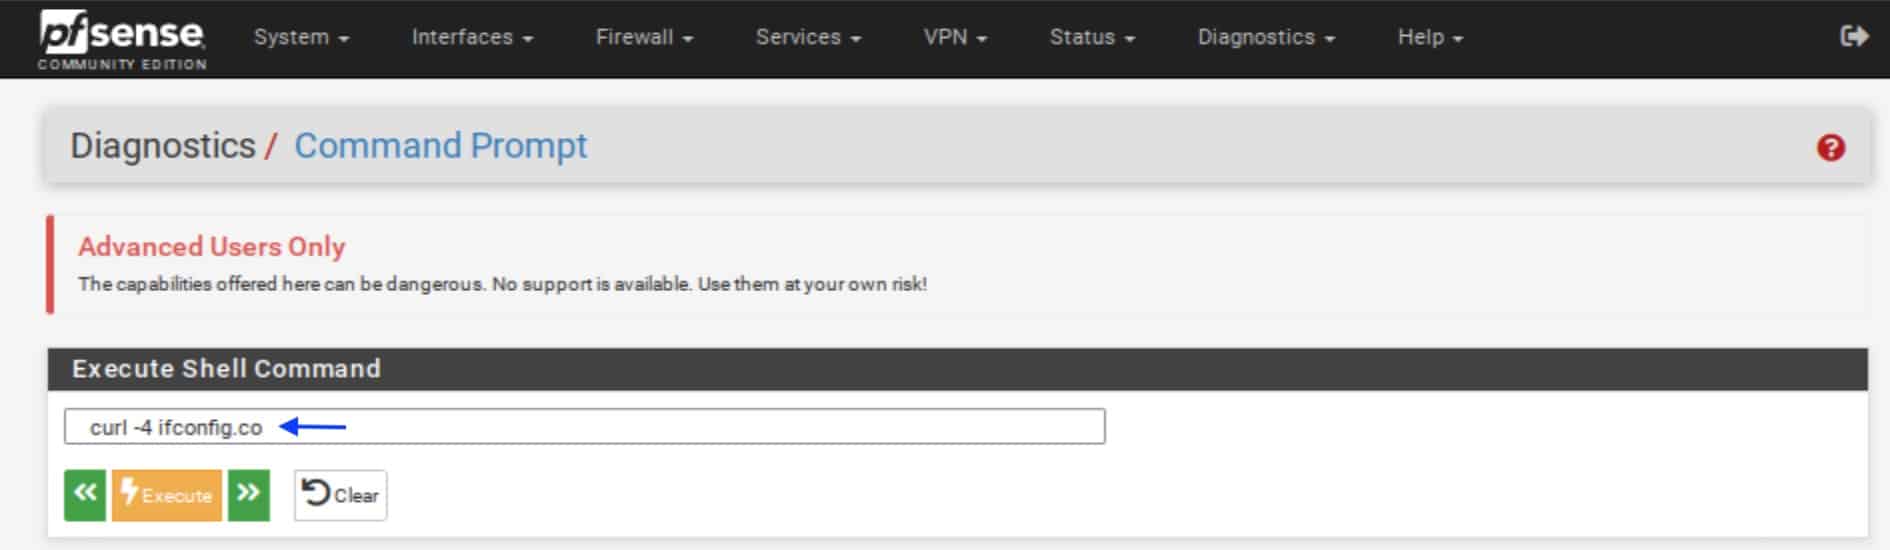
- The last line of the Shell Output window should list the IP address of the WireGuard endpoint to which you’re connected.
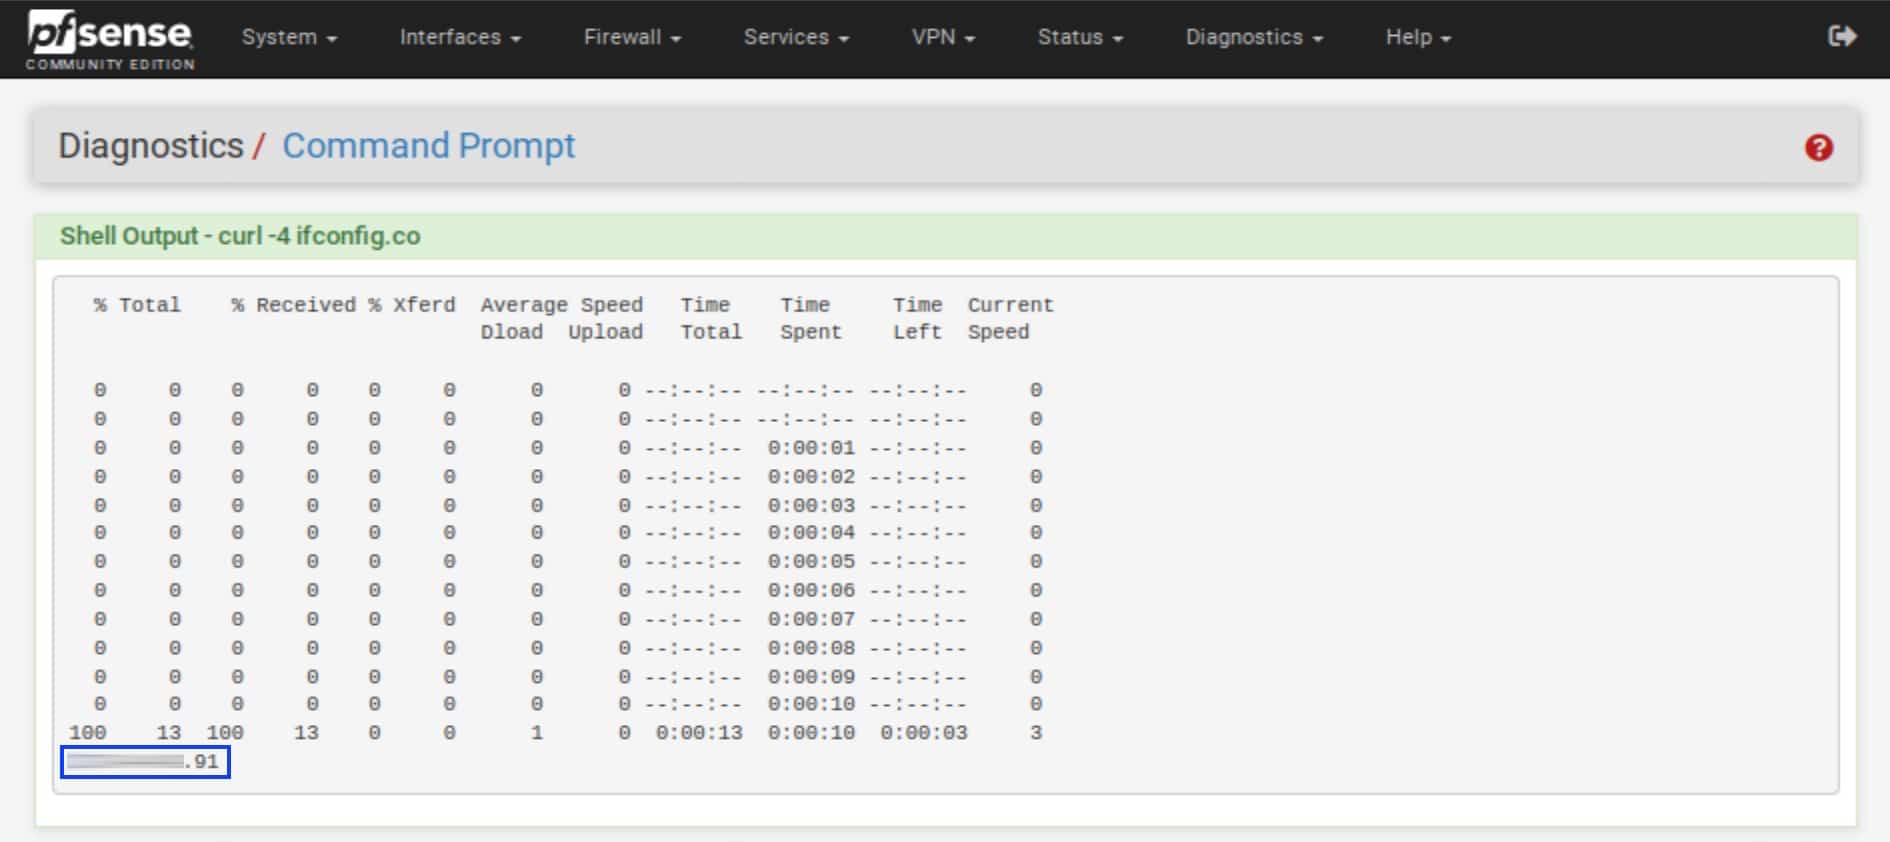
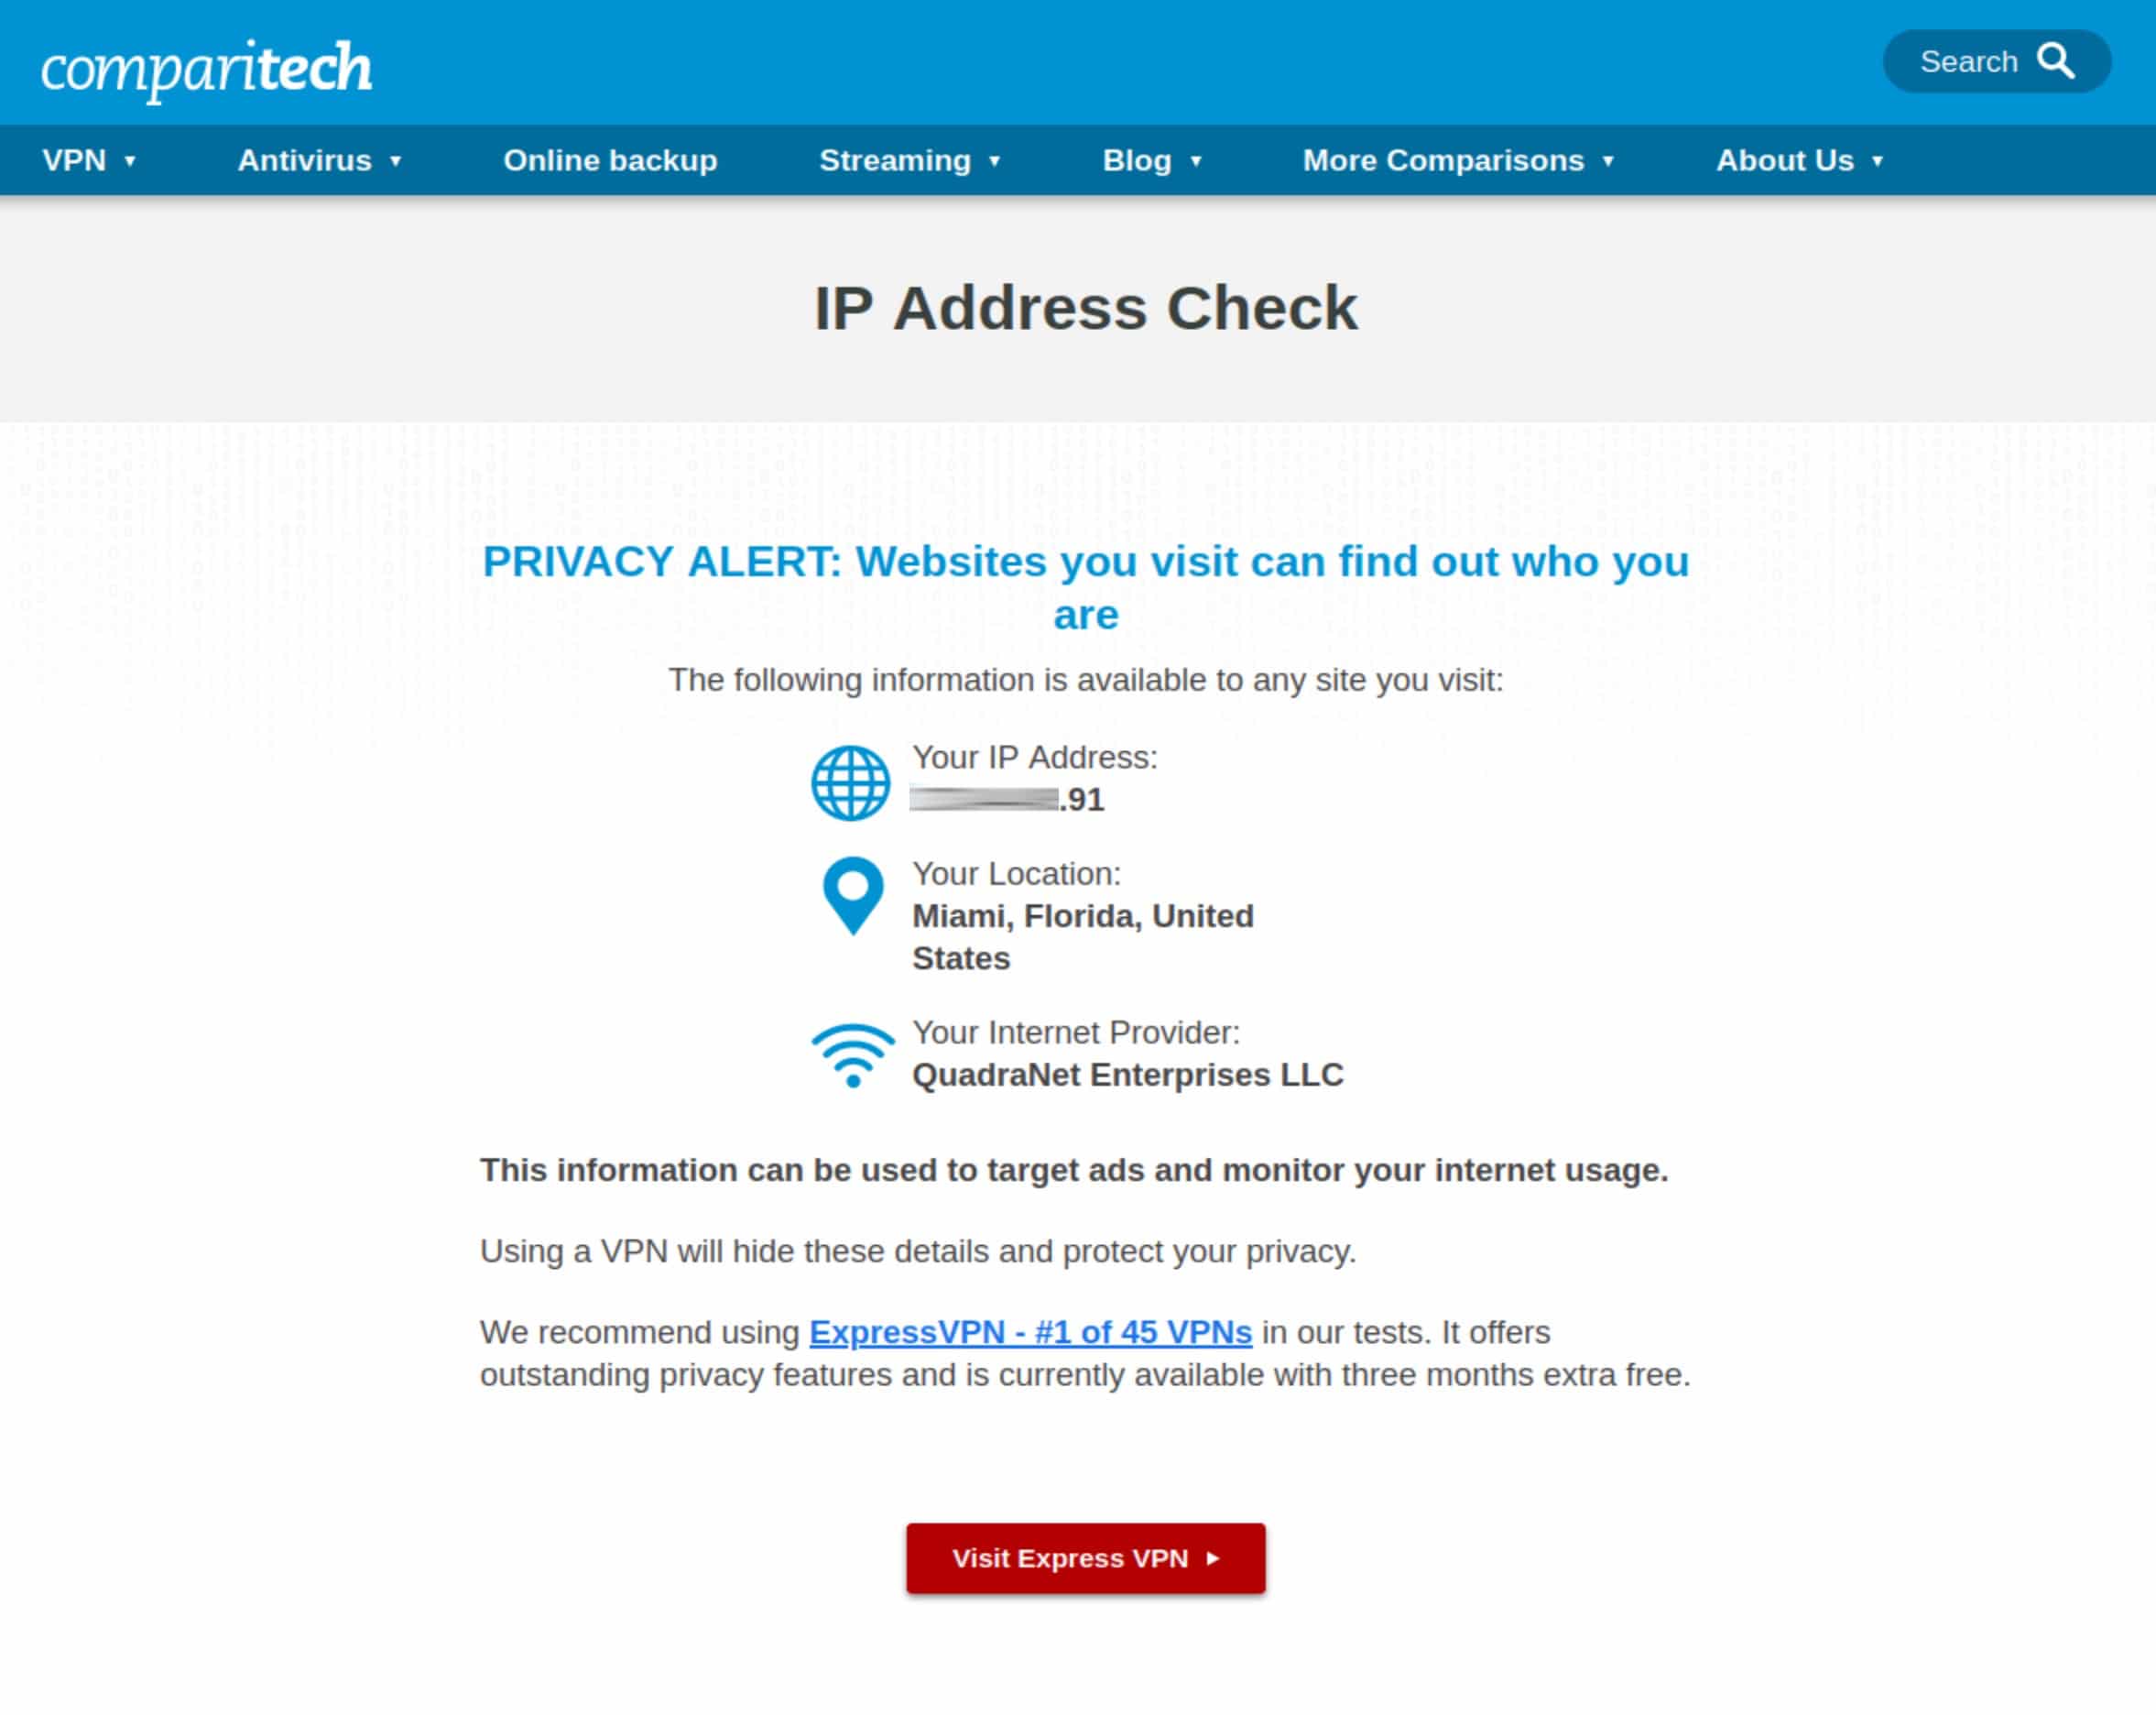
- Launch a web browser and visit the Comparitech IP Address Check page. It should list the same IP address that was listed in our shell output from the previous step.
Adding the WireGuard widget to the pfSense dashboard
You can display a WireGuard widget on the pfSense dashboard if you like.
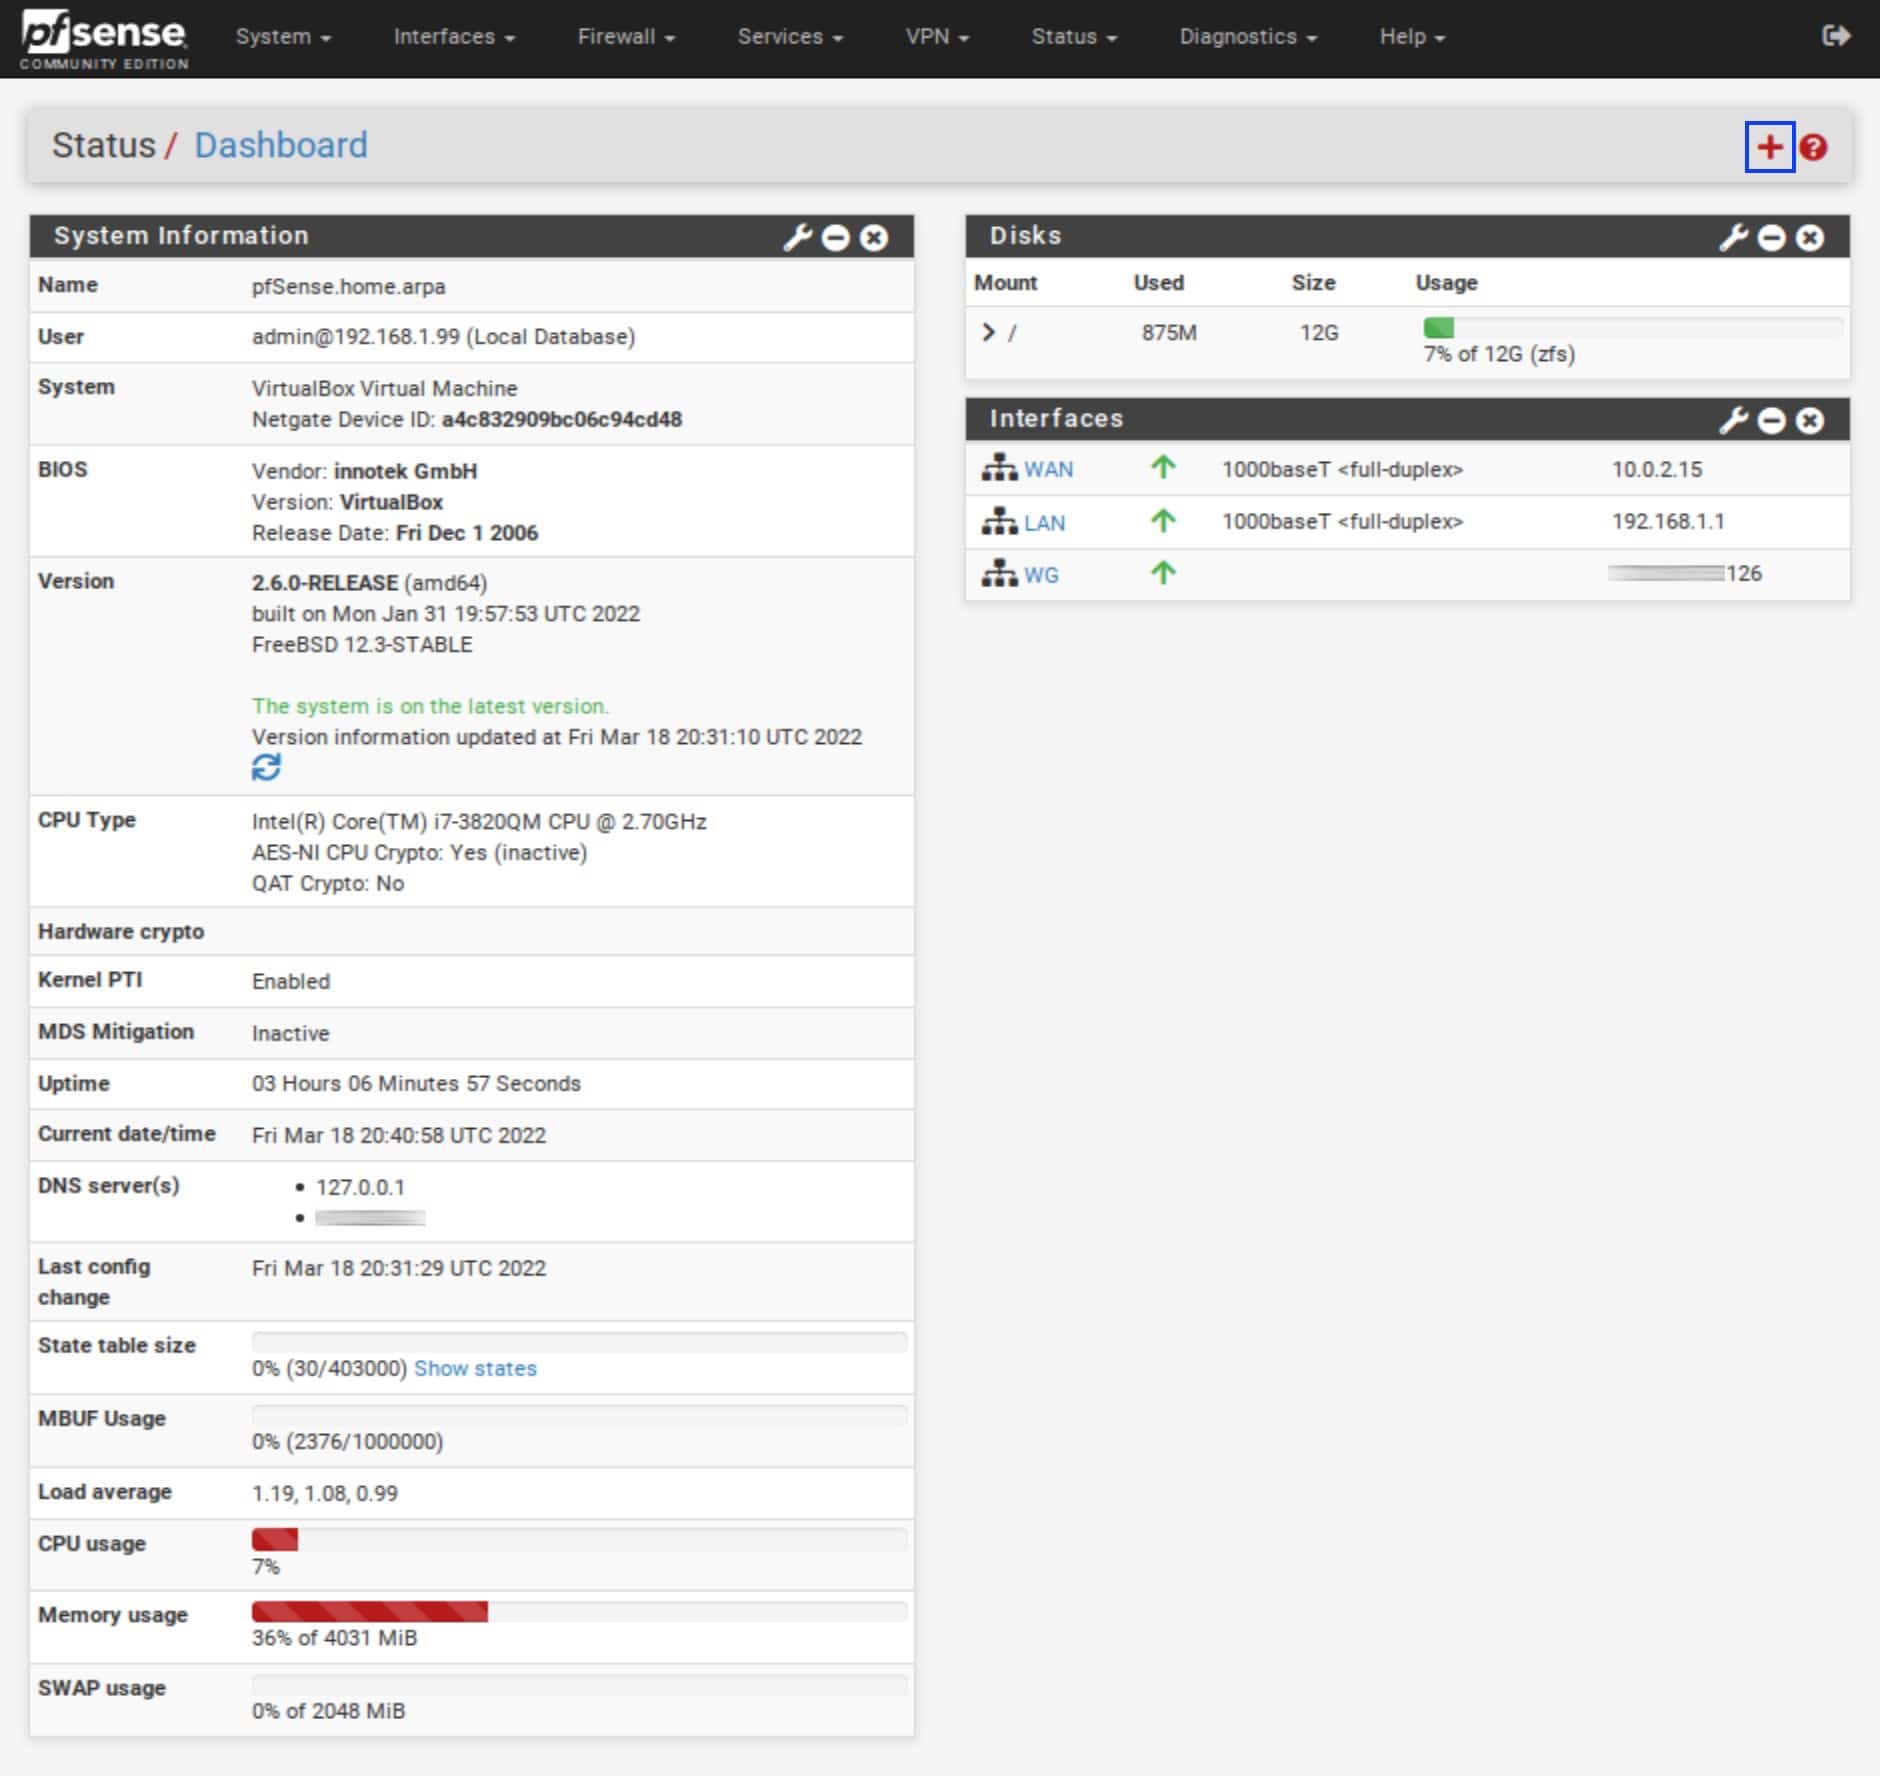
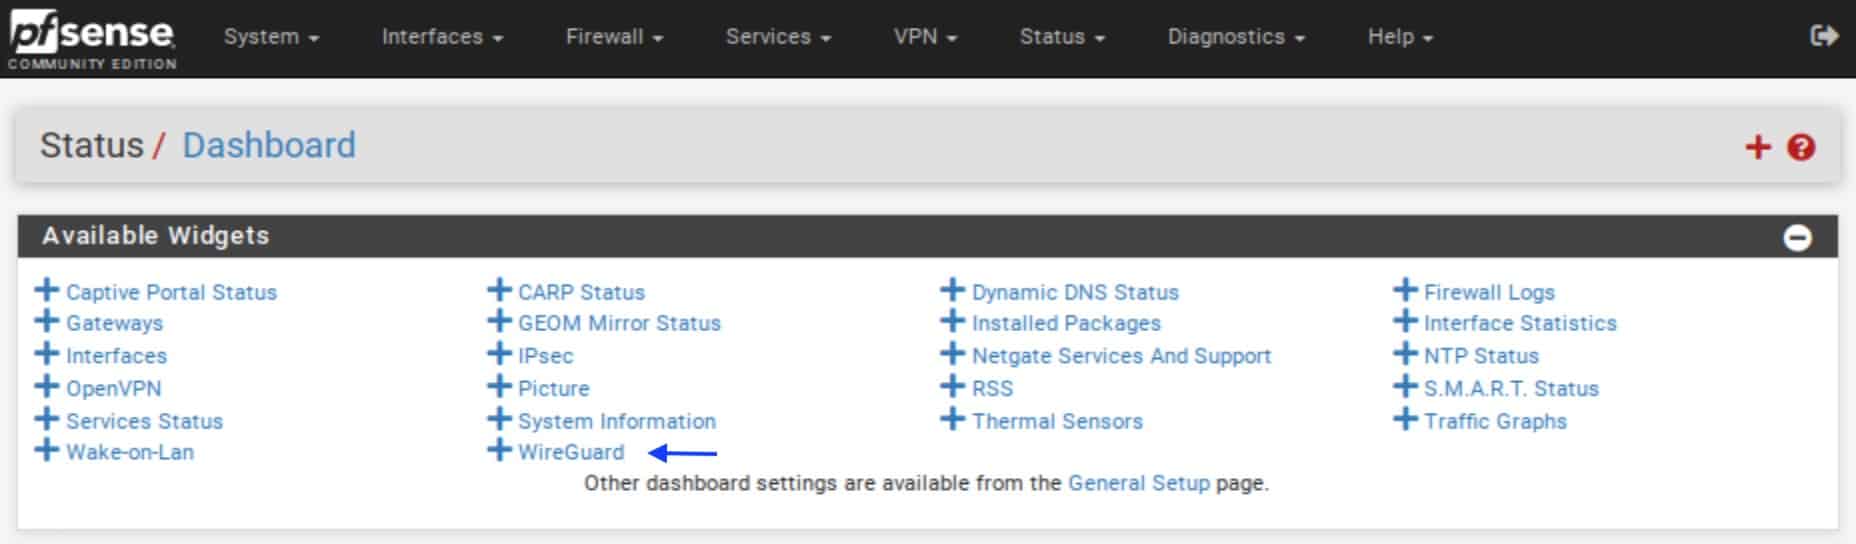
- From the dashboard, click the + sign at the top left of the UI. The list of Available Widgets is displayed.
- Click WireGuard.
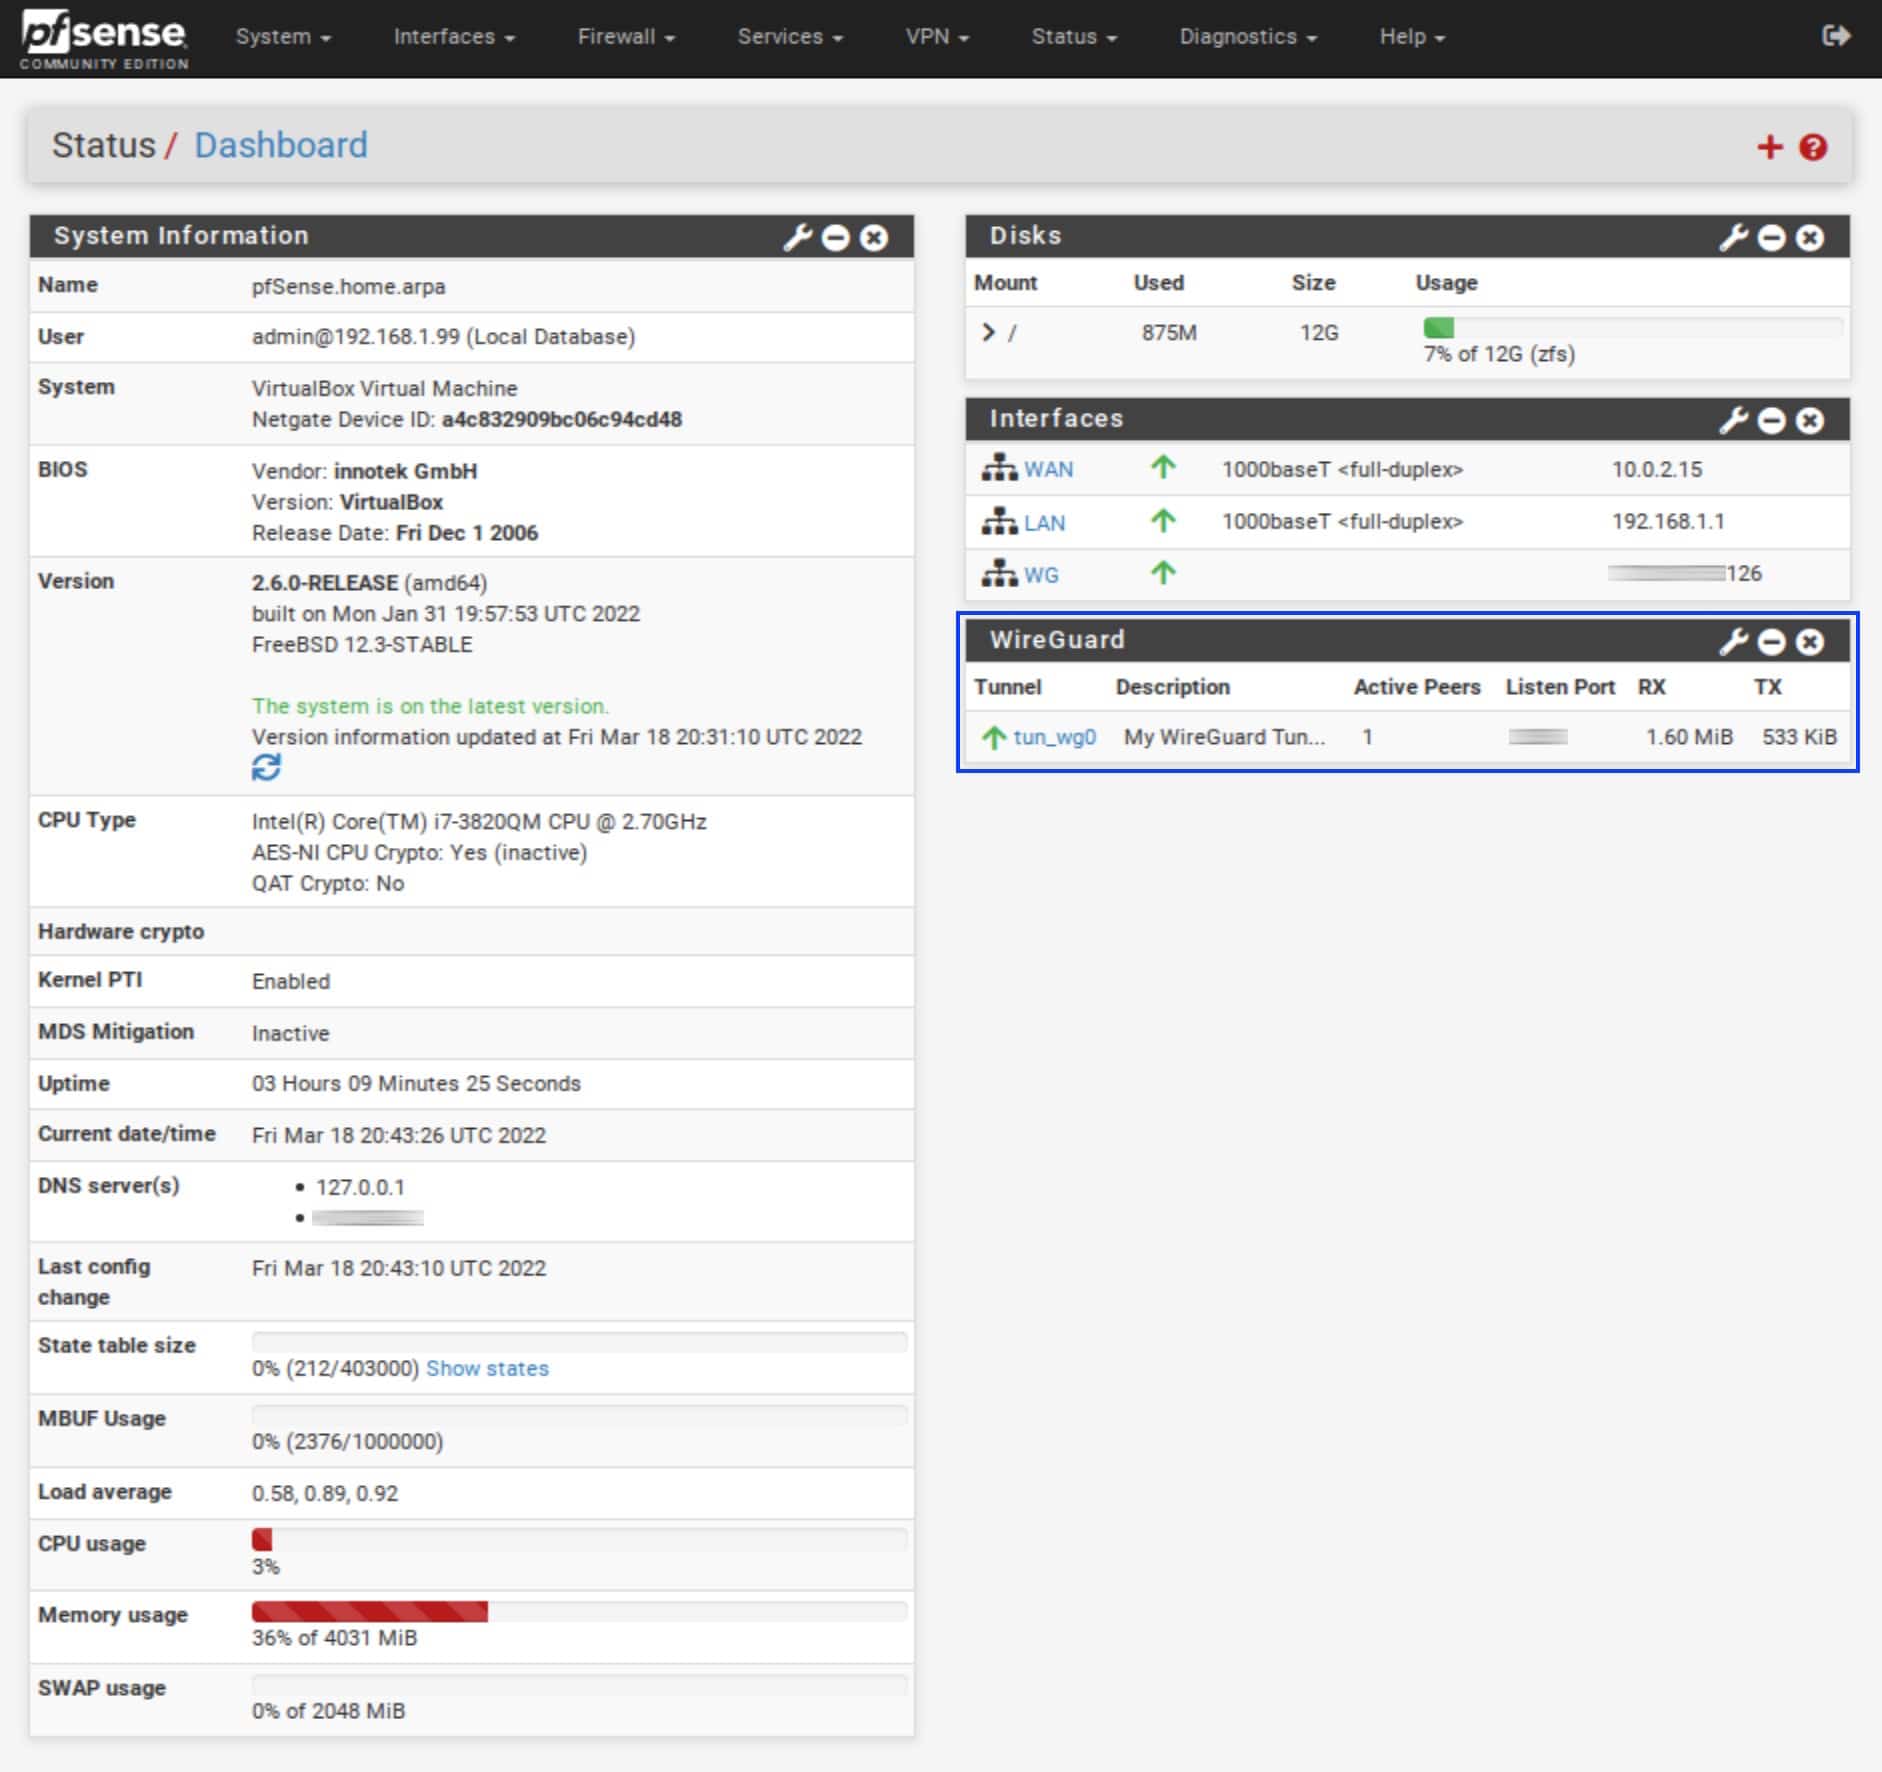
- The WireGuard widget is added to the dashboard.
Wrap up
So that’s how you set up a “client” connection to a WireGuard VPN provider in pfSense. If you run into any issues, I recommend looking at your DNS settings and firewall rules (regular and floating). A misconfiguration in those places is usually the culprit.
Aside from that, VPN on.


Hi Marc, really great article and I got it to work. using surfshark VPN, thankfully they have config files for wireguard available
I left out changing my default route to the WG Gateway, I didn’t fully understand the need for that + the static route workaround if the VPN is down on boot up.
Also on the Firewall->NAT->Outbound mapping , I left my existing WAN stuff there, I just ensured they’re all below the Wireguard mapping, as in my case I still need the connection to fail-over when the VPN can’t be reached.
Really awesome article, it was a great learning process for me
Hello,
I used this great guide, and it has been working great, but I am trying to port forward to a device on my network and it just does not work, no matter what I do. Can you please tell me how I can go about doing this?
Thank you
To port forward, go to NAT > Port Forwarding and set your source, destination, and ports. You also need to set a corresponding rule on the interface the traffic is being forwarded to. You can have the port forward create that rule automatically at the bottom. Hope this helps!
Great article! Actually worked on my Protectli FW6B? Would you also be to make an article explaining how to setup multiple WireGuard VPN connections across different interfaces in pfSense. I am struggling to do that right now.
Nice write up. Any guidance on on how to use Wireguard on selected lan clients. I do not want all Lan client to be on VPN.