
There is a range of reasons you might want to bulk delete all of your social media posts. Perhaps you’re job-hunting and want to make sure nothing mars your squeaky-clean reputation. Or you’re dating someone new and reminders of old relationships are not what you want popping up on Facebook. Maybe you run a business that’s going through a rebranding and you want to start your social media pages from scratch.
Of course, one simple solution is to deactivate your account and start over. However, this means you lose all friends and followers, and any other public or private information you have associated with your account. That leaves deleting unwanted posts from your account. The problem is that if you have thousands of posts to get rid of, deleting them one by one can be seriously time-consuming, not to mention tedious. Thankfully, for many social media sites, there are workarounds that enable you to delete posts in bulk.
In this article, we’ll explore your main options for some of the most popular sites (Facebook, Twitter, and Instagram).
How to delete all Facebook Posts
Want to wipe your Facebook Page or profile? Here are your options:
Delete Facebook Profile posts
When it comes to your Facebook profile, the platform’s built-in settings only enable you to delete one at a time. Here’s how to do that:
- Find the post on your timeline.
- Click the three dots in the upper right corner of the post.
- Click Delete.
An alternative option allows you to sort posts by specific categories. Go to Activity Log and select a filter. Then you can click the pencil icon next to each post and select Delete. You can still only delete one post at a time using this method.
It is possible to delete posts in bulk from Facebook profiles using a browser extension. One such plugin is Social Book Post Manager for Chrome, which is free to use. It enables you to batch-delete profile posts, as well as carry out other batch actions such as hiding or unhiding multiple posts.
Here’s how to use Social Book Post Manager:
- Install Social Book Post Manager in your Chrome browser.
- Open your Facebook profile and click Activity Log. Choose a filter on the left side of the page. You can choose Activity Log (which shows all activities) or one of the other filters, such as Posts You’re Tagged In or Hidden From Timeline.
- Open the Social Book Post Manager extension. Note that if you try to open the extension when you’re not in your Activity Log, you will be prompted to navigate to the correct page. When opened, the plugin looks like this:
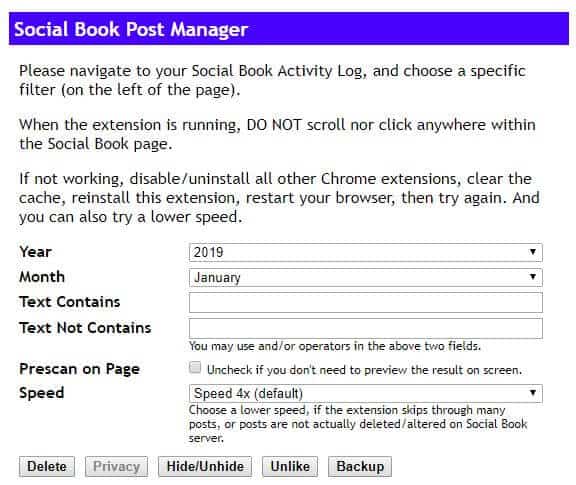
- In the extension, you’ll see a series of fields including Year, Month, Text Contains, and Text Not Contains. There is also a Prescan on Page checkbox (check this to review posts before deletion) and a speed dropdown. Complete these options as per the instructions and choose Delete (other options include Privacy, Hide/Unhide, Unlike, and Backup).
Note that the Year and Month fields include Select All options. This means you could effectively delete posts on a monthly or yearly basis or delete every post. However, to delete posts from a specific time period such as three months or three years, you will have to do this one month or one year at a time respectively.
The Text Contains and Text Not Contains fields can be used as search filters to help the plugin decide what can stay or go. For example, you could choose to delete every post with the word “marketing” in it. And/or operators are allowed in these fields.
The notes for the speed selector suggest that the plugin can be unreliable at times, and it advises you to choose a lower speed if a previous attempt wasn’t entirely successful.
Disclaimers for this extension include the fact that deleted posts cannot be recovered, so downloading your Facebook data beforehand (see above) may be a wise move. Additionally, as alluded to in the speed notes, the extension might need to be run multiple times for all posts to be deleted.
Delete all Facebook Page posts
Facebook Pages (typically used for businesses) work a lot differently than Facebook profiles. If you have a Facebook Page, it’s simple to delete multiple posts in one go, although bear in mind, you can still only delete 25 posts at a time with this method:
- Go to your Page and click on Settings, then select Publishing Tools.

- You should see a list of your published posts. Click the box to the left of Posts to select all.
- Click on the Actions dropdown and select Delete.
And that’s it. If you have more than 25 posts you want to delete, you can keep repeating the process until you’re done.
If you want to delete bulk posts but are concerned you might need the information contained in them at a later date, you may want to consider downloading your Facebook data.
Other Facebook post options
Aside from deleting posts, Facebook gives you other options such as allowing you to hide a post or limit who sees past posts. These can be helpful if there are specific posts you don’t want some people to see.
To hide a post, go to the post, click the three dots in the upper right corner, and select Hide from timeline. The posts still exist and may appear elsewhere on Facebook, but will no longer show up on your timeline.
Another option is to limit who can see your past posts. Go to Settings > Privacy and look for the Your Activity section which should be at the top. Here, there’s an option to “Limit the audience for posts you’ve shared with friends of friends or Public?” If you select Limit Past Posts, then any posts currently on your timeline will only be visible to people in your friends list.

This is handy, for example, if you don’t want a snooping employer to see your posts, but you want to keep your profile public.
Note that you can’t delete posts by others, although you can stop them appearing on your timeline, remove tags, or report a post as being inappropriate. You can also delete posts you made on someone else’s page.
How to delete all Twitter posts
Similar to Facebook, Twitter’s built-in settings only allow you to delete posts on an individual basis. To do this:
- Find the post (tweet) on your timeline.
- Click the downward arrow in the upper right corner of the tweet.
- Select Delete Tweet.
There are a couple of options available for bulk deleting tweets:
TweetDelete is an application that enables you to delete your 3,200 most recent tweets, which is likely ample for most people. It also lets you set up automatic tweet deletion for specified timeframes. Since TweetDelete works in any web browser and you don’t have to download an app or extension, you can use it on your desktop, phone, or tablet. This application is free to use and simple to get started with:
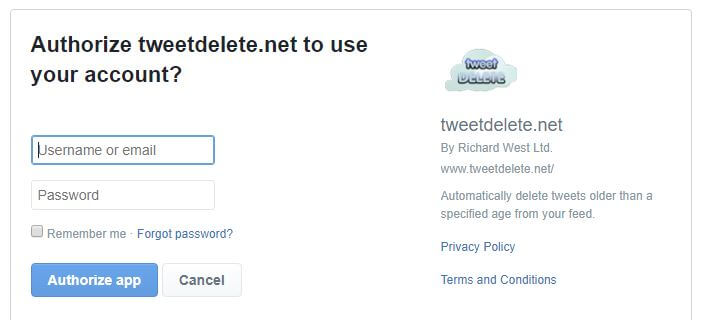
- Go to the TweetDelete homepage, read the terms and check the corresponding box, and click Sign in with Twitter.

- You’ll be prompted to sign in to your account, and doing so will authorize the application to use your account.
- You’ll then see a few options. The main option is the auto-delete feature. You can set it to automatically delete tweets of a certain age. The default is three months, but you can choose various timeframes, from one week to one year. You can also choose to delete all of your tweets by checking the box next to DELETE ALL MY TWEETS before activating this schedule.
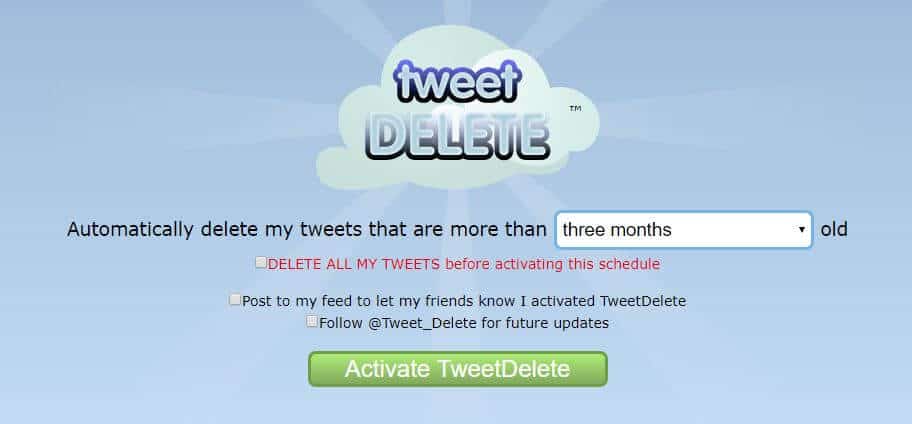
- Once you’ve made your selections, you can hit Activate TweetDelete.
If you have more than 3,200 tweets to delete, you can repeat the process until you’re done. On the other hand, if you want to rid your account of all Tweets in one fell swoop and you have lots to deal with, then you might want to try TweetEraser. This app costs $6.99 and has the ability to delete all tweets in one go.
These apps delete your posts permanently, so if you’d like to be able to retrieve any information after the fact, it may be wise to request your Twitter archive before deleting tweets. Also, note that one of TweetDelete’s disclaimers is that mass tweet deletion can “cause major bugs with your Twitter timeline that only Twitter support can fix.” Indeed, Twitter states that the reasons for various Twitter issues might include mass-deletion of Tweets.
Note that some deleted tweets may still be visible via services like Wayback Machine and Google cache. For Wayback Machine, someone would have to have intentionally archived the page with the tweet. For Google cache, recent tweets by prominent users are more likely to be saved.
See also: 1 in 5 Twitter users say they’ll quite within a year
How to delete all Instagram posts
Again, with its built-in settings, Instagram only allows you to delete individual posts manually. It’s even more restrictive, however, as you can’t delete posts from your web browser, only from the official iOS or Android app. Here’s how to delete your Instagram posts from the app:
- Within the app, find the post in your Instagram account.
- Click the three dots in the upper right corner of the post.
- Select Delete.
Note that you also have an Archive option, which will hide the post from view. Archiving is reversible whereas deleting is not.
As with Facebook and Twitter, external applications can help rid you of multiple Instagram posts at once. Popular options include Cleaner for Ins (iOS) Cleaner for IG (iOS), and Unfollower for Instagram (Android). Note that according to user reviews and reports, these types of apps tend to work much better on iOS than Android, so if you have the option, try an iOS app first.
These apps will let you perform a certain number of operations for free before asking you to upgrade to a paid account.
For this post, we’ll show you how to use Cleaner for Ins:
- Download the Cleaner for Ins app to your iOS device.
- You’ll be prompted to log in (use your Instagram credentials).

- Read and agree to the terms and conditions.
- Select Post from the bottom menu and your posts will pop up.
- Tap all those you want to delete and click Delete in the upper right corner.
The free version of Cleaner for Ins gives you 40 operations when you first log in, but you can earn more by logging in daily, presumably so the app can serve you ads (there are lots of Facebook popup ads in this app). Alternatively, you can pay to upgrade. The cost is $1.39 for 80 operations, $2.79 for 200 operations, and $3.99 for the Pro version. The lattermost option is a one-time payment that gives you unlimited operations and no ads.
Aside from mass deleting posts, you can perform other operations including unfollowing others, blocking current followers, adding users to a whitelist, and removing likes.
Again, it’s worth noting some of the disclaimers that come with this app. Even though the Pro version of the app enables you to delete as many posts as you want, Instagram sets their own limits, which still apply when using the cleaner app:
- Instagram may temporarily suspend your account if you perform more than 50 operations in an hour.
- It may also suspend your account if you perform more than 1,000 operations in a day.
The Pro version of the app might still be worth it, but bear in mind, it could be a long process if you have a lot of posts to delete.