

Testing an SMTP (Simple Mail Transfer Protocol) server is a critical skill for system administrators, email administrators, and developers. Ensuring the server is functioning correctly helps prevent email delivery issues, avoid disruptions in communication, and maintain security.
One of the simplest and most effective tools for testing SMTP servers is Telnet. Despite its age, Telnet remains a powerful command-line utility for manually interacting with servers
This guide will walk you through the process of using Telnet to test an SMTP server. You’ll learn how to connect to the server, send basic SMTP commands, and verify its response. This method allows you to simulate email sending without relying on email client software, making it easier to pinpoint issues at the protocol level.
By the end of this guide, you’ll have the skills to troubleshoot SMTP problems, test server configurations, and verify the functionality of specific email addresses. Whether you’re diagnosing a delivery issue or setting up a new mail server, understanding how to test an SMTP server with Telnet is an essential part of maintaining a reliable email system. Let’s dive in and explore the step-by-step process to ensure your mail server runs smoothly.
What is Telnet?
Telnet is a network protocol and command-line tool used to connect to remote systems over TCP/IP. It enables users to interact with servers or devices by sending text-based commands, making it useful for testing network services like SMTP, FTP, or HTTP.
Although Telnet is simple and widely supported, it transmits data in plain text, which makes it less secure than modern alternatives like SSH for remote management and communication. So, it isn’t advisable to use Telnet for regular communication, but, like Ping, which is equally insecure, it is a useful protocol for network testing.
Getting Telnet
Telnet is available in Windows 10 but it isn’t activated. To get Telnet operating:
1. Type Telnet into the search field in the toolbar at the bottom of your desktop.
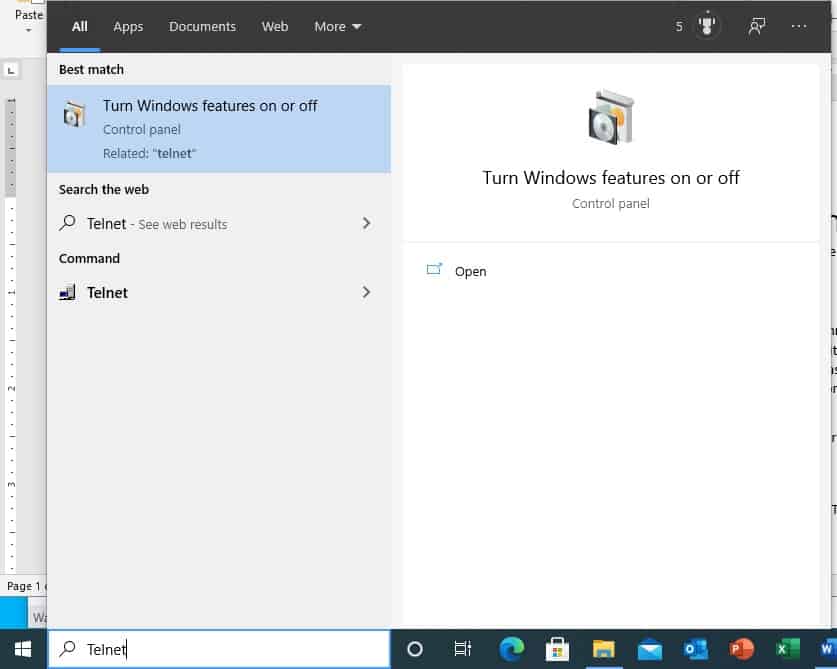
2. Click on Turn Windows features on or off. This opens a pop-up window.
3. Scroll down to Telnet Client, check the box next to it and press the OK button.
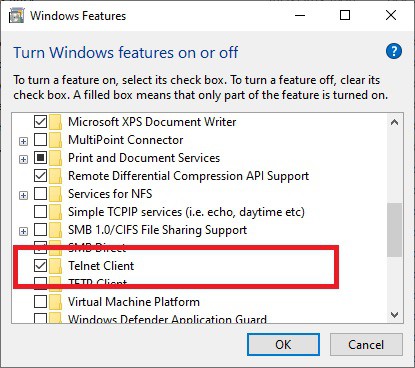
A progress window will appear and show the process of installation for Telnet. Once the installation has finished, the window will close.
4. Type Telnet into the search box again.
This time you will see the Telnet utility appear as the best match for your search. Click on this option to open a Telnet Window.
The command prompt in the Telnet window should display Microsoft Telnet>.
Gather required information
You need the following information from your email or web host in order to proceed:
- Email server name – this will be listed as the Outgoing Server in your Email settings within your hosting plan.
- Email account – if you haven’t set up an email account yet within your hosting service, do that now.
- Account password – if you can’t remember the password you gave for your email account, reset it.
Note down these three pieces of information.
You need to convert your username and password into the Base64 format in order to pass the authentication phase of the test.
1. Go to base64encode.org in order to convert your credentials.
2. Enter your email address in the top field of the web page.
3. Press the Encode button.
You will see the encoded version of your address in the bottom field of the screen.
4. Open another tab and surf to the same website again.
5. Enter your password this time to get its encoded version.
As the Telnet window doesn’t stretch across the screen, you can overlay that window over each tab for your email address and password so you can see the encoded results of each value as you type them in. That has less risk of transposition error than writing down the encoded values on a piece of paper.
Connecting to your mail server
Telnet will use port 23 by default if you don’t enter a port number at the end of the open command. Port 23 won’t get you into your SMTP server.
SMTP uses three ports: 25, 465, and 587. All of the other advice pages on the web that include tips on how to access SMTP with Telnet tell you to use port 25. However, I tried that with three different SMTP servers and it didn’t get me in. I also couldn‘t get into any SMTP server with port 465. Port 587, however, works.
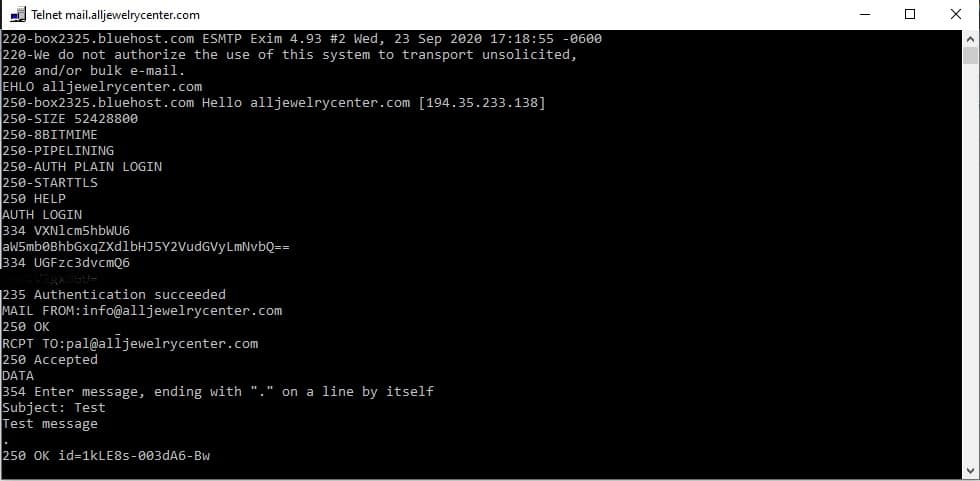
In this example, the mail server name in the screenshot is mail.alljewelrycenter.com. When you copy these commands, replace that email server name with the name of your email server. Also where you see values in angle brackets (<>) replace those with your own information – including deleting the angle brackets.
1. Open a connection to the mail server.
2. Enter open <your_mail_server_name> 587 and press Return.
Once you are in the environment for the mail server, Backspace and Delete do not work. It also isn’t possible to paste values into the screen, which is unfortunate because getting the SMTP server to accept your instructions requires you to type in those Base64 values. If you make a mistake, press Return and start again.
Sending an email
1. Enter EHLO <your_domain_name> and press Return.
2. Enter AUTH LOGIN and press Return.
3. Now you need to enter the Base64 version of your email address without making any mistakes. Press Return.
4. Enter the Base64 version of your password and press Return.
Hopefully, you will see the message: 235 Authentication succeeded.
5. Enter MAIL FROM:<your_email_address> and press Return.
You should see the message: 250 OK.
6. Enter RCPT TO:<destination_email_address> and press Return.
You will see the message: 250 Accepted.
7. Enter DATA and press Return.
8. Enter Subject: Test and press Return.
9. Enter Test message and press Return.
10. Enter . and press Return.
Note: A full stop on a line by itself is the signal to the SMTP server that input has ended.
You will see the message OK followed by an ID code. Your email has been sent. You can see a screenshot of a successful SMTP test below.
11. Check the Inbox of the email account that you sent the email to in order to confirm that the process worked.
You will notice that the email doesn’t have a sender’s email address in it.
12. Go back to the Telnet window, enter quit to close down the connection to the SMTP server, and then enter quit to close the Telnet window.
Troubleshooting email setup
If you get to the end of the test, then you know there is nothing wrong with your email server or the address and credentials that you have noted down in order to get access to it.
If the SMTP server gave you an error message that the origin email address wasn’t valid, that could be because you wrote it down wrong. It could also mean there is something wrong with your email account and that could be the reason that you can’t get it to work in your new email client.
Hopefully, carrying out a test of your SMTP server through Telnet away from your new email client will help you narrow down all the potential reasons for any email problems that you are experiencing.
SMTP server test FAQs
How do I test my SMTP server?
You can do a quick check to see whether your SNTP server is active a available for connections by using Telnet. Follow these steps:
- Type cmd in the Start menu search field and select Command Prompt from the results.
- At the command prompt enter telnet <mail server address> 25
- Check the response.
- Type QUIT to exit Telnet.
Substitute the address of your mail server in the above command where it says <mail server address> – don’t leave the angle brackets in (<>). The response you get to the Telnet command will tell you whether your SMTP server is contactable.
How do I ping my SMTP server with a port?
The Ping command doesn’t offer the option of testing a specific port. It only tells you whether a specific computer is connected to the Internet. In order to check if the SMTP port is open on a specific server, use the telnet command instead.
What port to connect ot SMTP?
SMTP is available on port 25. You might see that ports 465 and 587 are used by SMTP. While this is true, do not use these port numbers in your email testing transactions.


very helpful! One minor correction: you have to type an empty line (just enter return) after the subject line (#8) and also before the “.” (#10)
Cheers
Stefan