
Active Directory (AD) remains a critical tool for managing users, devices, and permissions within enterprise IT environments. It is widely adopted, especially among large organizations, as the primary directory service for identity and access management. For IT administrators, AD streamlines tasks such as user authentication and network security, but managing user accounts in AD can be time-consuming and tedious if done manually. This is especially the case when adding large numbers of new employees or system accounts.
As a system administrator, you will frequently need to create, modify, or delete user accounts in Active Directory. While doing this manually might be manageable for small numbers of users, the process becomes inefficient and error-prone when dealing with bulk account creation. This is where automation comes in handy. Fortunately, Active Directory provides built-in tools and scripts to simplify and expedite bulk user creation, helping to save time and reduce mistakes.
In this article, we’ll guide you through several methods for creating bulk users in AD, using tools and approaches available within your existing environment. We’ll cover how to use PowerShell scripting for advanced automation, as well as simpler methods like CSV imports. Additionally, we’ll explore some free third-party tools that can help you automate bulk user creation without requiring deep technical knowledge.
By the end of this guide, you will have the tools and know-how to create large batches of user accounts in AD quickly and efficiently, streamlining your IT workflows and freeing up time for other critical tasks.
Hint: Uploading new users into PowerShell is a lot easier with a free tool than it is with PowerShell.
Prepare Active Directory
If you are using Active Directory, you probably already have all of the necessary tools available on your server. However, just to be sure, look at the following steps.
- Go to the Start menu and click Server Manager. This should open a new window.
- In the Server Manager Dashboard, select Add roles and features.
- In the Before You Begin screen, click Next. In the Select installation type screen, make sure Role-based or feature-based installation is selected, and then press Next.
- In Select destination server, click Next to select your local server. This displays the Add Roles and Features screen.
- Select Server Roles in the left-hand menu and make sure that the Active Directory Domain Services role is checked. If you are just starting up a new Active Directory installation you will need to activate this role, if you are already running Active Directory, this role will already be running.
- Click Features in the left-hand menu. Make sure that Remote Server Administration Tools is checked. Expand this node and ensure that AD DS and AD LDS Tools is checked. If they are, you are good to go; if not, check it and click to install the option.
Also, in the Add roles and features screen, you can make sure that you have the PowerShell ISE service working. Click Features in the left-hand menu and scroll down through the list in the main panel of the screen. Click Windows PowerShell to expand that node and make sure that Windows PowerShell ISE is checked. If not, click this option and install it.
Set up user account details
Now that you have made sure that all of the PowerShell utilities you need are running on your server, you can create a list of all of the accounts that you want to upload. Open your favorite spreadsheet system and create a new file.
Make a heading line and in columns A to E type in the headings firstname, lastname, username, password, email, streetaddress, city, zipcode, state, country, telephone, jobtitle, department, company, and OU. Enter a record for each account that you want to create. If you don’t have data for all of the columns, you can leave those fields blank except for firstname, lastname, username, password, and OU, which must have values.
The OU column gives the details of the Organizational Unit. You should have these set up already in Active Directory, they are the departments or business functions that you assign to each user account.
In order to see exactly what value to put in this column:
- Open Active Directory Users and Computers.
- Select your Active Directory instance, select View in the top menu, and click Advanced Features.
- Right-click the organizational unit that you want to assign a user to and click Properties. Select the Attribute Editor tab.
- Double click the distinguishedName line. This will open a popup window. You can copy the attribute value from here and paste it into the OU field for the new user account record that you are creating in your spreadsheet.
Once you have entered records for all of the accounts you want to load, save the spreadsheet. Start to save the spreadsheet again, but this time, use the Save As option. Select CSV as the file type. You can make changes in the spreadsheet version and use the CSV version for the bulk upload. Remember, whenever you make changes to the spreadsheet, you need to generate a new version of the CSV file in order to get those changes written to your import file.
Create a PowerShell script
Open a text editor, such as Notepad in order to create a PowerShell script to import your list of users.
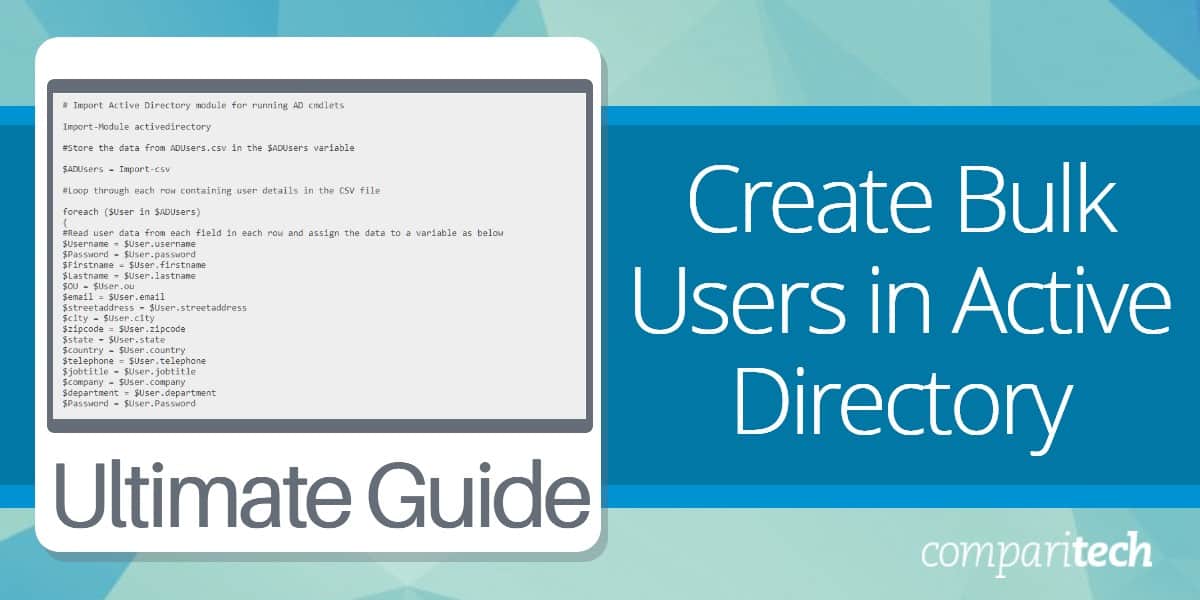
Copy the following text and paste it into the new file:
# Import Active Directory module for running AD cmdlets

Import-Module activedirectory

#Store the data from your file in the $ADUsers variable

$ADUsers = Import-csv <fileandpath>

#Loop through each row containing user details in the CSV file

foreach ($User in $ADUsers)
{
#Read user data from each field in each row and assign the data to a variable as below
$Username = $User.username
$Password = $User.password
$Firstname = $User.firstname
$Lastname = $User.lastname
$OU = $User.ou
$email = $User.email
$streetaddress = $User.streetaddress
$city = $User.city
$zipcode = $User.zipcode
$state = $User.state
$country = $User.country
$telephone = $User.telephone
$jobtitle = $User.jobtitle
$company = $User.company
$department = $User.department
$Password = $User.Password

#Check to see if the user already exists in the AD

if (Get-ADUser -F {SamAccountName -eq $Username})
{
#If the user does exist, give a warning
Write-Warning "A user account with username $Username already exists in Active Directory."
}
else
{
#User does not exist then proceed to create the new user account
#Account will be created in the OU provided by the $OU variable read from the CSV file
New-ADUser `
-SamAccountName $Username `
-UserPrincipalName "$Username@<domain>" `
-Name "$Firstname $Lastname" `
-GivenName $Firstname `
-Surname $Lastname `
-Enabled $True `
-DisplayName "$Lastname, $Firstname" `
-Path $OU `
-City $city `
-Company $company `
-State $state `
-StreetAddress $streetaddress `
-OfficePhone $telephone `
-EmailAddress $email `
-Title $jobtitle `
-Department $department `
-AccountPassword (convertto-securestring $Password
-AsPlainText
-Force)
-ChangePasswordAtLogon $True

}
}

**** End of script – do not copy this line ***
There are two elements in the above script that you need to customize before you run it. These are:
- <fileandpath> Replace this with the file name of your CSV file, including the .csv extension and the full path all the way from the root, including the drive letter. For example, C:\Users\Administrator\Documents\users.csv
- <domain> Replace this with the domain name of your AD server.
Once you have created the PowerShell script, save it. Give the script a name that has the extension ps1 – for example uploadusers.ps1.
Import users in AD with PowerShell
- Open File Explorer and click the directory where you saved your PowerShell script.
- Right-click the script and select Edit from the context menu. This will open Windows PowerShell ISE.
- Look for a green play icon in the button bar at the top of the screen and press it. If any of the accounts that you tried to upload already exist in your AD directory, you will see a warning message for each duplication – the duplicate record will not be entered into the database. When the script finishes its work, the PowerShell prompt will reappear.
- Go back to Active Directory Users and Computers. Click each of the departments that you created new user accounts for and check that all of the accounts that you held in the CSV file have actually been created.
An automated tool for uploading accounts into AD
If you are uncomfortable with running PowerShell scripts, you might be happier with a well-designed tool with an attractive GUI interface instead. You probably already use a lot of different tools in your job administering the company IT system, so this strategy will be easy to understand.
The big advantage that PowerShell has over third-party systems is that you already have it and you don’t have to pay for it. In many companies, requirements laid down to justify buying a new tool can be off-putting. However, there are some really good free tools for the bulk creation of Active Directory user account. That removes the need to seek budgetary approval.
SolarWinds Admin Bundle for Active Directory
Take a look at the Admin Bundle for Active Directory which is totally free forever – it isn’t a trial. The bundle is provided by SolarWinds and it has a great user interface. It measures up to the high standards that SolarWinds uses for its paid system monitoring and management tools.
There are three separate tools included in this package. These are the Remove Inactive Users utility, the Remove Inactive Computers tool, and the User Import Tool. Of the three, it is the third one that we will look at here.
Download and install the User Import Tool
Access the Create User Account utility at the Admin Bundle for the Active Directory download page. This will download an installation Wizard. Click the downloaded file to start the installation process.
Cycle through the installation instructions to get the utilities installed on your device. The bundle will install on Windows as well as Windows Server. The three utilities are created as separate tools – they are not accessed through a unified portal.
Bulk create accounts with the User Import Tool
Once the installation has completed, find the User Import Tool in the Start menu. This system will import a file created with a spreadsheet. So, you would create a list of new users in exactly the same way as the process described in the section for creating users through a PowerShell script. In the case of the User Import Tool, however, it is not necessary to save your spreadsheet in a CSV format if you use Microsoft Excel. This is because this utility will accept XLSX files as well as CSV files for input.

The first time you use the service you will need to enter the login credentials of your Active Directory administrator account. However, these are stored when you close the utility, so they will be available for your next session.
After entering the administrator account details, click the Test Credentials button. This will create a connection to the Active Directory instance.
The utility will create entries for the new users you want to upload in an associated Microsoft Exchange instance, generating mailboxes for each new account. If you want to activate this option, click the Create AD account and Exchange mailbox radio button. The top field in the Home screen of the User Import Tool is for the path and name of the input file. You can locate this through a file explorer by clicking the Select File button. Once all the fields on the screen have been filled in, click the Next button to proceed.
In the next screen, the tool displays the column headings it discovered in the input file and suggests some attributes in the AD system that might match.

You can add attributes to the right column of the screen by typing a field name in the search field below that panel and then scrolling through the list of results.
Click an attribute to get it in the candidate field and then click the Add button to get it in the list of available attributes.

Next, you click a column name in the list of input file headings and then click the related attribute name from AD in the right column. With both fields highlighted, press the Map Attribute button. This links the column to the attribute. Click the Next button after mapping all of the columns.
The next screen shows a preview of all of the records that are going to be added to the Active Directory. Click the Create button to get those records imported.
Go to the Active Directory Users and Computers screen from the Start menu to check that those new user accounts are now in the system.
Bulk importing Active Directory accounts
Whether you choose to copy the PowerShell script shown here to import users or access the free User Import Tool from SolarWinds, creating users through a spreadsheet is a useful way to add a lot of users all at once. Creating a list in a spreadsheet outside the AD system enables you to build up a list over time and you don’t feel so pressured to type in all of the account details in one session.
Using a system management tool is always going to be easier and more reliable than performing manual tasks, which are prone to error, or writing your own scripts and programs, which might contain bugs. The producers of system management tools test their products thoroughly before releasing them and they are less likely to contain errors than programs you try to write yourself in between other tasks.
The User Import Tool and the other facilities in the Admin Bundle for Active Directory are relatively simple. Each of these three tools performs just one function. It is probably better to investigate a more comprehensive package that can support all of your work managing applications and the servers that they run on.
SolarWinds produces a much more comprehensive system of application management tools, which is called the Server and Application Monitor. This package installs on Windows Server and you have to pay for it. However, you can get it on a 30-day free trial to assess its merits.
Active Directory management systems
SolarWinds isn’t the only supplier that produces Active Directory software. Some systems offer a complete substitute frontend for Active Directory.
ManageEngine ADManager Plus (FREE TRIAL)
An example of this type of package is ManageEngine ADManager Plus. This system allows you to onboard and adjust Active Directory users individually and in bulk.
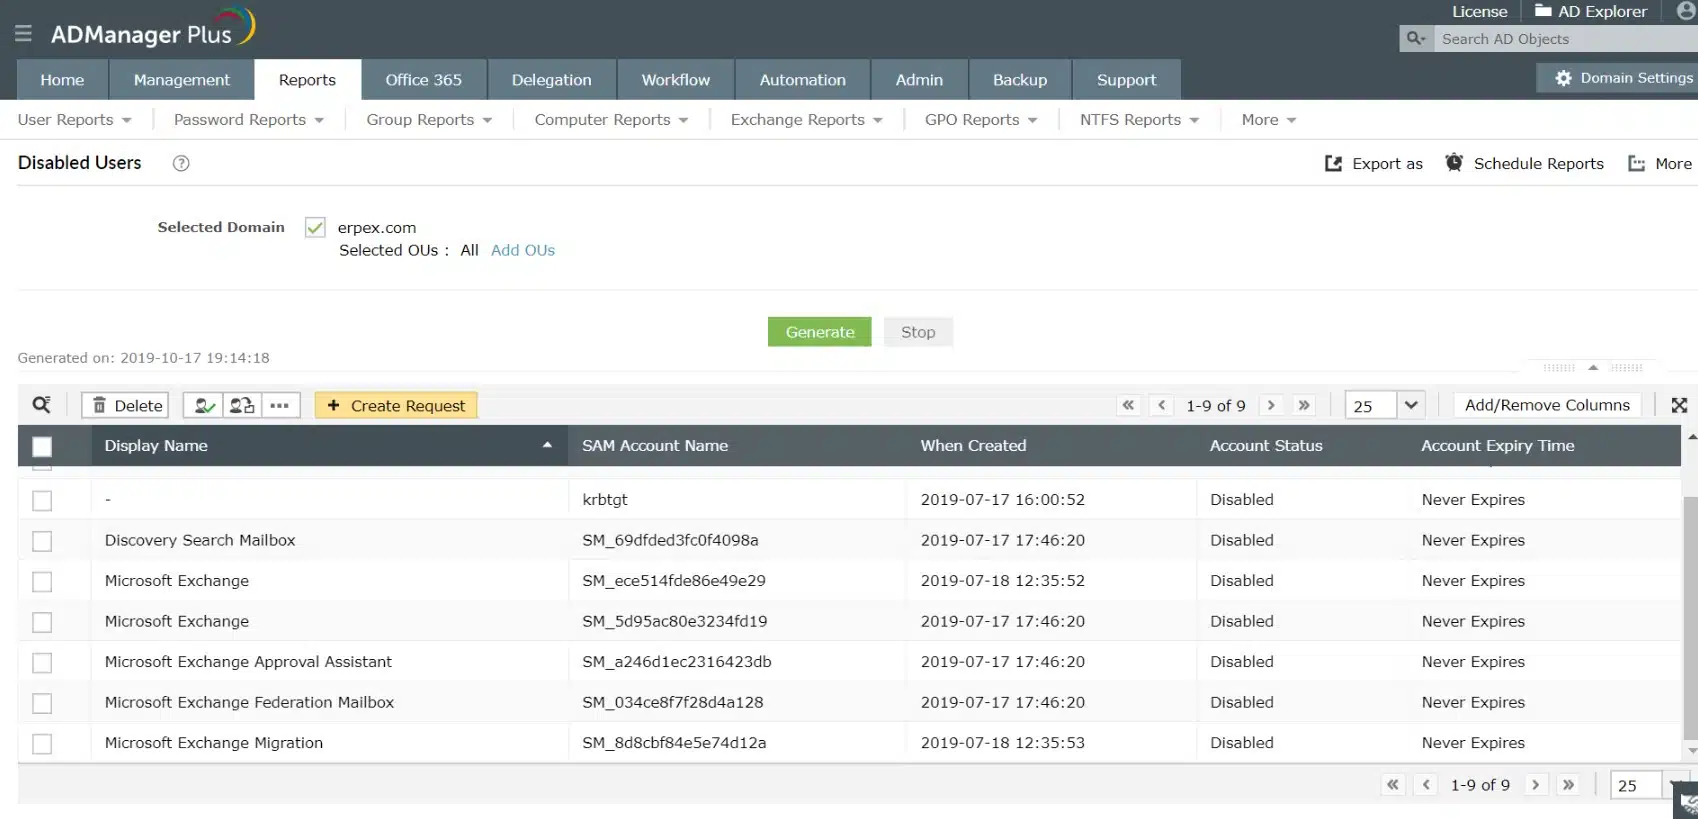
The ADManager Plus Bulk User Creation screen works through a library of templates. You select the template you want for your standard user account and then you can upload details from a CSV file to actually generate those objects in Active Directory. It is available on a 30-day free trial.
Active Directory FAQs
Which file format is used to create users through bulk create?
You should use the CSV file format for creating bulk users in Active Directory. This is a pain txt file with records represented by each line in the file. Fields in the records are separated by commas. Such a file can be created in a spreadsheet system, such as Excel.
How do I export all users from Active Directory?
Open the Active Directory Users and Computers tool and click on your desired organizational unit. Click on the Export List button. All of the accounts in that OU will be copied into a comma-delimited file.
What is the purpose of an Active Directory OU?
OU stands for “organizational unit”. An Active Directory OU is a subdivision of a domain. It allows you to group objects together, such as the modeling of a company department.


Hello,
I’ve been using the script, and it works great, but I tried adding a portion to give the users a home directory on a specific server, and I am having some trouble any advice?
Thank you,
Ty
Hi there,
is there a way of outputting from the bulk users import passwords, rather than populating the existing csv with password.
for example if I was to bulk create 250 users and PowerShell to randomize password and output that to a further csv, along with created SamAccount names. Thanks
Hello,
I am following the steps in mass import AD users via the powershell script, but the steps you reference the 2 places you need to modify: and , but in the script those 2 placeholders are not found. What is the program line for both of these, please.
Thanks
Hi, Mike,
I am so sorry — I appear to have left those two markers out of the text for the PowerShell script. I have put them in now. You should see the line $ADUsers = Import-csv <fileandpath> at the top of the script. Also, note that the third line of the insert now reads -UserPrincipalName “$Username@<domain>” `
Cheers,
Stephen