3DES is an encryption cipher that was derived from the original Data Encryption Standard (DES). It became prominent in the late nineties but has since fallen out of favor due to the rise of more secure algorithms, such as AES-256 and XChaCha20.
Although it will be deprecated in 2023, it’s still implemented in some situations. Since it’s based on one of the first widely published and studied algorithms, DES, it is still important to learn about what 3DES is and how it works.
This guide will take you through:
- Each step of the DES process in detail
- How DES is modified in 3DES to make it more secure
- The various security issues and whether or not you should use the algorithm
What is 3DES?
Although it’s officially known as the Triple Data Encryption Algorithm (3DEA), it is most commonly referred to as 3DES. This is because the 3DES algorithm uses the Data Encryption Standard (DES) cipher three times to encrypt its data.
DES is a symmetric-key algorithm based on a Feistel network. As a symmetric key cipher, it uses the same key for both the encryption and decryption processes. The Feistel network makes both of these processes almost exactly the same, which results in an algorithm that is more efficient to implement.
DES has both a 64-bit block and key size, but in practice, the key only grants 56-bits of security. 3DES was developed as a more secure alternative because of DES’s small key length. In 3DES, the DES algorithm is run through three times with three keys; however, it is only considered secure if three separate keys are used.
The uses of 3DES
Once the weaknesses of normal DES became more apparent, it was withdrawn in 2005. In its place, 3DES was adopted as an interim replacement in a wide range of applications. It was one of the more commonly used encryption schemes before the rise of AES.
Some examples of its implementations included:
- Microsoft Office
- Firefox
- EMV payment systems
These platforms no longer use 3DES because there are better alternatives. Indeed, the National Institute of Standards and Technology (NIST) has said that 3DES will be disallowed after December 31, 2023.
3DES will only “continue to be allowed for the decryption, key unwrapping, and verification of MACs of already-protected data”. So what, exactly, went wrong with 3DES?
The history of 3DES encryption
Since 3DES is derived from DES, it’s best to introduce the earlier standard first.
The origins of DES encryption
In the seventies, the National Bureau of Standards (NBS—it has since been renamed NIST) was searching for an algorithm that it could use as a standard for encrypting sensitive yet unclassified government information.
The NBS accepted proposals for a standard that would fit its requirements, but none of the candidates from the original round were appropriate. It invited more submissions, and this time IBM sent through an algorithm that its team had developed. The submission was derived from the Lucifer cipher that Horst Feistel designed.
In 1975, the IBM algorithm was published by the NBS as the proposed Data Encryption Standard (DES). The public was invited to comment on the design, which attracted some criticism.
Prominent cryptographers such as Whitfield Diffie and Martin Hellman, designers of the Diffie-Hellman key exchange, claimed that the key length was too short and that the S-boxes had been changed from their initial design.
At the time, many in the cryptographic community thought that the NSA had sabotaged the project and weakened the algorithm so that it would be the only agency that could break DES.
When this was investigated by the United States Senate Select Committee on Intelligence (PDF), it was found that the:
NSA convinced IBM that a reduced key size was sufficient; indirectly assisted in the development of the S-box structures; and certified that the final DES algorithm was, to the best of their knowledge, free from any statistical or mathematical weakness.
The same report went on to say that the “NSA did not tamper with the design in any way.” This has been backed up by some former IBM staff who claimed that the DES algorithm was designed entirely by the IBM team.
The NSA’s own declassified documentation claims that the agency:
worked closely with IBM to strengthen the algorithm against all except brute-force attacks and to strengthen substitution tables…
Suspicions of NSA tampering were eased in the nineties once differential cryptanalysis was publicly discovered. When the much-maligned S-boxes were tested with the new technique, they were found to be more resistant to attack than if they had been chosen randomly.
This indicates that the IBM team had already known about the differential cryptanalysis in the seventies, with Steven Levy claiming that the NSA asked them to keep the technique secret in order to protect national security.
Famed cryptographer Bruce Schneier once quipped, “It took the academic community two decades to figure out that the NSA ‘tweaks’ actually improved the security of DES.”
Despite the initial questions about the algorithm’s security and the NSA’s involvement, the IBM algorithm went on to be approved as the Data Encryption Standard in 1976. It was published in 1977 and reaffirmed as the standard in 1983, 1988, and 1993.
The origins of 3DES
When linear cryptanalysis was first published in 1994, it started to raise questions about the security of the algorithm. In 1997, NIST announced that it was looking for an algorithm to replace DES. The need for a new algorithm was intensified as technology developed further and potential attacks grew stronger.
Various cracking attempts showed that it was less difficult to break the algorithm than previously thought. In 1998, distributed.net was able to crack DES in 39 days.
By the start of 1999, the Electronic Frontier Foundation’s Deep Crack had gotten the time down to a little over 22 hours. This signalled the end of DES since an attack of this nature was now within the reach of a well-resourced adversary.
The main issue was the small key space, and a new algorithm was sorely needed. This was a problem, because it would take several more years for NIST to settle on the algorithm which became the replacement standard, the Advanced Encryption Standard (AES).
While the cipher for AES was being decided upon, 3DES was proposed as a stopgap measure. It involves running the DES algorithm three times, with three separate keys. In 1999, DES was reaffirmed, but with 3DES as the ideal algorithm. Normal DES was only permitted in legacy applications.
3DES went on to become a widespread encryption algorithm, although its heavy use of resources and security limitations have led it to be replaced by AES in the majority of use cases.
Understanding the DES algorithm
Before we can talk about the details of 3DES, it’s important to understand the DES algorithm that it’s derived from. So let’s start right at the beginning.
We use encryption to turn our plaintext data into ciphertext, which is information that cannot be accessed by attackers (as long as we are using appropriate algorithms).
Encryption algorithms are essentially complex mathematical formulas. When it comes to encrypting something like “Let’s go to the beach”, many people get confused. After all, how can you apply math to things like letters and characters?
Encoding the text
The reality is that computers don’t deal in letters and characters. Instead, they work on a system of 1s and 0s known as binary. Each 1 or 0 is known as a bit, and a collection of eight of them is known as a byte.
You can either look it up manually or use an online converter to see that in binary, “Let’s go to the beach” becomes:
01001100 01100101 01110100 00100111 01110011 00100000 01100111 01101111 00100000 01110100 01101111 00100000 01110100 01101000 01100101 00100000 01100010 01100101 01100001 01100011 01101000
Blocks
When data is encrypted, it’s divided into separate blocks for processing. DES has a 64-bit block size, which essentially means that each block fits a mix of 64 ones and zeros. Our first block (the first 64 digits of the binary shown above) would be:
01001100 01100101 01110100 00100111 01110011 00100000 01100111 01101111
Our second would be:
00100000 01110100 01101111 00100000 01110100 01101000 01100101 00100000
And our final block would be:
01100010 01100101 01100001 01100011 01101000
Padding
You may have noticed that our third block is only 40 bits long. Before it can be encrypted, it needs to be build up to a 64-bit block size. This is done with padding, which involves adding extra information to a block in order to complete it. This can be done with a number of different schemes, and it can also serve to make encrypted information harder to crack
In the past, padding might include adding meaningless words to the end of a message that would otherwise start or end predictably. There are a variety of conventions for padding DES. Bit padding, for example, involves adding a single ‘1’ bit followed by as many ‘0’ bits are needed to reach the block boundary.
The DES key schedule
Encryption algorithms use keys to add in data that will alter the end result of the process. If DES only involved steps like permutation and S-boxes (permutation is explained below, while S-boxes are covered in the substitution section), all that an attacker would have to do is uncover the details of the algorithm, then do each of the steps in reverse to reveal the initial message.
Since most of our algorithms are widely known, this wouldn’t really add much security. Instead, secret keys are added to alter the output in a way that cannot be predicted just by knowing the algorithm (as long as a sufficiently complex algorithm is used).
The beginning: a single key
DES begins with a single key, which is used to make subkeys that are applied in each round. This is a 64-bit key, which is the same size as our blocks. Let’s say our key is:
01001010 10101101 11101000 10100101 01110001 01010100 10101001 11111010
Now, this key is in binary, which is the way that data is expressed when computers process it. When humans deal with keys, they will normally appear as a mix of characters, something like this:
kj329nf982bc9wn1
The first step: permute the key
In DES, the first step of deriving our round keys is to permute the key (move it around) according to the following table:
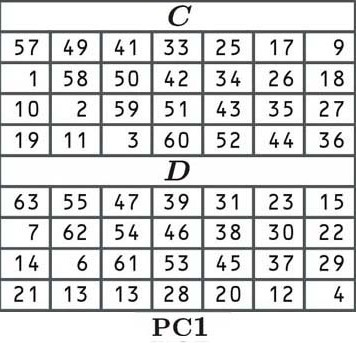
In permutation, each bit of our original key is shuffled to a new position as indicated by the table. Since the cell in the top left corner (of C) says 57, the first number of our permuted key will be the number in the 57th position of our old block:
01001010 10101101 11101000 10100101 01110001 01010100 10101001 11111010
The second cell says 49, which means that the second digit of our new key will be the number that is in the 49th position of our old block:
01001010 10101101 11101000 10100101 01110001 01010100 10101001 1111010
The third cell says 41, so we look for the digit at the 41st position:
01001010 10101101 11101000 10100101 01110001 01010100 10101001 1111010
So far, our key is made up of “110”.
The rest of the key is arranged in the same way, according to the values of the table. We move left to right, and once we get to the end of a row, we jump down to the next one, just like normal. Once table C is finished, we jump to table D to complete the second half of the key.
There’s no easy way to transpose our entire block according to the initial permutation table. You could do the whole thing manually, or write a script for it (or even get lucky and find one in the depths of the internet), but we are going to cheat and make it up:
1100010 1010010 1010101 0101010 1010000 1111001 0001011 1000111
You may be worried that we are making up some of the numbers in this guide, but the reality is that it doesn’t really matter. No one encrypts data manually anymore, it’s all done via programs. The most critical aspect of this tutorial is that you get a clear idea of the concepts that we are dealing with. The numbers themselves just serve to help you visualize what is going on.
Some readers may have noticed that the table (and now our key), only has 56 bits rather than 64. This is because every eighth bit is skipped. This is an artifact from the older days of technology, when it was important to have parity check bits, which verified whether the key had been received correctly. These parity check bits mean that in practice, DES only has the security of a 56-bit key.
The tables C and D give us a key that has two 28-bit halves. Sometimes, the halves are referred to as C and D, but throughout this article, we will refer to them as L and R, for left and right. Our left side is:
1100010 1010010 1010101 0101010
While our right is:
1010000 1111001 0001011 1000111
The second step: shifting the key to the left
The next step is to shift the key by either one or two spaces to the left, depending on the round. The exact number of spaces is decided on according to the following predetermined table:
| Round number | Number of left shifts |
|---|---|
| 1 | 1 |
| 2 | 1 |
| 3 | 2 |
| 4 | 2 |
| 5 | 2 |
| 6 | 2 |
| 7 | 2 |
| 8 | 2 |
| 9 | 1 |
| 10 | 2 |
| 11 | 2 |
| 12 | 2 |
| 13 | 2 |
| 14 | 2 |
| 15 | 2 |
| 16 | 1 |
So let’s take our left and right halves:
L 1010010 1010010 1010101 0101010
R 1010000 1111001 0001011 1000111
And shift both of them one position to the left, since the first round has a shift of 1 according to the table (the number on the left end gets moved to the right end).
First round subkey:
L 0100101 0100101 0101010 1010101
R 0100001 1110010 0010111 0001111
In the second round, the table also says 1, so this result will again be altered by moving each number one position to the left.
Second round subkey:
L 1001010 1001010 1010101 0101010
R 1000011 1100100 0101110 0011110
In the third round, the numbers will be moved two places to the left, because the table now says 2.
Third round subkey:
L 0101010 0101010 1010101 0101010
R 0001111 0010001 0111000 1111010
In the subsequent rounds, the numbers are moved to the left according to the distances specified in the table, with each shift being applied to the result of the previous round. In the end, this gives us sixteen different subkeys, one for each round of the DES process.
The third step: another permutation
The next step is another permutation according to the PC2 table shown below:
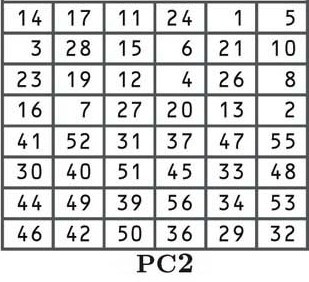
By now, you should be familiar with permutations, so we won’t go into the process in-depth. If you want to see how it works in more detail, refer to the explanation near the start of this section. Although the relocation positions are different, the process is the same.
Each of the 16 keys derived in the shifting process is now shuffled according to the table, with the number from the 14th position moved to the first place, the 17th to the second, the 11th to the third, etc.
If you look closely at the table, you will notice that there are only 48 bits, rather than the 56 bits that we previously had. This process is known as compression permutation.
You can also see that the top half of the table features numbers between one and 28, while the bottom half contains numbers from 29 to 56. This keeps the left and right halves of our subkeys separate, and it is indicated below by the larger space in the middle of the keys.
Again, we’re going to cheat and make up the numbers. Let’s say that this entire process gave us the following subkeys:
Round one: 010101 010101 101010 110100 101001 100101 101010 101010
Round two: 011010 110101 101110 110010 010100 110010 111101 101101
Round three: 010100 100110 110110 101010 100110 011000 101011 011001
Round four: 011001 110101 011001 110101 000011 001011 010101 010101
Round five: 110101 001101 010101 010101 010011 001011 010111 100101
Round six: 010111 110101 011001 111001 101001 100101 101010 101010
Round seven: 110101 111010 101110 101010 100110 010110 111011 001110
Round eight: 011001 110101 010101 001001 010011 001011 010100 101010
Round nine: 111011 011010 011110 100010 100010 010110 110011 110010
Round 10: 011010 010101 101110 101001 010010 010110 111000 101010
Round 11: 110101 001101 101110 101010 100101 100101 101010 001010
Round 12: 101001 100100 101001 101010 100110 011000 101011 011001
Round 13: 010010 010010 010101 010101 010110 110001 100101 101010
Round 14: 101001 100110 010101 011101 010001 001010 110010 111110
Round 15: 011001 011010 011001 110101 001001 011001 100101 101101
Round 16: 010010 100110 010101 010101 010001 101000 110010 111010
This shifting process results in each bit from the initial key being used in about 14 of the 16 subkeys, although some bits are used slightly more than others.
Initial permutation
Once the data has been divided into blocks and padded if necessary, it’s time to begin the DES encryption process.
We will get back to the subkeys that we just created at a later stage.
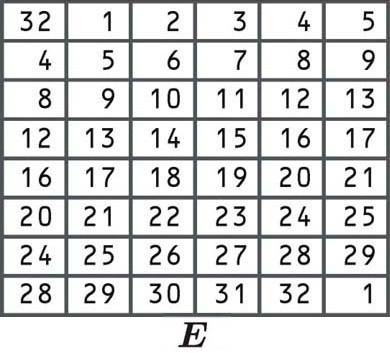
The first step is known as the initial permutation, where the data is rearranged according to the following table:
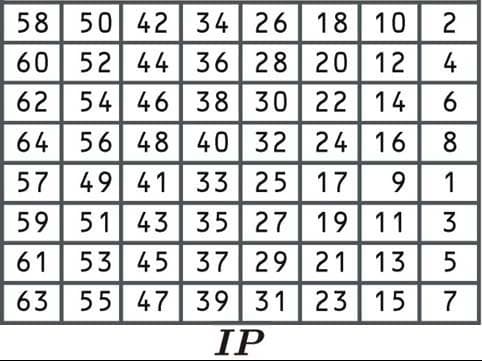
This initial permutation process doesn’t make the algorithm any more secure. This is because it doesn’t involve the input of any key, and can easily be reversed. The algorithm was originally designed this way because it made implementation easier in certain contexts.
Since we have covered permutations a couple of times, we’ll skip any major explanation here. Head back to the DES key schedule section if you need more information on how they work.
Let’s take the first block from the message “Let’s go to the beach”, which we derived in the Block section understanding the DES algorithm:
01001100 01100101 01110100 00100111 01110011 00100000 01100111 01101111
Since the first cell says 58, we would select the number from the 58th position:
01001100 01100101 01110100 00100111 01110011 00100000 01100111 01101111
Then we would take the number from the 50th position:
01001100 01100101 01110100 00100111 01110011 00100000 01100111 01101111
And the number from the 42nd position:
01001100 01100101 01110100 00100111 01110011 00100000 01100111 01101111
This gives us “110” so far. We will make up the rest of the number:
11010111 01001010 10101000 10011101 01001011 10110101 10000111 10101001
When the initial permutation is complete, the data is moved on to the next step.
Splitting the blocks
Once the data has undergone its initial permutation, it is split into two halves. We take our block that just underwent its initial permutation:
11010111 01001010 10101000 10011101 01001011 10110101 10000111 10101001
And we will separate it into two blocks, a left block (made up of the first 32 digits), known as L0:
L0 11010111 01001010 10101000 10011101
And a right block (made up of the second 32 digits), known as R0:
R0 01001011 10110101 10000111 10101001
The F function
Now that the block has been split, it’s time for the F function to take place. In the first round, it will only be applied to the right half of the block, while the left half is kept aside until later. The right side undergoes the following four steps as part of the F function:
- Expansion permutation (E in the diagram)
- Key mixing (⊕ in the diagram)
- Substitution (each S1, S2 etc. in the diagram)
- Permutation (P in the diagram)
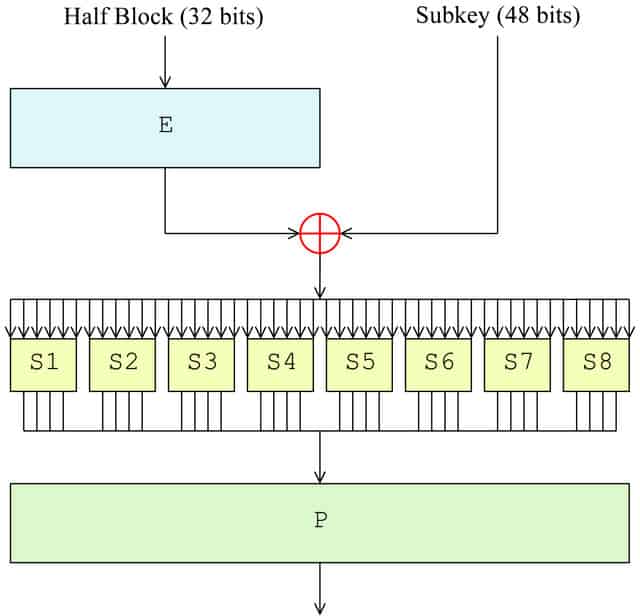
Expansion permutation
The expansion permutation accomplishes three things:
- The most important is that it allows single bits of input data to affect the output of two other bits, causing an avalanche effect
- It also makes the right half 48-bits, so that it is the same size as the subkey for the next step
- The other effect of the expansion permutation is that it makes the output longer than the input. This allows it to be compressed in the substitution operation
The bits are rearranged according to the following table. Some of the individual bits are in the table twice, which is how the block expanded from 32 to 48 bits:
Since the first cell says 32, we take our right block and select the number from the 32nd position, just like we did in the other examples of permutation listed above:
R0 01001011 10110101 10000111 10101001
We then take the numbers from the first position, the second position, and so on, right up until we get to the bottom right corner of the block. Since there is a 1 in this cell, the last digit will also be the number that appears in the first position of our block.
Let’s say that the expansion permutation gives us a new 48-bit block of:
101110 100110 100100 000000 001100 001110 101101 011110
Key mixing
Once the block has been expanded to 48 bits, it’s time to apply the first round’s subkey, which we derived in the DES key schedule section above. The block is modified by the subkey using the XOR cipher.
The XOR cipher is an addition cipher that follows a simple process, especially when compared to the other elements we have already discussed. It is a very common component of complex ciphers as it’s easy to implement and perfectly balanced.
In an XOR cipher:
0 + 0 = 0
1 + 0 = 1
1 + 1 = 0
So let’s say you have to XOR the following two numbers in binary:
1101
0101
Each digit would be added to the one below it. According to the three rules shown above, this gives a result of:
1000
To complete the key mixing step, we take the right side of our block that we just expanded to 48 bits, and the first round key. We then perform the XOR addition:
Block: 101110 100110 100100 000000 001100 001110 101101 011110
Round one key: 010101 010101 101010 110100 101001 100101 101010 101010
XOR result: 111011 110011 001110 110100 100101 101011 000111 110100
The result of the XOR operation is then passed on to the next round.
Substitution
Substitution adds confusion to data. It’s normally done with lookup tables, which are also known as substitution boxes or S-boxes. DES uses eight separate tables or S-boxes, a different one for every 6 bits of data. The following table shows the eight S-boxes of DES:
The eight separate S-boxes are used to translate each 6-bit input into a 4-bit output. The first step in the process is to take the digits at the beginning and end of a 6-bit segment, then convert that binary value to decimal.
Let’s take the data that we just finished XORing in the previous step:
111011 110011 001110 110100 100101 101011 000111 110100
We will look at the first 6-bit segment to show you how the substitution process works:
111011
Since the first number and last number are both 1, this gives us a value of 11. We then convert 11 from binary to decimal, which gives us 3. These are just equivalent values, written in different ways. Think of it as converting computer language to human language. You can check out the conversion for yourself with an online calculator if you want.
We then take the four middle digits of the first 6-bit segment:
111011
And convert them from binary to decimal. 1101 translates to number 13.
Now, we take these two numbers and look them up in the S1 table:
Our first number, 3, tells us to look in the third row, while our second number, 13 tells us to look in the 13th column. The value in the third row of the 13th column is 0.
Now that we have looked up our number in the table, we convert it back to a four-digit binary. Zero is normally written as 0 in binary, but 0000 is the same, and this is the format that is most suitable for our purposes.
Following this process, the S-box converts our first 6-bit section of data (111011) into a different 4-bit value (0000). It seems convoluted, but this technique helps to further obscure the relationship between the ciphertext and the plaintext that it is linked to.
The next 6-bit section of data then goes through the same process; but instead, it uses the S2 box shown above. The third section uses the S3 table and so on, up until the final section undergoes the substitution through the S8 table.
Again, we’re going to cheat for the rest of the values. Let’s say that the substitution boxes give us a result of:
0000 1010 1100 1001 0100 1001 0111 0001
Once each section of the data has gone through its S-box, it moves onto the next step.
Permutation
The last stage of the F function is another permutation, using the following table: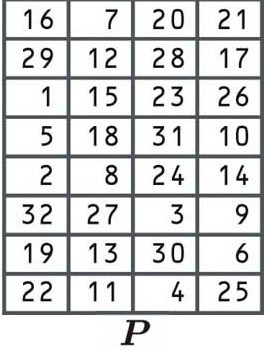
By now, you should have a decent understanding of how permutations shift digits from the old block to a different position in the new block, so we won’t go into it again.
Let’s say that this permutation takes our previous result:
0000 1010 1100 1001 0100 1001 0111 0001
And gives us an output of:
0101 0110 1001 0101 0010 0100 0101 0010
Now that the permutation has been completed, we have finished with the four steps of the F function in this round. In mathematical notation, this value is known as f(R0, K1). This means that the result is the function (f) of the initial right side of the block (R0) and the first round’s subkey (K1).
XOR with the left block
Remember how we split the block in half just before we began the steps of the F function? We set aside the left side of the block (L0), while the right side underwent each of these processes. Well, now it’s time for L0 to come back into action.
We take the right side that we have just processed f(R0, K1) and add it to the old left side (L0) using the XOR cipher. This gives us R1, the result of our first round:
f(R0, K1): 0101 0110 1001 0101 0010 0100 0101 0010
L0: 1101 0111 0100 1010 1010 1000 1001 1101
XOR result (R1): 1000 0001 1101 1111 1000 1100 1100 1111
Refer to the key mixing section above if you need a reminder of how the XOR cipher works.
15 more rounds…
If you’ve gotten this far, then DES probably seems like an arduous process. But it’s not even close to being finished yet. The data goes through the four steps of the F function, followed by the XOR, another 15 times, for a total of 16 rounds.
In the second round, we take the original, untouched version of the right side of the block (R0) and make it the new left side (L1). Meanwhile, we take the result of our first round and send it through the F function.
Everything happens the same as last time, however this time the subkey for round two is used instead. Let’s say that this process gives us a result of:
f(R1, K2): 1011 0111 1000 1011 1001 1101 1001 1110
We then XOR the result with L1, which is actually R0 (we derived this in the Splitting blocks section). This gives us the result of the second round, R2:
f(R1, K2): 1011 0111 1000 1011 1001 1101 1001 1110
L1: 0100 1011 1011 0101 1000 0111 1010 1001
R2: 1111 1100 0011 1110 0001 1010 0011 0111
This step can seem a bit confusing, but under the Feistel scheme, the old right side becomes the new left, while the result of the operation becomes the new right side.
The following diagram gives you a visual representation of what is happening. IP represents the initial permutation, F is a stand-in for the entire F function, the ⊕ symbolizes the XOR function and the arrows indicate each side of the block moving between left and right:
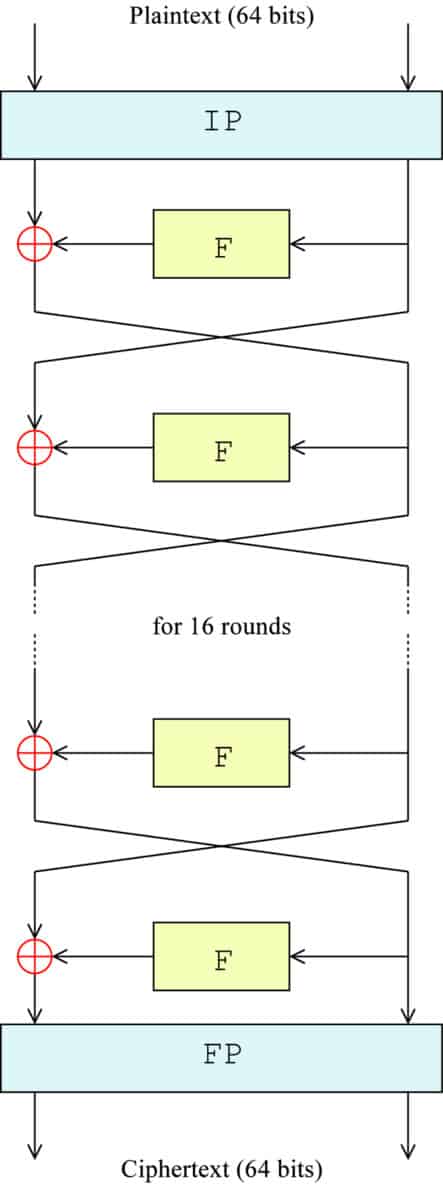
The exact formula for each step is:
Ln = Rn-1
Rn = Ln-1 + f(Rn-1,Kn)
Where:
L = The left half of the block (starting with L0 when the block was initially split)
R = The right half of the block (starting with R0 when the block was initially split)
n = The round number (beginning with 0, when the block was initially split)
f = The F function
Kn = The subkey for round n
According to the formula and the diagram, in the third round, R1 becomes the new left half (L2), while R2 is processed through the F function. Let’s say that it gives us a result of:
f(R2, K3) 1001 0111 0000 1011 1101 0111 1011 1011
We then calculate the result of our third round (R3), using the XOR cipher, just like before:
f(R2, K3): 1011 0111 1000 1011 1001 1101 1001 1110
L2: 0100 1011 1011 0101 1000 0111 1010 1001
R3: 1111 1100 0011 1110 0001 1010 0011 0111
The same process continues up until the fifteenth round, with the blocks switching over and the next subkey being used in each round. In the 16th and final round, the blocks are not switched over. Instead, they are combined to form a 64-bit block.
Refraining from swapping the blocks in this last stage allows the algorithm to be used for both encryption and decryption.
Let’s say that the final round gives us a result of:
1010 0101 0100 1011 1001 0001 0100 1000 0101 1010 1101 0001 1101 1001 1001 1101
Final permutation
This permutation is the inverse of the initial permutation, and again, it adds no extra security value. It rearranges the data according to the following table:
This permutation table works the same as the previous ones. Since it’s the final step of the encryption process, the result will be the ciphertext for the first block of “Let’s go to the beach”. Let’s say that the encrypted block is:
0100 1001 0011 0010 1001 0101 0111 0100 1011 1010 0111 0101 0111 1010 0101 0101
Now, if you wanted the real ciphertext for “Let’s go to the beach”, you could have just skipped the whole learning process and gone straight to an online DES encryption tool. If we enter our sentence alongside a key (let’s say kj329nf982bc9wn1) the tool gives us an encrypted text of:
U2FsdGVkX19Pienyu3w3q4zCd2IPKEPUWBzu3AeyVu2H3FeimZe6hA
If you want to, you can then convert the key and the ciphertext to binary and then compare how the first block’s ciphertext lines up with the entire process that has been outlined.
DES decryption
In DES, the decryption process is incredibly straightforward. The algorithm’s Feistel structure allows it to easily be reversed.
The process is run almost exactly the same to decrypt information. The only difference is that the subkeys are applied in reverse. This is an efficient setup, because it means that the same software and hardware can be used in both the encryption and decryption processes.
To decrypt the data, it first goes through an initial permutation, then the block is split and the right half goes through the F function. The difference is that in the first round of decryption, the 16th subkey is applied. Everything else proceeds as normal. Once the F function is complete, it is XORed with the left side of the block.
The blocks are switched over and the result goes through the same process for the second round, with the only exception that the 15th subkey is applied. This process continues up until the 16th round, when the 1st subkey is used.
Just like in the encryption process, the blocks aren’t swapped in the final stage, and then the data undergoes a final permutation. This finishes the decryption process, resulting in the original plaintext of the message.
3DES
As the security weaknesses of DES became more apparent, 3DES was proposed as a way of extending its key size without having to build an entirely new algorithm. Rather than using a single key as in DES, 3DES runs the DES algorithm three times, with three 56-bit keys:
- Key one is used to encrypt the plaintext.
- Key two is used to decrypt the text that had been encrypted by key one.
- Key three is used to encrypt the text that was decrypted by key two.
In each stage, the complete DES process is followed as outlined above.
Now, you may be wondering “How can applying decryption in the second step enhance security?”
The answer is that it uses a separate key. If the first key was also used to decrypt the data in the second step, then the data would be right back where it started.
However, since it uses a different key, the decryption process doesn’t actually serve to decrypt the data. It may seem logically perverse, but decrypting with a separate key only serves to jumble up the data even further.
Once the second key has “decrypted” the data, the third key is applied to encrypt it again. The result is the 3DES ciphertext.
3DES is structured this way because it allows implementations to be compatible with single key DES, two key DES, and three key DES (these are covered in the following section). This would not work if encryption was used in all three steps.
3DES keying options
Technically, 3DES can be implemented with three different key configurations. Despite this, the second and third options are insecure and should never be implemented.
- Keying option one – This option uses three independent keys and is the most secure
- Keying option two – In this configuration, the first and third keys are the same
- Keying option three – This uses three identical keys. When identical keys are used, the decryption process in the second stage cancels out the first encryption, leaving only the final encryption to alter the data. This makes the result the same as ordinary DES
The 3DES process: Keying option one
Let’s be honest, the entirety of the 3DES process can make your head spin, especially if you are new to cryptography. To help it sink in, here’s a brief summary of the entire encryption scheme of the 3DES algorithm:
The plaintext enters the 3DES algorithm and is first encrypted with key one in the following steps:
-
-
Key schedule – the 16 subkeys are derived from key one
-
Initial permutation
-
The block is split into left and right halves
-
-
-
-
The right half is sent through the F function
-
Expansion permutation
-
XOR with the subkey for the round
-
Substitution
-
Permutation
-
-
XOR the result of the F function with the left side
-
Make the old right side the new left side, and the result the new right side
Repeat the above steps 14 times
-
-
-
-
-
The right half is sent through the F function
-
Expansion permutation
-
XOR with the subkey for the 16th round
-
Substitution
-
Permutation
-
-
XOR the result of the F function with the left side
-
Combine the left and right sides of the block together
-
-
-
-
Final permutation
-
Take the text that has been encrypted with key one, then send it through the “decryption” process with key two:
-
-
Key schedule – the 16 subkeys are derived from key two
-
Initial permutation
-
The block is split into left and right halves
-
-
-
-
The right half is sent through the F function
-
Expansion permutation
-
XOR with the subkey for the round (starting from the 16th subkey for decryption)
-
Substitution
-
Permutation
-
-
XOR the result of the F function with the left side
-
Make the old right side the new left side, and the result the new right side
Repeat the above steps 14 times
-
-
-
-
-
The right half is sent through the F function
-
Expansion permutation
-
XOR with the subkey for the first round
-
Substitution
-
Permutation
-
-
XOR the result of the F function with the left side
- Combine the left and right sides of the block together
-
- Final permutation
-
Take the data that has been “decrypted” by key two, then send it through the encryption process with key three:
-
-
Key schedule – the 16 subkeys are derived from key three
-
Initial permutation
-
The block is split into left and right halves
-
-
-
-
The right half is sent through the F function
-
Expansion permutation
-
XOR with the subkey for the round
-
Substitution
-
Permutation
-
-
XOR the result of the F function with the left side
-
Make the old right side the new left side, and the result the new right side
Repeat the above steps 14 times
-
-
-
-
-
The right half is sent through the F function
-
Expansion permutation
-
XOR with the subkey for the 16th round
-
Substitution
-
Permutation
-
-
XOR the result of the F function with the left side
-
Combine the left and right sides of the block together
-
-
-
-
Final permutation
-
The result is the 3DES ciphertext.
The security of 3DES
The security of 3DES depends on which keying option is being used. Keying option one involves three different 56-bit keys, which gives it a total key length of 168 bits. The effective length is reduced considerably by meet-in-the-middle attacks, which bring its real-world security down to 112 bits.
Meet-in-the-middle attacks are useful against encryption schemes that repeat the same algorithm several times. The technique stores the immediate values from each encryption stage, then uses this information to radically improve the time that it would take to brute force the algorithm.
Options two and three have significantly smaller keys and are vulnerable to both known-plaintext, and chosen-plaintext attacks, as well as others.
Known-plaintext attacks are possible when an adversary has access to both the plaintext and ciphertext of a message. If an algorithm is susceptible to these attacks, the attacker can use this information to deduce the key, which allows them to crack all of the other data that has been encrypted by the same key.
A chosen-plaintext attack is similar, but it involves the attacker uncovering the key by comparing ciphertexts to arbitrary plaintexts.
Because of these vulnerabilities and the overall small key-sizes involved, keying options two and three are insecure and should not be implemented.
Is 3DES safe?
Since 3DES is being deprecated — and disallowed from 2024 — it’s best to use other algorithms. While keying option one is still considered secure for many applications, there aren’t many good reasons for why it should be used instead of an alternative like AES.
Although 3DES holds an important place in cryptography as the follow-up to DES, its glory years are over and it’s time to move on. If you want to secure your systems well into the future — or at least until quantum computing comes of age — you should be use one of the more up-to-date algorithms.
Alternative forms of encryption algorithm
As mentioned, there are other, stronger types of encryption algorithm to consider. Let’s take a look at three of the most secure ones.
AES-256 encryption
This type of encryption algorithm is virtually uncrackable. No amount of current computing power can effectively deliver a brute-force attack that would crack a password protected by this kind of encryption. The US government uses AES-256 encryption to protect classified documents. If a password manager or other piece of software uses this too, you can feel assured that your data will be safe.
XChaCha20 encryption
Some of the biggest tech corporations, such as Google and Cloudflare, use this as an alternative to AES-256. XChaCha20 — a variant of ChaCha20 — is a stream cipher. It involves combining plaintext digits with a pseudorandom cipher digit stream. The benefits of XChaCha20 include faster implementation and no hardware requirements.
Related: Common encryption types explained
Loved the way you explained each and every bit.
Below “3DES” section the following (third) bullet point has a mistake:
– Key three is used to encrypt the text that was decrypted by key three.
The last part of the statement should refer to “key two”, and not key three. Key two is used for decryption.
Thanks for pointing that out Phil, sometimes a few of those little mistakes slip through. I’ll fix it now so that it doesn’t confuse readers in the future.
Under the section “Initial permutation” you have listed the “E” table, not the “IP” table, therefore your table does not match your text under this section where you talk about the “IP” table.
Thanks for catching that Lee, I must have made a mistake when I was uploading the pictures. It’s been replaced with the correct table now.