OPNsense and pfSense have the bulk of their functionality in common. They’re both based on FreeBSD, and OPNsense is actually a fork of pfSense. So, it makes sense that they should have so many similarities.
Both pfSense and OPNsense support caching proxies with URL list filtering and that’s exactly what Squid (and SquidGuard, in pfSense’s case) does. Squid is able to cache content as you go about your business on the internet, and once content is cached, it can be served locally, which is faster and consumes less bandwidth. With its URL list filtering capabilities, it can also be used to filter out ads, malware, and other categories of content based on your selection. We’re going to explain how to configure both.
If you’ve recently switched from pfSense to OPNsense – and many have since Netgate started developing and prioritizing the partially proprietary pfSense Plus alongside the fully open-source pfSense CE – you may be wondering how to replicate the functionality you relied on in pfSense in OPNsense. That’s where this guide comes in.
In this guide, we explain how to reproduce pfSense’s Squid and SquidGuard functionality in OPNsense.
What is a proxy server?
A proxy server essentially acts as a middleman between your device, such as a laptop, tablet, or smartphone, and the website or online service you are trying to access. Your in-transit data first goes through the proxy server before reaching its ultimate destination.
Proxy servers are helpful for a variety of reasons. One of the benefits of using a proxy server is that it can cache content, meaning it will save some remote content locally. The next time a client requests the cached content, it will be served locally instead of being downloaded from the internet. It’s like having a shortcut to frequently visited websites, saving you time and speeding up your browsing experience.
Proxies can perform content filtering. Content filtering means restricting access to specific domains or IP addresses. For example, organizations that block access to social media sites are engaged in content filtering.
Content filtering also allows you to block online ads. Ads are not only annoying, but they also infringe on your privacy, use up your internet data, and can even carry dangerous malware. It’s entirely reasonable to want to eliminate them. And we’re going to show you how to do just that by replicating pfSense’s Squid and SquidGuard functionality in OPNsense. It’s actually somewhat simpler to configure in OPNsense because Squid Proxy is included in OPNsense’s base install, and the SquidGuard functionality (URL list-based blocking) is baked into OPNsense’s version of Squid.
This guide assumes you have OPNsense set up with configured WAN and LAN interfaces. We’re also assuming that you can access the GUI. Also, as we go through this tutorial, we’ll focus only on the necessary sub-menus rather than reviewing every single one. Any settings not explicitly mentioned should be kept at their default values.
Squid configuration
General Proxy Settings
Because Squid is included in OPNsense’s base install, there’s no need to install any plugins. We can start configuring our proxy server straight out of the box.
- From the side menus, go to Services > Web Proxy > Administration. This takes you to the Web Proxy Administration page.
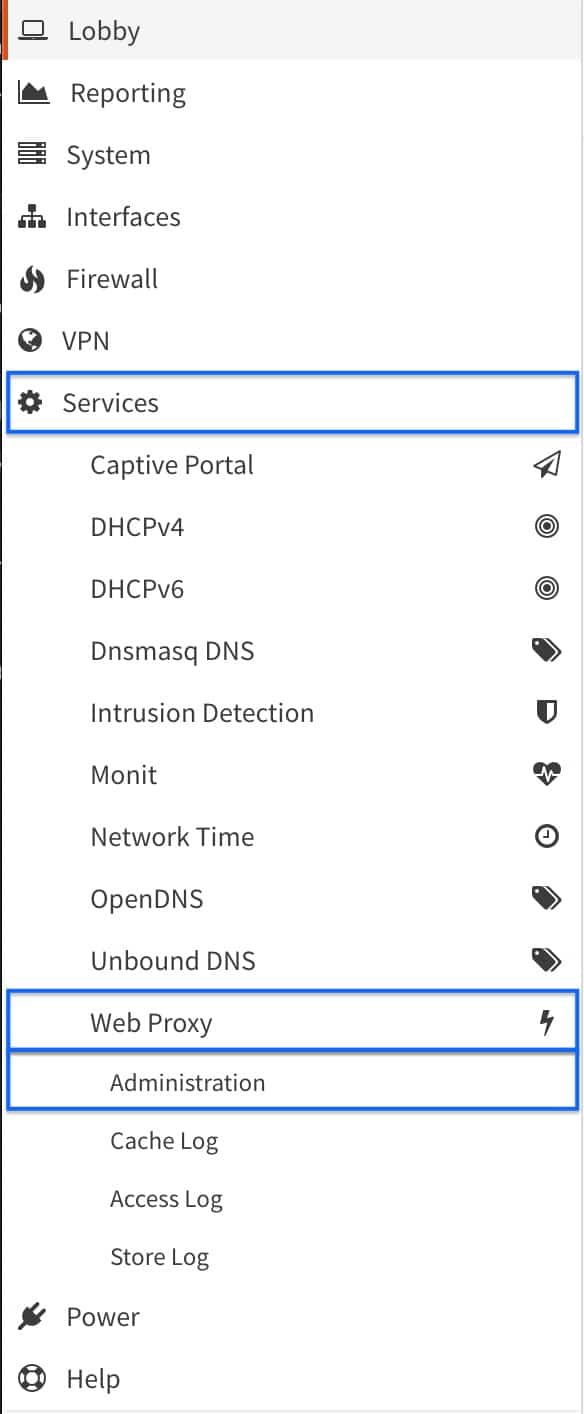
- We’ll start by clicking the advanced mode switch on the top left. This will display all of the settings available on this page.
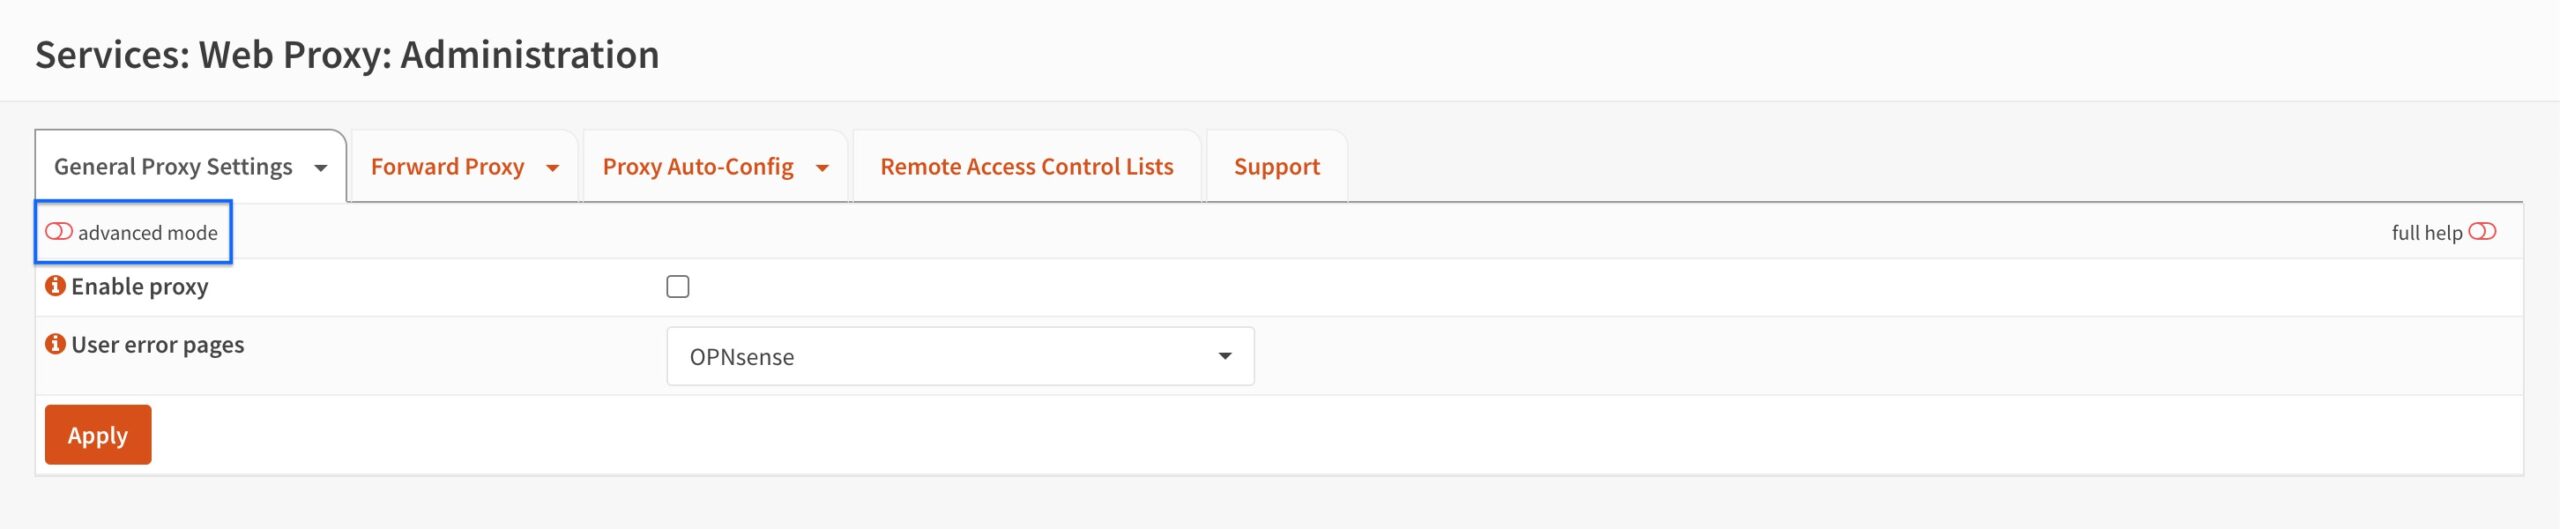
- Tick the Enable proxy box.
- Untick the Use via header box (for privacy).
- Select Remove forward header (delete) from the X-Forwarded-For header handling drop-down menu.
- Click Apply.

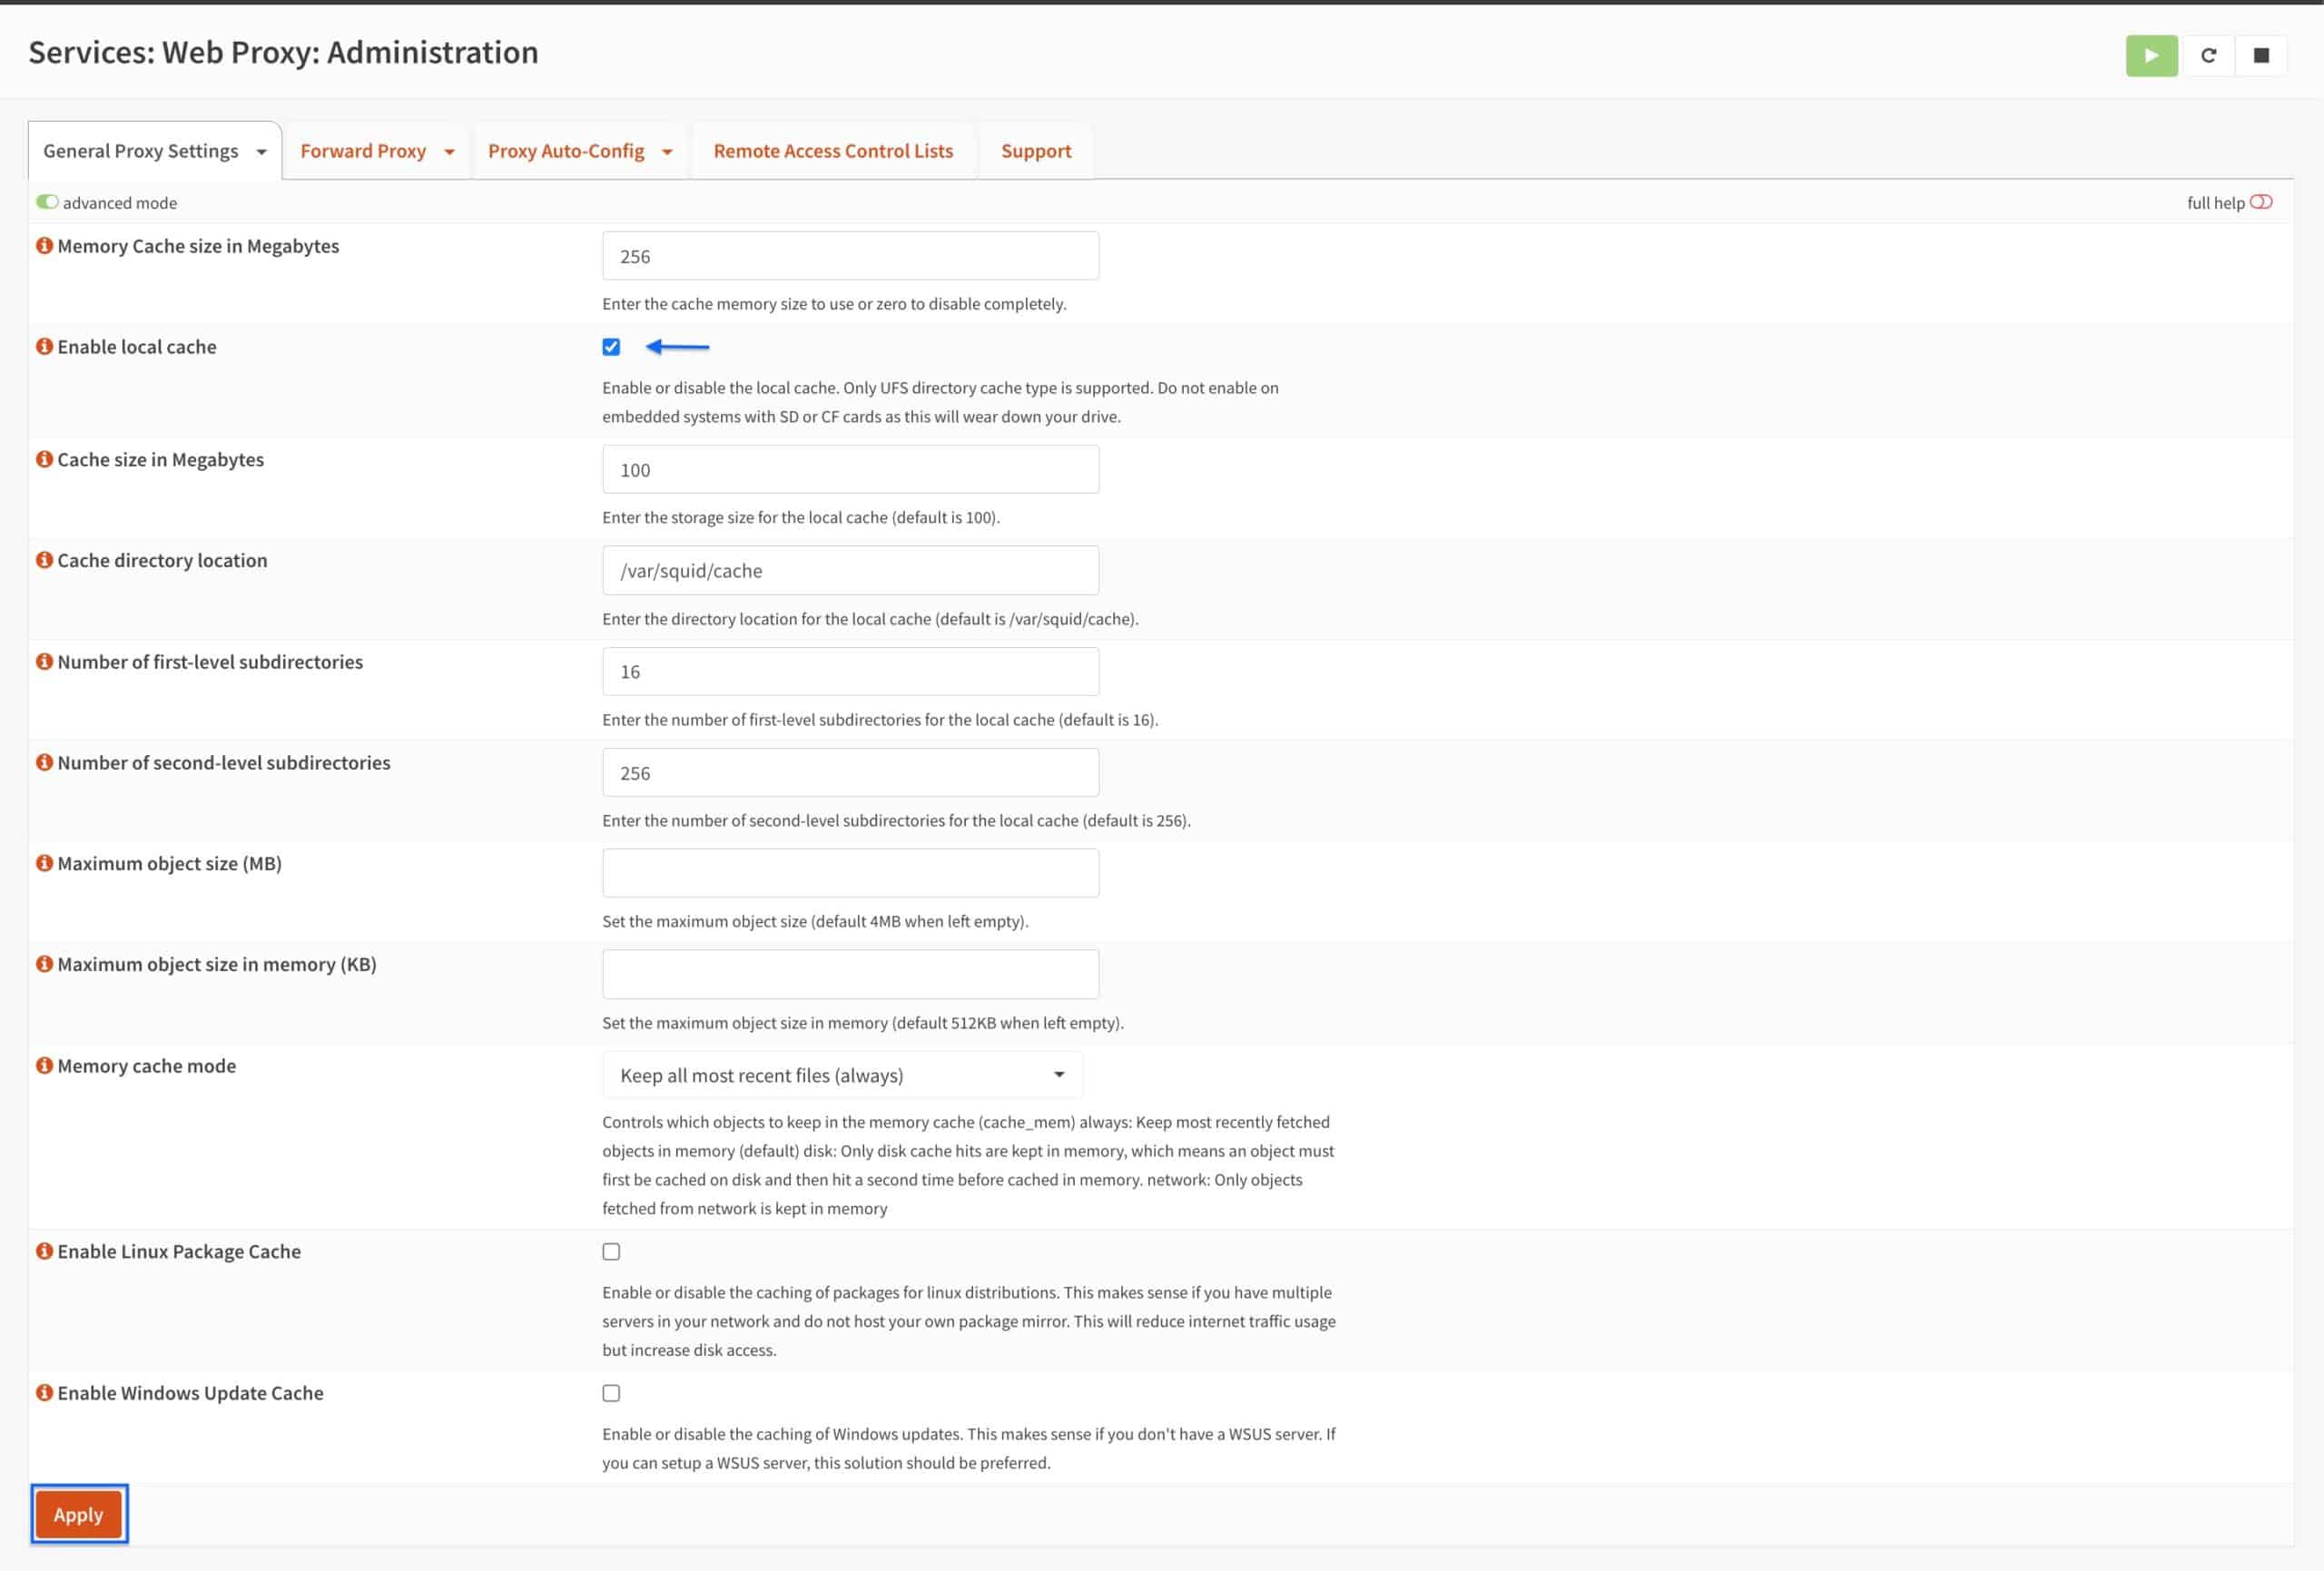
Local Cache Settings
- Select Local Cache Settings from the General Proxy Settings tab drop-down menu. The Local Cache Settings page is displayed.
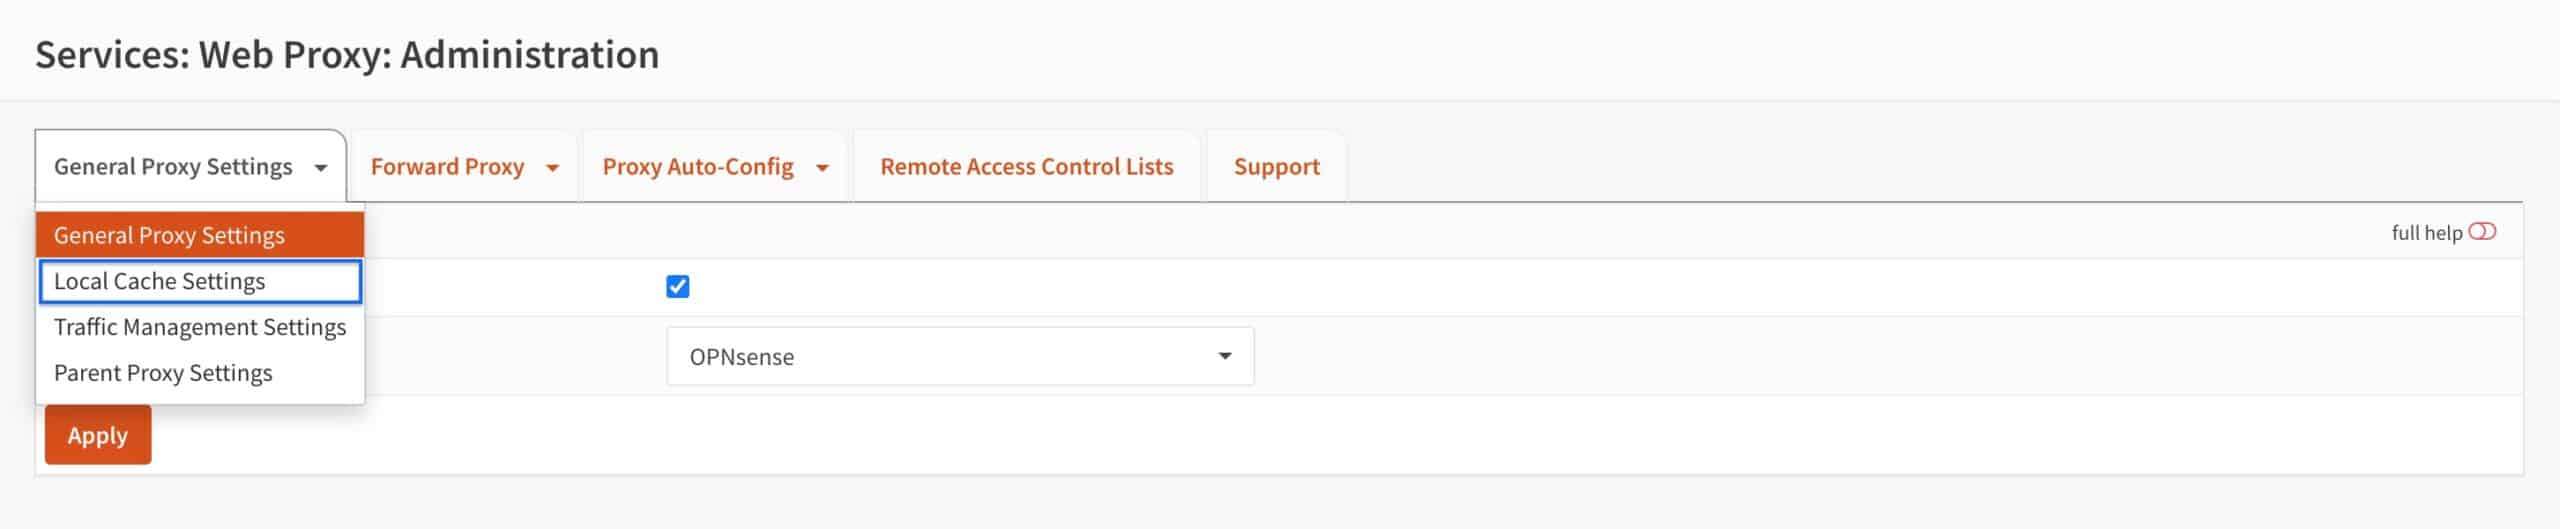
- Tick the Enable local cache box.
- Click Apply.
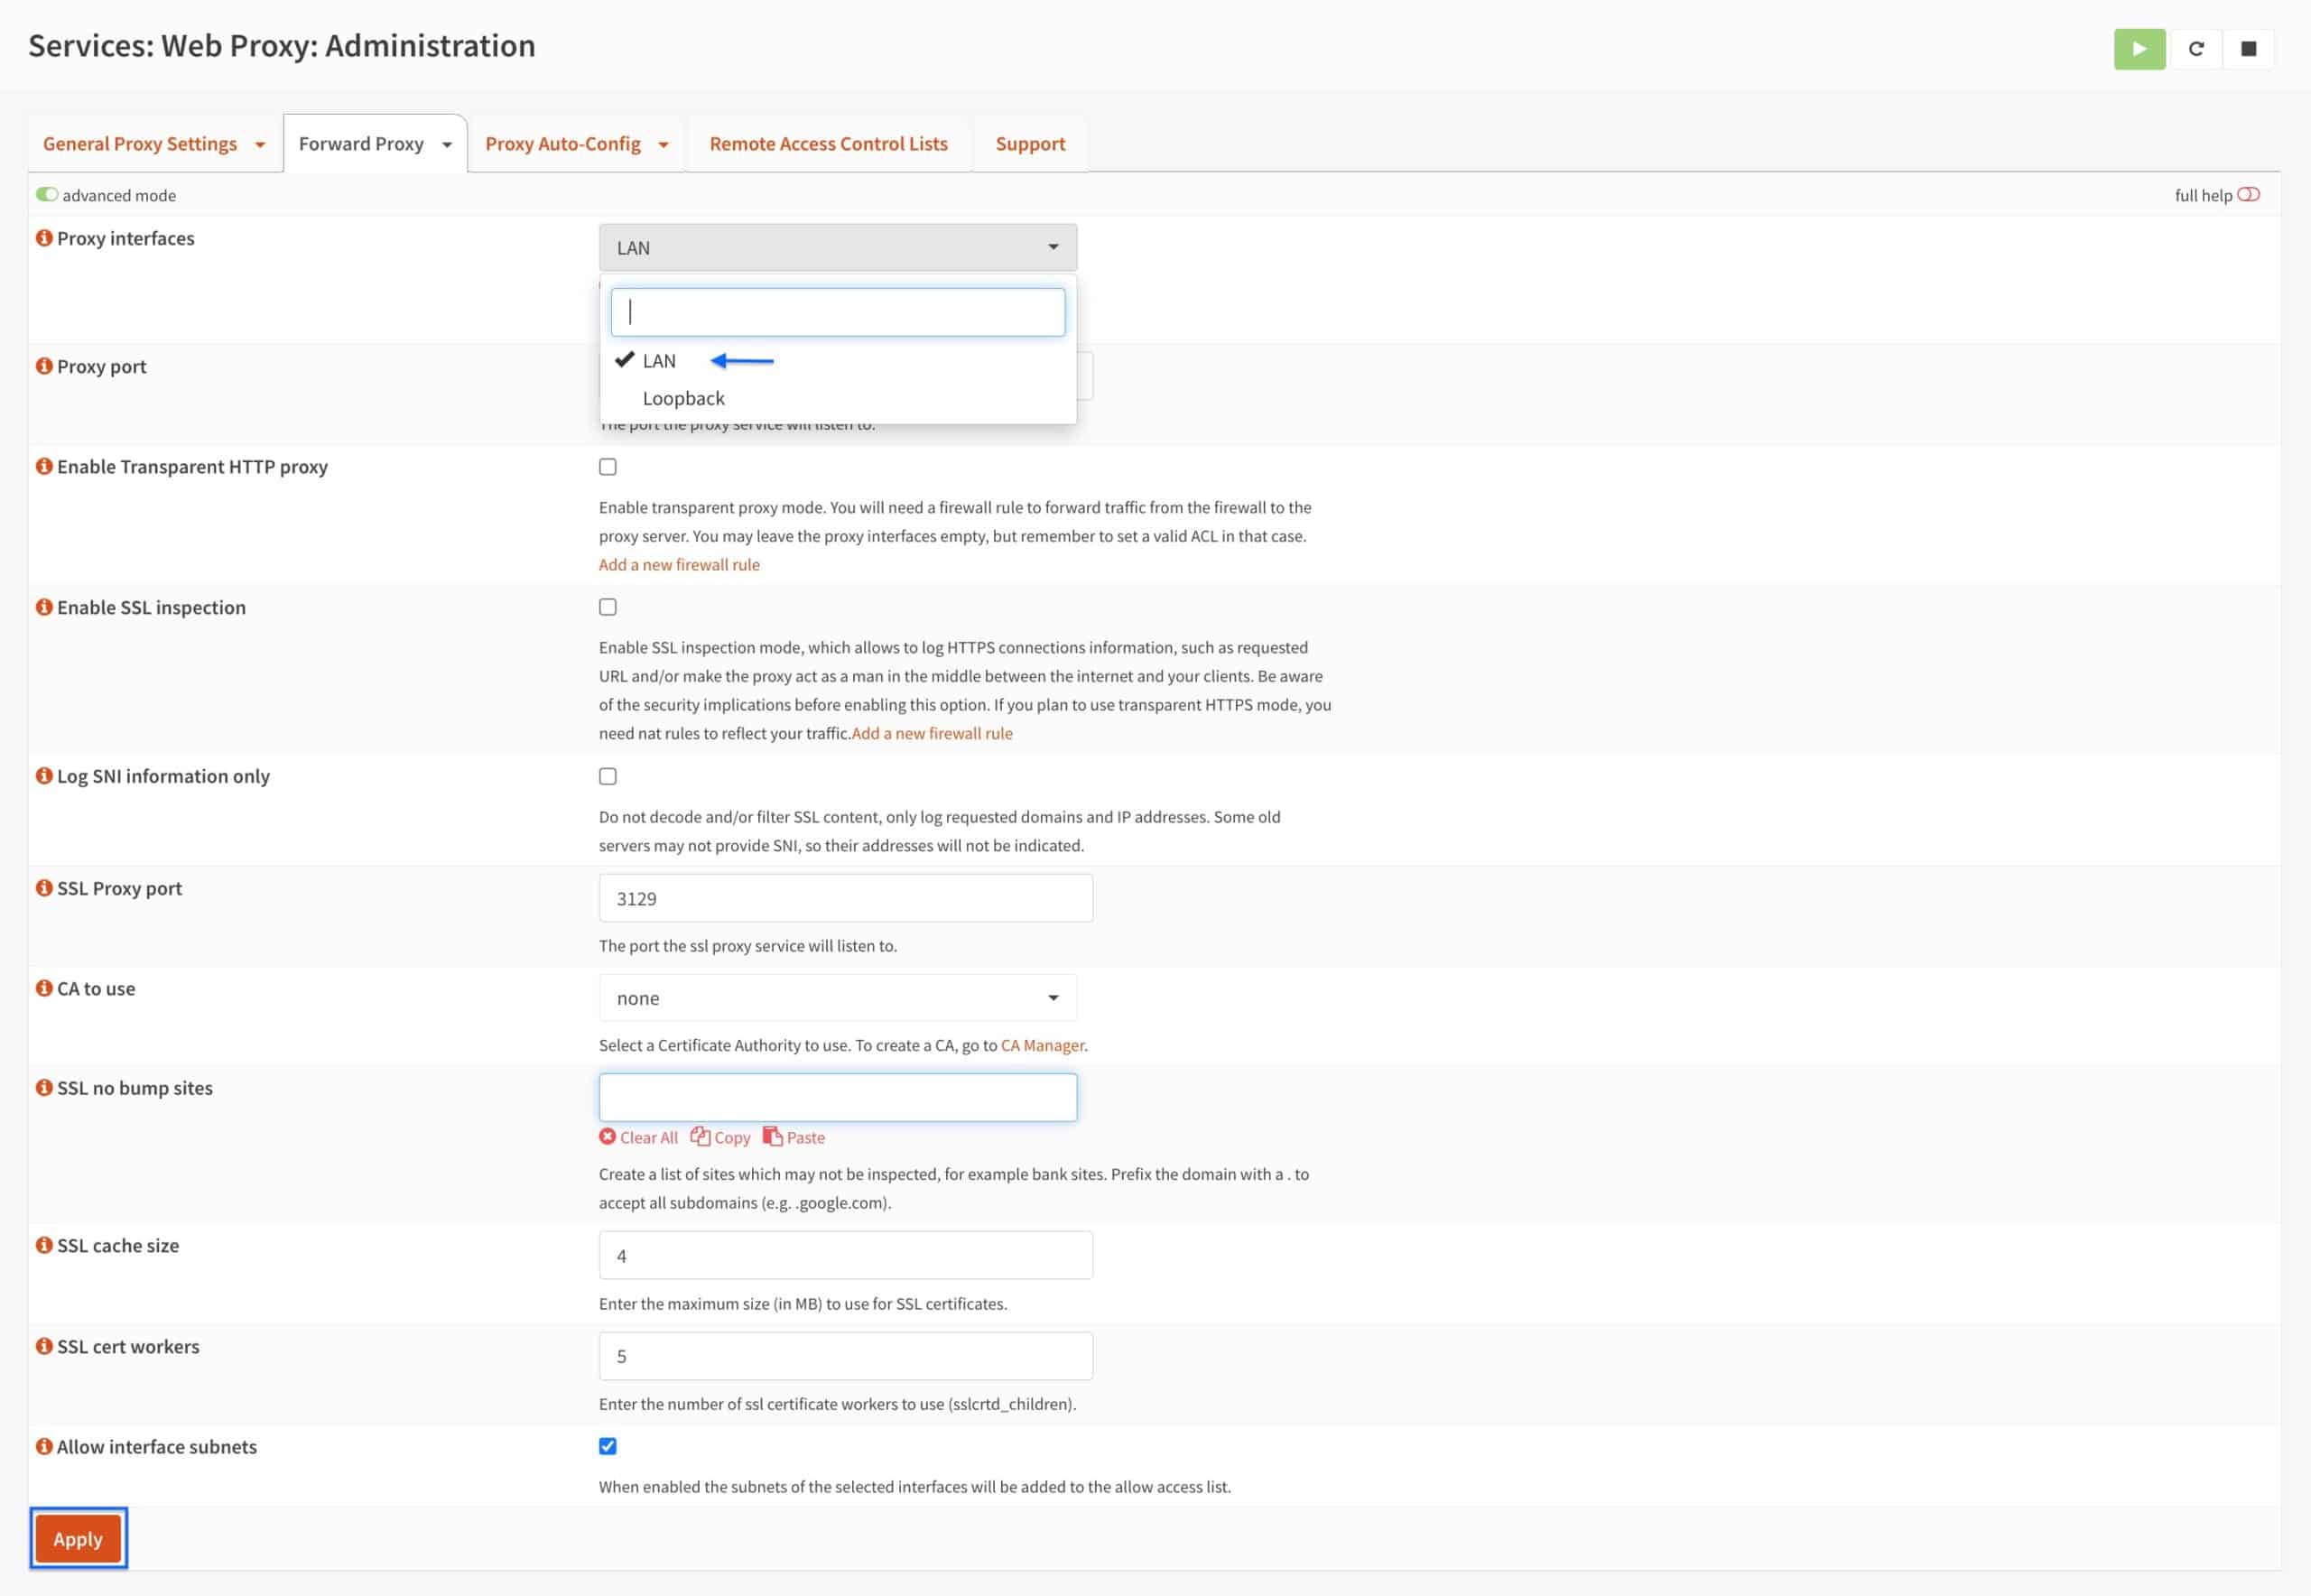
Forward Proxy
- Select the Forward Proxy tab. The General Forward Settings page is displayed.

- From the Proxy Interfaces drop-down menu, select LAN (and any other LAN-type interfaces you want to proxy).
- Click Apply.
There are two settings on this page that we won’t be enabling, but that are still worth mentioning in the context of setting up a proxy server.
Enable Transparent HTTP proxy
Proxy servers can operate in two ways: transparent and explicit. Transparent mode requires no configuration on your clients. Their traffic will be proxied transparently. However, this mode is only capable of proxying HTTP traffic over port 80 and not HTTPS traffic unless Man In the Middle SSL filtering is configured. We’ll discuss that further down.
Explicit mode, on the other hand, requires you to configure each of your clients to request access to the proxy. In Explicit mode, all TCP traffic is proxied, whether HTTP or HTTPS. This is the mode that we will be using in this guide since it provides a more comprehensive solution. While both modes can be enabled without any issues, transparent mode has limited scope for ad-blocking due to the widespread use of HTTPS on the web today. But transparent mode is still useful for caching.
Enable SSL Inspection
While it’s possible to transparently proxy HTTPS connections using Squid, I don’t recommend it. To do so, you would need to break HTTPS. Squid can replace a website’s SSL certificate with its own. It does this by decrypting the connection and re-encrypting it using its own certificate. This will effectively enable you to filter SSL connections, but the HTTPS validation that’s meant to happen in your browser will be broken.
We won’t be enabling SSL inspection in this tutorial.
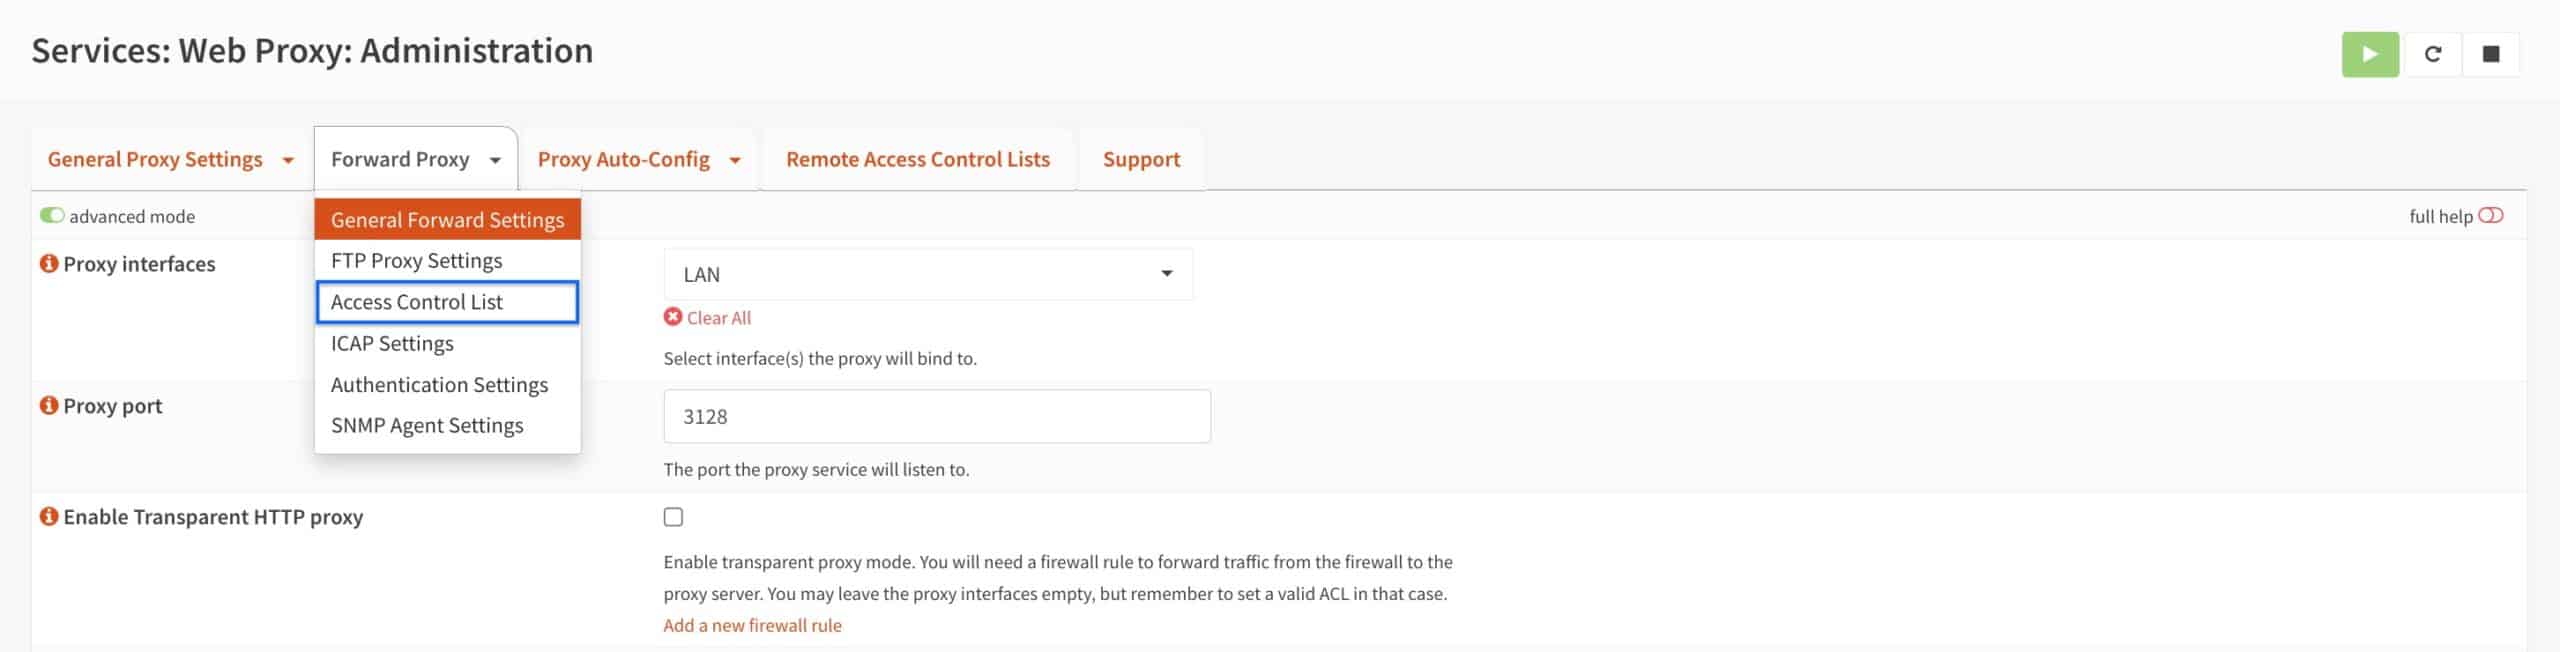
Access Control List
Squid is now configured. Our config is very basic at this stage, but Squid is enabled and working. It’s only configured for caching. Before we configure Squid for URL-list-based filtering (SquidGuard), we’ll need to give Squid domains to block. This is done from the Access Control List page.
- From the Forward Proxy tab drop-down menu, select Access Control List. The Access Control List page is displayed.
- The Access Control List page hosts multiple boxes in which we can define what to filter out. We will look at each one before configuring our own access control settings.
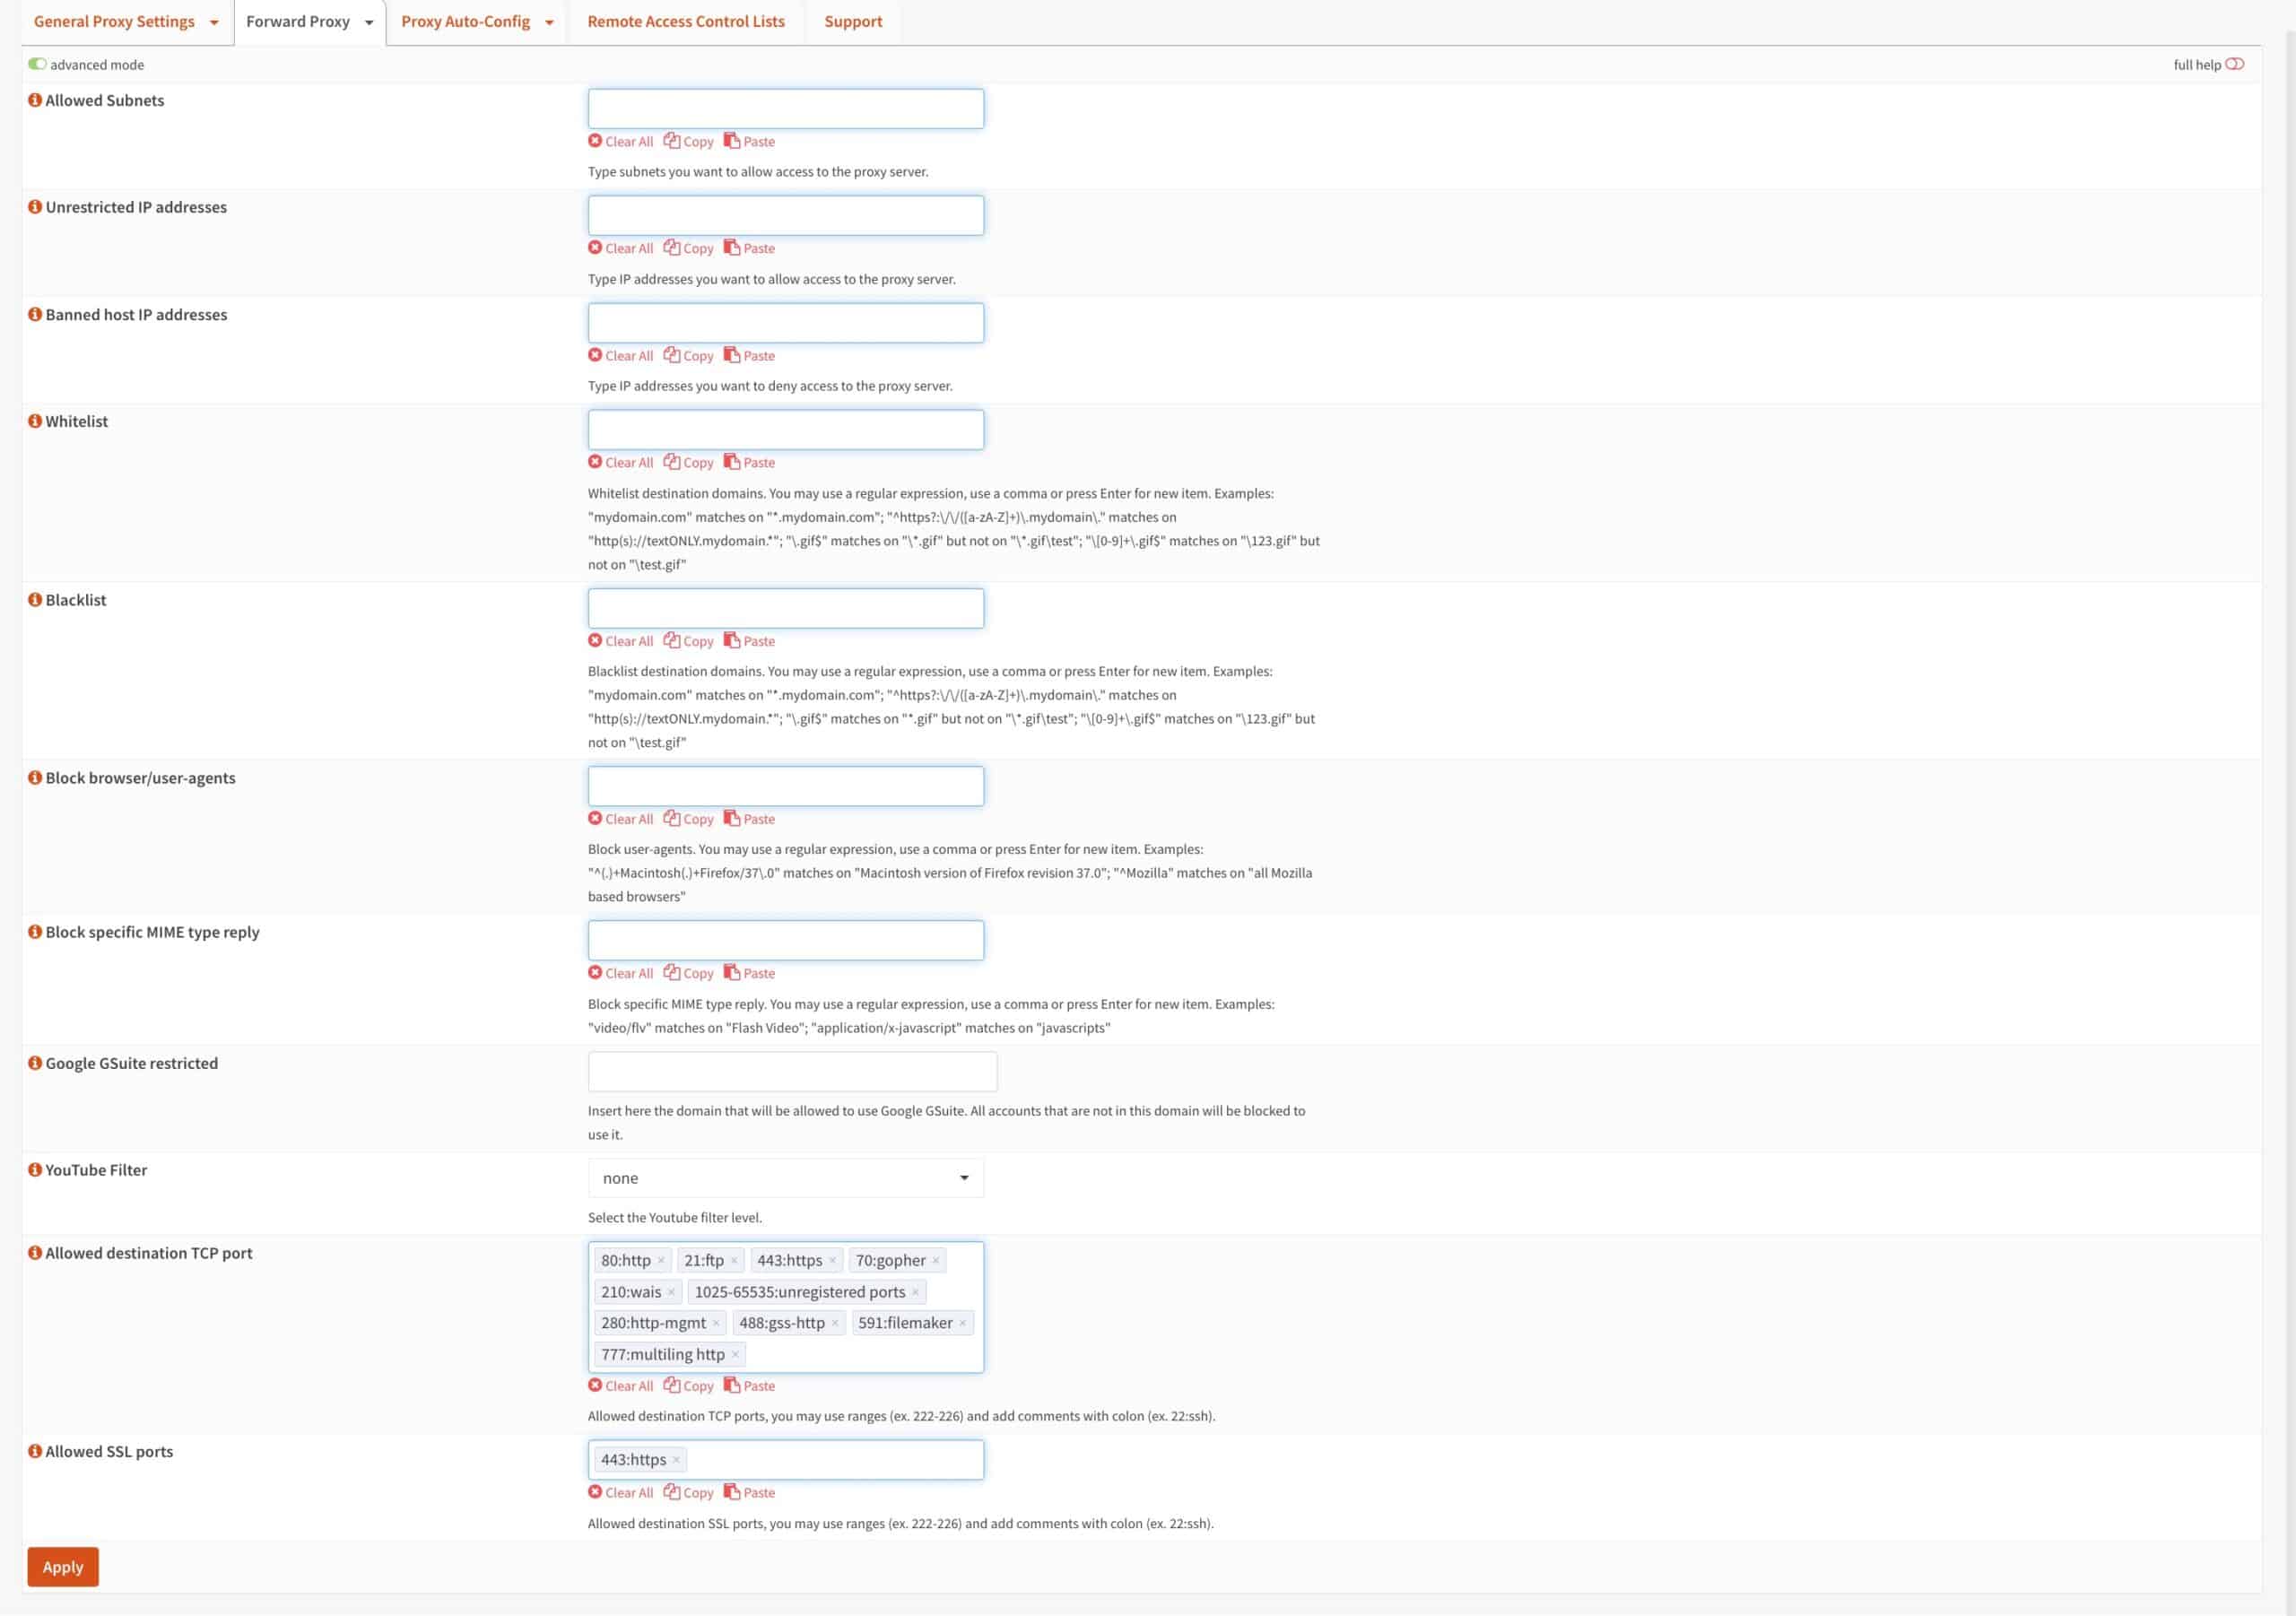
Allowed Subnets
The Allowed Subnets box enables you to provide additional subnets with access to the Squid proxy. This is particularly useful for subnets that are present on your system but that may not have a dedicated interface, such as IPsec, making their selection impossible on the General tab. We won’t be adding anything here.
Unrestricted IP addresses
You can enter IP addresses in this box, and those IPs will bypass the proxy server even if their subnets are configured to use the proxy.
Banned host IP addresses
You can enter IP addresses in this box, and they will be banned from using the proxy server even if their subnets are allowed.
Whitelist
You can add domains to the Whitelist box, making them available to all hosts that are authorized to use the proxy. Entries in the Whitelist override any Blacklist entries.
Blacklist
Adding domains to the Blacklist box will render those domains inaccessible to all hosts that are authorized to use the proxy.
Block browser/user-agents
This box is particularly useful for preventing certain applications from accessing the internet. Whenever an application sends a request out to the internet, the request includes a field called the user agent. This field identifies the specific application being used. For instance, the user agent for Google Chrome is simply “Chrome.”
User agents were originally developed to identify the different web browsers making requests to a web server. The server properly formats the data for that particular browser. Later, user agents were generalized to practically any app making web requests.
Blocking a user agent in Squid is simple. You just need to prefix the user agent string with “^” (without the quotes).
For example, entering ^Chrome in Squid’s Block User Agent box will disallow Google Chrome from accessing the internet. Entering ^Mozilla will block Firefox from accessing the internet, etc.
Bear in mind that user agents are very specific and may not be as simple as the examples listed above. You should make sure to have the exact user agent you want to block to avoid blocking unintended traffic.
Block specific MIME type reply
MIME or Multipurpose Internet Mail Extensions are used to define file types that are included in URLs. MIME types follow a type/subtype structure, where the type is the general category and the subtype is the specific type. Examples will make this clearer.
If we add audio/mpeg to the Block MIME Types, we will be blocking the download of mp3 files. Were we to add image/png to the Block MIME Types box, we would be blocking the download of png images.
Like user agents, MIME types are very specific. Make sure to enter the exact type and subtype for the filtering to work properly in Squid.
Google GSuite restricted
You can use this field to restrict GSuite access to accounts within the specified domain.
YouTube filter
You can enable YouTube filtering from this drop-down menu. The options are none, Strict, or Moderate.
Allowed destination TCP port
You can define a list of allowed outgoing TCP ports. Traffic destined for ports outside this list will not be allowed through the proxy.
Allowed SSL ports
You can define a list of allowed outgoing SSL ports. Traffic destined for ports outside this list will not be allowed through the proxy.
Testing Squid
Blacklisting an entry
To test our Squid installation and make sure everything is working correctly before moving on to the next steps, we’re going to enter a domain in the Blacklist box. If we set things up correctly, Squid should block any attempts to access that domain.
- On the Access Control List page, enter facebook.com in the Blacklist box and click Apply.
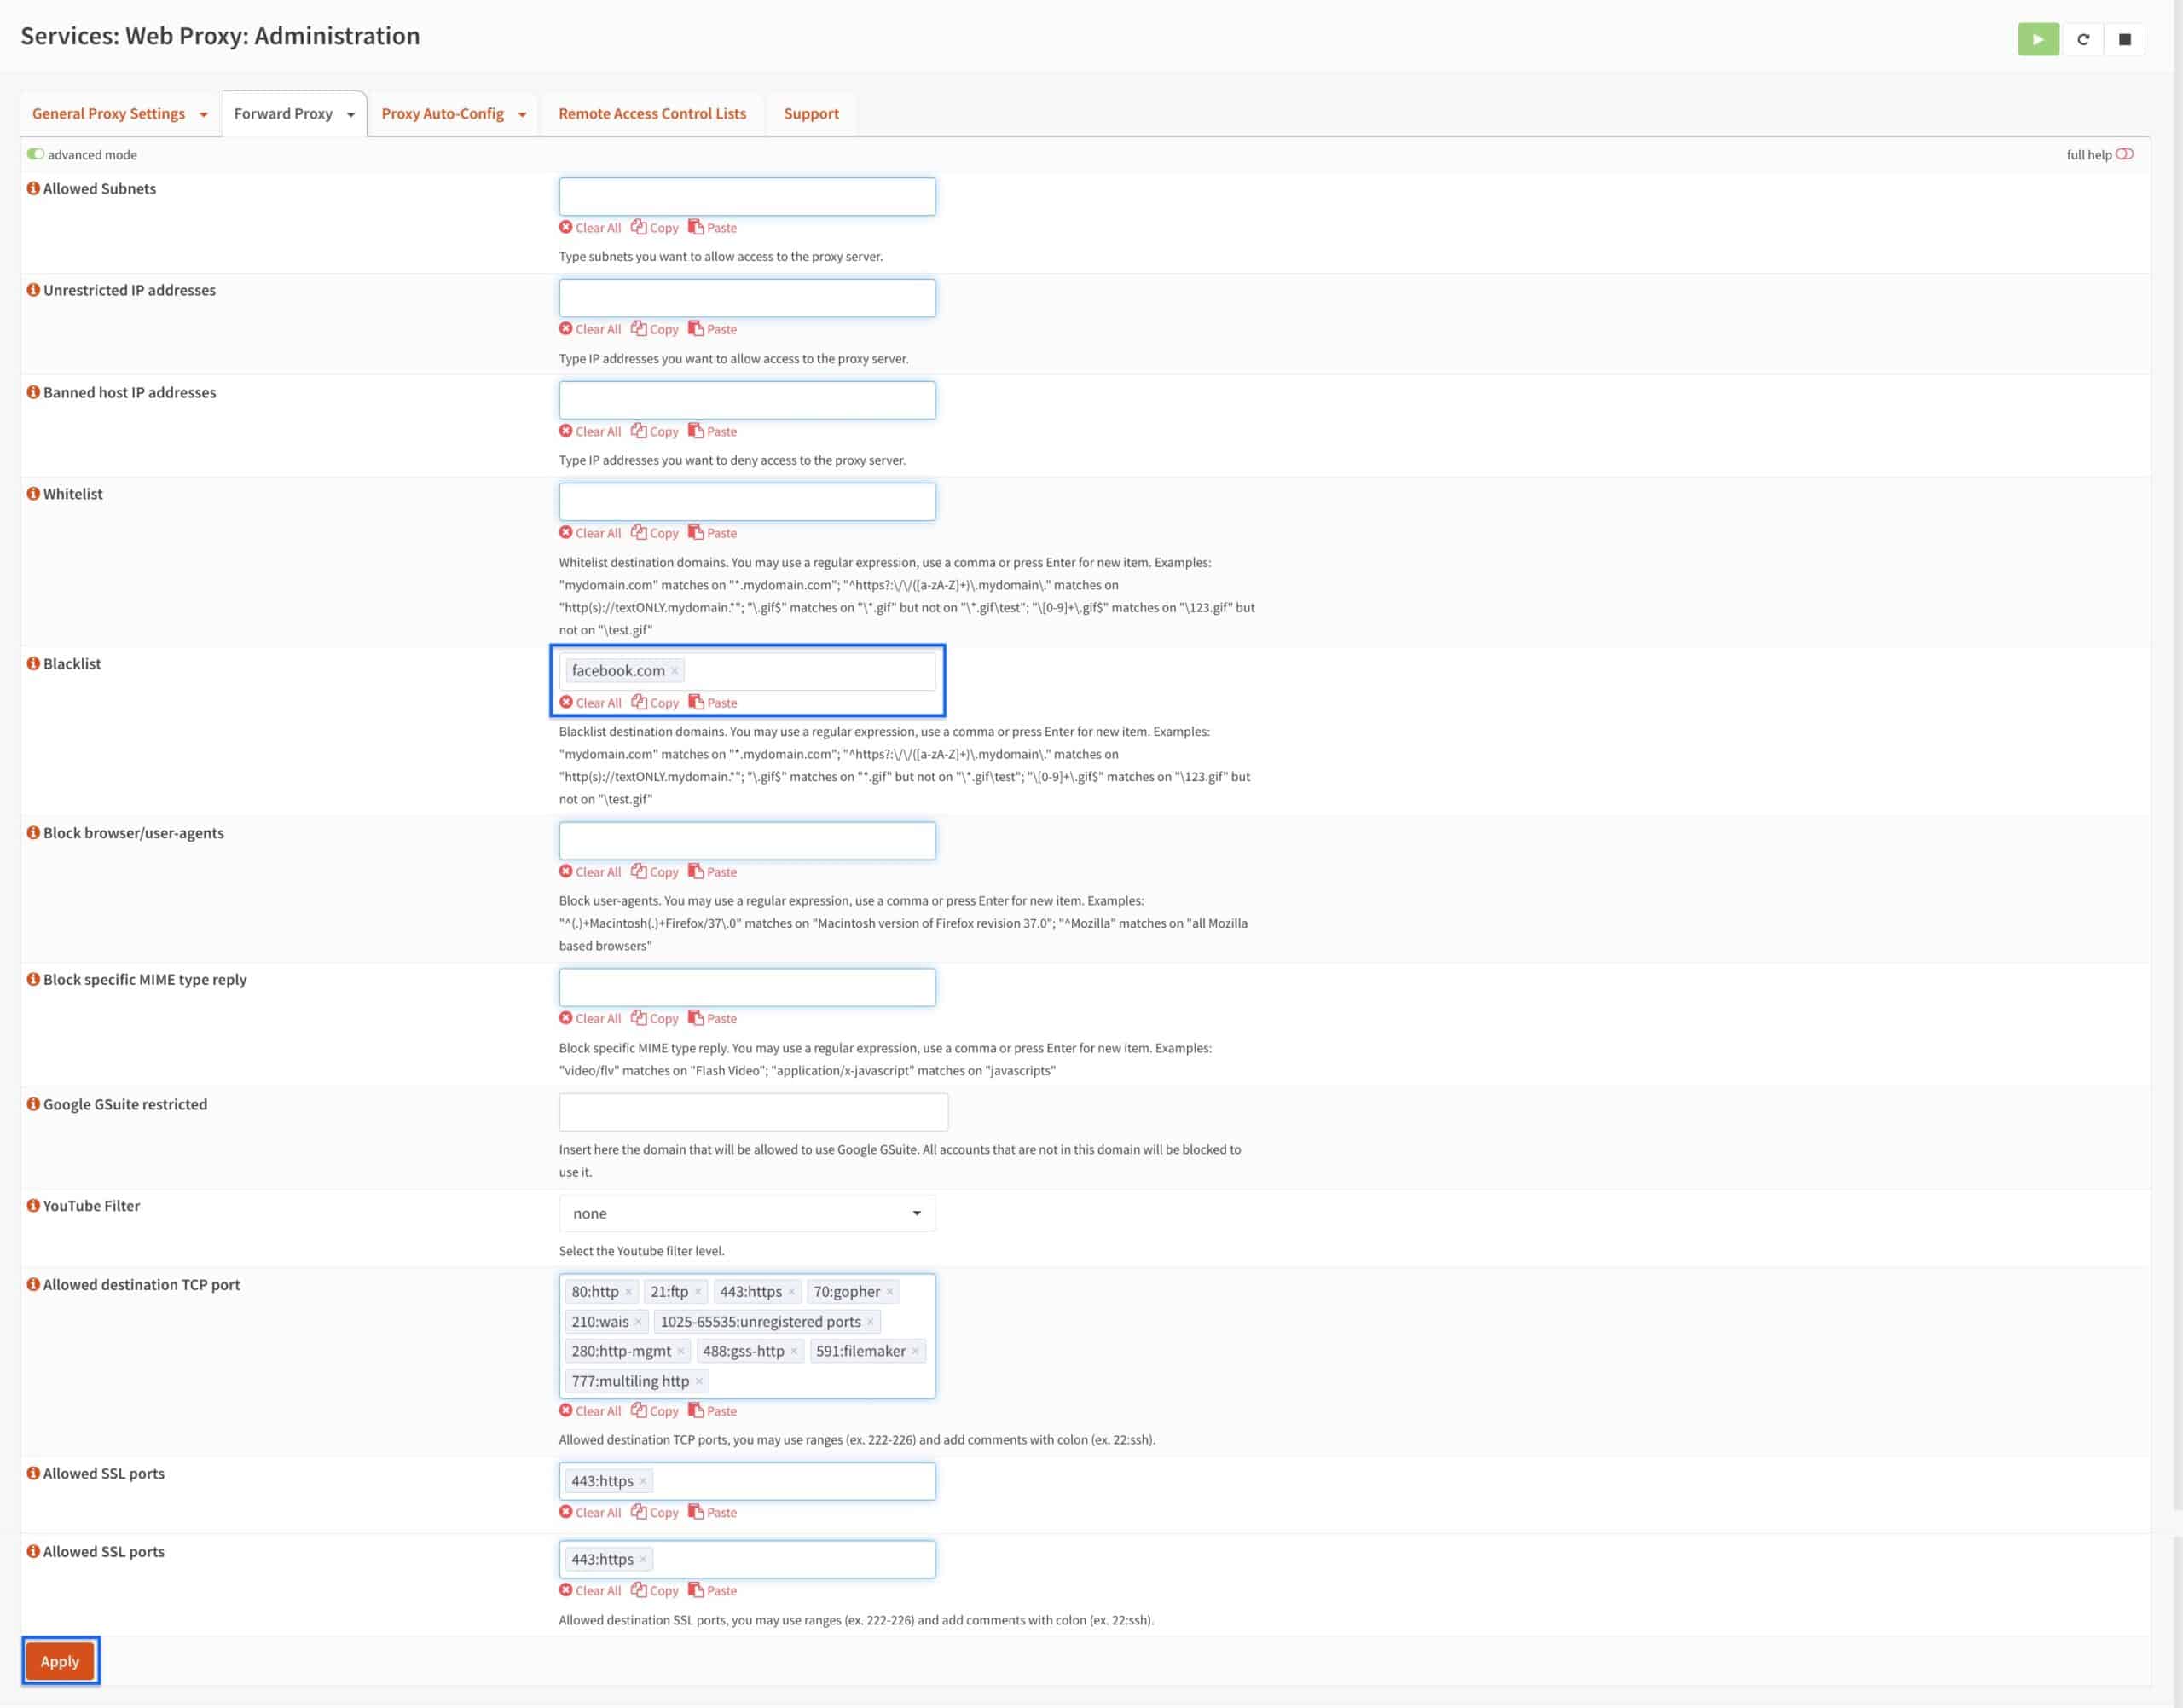
We’ve configured Squid to block facebook.com. The next thing we need to do is configure our web browser to use the proxy server so we can see if it’s working properly. If it is, Squid should block access to facebook.com.
Configuring Firefox to use Squid
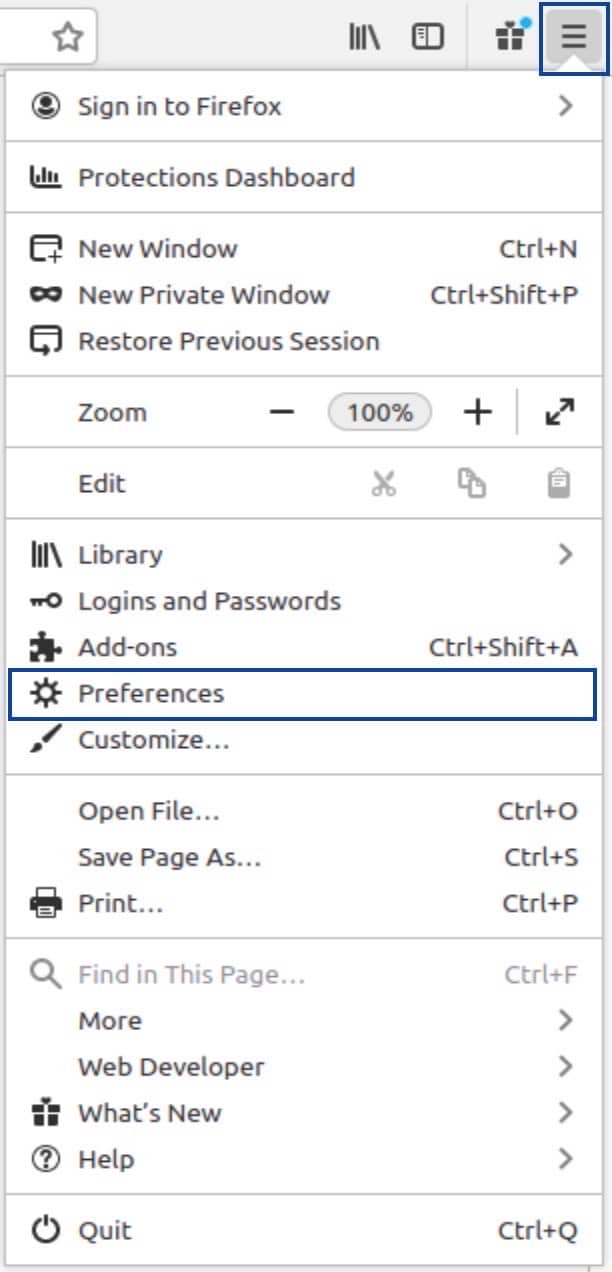
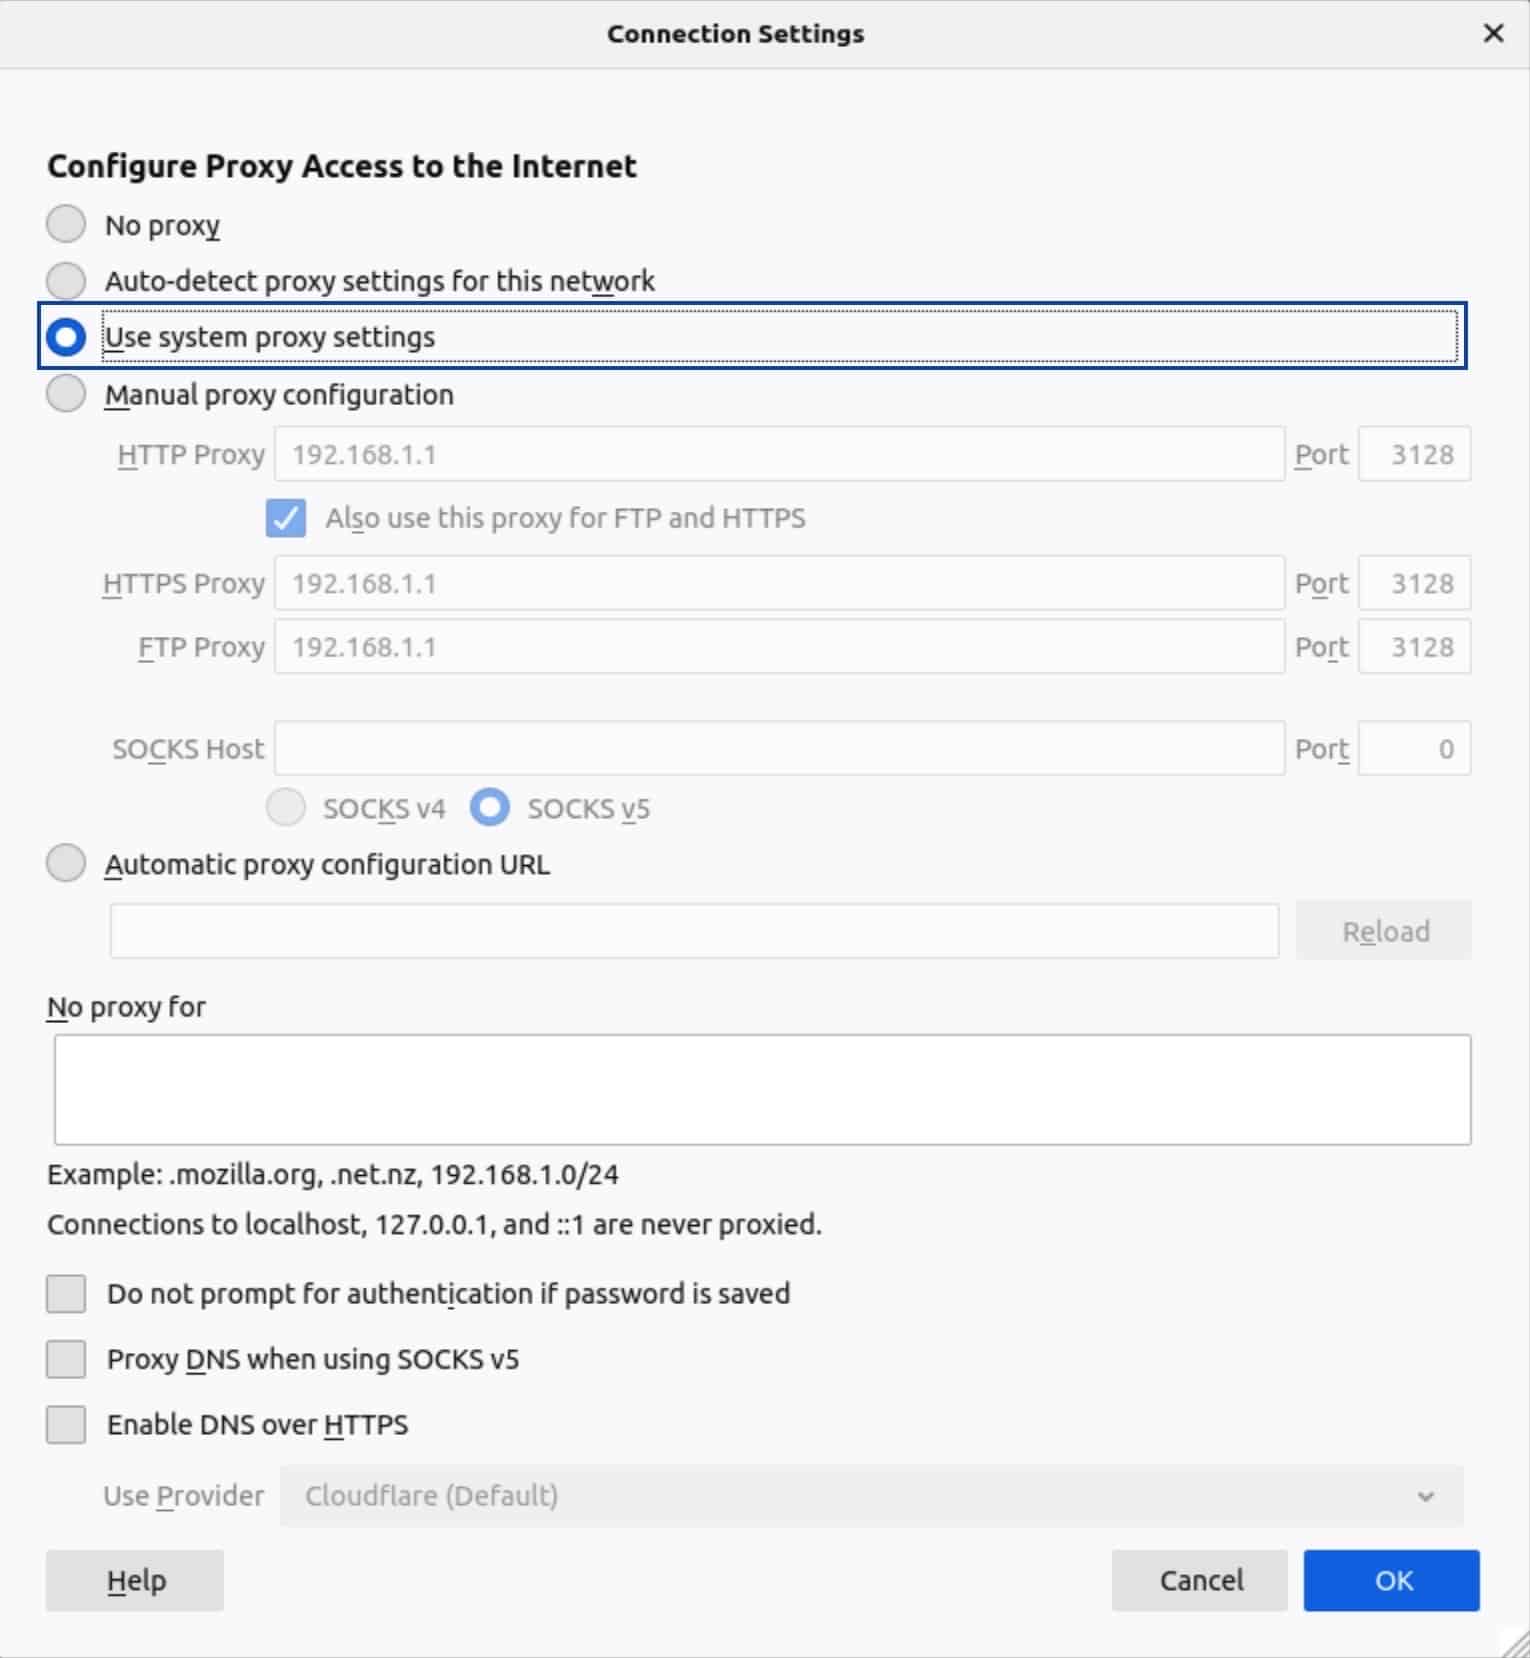
- Launch Firefox and click the Settings icon at the top right of the UI. Select Preferences (or Options in Windows). This displays the General Settings page.
- Scroll down the General Settings until you see Network Settings, and click the Settings button.

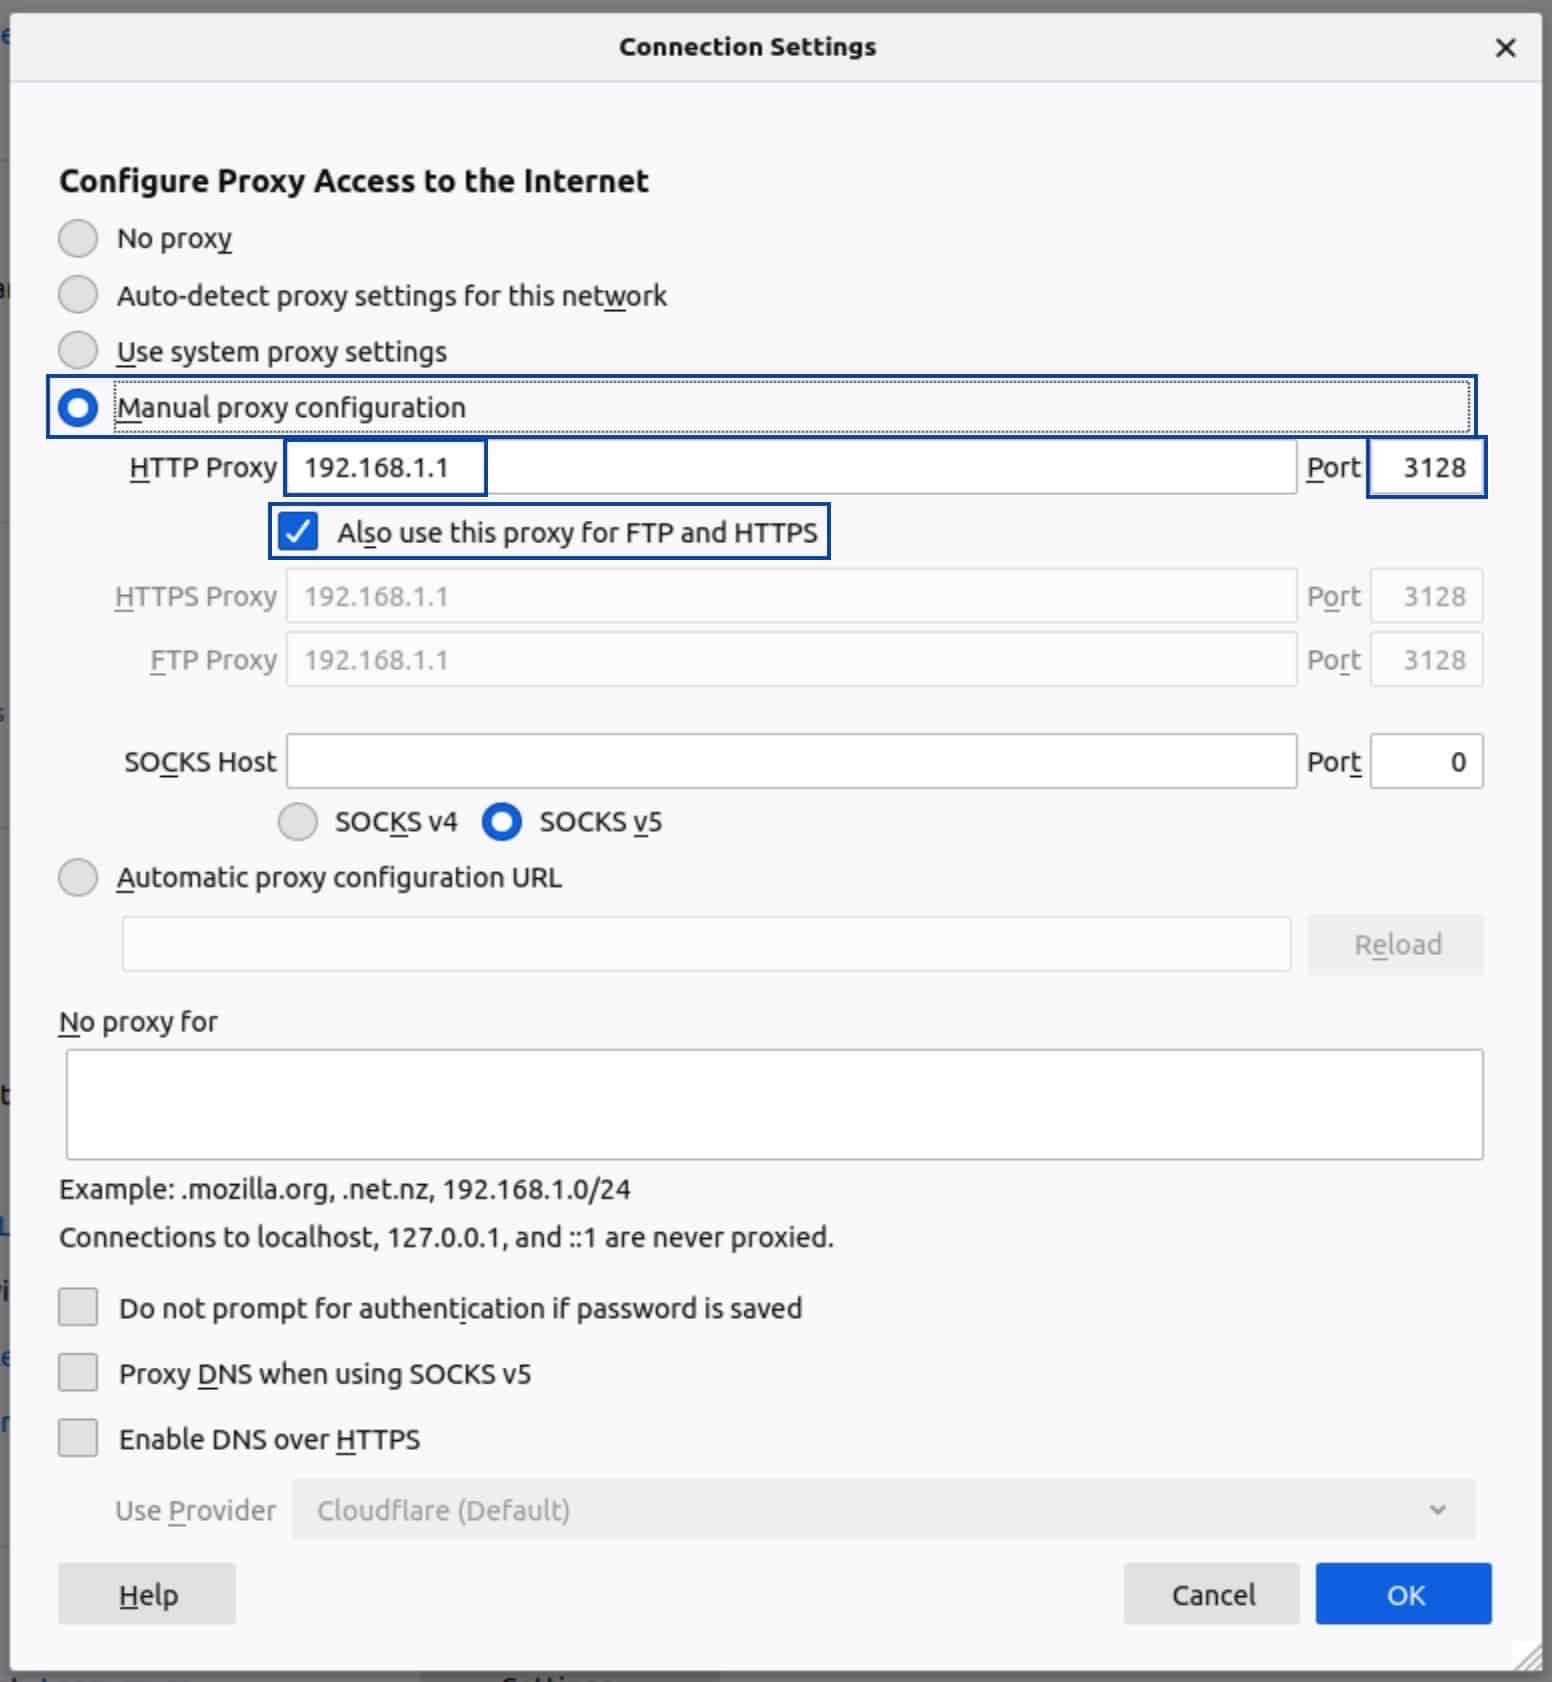
- Select Manual Proxy Configuration.
- In the HTTP Proxy box, enter your OPNsense box’s IP address. The default is 192.168.1.1.
- Enter 3128 in the Port field.
- Check the Also use this proxy for FTP and HTTPS box.
- Click OK at the bottom of the menu, and exit the Settings page.
Now, when I try to access facebook.com – whether over HTTP or HTTPS – I get the following error:
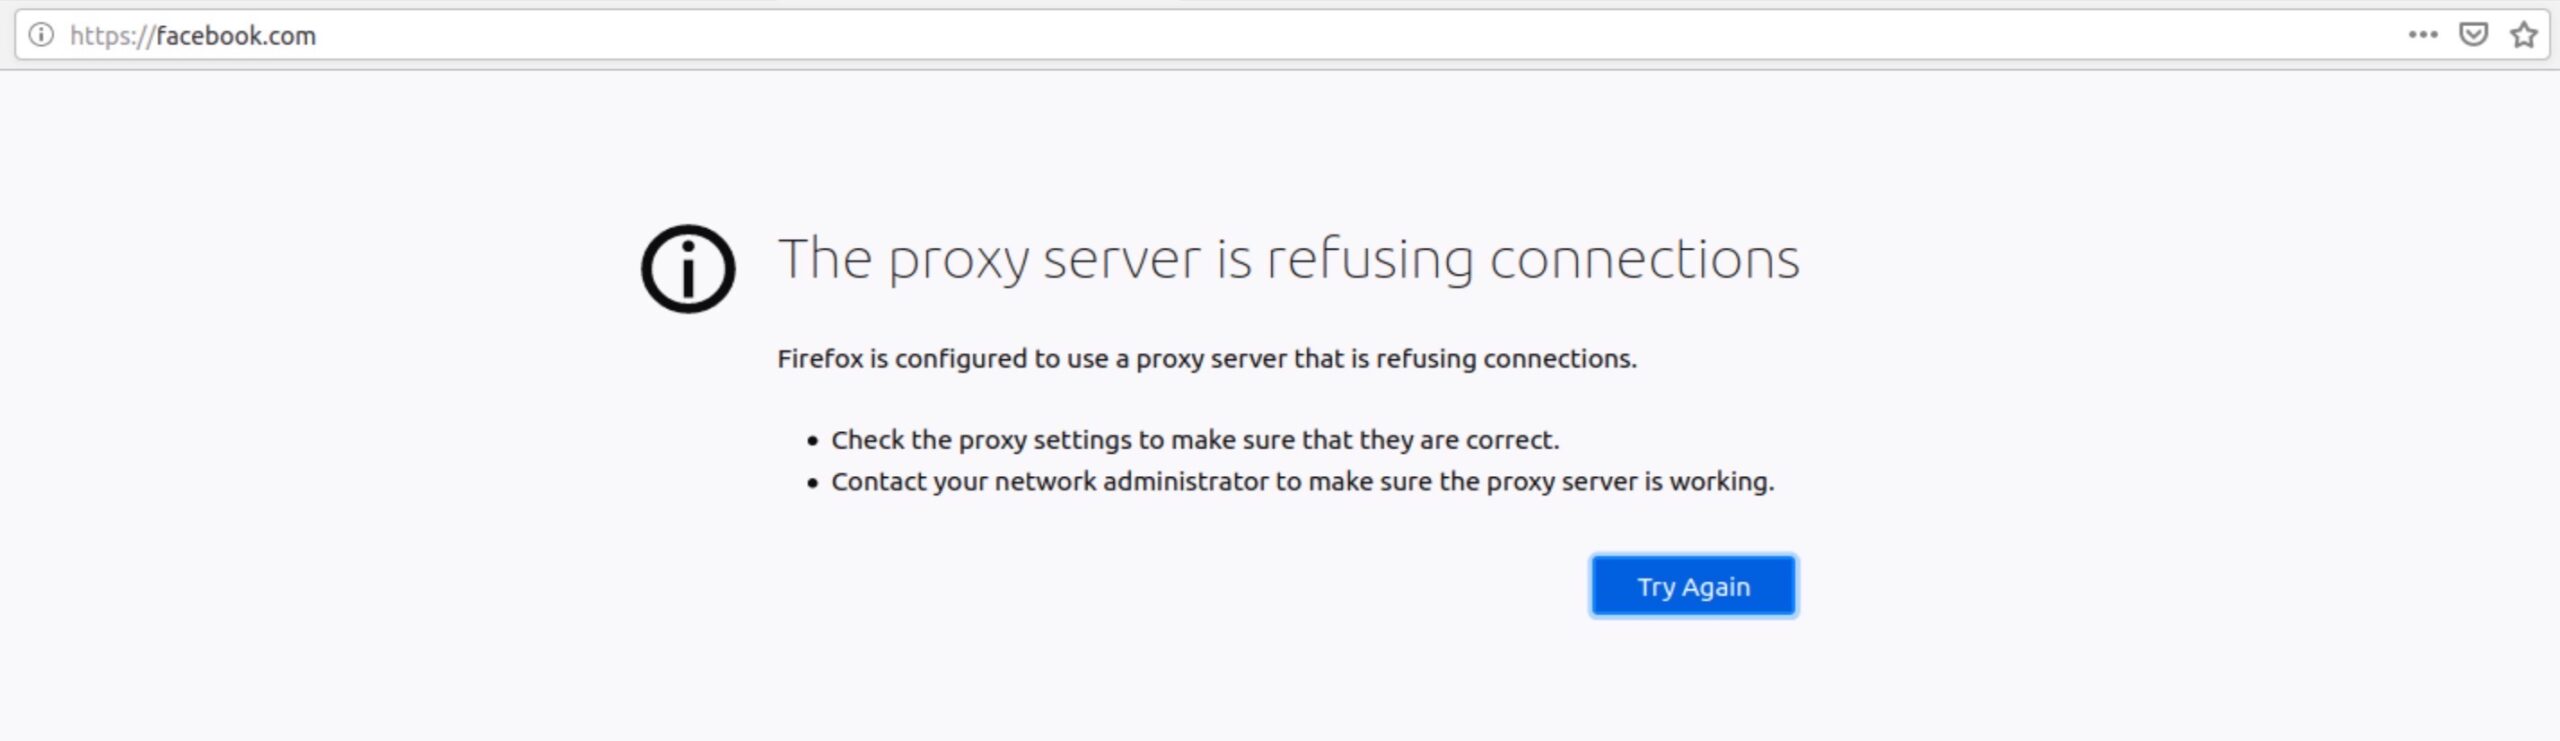
And that’s exactly what I wanted. Squid is working properly.
The SquidGuard part
So our proxy server is working and configured to block Facebook, but if we were to block ads this way, we’d have to add a massive amount of domains to Squid’s Blacklist. This is far from ideal.
That’s what SquidGuard is for. In pfSense, you need to install the SquidGuard package to get that functionality. But, as mentioned previously, it’s baked into OPNsense’s Squid implementation. We can configure URL list-based filtering straight from Squid’s settings.
Configuring URL list-based filtering in Squid
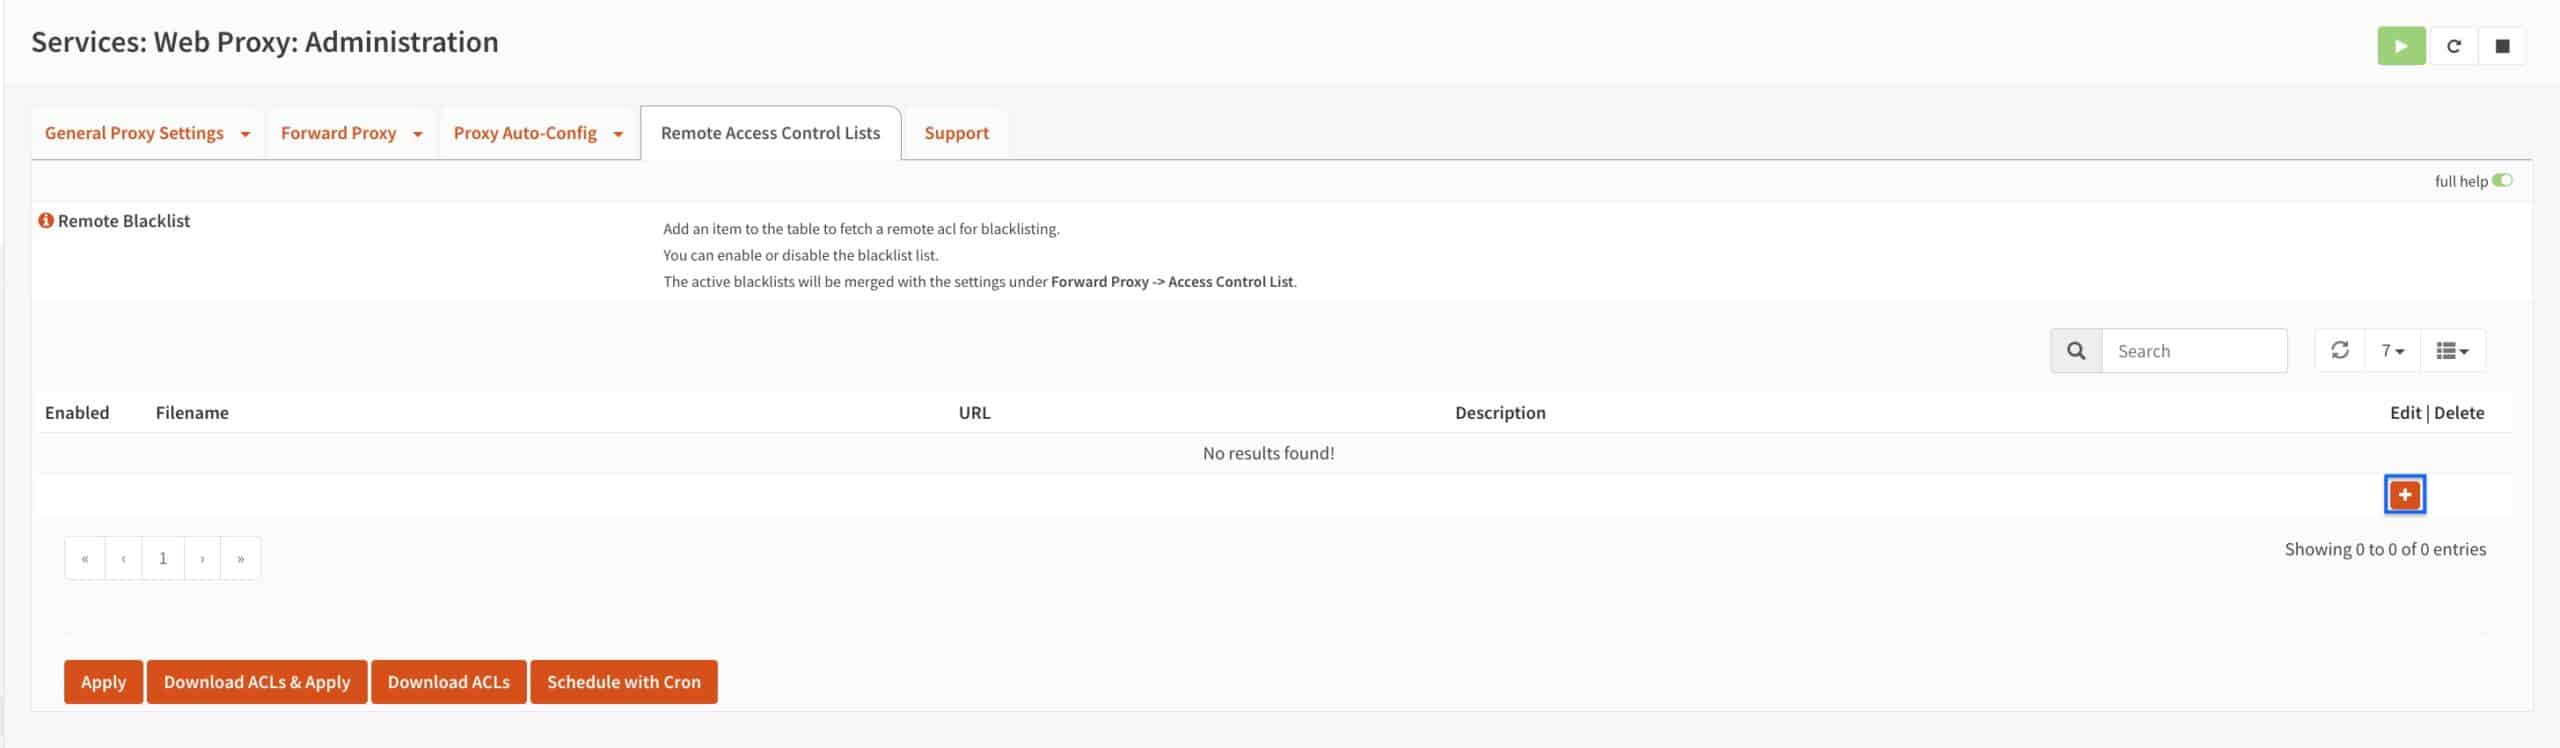
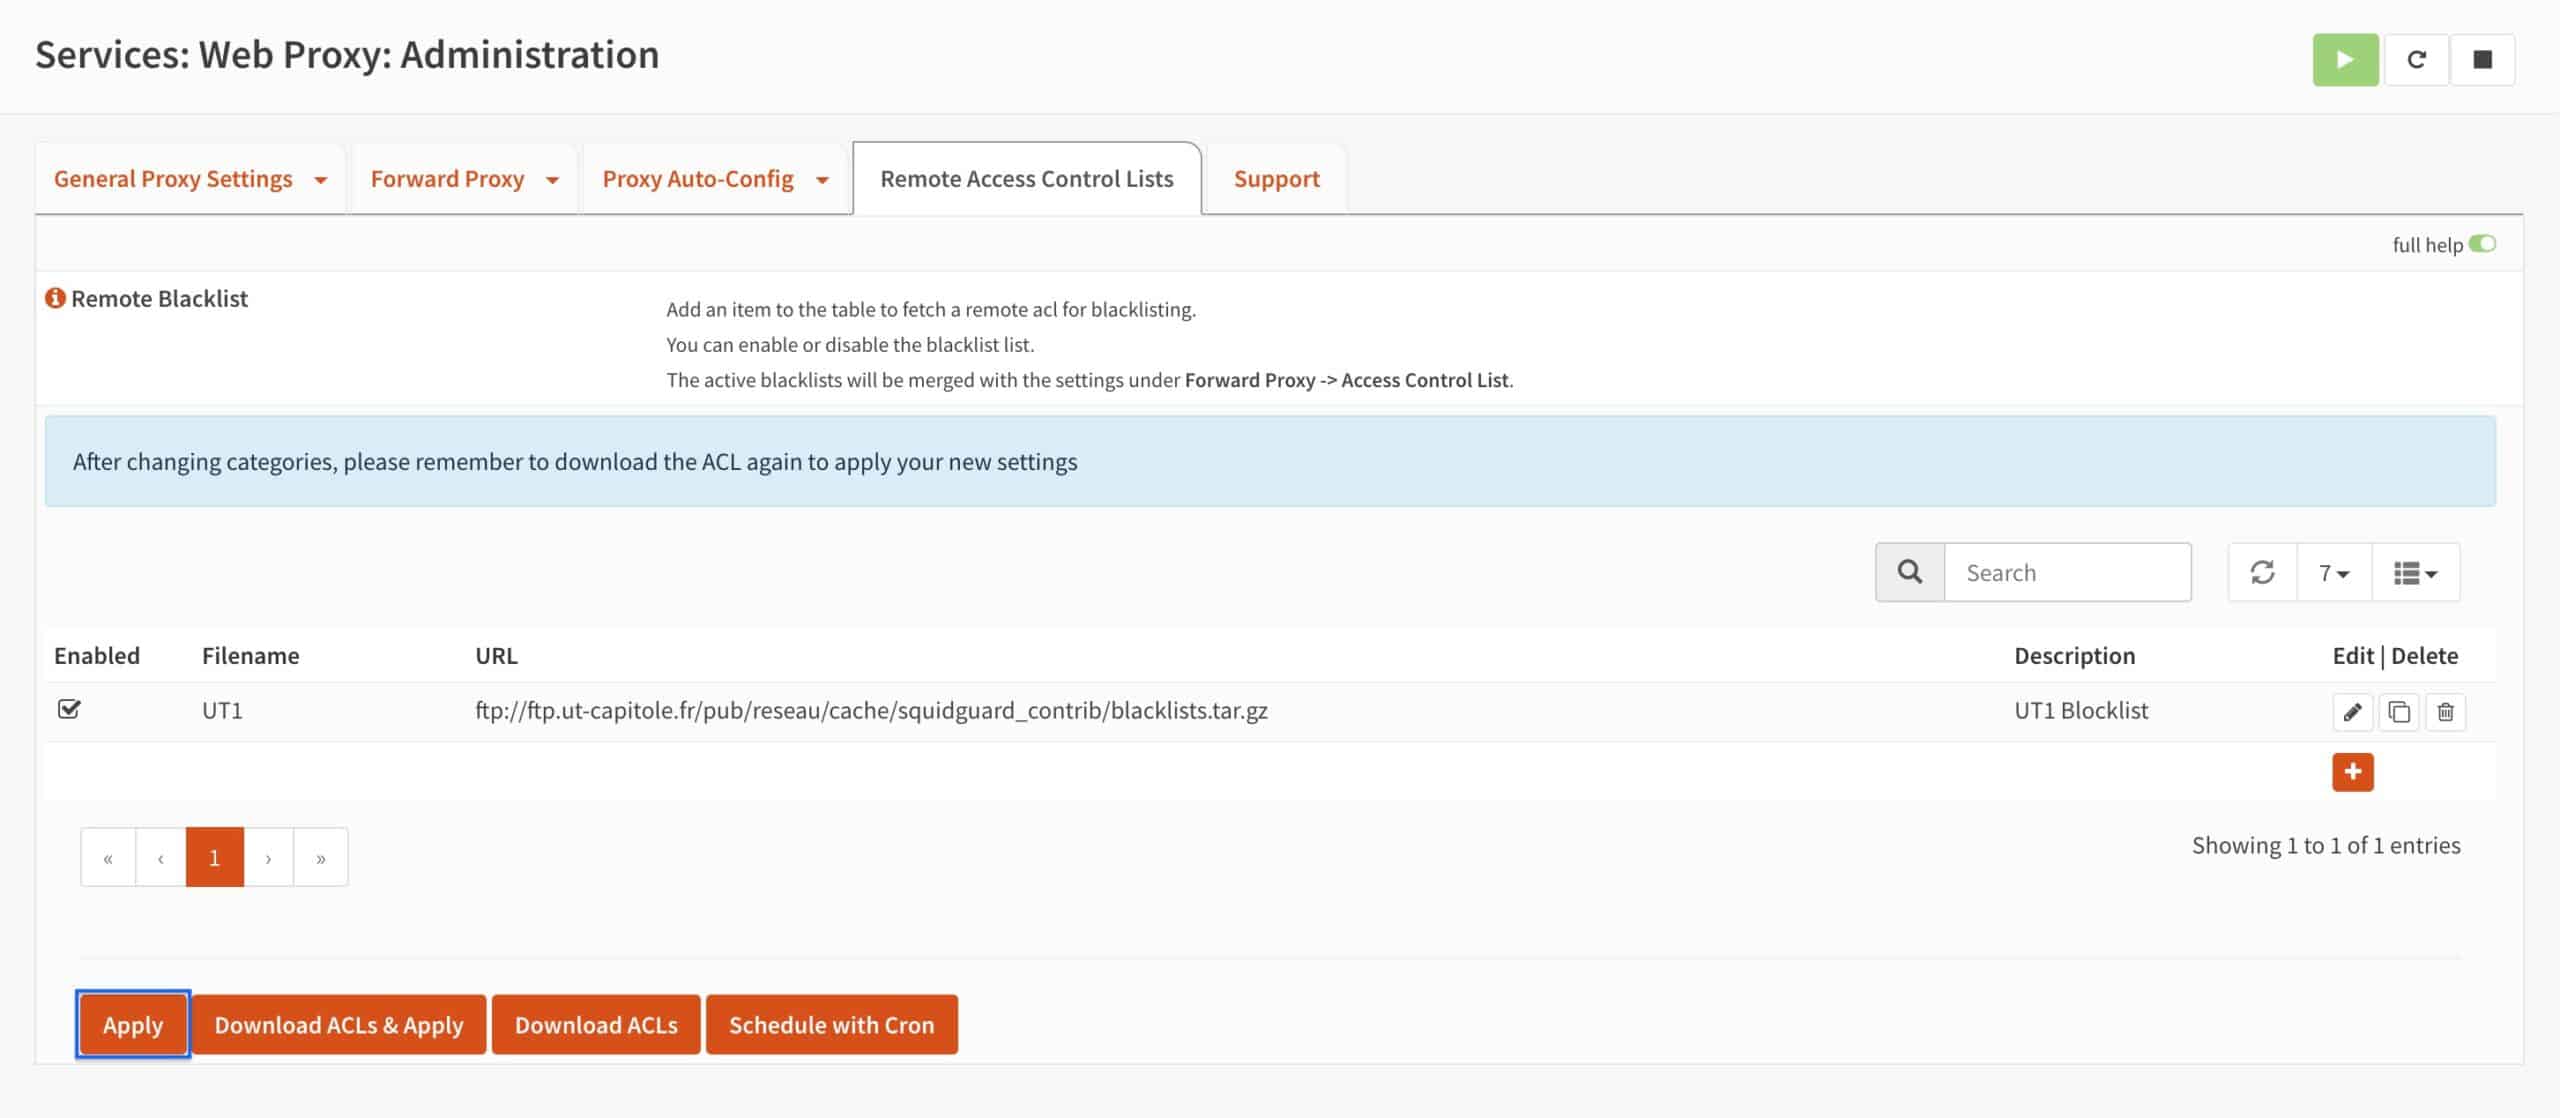
- From the Squid settings pages, select the Remote Access Control Lists tab. The Remote Access Control Lists page is displayed.

- The page is empty by default. Click on the + sign to add a new remote access control list.
- Tick the enabled box.
- Provide a name for your list in the Filename field.
- Copy and paste the following URL into the URL field: ftp://ftp.ut-capitole.fr/pub/reseau/cache/squidguard_contrib/blacklists.tar.gz.
- Enter a description for your list in the Description field (optional).
- Click Save.
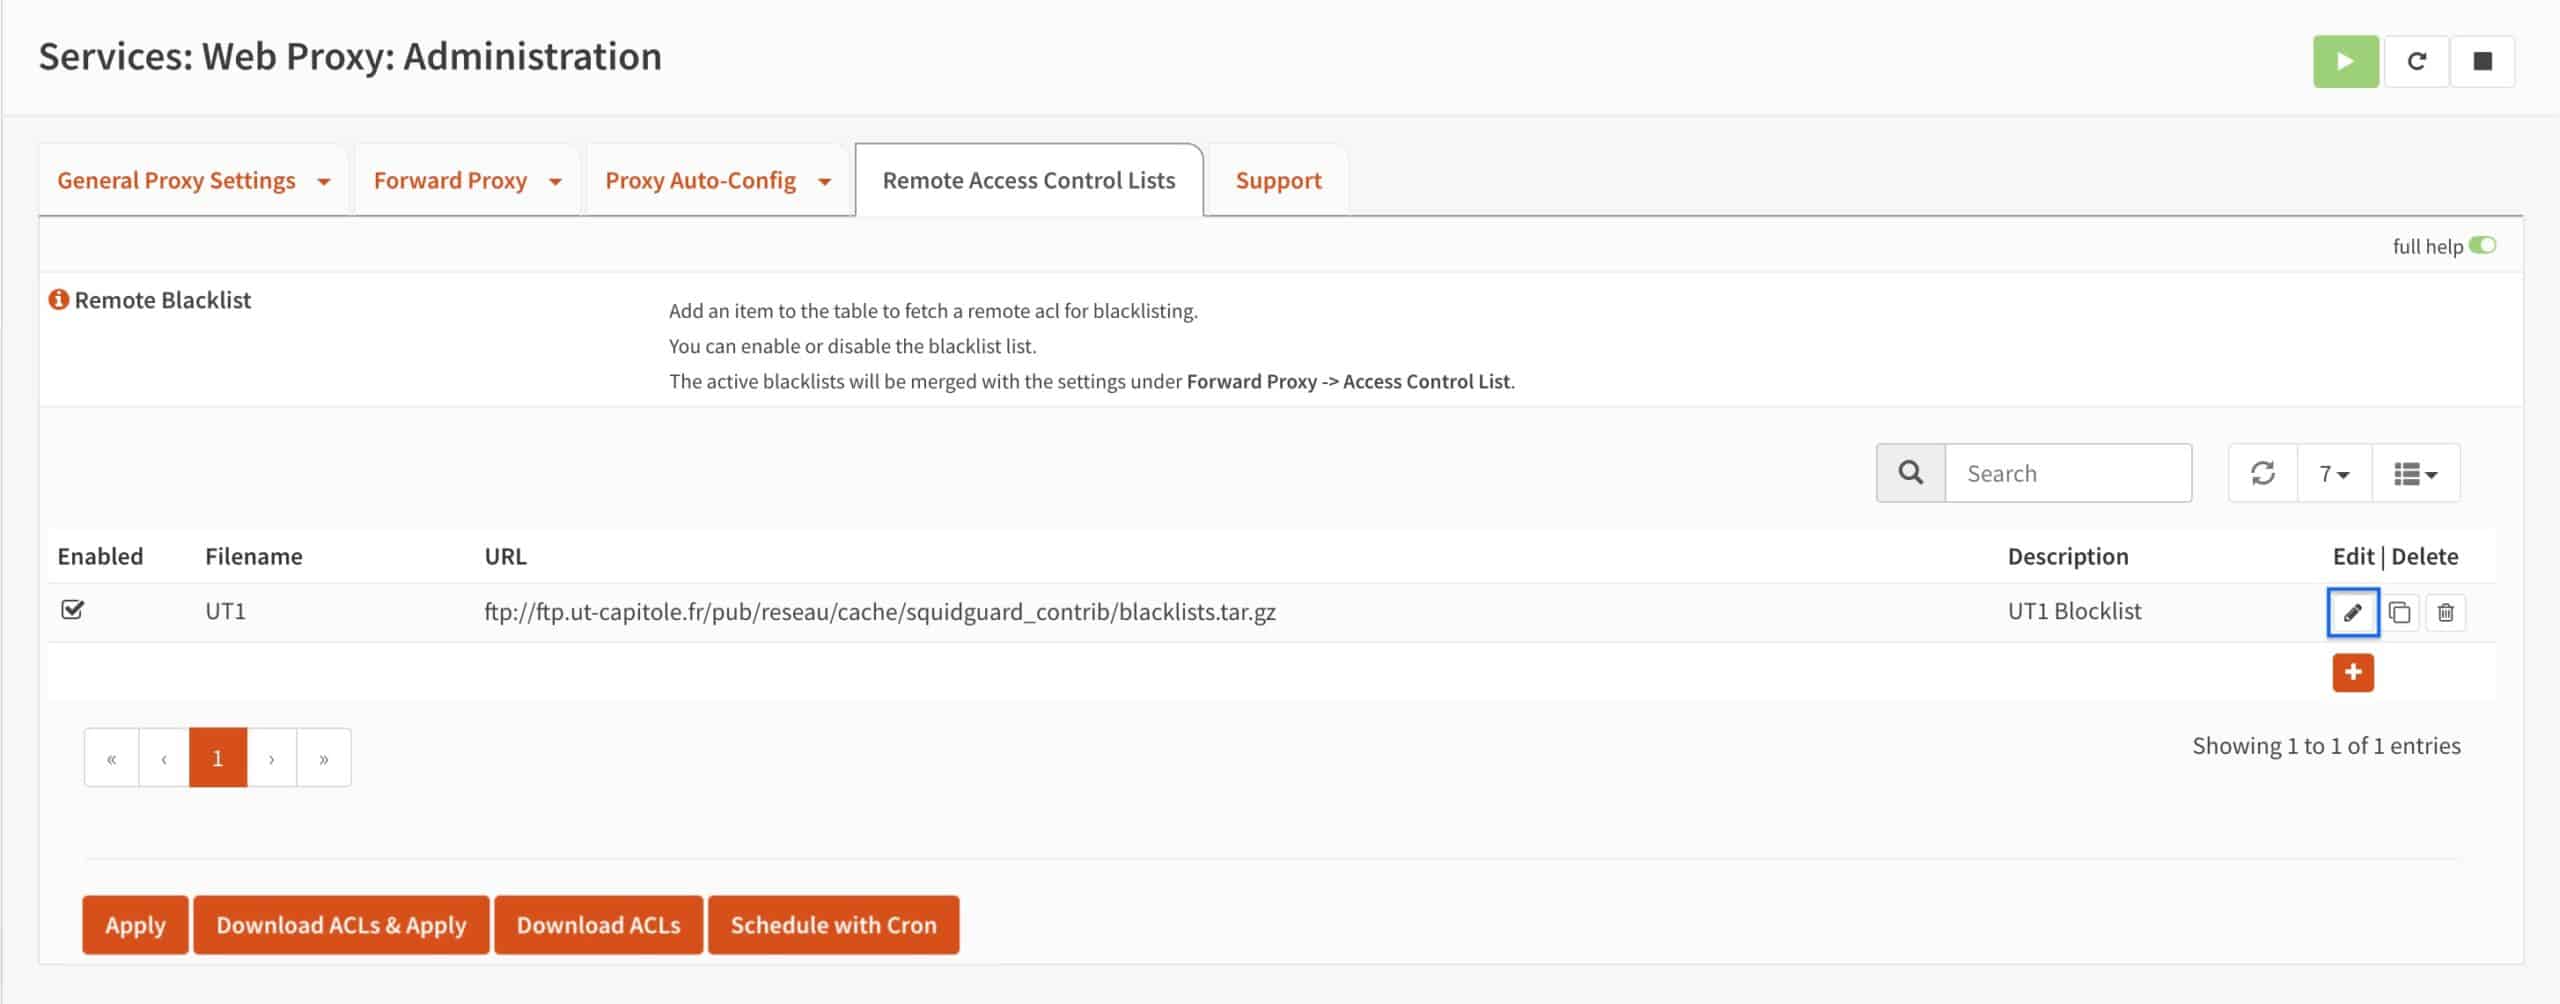
- You’re taken back to the main Remote Access Control Lists page and we can see that our list has been created. Click Download ACLs to download our list.

- Once the list has been downloaded (the spinning dotted circle disappears), click on the pencil icon to edit the ACL.
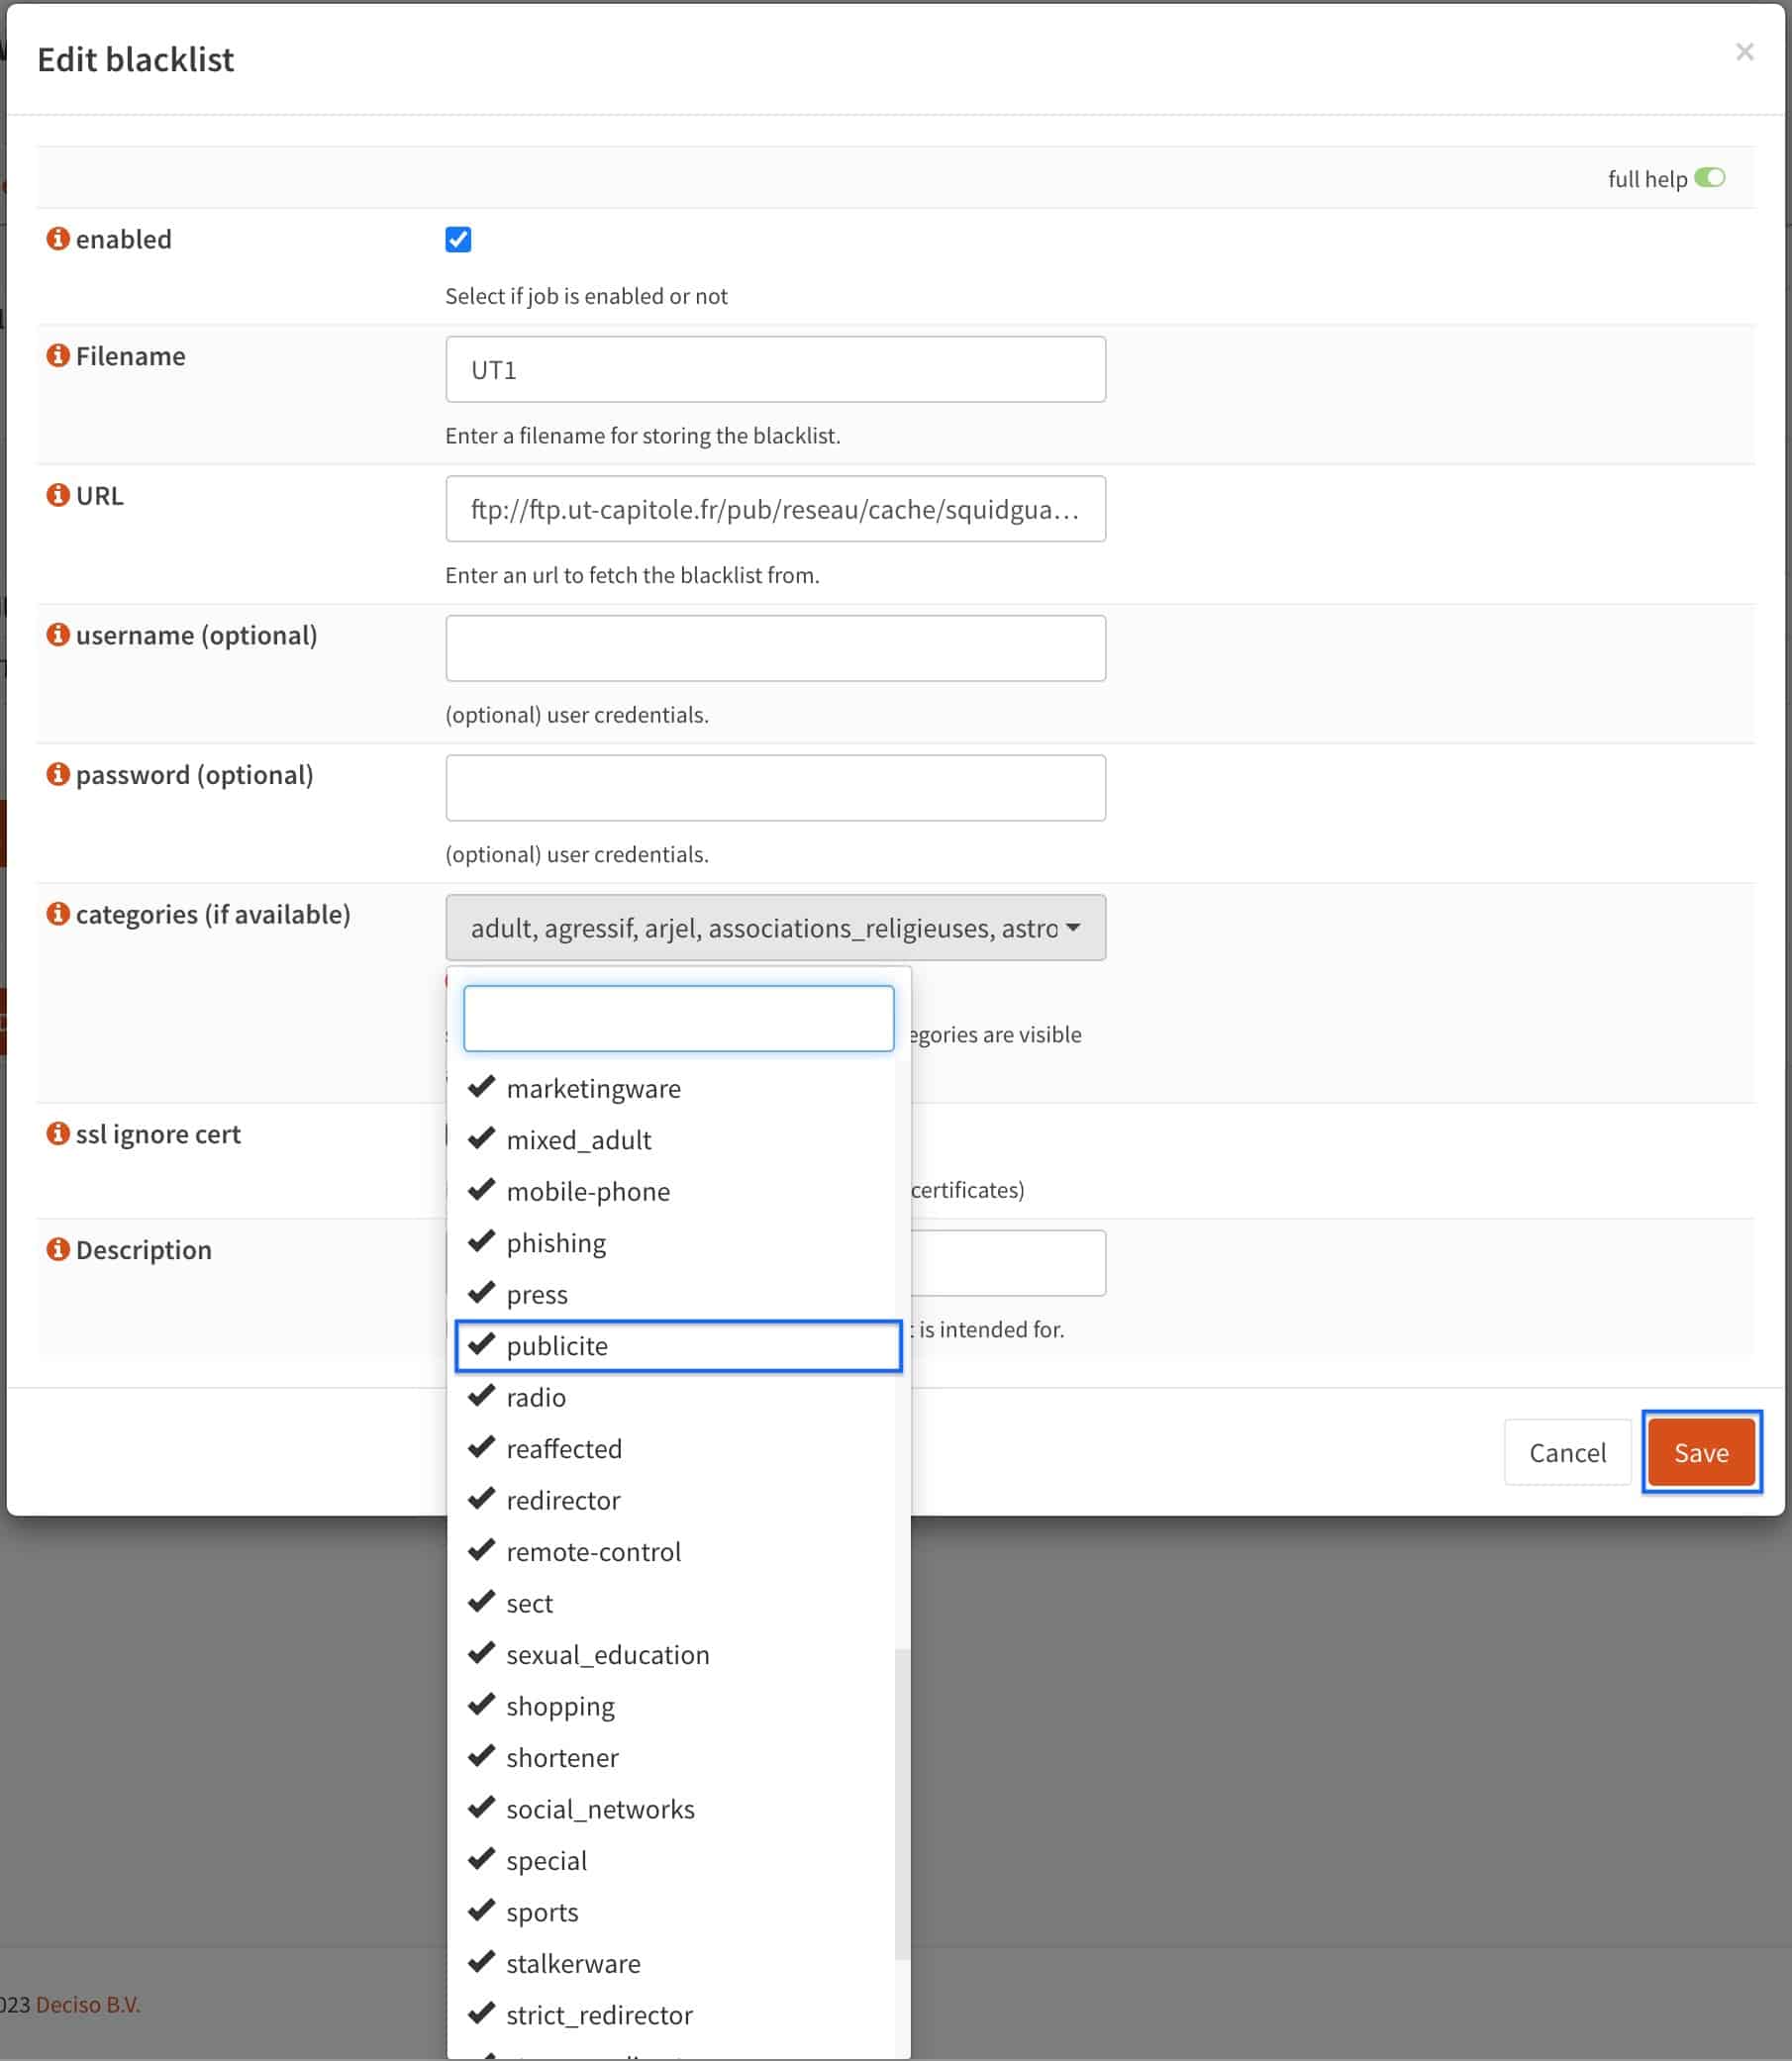
- Click on the categories drop-down menu. By default, all categories are selected. That may lead to over-blocking. Unselect all of the categories you wish to allow. Just make sure that publicite (advertisement in French) remains selected, as ad blocking is what we’re trying to achieve here. When done, click Save. You’re taken back to the main Remote Access Control Lists page.
- Click Apply.
Testing the setup
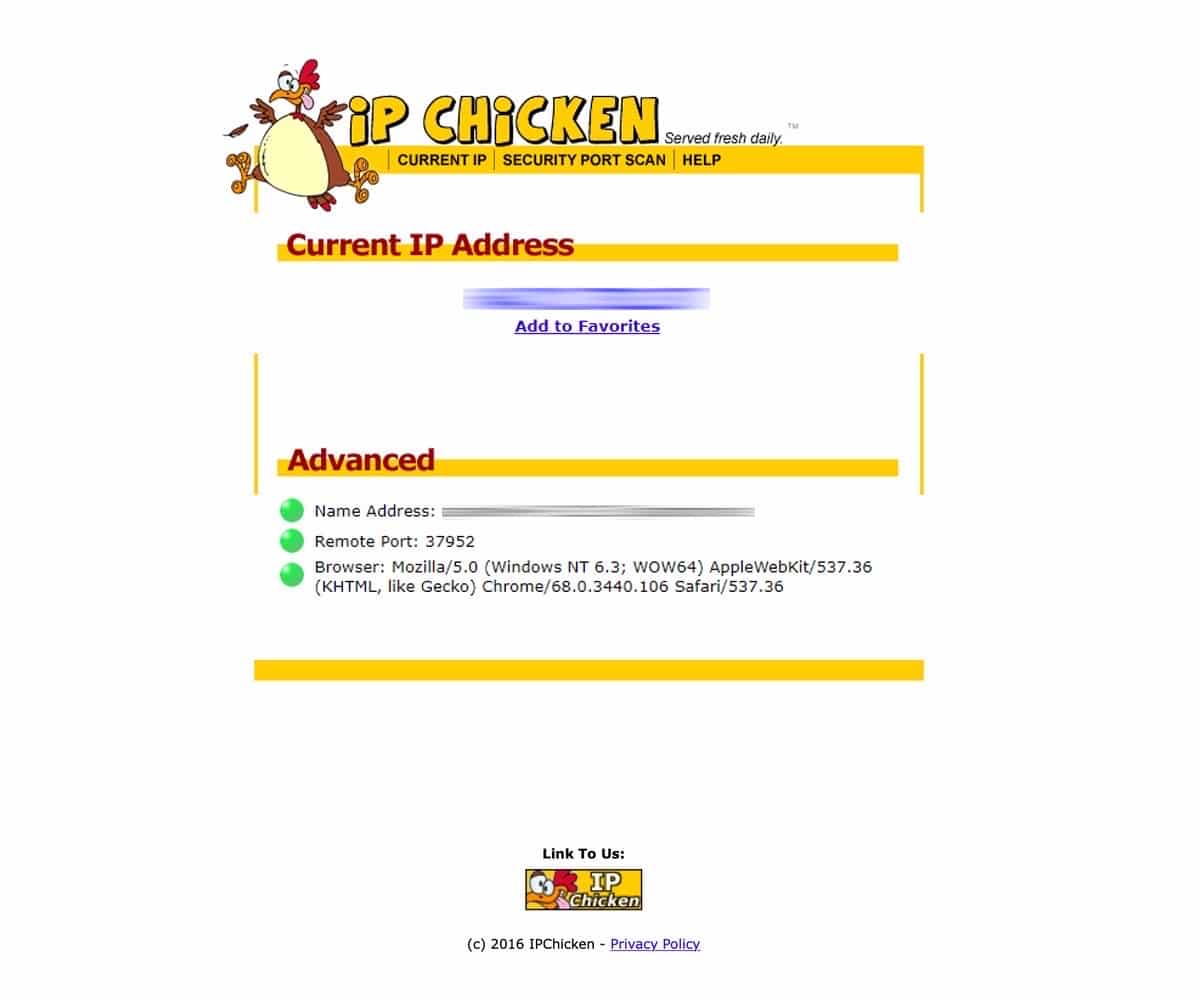
We’ve now configured Squid and integrated SquidGuard’s functionality for blacklist filtering. Because I already configured my browser to use the proxy in our previous test, if I access a webpage that displays ads, they should be filtered.
With Squid enabled:
With Squid disabled:
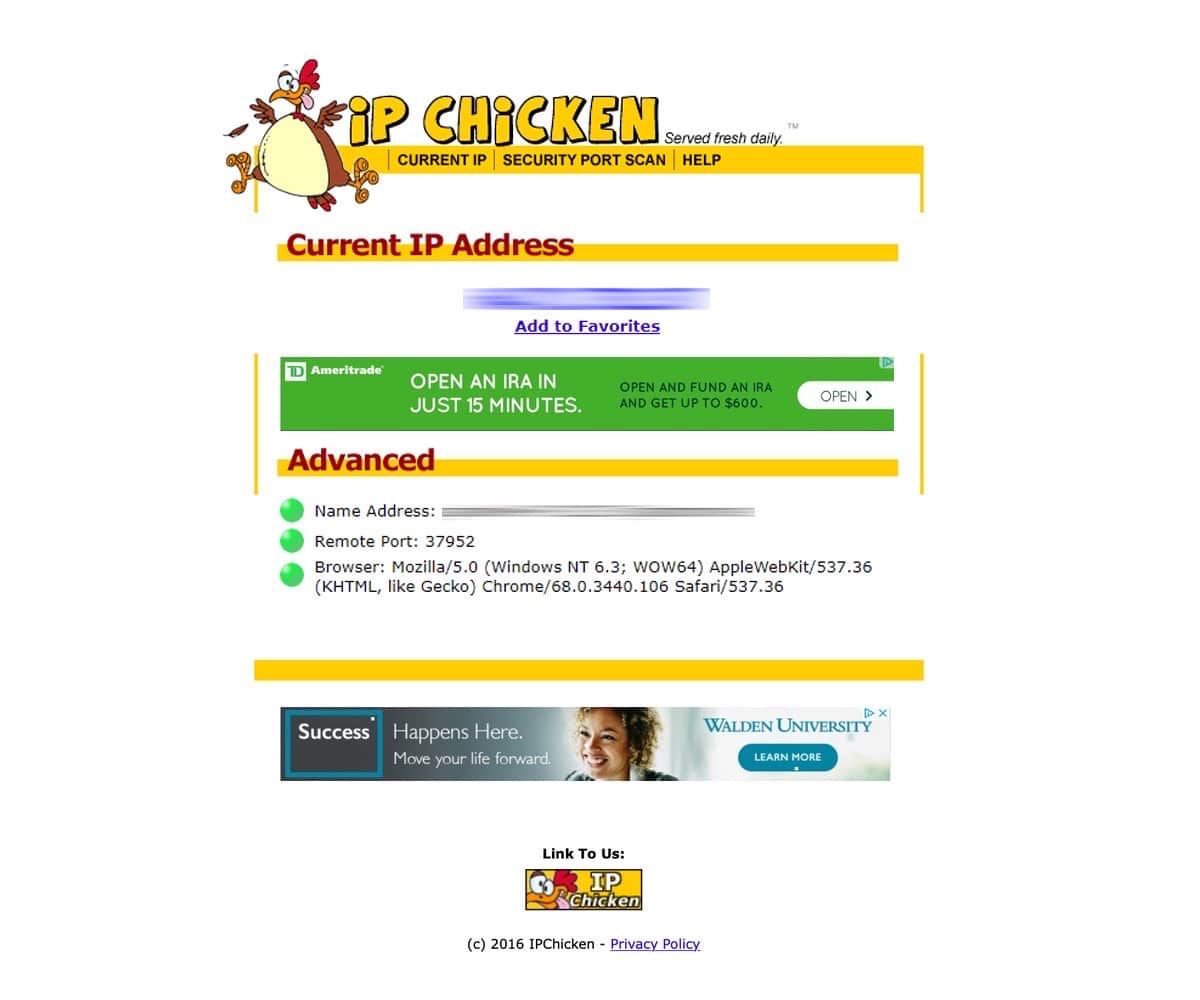
Great, it works. But as things are set up now, Squid will only filter my browser’s traffic. What if I wanted to filter ads out system-wide? That’s what I’m going to show you now. We’re going to configure our device(s) to send all their traffic through the proxy server. This means all your apps will benefit from Squid’s ad-blocking. I’m going to show you how to set this up on Windows, macOS, Linux, iOS, and Android.
Configuring system-wide content filtering on client devices
Reset the browser settings
First, we need to undo the manual proxy settings we applied to Firefox in our previous test.
- Access the Network Settings in Firefox’s preferences, and select Use system proxy settings. This tells Firefox to use the system’s (your device) proxy settings as its own.
- Click OK at the bottom of the menu and close the Settings page.
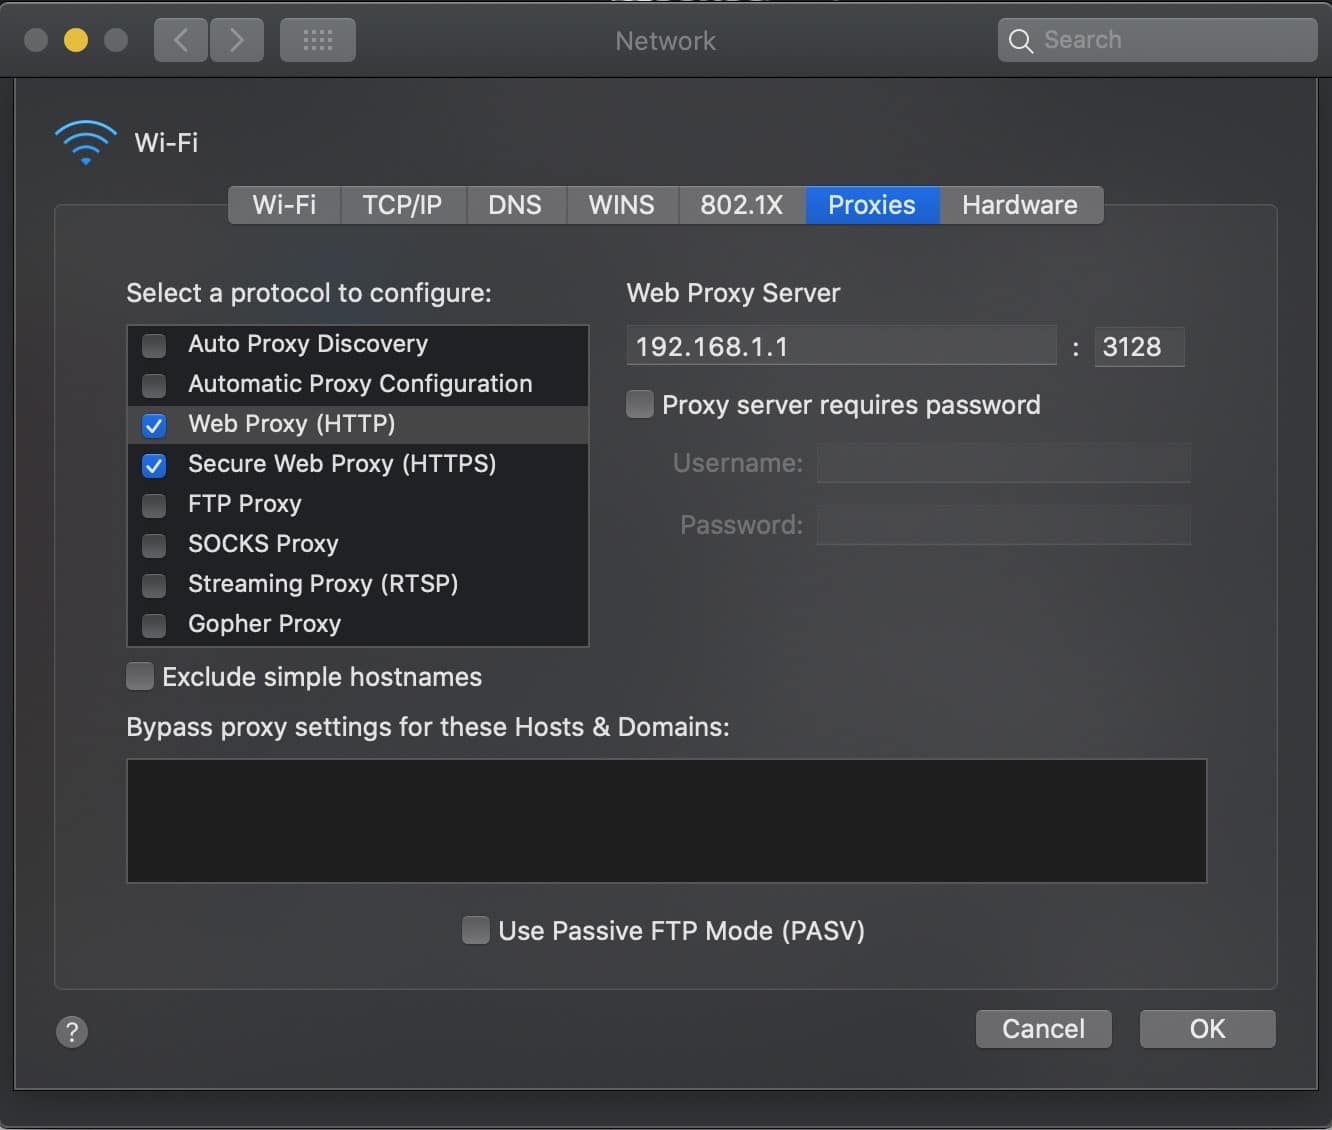
macOS
- Select Network from the System Preferences app.
- Select your current connection and click Advanced at the bottom right.
- Select the Proxies tab.
- Click the Web Proxy (HTTP) and the Secure Web Proxy (HTTPS) boxes.
- Enter the IP address of your OPNsense box and the proxy port. 192.168.1.1 and 3128 are the default values.
- Click OK and Apply.
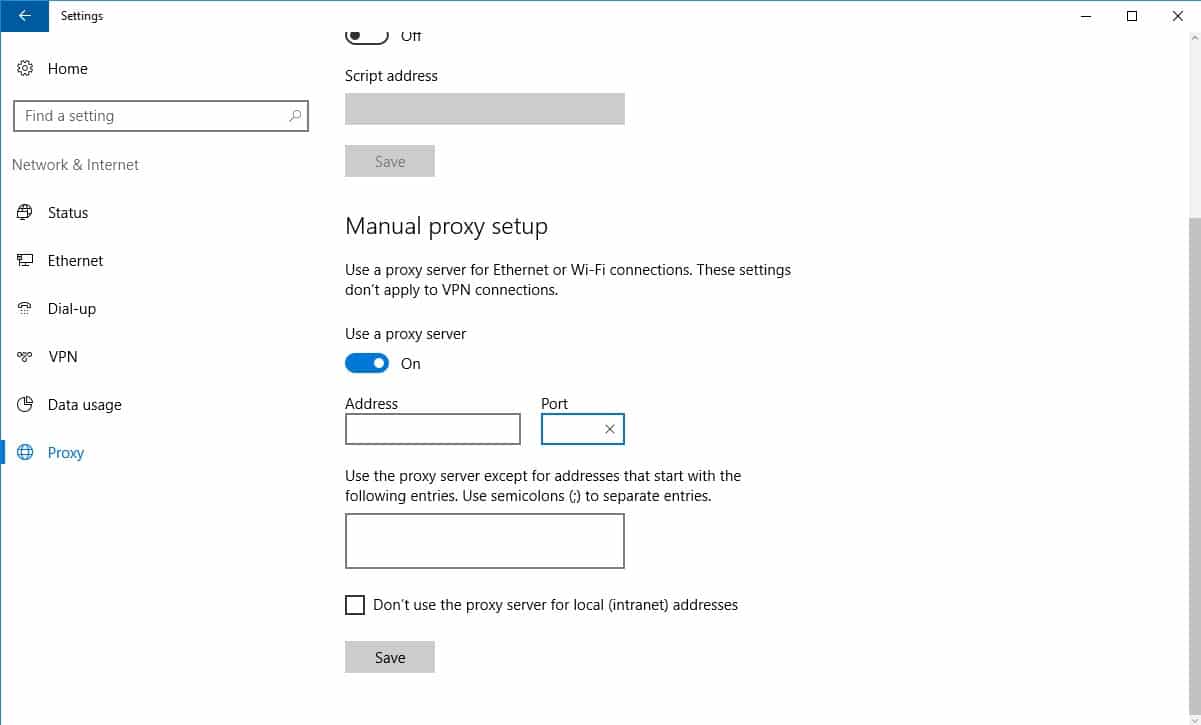
Windows
- Access the Settings app (Win+I keyboard shortcut).
- Select Network and Internet.
- Select the Proxy tab.
- Scroll down to find the Manual proxy setup section.
- Enable the Use a proxy server switch.
- Enter the IP address of your OPNsense box and the proxy port next to Server and Port. 192.168.1.1 and 3128 are the default values.
- Click Save.
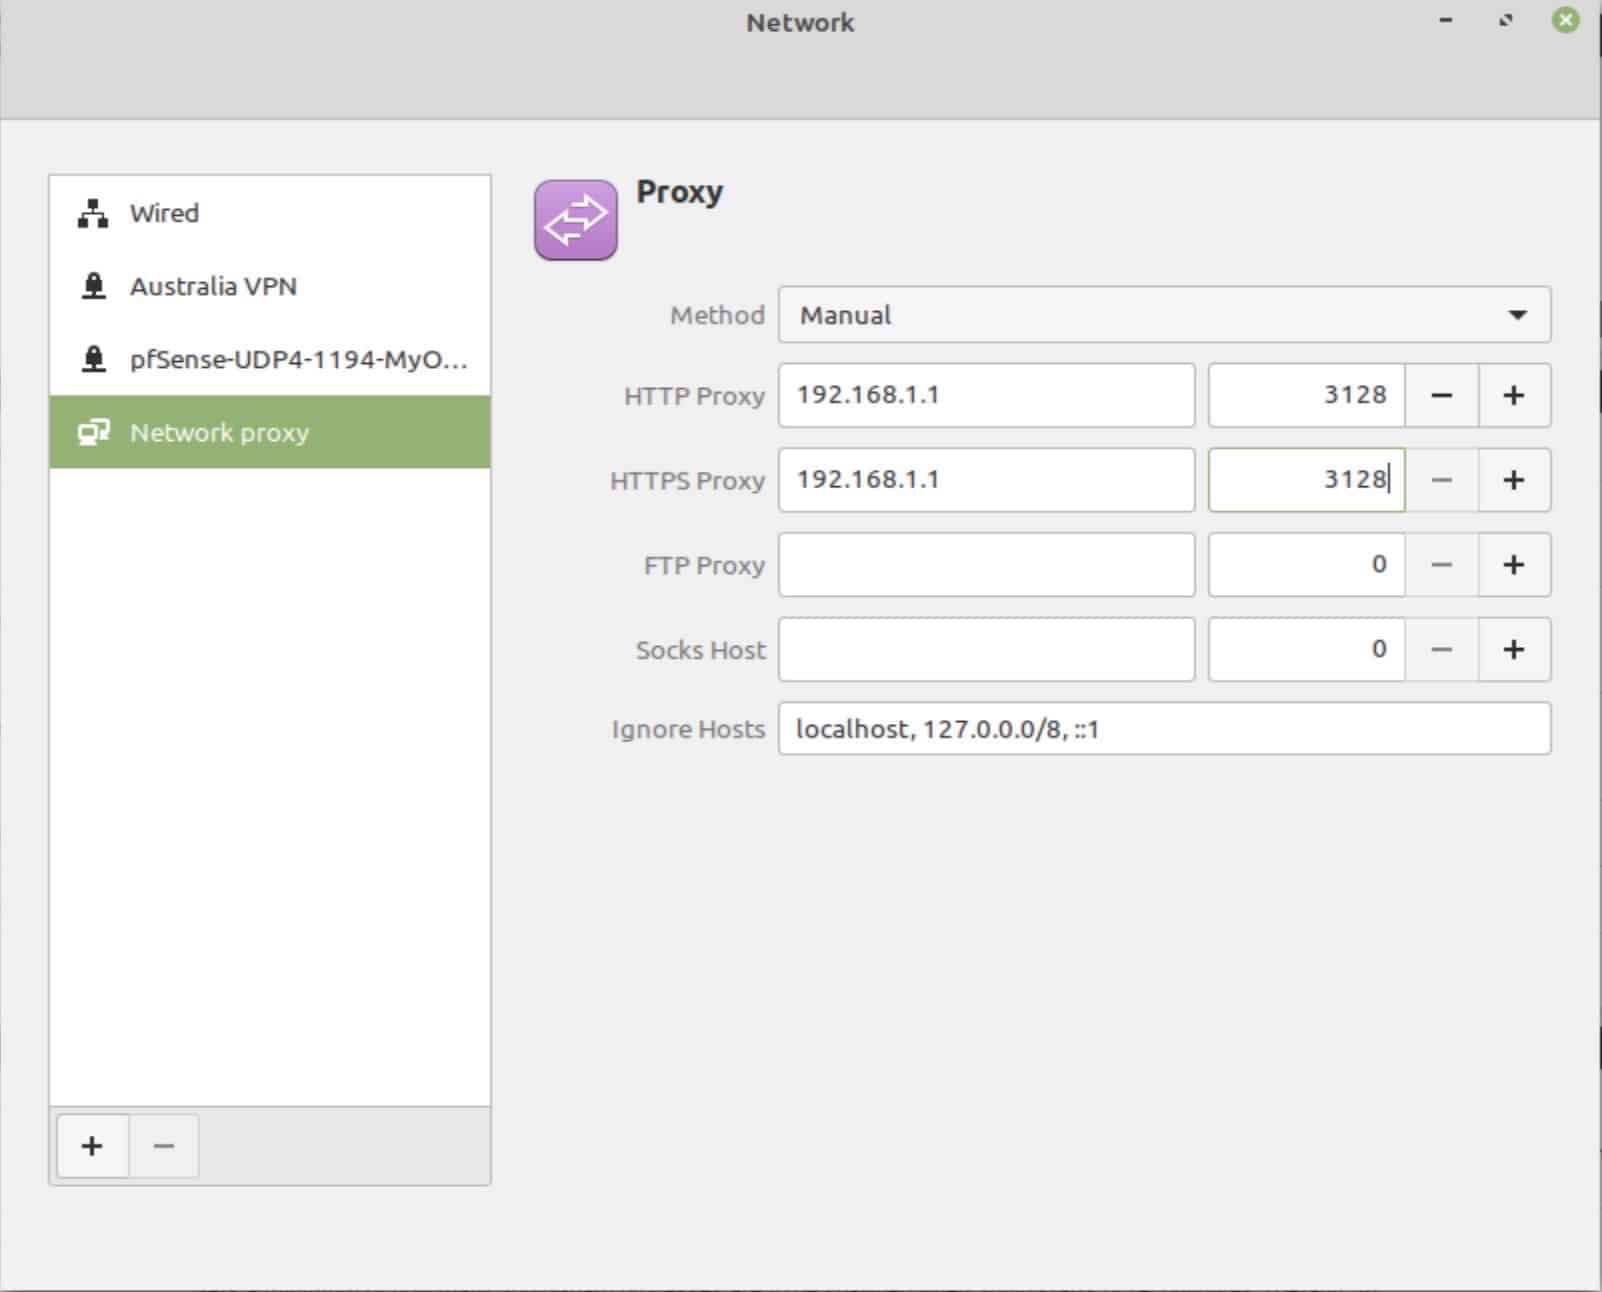
Linux
- Access the Network Settings window and select Network proxy.
- From the Method drop-down menu, select Manual.
- Enter the IP address of your OPNsense box and the proxy port next to HTTP Proxy and HTTPS Proxy. 192.168.1.1 and 3128 are the default values.
- Exit the Network Settings window.
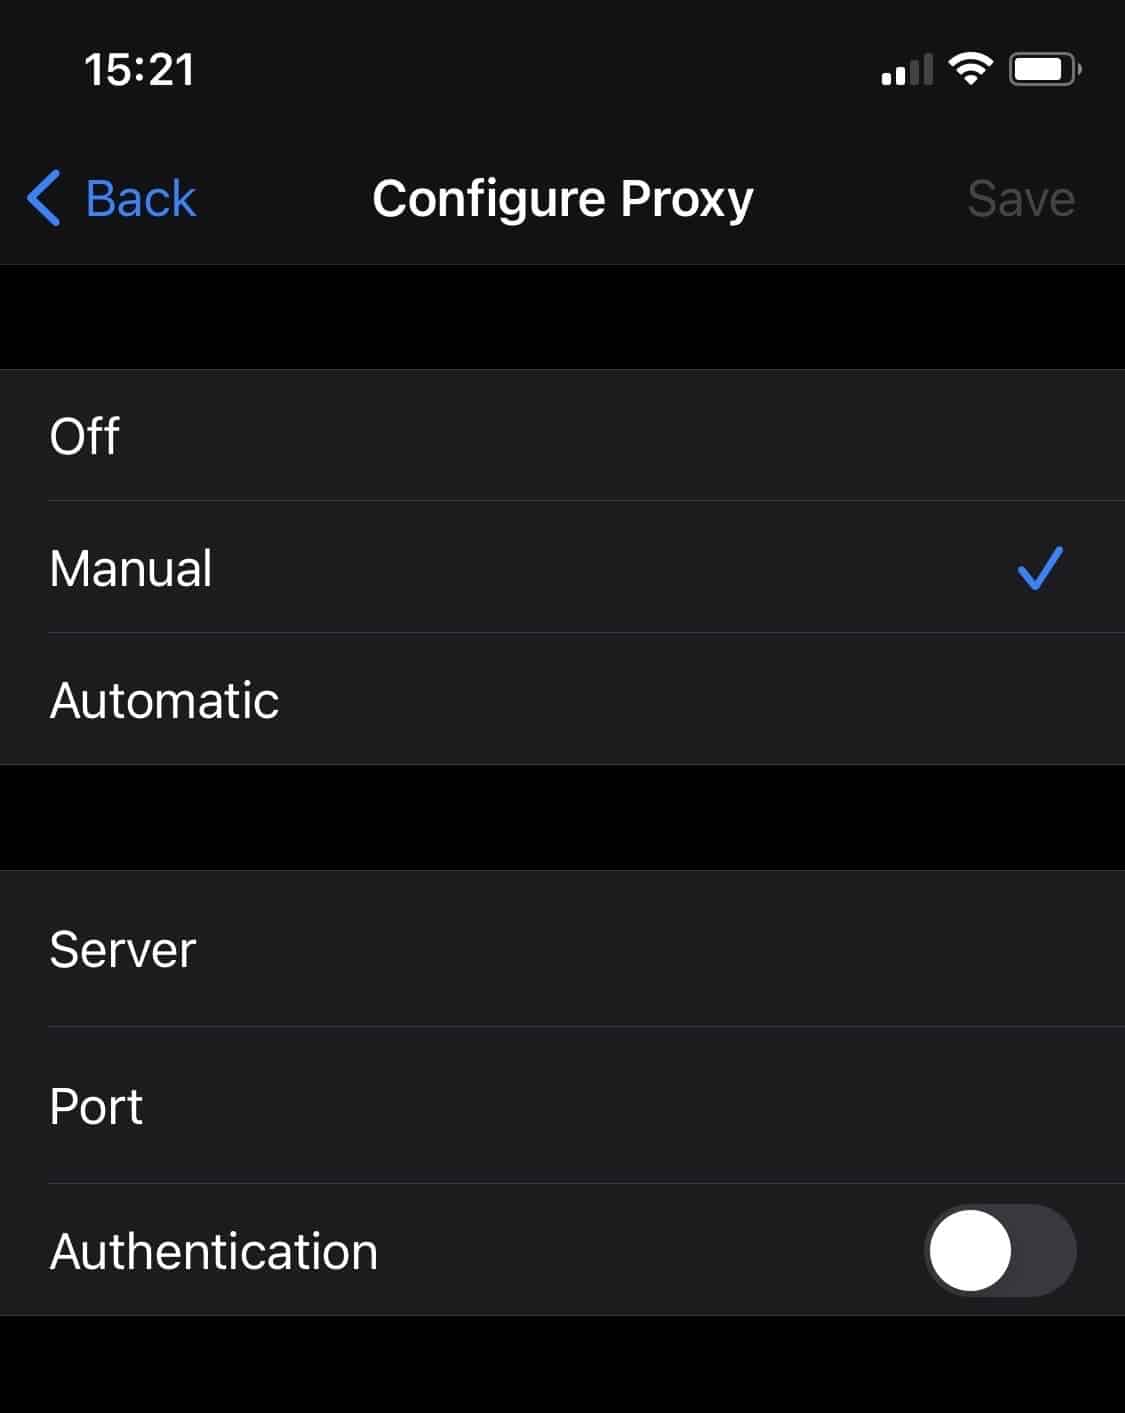
iOS
- Access the Settings app, select WiFi, and tap the “i” next to your WiFi connection.
- Scroll down the page and select Configure Proxy.
- Choose Manual.
- Enter the IP address of your OPNsense box and the proxy port next to Server and Port. 192.168.1.1 and 3128 are the default values.
- Exit the Settings app.
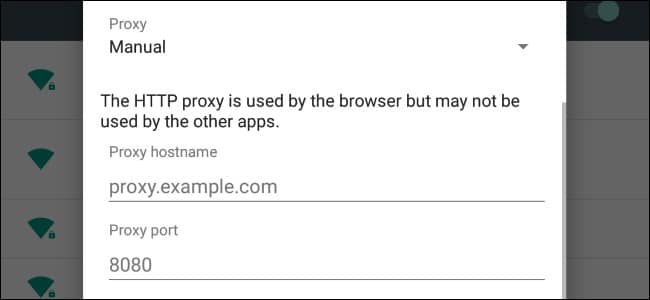
Android
- Launch the Settings app and select WiFi.
- Long-press the current WiFi network.
- Choose Modify network.
- Expand the Advanced options.
- From the Proxy drop-down menu, select Manual.
- Enter the IP address of your OPNsense box and the proxy port – 192.168.1.1 and 3128 are the default values – under Proxy hostname and Proxy port.
- Click Save.
You may have noticed that these settings only apply to WiFi. In order to use the proxy with mobile data on iOS or Android, you would need to install a mobile device management (MDM) profile, which is beyond the scope of this tutorial.
Disabling proxy bypass (optional)
You can also remove the ability for clients on your LAN interface (and any other LAN-type interface you want to proxy) to bypass the proxy server by setting up two firewall rules:
- A rule blocking port 80 (HTTP) outside the proxy;
- A rule blocking port 443 (HTTPS) outside the proxy.
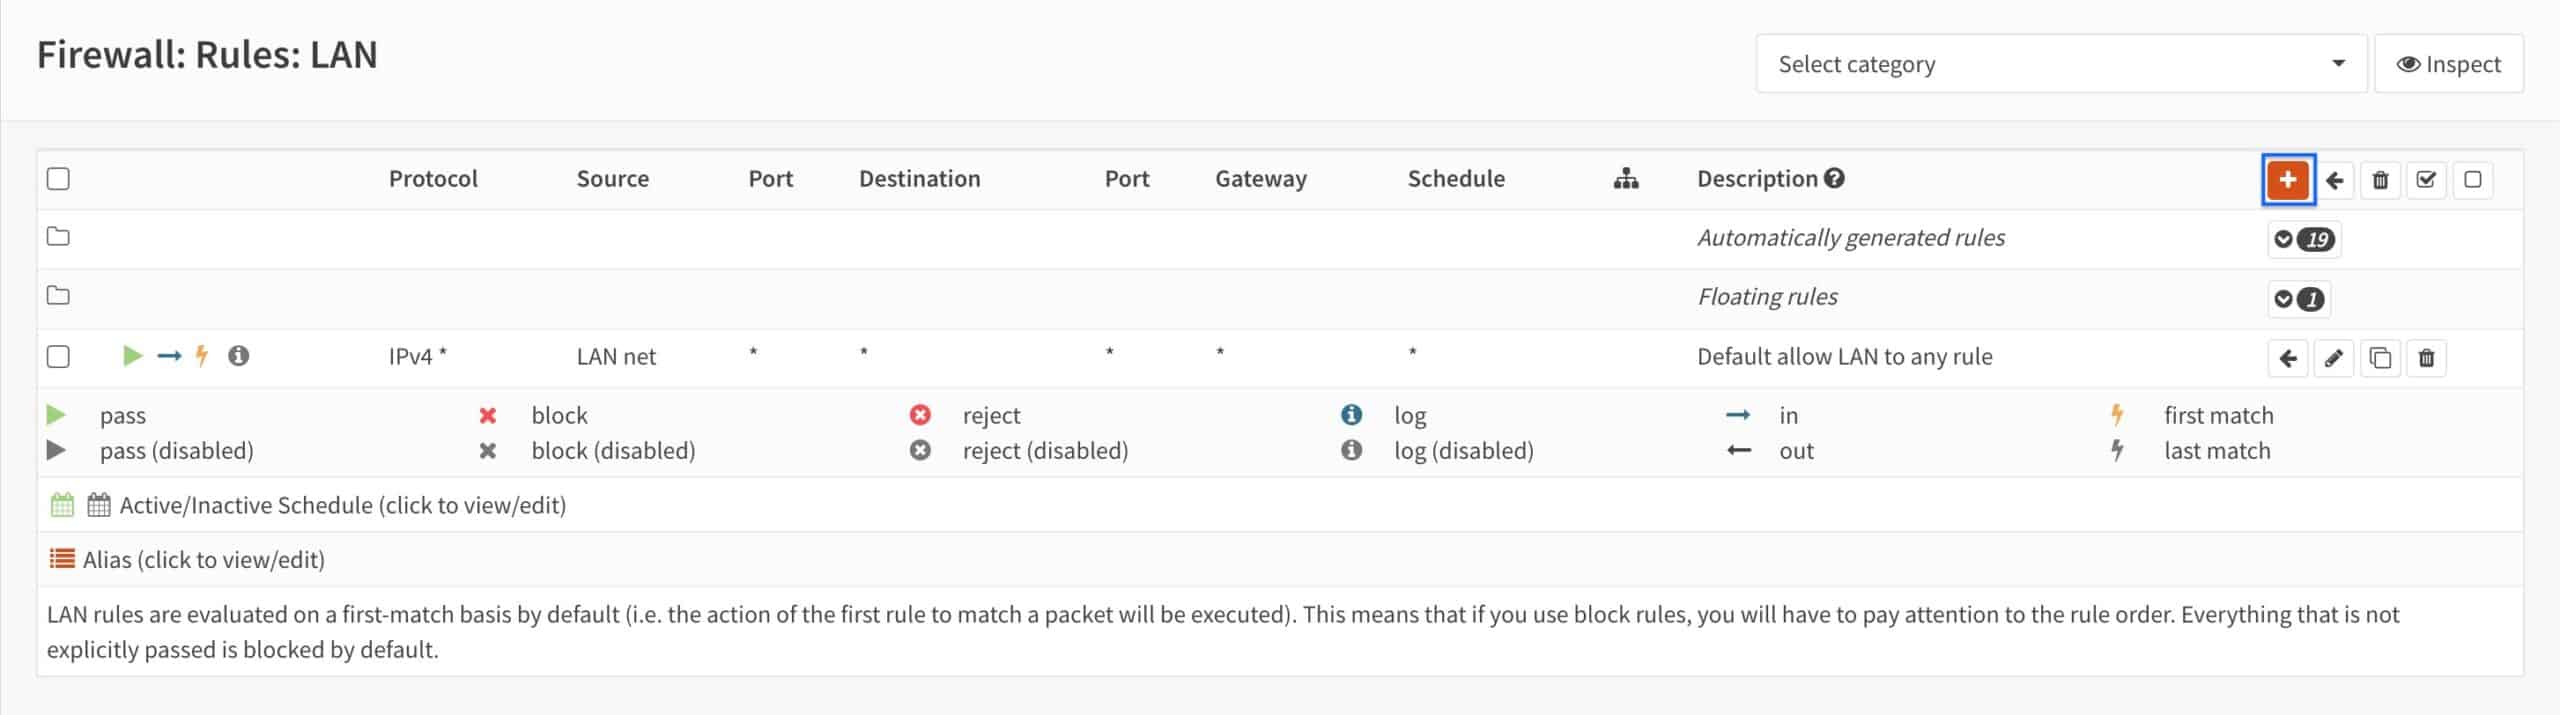
- From the side menus, select Firewall > Rules > LAN. The LAN Firewall Rules page is displayed.
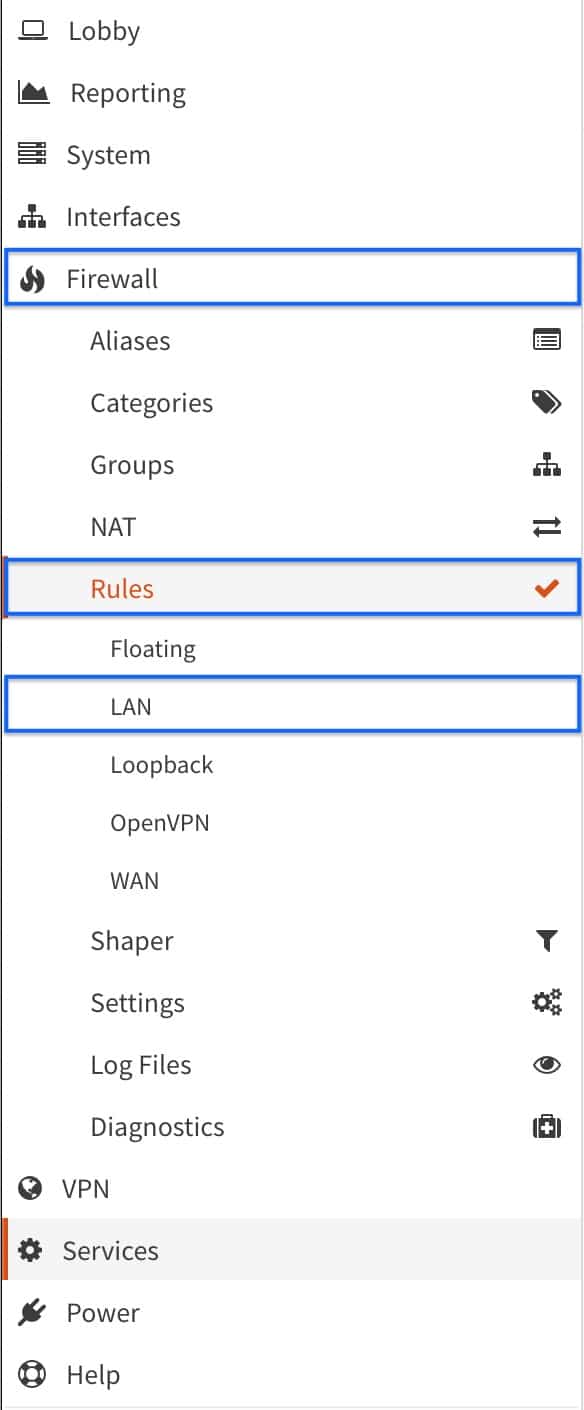
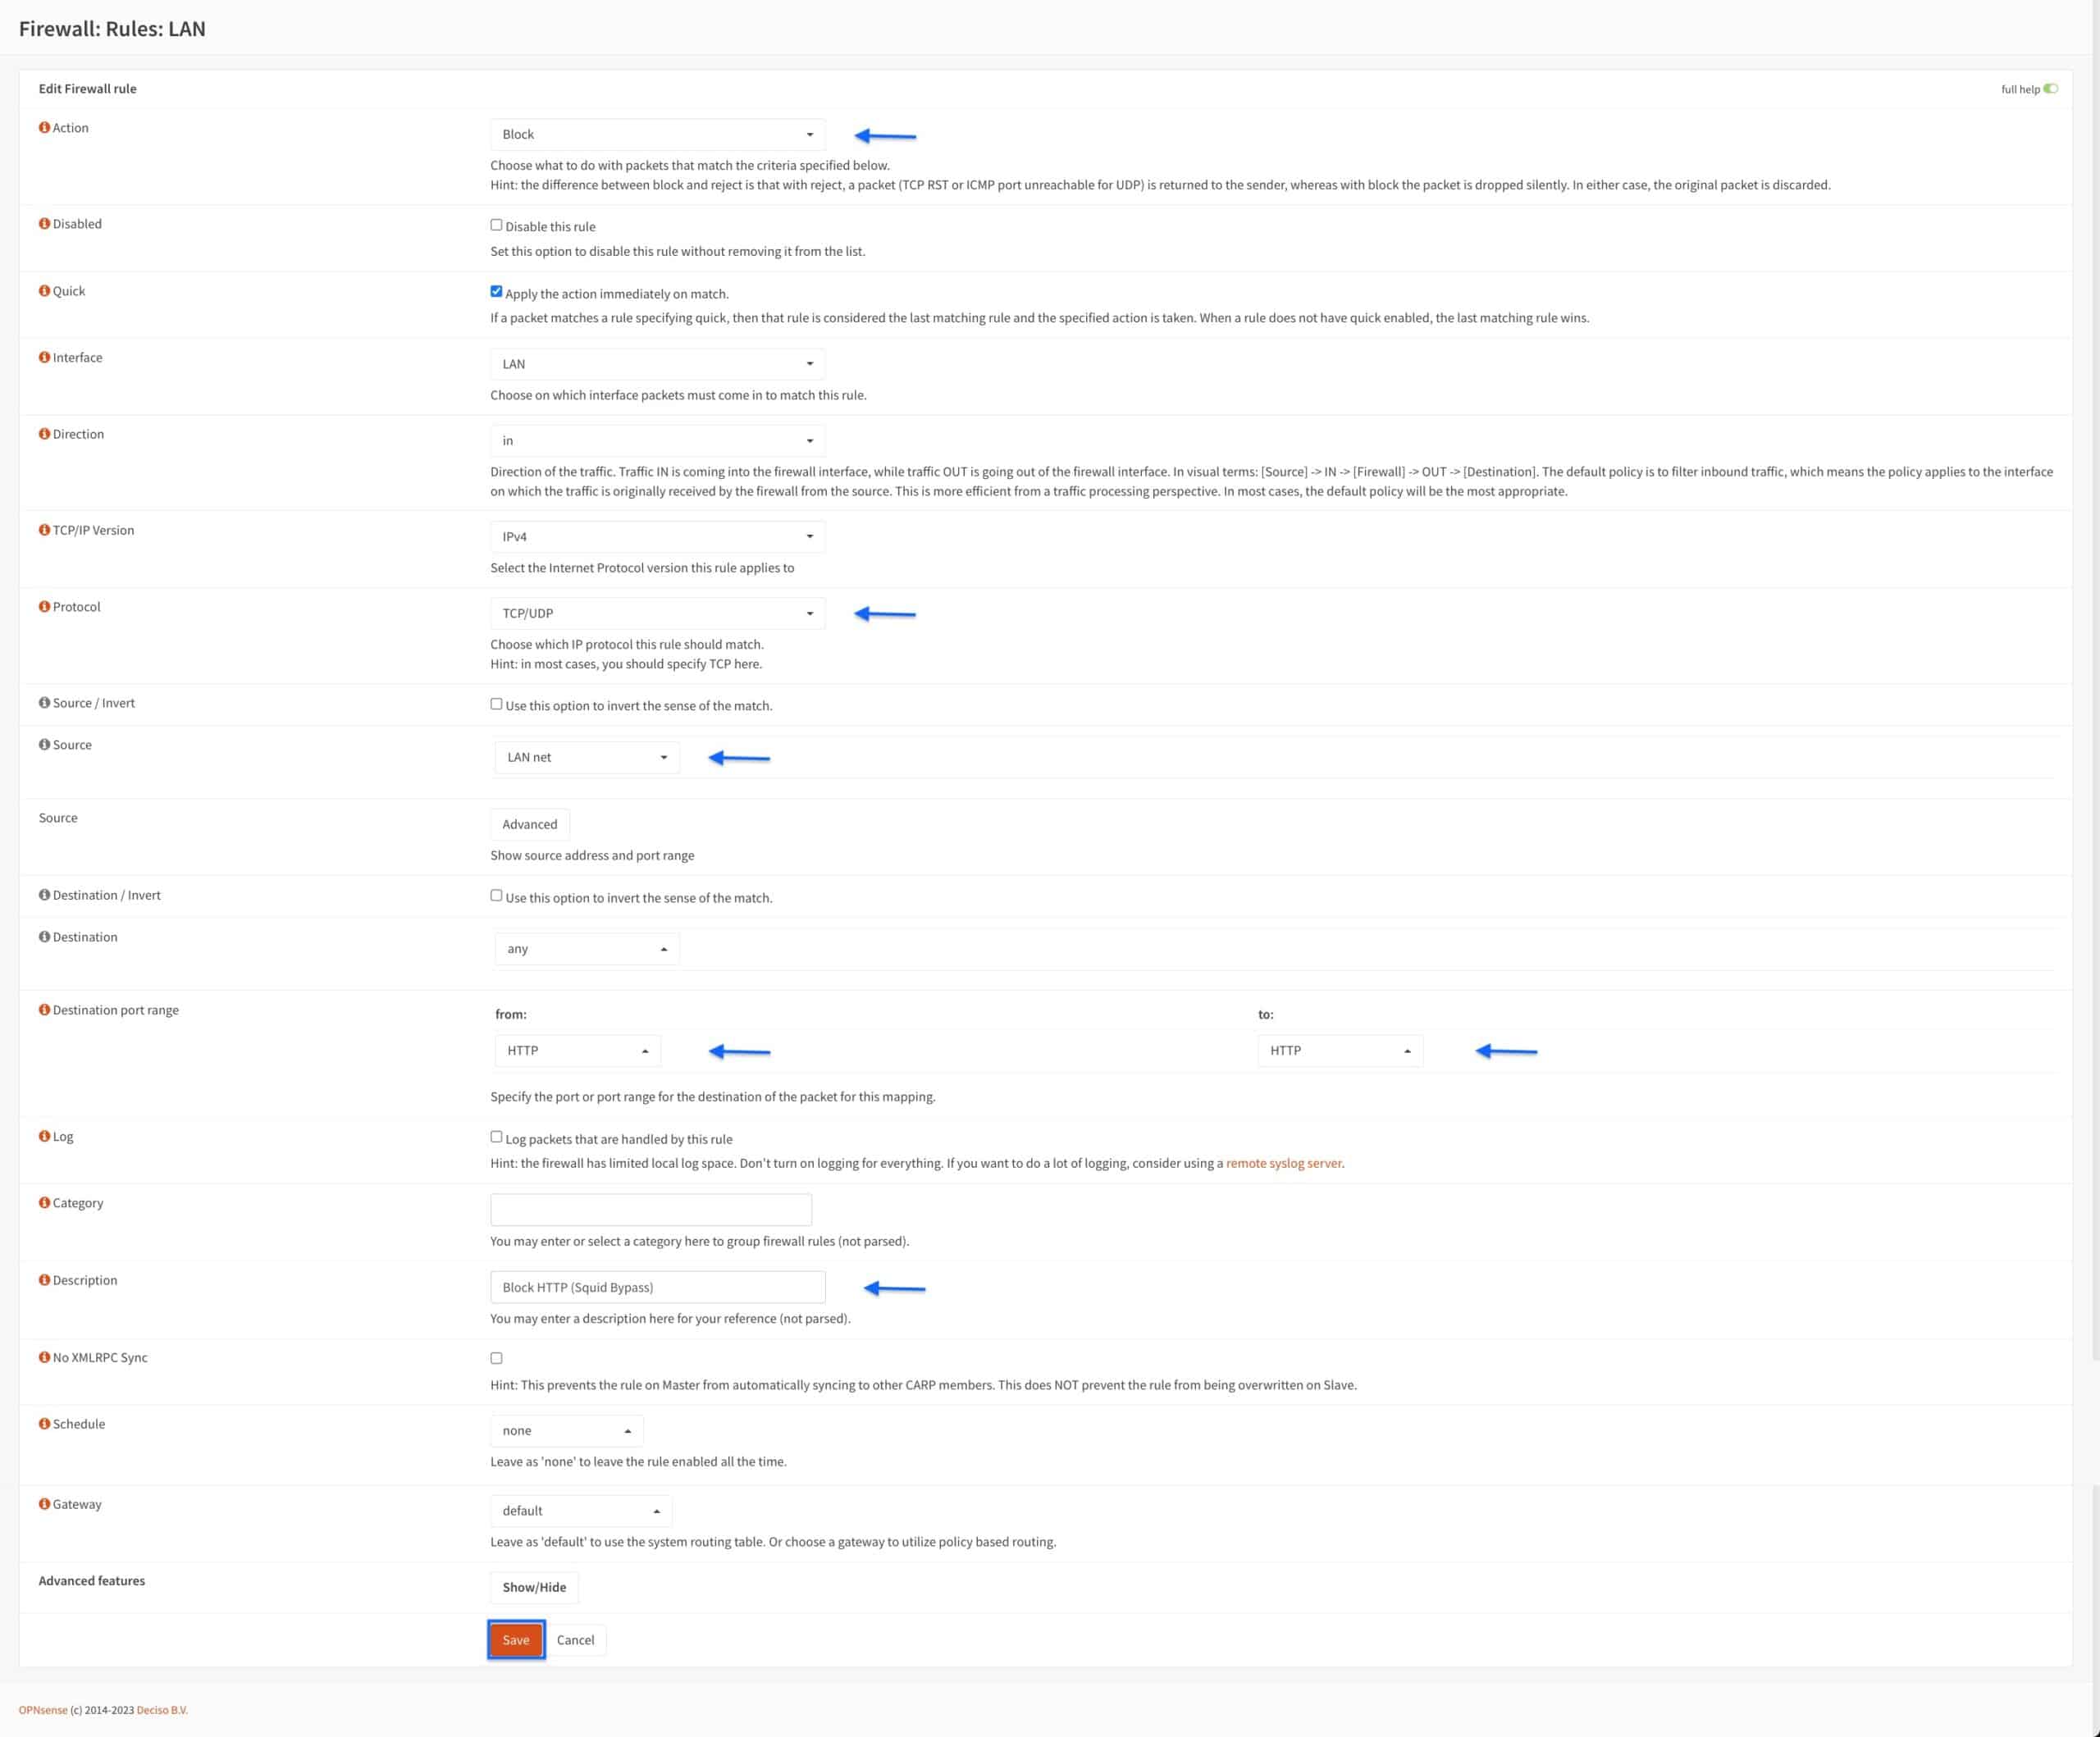
- Click the + sign to add a new rule. The Firewall Rule Configuration page is displayed.
- Set the Action drop-down menu to Block.
- Set the Protocol drop-down menu to TCP/UDP.
- Set the Source drop-down menu to LAN.net.
- Set the Destination port range drop-down menus to HTTP.
- Enter a description for your rule in the Description box (optional).
- Click Save.
- You’re taken back to the LAN Firewall Rules page and we can see that our rule has been created. Click the Copy icon to create a copy of that rule and edit it.
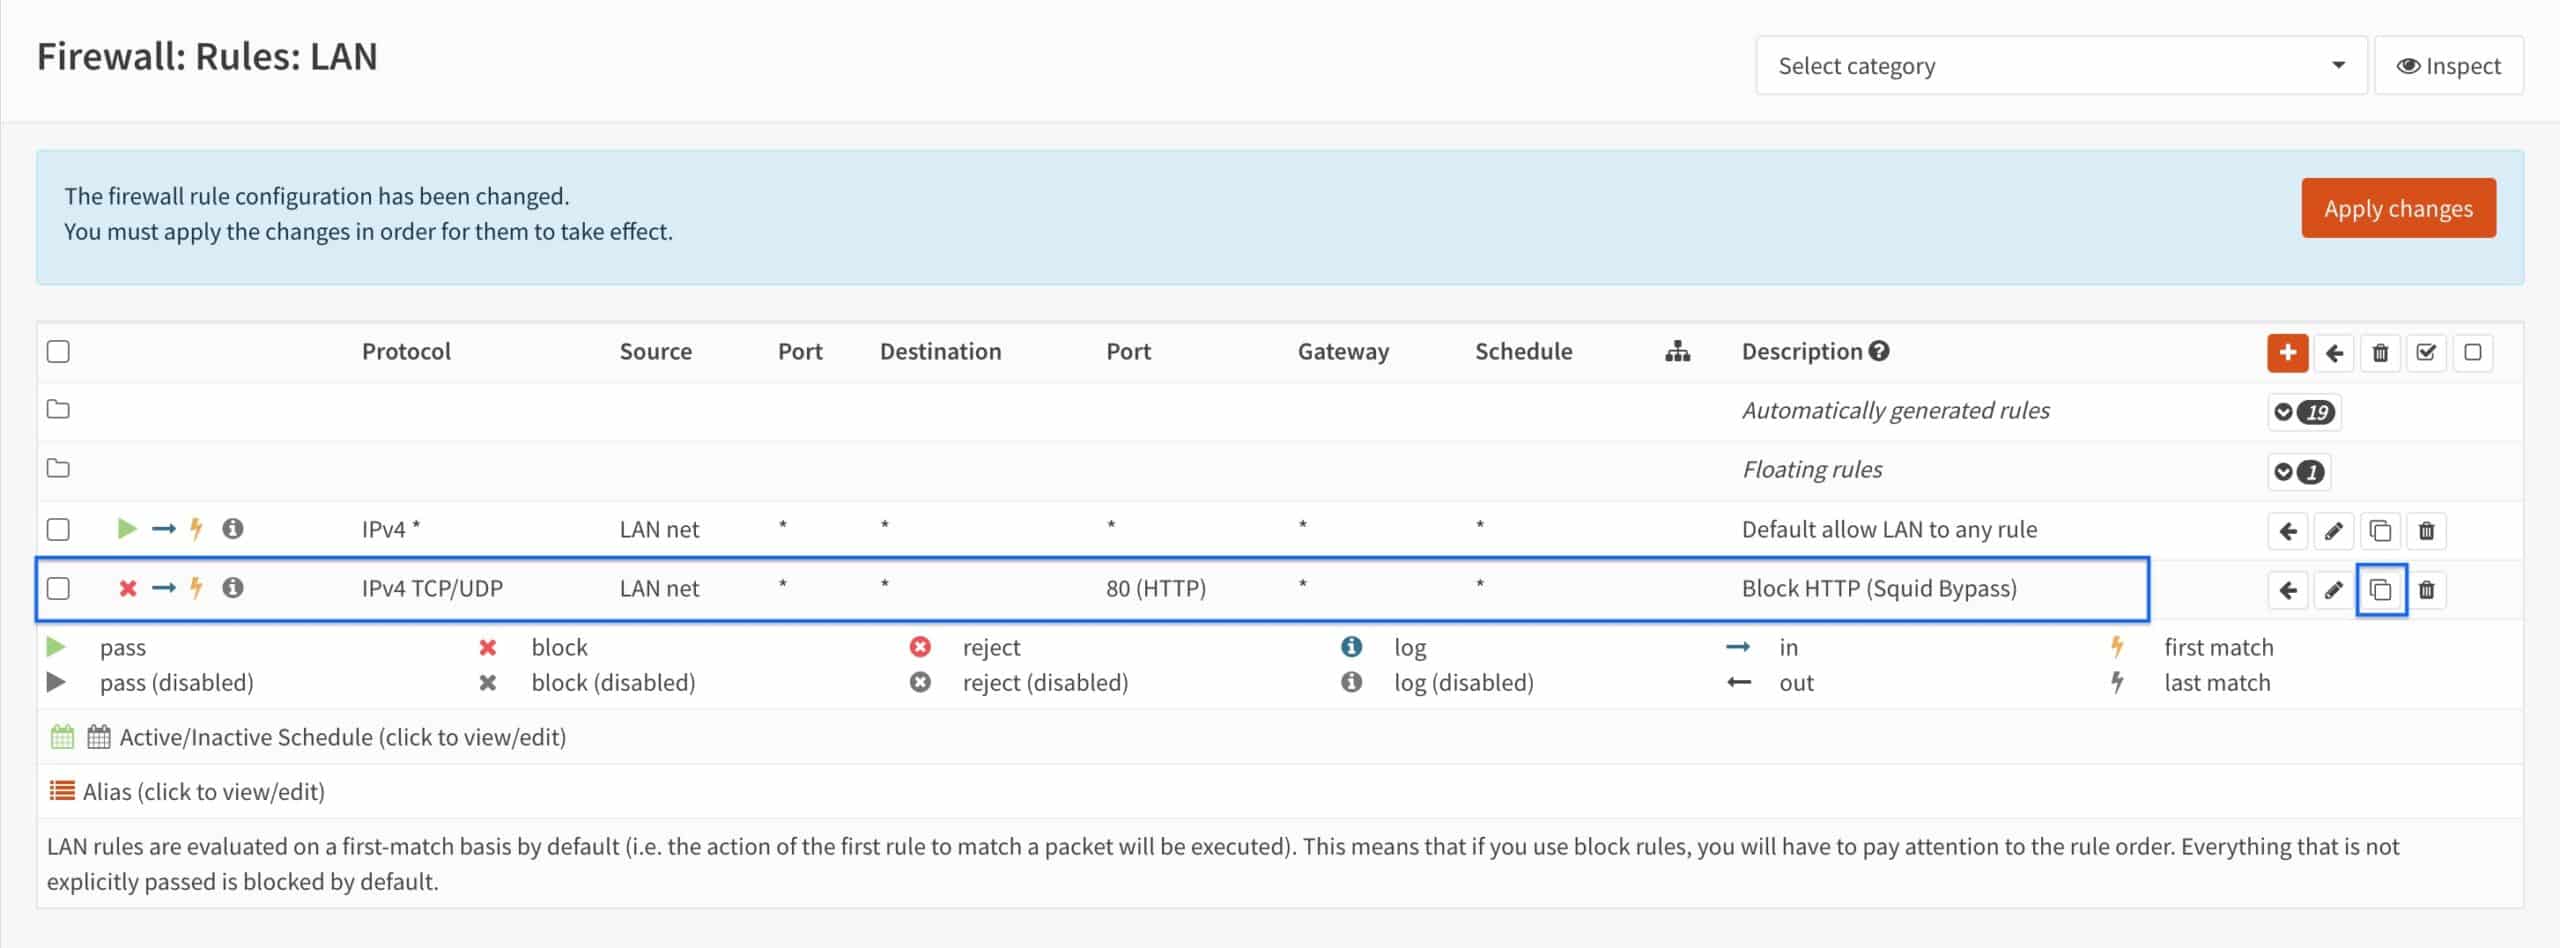
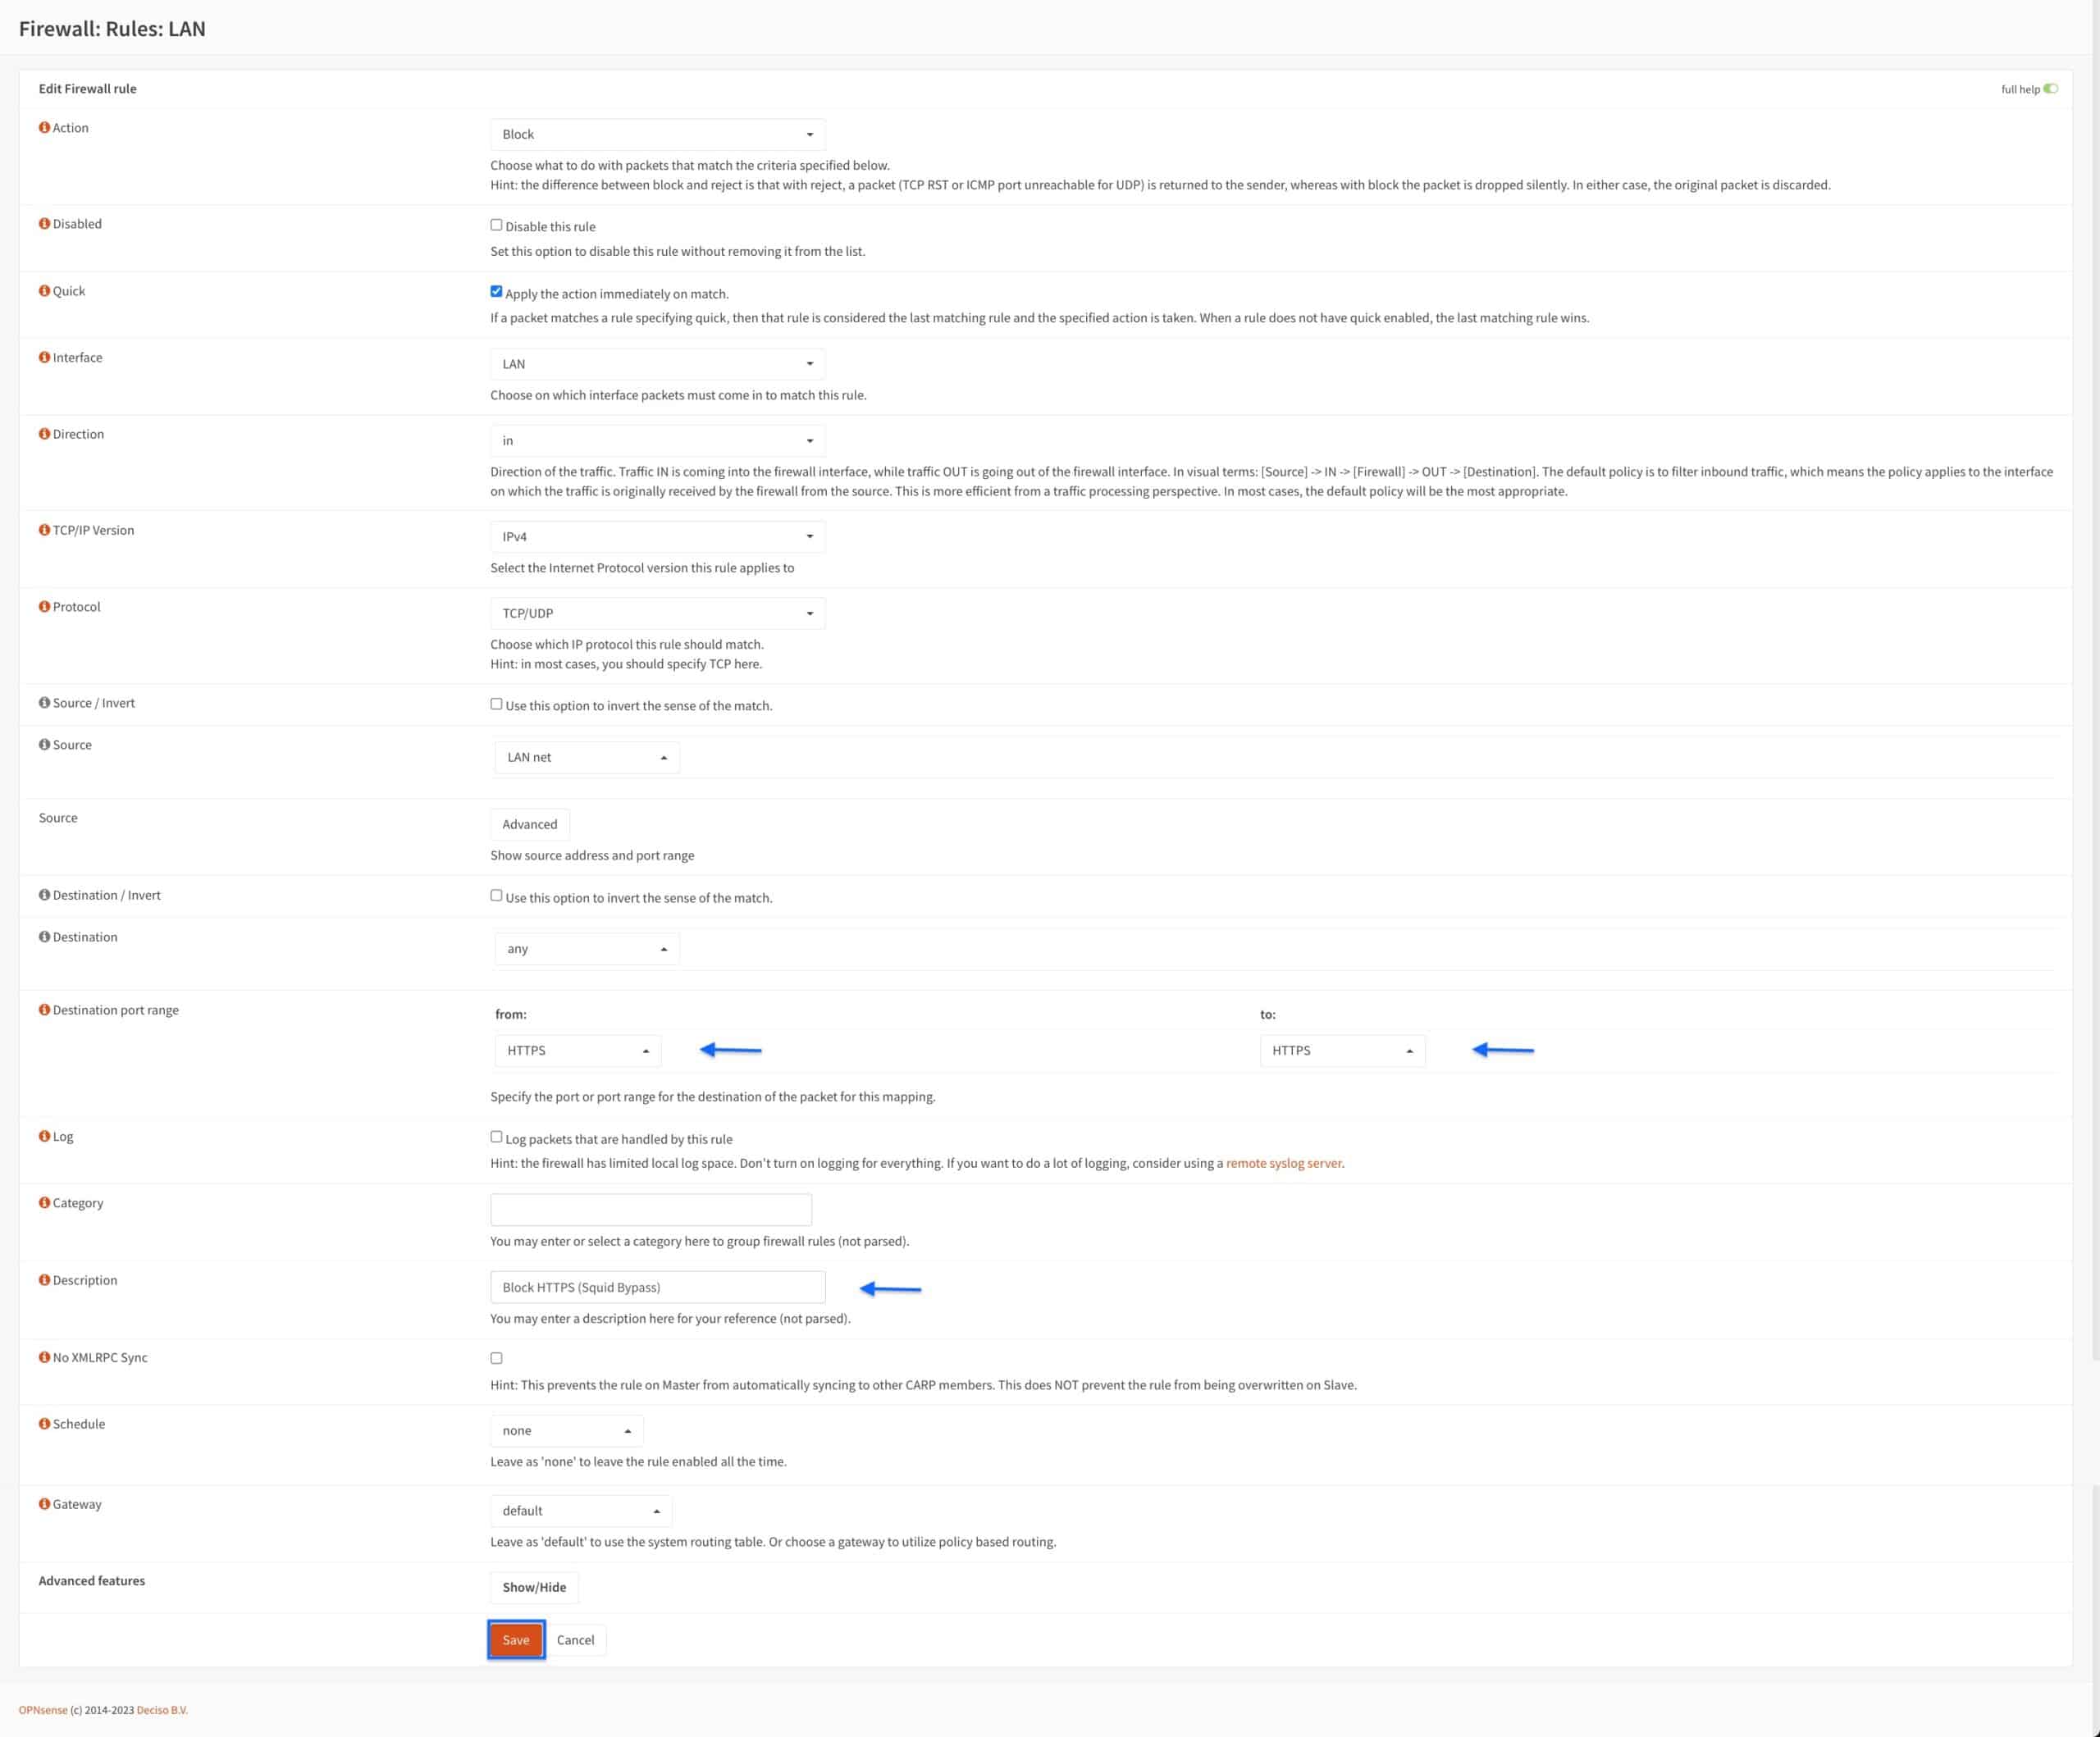
- Scroll down to the Destination port range drop-down menus and select HTTPS instead of HTTP.
- Update the rule description in the Description field (optional).
- Click Save.
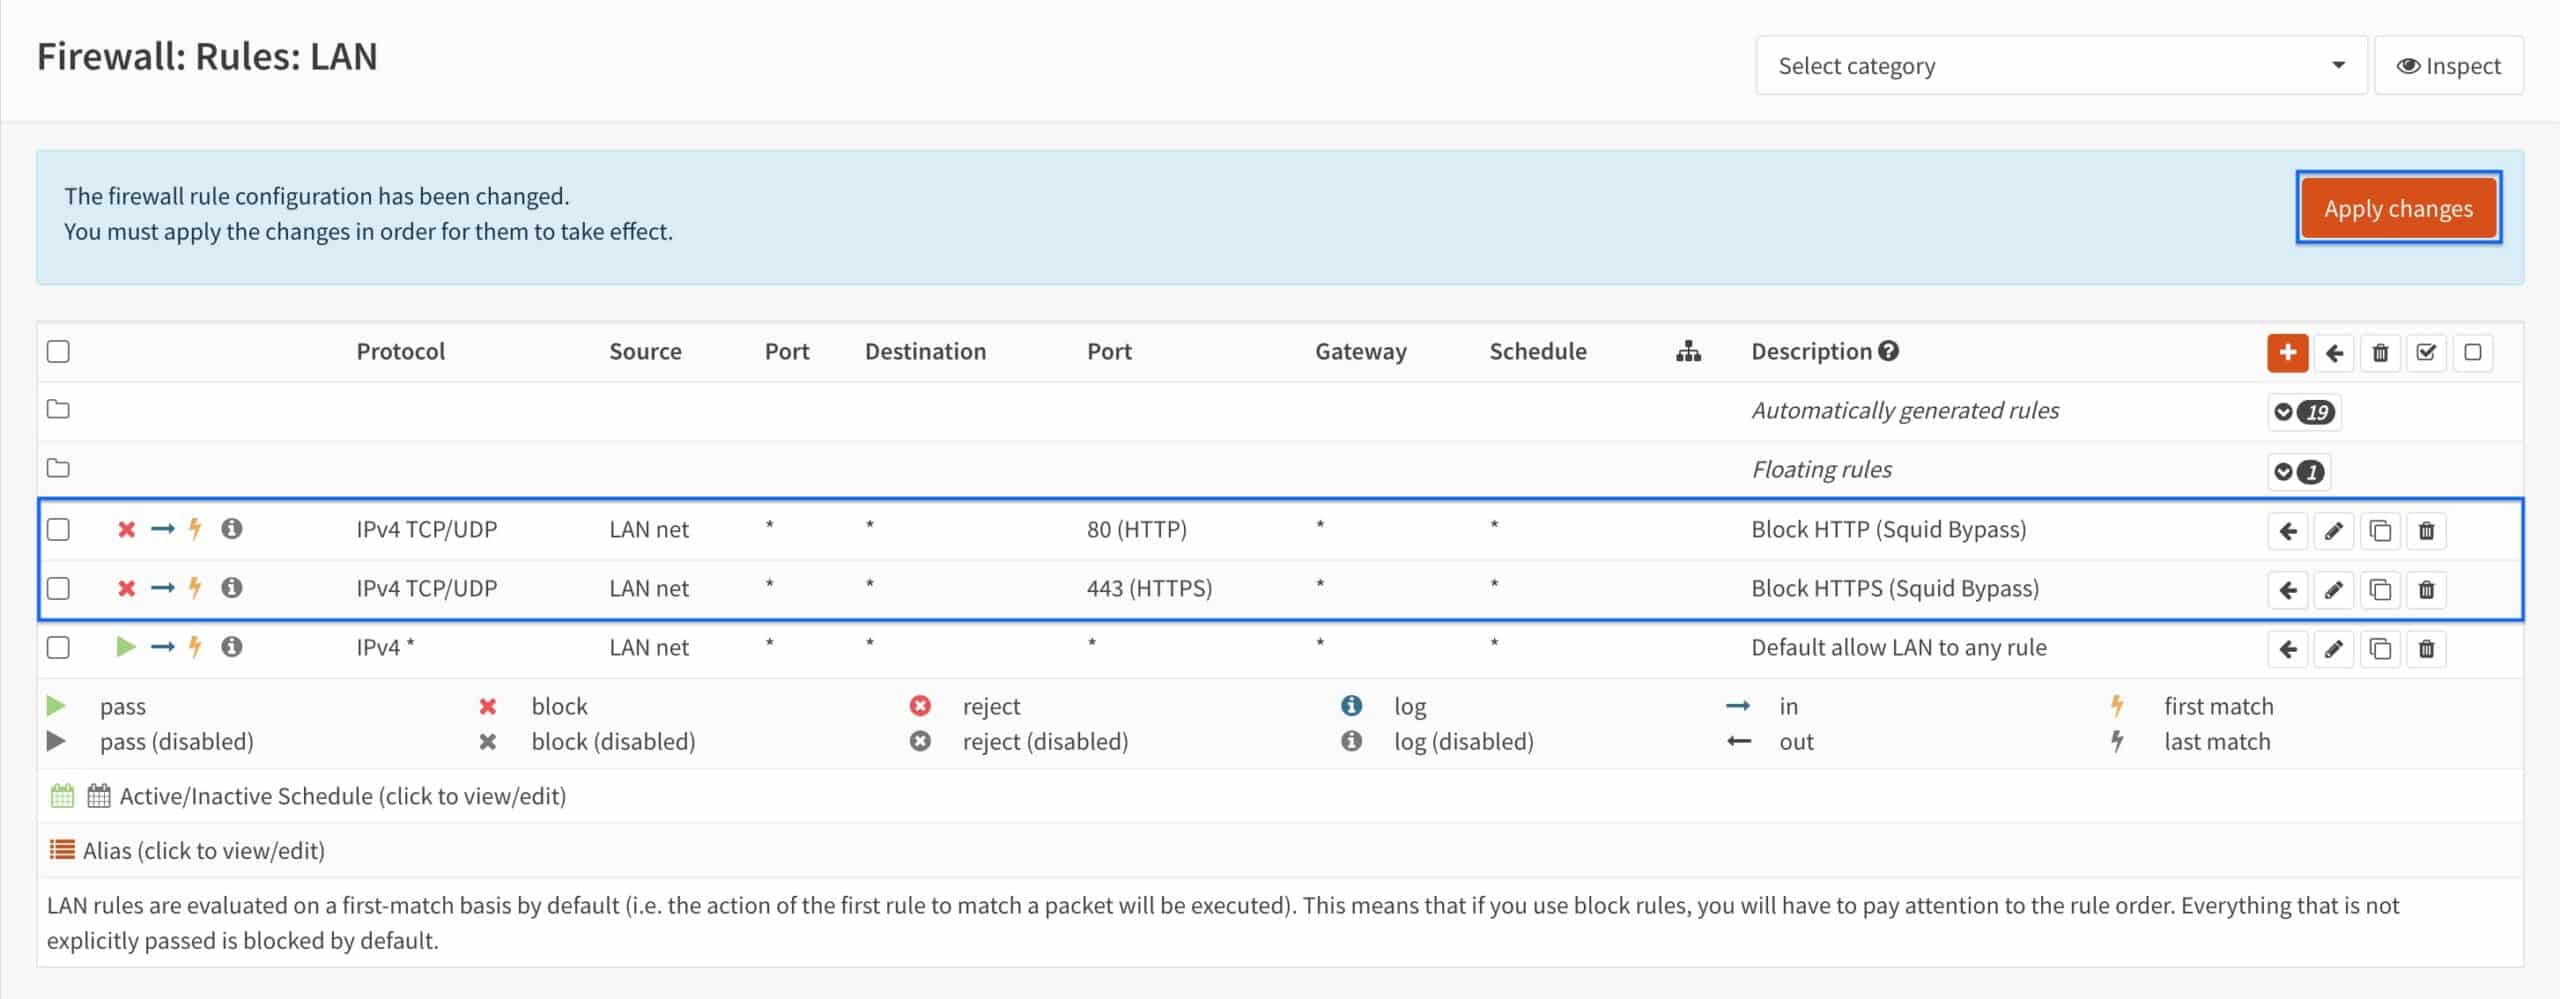
- You’re taken back to the LAN Firewall Rules page and we can see that our two rules have been created.
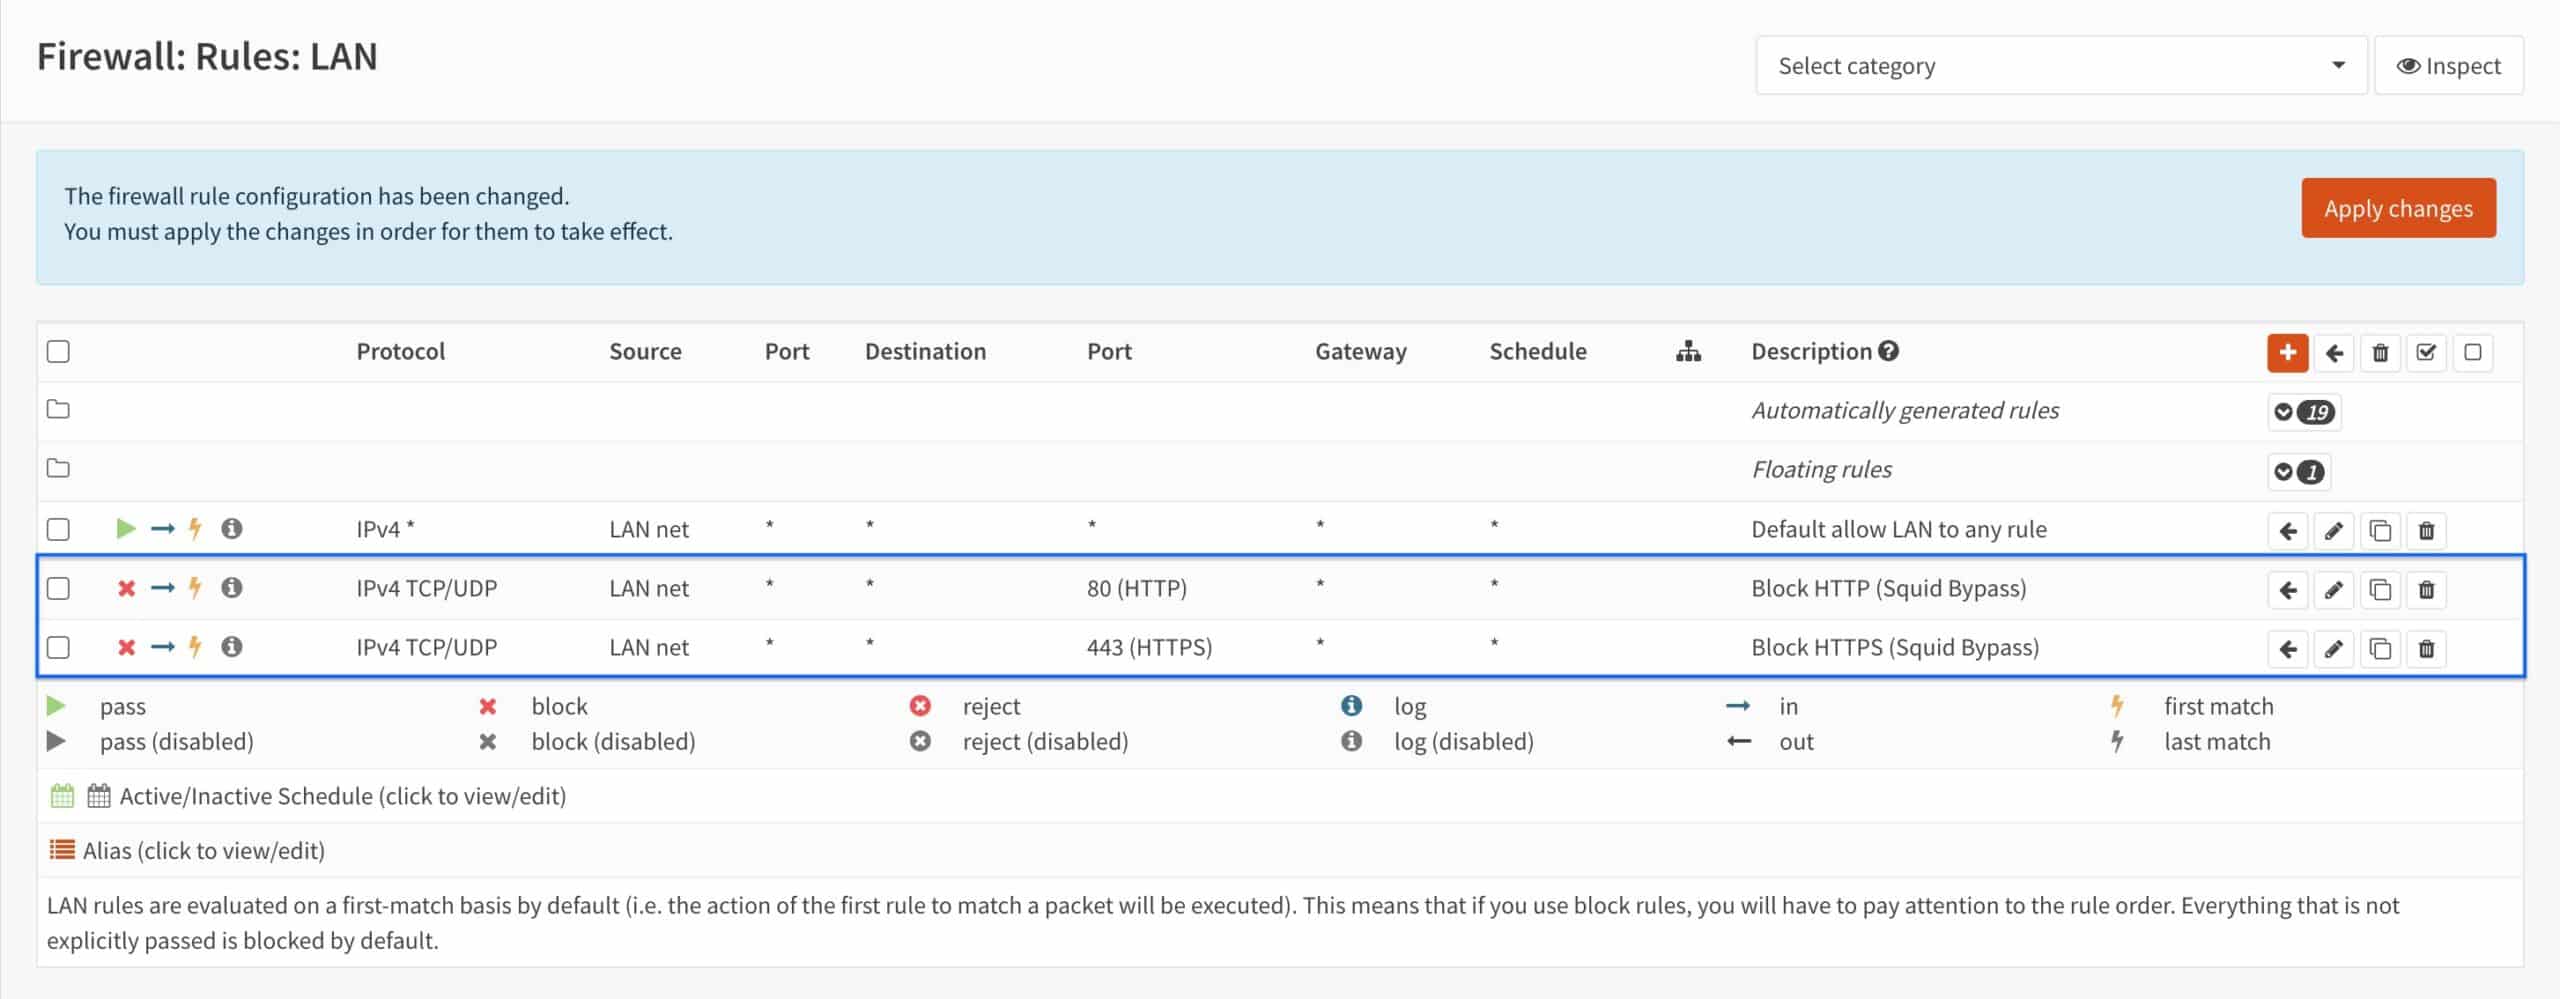
- Tick both rules’ selection boxes and click the Left Arrow icon next to the Default allow LAN to any rule. That will move the selected rules on top of the Default allow LAN to any rule. OPNsense applies firewall rules in a top-down order, so it’s critical that our “block” rules be above our “allow” rule.
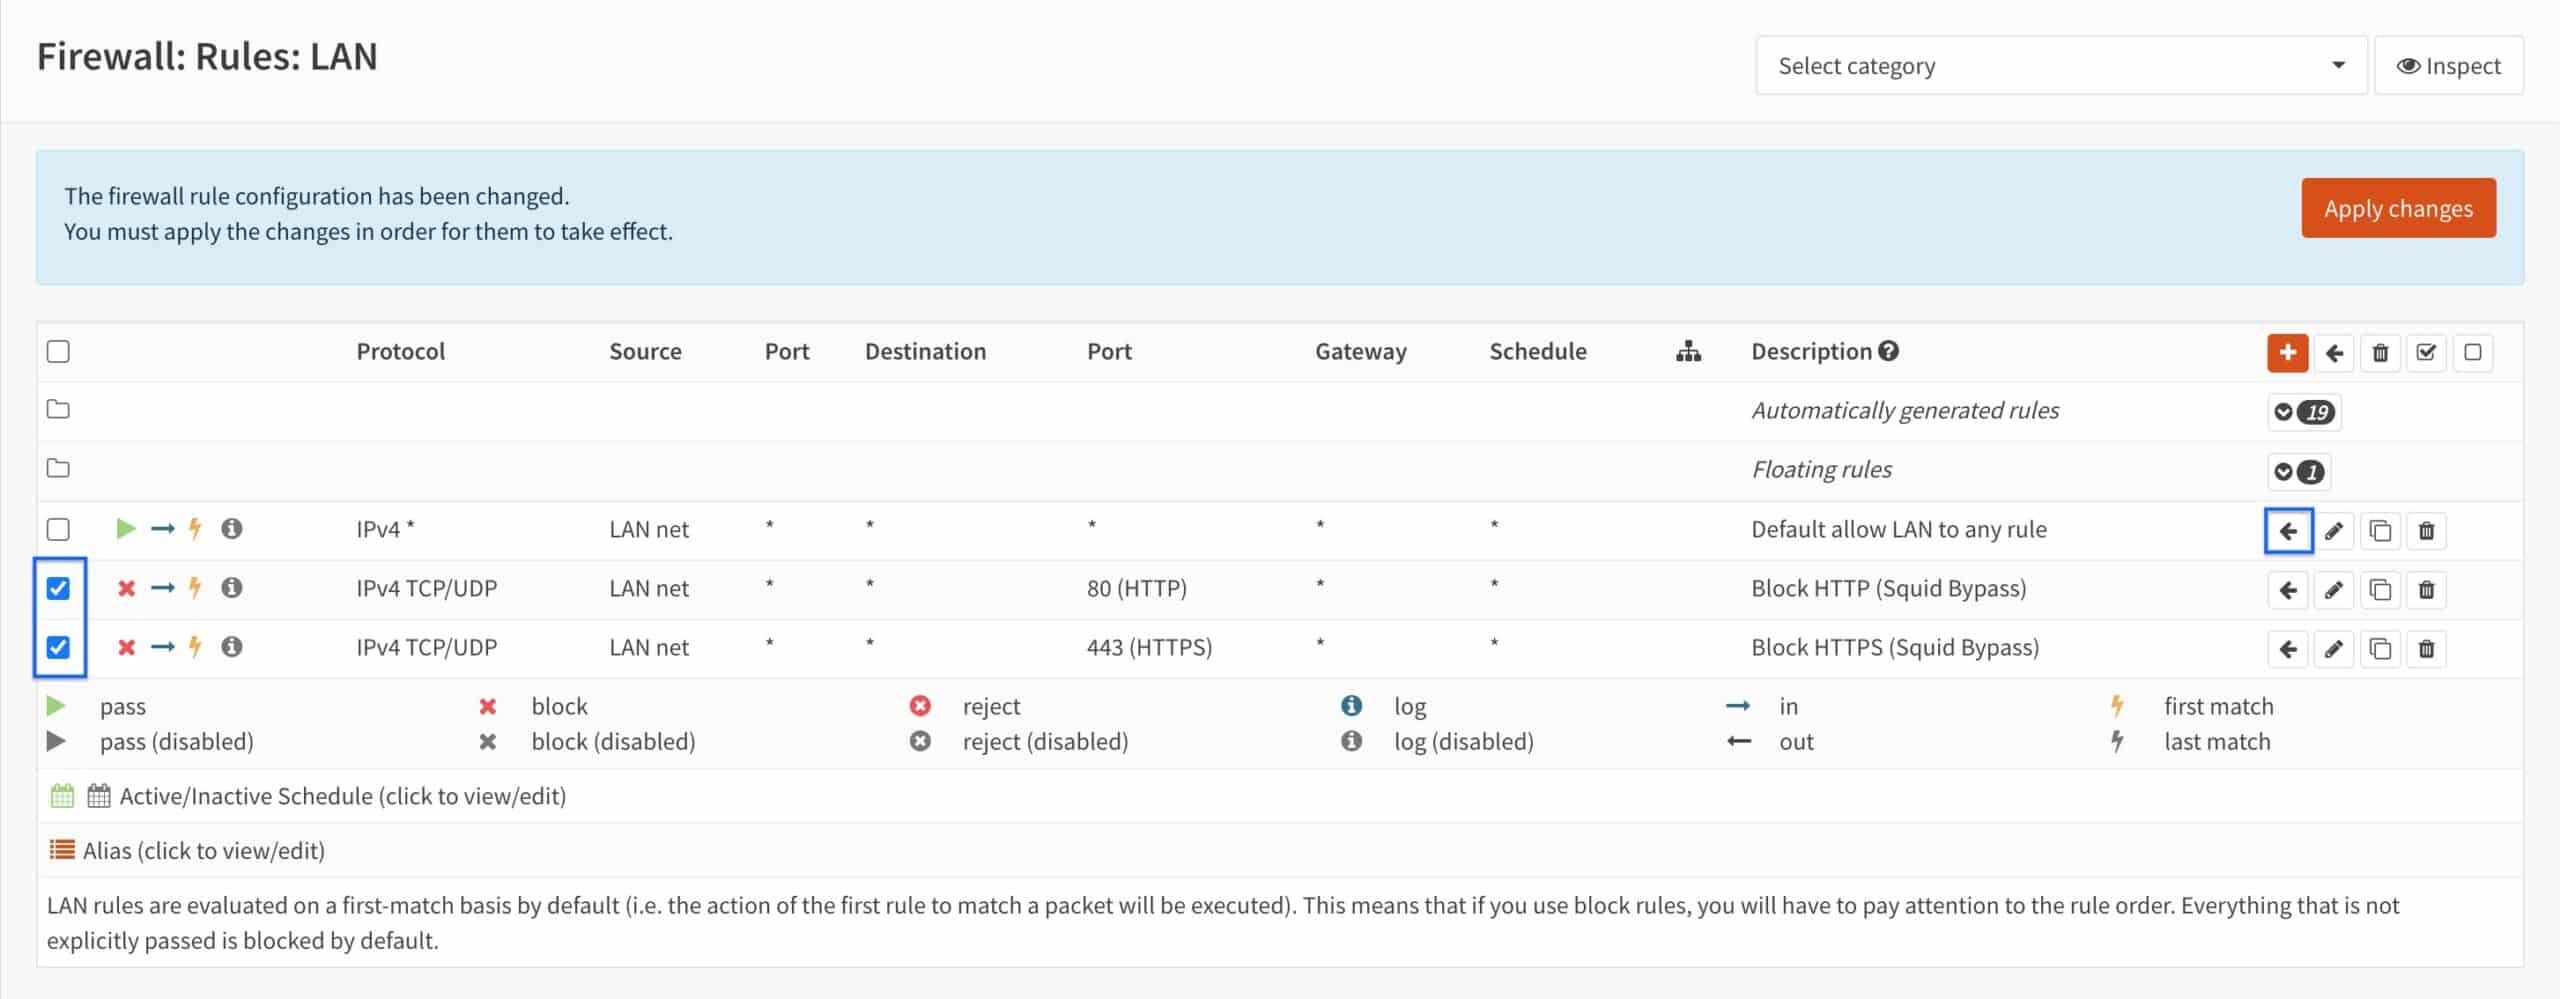
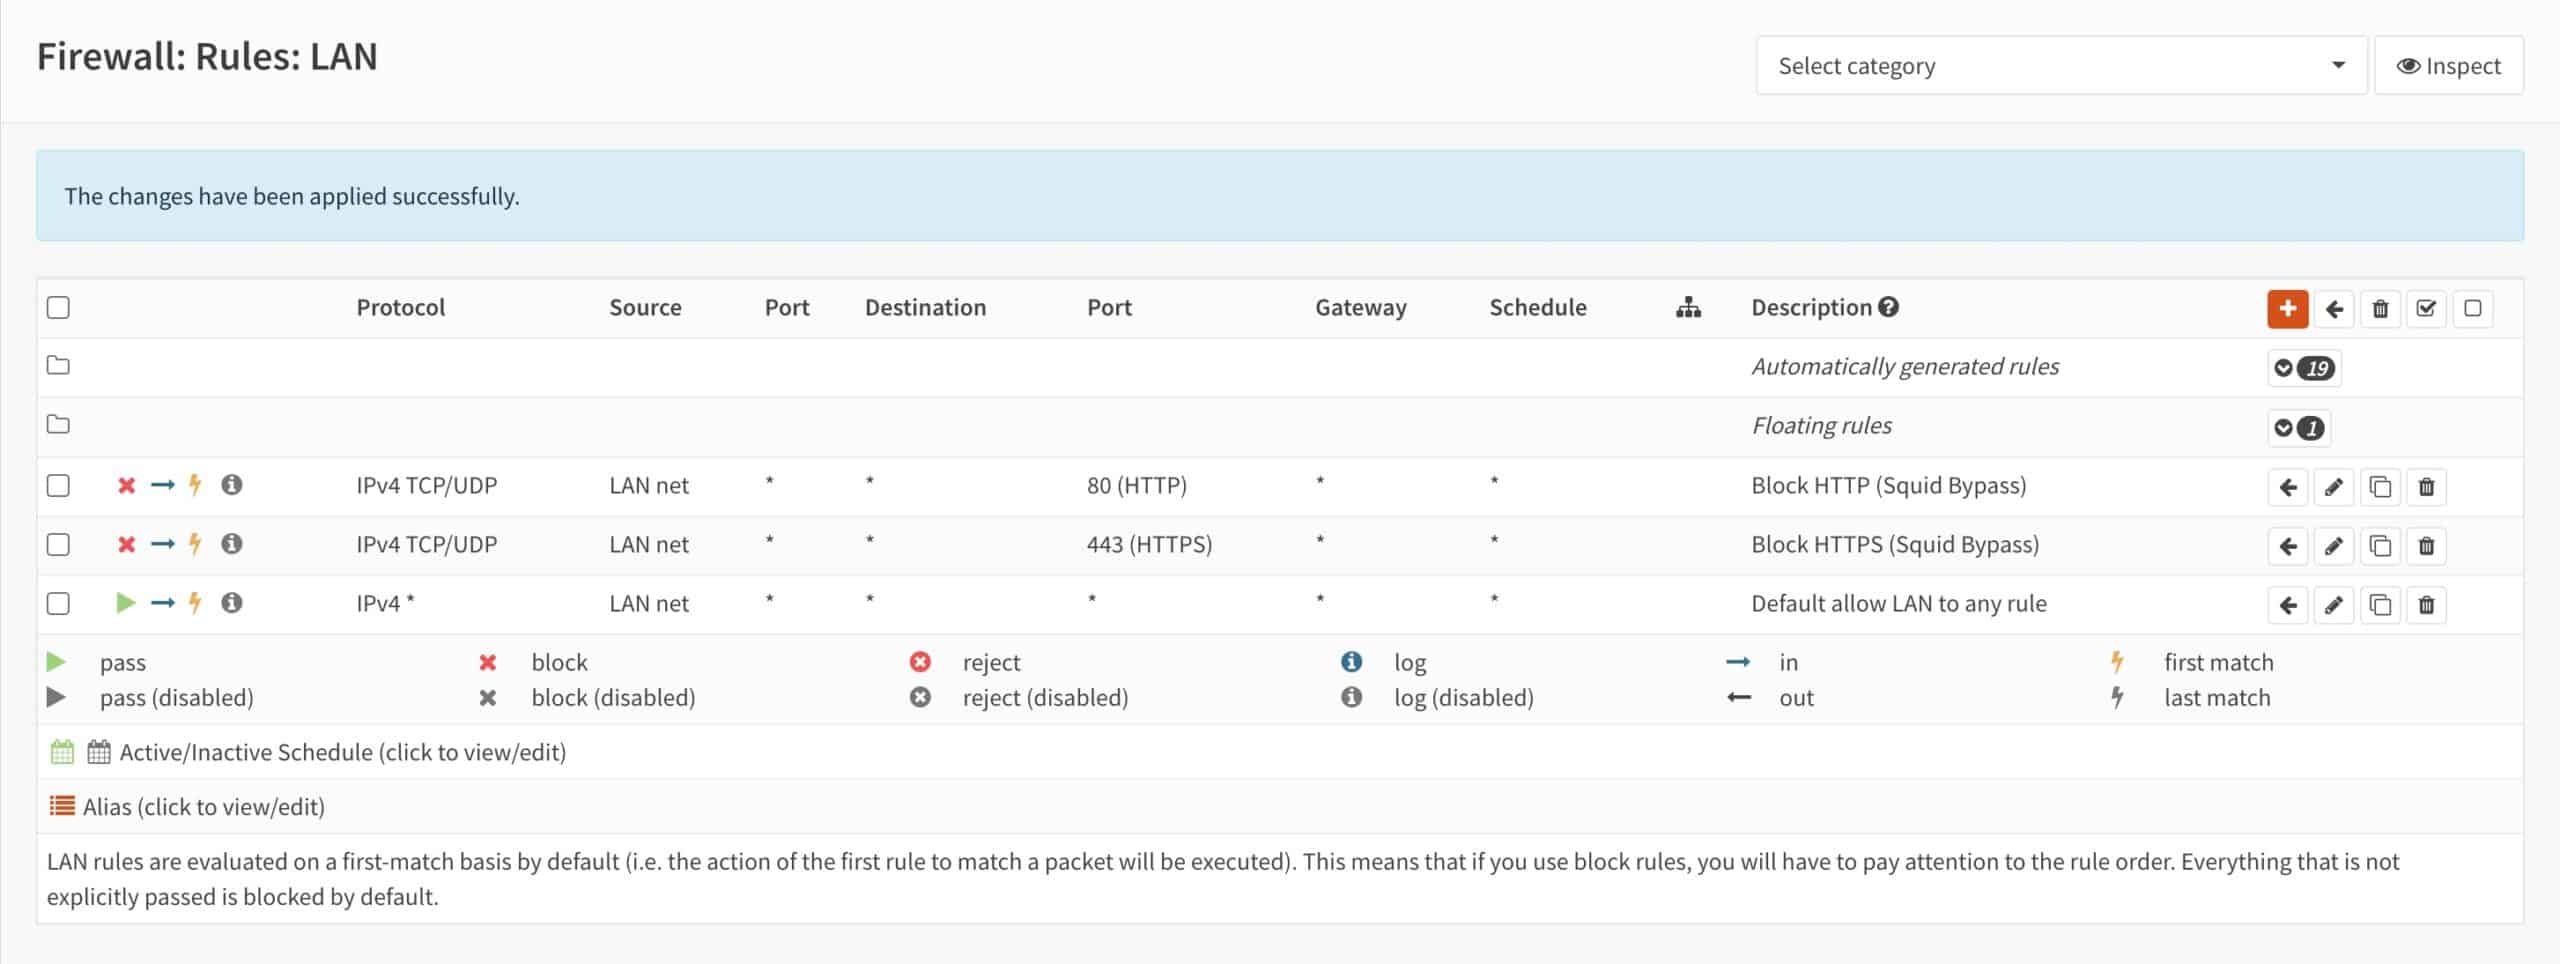
- Our “block” rules are now in the correct position. Click Apply changes.
- Our firewall rules are applied and now, users on your LAN cannot bypass the proxy server.
Note: If you’re wondering why we didn’t need to create firewall rules to send LAN traffic through the proxy, it’s because Squid takes care of this behind the scenes.
Wrapping up
You’ve now successfully set up a caching proxy server with blacklist filtering in OPNsense. When using your OPNsense network, all ads will be blocked on all your devices. This will not only enhance your privacy and security by preventing ads from funneling your data, but will also reduce your bandwidth consumption.
Web pages will load faster because no ads will be downloaded and Squid is caching frequently requested content for you and serving that content locally instead of going back out to the internet to re-download it.
As always, stay safe.
Related: