

If you’re looking for a powerful firewall/router solution emphasizing security, pfSense CE should be at the top of your list. Built upon FreeBSD, pfSense CE provides a range of tools to help you configure a secure network tailored to your specifications. Even without any customization, pfSense will still be more secure than any store-bought router.
Before going any further, you’ll notice I’ve been using the name pfSense CE. CE stands for Community Edition. There are actually two versions of pfSense available: pfSense CE and pfSense Plus. pfSense CE is entirely open-source, while pfSense Plus adds some extra features with proprietary code. Both versions are free for individual users. This guide uses pfSense CE.
One extremely popular add-on package for pfSense CE/Plus is pfBlockerNG. The package further enhances your firewall’s functionality by giving you the ability to filter inbound and outbound connections using IP and DNS blocklists.
pfBlockerNG’s two main functions are:
IP-based Inbound & outbound traffic filtering
pfBlockerNG enables you to filter both inbound and outbound traffic using IP lists. It can also implement GeoIP restrictions to permit or prohibit traffic to and from certain countries. That can be especially beneficial if you open ports on your WAN.
DNS-based ad and malicious site blocking
pfBlockerNG can block ads and prevent access to malicious sites without the need for a proxy server. It achieves this through DNS-based blocking, sometimes referred to as DNS-blackholing. Using pfBlockerNG, your DNS requests are cross-referenced against a list of blocked domains as you move about the internet. If there’s a match, the request is denied. If not, it goes through unhindered.
We’re going to look at and configure both functions, providing more detail about each one as we go.
This guide assumes you have a working pfSense configuration with a WAN and a LAN interface setup.

Let’s start.
Installing pfBlockerNG-devel
The first thing to do is install pfBlockerNG.
- Select System > Package Manager from the top menus. This displays the Installed Packages tab of the Package Manager.

- Go to the Available Packages tab. This displays the list of available packages.

- Scroll down the page to find pfBlockerNG. You’ll notice there are two entries for pfBlockerNG: pfBlockerNG and pfBlockerNG-devel. Select pfBlockerNG-devel. While the “devel” suffix (which stands for development version) makes it appear to be a Beta package, it’s not. The “devel” version is fully functional and under active development. The developer behind the package just prefers to consider it beta software because he’s continually adding new functionality to update the package.

- Click the Install button to the right of pfBlockerNG-devel. This brings up the Package Installer window.
- Click Confirm to start the installation.

- Once complete, Success should be displayed at the bottom of the Package Installer window. You’ve successfully installed pfBlockerNG-devel.

Basic configuration
pfBlockerNG-devel is now installed. To start configuring the package, we’re going to set up IP and GeoIP filtering.
We’re going to configure pfBlockerNG section by section. Settings we don’t mention should remain untouched and left at their default values.
- Select Firewall > pfBlockerNG from the top menus. This brings up the pfBlocker configuration wizard.

- The wizard gives us two options: 1) running the configuration wizard or 2) configuring pfBlockerNG manually. This guide shows you how to configure pfBlockerNG manually. Click on the red HERE to exit the wizard. This takes us to the General page of pfBlockerNG’s settings.

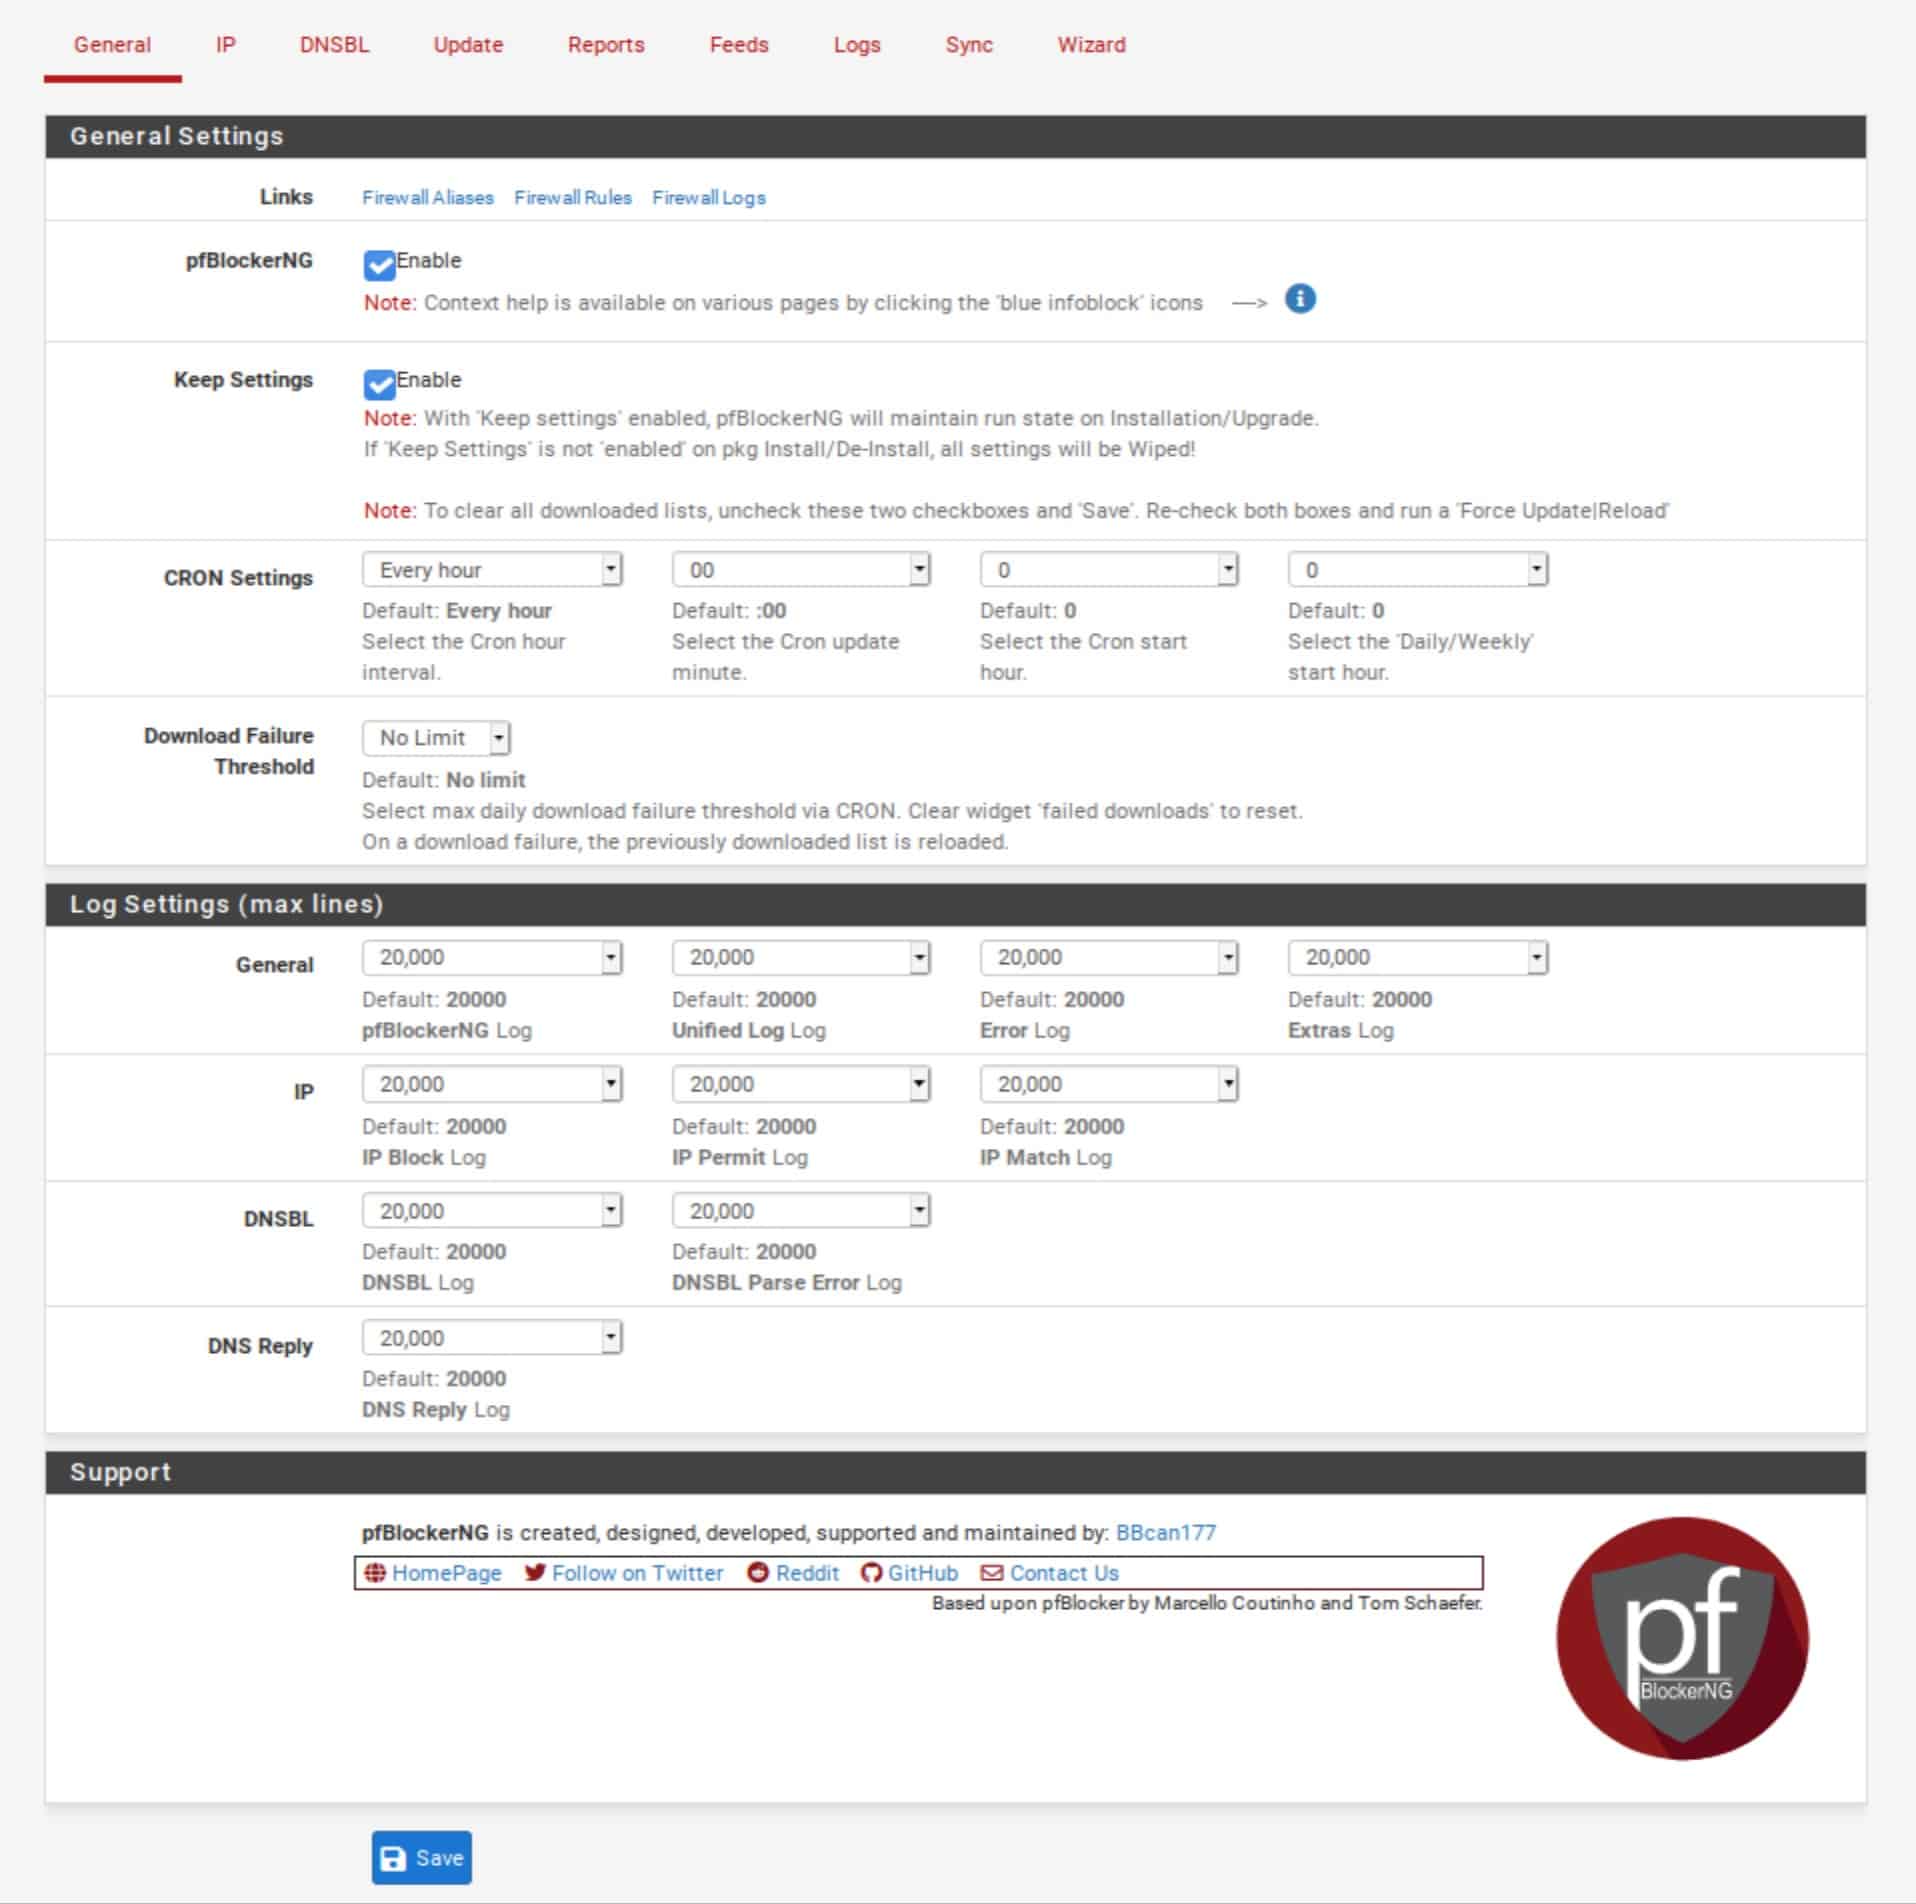
General / General Settings
- Tick the Enable box next to pfBlockerNG. This, unsurprisingly, enables the service.
- Click Save (at the bottom of the page).
- Leave all the other settings on this page untouched.
IPv4 Filtering
IP / IP Configuration
- Click the IP tab to display the IP settings page.
- Tick the De-Duplication box. This discards duplicate entries that can crop up when using multiple IP feeds.
- Tick the CIDR Aggregation box.
- Tick the Suppression box. Suppression ensures that traffic to your local subnets is not blocked.

IP / MaxMind GeoIP configuration
pfBlockerNG’s GeoIP feature allows you to filter traffic to and from entire countries – or even continents. It uses the MaxMind GeoIP database, which requires a (free) license key. A link within the pfSense UI (in the MaxMind License Key field description) links to the MaxMind registration page. Fill out the registration form to obtain your free license key. Once you’ve obtained your license key, copy and paste it into the MaxMind License Key field.

IP / IP Interface/Rules Configuration
In this section, select the inbound and outbound interfaces on which pfBlockerNG should apply IPv4, IPv6, and GeoIP filtering.
- From the Inbound Firewall Rules field, select WAN (and any other WAN-type interfaces you have and want to filter).
- From the Outbound Firewall Rules field, select LAN (and any other LAN-type interfaces you have and want to filter).
- Tick the Enable box next to Floating Rules. Floating rules differ from the firewall rules you configure on each interface; they’re processed and applied before the “regular” firewall rules. Using floating rules ensures that pfBlockerNG’s filtering is triggered as soon as the firewall sees the offending traffic. By ticking this box, pfBlockerNG automatically creates the floating rules for you.
- Click Save IP Settings at the bottom of the page.

Feeds
We’re now going to add some blocklists to pfBlockerNG. pfBlockerNG is bundled with some built-in feeds that we can use (feeds and lists mean the same thing in pfBlockerNG). While you’re free to use your own custom lists, having “preset” is really convenient as searching for blocklists on the internet is time-consuming, and many of the ones you’ll find will either not work or will no longer be maintained. pfBlockerNG regularly updates its bundled feeds, so go ahead and use those.
- Click on the Feeds tab.
- Click the blue + to the left of PRI1 at the top. PRI1 is a group of feeds (multiple lists). Clicking the blue + takes you to the IP / IPv4 page, which displays your selected feeds. Most of the relevant fields are populated automatically.

IP / IPv4
At the top of the page, pfBlockerNG displays the name of the feed collection and its description. Below are the included feed URLs and their descriptions on the right. All of our feeds are set to OFF by default. We’re going to enable them.

Before that, we’re going to delete one of the feeds from the PRI1 group. The 7th feed from the top, Pulsedive, requires a paid API key. This guide doesn’t require purchasing the API key, so click the orange Delete button next to the Pulsedive list.

- With Pulsedive deleted, set the remaining feeds to ON.

- Go to the Settings section of the page below the feeds list.
- The first field is the Action drop-down menu. Select Deny Both. This will block the IP addresses in the above lists bidirectionally (to and from the IP addresses contained in the feeds). You can deny inbound, outbound connections, or both. Bear in mind that if you only deny inbound traffic, when a host on your network establishes an outbound connection to one of the IP addresses in the above lists, pfBlocker will allow the inbound response from that IP address. In our example, I will select Deny Both.

- Click Save IPv4 Settings (bottom of the page).
If your ISP assigns both an IPv4 and an IPv6 IP address to your WAN, you can apply the same configuration steps for IPv6 on the IPv6 tab. Currently, the majority of users are still on IPv4-only networks.
GeoIP Filtering
We’re going to force an update of pfBlockerNG before configuring GeoIP filtering. Once configured, pfBlocker will automatically update itself at set intervals. But because GeoIP filtering relies on the MaxMind database, pfBlocker needs to download the database before setting that up.
- From the pfBlockerNG settings, select the Update tab.
- Click the Run button to start the update.

- You should see UPDATE PROCESS ENDED at the bottom of the Log window once the update is complete.

- The Log window shows that both my IPv4 feeds and the GeoIP database have been updated.
IPv4 logs

GeoIP logs

- Select the GeoIP sub-menu next to IPv6 from the IP tab in the pfBlockerNG settings. This displays the GeoIP Summary.

The GeoIP Summary groups GeoIP address feeds arranged by continent. There are also two extra categories: Top Spammers and Proxy and Satellite. The Top Spammers list contains IP address blocks from countries where online attacks are frequently launched. The Proxy and Satellite list contains IP address blocks from countries known to be anonymous proxy and satellite providers.
pfBlockerNG allows you to filter traffic to/from an entire continent or to fine-tune the filtering by only selecting certain countries.
Customizing country lists
- To edit a feed, click the pencil icon to its right.

- Select the countries you want to include in your list (and that pfBlocker will filter).
- Click Save.

Configuring country blocks
- Select the GeoIP menu in the pfBlocker settings.
- As with the IPv4 lists, select either Block Inbound, Block Outbound, or Block Both from the Action drop-down menu to the right of each list’s description.

Keep a few things in mind when it comes to blocking outbound or inbound connections to countries or continents. If you’re looking to only block outbound connections, then do so. But if you’re considering blocking inbound connections, note that pfSense is configured to block all unsolicited inbound traffic on the WAN out of the box. So unless you have open ports on your WAN, blocking countries or continents won’t do anything except take up memory. And if you do have open ports on your WAN, be mindful not to block connections from countries that should be allowed to connect to your WAN’s open port(s).
To facilitate the above, pfBlockerNG enables you to create custom aliases from the MaxMind GeoIP database. Aliases are IP address lists built into pfSense, and you can use them to craft port-forwarding firewall rules that only allow specific countries to access your open ports. The “rest of the world” will be blocked by pfSense without requiring any intervention on your part.
Creating a GeoIP alias in pfBlockerNG
pfSense blocks traffic that isn’t explicitly allowed in the firewall rules by default, so create an alias containing the countries to allow through the firewall.
- From the IPv4 sub-menu, click the green Add button.

- Enter a name and a description for your alias.
- Select GeoIP from the Format box.
- Set the State field to ON.
- Select the countries you want to add to the alias by typing the first letters of the country you want to add to the alias. This displays the countries matching the letters you typed.

- You can add more countries to your alias by clicking the green Add button.

- From the Action box, select Alias Native to create a native pfBlocker alias.
- Select Once a day in the Update Frequency box.
- Click Save IPv4 Settings (bottom of the page). Your alias will be available for use in the firewall rules after a forced update of pfBlockerNG.

If you have open ports and just want a quick and dirty solution, you can block inbound connections from Top Spammers and Proxy and Satellite without having to create a custom alias. Again, blocking inbound connections is only useful if your WAN has open ports. 
If your WAN doesn’t have any open ports, then either only block outbound traffic or disable GeoIP filtering.
Testing IPv4 filtering
Before going any further, let’s make sure that pfBlocker is properly configured and filtering our traffic. To that end, I will attempt to connect to an IP address included in my IPv4 feeds: 1.13.9.177.
We can see that the IP address is not translated to a domain name, and the connection is blocked. Excellent.

Now let’s move on to pfBlocker’s DNSBL.
DNSBL
We’ve configured IPv4 filtering and GeoIP filtering, and aliases. It’s now time to move on to using pfBlockerNG for ad-blocking. Ad-blocking in pfBlockerNG is achieved through DNS blackholing. This references your DNS requests against a list of known ad networks and trackers and blocks them at the DNS level whenever there’s a match, resulting in an ad-free internet.
To use pfBlockerNG’s DNSBL, it’s required to use the DNS Resolver (Unbound) as the resolver. The trade-off is that you can’t assign DNS servers to clients through DHCP or use pfSense’s built-in DNS Forwarder (dnsmasq).
In its default configuration, pfSense is set up to use the DNS Resolver on all interfaces. Assuming you haven’t made any modifications to the DNS Resolver settings, you’re good to go. If, however, you did adjust the settings, it’s important to ensure that the Resolver is configured to bind to your LAN (outgoing interface) and WAN (incoming interface) at a minimum. If you’re in a multi-WAN or multi-LAN (OPT interfaces), you can select those too if you want to filter their traffic using pfBlockerNG’s DNSBL.

Configuring DNSBL
Here’s how to configure DNSBL:
- Go to the DNSBL tab.
- Tick the Enable DNSBL box.
- From the DNSBL Mode drop-down menu, select Unbound Python mode.

- Find the DNSBL Configuration section lower down on the page.
- Tick the Enable box, next to Permit Firewall Rules, and select the LAN-type interfaces you want the DNSBL to filter. This creates floating firewall rules automatically, ensuring that DNSBL filtering will happen as soon as the firewall sees the traffic.
- Click Save DNSBL settings.

We’ll now add some DNSBL feeds.
Adding DNSBL feeds
- Go to the Feeds tab.
- Further down on the page, you should see DNSBL Category on the left. The first entry is EasyList.
- Click the blue + sign next to the i. This displays the DNSBL Groups page, which lists your feeds, with most of the relevant fields automatically populated.

- We only want two feeds here: EasyList and EasyList Privacy, so delete the rest.
- Set the EasyList and EasyList Privacy feeds to ON.

- Go down to the Settings section.
- From the Action drop-down menu, select Unbound.
- Click the + sign next to DNSBL Custom_List to bring up the DNSBL Custom_List (it becomes a – sign when clicked).
- In the DNSBL Custom_List window, enter vungle.com. This domain will serve as our test domain to make sure that pfBlockerNG’s DNSBL is working correctly.
- Click Save DNSBL Settings.

Forcing an update of pfBlockerNG
To apply our settings, we need to force an update of pfBlockerNG.
- Go to the Update tab. This brings you to the pfBlockerNG update page.
- Click the Run button to start the update.
After a successful update, our feeds have been downloaded and activated, and our test domain is included in the list of offending domains.
Testing pfBlockerNG’s DNSBL
To ensure that DNSBL filtering is working, we will try to connect to the domain I added to DNSBL Custom_List: vungle.com. If I try to access vungle.com in my browser, the DNSBL block page is displayed with some bits of helpful information.
To confirm that DNSBL is working properly, we’ll attempt a connection to the custom domain I added to DNSBL Custom_List in the previous step, which is vungle.com.
And we can see that it’s blocked.

pfBlocker’s DNSBL is built with a mini web server that displays the above page for blocked domains. This applies only to DNSBL filtering. IPv4, IPv6, and GeoIP filtering do not show a block page.
Wrap-up
If you made it this far, you’ve installed and set up pfBlockerNG-devel on pfSense. With this configuration, you’ve got IPv4 filtering, GeoIP filtering, and DNSBL filtering, and enhanced security and privacy for your network without compromising your connection speed.
Over time, it’s likely that your network will grow in both size and complexity, and you may want to open specific ports on your WAN for things like running a Virtual Private Network (VPN) server or hosting a web server that can be accessed from the internet. In such cases, pfBlockerNG will be a valuable asset in your security arsenal, helping you safeguard your network and fine-tune external access.
