In this tutorial, we’ll show you how to set up a virtual router with a VPN. Once finished, you can use the virtual router to connect other devices and route their traffic through the VPN. This is especially useful for devices that don’t natively support VPN connections, such as Roku, Apple TV, Chromecast, smart TVs, game consoles, and first-generation Amazon Fire TV sticks (newer Fire TV sticks support VPN apps). The process is much easier than setting up a VPN on your physical router, which often requires the risky task of flashing new firmware onto the device.
A virtual router can also be used to extend the range of a weak wifi signal. My friends and I recently used this in a hotel where the wifi didn’t extend all the way across the room. I placed my laptop in a spot where it got a better signal, then connected our phones to my laptop’s virtual router.
GET A 30 DAY FREE TRIAL OF NORDVPN
NordVPN is offering a fully-featured risk-free 30-day trial if you sign up at this page. You can use the VPN rated #1 for setting up VPN-protected wi-fi hotspots without any restrictions for a month. This is perfect if you want to connect devices that don't normally support VPNs apps.
There's no catch, either—just contact support within 30 days if you decide NordVPN isn't right for you and you'll get a full refund. Start your NordVPN trial here. They don't work in Google Docs unfortunately.
How to set up a VPN-protected wi-fi hotspot on Windows 10: easiest option
If you’re using Windows 10, you can follow the instructions in the video below. Windows 10 users do not need to use the Command Prompt to set up a VPN-protected wifi hotspot, as this feature is now accessible directly from the Settings app.
For older versions of Windows, keep reading.
What you need to create a virtual router in Windows
To get started, you’ll need the following:
- A laptop with a Broadcom-based wifi-adapter (most laptops made in the last 10 years have this)
- A VPN app and subscription that supports the OpenVPN protocol. Note that many VPNs now opt for Wireguard by default. We can’t guarantee this tutorial works with Wireguard connections, so you might need to switch to OpenVPN in your VPN app settings.
- Administrative privilege on your laptop
First off, check to make sure your computer supports setting up a virtual router:
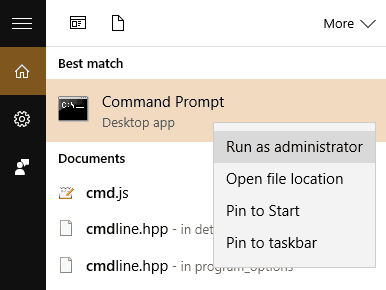
- Type cmd into the Windows search bar. In the search results, right-click Command Prompt > Run as Administrator
- In the command prompt window that appears, type
netsh wlan show driversand hit Enter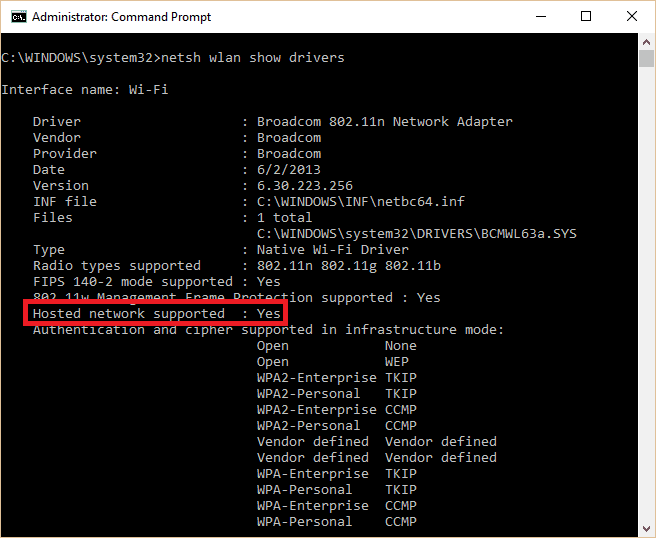
- Check for the line that says Hosted network supported. If it says “Yes” then your computer is capable of broadcasting its own wifi hotspot
This tutorial is for Windows 10, but Windows 7 and 8 users should be able to follow along as well.
How to configure your Windows Virtual router wi-fi hotspot with a VPN
Now to actually set it up:
- In the command prompt, type
netsh wlan set hostednetwork mode=allow ssid=<MY-NETWORK> key=<MY-PASSWORD>, replacing <MY-NETWORK< and <MY-PASSWORD> with a network name and password of your choice. Press Enter.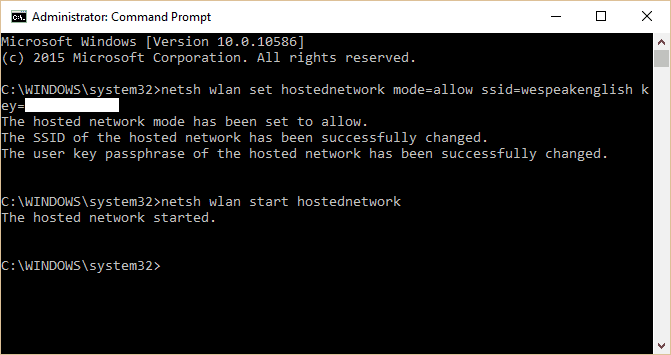
- Some text will appear indicating you successfully created the virtual router. To turn it on, type
netsh wlan start hostednetworkand press Enter - A message will appear that says the hosted network has started. If not, you need to update your network adapter drivers and try again.
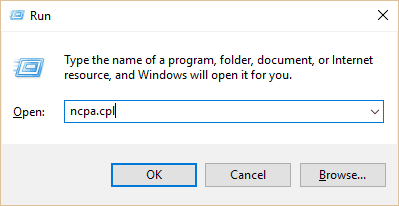
- Next, we need to share the virtual router’s connection with other devices. Press Windows Key+R to launch the Run prompt, type ncpa.cpl, and press Enter.
- A list of connections will appear. Find the one you just created. It will have the network name you input earlier. Memorize or write down the name of this connection.
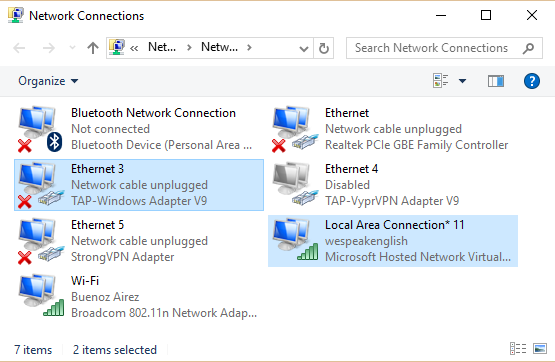
- On the same list of connections, find the one that says TAP-Windows Adapter. Right click it and select Properties
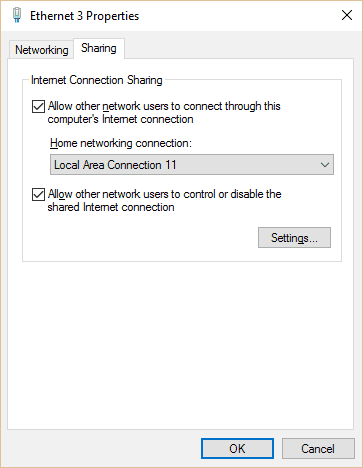
- Click the Sharing tab at the top and check the box to Allow other network users to connect through this computer’s Internet connection.
- Under Home network connection, click the dropdown and select the name of the network you created earlier. Press OK.
- Open your VPN app, set the protocol to OpenVPN if necessary, and connect to a server in whatever location you wish. Using OpenVPN activates the TAP Windows Adapter.
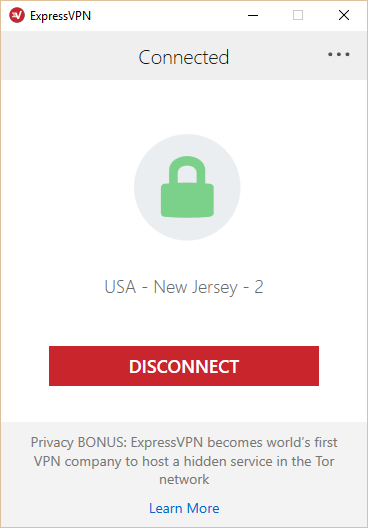
- Your PC is now a VPN-enabled wi-fi router!
Now all that’s left to do is connect your devices to the virtual router. When you enter the wifi settings, the new network you just created should appear in the list of available wifi connections. Connect to it, enter the password that you created above, and that’s it!
If you disconnect from the VPN, the TAP adapter will de-activate and the virtual router will stop broadcasting the wifi signal.
Troubleshooting tips
If you have trouble starting the network, chances are there’s something off in your network adapter settings. To find these settings and adjust them, do the following:
- Press Windows Key+X and select Device Manager
- Click the arrow next to Network Adapters to see a list of available adapters.
- Find your main wifi adapter. It will usually contain Broadcom or 802.11 or something similar in the text. Right click it and select Update Driver Software to check for any available updates. You can choose the option to search automatically.
- Next, find the adapter that says TAP-Windows Adapter V9 or something similar. It might contain the name of your VPN provider instead of “Windows”. Double check that this is enabled and up-to-date by right-clicking. Select Enable if it is not enabled, and Update Driver Software to check for driver updates.


Hi Paul
I recently set up my virtual WiFi router with express vpn on my laptop here in China.. I recently bought a new xiaomi iPad and cannot seem to remember the password. How Can I see the password I created when I set up the router ?
I’m not sure you can. It would probably be easier to make a new one.
Paul thanks gor this do i have to keep the pc on then when usingnoyher devices like chromecast on my tv
Yes
Should the ip address of my xbox match the ip address of my VPN?
After you’ve connected it to the VPN, yes.
Hi Paul: I just noticed that in Network Connections, it doesn’t show TAP-Windows Adapter anywhere. The only TAP showing is ExpressVPN Tap Adapter. Maybe that’s why I’m getting Failed to Obtain IP Address?? How do I get it to show me the TAP-Windows Adapter, so I can configure it to share? Is it hidden somewhere? Thanks for your help!
Try using the ExpressVPN one. Different VPNs name the adapters differently, but it should be what you’re looking for regardless.
If I want to purchase a game for cheaper on my games console, could I change my location to, say, Argentina using this VPN enabled virtual router?
Depending on the console you might have to provide a local form of payment.
do you do this every time you turn on your pc or does it stay on for the next time you use pc
Hi gregm, I believe it activates whenever you connect to the VPN using the same VPN adapter (TAP or TUN).
So here is an interesting thing maybe you can shed some light on. I can use the mobile hotspot feature in Windows 10 fine (without vpn). But when I go through the command prompt to check for “Hosted Network support” it is listed as NO . . . and won’t let me continue to setup a network with vpn tunneling . . . doesn’t the fact that I can make a mobile hotspot mean I can host a network?
Lenovo Yoga 900 Laptop running Windows 10 (with all recent updates)
If it says you don’t have hosted network support but still offers you the option to create a wifi hotspot, then that’s a discrepancy you might want to take up with Lenovo.
Paul,
Why is this a discrepancy? I think other computers include wifi adapters that don’t have hosed network support in Windows 10, but still should work with the Windows 10 mobile wifi hotspot feature. Of course, the Windows 10 mobile wifi hotspot featured doesn’t guarantee sharing the VPN connection, which is another issue…
It is actually a huge oversight on the part of Windows that they let this come about. There is more detail here: Recent Intel WiFi adapters do not support this feature: https://www.intel.com/content/www/us/en/support/articles/000023257/network-and-i-o/wireless-networking.htm
I am struggling with this, so would appreciate your views on the topic.
Thank you in advance
Apparently all I have to do is skip the command prompt portion, share the vpn tap adapter in settings, and then turn on the wifi hotspot. . . . still says I have no hosted network support but ive confirmed that all my wireless devices on the hotspot are running through the vpn . . . don’t get it but ill take it.
Paul thanks for the article but I’m confused. Windows 10 on my laptop has a super easy option to make a mobile hotspot with a click from the wifi settings. Would it not also work to simply turn on a vpn and then activate the mobile hotspot?
I personally have not been able to get the built-in wifi hotspot feature in Windows 10 to work reliably, and from what I’ve read I’m not the only one. Even if you got it to work, I’m not sure it would tunnel other devices’ traffic through the VPN. You need to tunnel it through the VPN adapter, not the default wifi adapter. My tutorial here works more reliably from what I can tell, and it should also work with Windows 7 and 8.
Yea since posting I’ve done my own trial and looks like you’re right it does not tunnel all connections through. My wife and I haven’t had too many issues with the hotspot feature, we use it constantly on the road. Now that we’re heading up into China for a year however I’m looking forward to hopefully adding VPN through it so I don’t need to worry about also getting a trace router. Do you know if the script works with any protocol and not just open vpn? Also if I read this correctly, does this mean that anytime I turn on my vpn (currently ExpressVPN) the wireless router on my laptop will also activate from here on out? If for some reason I do not want to broadcast a network and just use my laptop on its own with the vpn is it a simple edit? (Thanks for your time, I’m tech savy but not a power user)
It should work with any VPN connection that shows up under your list of network connections after setting it up. I’m not certain about other protocols but it’s worth a shot if you need them. It’s fairly easy to disable the connection if you don’t want to broadcast it.
Trace = travel