Securely transferring files over the internet is a critical requirement for businesses, organizations, and individuals handling sensitive data. File Transfer Protocol (FTP) is one of the most common methods for file exchange, but traditional FTP lacks encryption, leaving data vulnerable to interception. To address this, a secure version of FTP, known as FTPS (FTP over SSL/TLS), adds encryption to ensure that your data remains private during transmission.
Windows Server offers a built-in solution for setting up a secure FTP server through Internet Information Services (IIS), Microsoft’s web server platform. IIS includes an FTP server feature that supports FTPS, enabling secure file transfers over SSL/TLS encryption protocols. By using IIS, administrators can take advantage of a familiar interface, enhanced security options, and seamless integration with other Windows Server components.
This guide will walk you through the process of installing and configuring a secure FTP server on Windows using IIS. Whether you’re looking to set up a secure FTP server for your business or personal use, this step-by-step guide will help you achieve that with ease. You’ll learn how to install the FTP server role in IIS, configure SSL/TLS certificates for secure connections, set up user authentication and permissions, and ensure your server is properly secured from potential vulnerabilities.
By the end of this guide, you will have a fully functioning FTPS server that allows you to transfer files securely and efficiently, helping you meet regulatory compliance requirements and protect your data during file transfers. The steps required to complete the procedures in this article include:
- Installing IIS and FTP Server features.
- Creating an SSL certificate.
- Working with servers behind external firewall/NAT.
- Creating a new FTP user with Windows.
- Creating the new FTP site in IIS.
- Binding the certificate to TLS/SSL in IIS.
- Configuring FTP Authentication and Authorization.
- Testing your new FTP Server.
Installing IIS and FTP Server Features
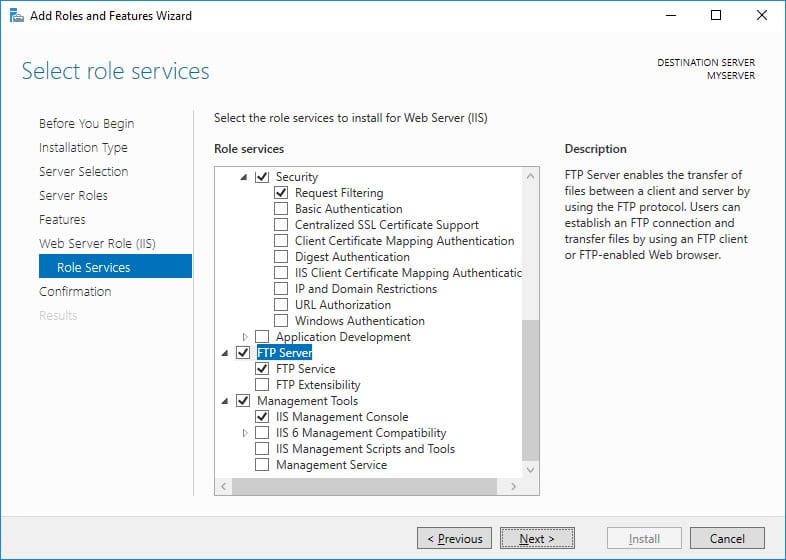
IIS is installed by default on most Windows Servers, but the FTP server feature is usually disabled by default. Therefore the first step is to enable FTP server features. Follow the steps below to enable the FTP server feature on Windows Server 2022, Windows Server 2019, Windows Server 2016, or Windows Server 2012:
- In Windows, Server Manager go to Dashboard and run Manage >> Add Roles and Features.
- In Add Roles and Features wizard: Proceed to the Installation Type step and confirm Role-based or feature-based installation.
- Proceed to the Server Roles step and check the Web Server (IIS) role. Note that it is checked already if you had IIS installed as a Web Server previously. If you are prompted to install the IIS Management Console tool, confirm it.
- Proceed to Web Server Role (IIS) >> Role Services step and check the FTP Server role service. Uncheck the Web Server role service, if you do not need it.
- Confirm your installation by clicking “Next,” proceed to install, and wait for the installation to complete.
Creating a TLS/SSL Certificate for the FTPS Server
Your FTP server needs a TLS/SSL certificate to establish a secure connection between client and server. The certificate contains information about the server’s identity, along with the encryption technique used to establish the secure channel. This makes it easier for end-users to verify the identity of a remote computer. Depending on the use case or scenario, the TLS/SSL certificate can be either self-signed, domain-signed, third-party-signed.
- Self-signed certificates are used in internal websites, but in such cases, users of your FTPS server will always receive a security warning. This is because there is no way of proving that the identity is yours unless a certificate authority (CA) created it.
- Domain certificates are used inside domains and signed by the organization’s certificate authority. Internal users will not receive any security warning message, but users outside the domain will.
- Third-party-signed certificates are used in production servers because they are backed by a certificate authority (CA). CA-signed certificates provide assurance to FTP clients that your server is who it says it is.
With IIS, you can create a self-signed and a domain certificate. To create a self-signed certificate, follow the steps below:
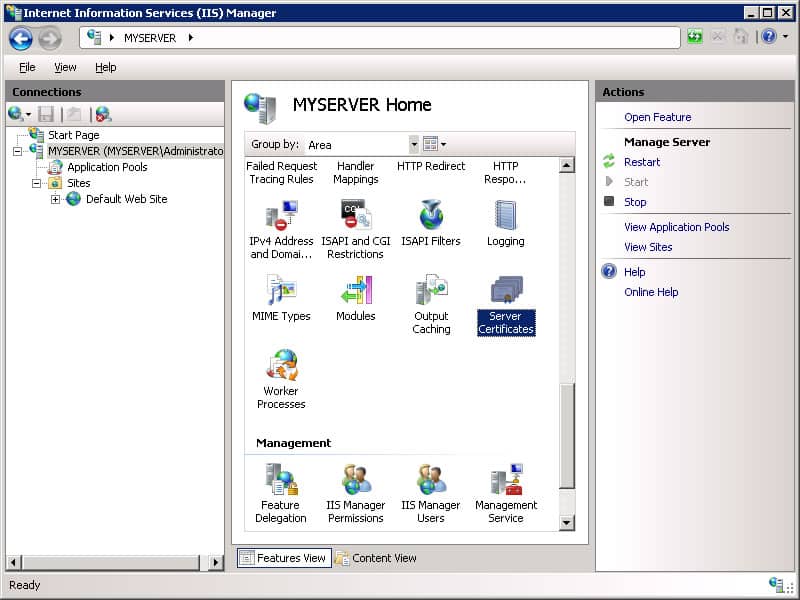
- In IIS Manager, open IIS >> Server Certificates.
- On the Actions menu on the right-hand side of the IIS Manager, choose the option “Create Self-Signed Certificate”.
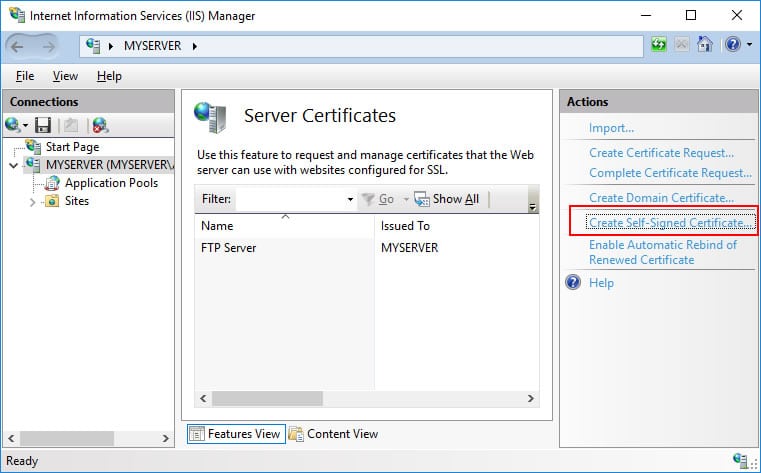
- Specify a certificate name (e.g. “My FTP Certificate”) and click “OK” to submit.

- To create a domain certificate, follow the steps below:
- Go to Server Certificates, and select “Create Domain Certificate”.
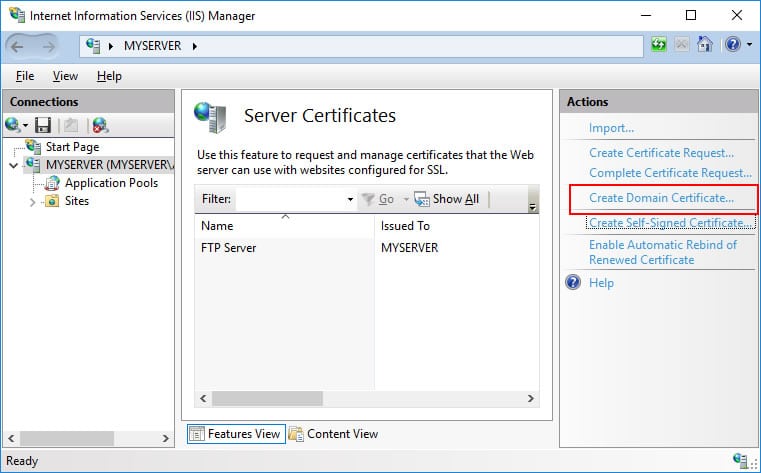
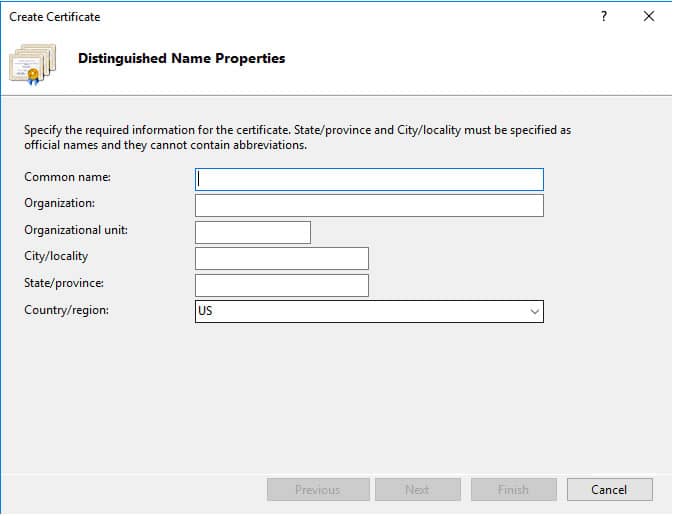
You’ll be required to provide Distinguished Name (DN) information when enrolling and creating a Certificate Signing Request (CSR).
- In the “Common name” field, use the Fully Qualified Domain Name (FQDN) of the computer or web server.
- In Organization, use the legal company name.
- In Organization Unit (OU), use the department or area (optionally for Active Directory domains).
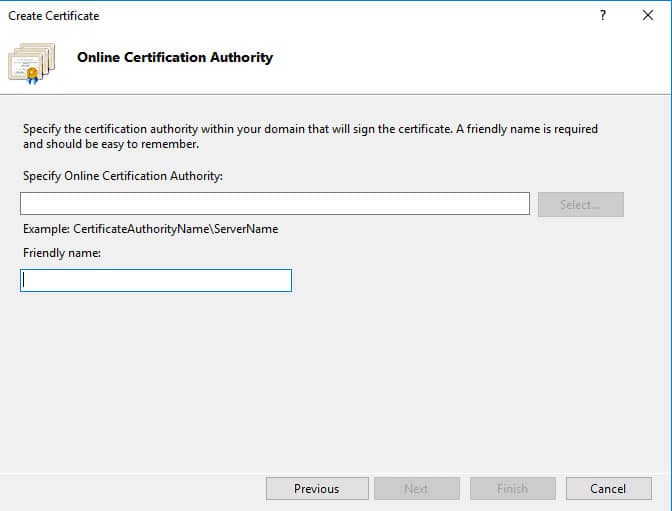
- Specify the Online CA within your domain. If there is an Online Certification Authority online, you should see the “select” option available. If the “Select” option is unavailable, you can specify the DA using the appropriate naming, such as CertificateAuhtorityName\Name\ServerName.
Working With Servers Behind External Firewall/NAT
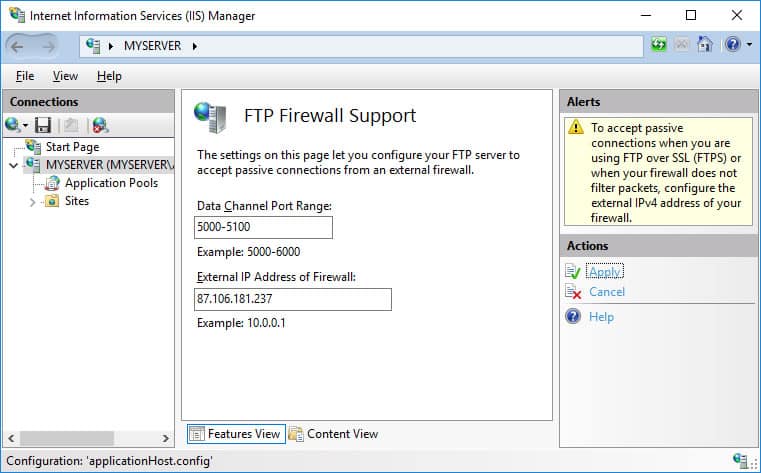
If your server is behind an external firewall/NAT, you need to tell the FTP server its external IP address, to allow passive mode connections. Follow the steps below to complete this process:
- In IIS Manager, open FTP >> FTP Firewall Support.
- Specify your server’s external IP address.
For Microsoft Azure Windows servers you will find the external IP address in the Public IP address section of the virtual machine page.
When you are working behind an external firewall, you need to open ports for data connections, in addition to opening an FTP port 21 and possibly an implicit TLS/SSL FTP port 990. You probably won’t want to open the whole default port range 1024-65535. In such a case, you need to tell the FTP server to use only the range that is opened on the firewall. Use a Data Channel Port Range box for that. Any time you change this range, you will need to restart FTP service.
- Click Apply action to submit your settings.
Some external firewalls are able to monitor FTP control connection and automatically open and close the data connection ports as needed. So you do not need to have the whole port range opened all the time, even when not in use. This won’t work with the secure FTPS as the control connection is encrypted and the firewall cannot monitor it.
In Windows machines, an internal Windows firewall is automatically configured with rules for the ports 21, 990 and 1024-65535 when the IIS FTP server is installed. The rules are not enabled initially on some versions of Windows. To enable or change the rules, follow the steps below:
- Go to Control Panel >> System and Security >> Windows Defender Firewall >> Advanced Settings >> Inbound Rules and locate three “FTP server” rules.
- If the rules are not enabled, click on Actions >> Enable Rule.
Creating a New FTP User with Windows
In this section, we’ll show you how to create a new user to connect to the FTPS server with the appropriate permissions. Here are the steps to take:
- Open Local Users and Groups on your Windows Server. Go to Server Manager >> Tools >> Computer Management. Expand the Systems tools >> and open “Local Users and Groups”.
- Alternatively, you can use the Win+R shortcut to open “Run” and type “lusrmgr.msc”.
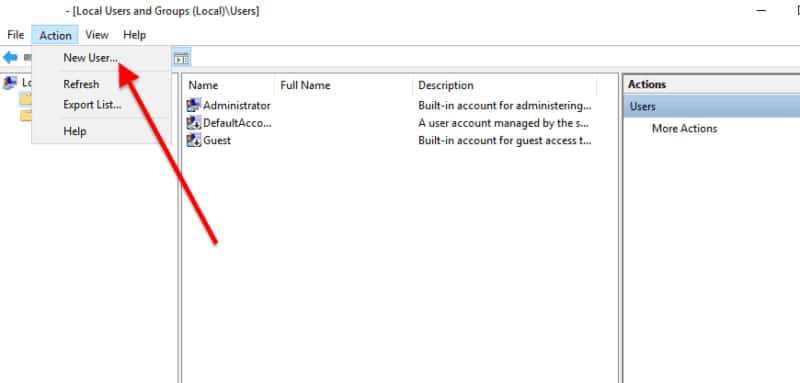
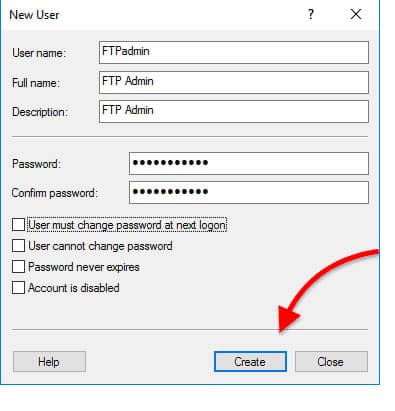
- Go to Action and click on “New User”.
- On the “New User” window, go ahead and enter the user’s credential information.
- Click on “Create”.
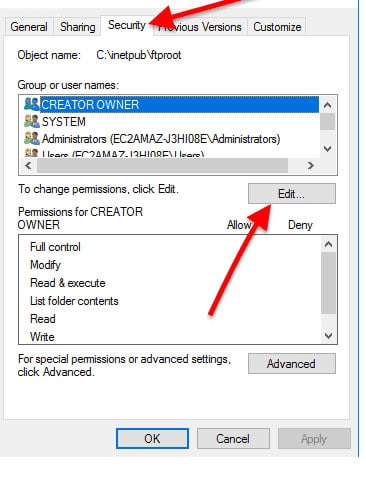
Now, you need to grant the new user permission to the FTP root folder
- The default folder in IIS for storing content is called “inetpub”. Go to the C:\inetpub, and find the folder “ftproot”.
- Right-click on it and open “Properties”.
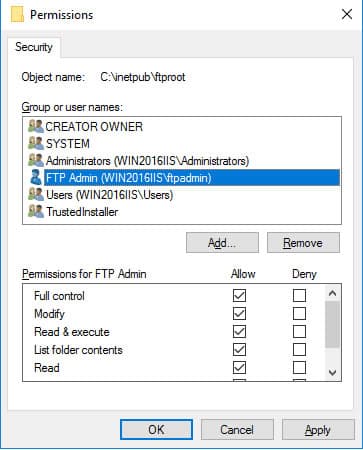
- Go to the Security tab >> and then click on “Edit”, and find the user that you created previously and set the permissions. For example, you can restrict or allow the user access to the FTP Root folder resources.
Now that we have created a user with the right permission, we need to create an FTP site that can only be opened by the user with the right permissions.
Creating the New FTP Site in IIS
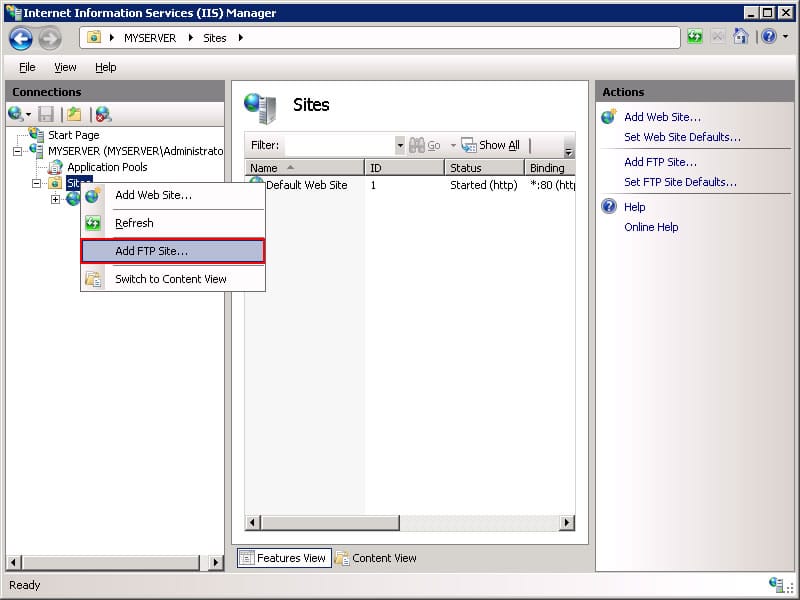
An FTP site is a server that can be accessed from outside the LAN— from any place across the Internet. In the Connections pane, click the Sites node in the tree.
- Open IIS Manager >> go to your home Server >> in the Connections pane, click the “Sites” node in the tree.
- Add FTP Site. Right-click the Sites node in the tree and click Add FTP Site, or click Add FTP Site in the Actions pane.
- When the Add FTP Site wizard appears, enter FTP Site’s information (for example “My New FTP Site”) and the content directory’s physical path (for example %SystemDrive%\inetpub\ftproot) in the FTP site name box. Whatever path you have selected here, make sure it has the correct permissions to allow or restrict access.
- Click Next
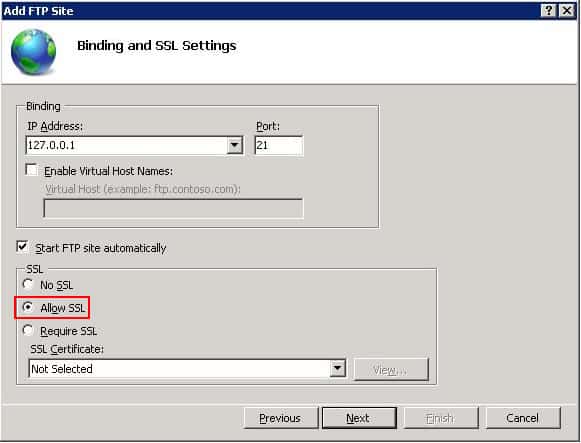
Binding the Certificate to TLS/SSL in IIS
On the next page of the wizard, we will attempt to bind the certificate to TLS/SSL in IIS. You can bind TLS/SSL certificates while you are creating or after you created your FTP site. Follow the steps below to complete the process:
- Choose an IP address for your FTP site from the IP Address drop-down, or choose to accept the default selection of “All Unassigned”.
- Enter the TCP/IP port for the FTP site in the Port box. For this walk-through, choose to accept the default port of 21. FTPS uses port 21 for its explicit FTPS control connections and port 990 for the implicit FTPS control connections.
- Optionally, you may check the “Start FTP site automatically”. This option is helpful whenever the server goes down. IIS will start the FTPS site automatically after the server comes back online
- For this walk-through, we do not use a hostname, so make sure that the Virtual Host box is blank.
- Make sure that the Certificates drop-down is set to your TLS/SSL certificate. You can do this by selecting your self-signed certificate, domain certificate, or browse through any certificate created by other means.
- Make sure that the Allow SSL option is selected.
- Click Next.
- Click Next again.
Configure FTP Authentication and Authorization
On the next page of the wizard, you’ll be able to define who and how users are connecting to your FTPS server.
You can select Anonymous (encryption-enabled) or Basic (no encryption), which depends on the type of SSL certificate.
- For this walk-through, Select Basic for the Authentication settings.
For the Authorization settings:
- Choose “Specific users” from the Allow access to drop-down.
- Type “administrator” for the user name.
- Select Read and Write for the Permissions option. When you have completed these items, click Finish.

Testing Your New FTP Server
Once the above steps have been completed, the final step is to verify that your FTPS Server is working properly. You can begin your testing from the local host, followed by third-party clients.
- To test from the localhost, simply go to any web browser on your server and type “FTP://localhost”.
For third-party-based testing, the Solarwind Serv-U Managed File Transfer Server is a great tool. Serv-U Managed File Transfer Server is a reliable FTP server software for secure file transfer. It provides better security and control over file transfers in and outside your organization.
