Want to make your Gmail messages more secure and private? Then you’re in the right place. This guide will tell you everything you need to know about using PGP encryption with Gmail to prevent attackers from snooping into your messages. From why you should use it, to the different options available — and every step of their configuration — this tutorial will turn you into a PGP-pro in just a few minutes.
Why would anyone want to use PGP encryption with Gmail?
To start with, normal email isn’t secure by any metric. Most emails are sent as plaintext and then stored on servers somewhere in the world. Once the message leaves your account, there are a number of points at which it can be intercepted, read, and even altered.
Sure, regular email is a good option for a lot of mundane tasks. It’s fine for discussing which shade of blue to paint your living room or for planning your grandmother’s birthday party.
For anything more sensitive or valuable, let’s say revealing corporate wrongdoing planning a political protest against a totalitarian regime, then normal email isn’t suitable. It’s also not a great idea for anyone who is worried about online stalking or cybercrime.
Google has been attempting to make its services more palatable for privacy-conscious business users. At the end of 2022, it added end-to-end encryption (E2EE) to Gmail on the web for Google Workspace Enterprise Plus.
This enables paying users to send and receive encrypted emails – though the email header remains unencrypted. Google says that “content encryption is handled in the client’s browser before any data is transmitted”. However, Gmail E2EE beta is not yet available to users with personal Google Accounts.
Independence from Google
Rather than wait for E2EE to be formally rolled out, PGP encryption offers Gmail users a way to continue using email, without having to worry about privacy concerns. With a normal email account and a few adaptations, you can easily use Gmail to send secure messages. These messages can only be opened and viewed using your intended recipient’s private key.
If you want to take a step back and learn a little bit more about PGP, what it is, how it works and how it keeps you safe, then our guide on PGP encryption will give you all of the information you need.
Otherwise, the only technical details you really need to know are that PGP keeps your communications safe by allowing you to encrypt messages using the recipient’s public key. These messages can only be accessed using their private key — which only they should have access to.
PGP can also be used to both confirm that a message has been sent by the person that claims to be the sender, and to prevent attackers from fraudulently sending messages. PGP can prove that a message hasn’t been tampered with by a third party along the way as well, showing whether or not a message retains its initial integrity. Both of these tasks are achieved using digital signatures.
See also: What is PGP encryption and how does it work?
Is using PGP encryption with Gmail a good solution for your threat level?
While using PGP is definitely an upgrade to your security, using it alongside Gmail may not be the best idea from a privacy standpoint. Google scans all of your normal emails for marketing purposes, and although using PGP prevents this, Google still gets access to your metadata. This includes the time an email was sent and the email address of the person you are communicating with.
If you have serious privacy concerns, it may be best to switch to an email provider that doesn’t access this data. There are a range of options, with encrypted email providers such as Proton Mail and Tutanota being popular choices among privacy and security advocates.
For those with more moderate privacy concerns, using PGP encryption alongside Gmail is probably an adequate solution. One of its advantages is that it can be much easier to implement and operate than the more secure alternatives. You don’t need to set up a new email account and the learning curve isn’t as steep as with something like GPG.
Webmail encryption vs standalone email clients
Setting up PGP encryption with Gmail is generally done with browser extensions or addons, which makes it one of the most convenient ways to integrate PGP into your email use.
Despite this, there are downsides. One of the major issues is that these options are browser-based, which means that they are susceptible to the security weaknesses of whichever browser you use. Depending on your threat model, it may be best to use a standalone email client such as GPG. We have a separate article with detailed instructions for setting up Gpg4win.
Setting up PGP encryption
Unfortunately, Gmail isn’t set up to encrypt your messages with PGP straight out of the box, so you will have to do some tinkering and install an extension. Two popular choices are Mailvelope and FlowCrypt.
Mailvelope
Mailvelope is an open-source browser add-on that’s been around for over a decade. It’s one of the most popular PGP options and can be used with Firefox, Chrome, and Edge. It enables users to both encrypt messages through your webmail and receive encrypted emails from other types of software. Mailvelope can be used with a number of webmail providers including Gmail, Outlook, and Yahoo.
Despite it’s popularity, Mailvelope is not necessarily the easiest to operate. Many users report that the setup can be a little technical and that it isn’t the most intuitive program.
FlowCrypt
Formerly known as CryptUp, FlowCrypt is a Czech-based company that has seen increased adoption in recent years. It’s available for both Chrome, Brave and Firefox. It also has apps for Android and iOS app that provide end-to-end encryption for Gmail, Outlook and other email providers. The software is open source, quick to set up, and regarded as relatively easy to use.
FlowCrypt allows new users to bring their current key into the program, or it will generate a key pair for new PGP users. Users can digitally sign their messages to prove to the recipient that the email is authentic and has not been tampered with.
How to install Mailvelope & send a PGP encrypted message with Gmail
The first step to sending PGP encrypted emails with Mailvelope is to head to its homepage. Scroll down to download either the Chrome, Edge or Firefox addon, depending on which browser you prefer to use:
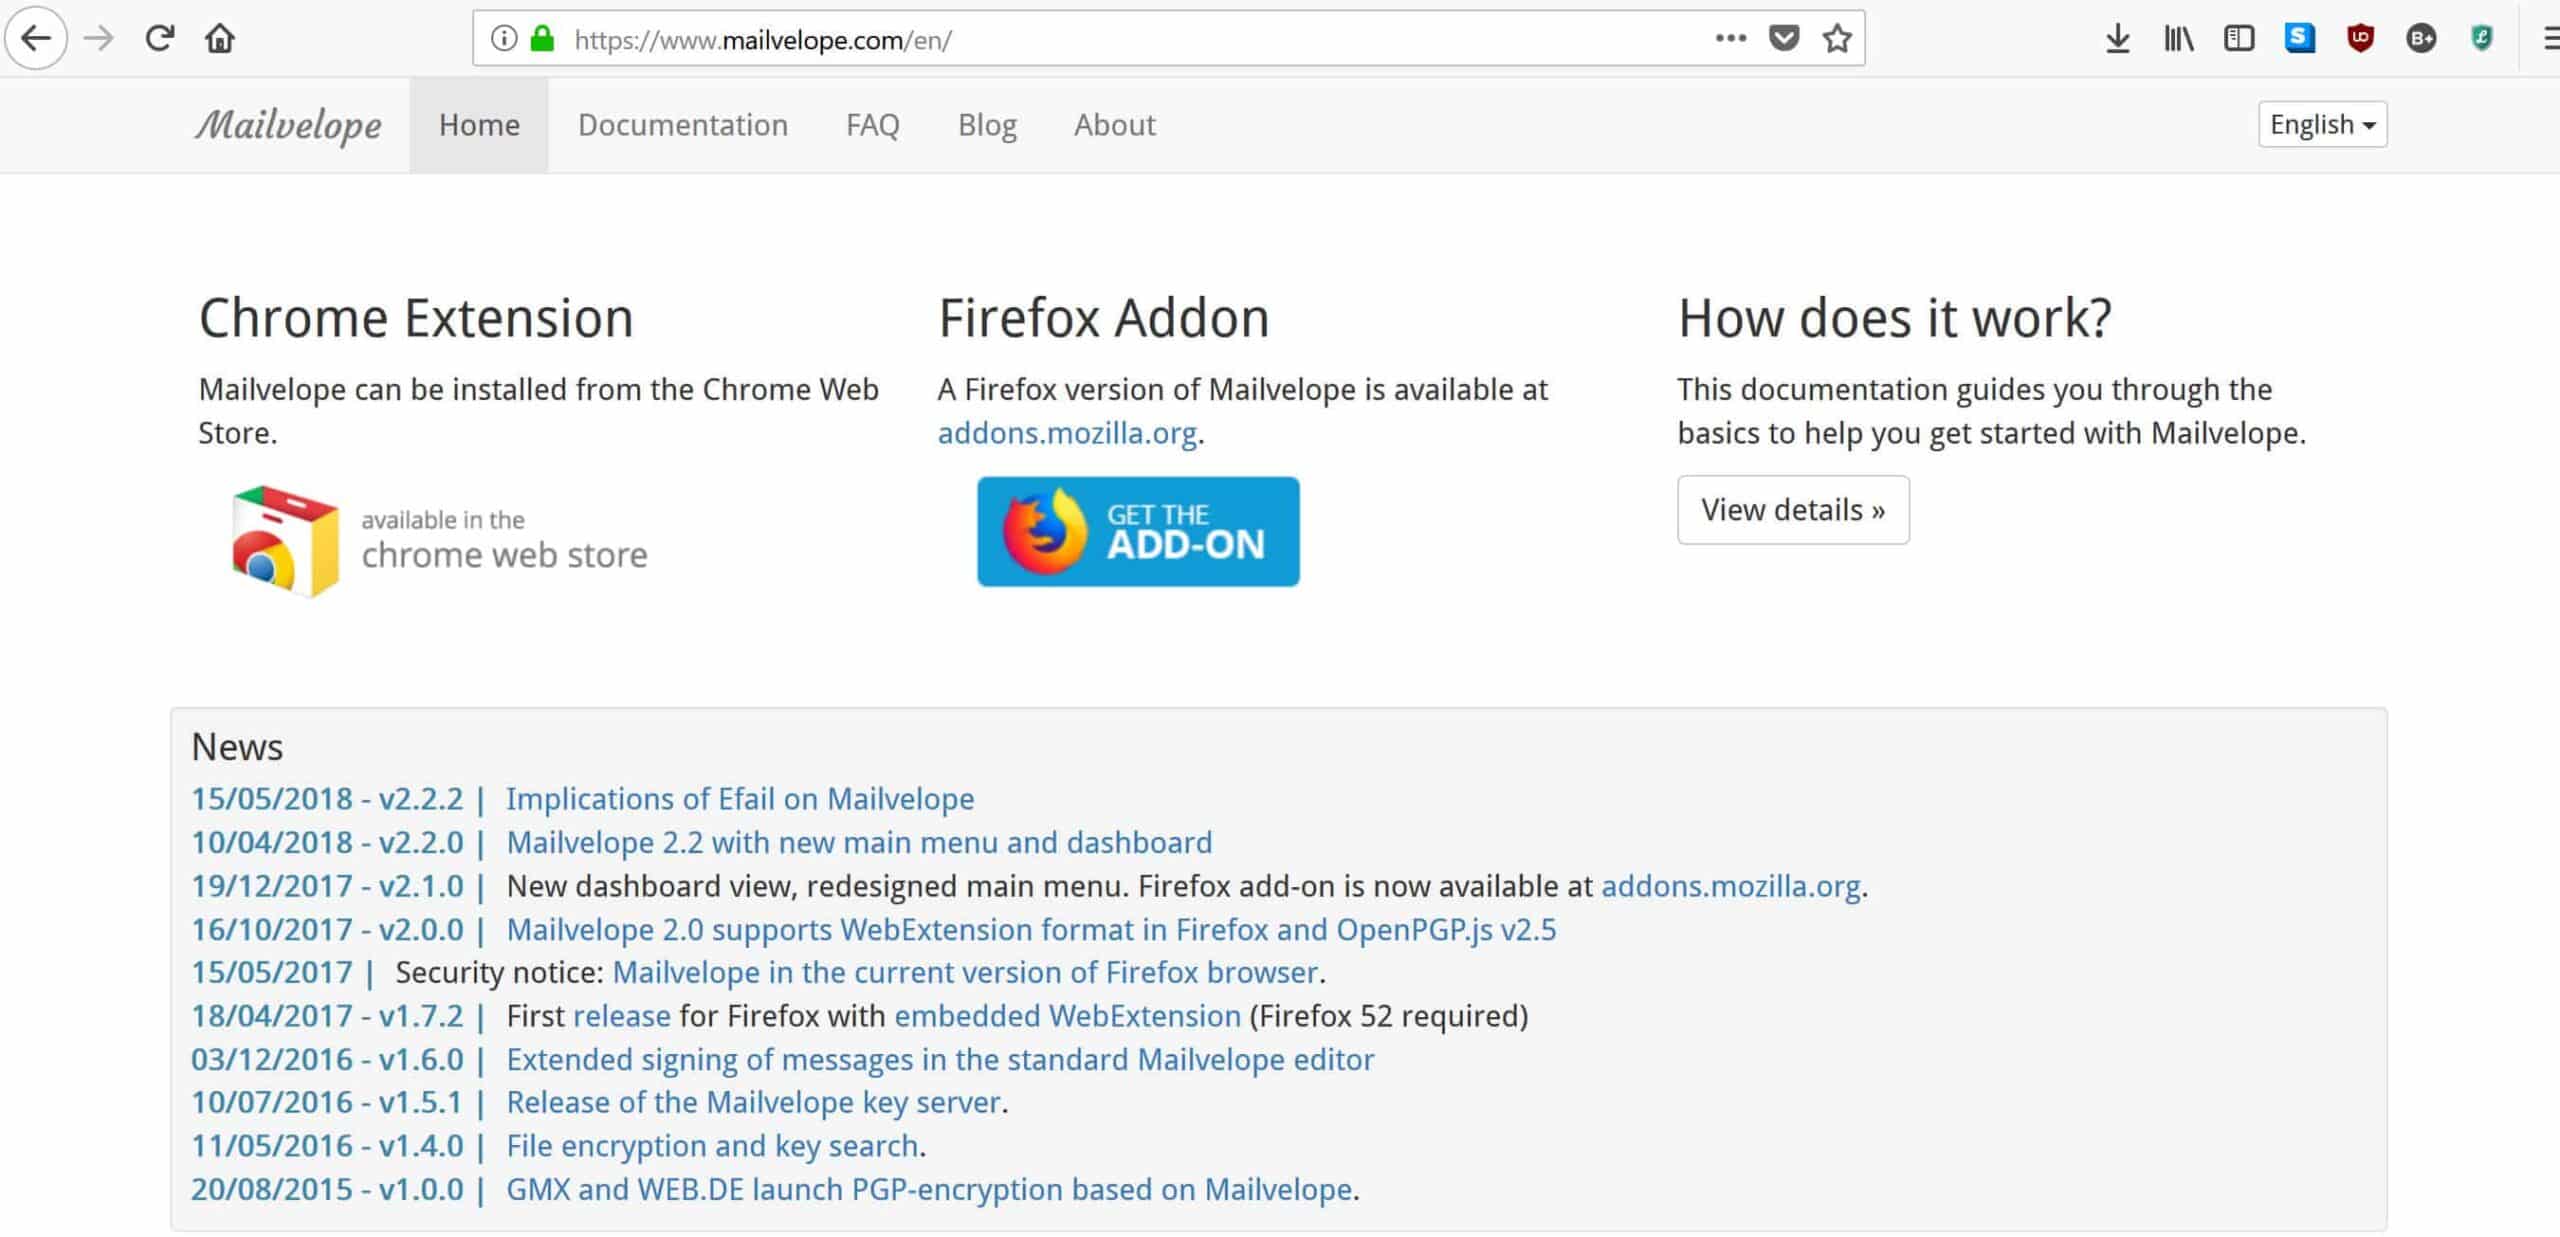
Because we’re talking about privacy here, it’s probably best to go with Firefox, but it’s not that important. This guide will focus on Firefox, but the steps for implementing it on Chrome and Edge aren’t too different.
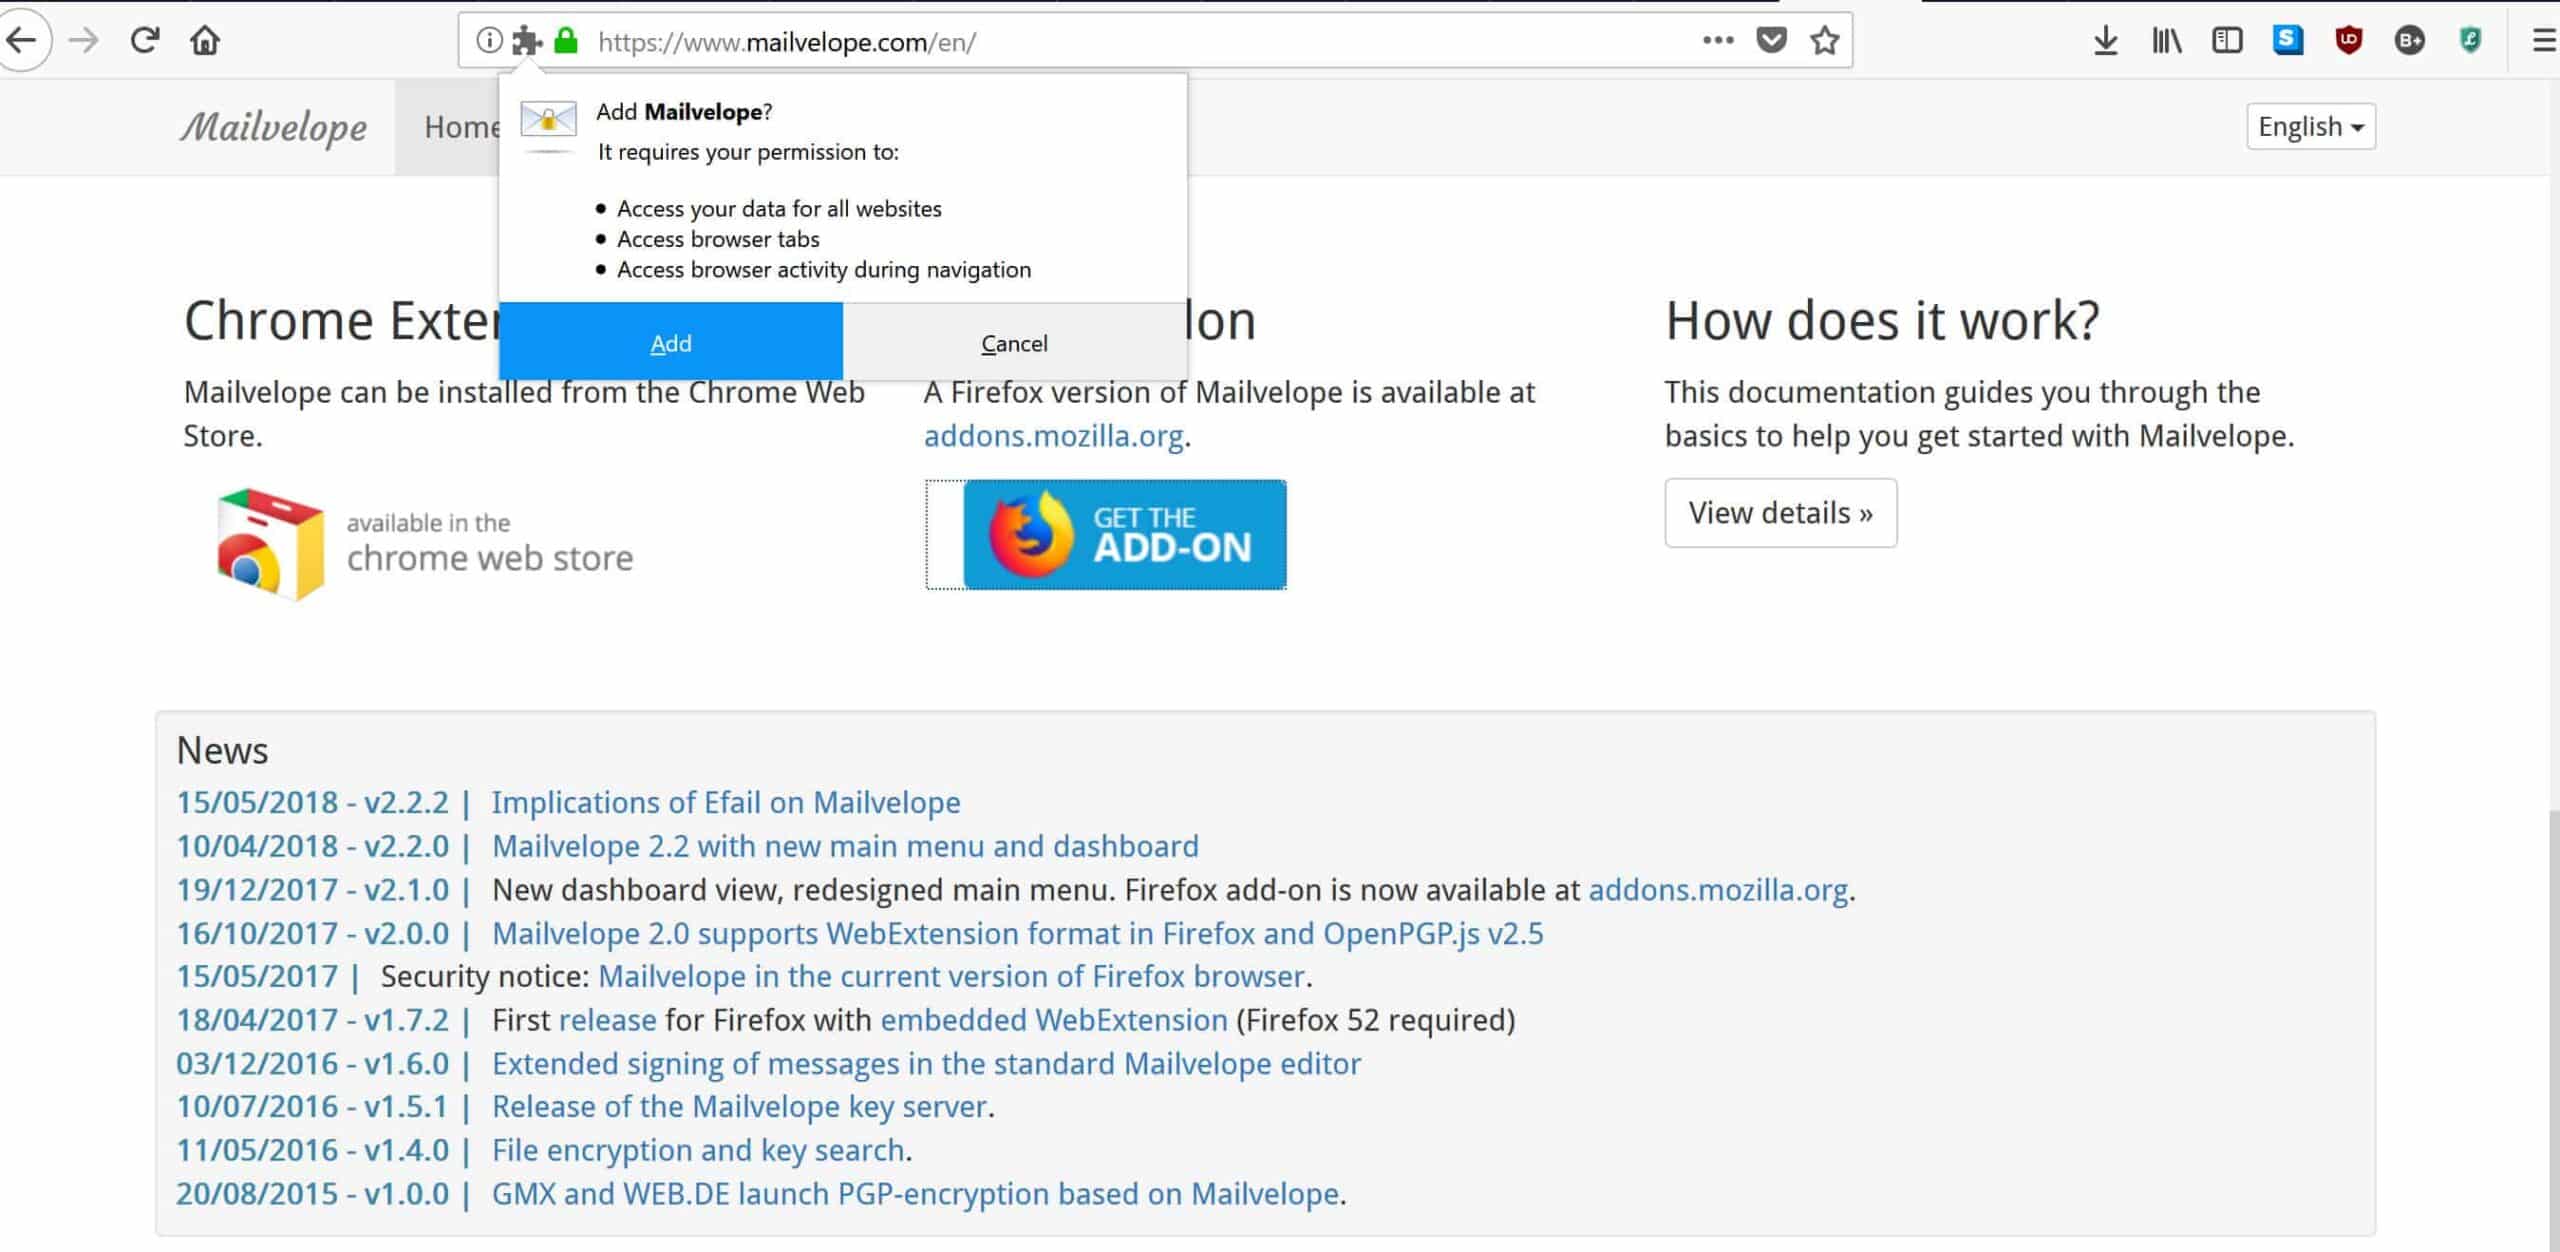
Click on your choice, then allow it to download. Accept the app permissions by hitting the add button:
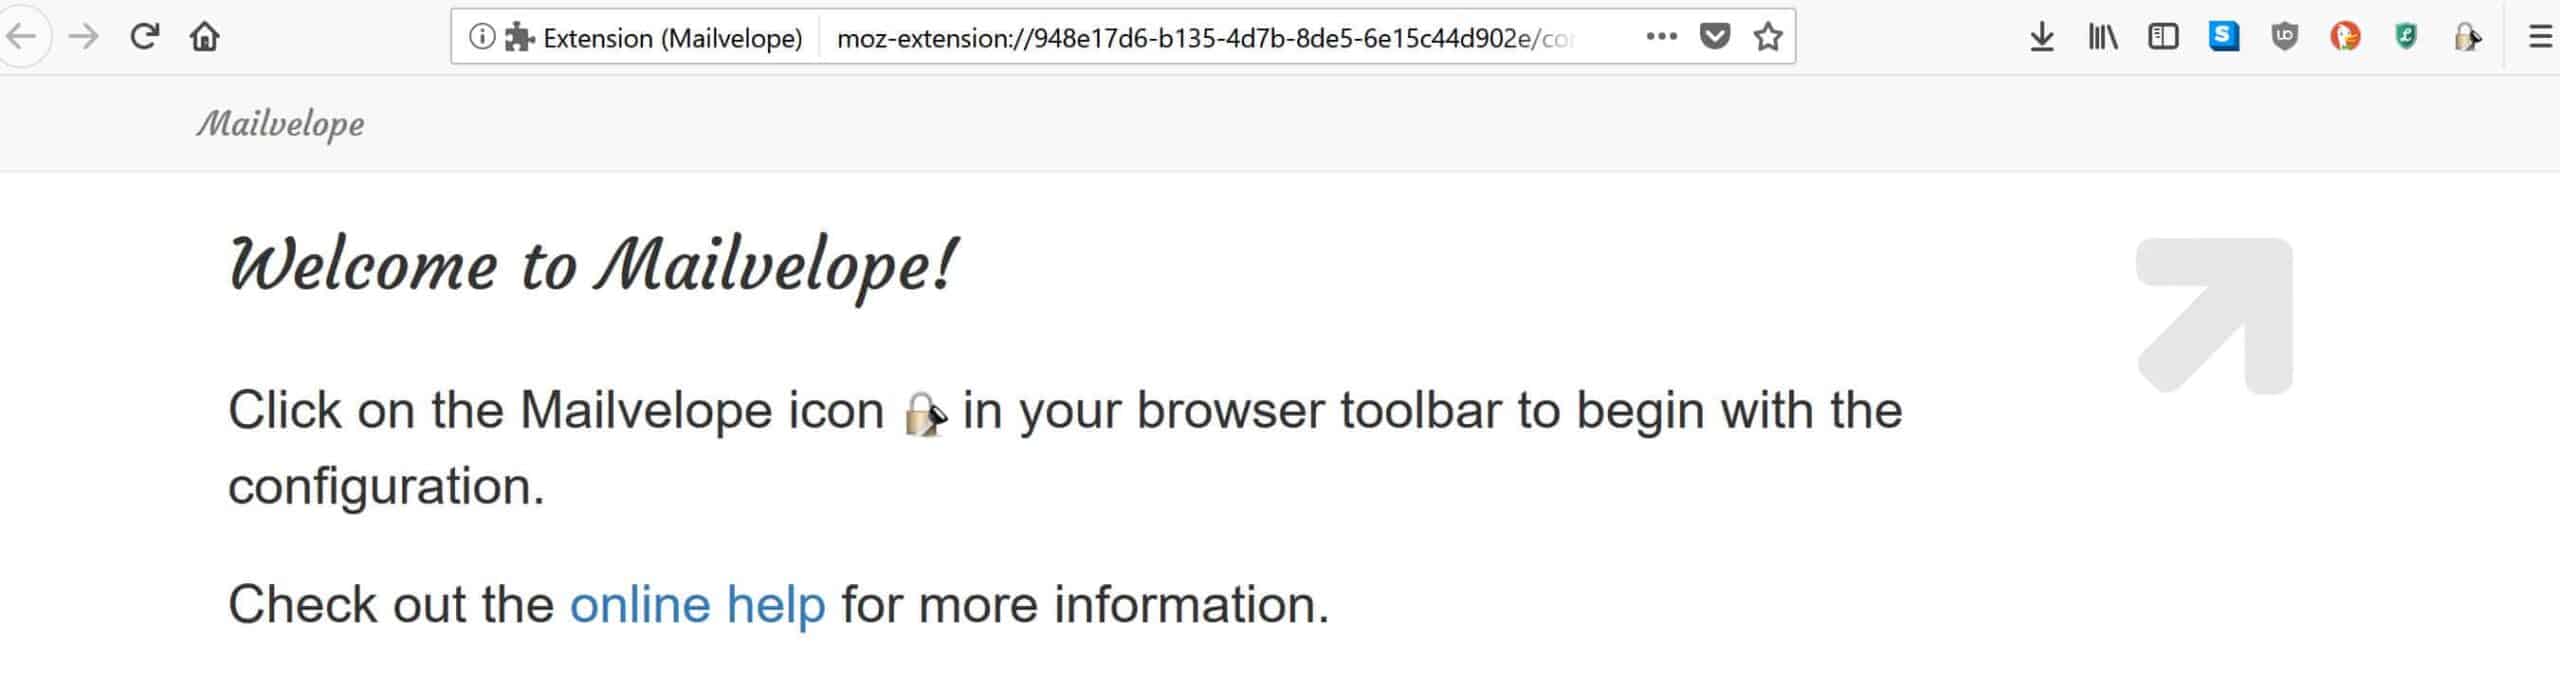
It will open a new tab in your browser instructing you to click on a button in the top right-hand corner to begin configuring the addon:
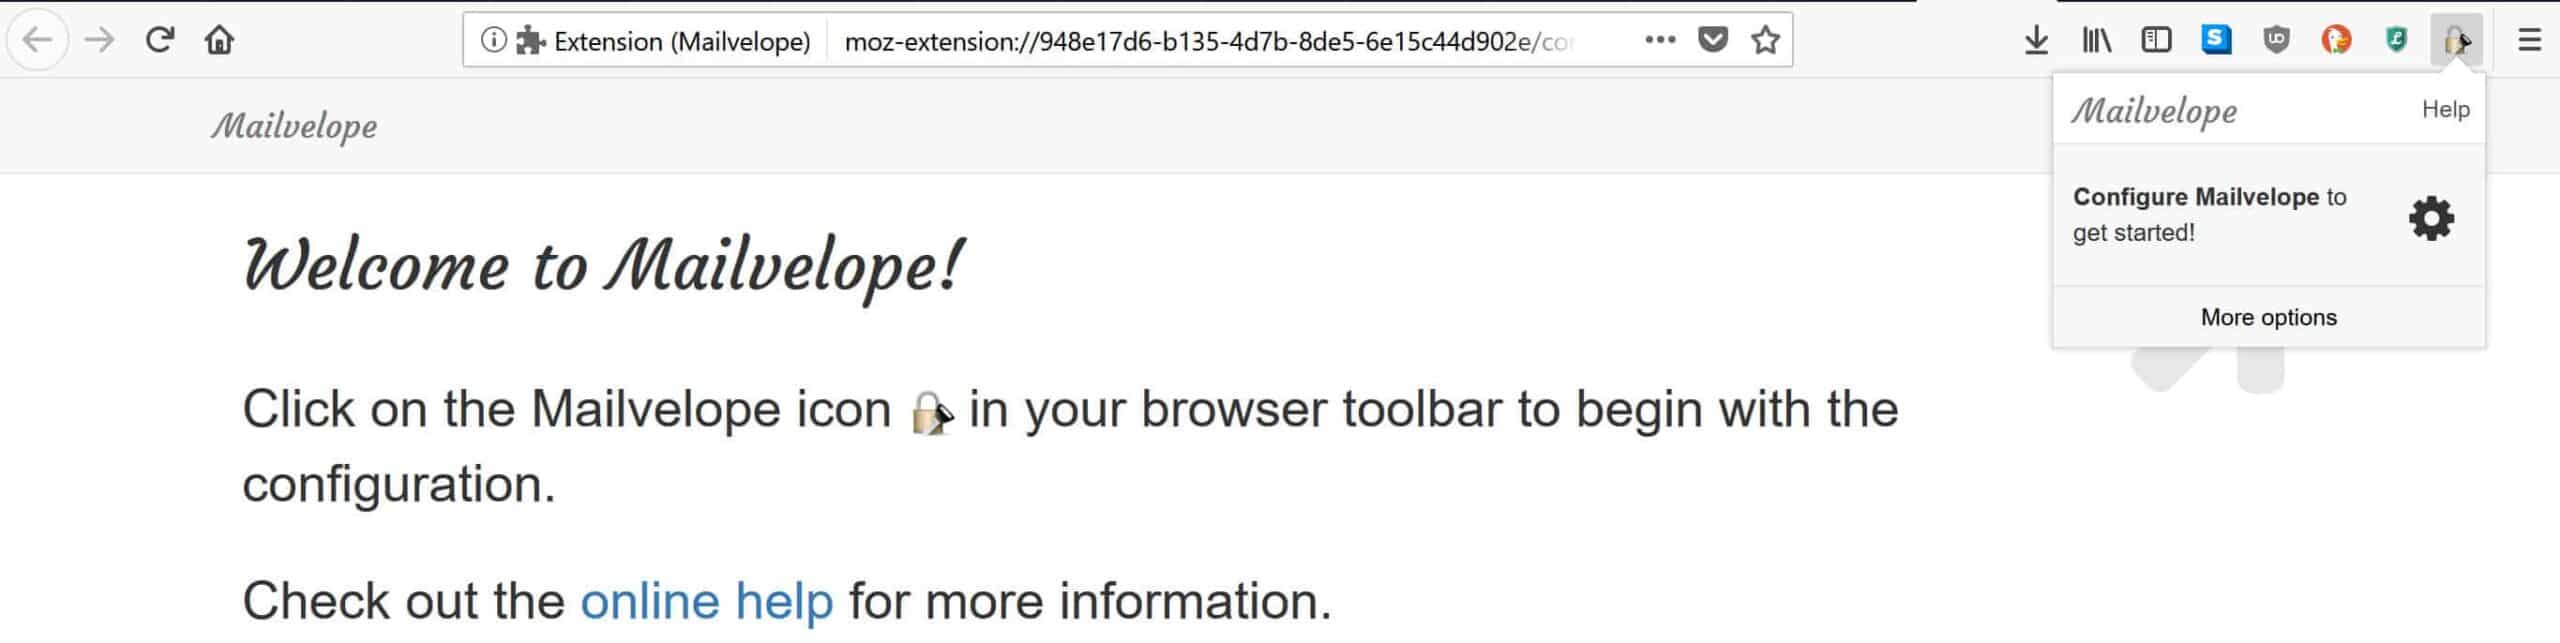
Clicking the lock icon in the corner will bring up a menu to begin the configuration:
This brings you to the following setup page, where Mailvelope has two options, Generate Key or Import key:
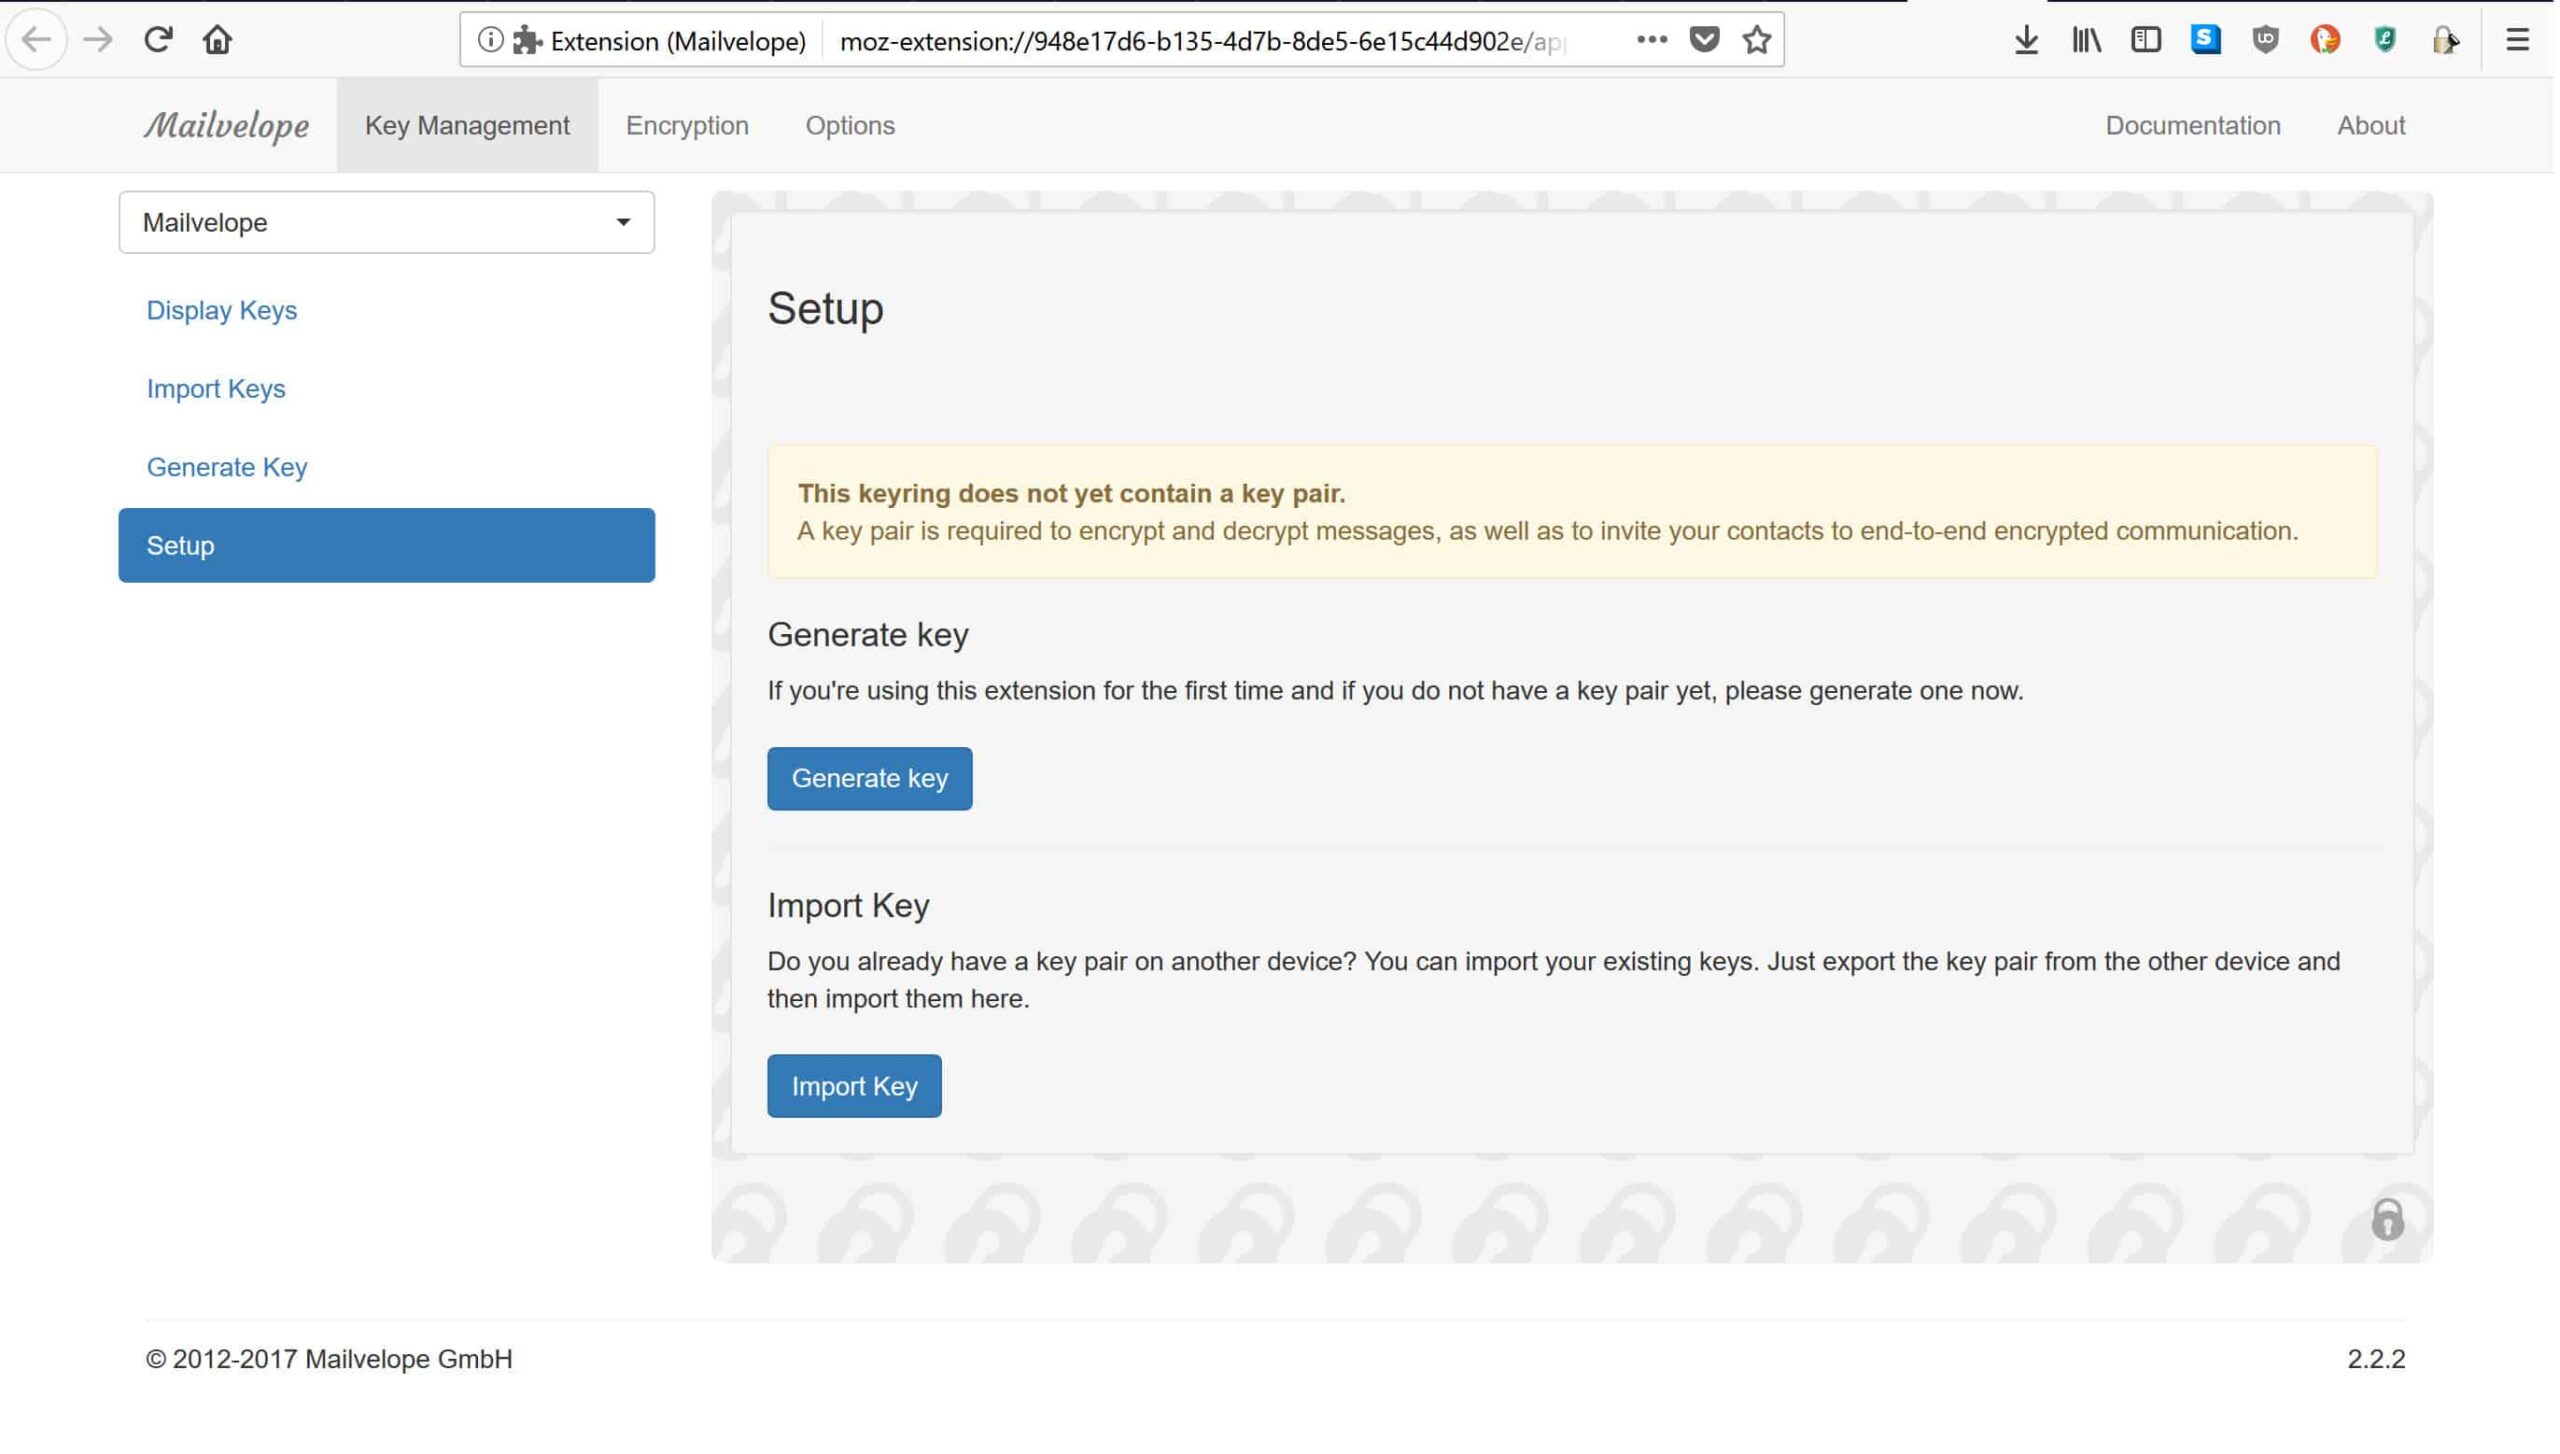
Generating a key
Since most users reading this guide will probably be new to PGP and not have an existing key pair, we will focus on generating a key. To do this, click on the blue button that says Generate key. If you already have a PGP key, click the Import key button instead and follow the prompts.
Once you hit the generate key button, you’ll arrive at the following page:
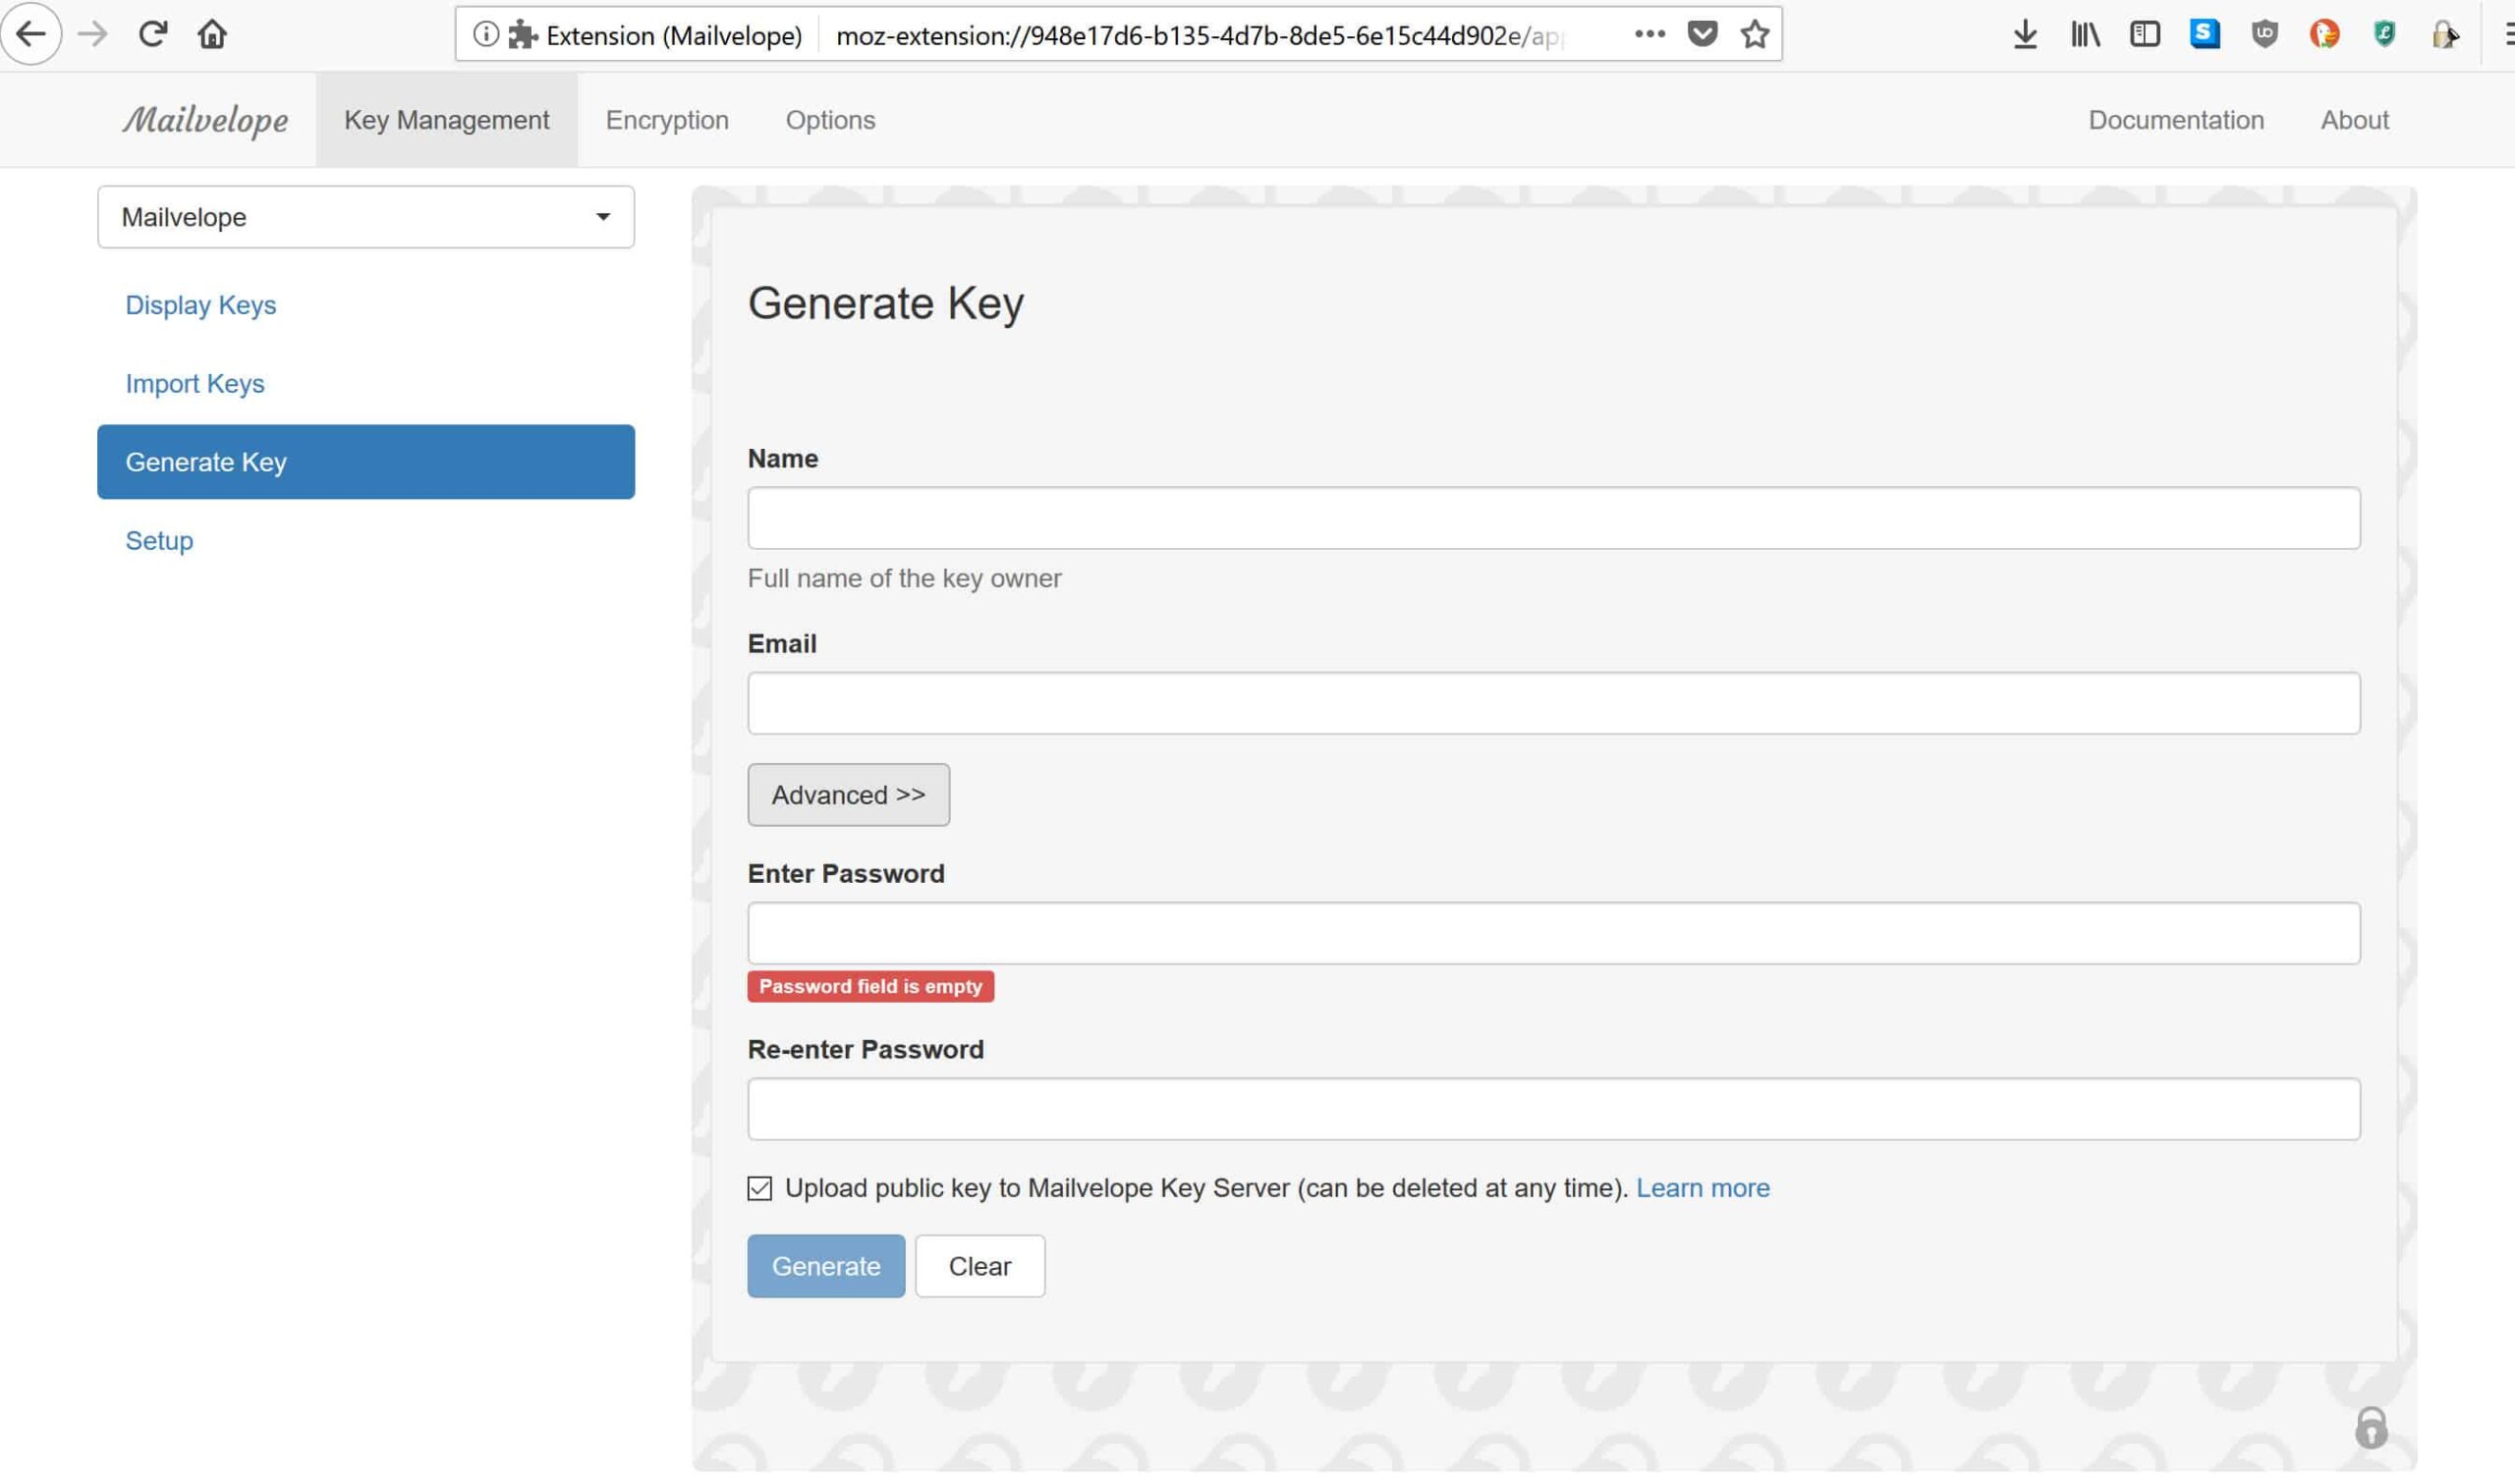
Here, you enter your full name for the Mailvelope key registry, alongside your Gmail address. You will also need to enter a password. Since the whole reason we are setting up Mailvelope is to improve our privacy and security, it’s important that we also have a secure password. Otherwise, your password can easily be cracked and anyone can access your encrypted mail.
Password guidelines have changed a lot in recent years. It’s less important to have symbols, capitals, and numbers, and instead it’s best to focus on having a long password. From a standpoint of both being secure and easy to remember, a string of unrelated words that is over 25 characters long is ideal (e.g. cranenaturaltowelpurplelobster).
See also: Password Generator tool
Most importantly, the password needs to be unique and not one that you use for all of your other accounts. The most effective way to juggle different passwords for each account is with a password manager such as the open-source KeePass or the proprietary LastPass.
Now that you’ve entered your details alongside your secure password, the Mailvelope extension will generate a key pair for you. You will be returned to the same page, with a green bar that says “Success! New key generated and imported into keyring” appearing above the blue Generate key button.
Adding contacts
By now, you have your keys, which is a good start. However, PGP is useless if you don’t have anyone to talk to. On the same page, in the vertical menu bar to the left, click on the second option down which says Import Keys. This is where you add your recipients:
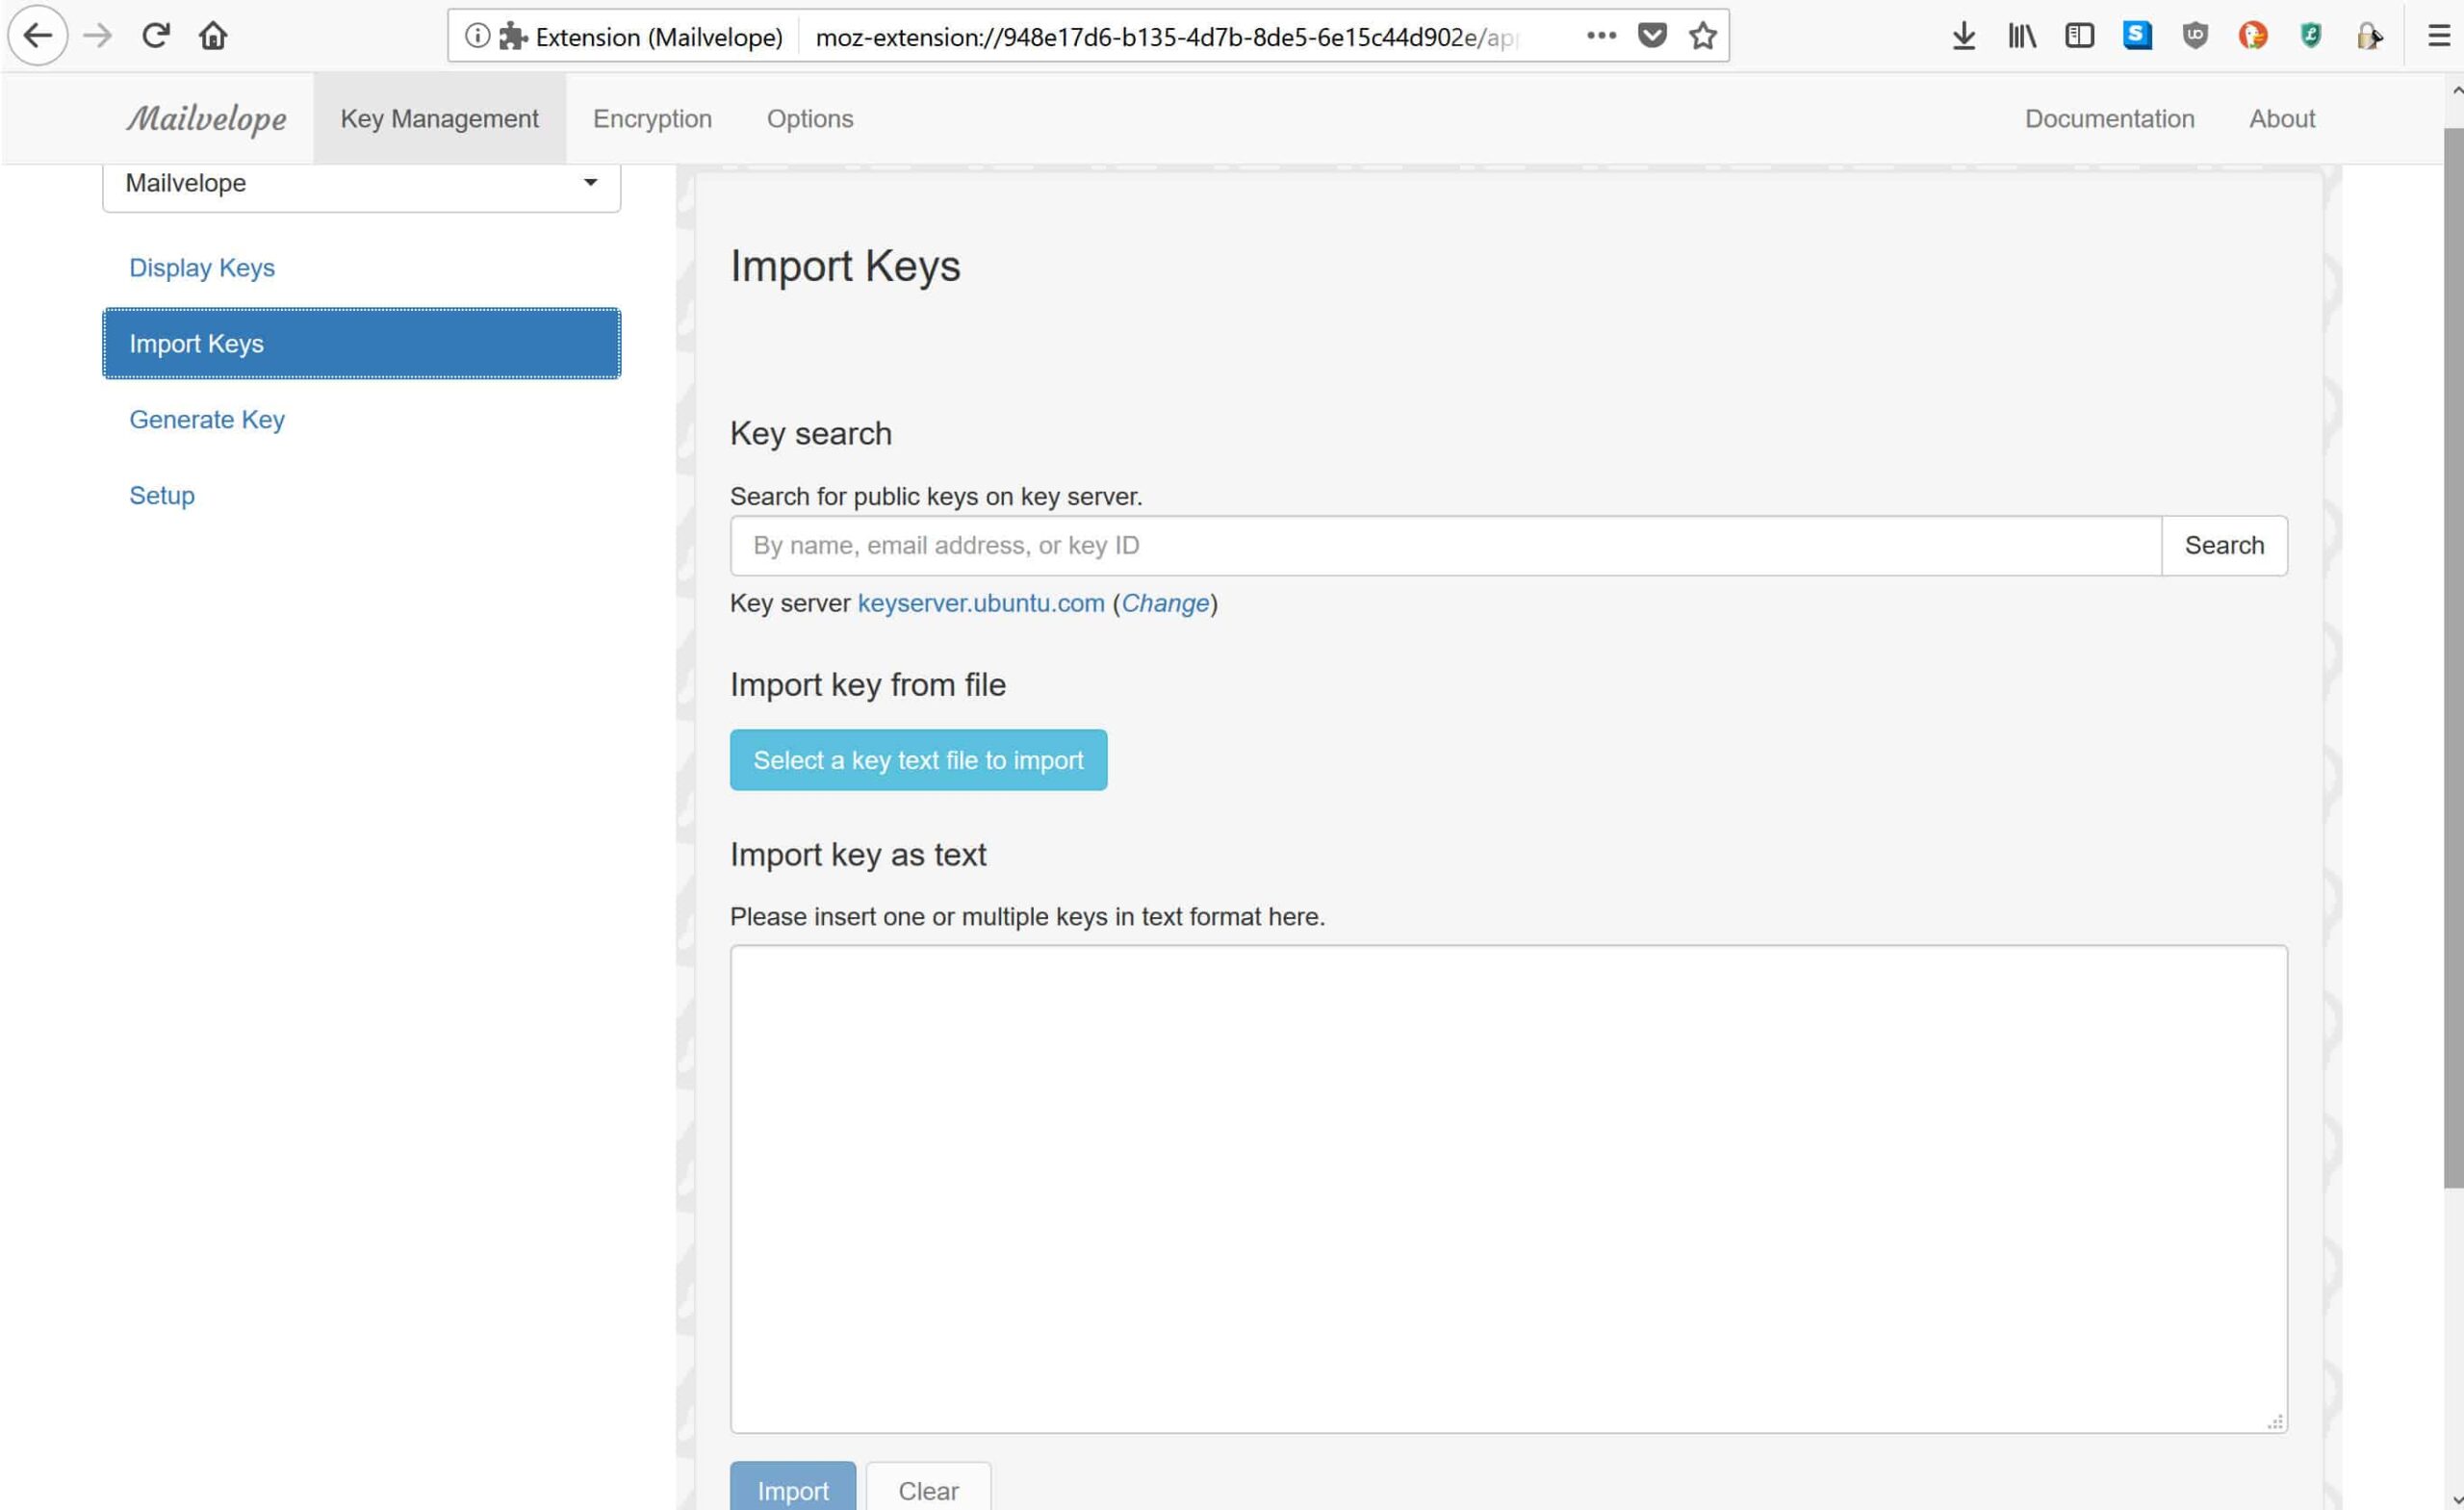
If you don’t already have your intended recipient’s public key, you can look it up on Mailvelope’s key server. If it isn’t available there, you will have to resort to other means. These include searching other key registries, seeing if the recipient lists their public key on their personal website, or asking them directly.
Once you have their key, you can import it from the file or as text, using either of the options listed on the page. Click Import once you have uploaded the recipient’s public key.
Sending your first PGP encrypted email
Since we’ve already generated our key pair and we now have someone to talk to, it’s time to head over to Gmail. Select the red Compose button that you normally use when starting a new email: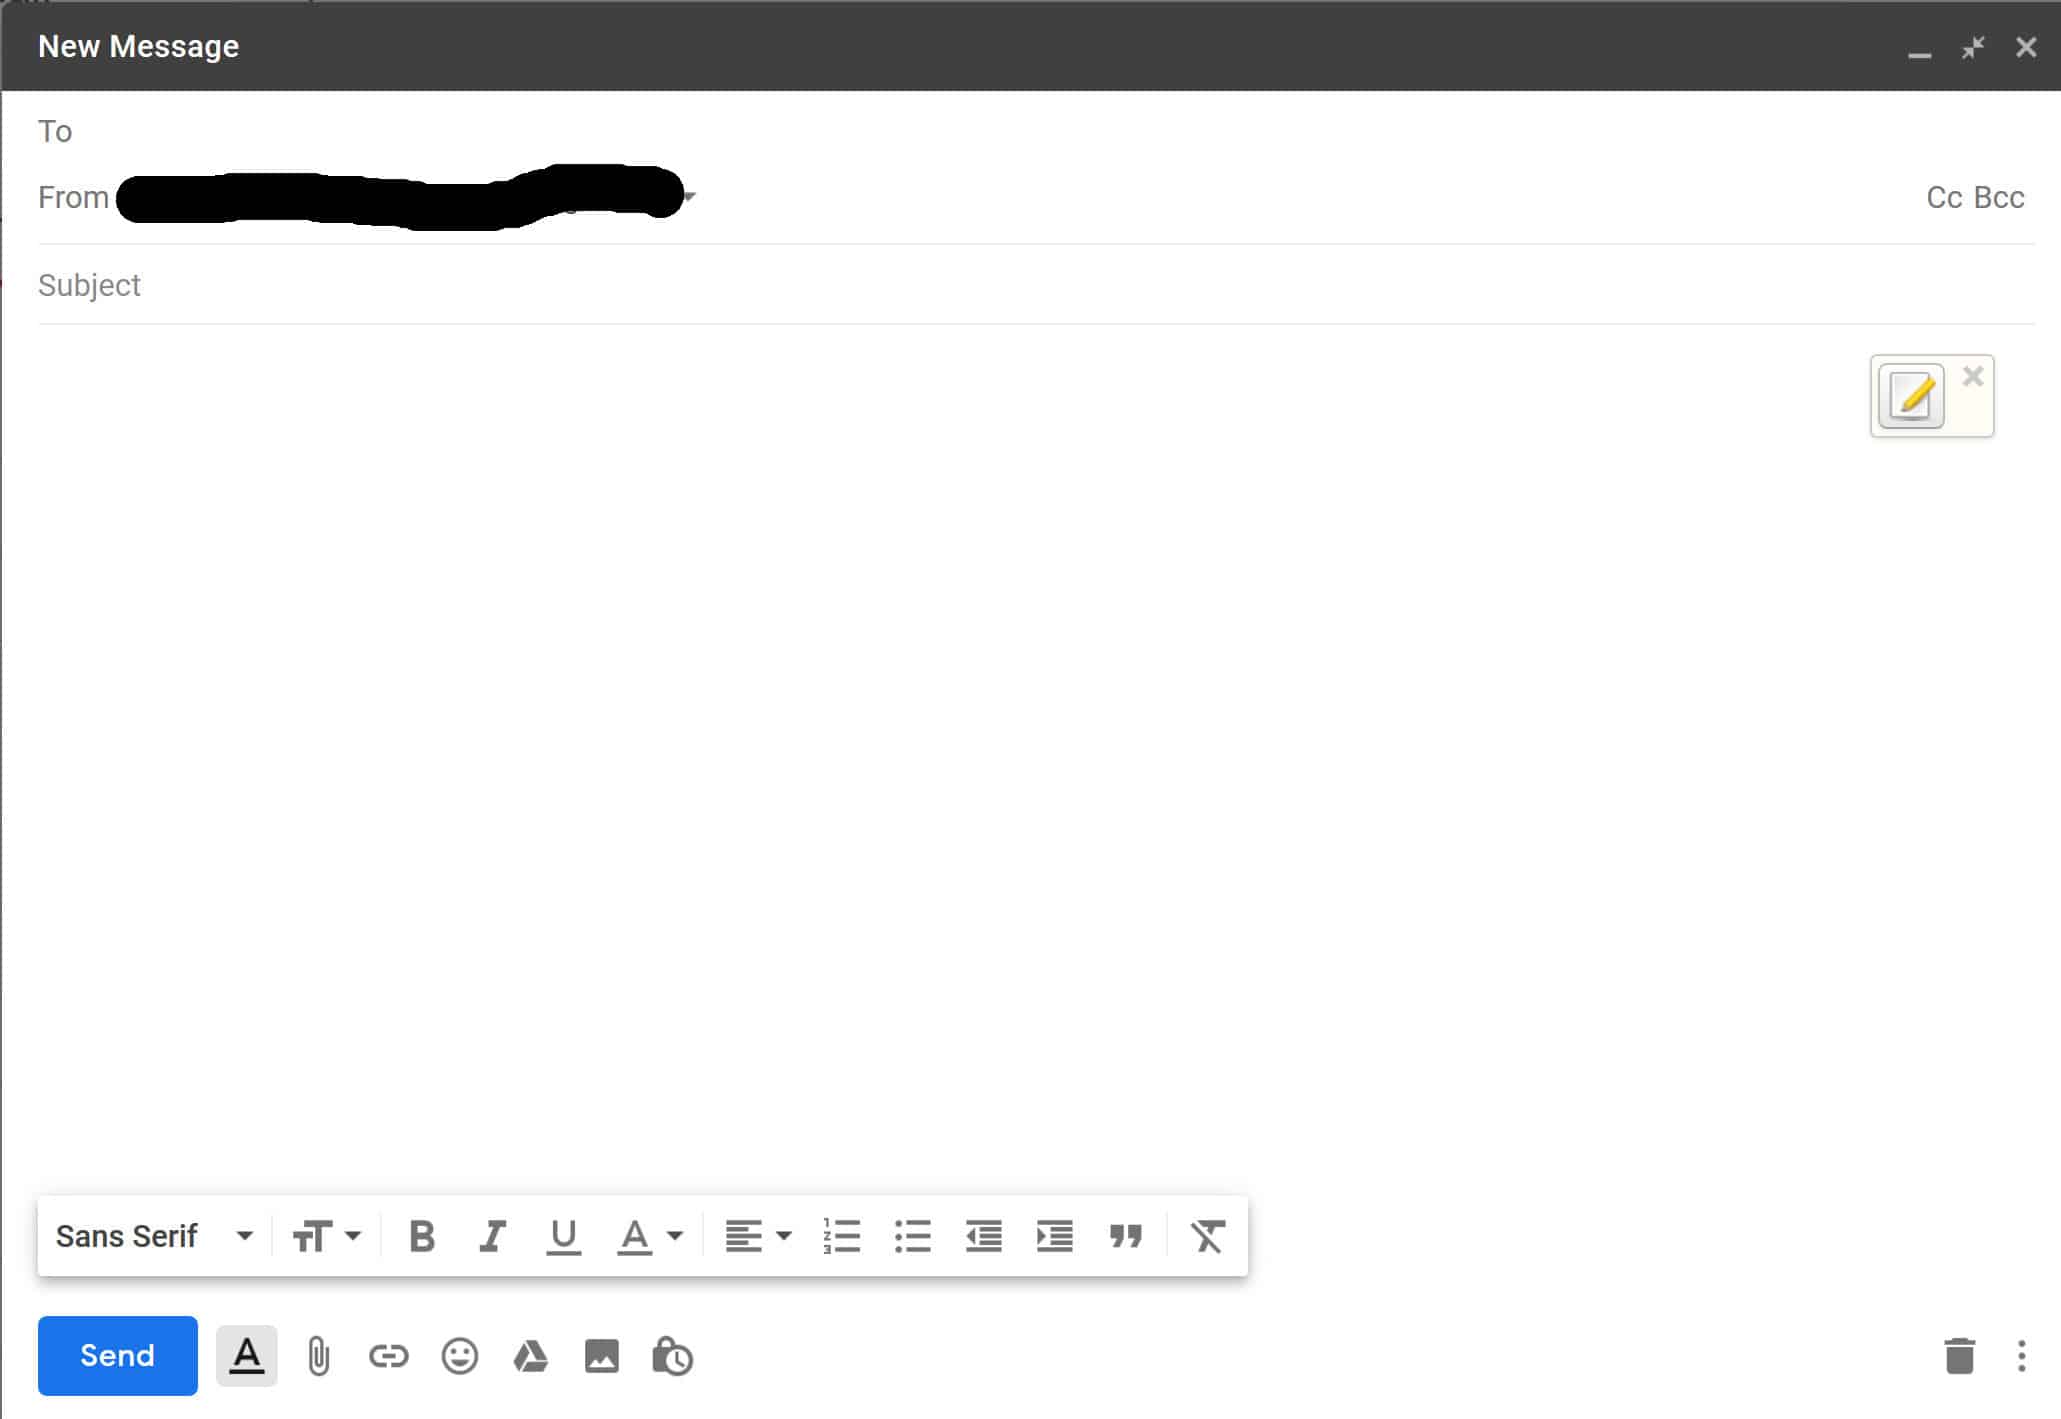
As you will see, your message interface now has a new Mailvelope icon of a pencil and paper in the top right of the body text. If you want to send a message with PGP encryption, hit this button. This brings you to the popup where you can enter the text you want to encrypt:
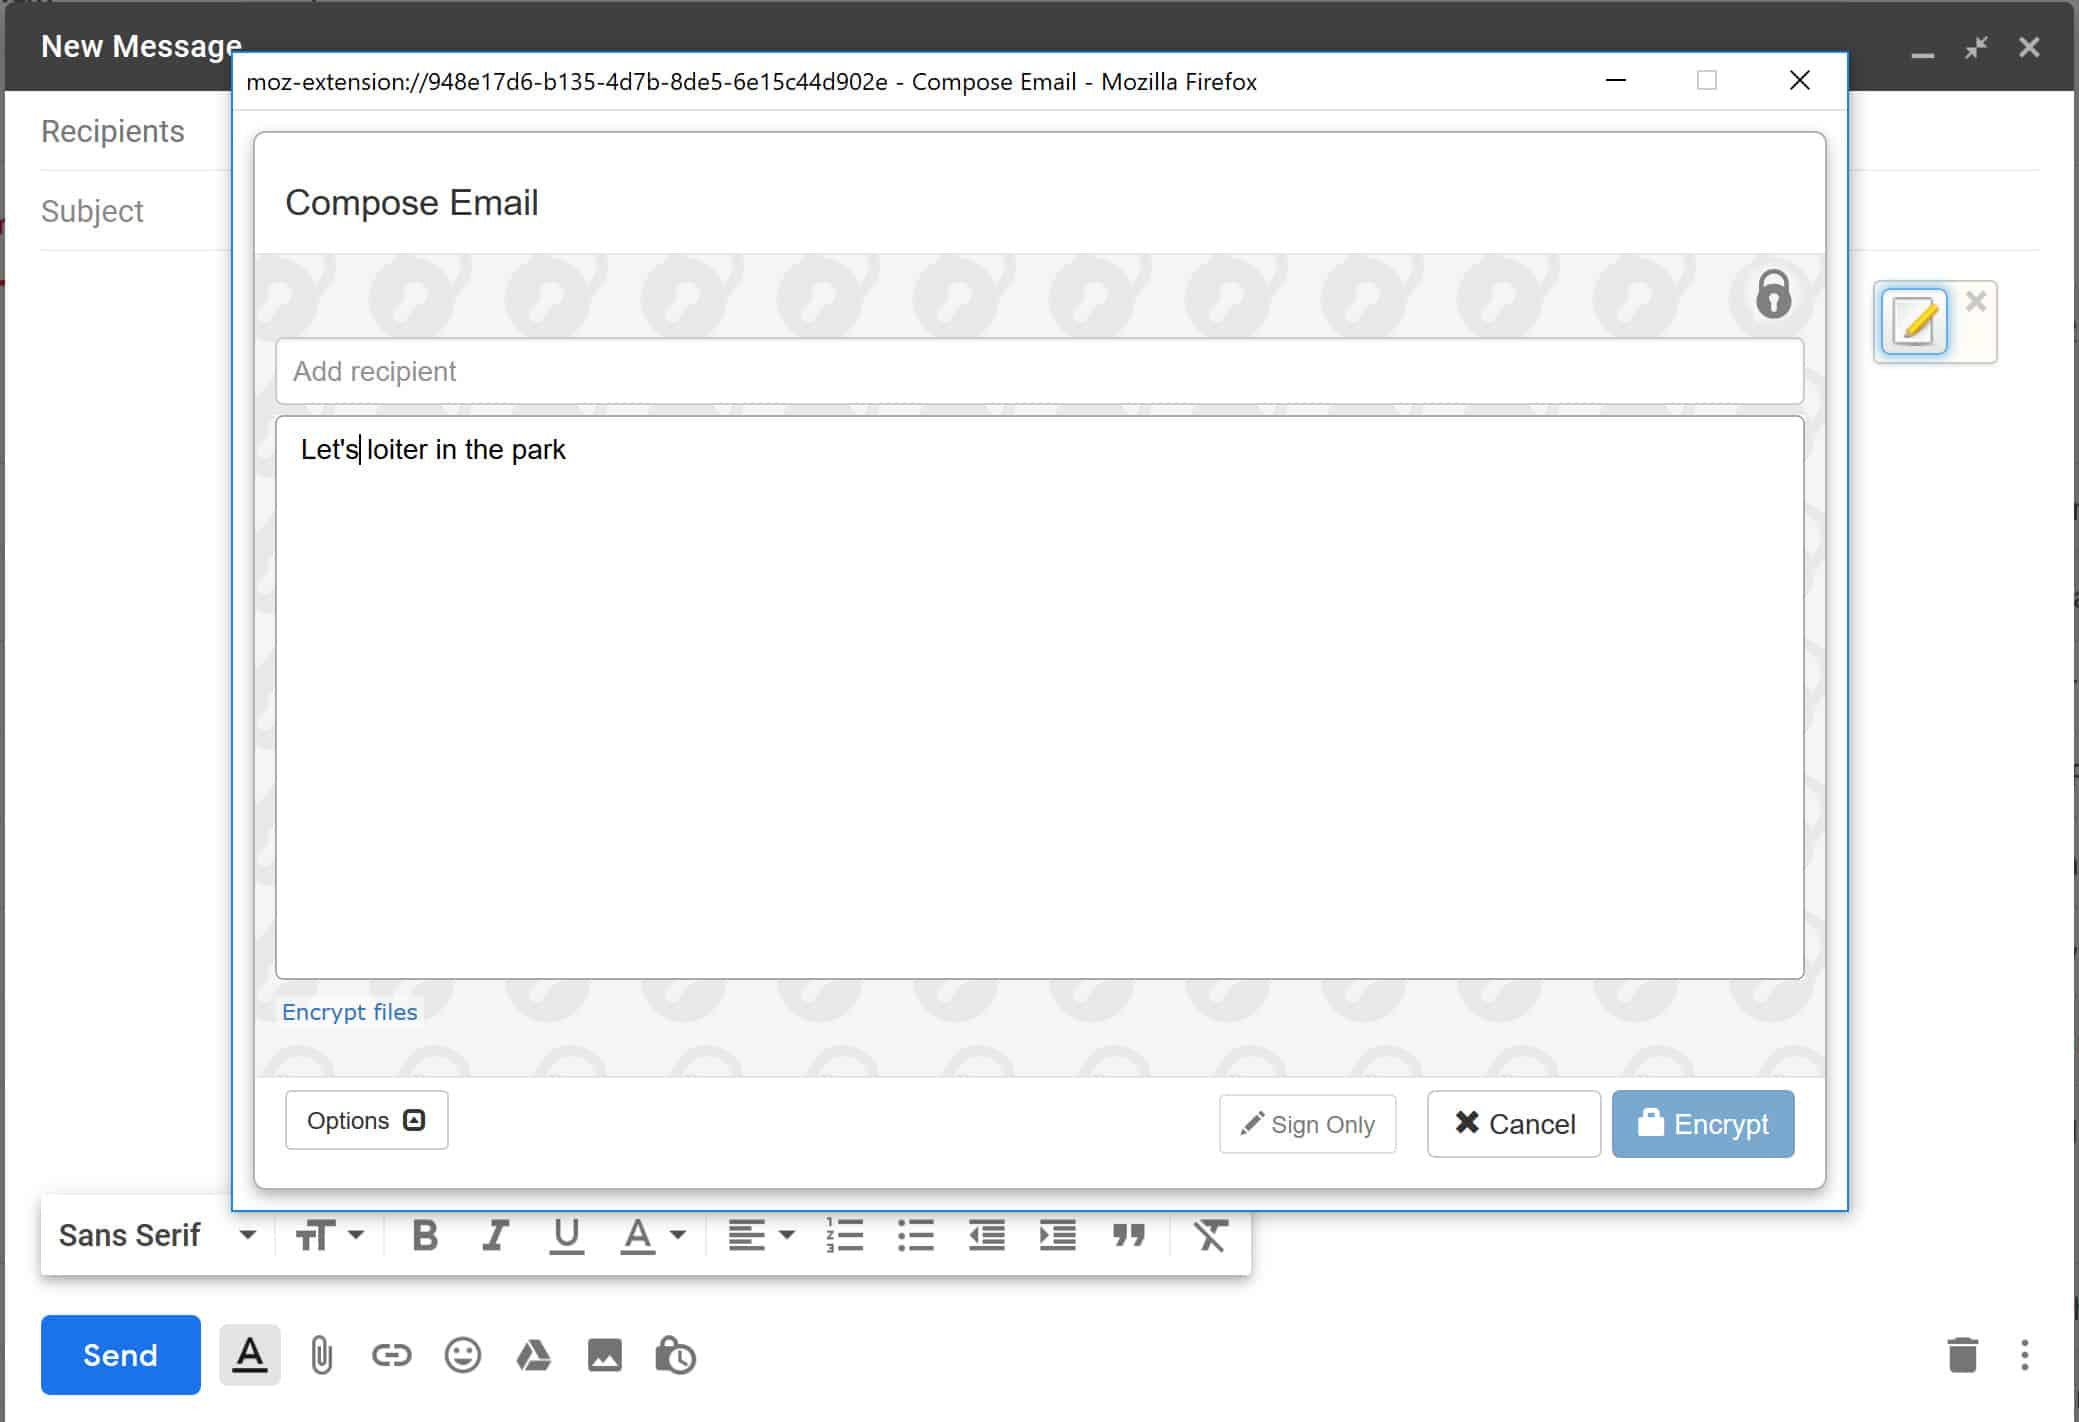
When you’ve finished typing your message, you will need to add in your recipient. If you haven’t already added them, then follow the steps listed under Adding contacts.
Once you’ve added your recipient and typed out your message, hit the blue Encrypt button on the bottom right. This returns you back to the “New Message” page of your Gmail. Now, you will see a jumble of letters, which is the encrypted cipher text of the message you entered on the Mailvelope page:
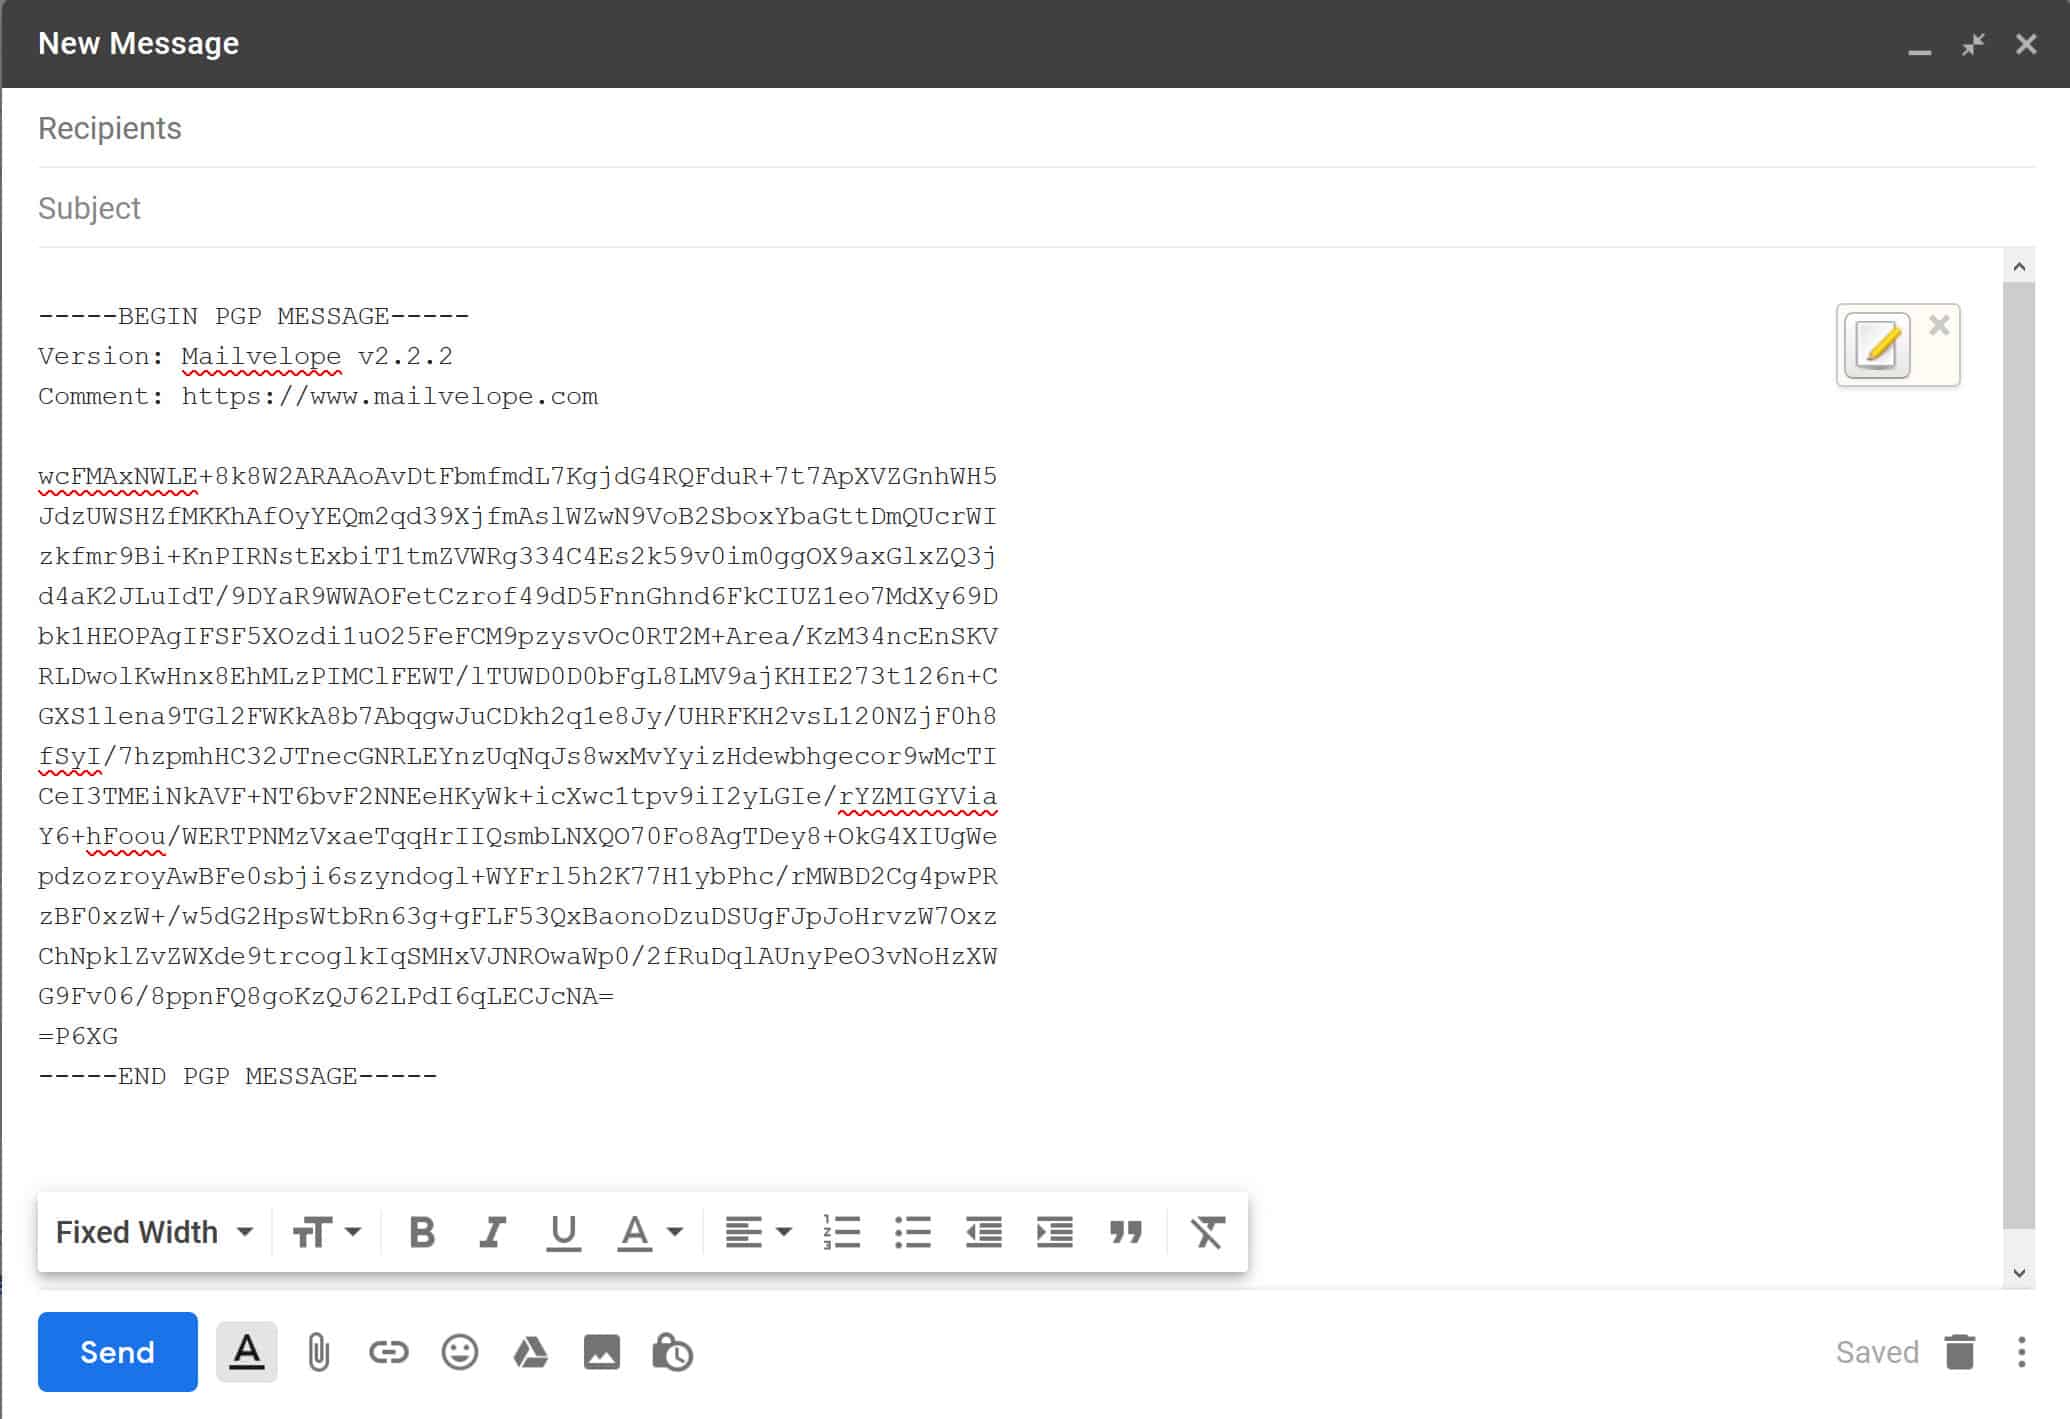
All you have to do is hit Send, and your first PGP encrypted message will be on its way to your recipient. The only way it can be accessed and read is with your recipient’s private key. This makes the whole process far more secure than normal emailing.
How to install FlowCrypt & send a PGP encrypted message with Gmail
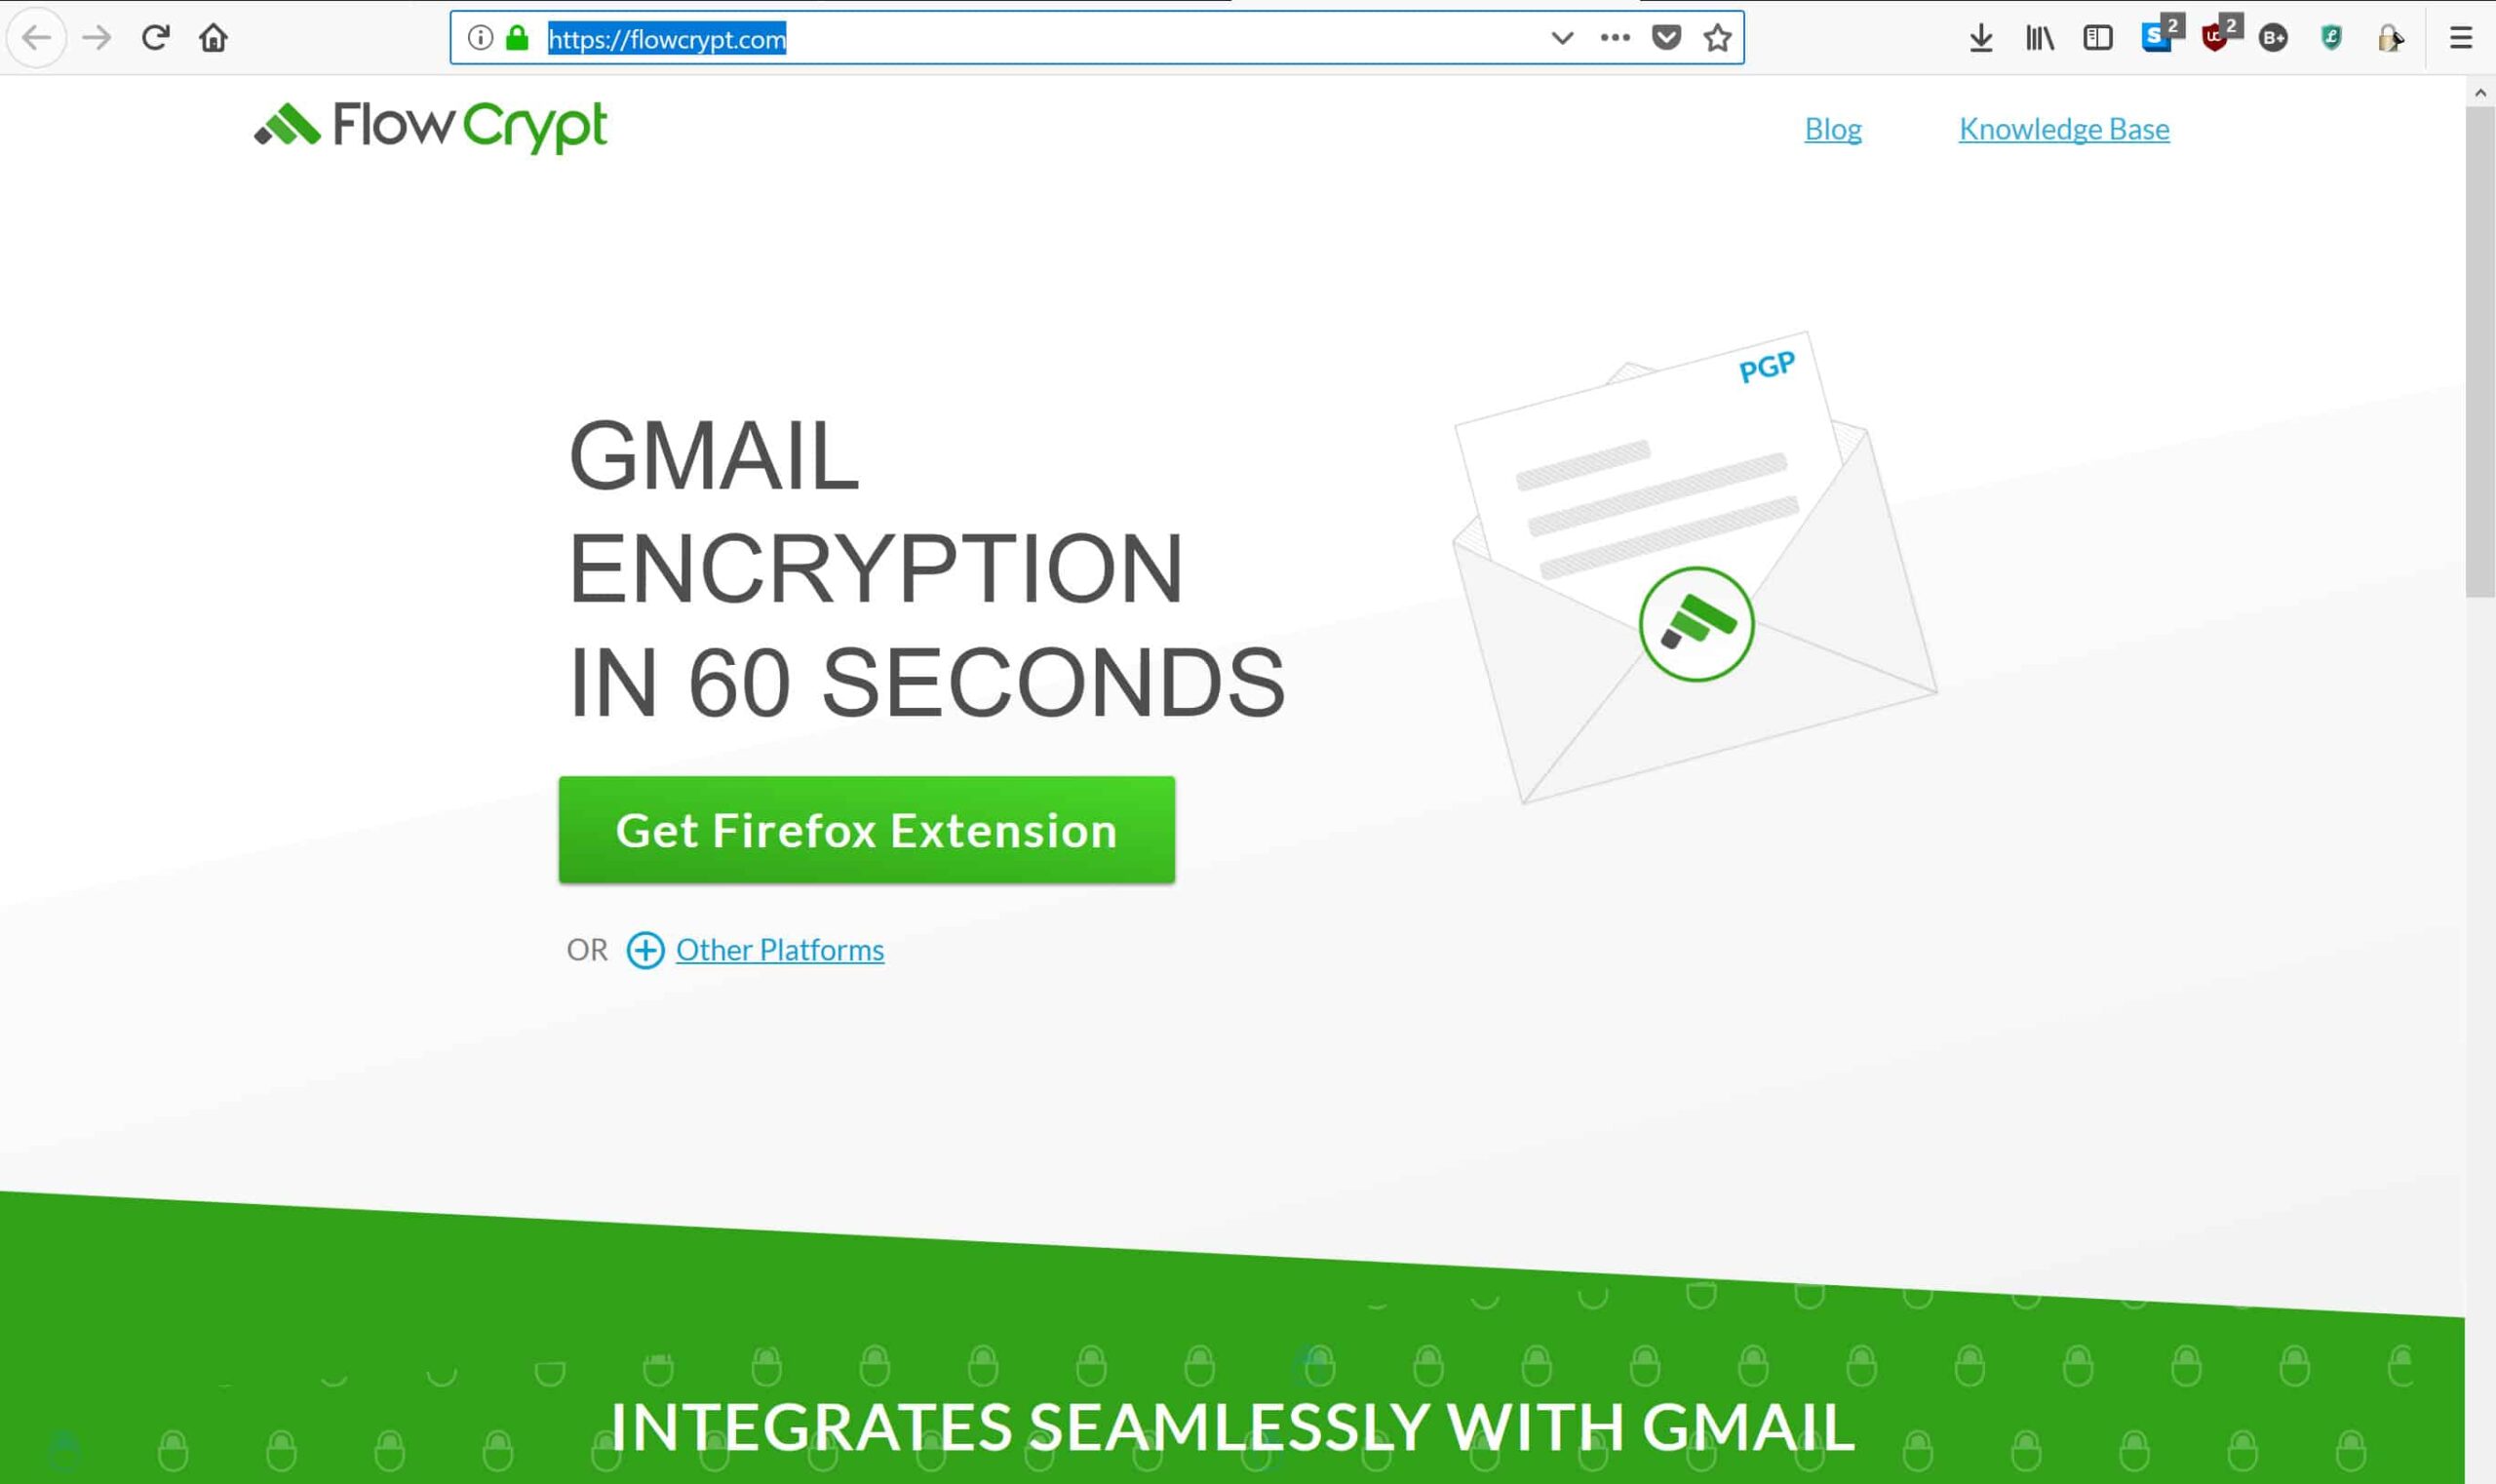
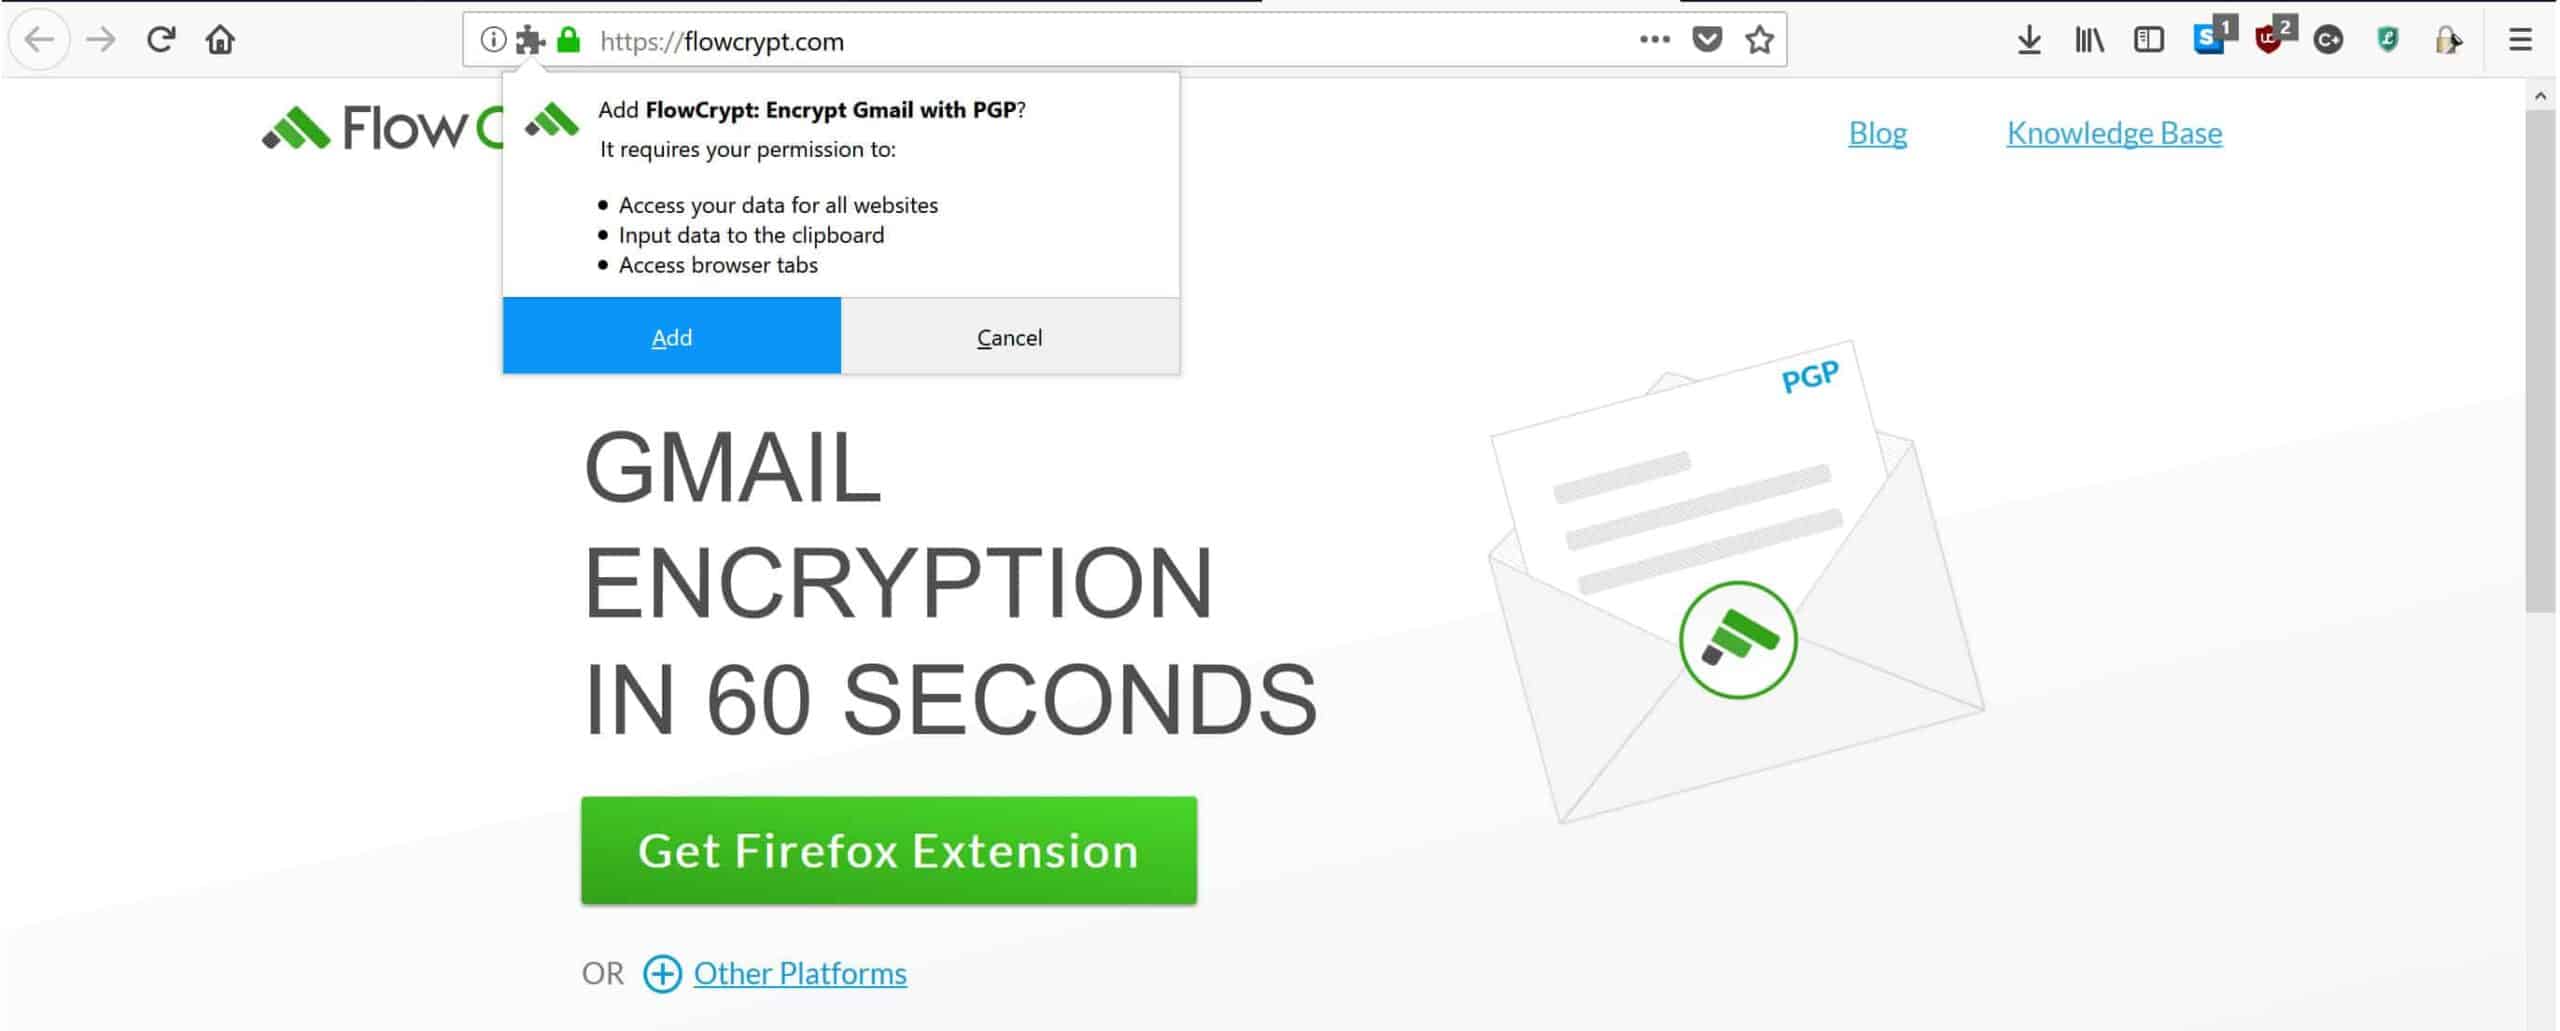
If you decide that FlowCrypt is a better option for you, it’s even easier to set up and send emails. Once again, this tutorial will focus on Firefox, but the steps in Chrome and Edge aren’t much different. First, you’ll need to head over to the FlowCrypt site and click on the big green Get Firefox Extension button in the middle of the page:
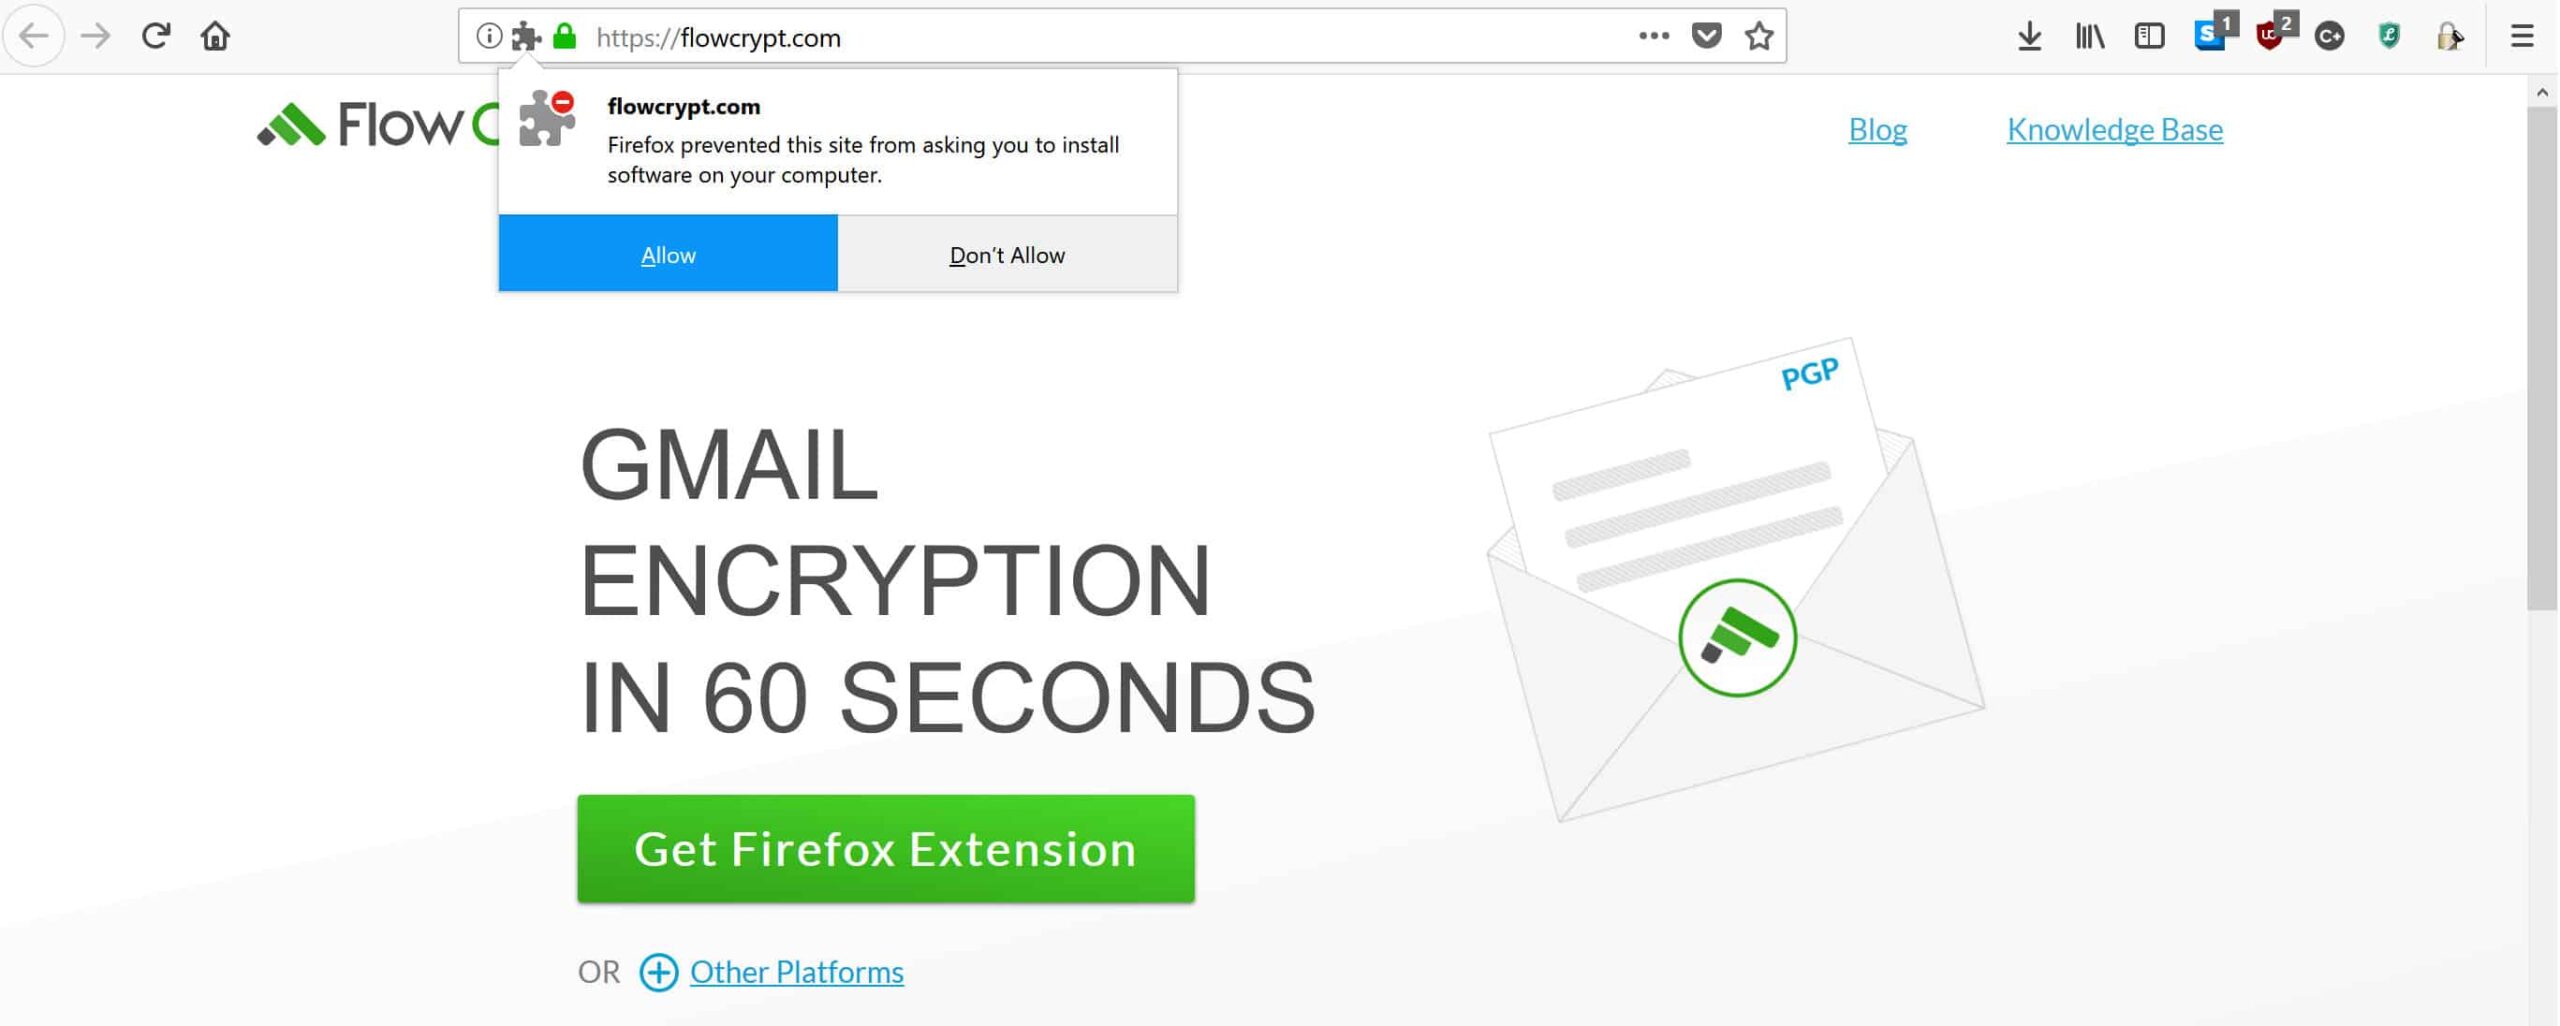
Once you click the button, Firefox may try to block it. If it does, just click the Allow button in the top left:
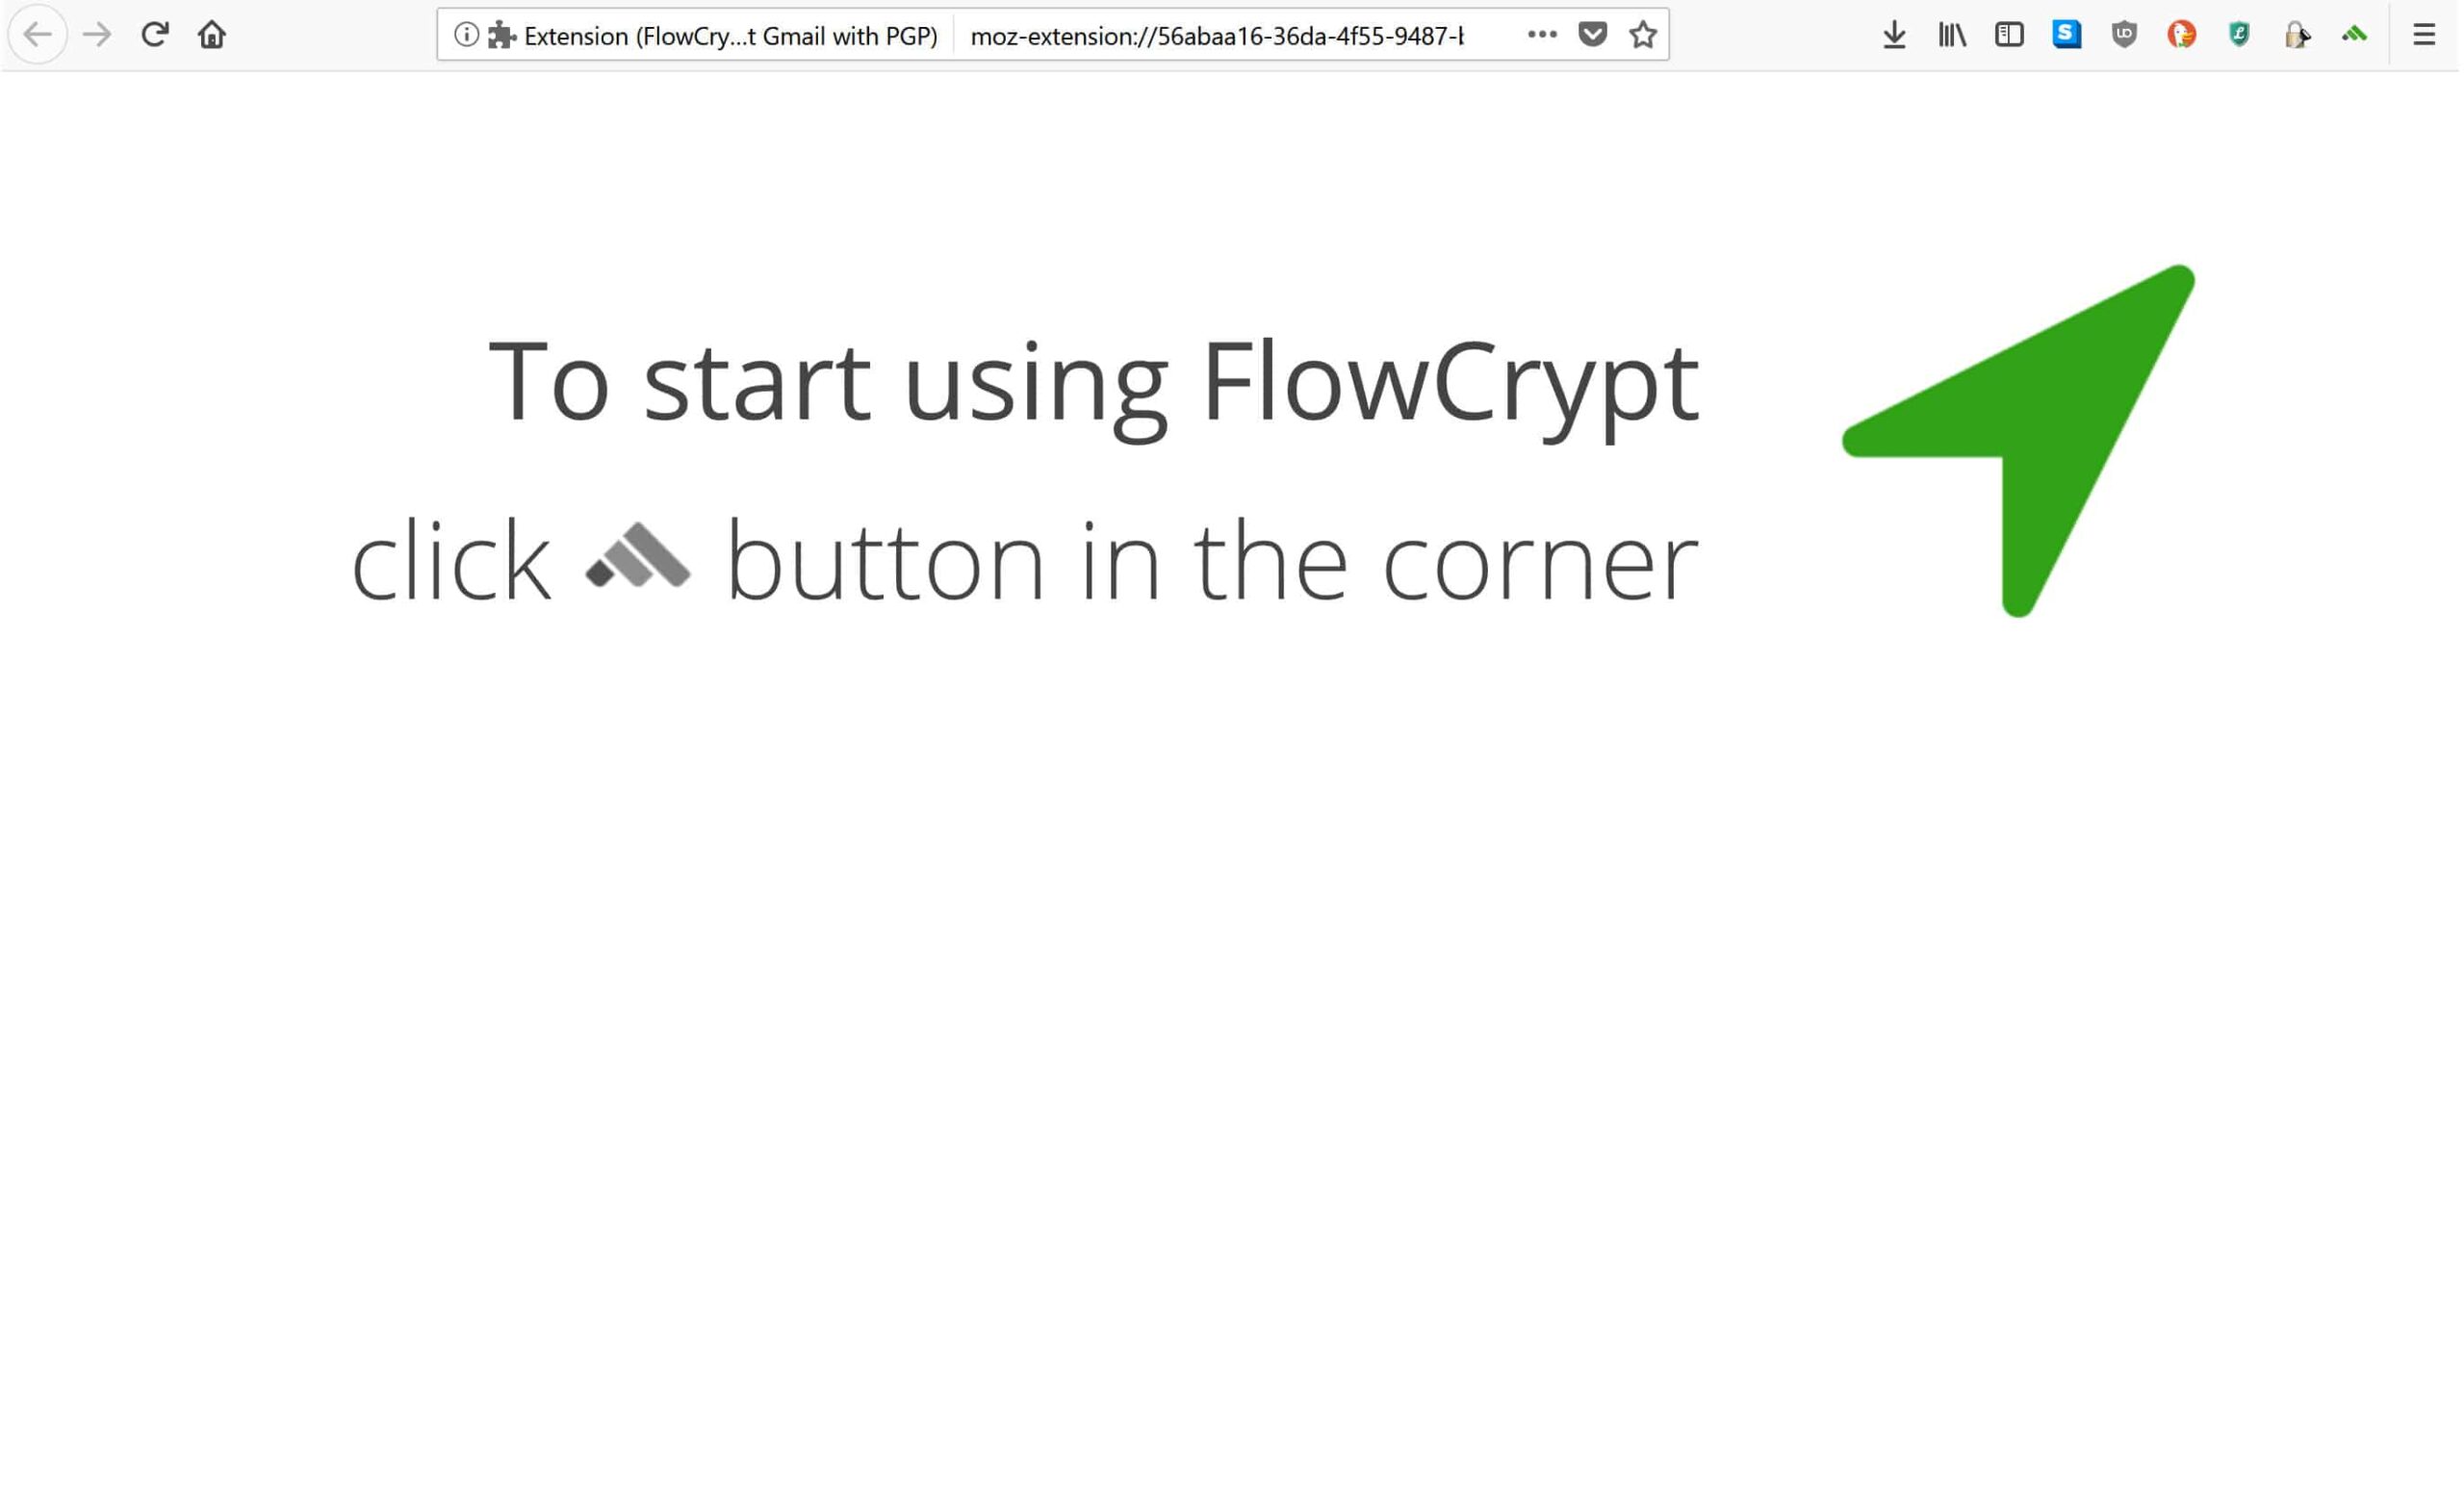
It will take a few seconds to download, then click on the Add button that comes up in the same place:
You will be brought to the following screen, which advises you to click on the new FlowCrypt icon in the top right:
Select the icon that looks like a green mountain made from three stripes, and you’ll arrive at this setup page:
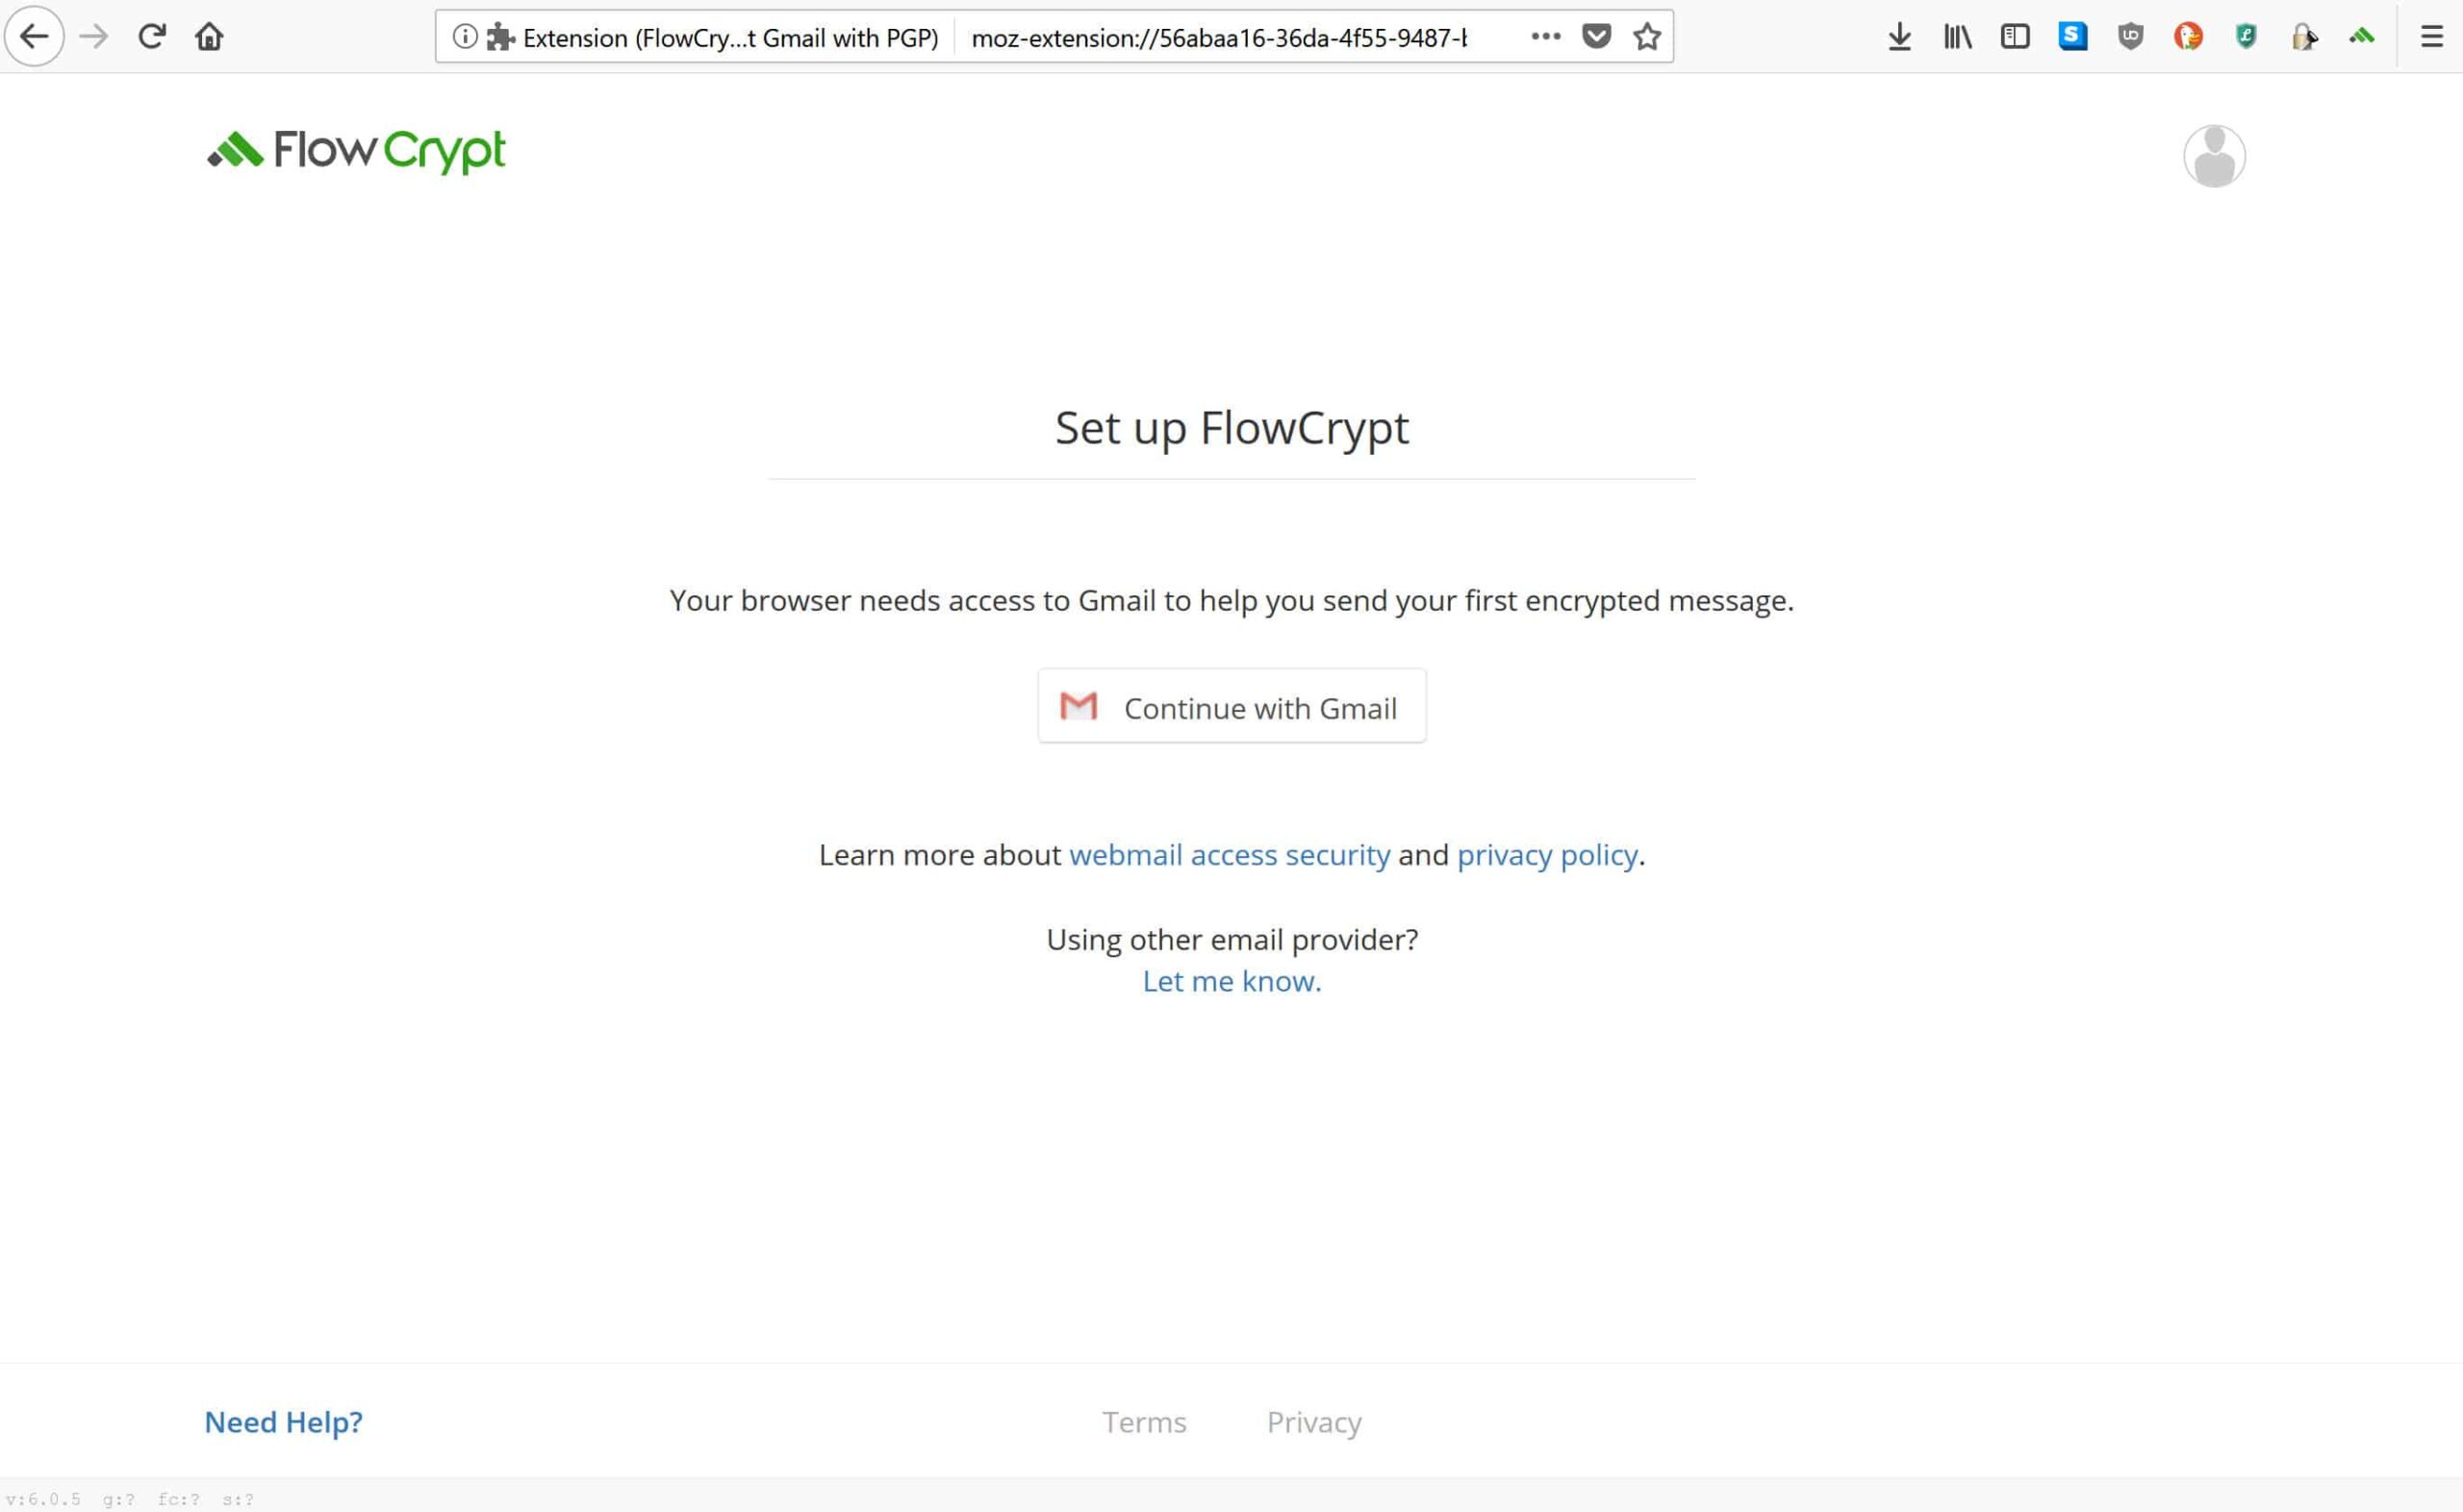
Click on the Continue with Gmail button, which will send you to a popup. Enter the Gmail account that you intend to use:
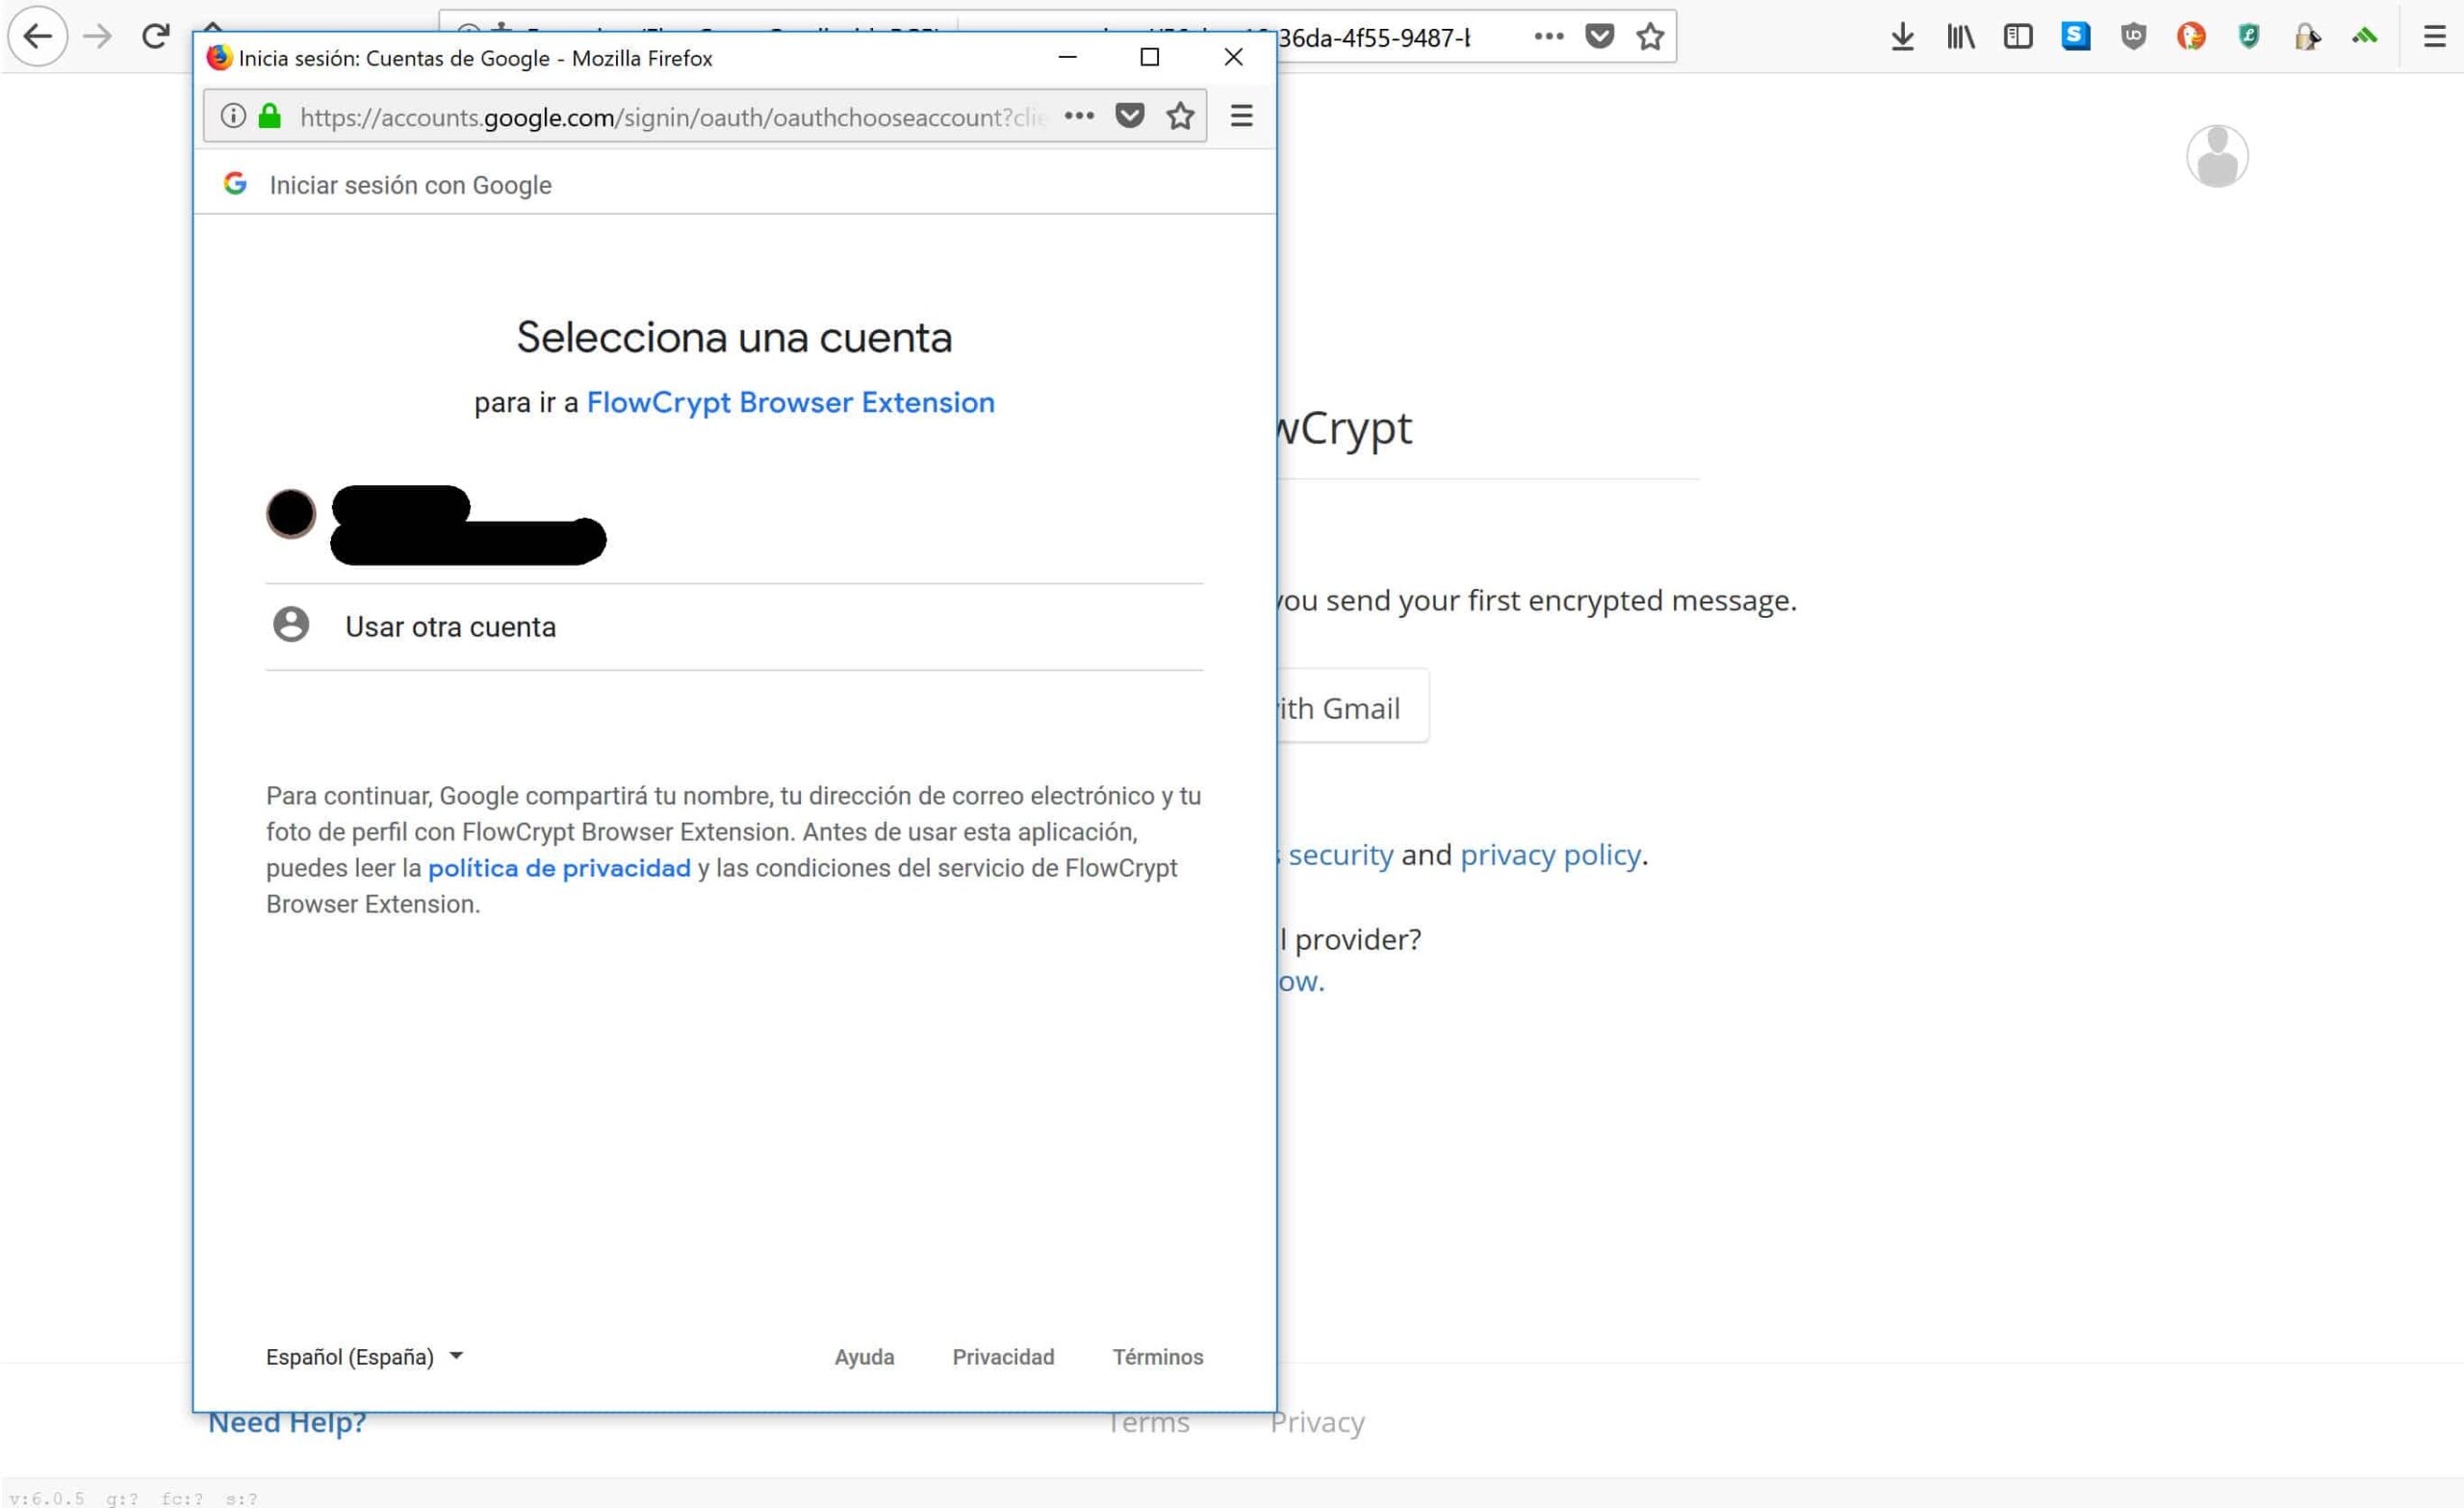
Once you have selected or entered your account, FlowCrypt will bring you to the next page:

Decide whether to allow access
This page covers the elements that FlowCrypt will have access to. If you are unsure about them, it may be best to click on the privacy policies or the Learn about the risks links. Those who don’t like the idea of FlowCrypt having this kind of access may be more interested in setting up PGP in a standalone client, which we will cover in a later tutorial.
Click Allow if you are fine with the access permissions. This takes you away from the popup and into this tab:
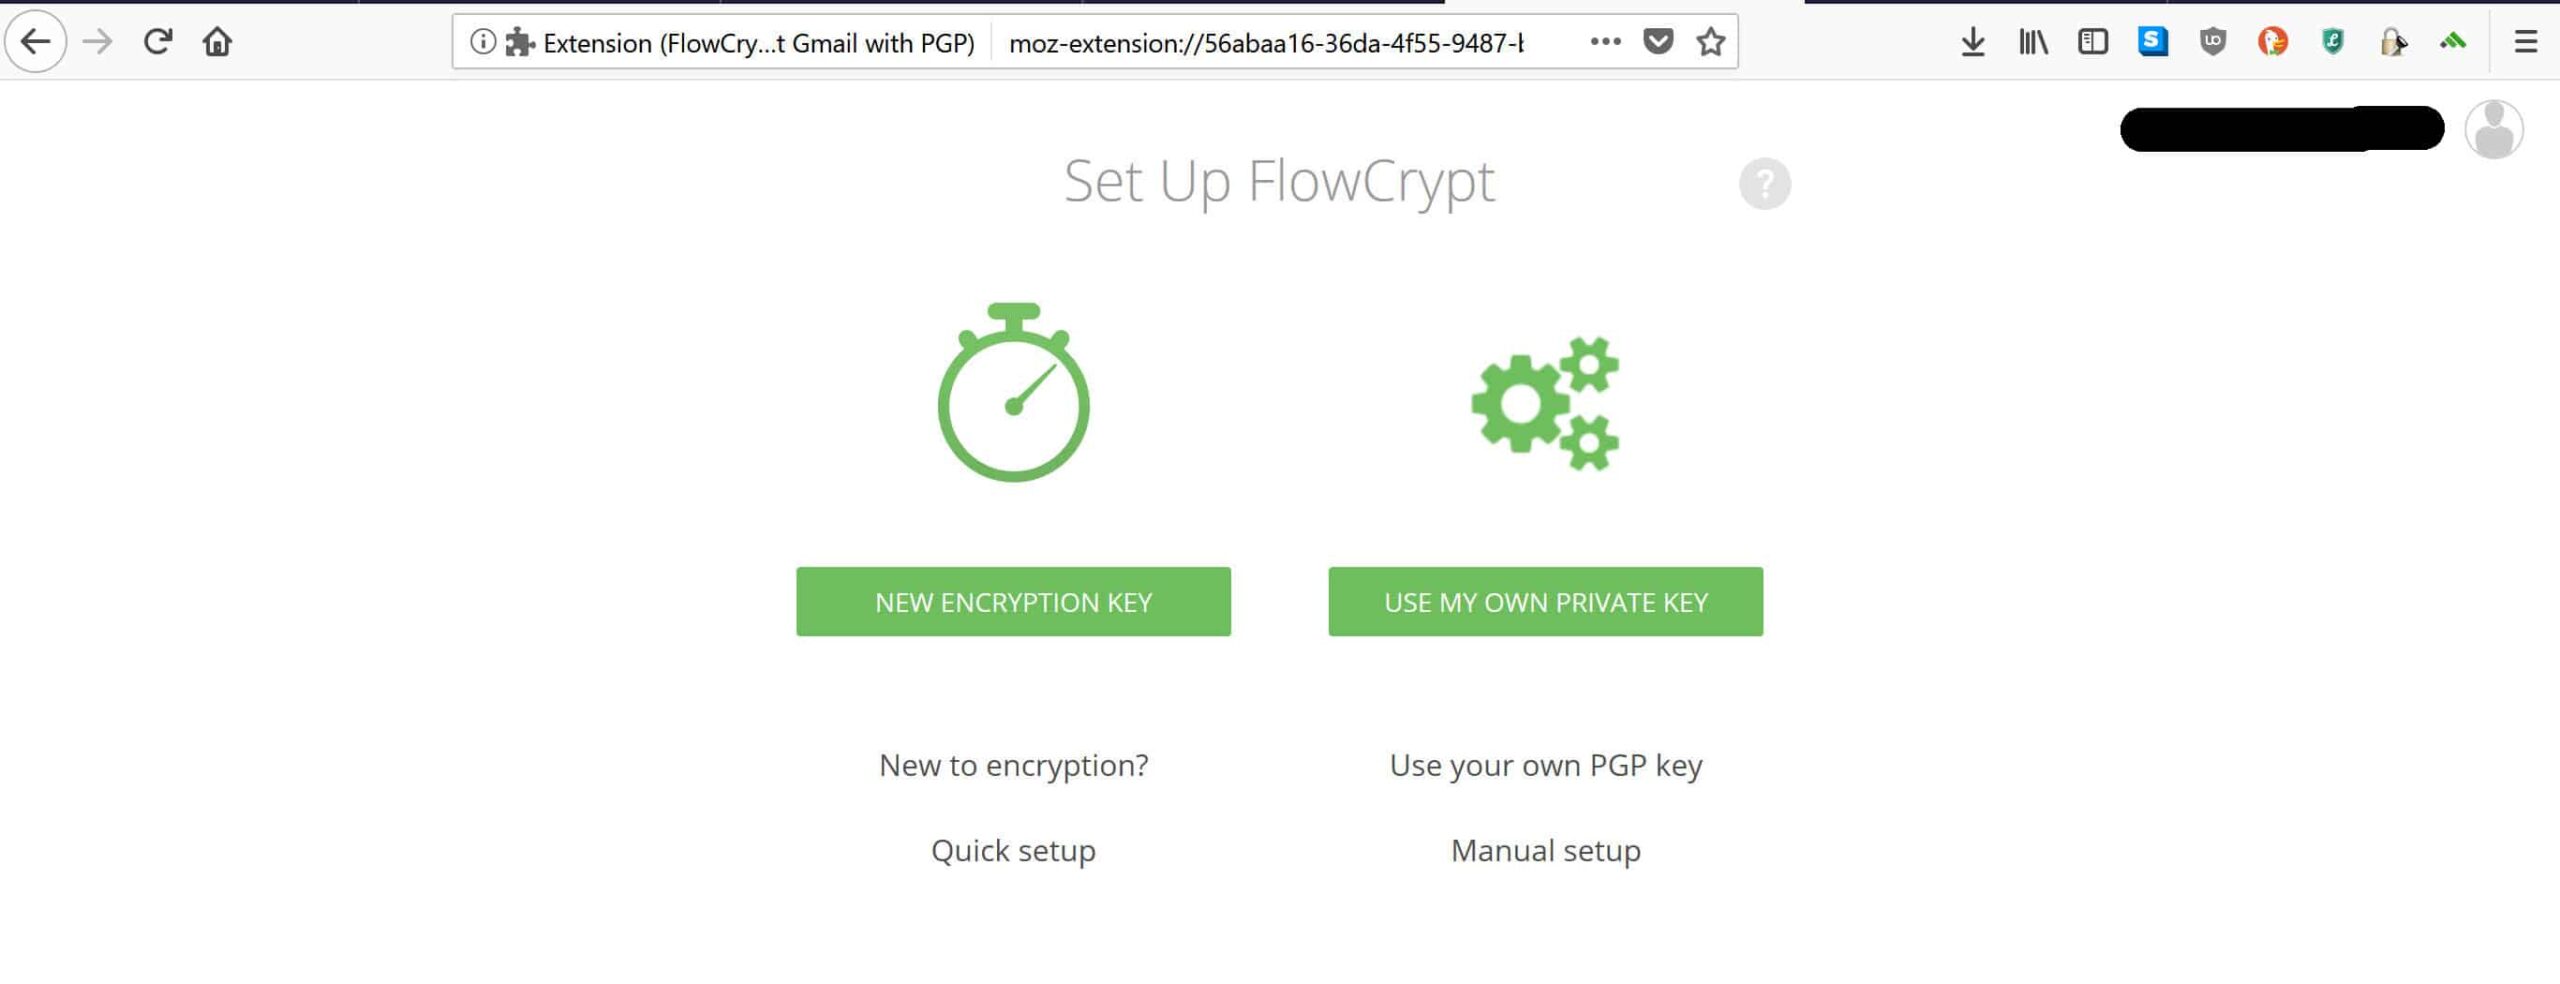
Once again, this tutorial will assume that you are new to PGP, so it will focus on generating a key pair. Click on NEW ENCRYPTION KEY to generate your keys. If you are an existing PGP user and want to use a key that you already have, click USE MY OWN PRIVATE KEY and then follow the prompts.
When you click NEW ENCRYPTION KEY, you will be brought here:
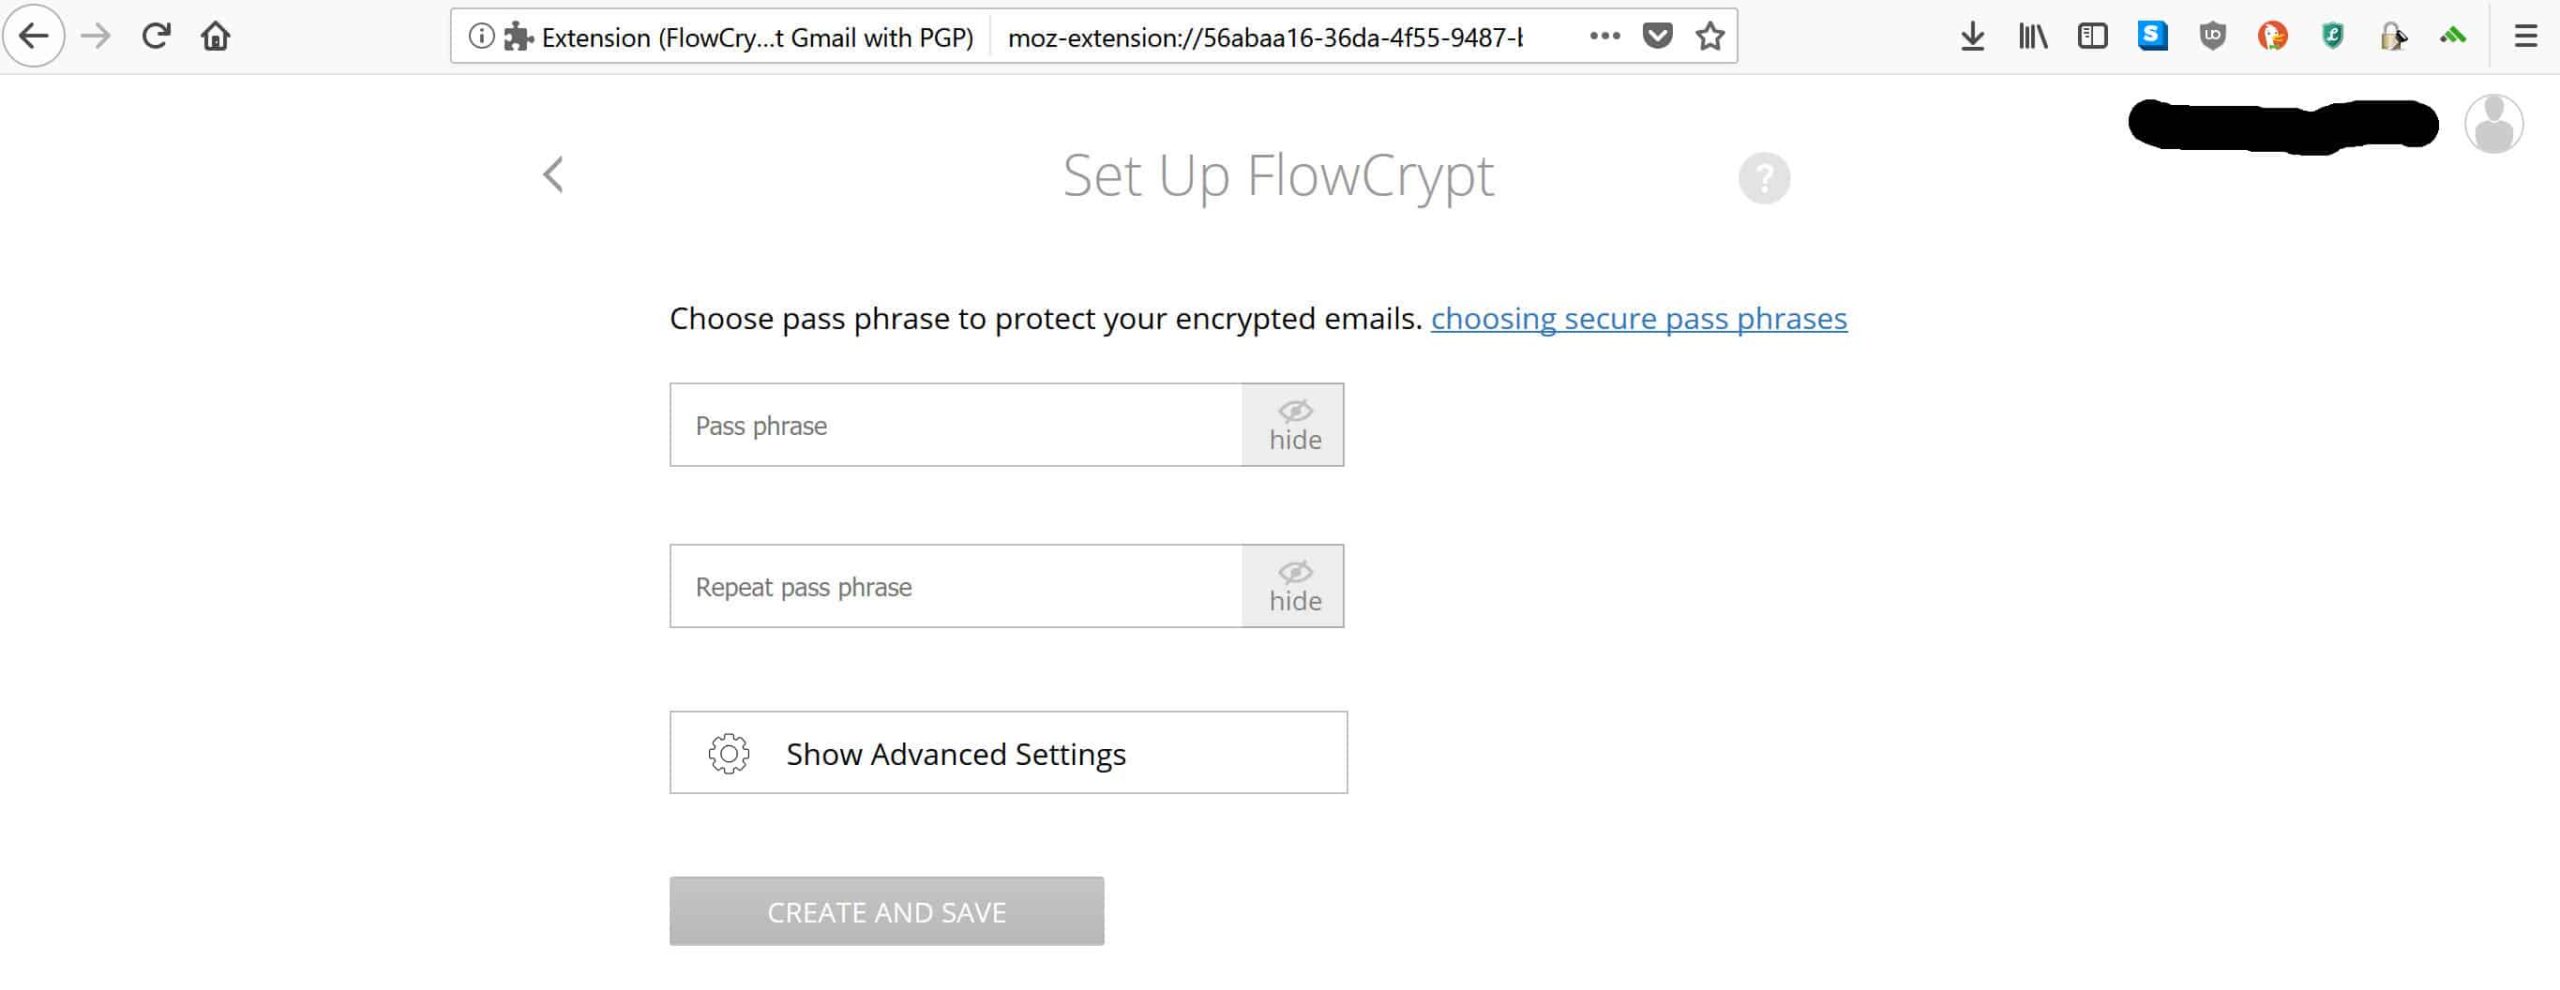
Choose a strong password
Enter a new passphrase, but make sure it’s strong, otherwise taking all of this effort to set up PGP could be in vain. For advice on how to make a strong password, see the How to install Mailvelope & send a PGP encrypted message with Gmail section above.
Once you have entered your strong password, hit the CREATE AND SAVE button. Wait a little while for it to load, then you will be brought to the following page:
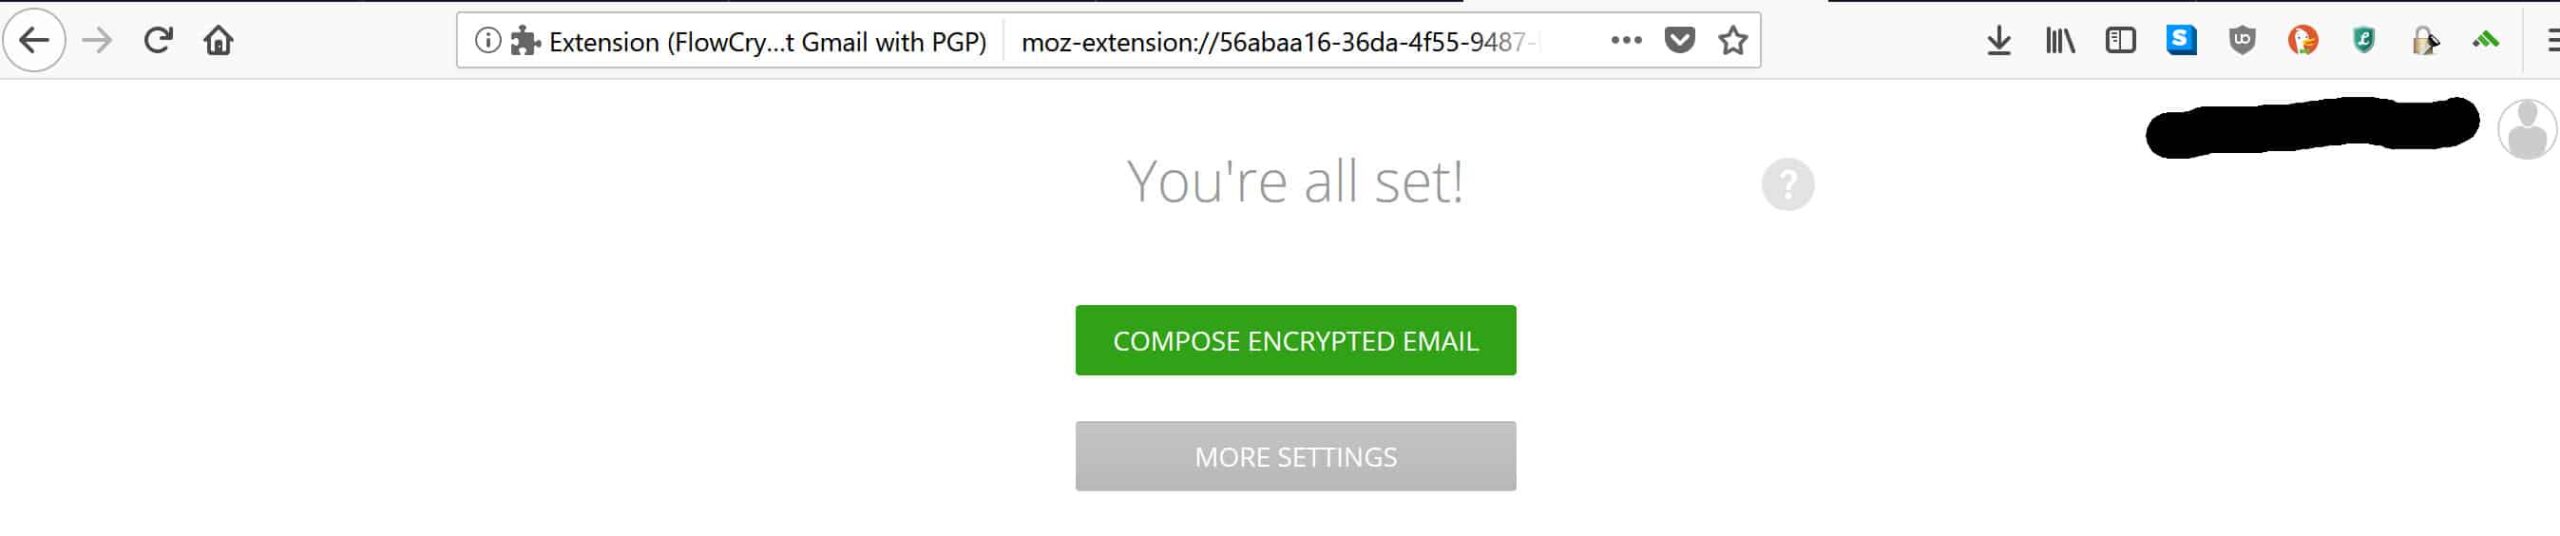
As you can probably guess, all you have to do is click COMPOSE ENCRYPTED EMAIL to send your first PGP encrypted message. You will be taken to the following popup:
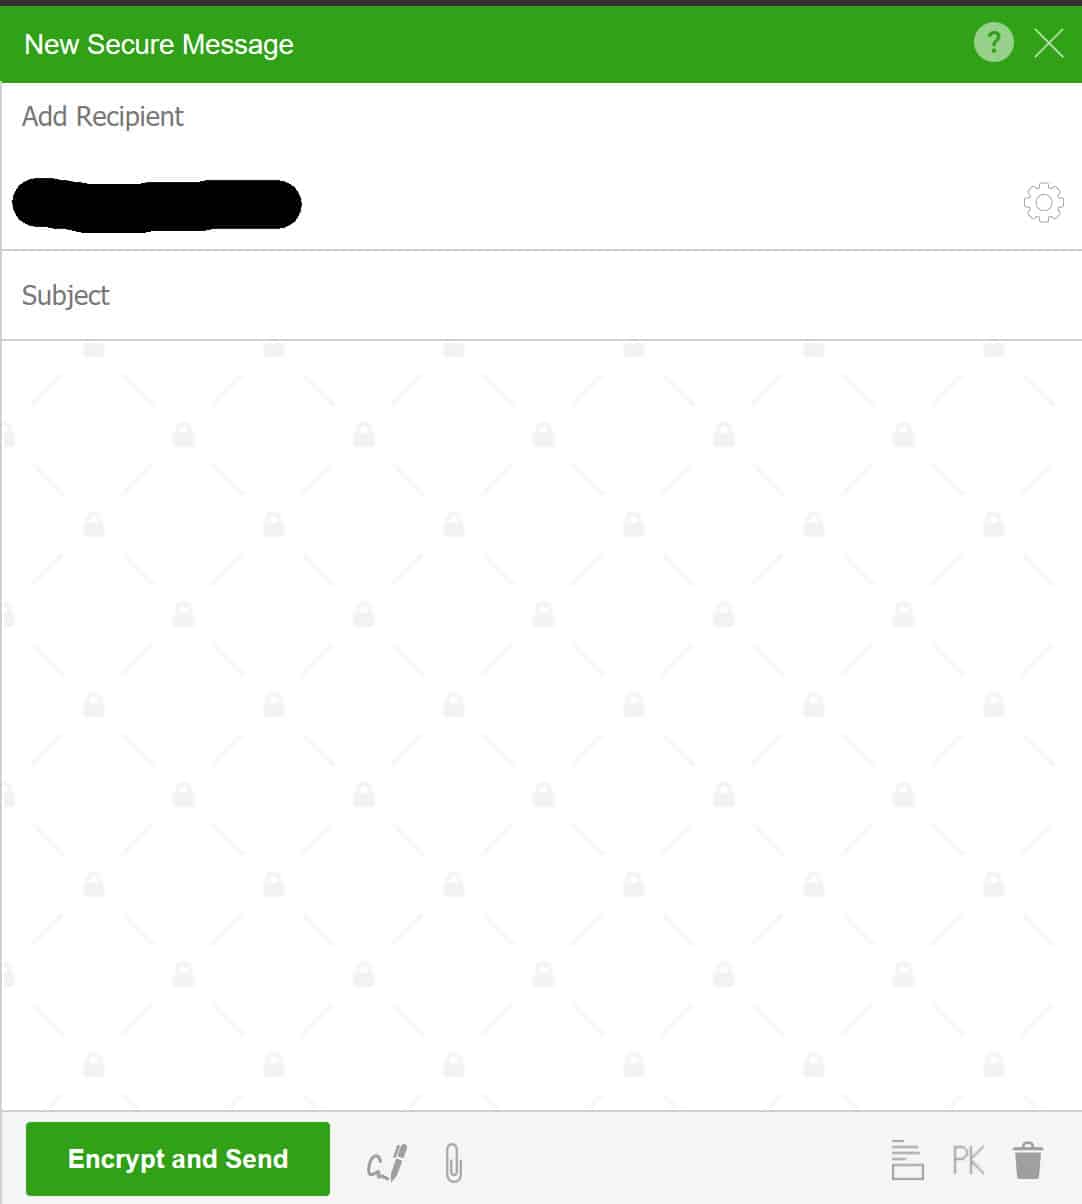
Sending your first PGP encrypted email
One of the great features of FlowCrypt is that you can send encrypted emails to anyone’s email address. It doesn’t matter if they’re not a FlowCrypt user and have never heard of PGP. If you enter your desired recipient’s address in the add recipient field, FlowCrypt will look for their public key for you.
If they don’t already have a PGP key pair, you will be asked by FlowCrypt to protect the message with a one-time password. You will need to communicate this password to them via a secure channel or in person.
Once you have added your recipient, type in your message:

Click Encrypt and Send when you’re finished typing. If you choose not to include a subject line, it will ask you whether you want to send the message without one.
Avoid a subject line
Adding a subject line isn’t necessary and can even be dangerous. This is because subject lines (along with metadata) do not get encrypted in PGP emails. If you do add a subject line, make sure that it is vague and doesn’t give away too much about what you are communicating about.
Once you’ve done this, your first PGP encrypted email will be sent through Gmail. If you want to send encrypted messages in the future, all you have to do is click on the Secure Compose button that appears above the normal Compose button in Gmail. Then just follow the steps we mentioned above to securely send your message.
As you can see, it’s not so hard to secure your communications after all. While FlowCrypt may not be the most ideal option from a privacy and security standpoint, its biggest advantage is that it’s so much easier to use than most other choices. This makes it an excellent system for those who are becoming more concerned about their privacy in the digital age.
Related: Encryption Resources
Now… let’s talk about decryption…..
Lovely, helpful post. Thank you!
is there something available that uses PGP for all of the emails already in your inbox so noone can read them even if they hacked into your account?
Posteo (https://posteo.de/en) offers a service to encrypt all incoming emails using your public PGP key. It’s a German email service focused on privacy and encryption.
Hi Jay,
I’m not aware of anything that does that. The best approach that comes to mind would be to copy the emails offline and store them in an encrypted format, then delete the ones in your mailbox. This isn’t a perfect solution though, because your recipients might still be saving unencrypted copies of the messages
What if I want to use OpenPGP (ZeitControl) smart card?
That’s kind of out of the scope of this article. I would suggest contacting the manufacturer for support.
My main reading and writing is done at my desk, using Windows 10 (at least for now). Chrome is my default browser, but I have Firefox, too. So far, these present no problem. My question relates to how the gmail app on my android phone has to be used. I use that app for mail, not the mobile [chrome] browser.
1) Can these programs be installed to interact with the gmail app? If so, can my public and private keys be exported to my phone in order to load them for use?
2) If #1 above is “no”, then can they be installed to the mobile chrome on my phone? And, again, if that’s the only method, can I copy the keys from my primary installation (desktop) to the phone?
I’d hate to get mail from someone when I’m in my car, and not be able to read it until I get home. If you have comments regarding iOS, they’d be welcome too.
Thanks.
I’ve never used FlowCrypt on mobile, so I can’t comment with certainty. My understanding is that it doesn’t integrate with the Gmail app, however FlowCrypt do have an Android app in the beta stage which links to your email account.
I had a look at putting FlowCrypt on the Chrome app. When you go to the Google Web Store through the Chrome app, it just says “add to desktop”, so my assumption is that it is currently not compatible.
I’m not too sure about iOS, because I don’t use it. They don’t have an iOS app yet, but you can sign up to get notified when it arrives.
Any concerns that FlowCrypt is HK based and therefore “technically” part of China?
That all depends on your individual risk profile. Personally, I think that Chinese spying is overhyped and they probably don’t do much more than any other country. From memory, I think Hong Kong still operates quite independently from the rest of the country. If you are a high value target or just someone who has more extreme privacy concerns, I would recommend using either Gpg4win or Signal. Gpg involves more screwing around than FlowCrypt, but it eliminates your concerns. Signal is a great option for easy encrypted messaging. At the end of the day, FlowCrypt fits my risk profile, but it may not fit yours.