
Knowing how to securely erase your hard drive, SSD, or mobile device is an important part of managing your data needs in the modern world today. Whether you’re trying to free up a little space in your family photos folder, or just want to be sure that a sensitive file at work is 100% dead and buried, it’s vital to learn all the ins and outs of how to securely erase your storage media on your desktop, laptop, tablet or smartphone.
So read on in Comparitech’s comprehensive guide to find out everything you need to know about safely and securely erasing data!
Why just “deleting” your data isn’t enough
Whether you’re on a Mac, a PC, or a mobile device, all three platforms already include their own tools that you can use to delete files at will. So what’s wrong with just using these and calling it a day?
Well, to start, while all three platforms may tell you that your file has been “deleted” after you hit a button carrying the same namesake, often you’ll come to find there are actually more folders buried in the crevices of your storage drive where recently deleted files are still somehow taking up space.
Operating systems do this for a number of reasons. The first is probably the most obvious: even when people say they want to delete something, they don’t always mean it as much as they thought they did. This is why it’s handy to have extra folders like the Windows Recycle Bin or the iPhone’s “Recently Deleted” photo folder to catch any accidentally deleted files before they’re completely wiped from the device.
For example, if I were to go into my iPhone right now and “delete” a photo, I wouldn’t actually be erasing it, I’d just be moving it to what’s known as the “Recently Deleted” folder. The Recently Deleted folder holds all my deleted photos for a period of 30 days before actually erasing them off the device, which means if I had any incriminating evidence in there (or just some embarrassing photos of my cat), anyone with knowledge of where to find the Recently Deleted folder on the phone would be able to restore anything that was sent there in the past month.
That said, it can be helpful to have this kind of stopgap between you and permanently deleting a photo when you need it. Having a way to go back and undo the deletion could be the difference between having an album full of photos from your kid’s first trip to Disneyland and not.
But what about files that you choose to “permanently delete,” like in the case of emptying out your Windows Recycle Bin?
You might be surprised to find out that no, not even those files are being “deleted” as you may think. Data recovery software suites like by Stellar Windows Data Recovery Professional are designed from the ground up to be able to sift through the remains of old hard drive sectors (previously formatted or otherwise), and use the rubble of old file deletions to put together a complete picture of what was erased from the drive.
So, while emptying your Recycle Bin is certainly a good step in the right direction, it’s by no means a complete solution if you’re looking for true data scrubbing.
So if you’re trying to stop anyone from finding even a scrap of evidence that a file was ever there in the first place, your best bet is to use a third-party program designed to completely wipe and sanitize a hard drive or folder from the bottom up.
Related: How to encrypt your Android phone
But what about formatting?
“But I used the ‘format’ option on my computer to erase my hard drive, that should be enough to get the job done, right?”
Well, almost. While formatting a hard drive is certainly one of the easiest and most commonly used methods of quickly clearing a significant amount of data from your drive, there are two different types of formatting, and neither is the best solution for a full, base-level rewrite of the drive’s structure.
To start, a “quick format” isn’t really a full scrub of the data on a drive, and it’s probably better described as simply an extension of the “Recently Deleted” technique we discussed earlier.
Technically, any files caught in the quick format have been deleted, but without a secondary disk scan to verify all the sectors are properly cleaned (like you’d get in a full format), almost any rudimentary data recovery software would still be able to salvage the results left over from a quick format operation.
With a full, standard format process on Windows (for every version released since Windows Vista), your PC will perform what’s known as a single “write-zero” pass on the drive. This command will set all the binary data on the drive to a “0”, rather than a combination of 1s and 0s or any other information that might be stored in folders and files.
Write-zero passes are effective for what they offer, but many data recovery tools are actually designed to break through standard write-zero efforts by piecing together information from sectors that either weren’t completely wiped or weren’t verified after the first pass.
How secure deletion software works
Enter data deletion software. With hundreds of available options (many of which are free to use), it can be difficult to know which services are right for your hardware needs, and which offer the best combination of both features and security.
Secure deletion software may employ any number of methods to delete the information stored on your hard drive, including (but not limited to): write-zero passes, Secure Erase passes, file shredding, and data encryption.
Each software suite offers up its own benefits and drawbacks when it comes to how it deletes data, how secure that deletion method is, and what types of drives or filesystems it’s equipped to handle. Which one is right for you will ultimately come down to how deep you want to go on your deletion, as well as how many drives you’re trying to scrub at once.
Between the different methods, write-zero and Secure Erase passes are the most commonly used. Secure Erase is sometimes preferred by IT professionals because, unlike write-zero operations that often need to be re-verified once the process is complete, the Secure Erase command actually comes from within the drive itself.
This means the disk can use its own write fault detection to verify that all sectors have been wiped clean while the deletion is in process, all without using any extra resources to do it.
The main drawback of the Secure Erase method is that it only works if you plan on completely resetting a drive back to zero — filesystems, partitions and all. This means you won’t be able to individually go through and choose which specific files and folders get wiped. If you’re only trying to get rid of the bathwater but still want to hang onto the baby, a write-zero software option might be a better choice for your individual needs.
How to securely erase your hard drive
Windows (Windows XP and above)
To erase an HDD in Windows using the native operating system format method, start by right-clicking your Start menu, and scrolling up to the option labeled Disk Management:

Once here, you’ll see a list of all the hard drives and SSD drives currently installed on your system. Find the drive letter of the disk you want to format in the main window, and right-click it. From the drop-down menu, you should see an option labeled Format:
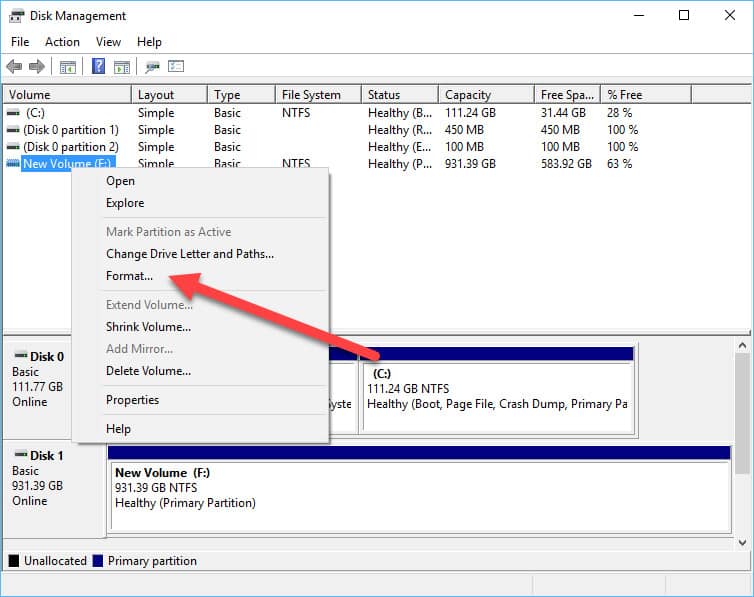
Click this, and you’ll be taken to the following window:
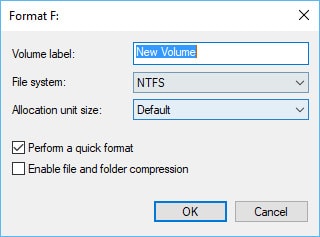
Here is where you can set the type of format you want to use, as well as the new volume label and volume type. We recommend always keeping your hard drives under the NTFS format, as the REMS option is only viable in a very select number of circumstances.
As we discussed before, in order to get the full write-zero pass out of the Windows format option, you’ll need to uncheck the box labeled Perform a quick format:
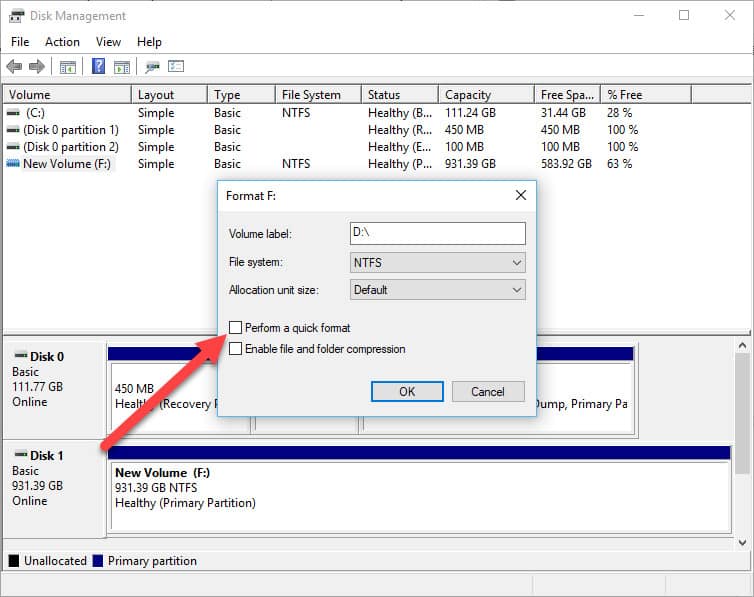
This will substantially increase the amount of time it takes to get the drive clean, but it will also guarantee at least one full write-zero pass before the procedure is finished.
Once the hard drive has been formatted (assuming it’s not the hard drive with your Windows filesystem installed on it), Disk Management will give you a prompt letting you know the process is done!
There are also a number of third-party software programs out there that will get the job done simply, easily, and perhaps most importantly: for free.
DBAN – One of our favorites for the Windows operating system is Darik’s Boot and Nuke, otherwise more commonly referred to as “DBAN”. DBAN has been around for years, and is still one of the most widely trusted methods for completely scrubbing a hard drive clean. Unfortunately, DBAN is limited in what it can do as far as erasing SSDs goes, so it should only be your first choice if you’re trying to scrub an HDD.
Active@ KillDisk – Another stalwart of the data deletion industry, Active@’s KillDisk software offers about 10 different write pass options that have varying levels of severity all the way up to the “Gutmann method” industry standard format, which will perform a whopping 35 write-zero passes on your drive before handing it back over to you.
A 20V Cordless Drill – Of course, if you’re really intent on making 100% absolutely sure, without question, that your hard drive will never give up a deleted secret again, there’s always the scorched earth approach. By using a power drill and a medium-sized drill bit, you can puncture a hole straight through the physical disk itself, guaranteeing that no information contained on the drive will be accessible thanks to sheer physical data domination. Check out this YouTube video for tips on how to do it properly. Make sure that you wear all the appropriate safety gear before getting started, and take the platter out afterwards to check that it has been destroyed.

Mac (OSX Maverick and above)
To delete data from your MacBook Pro, MacBook Air, Mac mini, or iMac running OSX or macOS, start by turning the device off completely.
Restart the machine and quickly press the CMD and R buttons simultaneously. This will need to happen before the startup sound, and if you miss the window, you’ll have to try again with another reboot.
Hold the keys down until the OSX Utilities screen appears (you may have to go through a language prompt first):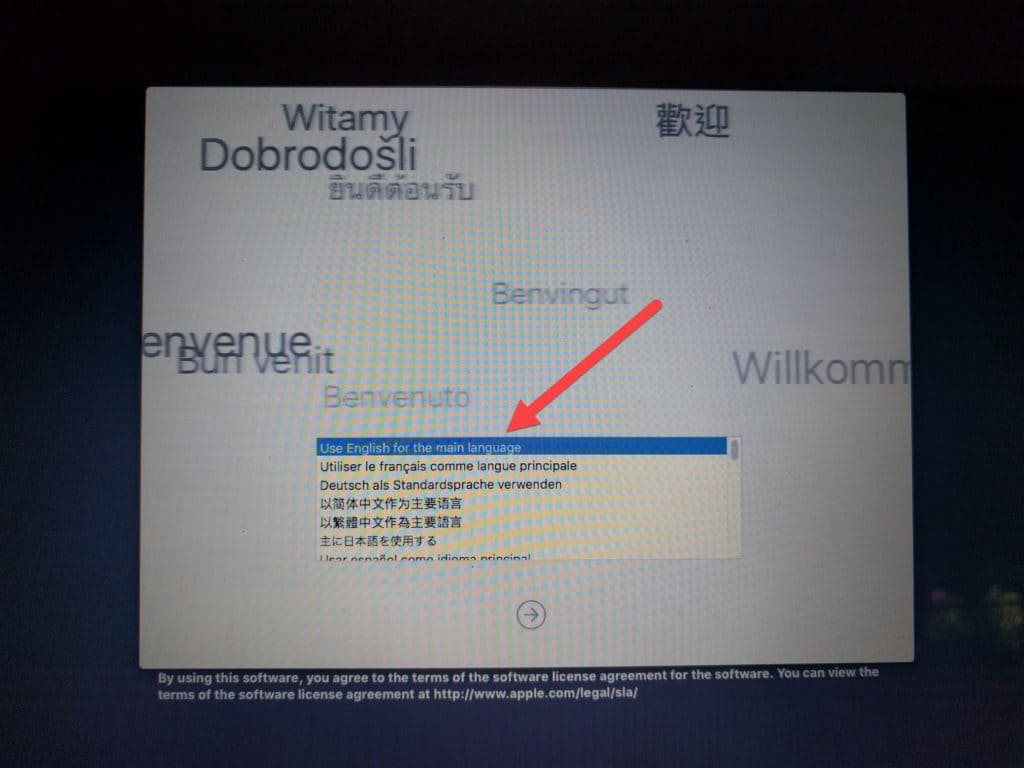
From the following menu, select the option labeled Disk Utility: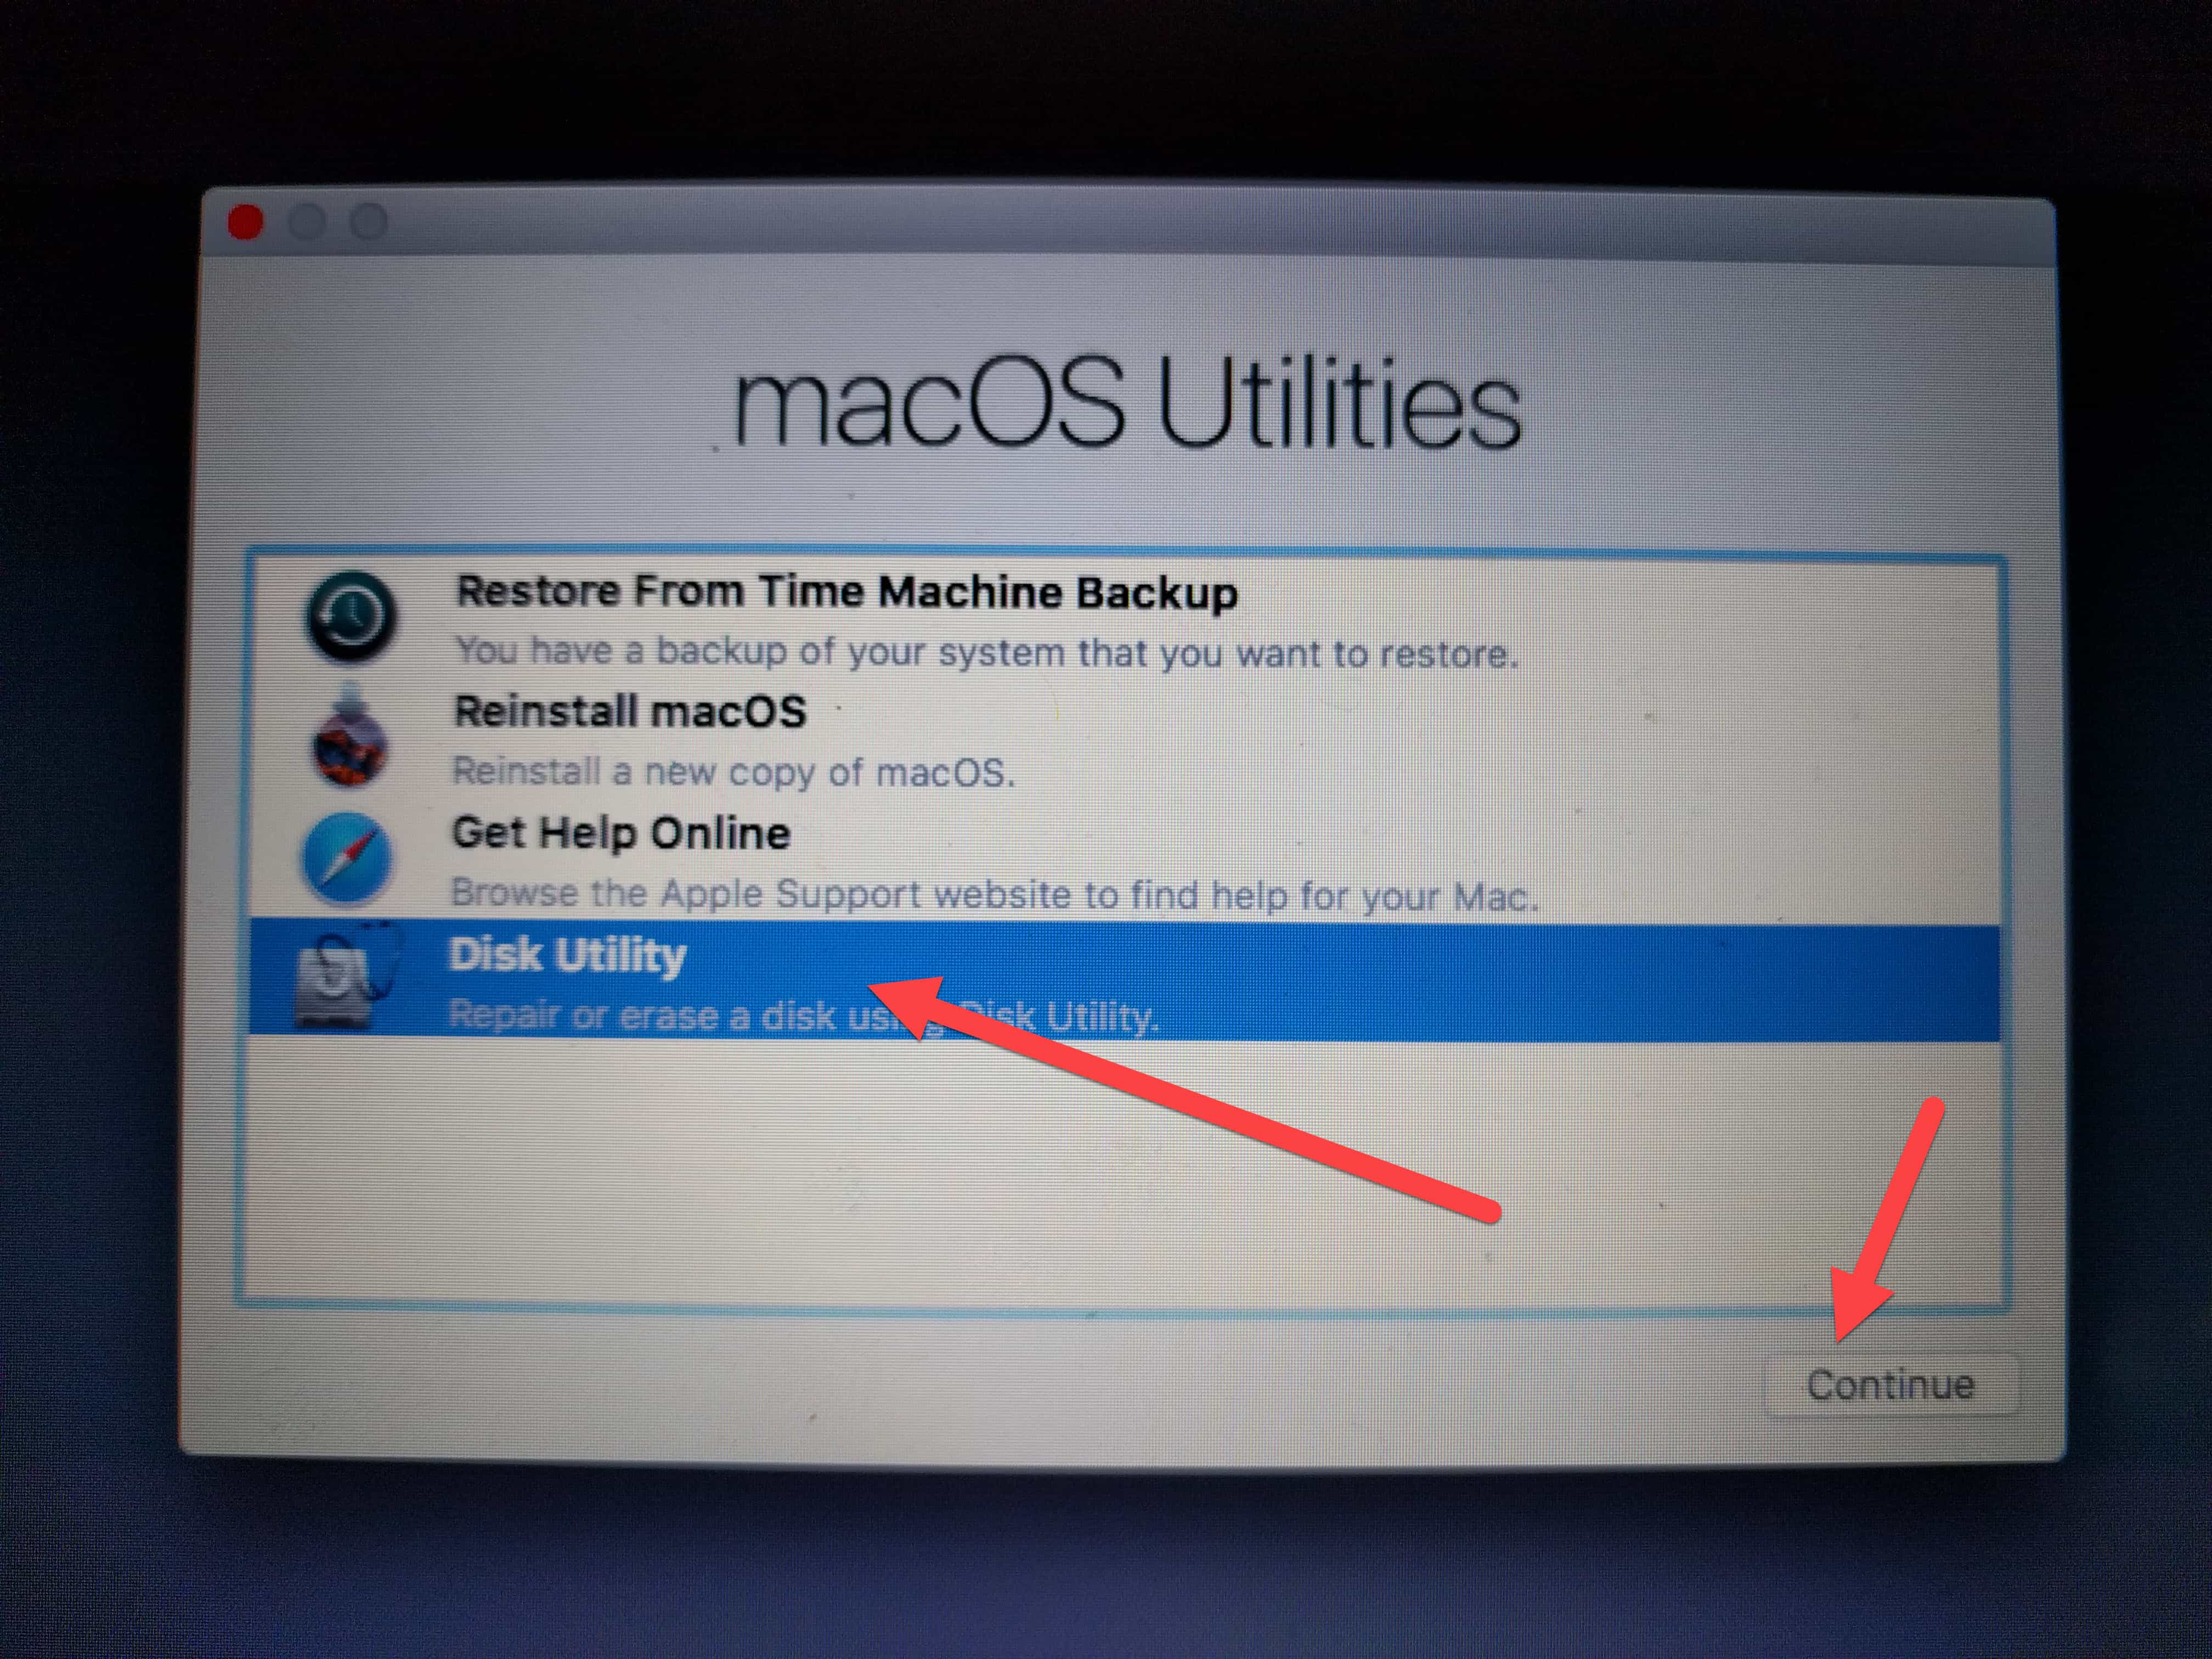
You should see the hard drive you want to format listed twice. Click the second option: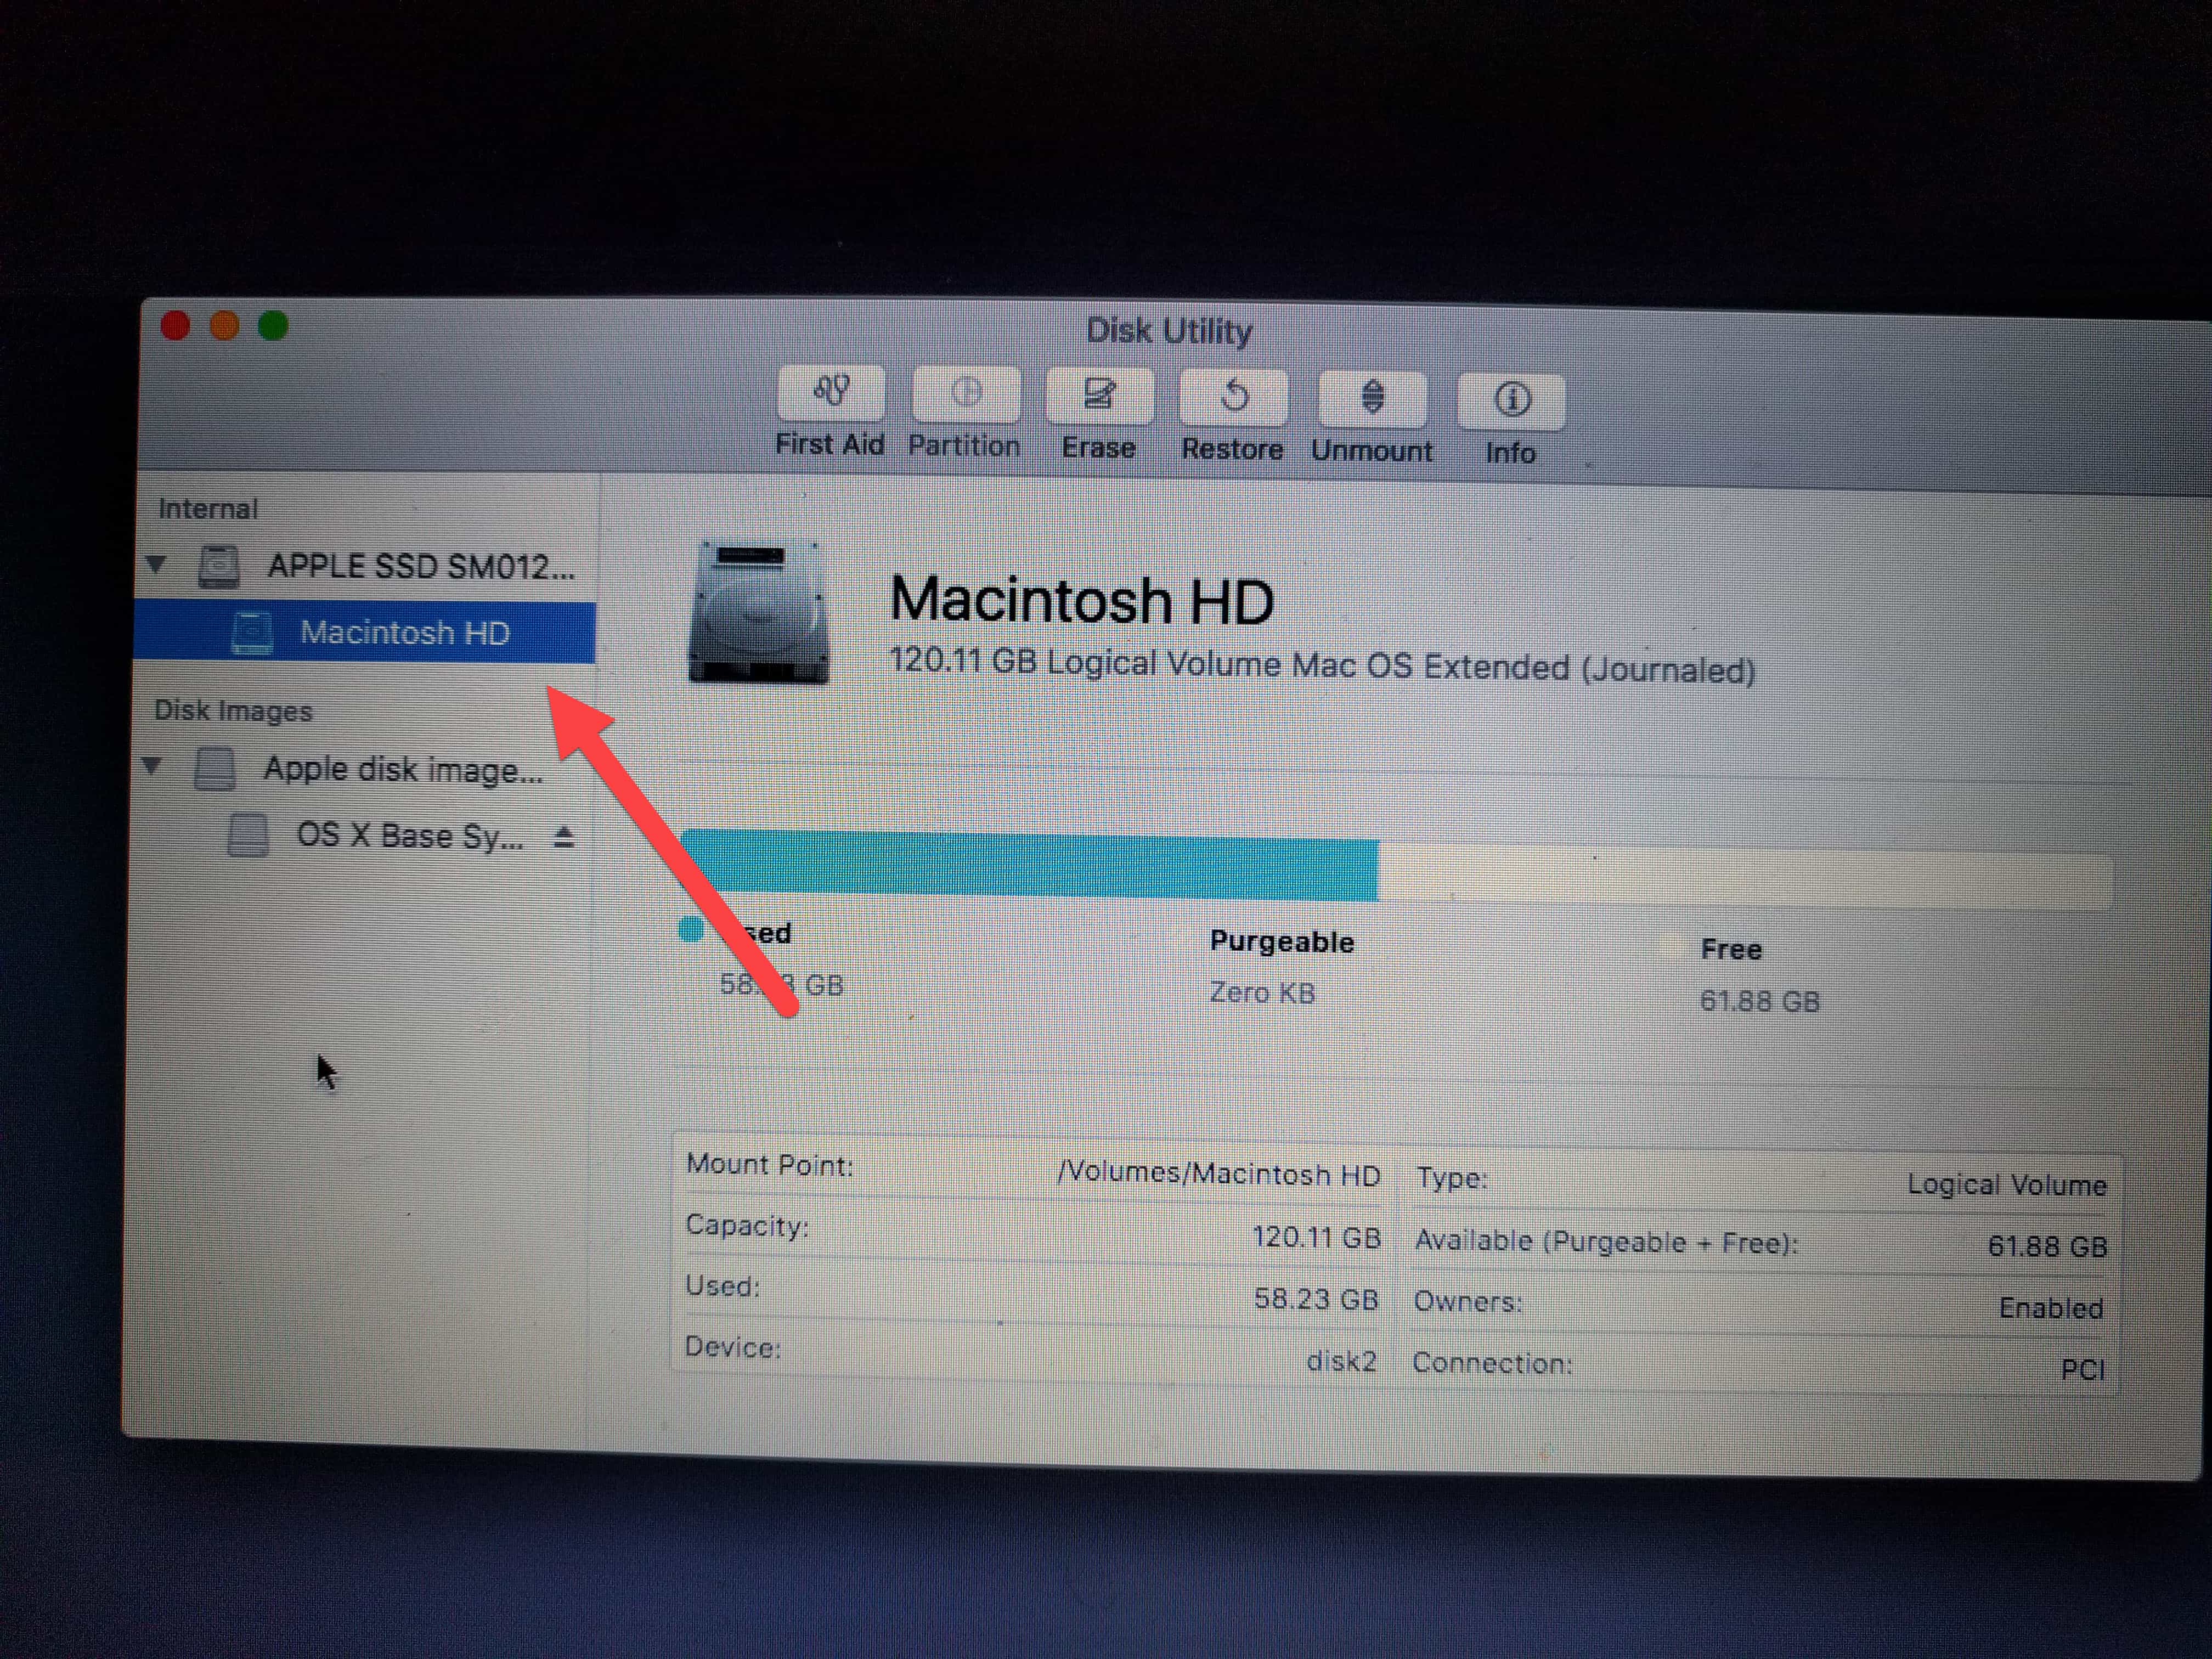
After the drive you wish to erase has been selected, click the Erase button near the top of the window:
You’ll be greeted with a prompt that asks if you’re sure you want to erase the data, as well as the option of what to rename the hard drive once the process has finished. Click Erase, and the deletion will begin!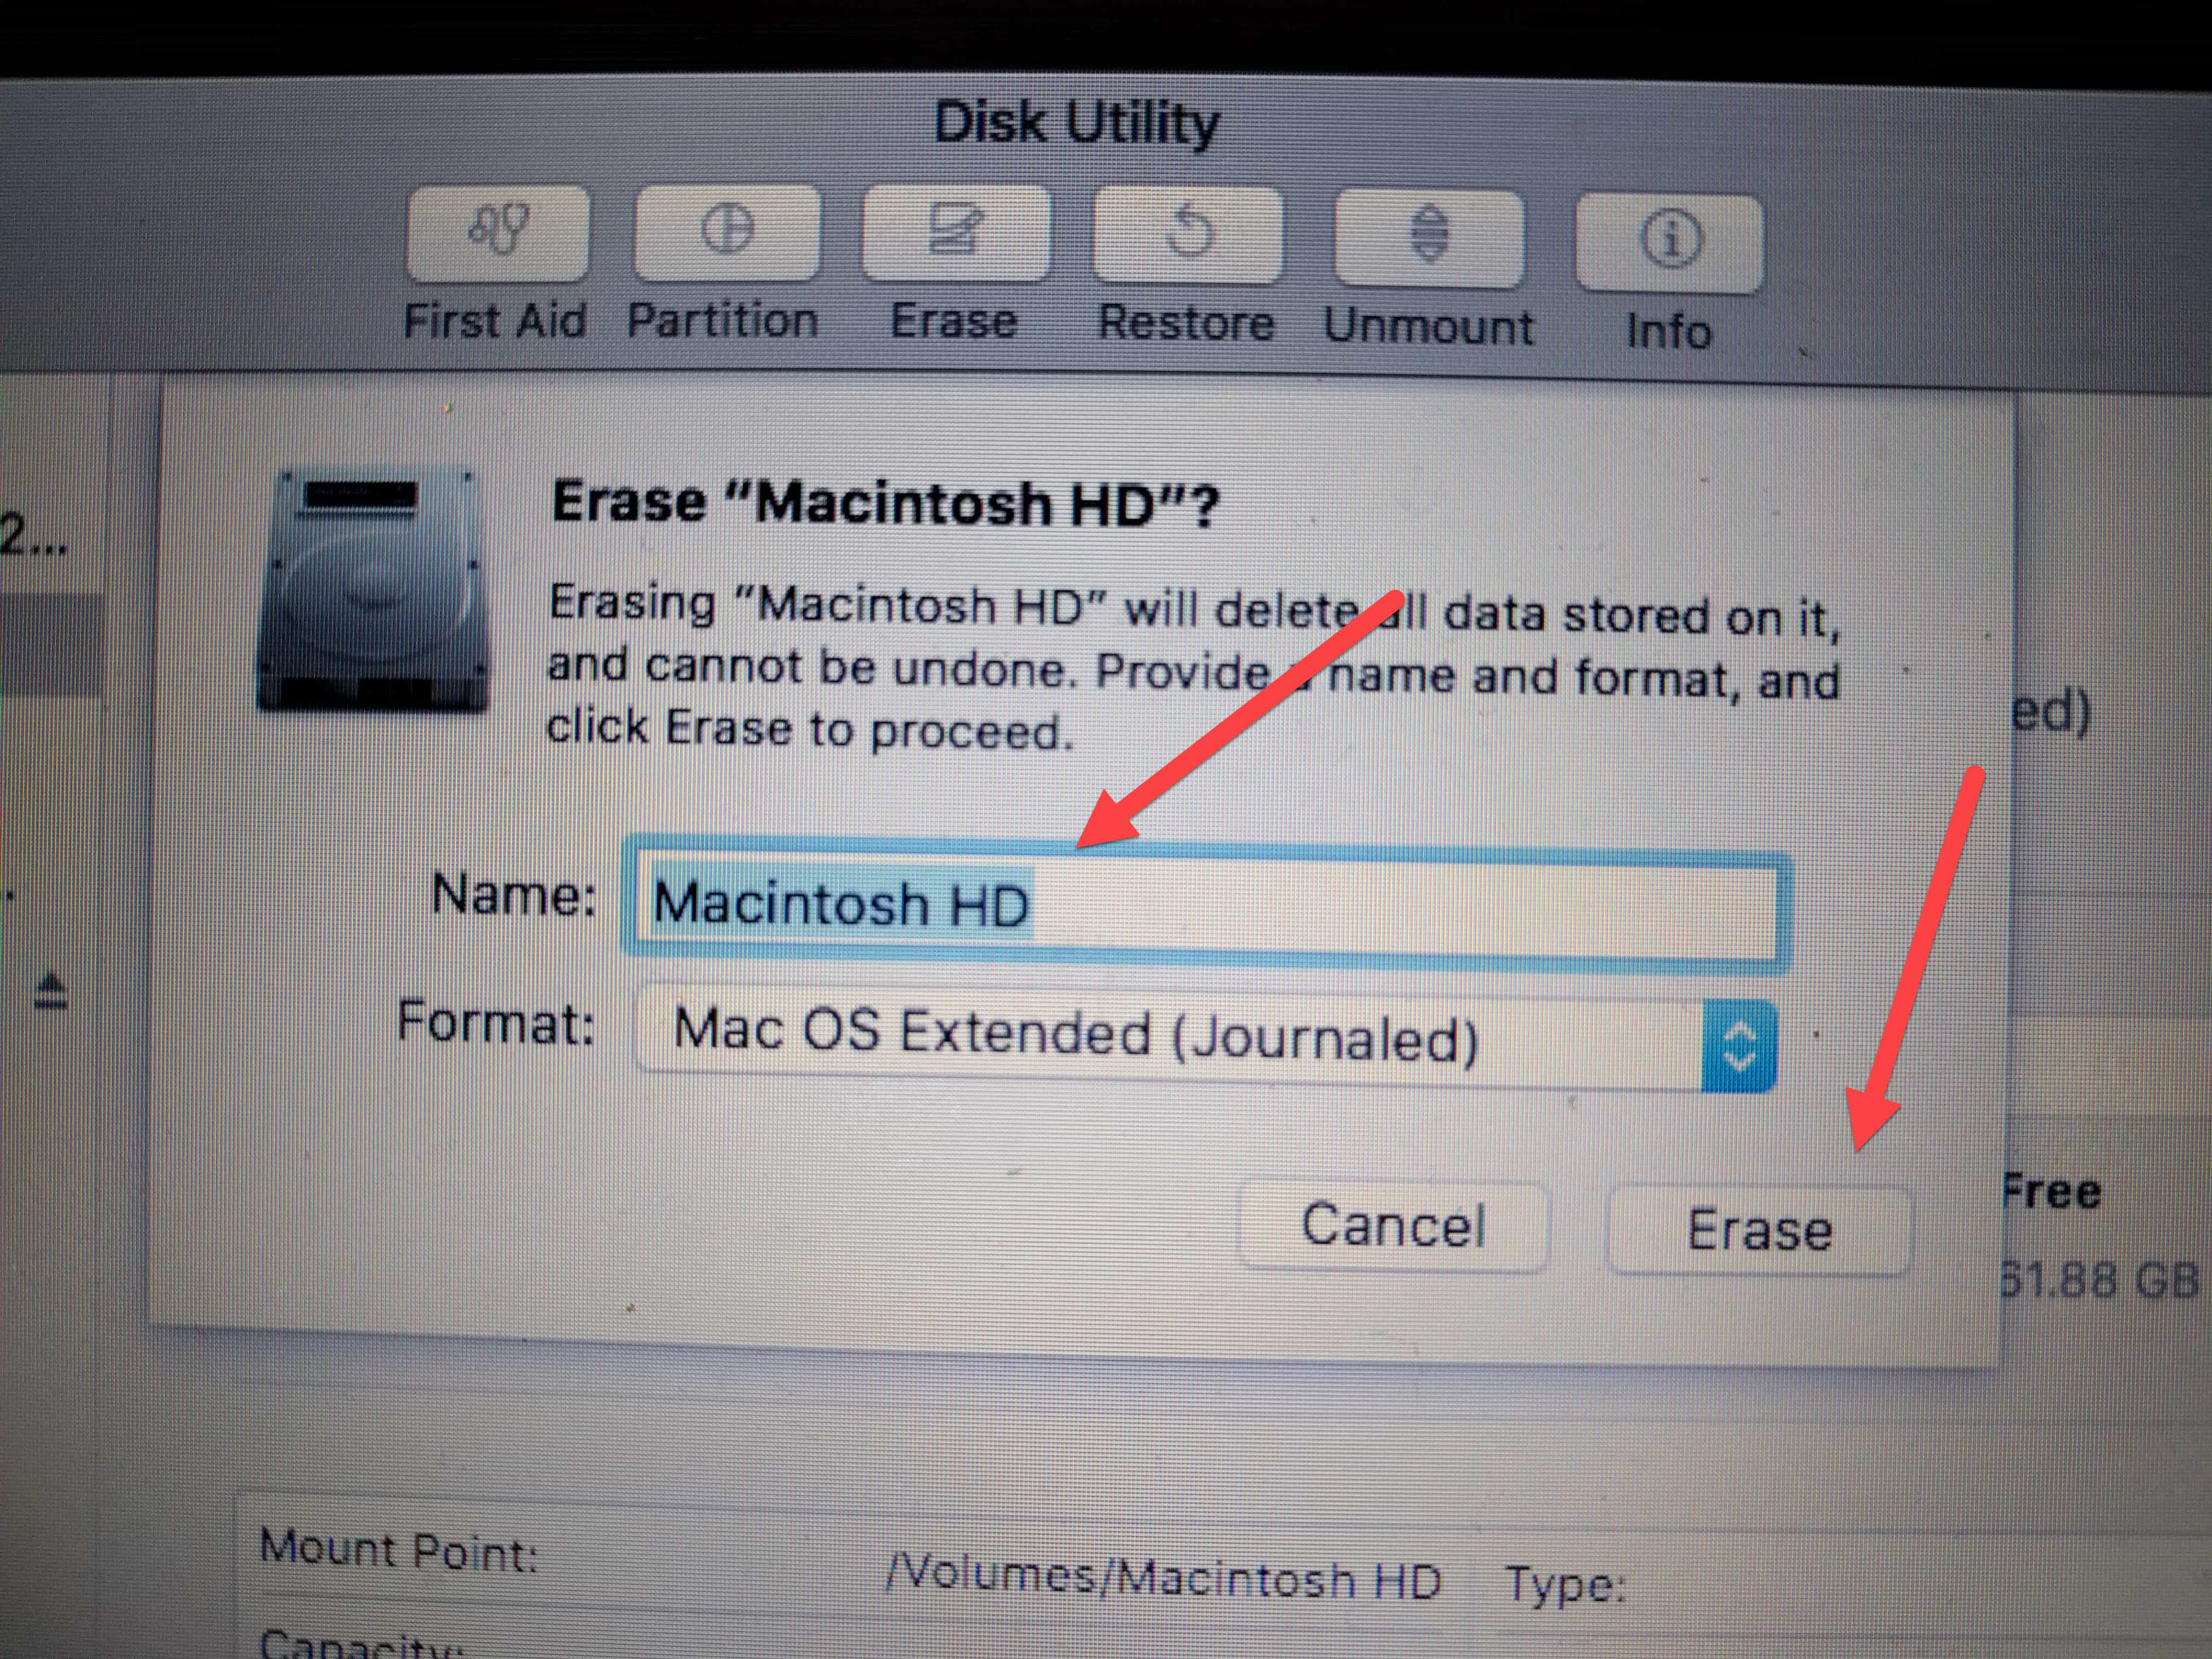
How to securely erase your SSD
Solid state drives are a bit more complicated to erase than standard hard disk drives, primarily due to the way wear-leveling filesystems are structured on the flash chips as opposed to traditional disk drives. The first option we always recommend to anyone looking to erase an SSD is to first check out the SSD manufacturer’s own website, which will usually have a piece of software or a toolbox that can be used to securely erase any contents of the drive itself.
These include the:
If none of those work – or your manufacturer doesn’t offer a corresponding toolkit – there are two more options you can use to achieve pretty much the same result.
PartedMagic – One of the most trusted data destruction programs on shelves today, PartedMagic makes it easy to execute a Secure Erase command on any SSDs hooked up to your Windows machine. You will have to know how to create a bootable USB, but beyond that it’s just a matter of finding the drive you want to obliterate and pressing enter to get off to the races.
A 16oz Ball Pein Hammer – Just like with HDDs, if all else fails and you want to kill your SSD beyond any shadow of a doubt, there’s always the manual option. Unlike HDDs, though, SSDs store their information on a series of small flash chips, rather than a single disk. This means that if you went the drill route, for every chip in the drive, you’d have to put in a new hole, which is too time-consuming for the average data destroyer and, to be frank, just not as fun.

Before you get started with the smashing, make sure to carefully remove the outer casing of the SSD, and wear all the appropriate safety equipment (eye and mouth protection are the most important for a task like this). The SSD will need to have all of its flash chips crushed individually before the data on them is rendered completely useless, so make sure to really get in there and smash ‘em up good before you call it a day.
How to securely erase your mobile phone
iPhone (iOS 10.3.3)
To securely erase all the data on your Apple iPhone:
Start by opening up the Settings app:

Once here, scroll down to the General tab, and tap it. On the “General” screen, scroll down to the “Transfer or Reset iPhone” menu option and tap it.
At the bottom of the “Transfer or Reset iPhone” screen, you’ll see “Erase All Content and Settings,” tap that.
On the next screen, which is the “Erase This iPhone” screen, tap “Continue.” You’ll see a prompt asking if you’re sure you want to do this. Tap the “Erase Data” button if you’re sure. Only do this if you’re absolutely certain that you want to erase your device. You will not be able to recover your data unless you have a full and recent backup of your device.
Your iPhone will begin the process of securely deleting all of the information on the iPhone, getting it ready for the next user, who will have no access to your data.

Because of Apple’s strict rules about what parts of the iOS operating system third-party apps can or can’t access, there’s no way to double-wipe your phone, or even verify that the data on the phone has truly been erased.
That said, Apple has always been one of the good ones when it comes to personal security, and although they haven’t revealed any information about their own formatting techniques for their devices, we’re sure that whatever they use is good enough to keep the average iPhone owner safe.
While these steps can vary, depending on the version of iOS you have installed on your iPhone, they are similar. Also, the steps are the same for iPads.
Android (14.0)
To securely delete your data on Android, do the following:
- Open the Settings app
- Scroll down to System and tap to open
- Scroll down to Reset
- Tap Erase all data (factory reset).
- Read the breakdown of all the information that will be lost and the accounts that will be signed out if you go through the refresh. This isn’t just a way to delete data off your Android device; this will completely reset every part of the OS to a factory-fresh state.
- Once you’ve got all your important photos, videos, music, and data backed up somewhere safe, tap the Erase all data button to finish out the process.

The data’s gone, what now?
If you’re trying to erase a hard drive or SSD (but still want to leave it in some kind of usable state after the deed is done), you’ll need to create what’s known as a “partition” on the drive in order to make it readable again.
Drive partitions help your operating system make sense of the space it’s trying to use to store files and folders. The actual system of partition types and how they differ from one another is enough to take up a whole article unto itself, but at its most basic, all you need to know is that once you’re done with securely erasing a drive, creating partitions on it is the next step.
Lastly, just to triple-verify the security of your deletion, we recommend trying out any one of the data recovery tools we’ll be covering in our roundup article. By running a deep scan on the drive with some of the same types of software that someone else might try and use to get into the drive, you can see what files or folder fragments might have been left over from the initial process.
If anything pops up on the scan, you’ll know whether you’ll either need to run a single pass write-zero deletion again, or up the ante and go for multiple passes to ensure that no unwanted information makes it out the other side alive.
In conclusion
Whether you’re just trying to free up a little space on your hard drive or completely nuke every file on it into oblivion, there are dozens of tools and techniques that you can use to securely erase sensitive information from your hard drive, SSD, or mobile phone.
Which one is right for you will come down to how far into the data deletion rabbit hole you want to go, and the type of storage media you’re working with. And just in case you want to wipe a drive, but still keep all the contents stored somewhere safe offsite, make sure to check out our guide on the best online backup providers.
See also:


