
If you look at the VPN world, you’ll discover a glaring inconsistency: robust support for Windows, macOS, Android, and iOS, yet Linux, notably, lingers in a precarious afterthought. This insight is garnered from our extensive research and testing across many VPN providers.
Although numerous platforms effortlessly cater to most operating systems, the Linux community, particularly users of distros like Kali Linux, often find themselves entangled in a web of manual configurations and workarounds. This raises a barrier to seamless, secure connectivity and increases potential risks, stopping your journey towards a foolproof, encrypted online experience.
In this guide, we extend a seasoned hand to adeptly navigate you through the complexities of establishing an OpenVPN client connection in Kali Linux using the Network Manager. With minimal effort, we make it straightforward to use a VPN across all platforms. Let’s get started.
OpenVPN configuration files
To get this working, you’re going to need to download your VPN provider’s OpenVPN configuration files (.ovpn).
In general, a provider that supports Linux without supplying a native Linux client makes its OpenVPN configuration files available on its website. This goes for VPN providers that support routers as well.
Some VPN providers, even though they do provide native client apps for a particular platform, still provide access to their OpenVPN configuration files to enable users of that platform to connect using a third-party client.
So, if your VPN provider supports Linux (without a native client), supports routers, or allows its users to connect with third-party clients, there’s a good chance it will make its OpenVPN configuration files available for download. And the information contained in these files can be used to create a VPN connection over Linux using the Network Manager, a third-party client.
Supported VPN providers
Below is a list of VPN providers that make their OpenVPN configuration files available. NordVPN is Comparitech’s top-rated VPN and tops the list of best VPNs for Linux.
- NordVPN
- Surfshark
- ExpressVPN
- VyprVPN
- PureVPN
- Mullvad
- Private Internet Access
- ProtonVPN
- Hide My Ass
- TorGuard
- OVPN
- Windscribe
- iVPN
- AirVPN
- hide.me
WANT TO TRY THE TOP VPN RISK FREE?
NordVPN is offering a fully-featured risk-free 30-day trial if you sign up at this page. You can use the VPN rated #1 for Kali Linux with no restrictions for a month. This is ideal if you’d like to try the service out before coming to a decision on whether to keep it.
There are no hidden terms—just contact support within 30 days if you decide NordVPN isn't right for you and you'll get a full refund. Start your NordVPN trial here.
To start, you need to download your VPN provider’s OpenVPN configuration files. There’s usually at least one config file per server location. Once you’ve got the files and your credentials, you should have everything you need.
You’re now ready to set up an OpenVPN client connection in Kali Linux.
Configuring an OpenVPN connection from the Network Manager
From our experience, there are two ways to configure an OpenVPN connection in Kali Linux: automatically or manually. We’re going to go through both.
Configuring an OpenVPN connection automatically
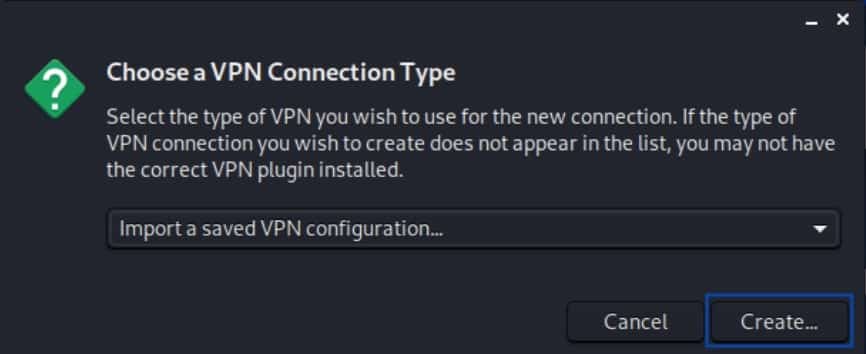
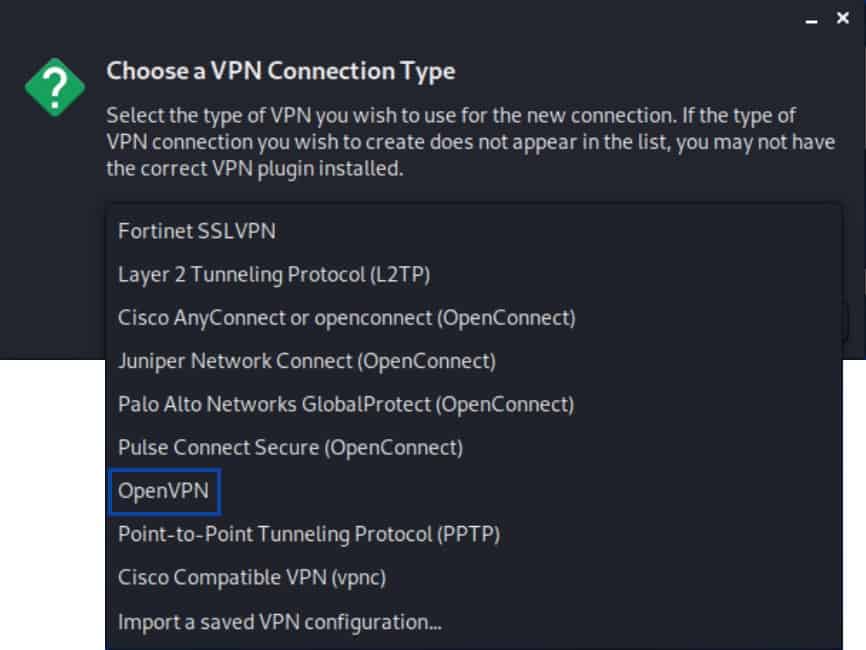
- From the Desktop, click the Network Manager icon at the top right of the screen. If you’re on a wired connection, the icon will be square like mine. If you’re on wireless, it will be a WiFi icon. Select VPN Connections > Add a VPN connection. The Network Manager is displayed.

- From the drop-down menu, select Import a saved VPN configuration…

- Click Create. The File Browser is displayed.
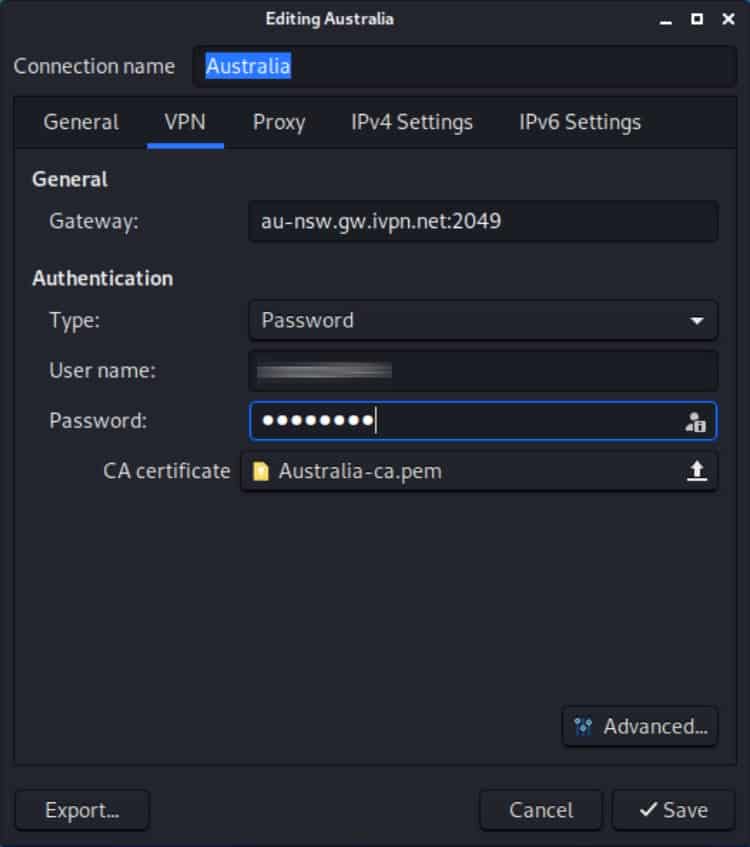
- Navigate to the location where you saved your provider’s OpenVPN configuration files and select the .ovpn file of the server to which you want to connect. The Editing VPN window is displayed.

- Enter your username and password and click Save. If your provider only requires a username, a client identifier, or an account number, and doesn’t require a password, just type anything in the password field. Don’t leave it blank.
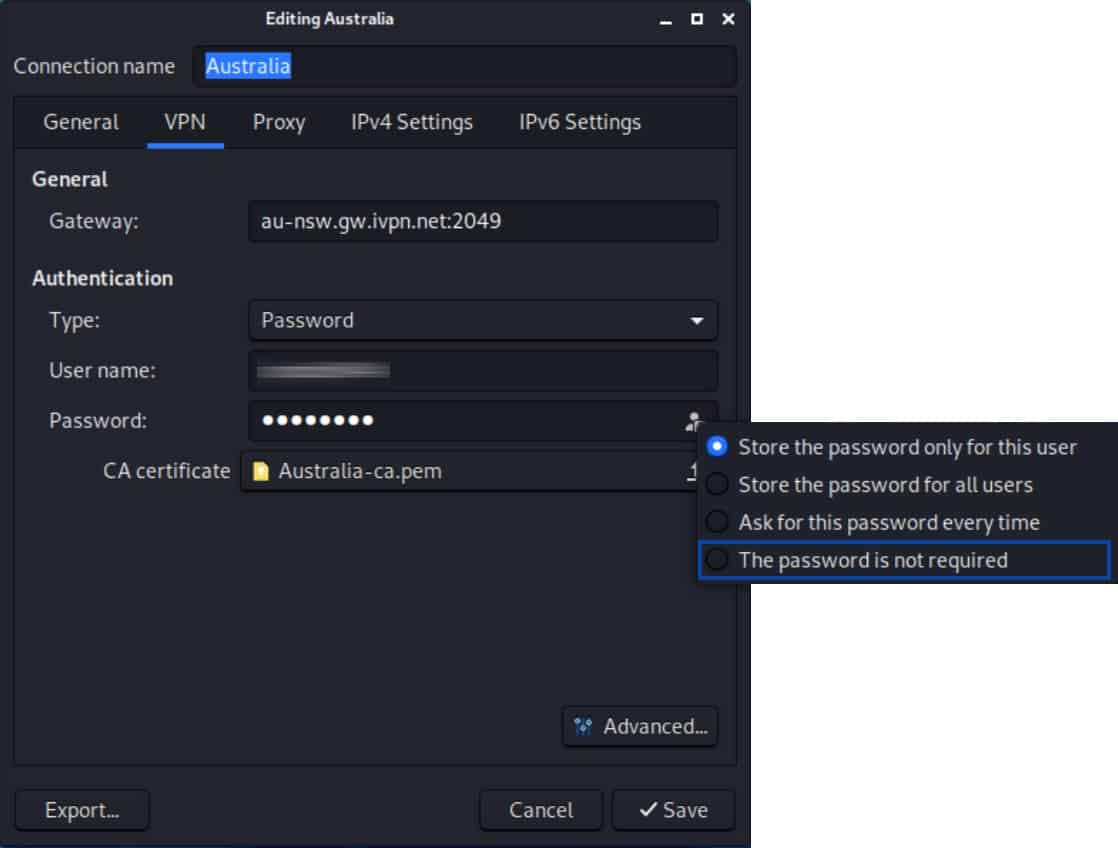
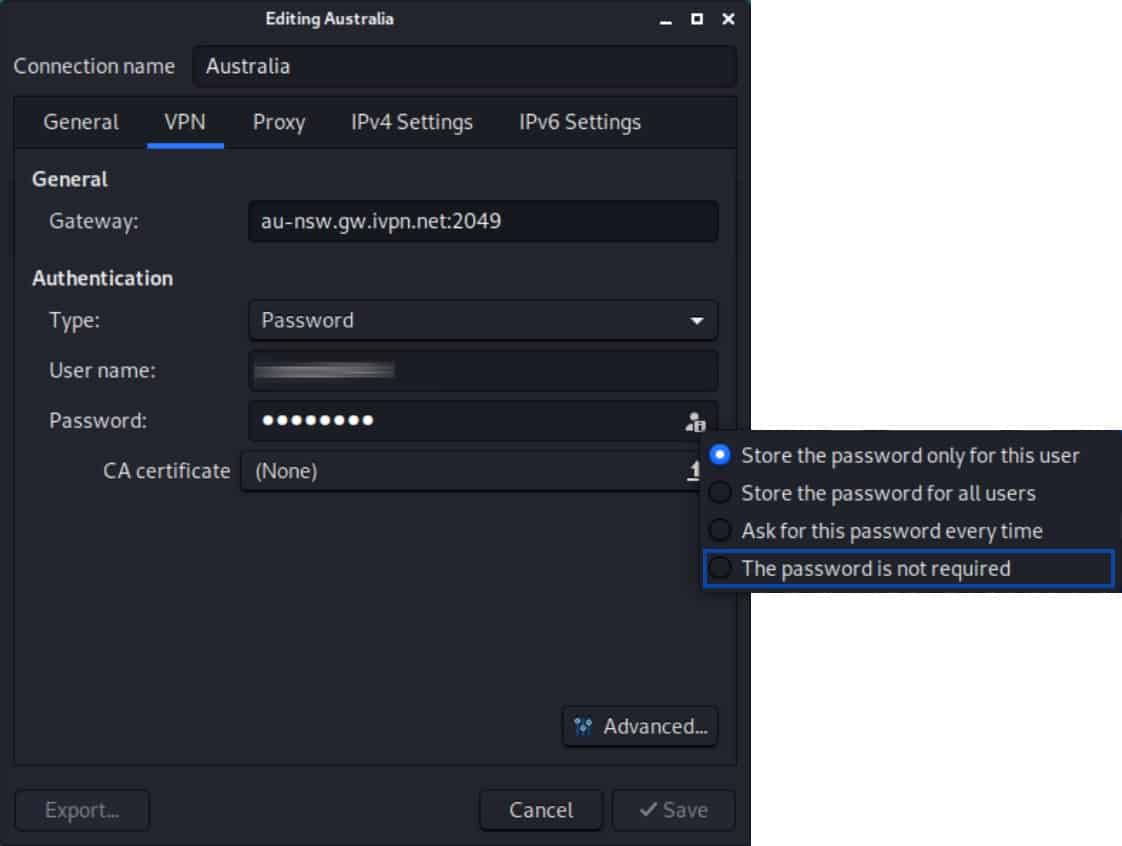
- By clicking the icon to the right of the password field, you can select The password is not required. However, in my experience, you’ll still be prompted for a password regardless of whether or not this option is selected.

- Click Save. The Editing VPN window is closed.

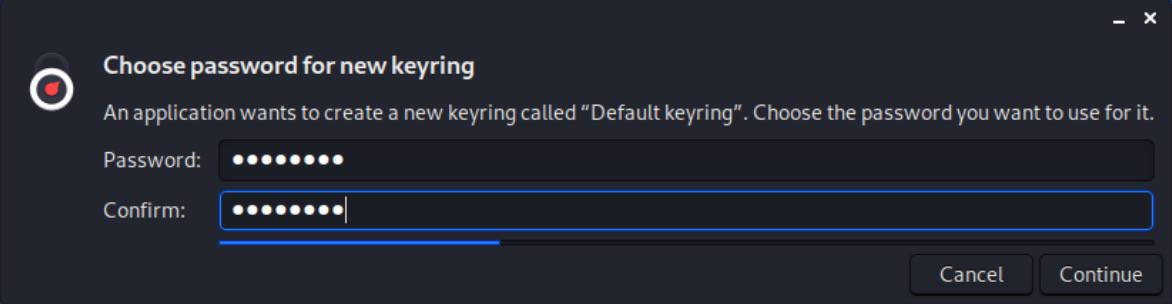
You are then prompted to create a password for a new keyring. Kali Linux is a security-focused Linux distribution. As such, the first time you create a password on the system, it prompts you to create an additional keyring password in order to store your passwords (like the VPN account password) in an encrypted vault (the keyring). You won’t be prompted to enter this password to connect to the VPN.
You will only be prompted to create a keyring password the first time you create a password on your system. If you’ve created the keyring password before, you won’t see this prompt.
- Type and confirm your keyring password, and then click Continue. Your OpenVPN connection is now configured.

- To enable your VPN new connection, click the Network Manager icon at the top right of the Desktop. Select VPN Connections / <Your VPN Connection> (mine is named Australia).

- Upon successful connection, you’ll see a notification appear stating that you’re now connected to the VPN.

- You can verify that your IP address has been changed by using the Comparitech IP Address Check Tool.

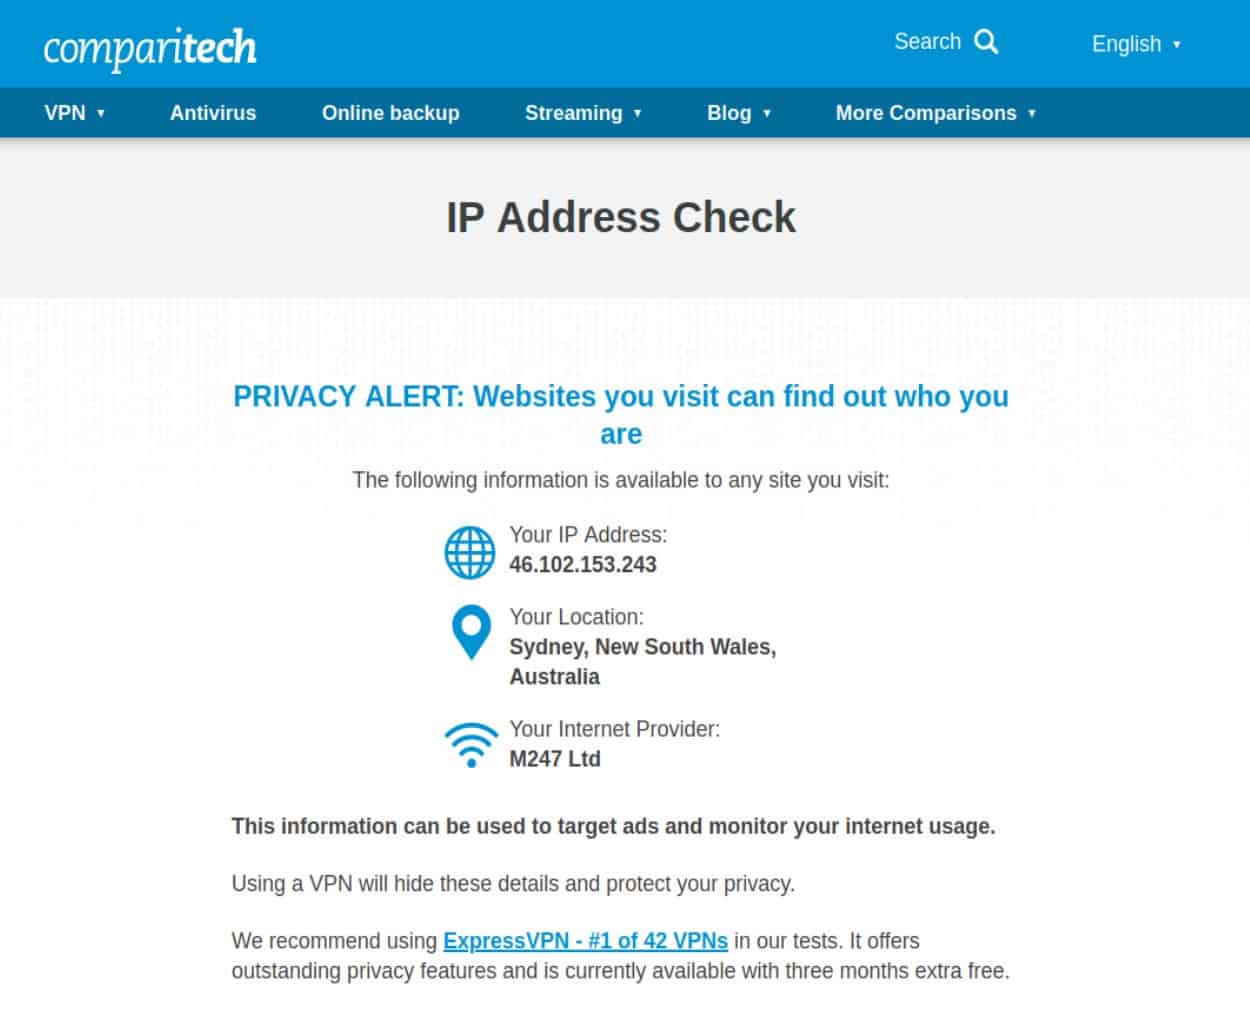
We can see that I now have an Australian IP address.
What we just went through was the automatic way to configure a client connection in Kali Linux. You can also create your connection manually. Configuring your OpenVPN connection manually will help you out if something goes wrong and you need to do some troubleshooting.
Configuring an OpenVPN connection manually
Whether creating your connection automatically or manually, you’re going to need your VPN provider’s OpenVPN configuration files.
Once you’ve got the .ovpn files, you’re going to create individual files for your CA certificate and your TLS key (if required).
- The CA certificate: Each VPN provider has a Certificate Authority that validates connections to its VPN servers. You’re going to need your provider’s CA certificate to configure a VPN client in Kali Linux. It looks like this:

- The TLS key: Many VPN providers also require a TLS key to initiate a client connection. You may have heard it referred to as a static key – they’re the same thing. Depending on whether or not your VPN provider requires a static key to establish an OpenVPN connection, you may or not going to need that as well. It looks like this:

These are all found in the .ovpn configuration files. Refer to the images above if you’re having trouble finding them, but they tend to stand out as blocks of numbers and letters. Once you’ve found them, copy each one to a text file and then save the text files with the extensions below:
- CA certificate – .crt extension
- TLS key – .key extension
Here’s how my files look:

To create our connection manually, we’ll need more than just the CA certificate and the TLS key. But every other piece of information we need is found in the OpenVPN configuration files. Here’s how:
-
- From the Desktop, click the Network Manager icon at the top right of the screen. If you’re on a wired connection, the icon will be square like mine. If you’re on wireless, it will be a WiFi icon. Select VPN Connections > Add a VPN connection. The Network Manager is displayed.
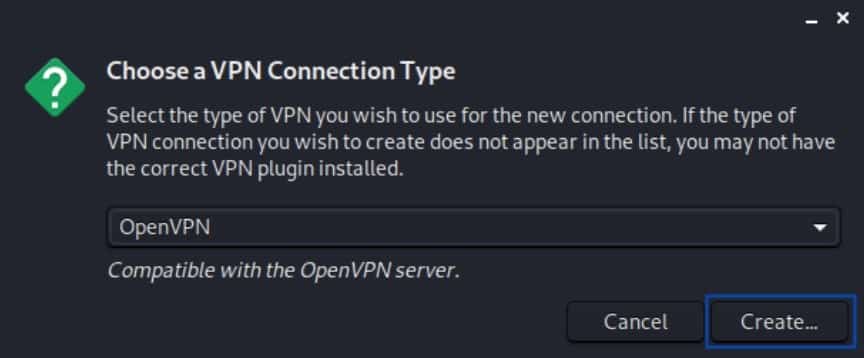
- From the drop-down menu, select OpenVPN.
- Click Create. The Editing VPN window is displayed.
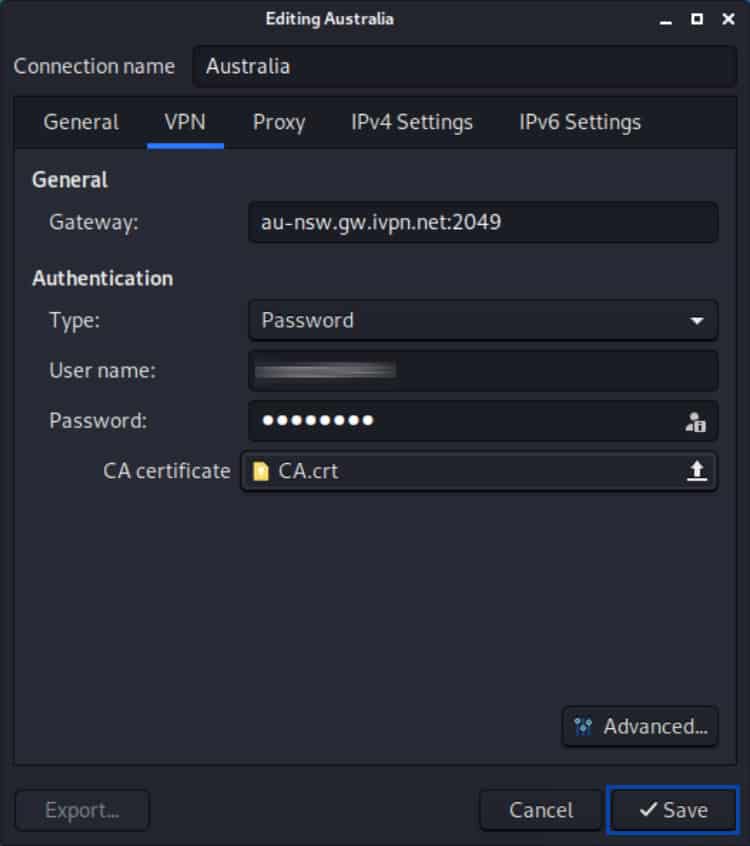
- Give the connection a name and enter the VPN server hostname or IP address in the Gateway field, followed by a colon and the port number. vpnserver.com:2049, for example.
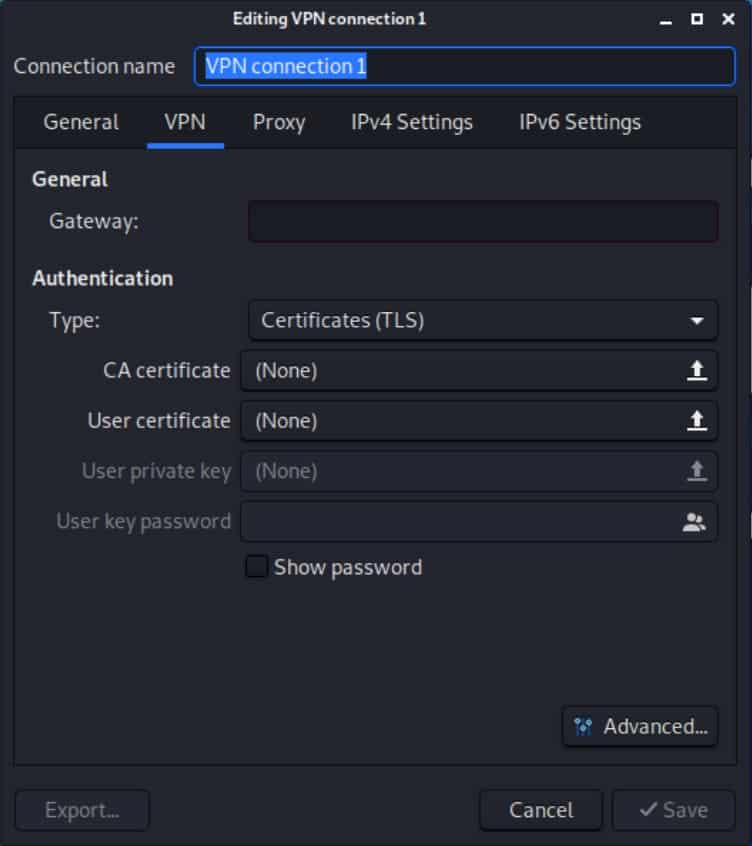
- Under Authentication, set the Type field to Password. Enter your username and password and click Save. If your provider only requires a username, a client identifier, or an account number, and doesn’t require a password, just type anything in the password field. Don’t leave it blank.

- As above, by clicking the icon to the right of the password field, you can select The password is not required but in my experience, it still prompts you for a password regardless of whether or not this option is selected.

- Click the CA certificate field. The file browser appears. Navigate to the CA.crt file you created earlier and select it.

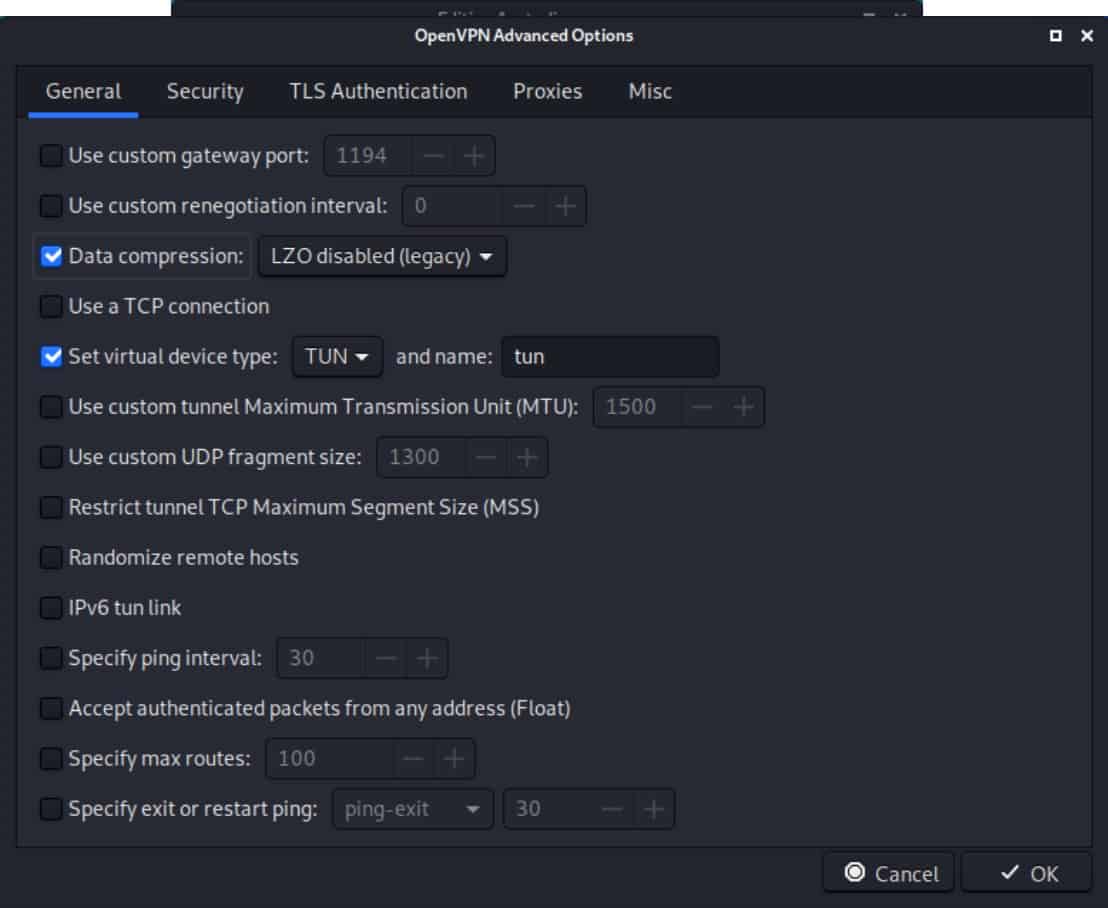
- Click the Advanced button. The advanced options are displayed.

- If your VPN provider uses data compression, tick Data compression and select the type of compression from the drop-down menu.
- Tick Set virtual device type, leave it set to TUN, and set the name to tun.
- Go to the Security tab.

- If your VPN provider supports different encryption ciphers, you can manually select your cipher here. If not, leave it to Default.
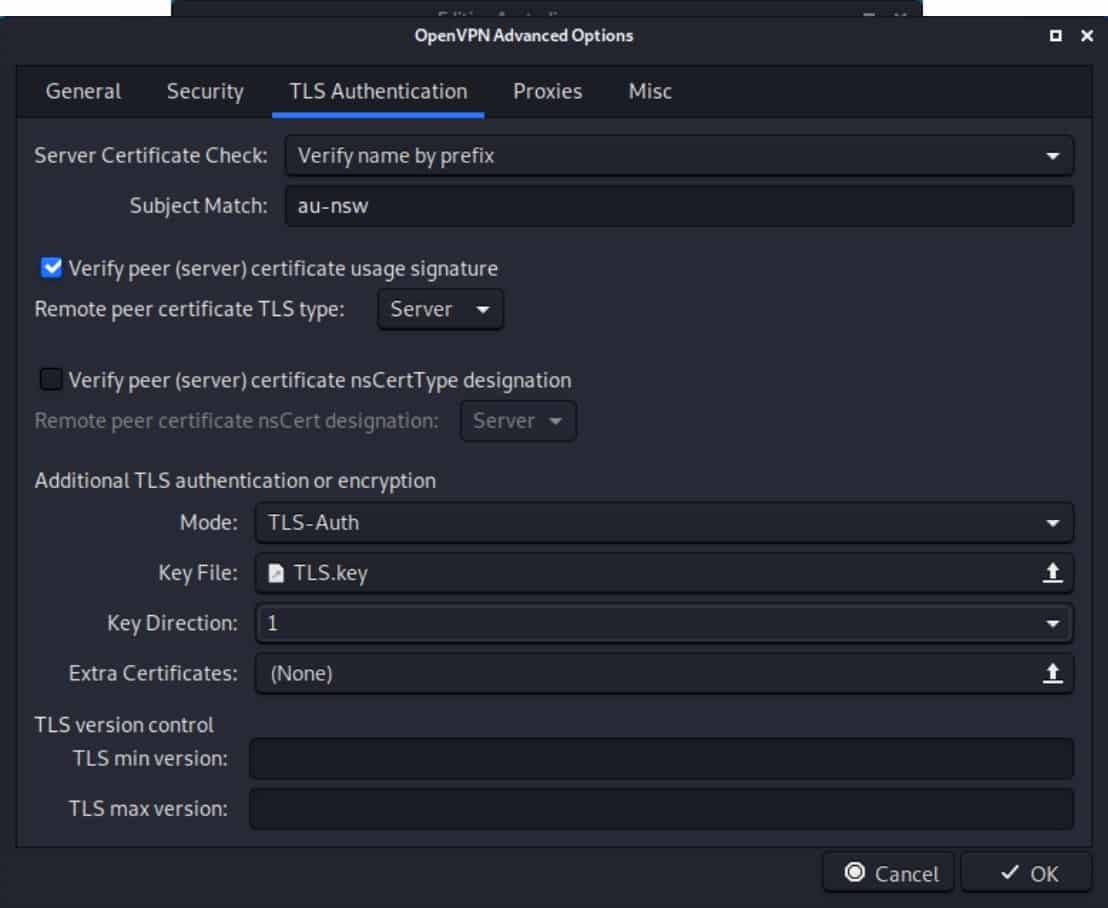
- Go to the TLS Authentication tab. Setting the TLS Authentication options is not required if your VPN provider doesn’t use TLS authentication and does not provide a TLS key.

- Select your provider’s Server Certificate Check method and enter the Subject Match. This is found in the .ovpn configuration file.
- Tick Verify peer (server) certificate usage signature and leave the setting to Server.
- Under Additional TLS authentication or encryption, select either TLS-Auth or TLS-Crypt, based on the options supported by your VPN provider.
- Click the Key File field. The file browser appears. Navigate to the TLS.key file you created earlier and select it.
- Click the Key Direction field and select 1 from the drop-down menu.
- Click OK. You’re taken back to the Editing VPN window.
- Click Save. The Editing VPN window is closed.
- If it’s the first time you create a password on this system, you will be prompted to create a keyring password, as above. Type and confirm your keyring password, and then click Continue. Your OpenVPN connection is now configured.
- To enable your VPN new connection, click the Network Manager icon at the top right of the Desktop. Select VPN Connections > <Your VPN Connection > (mine is named Australia).
- Upon successful connection, you’ll see a notification appear stating that you’re now connected to the VPN.
- You can verify that your IP address has been changed by using the Comparitech IP Address Check Tool.
- From the Desktop, click the Network Manager icon at the top right of the screen. If you’re on a wired connection, the icon will be square like mine. If you’re on wireless, it will be a WiFi icon. Select VPN Connections > Add a VPN connection. The Network Manager is displayed.

You’ve now set up an OpenVPN connection to your VPN provider over Linux, using the Network Manager. You can add as many connections as you want by repeating the process. When you want to connect, simply select the server you want to connect to and turn it on from the Network Manager.
However, in order to secure your traffic, there’s one more step you need to complete. To make sure that your traffic doesn’t leak out unencrypted if your VPN connection should ever drop, we’re going to create a VPN kill switch for our connection. We’re going to do this using iptables. Iptables is a firewall for Linux distributions.
We’re going to be using the terminal window and will be running some commands in there. If you’re new to Linux, it might seem scary at first but learning to use the Terminal will greatly help you in mastering your Linux Fu.
However, if you’re running Kali Linux, there’s a good chance you’ve used the Terminal before.
Configuring a VPN kill switch with iptables
Most VPN providers’ client apps include a kill switch. A kill switch will block all traffic from going out to the internet if your device should ever drop the VPN connection. It’s a great feature for security and privacy.
In this section, we’re going to configure a VPN kill switch for our connection, using iptables. Iptables is a well-known Linux firewall.
Installing iptables-persistent
- Disconnect the VPN.
- Launch the Terminal. We’re going to start by installing iptables-persistent.
- In the Terminal window type:
sudo apt update. Enter your password and press Enter. This will update your package repositories. - Type:
sudo apt install iptables-persistent. Enter your password if prompted. You will be prompted to typeYorNto install the package or to abort the installation. TypeY. The package is installed.
The iptables rules are saved in two files, one for IPv4 rules and one for IPv6 rules. The files are:
- /etc/iptables/rules.v4
- /etc/iptables/rules.v6
We’re going to start with our IPv4 rules.
Configuring an IPv4 VPN kill switch
- Type:
sudo nano /etc/iptables/vpn-rules.v4to create a new IPv4 rules file for our VPN. - Enter your password if prompted. An empty file is displayed.
- Copy the following to your file, but insert the IPv4 address of your VPN server instead of
<VPN server IPv4 address>and the VPN server’s port instead of<VPN server port>:
*filter
-A OUTPUT -o tun0 -j ACCEPT
-A OUTPUT -d <VPN server IPv4 address> --dport <VPN server port> -j ACCEPT
-A OUTPUT -j DROP
COMMIT
- Press Ctrl+X to save and exit. Type
Ywhen asked to save the file.
These rules allow traffic out from the VPN interface, allow a connection to the VPN server via the default route, and then block everything else.
Configuring an IPv6 VPN kill switch
If your VPN provider supports IPv6 (most don’t), you can do the same for IPv6 traffic.
- In the Terminal window, type:
sudo nano /etc/iptables/vpn-rules.v6to create a new IPv6 rules file for our VPN. - Enter your password if prompted. An empty file is displayed.
- Copy the following to your file, but insert the IPv6 address of your VPN server instead of
<VPN server IPv6 address>and the VPN server’s port instead of<VPN server port>:
*filter
-A OUTPUT -o tun0 -j ACCEPT
-A OUTPUT -d <VPN server IPv6 address> --dport <VPN server port> -j ACCEPT
-A OUTPUT -j DROP
COMMIT
- Press Ctrl+X to save and exit. Type
Ywhen asked to save the file.
Dropping IPv6 traffic
If your VPN provider doesn’t support IPv6, I recommend creating rules to drop that traffic altogether.
- In the Terminal window, type:
sudo nano /etc/iptables/vpn-rules.v6to create a new IPv6 rules file for our VPN. Enter your password if prompted. An empty file is displayed. - Copy the following to your file:
*filter
:INPUT DROP [0:0] :FORWARD DROP [0:0] :OUTPUT DROP [0:0]
COMMIT
Now, we need to load our new rules files so the iptables will apply them.
Loading IPv4 firewall rules
In the Terminal window, type: sudo iptables-restore > /etc/iptables/vpn-rules.v4
Loading IPv6 firewall rules
In the Terminal window, type: sudo ip6tables-restore > /etc/iptables/vpn-rules.v6
You’ve now got an OpenVPN client connection configured in Kali Linux. It can easily be enabled or disabled from the Network Manager at the top right of the Desktop.
You’ve also configured a VPN kill switch using iptables. That means that from now on If your VPN disconnects, all traffic from your device will be blocked. So none of it will ever reach the internet unencrypted.
Kali Linux updates and releases in 2023
In 2023, Kali Linux has seen several updates and releases. Here are some key highlights from the 2023 releases:
- Kali Linux 2023.1 (released on 13th March 2023) celebrated the 10th anniversary of Kali Linux. This release featured Kernel 6.1.0 and Xfce 4.18.1.
- Kali Linux 2023.2 (released on 30th May 2023) came with Kernel 6.1.0 and Xfce 4.18.2.
- Kali Linux 2023.3 (released on 23rd August 2023) featured Kernel 6.3.0 and Xfce 4.18.4.
Here are some notable features and updates in the 2023 releases:
- Kali Linux 2023.1 introduced Kali Purple, Python updates and changes, a 2023 theme refresh, desktop updates, and default kernel settings.
- Kali Linux 2023.3 focused on internal infrastructure improvements and introduced Kali Autopilot, an automation attack framework that received a major overhaul. This release also added nine new tools for ethical hacking and penetration testing.
You can visit the official Kali Linux website to stay updated with the latest Kali Linux releases and features.
FAQs about setting up an OpenVPN connection on Kali Linux
Can you get in trouble for using Kali Linux?
Using Kali Linux is generally not considered illegal; however, be careful when using Kali Linux and the tools provided to prevent any accidental misuse. As with any powerful tool, you should take steps such as only downloading programs from reputable sources and reading user manuals carefully. Additionally, ensure you understand applicable laws in your jurisdiction before using Kali Linux, as some activities may be illegal in certain areas. Finally, services used or accessed through Kali Linux should be done responsibly and cautiously. These steps can help minimize the potential for legal issues when using Kali Linux.
Why do hackers prefer Kali Linux?
Kali Linux is popular among ethical hackers and security professionals due to its comprehensive suite of cybersecurity tools, which can be used for tasks such as penetration testing, vulnerability assessment, and digital forensics. The open-source nature of Kali Linux lets you customize your setup according to your needs. In addition, the user-friendly interface makes accessing the wide range of available tools and navigating the operating system easy. These features make Kali Linux an attractive choice for hackers and security professionals.
Is Kali Linux Traceable?
Kali Linux is’nt traceable on its own; however, those activities may be traceable if you access or use services while connected to the internet. Remember that even anonymous networks and tools can offer only a degree of anonymity, so exercise caution when using any online services.
What is the command for run the VPN in Kali Linux?
To run a VPN in Kali Linux using the command line, you first need to have OpenVPN installed. Here’s how you can install it: Open a terminal and type ‘sudo apt install openvpn‘. This command will prompt you to enter your password. Once you’ve entered your password, the installation process will begin. You may be asked to confirm the installation by typing ‘Y’ and pressing Enter.
Once OpenVPN is installed, you can initiate a VPN connection by navigating to the directory where your VPN configuration files are stored and running the command ‘sudo openvpn [configuration file]‘. For example, if your configuration file is named ‘uk2-udp.ovpn’, you would type ‘sudo openvpn uk2-udp. ovpn’ to start the VPN connection. This command will prompt you to enter your VPN credentials (username and password), and once authenticated, it will establish the VPN connection. To disconnect, you can press ‘Ctrl+C’ in the terminal where the VPN is running.


Thanks
that worked!
well done