

The majority of VPN providers support the most common platforms. Almost all VPN providers supply native Windows, macOS, Android, and iOS client apps to their users. But with Linux, it’s not automatic. Some do but most do not.
That doesn’t necessarily mean that provider can’t be set up in Linux. It just means that you might have to work a bit harder to do it. In this article, we’re going to show you how to set up an OpenVPN client connection in Ubuntu Linux, using the Network Manager.
OpenVPN configuration files
To do this, you’re going to need access to your VPN provider’s OpenVPN configuration files (.ovpn).
Many VPN providers that support Linux without supplying a native Linux client will choose to make their OpenVPN configuration files available. That also commonly applies to VPN providers that support routers.
Other VPN providers make their OpenVPN configuration files available, even though they provide native client apps for all platforms. They do this to enable users to connect using third-party clients, like Linux’s Network Manager.
All that to say that if your VPN provider supports Linux (without providing a native client), supports routers, or allows its users to connect using third-party clients, there’s a very good chance that its OpenVPN configuration files will be made available for download. And it’s with the information found in these files that you can create a VPN connection over Linux using the Network Manager.
Supported VPN providers
Below is a list of VPN providers that make their OpenVPN configuration files available. NordVPN is Comparitech’s top-rated VPN and tops the list of best VPNs for Linux.
- NordVPN
- Surfshark
- ExpressVPN
- VyprVPN
- PureVPN
- Mullvad
- Private Internet Access
- ProtonVPN
- Hide My Ass
- TorGuard
- OVPN
- Windscribe
- iVPN
- AirVPN
- hide.me
What we’re going to do first is download your VPN provider’s OpenVPN configuration files. Normally, there’s at least one config file per server location. You’re also going to need your login credentials, which shouldn’t be too difficult to find.
Once you’ve got all of the above, you’re ready to set up an OpenVPN client connection in Ubuntu Linux.
Configuring an OpenVPN connection from the Network Manager
There are two ways to configure an OpenVPN connection in Ubuntu: automatically or manually. We’re going to go through both.
Configuring an OpenVPN connection automatically
- From the Desktop, click any of the icons at the top right of the screen. From the options window that appears, select Wi-Fi Connected or Wired Connected, based on your connection type. Then, select Wi-Fi Settings or Wired Settings. The Settings/Network Manager page is displayed.

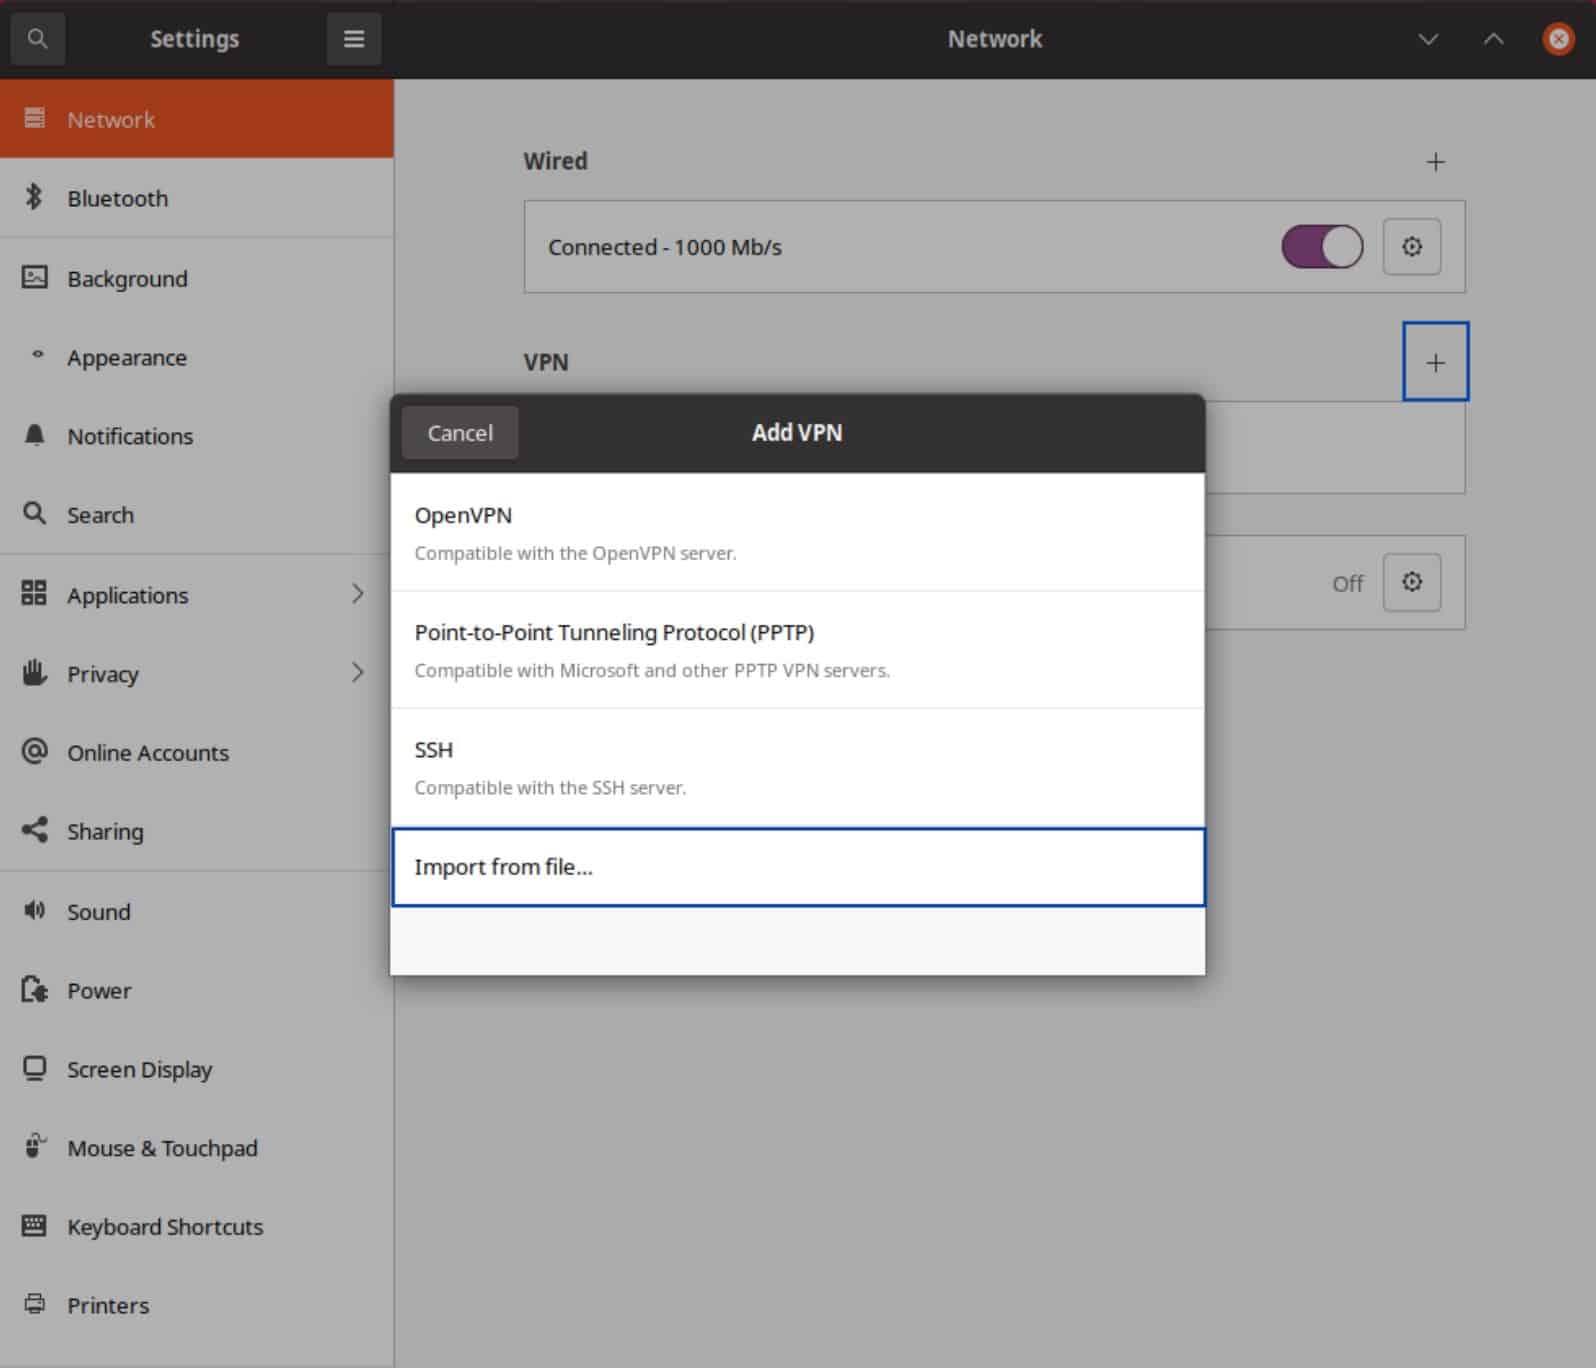
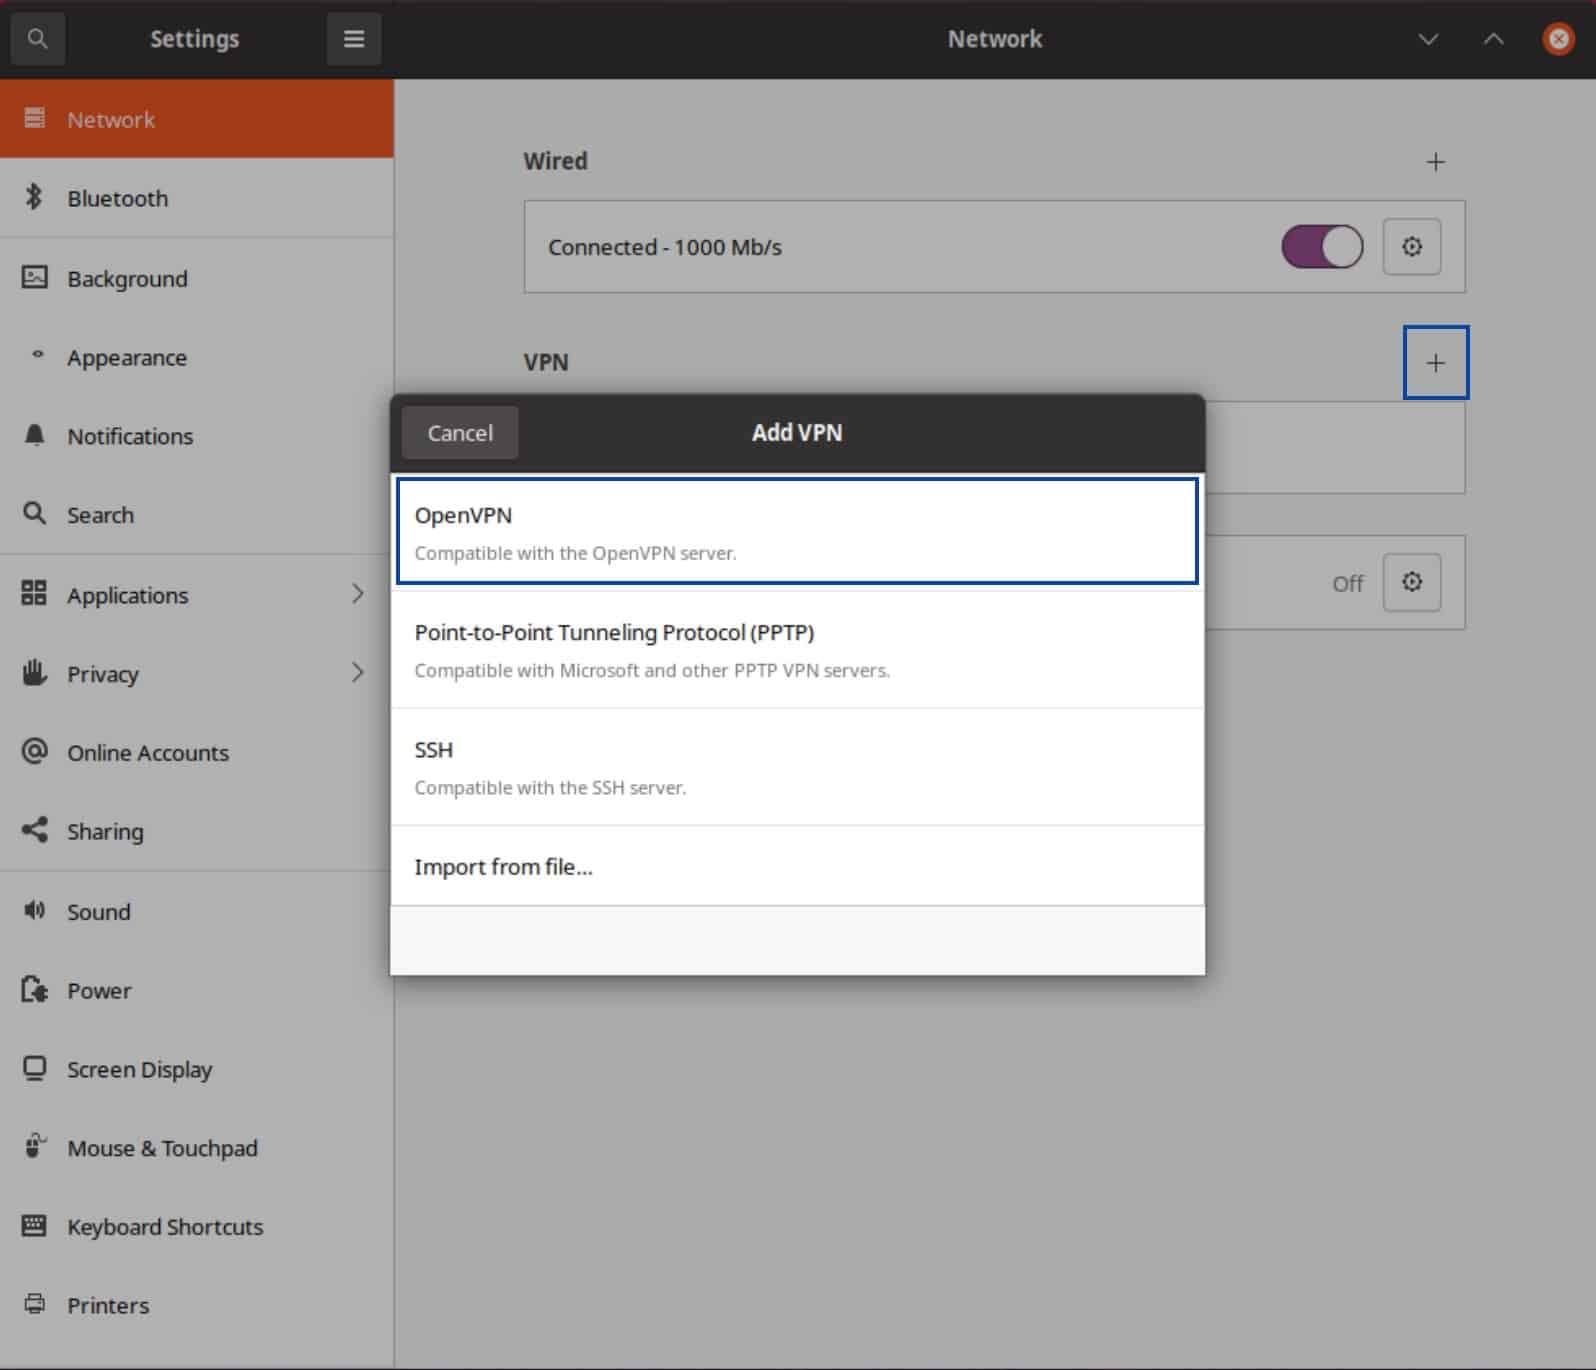
- Click the + to the right of VPN. The Add VPN window is displayed.

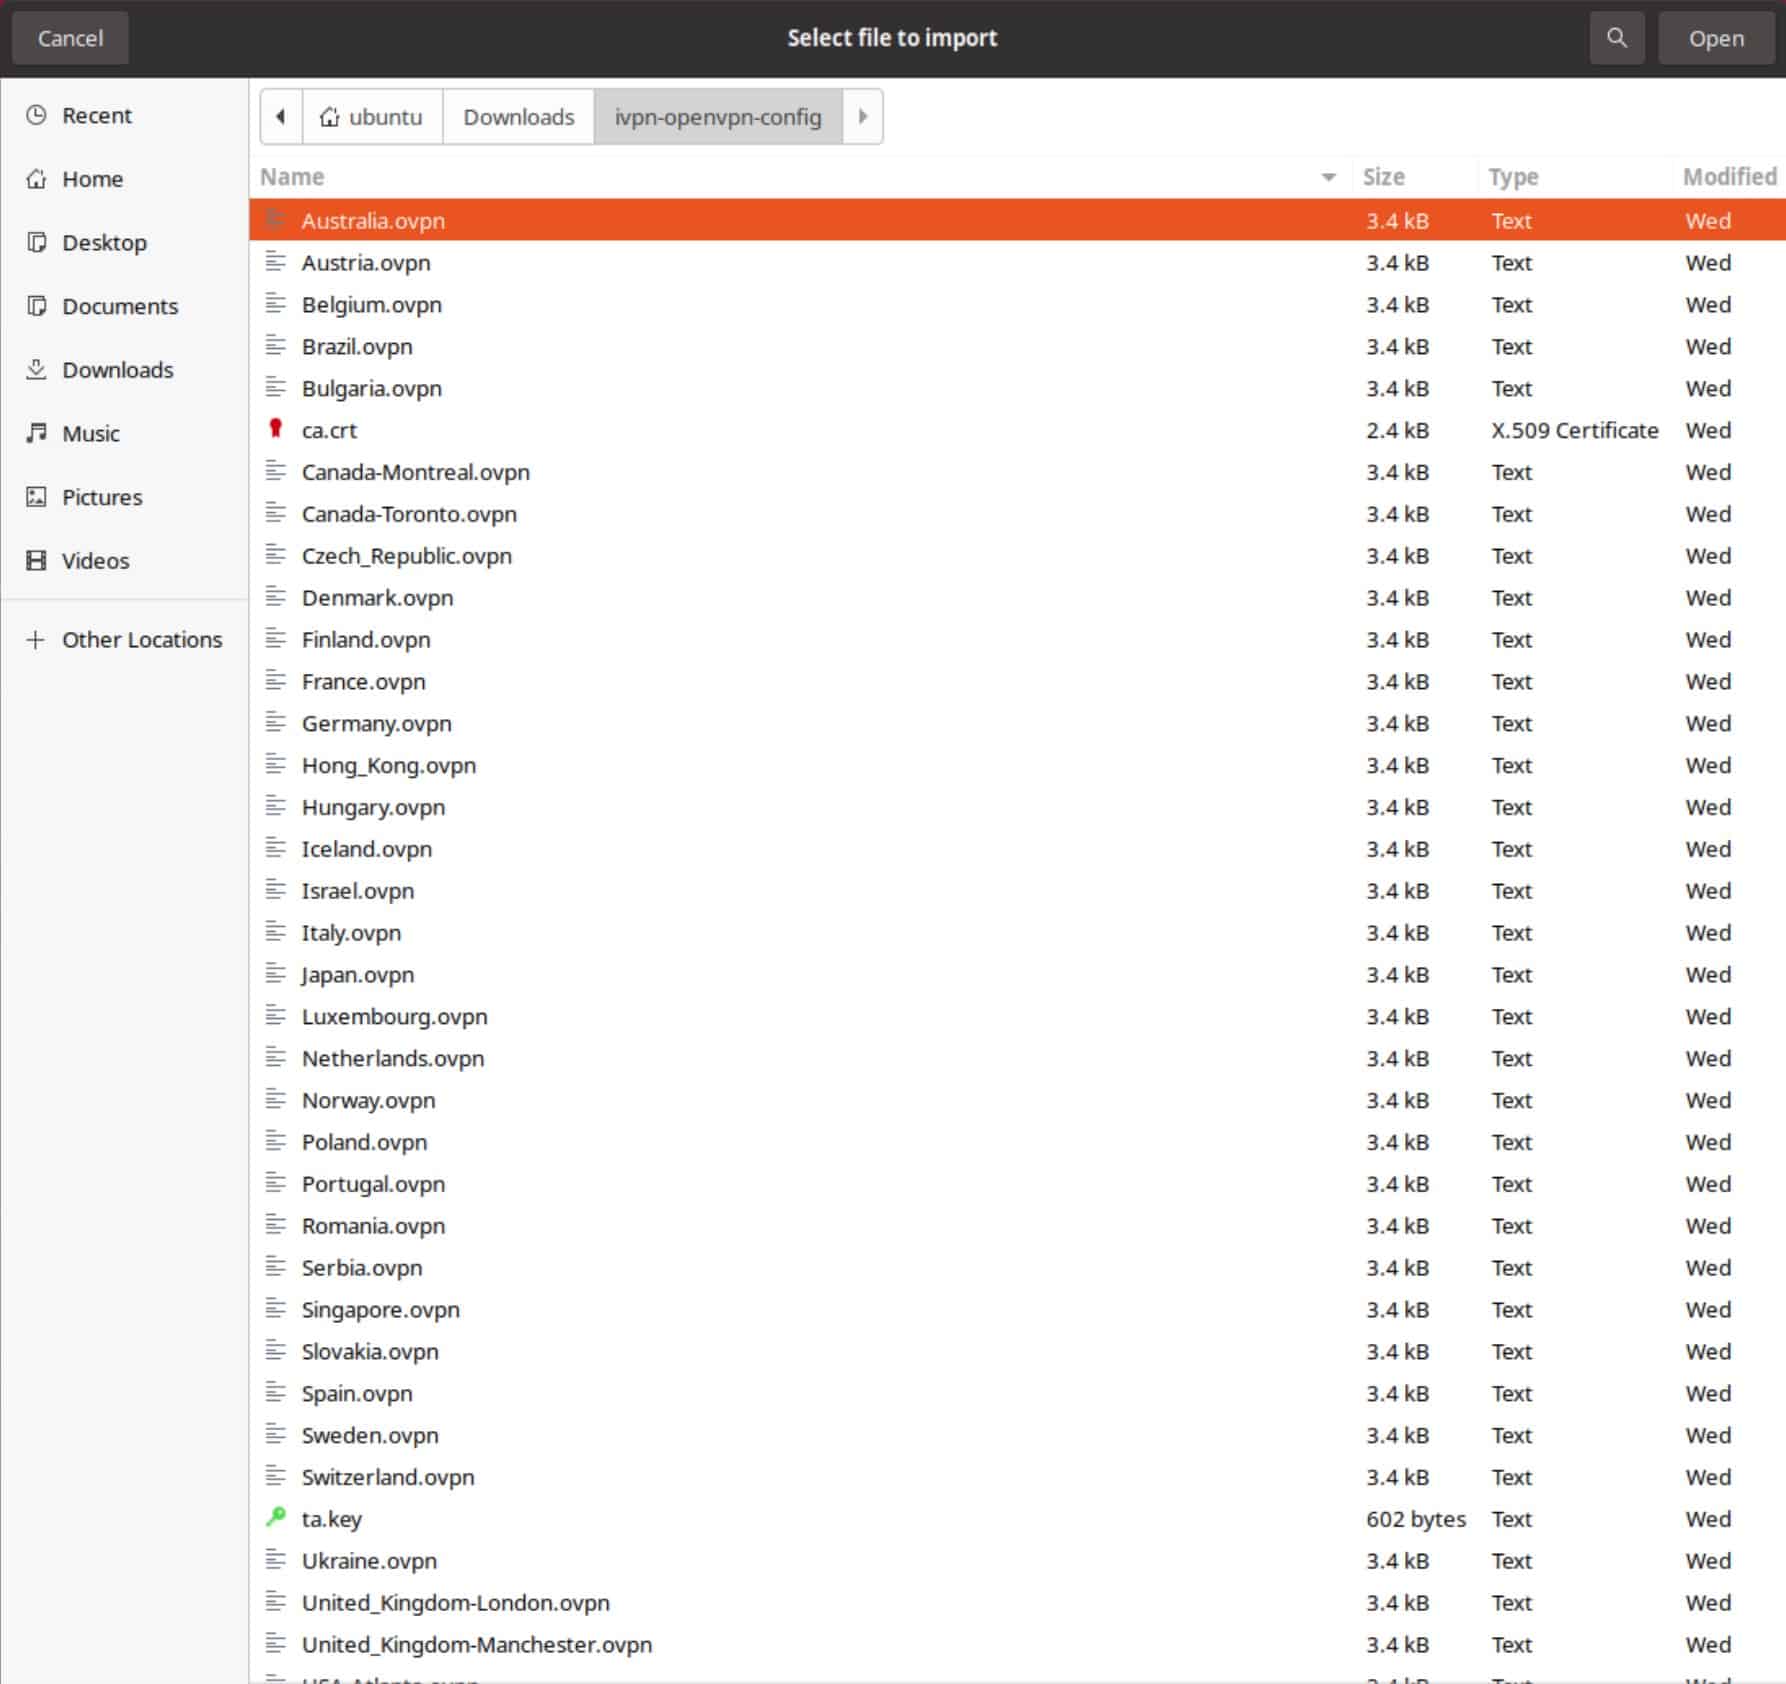
- Double-click Import from file… The file browser appears.

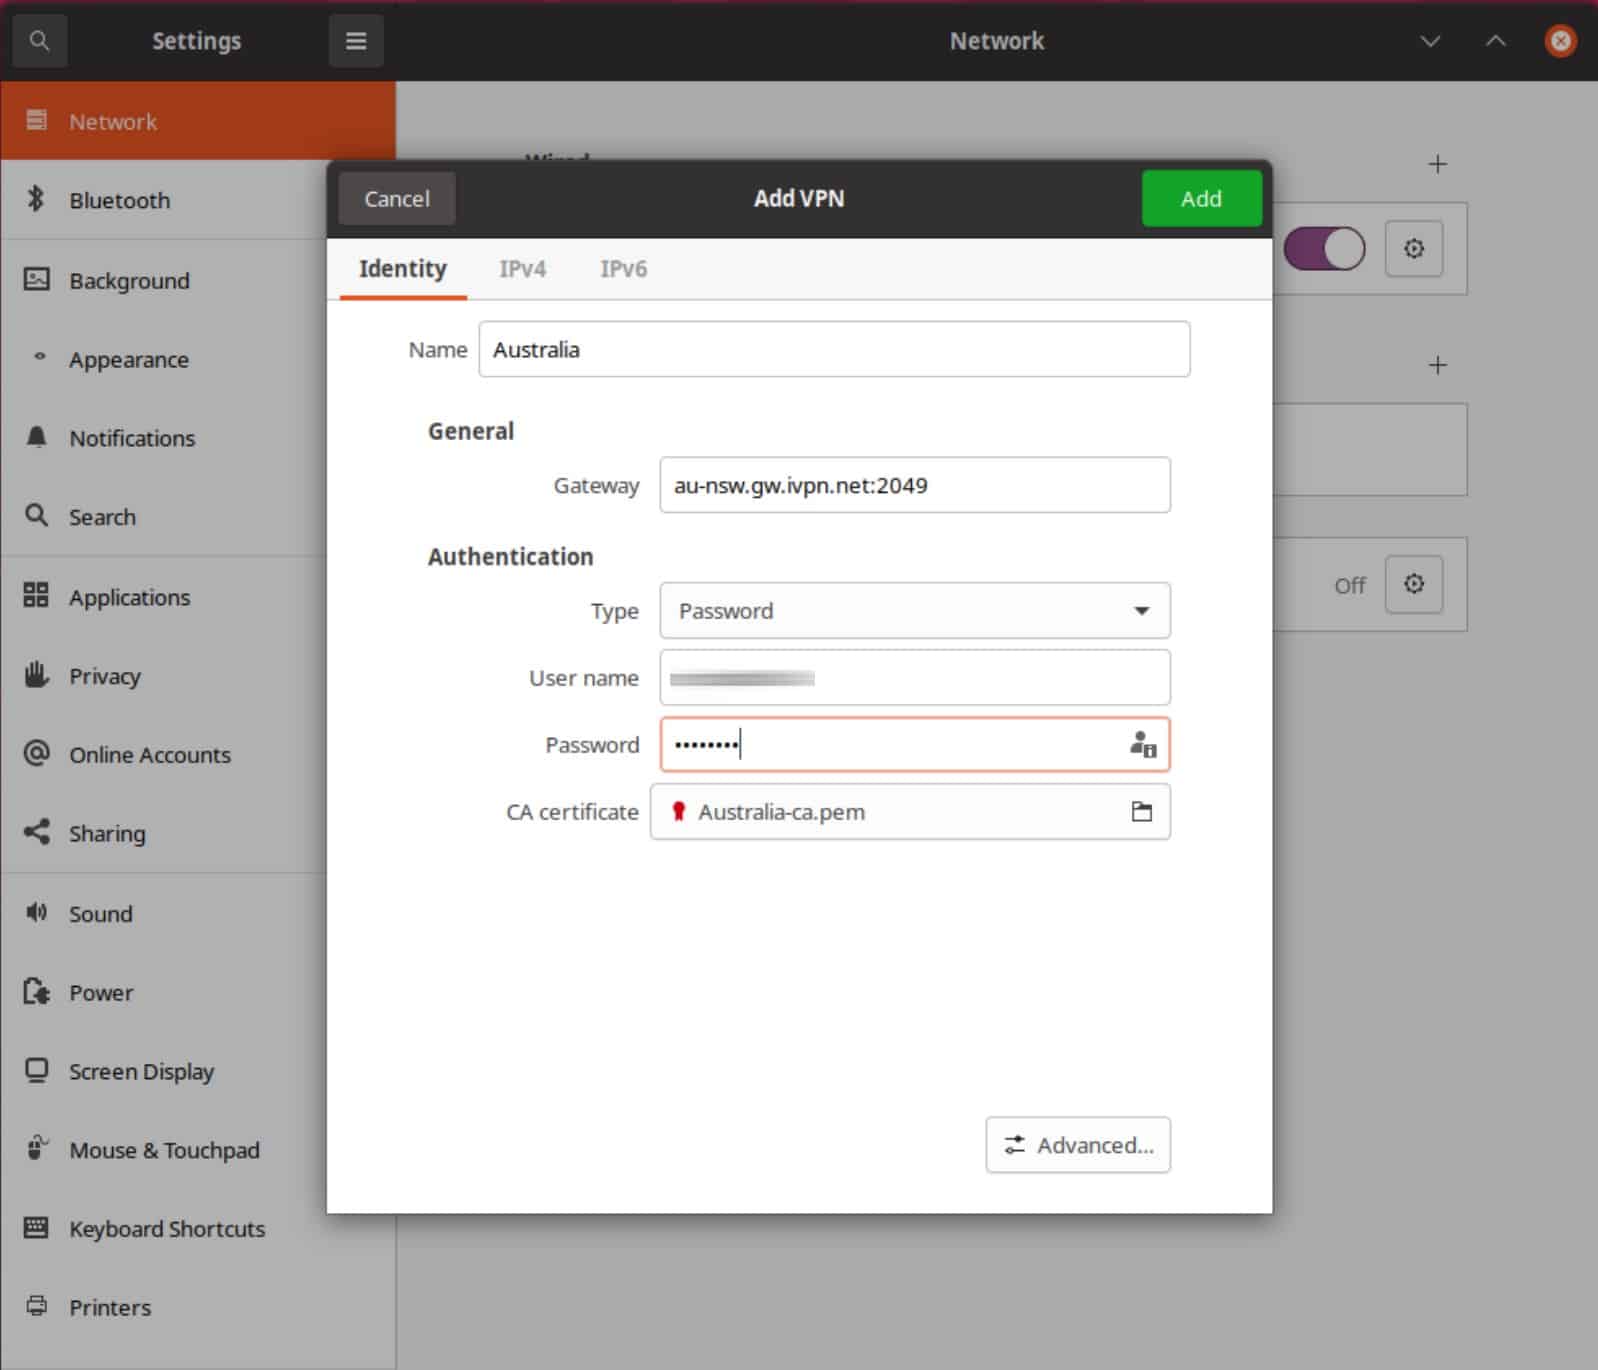
- Navigate to the location where you saved your provider’s OpenVPN configuration files and select the .ovpn file of the server to which you want to connect. You’re taken back to the Add VPN window.

- Enter your username and password and click Save. If your provider only requires a username, a client identifier, or an account number, and doesn’t require a password, just type anything in the password field. Don’t leave it blank.

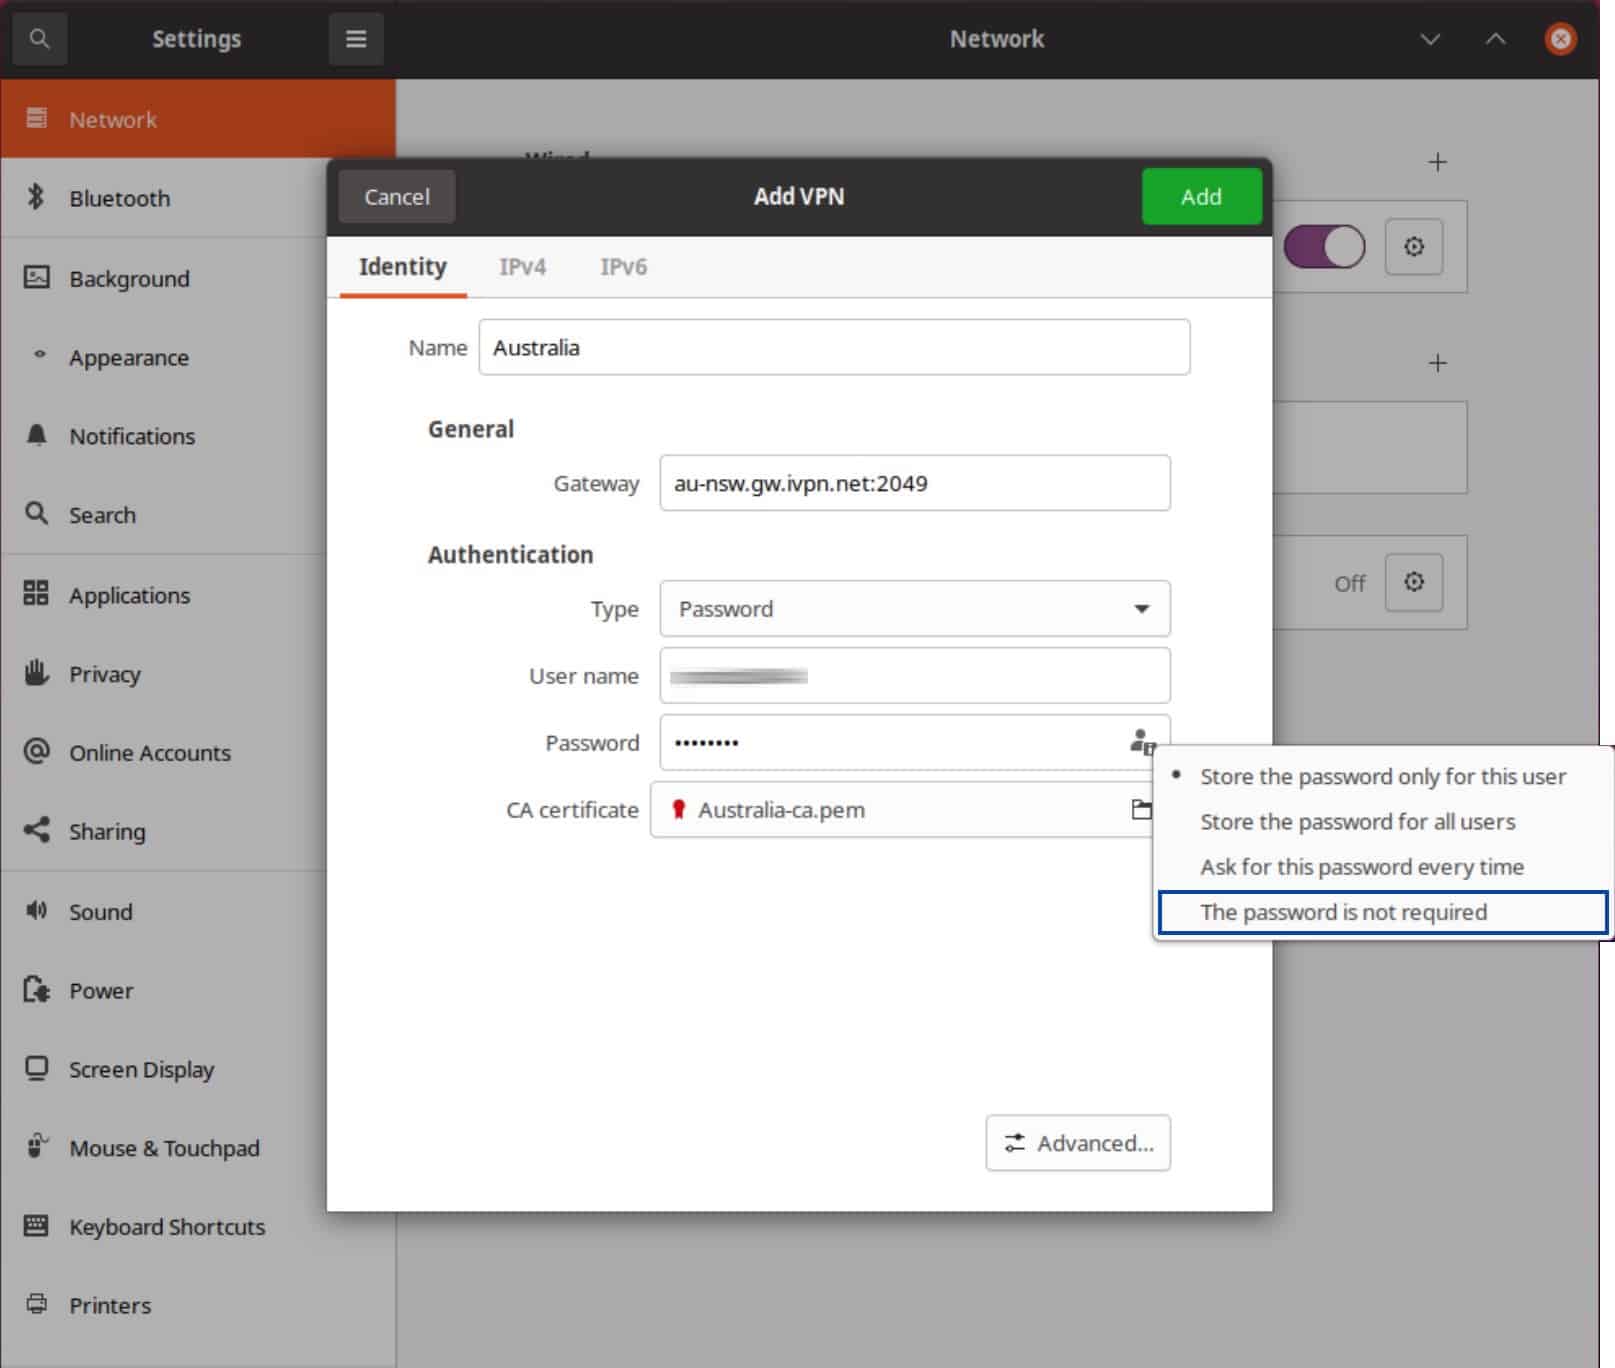
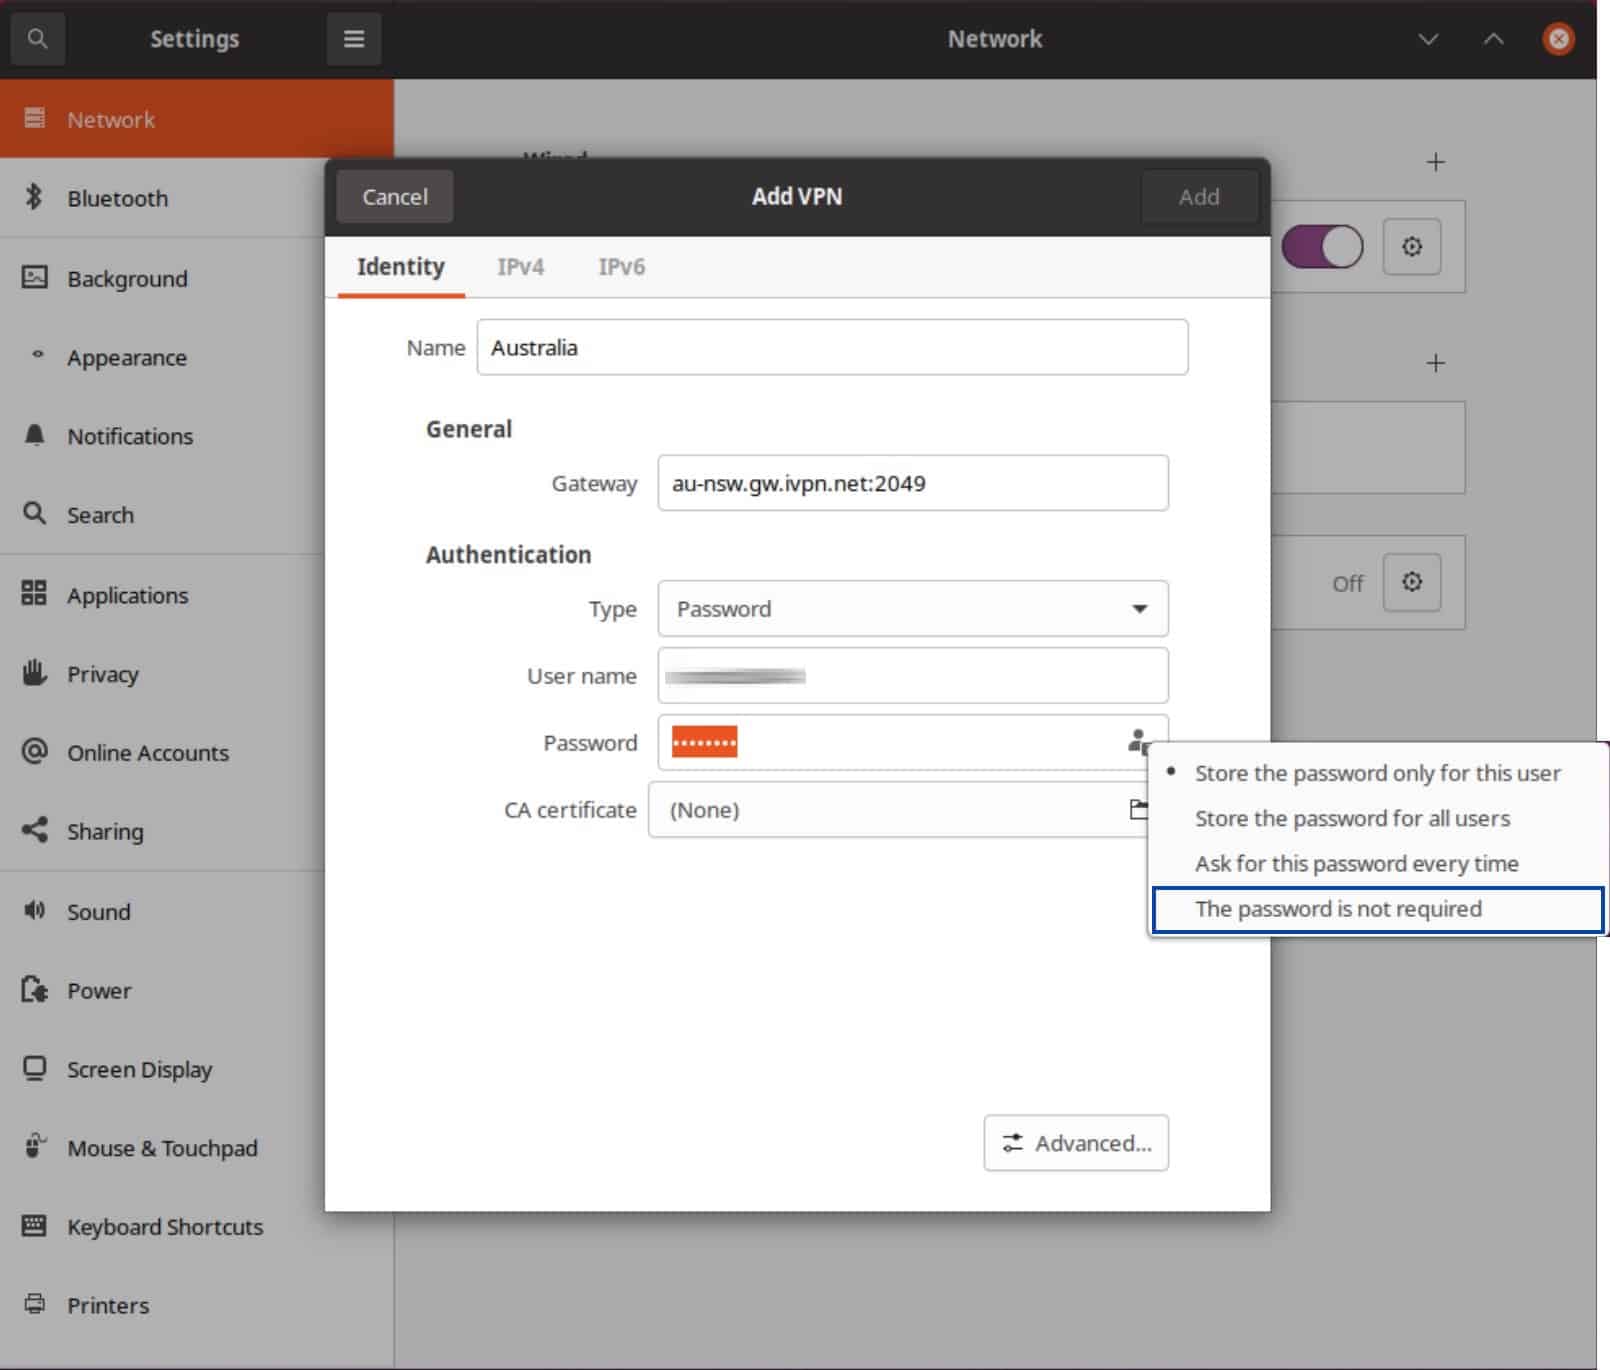
- By clicking the icon to the right of the password field, you can select The password is not required. However, in my experience, you’ll still be prompted for a password regardless of whether or not this option is selected.

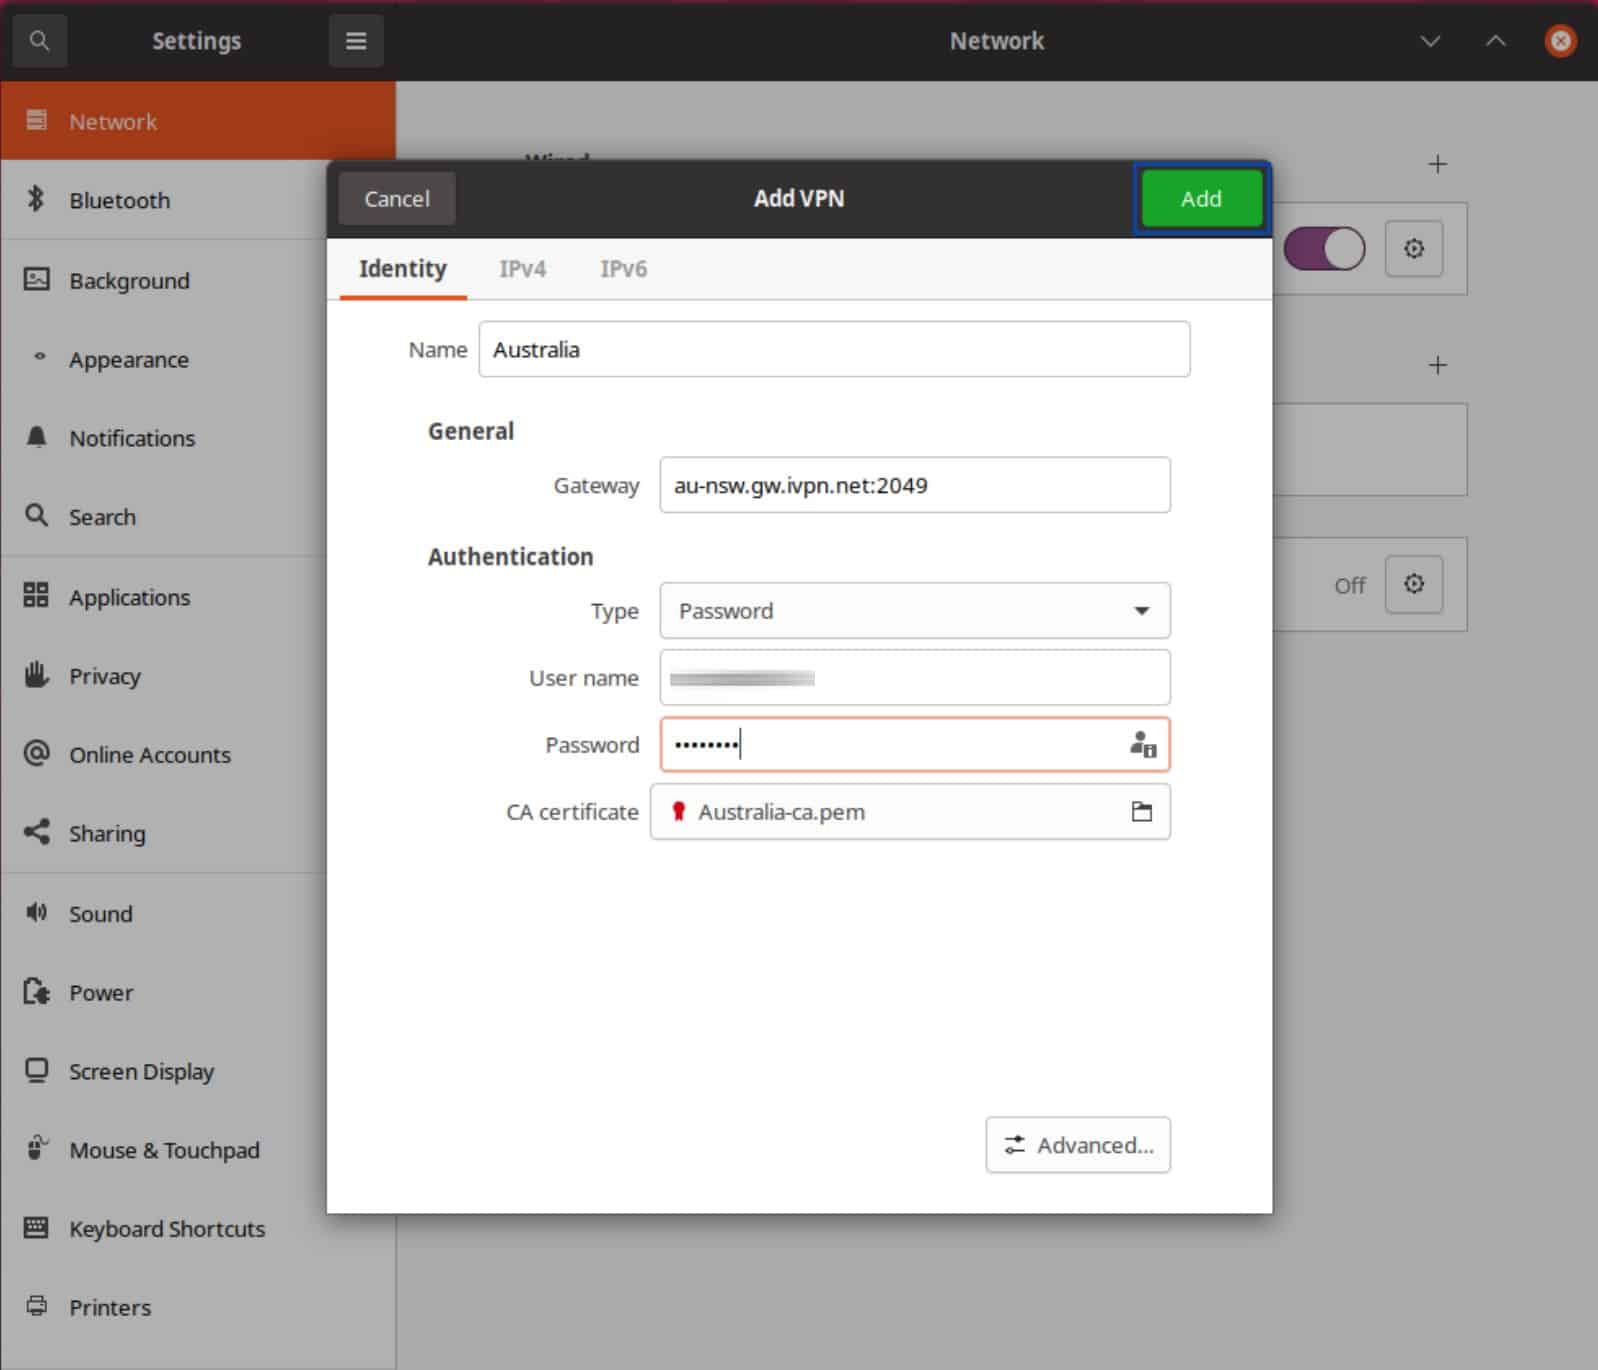
- Click Add. Your OpenVPN connection is now configured. Close the Settings/Network Manager window.

- To enable your VPN new connection, click any of the icons at the top right of the Desktop. Select VPN Off and Connect to turn your VPN connection on.
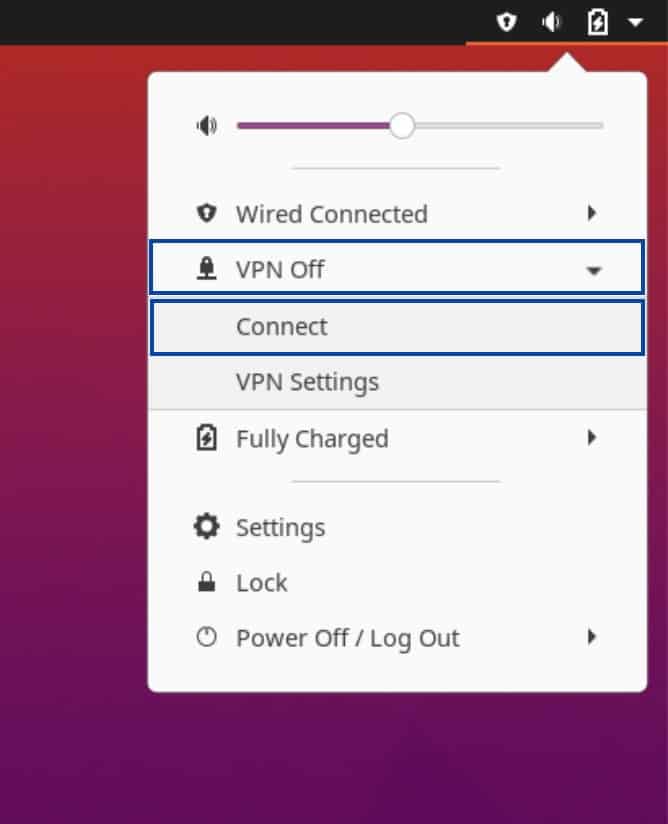
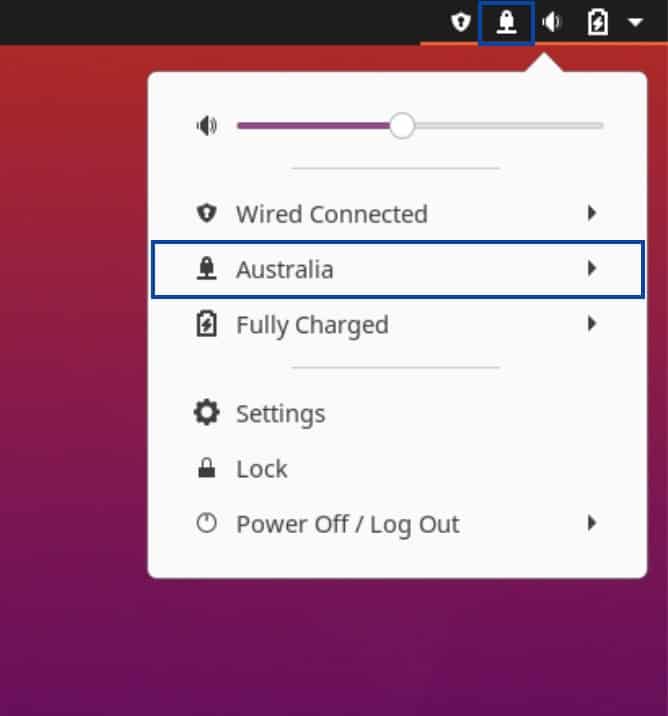
- Upon successful connection, you’ll see a new VPN icon at the top right of the Desktop. Clicking the VPN icon displays the status of your VPN connection.
- You can verify that your IP address has been changed by using the Comparitech IP Address Check Tool.
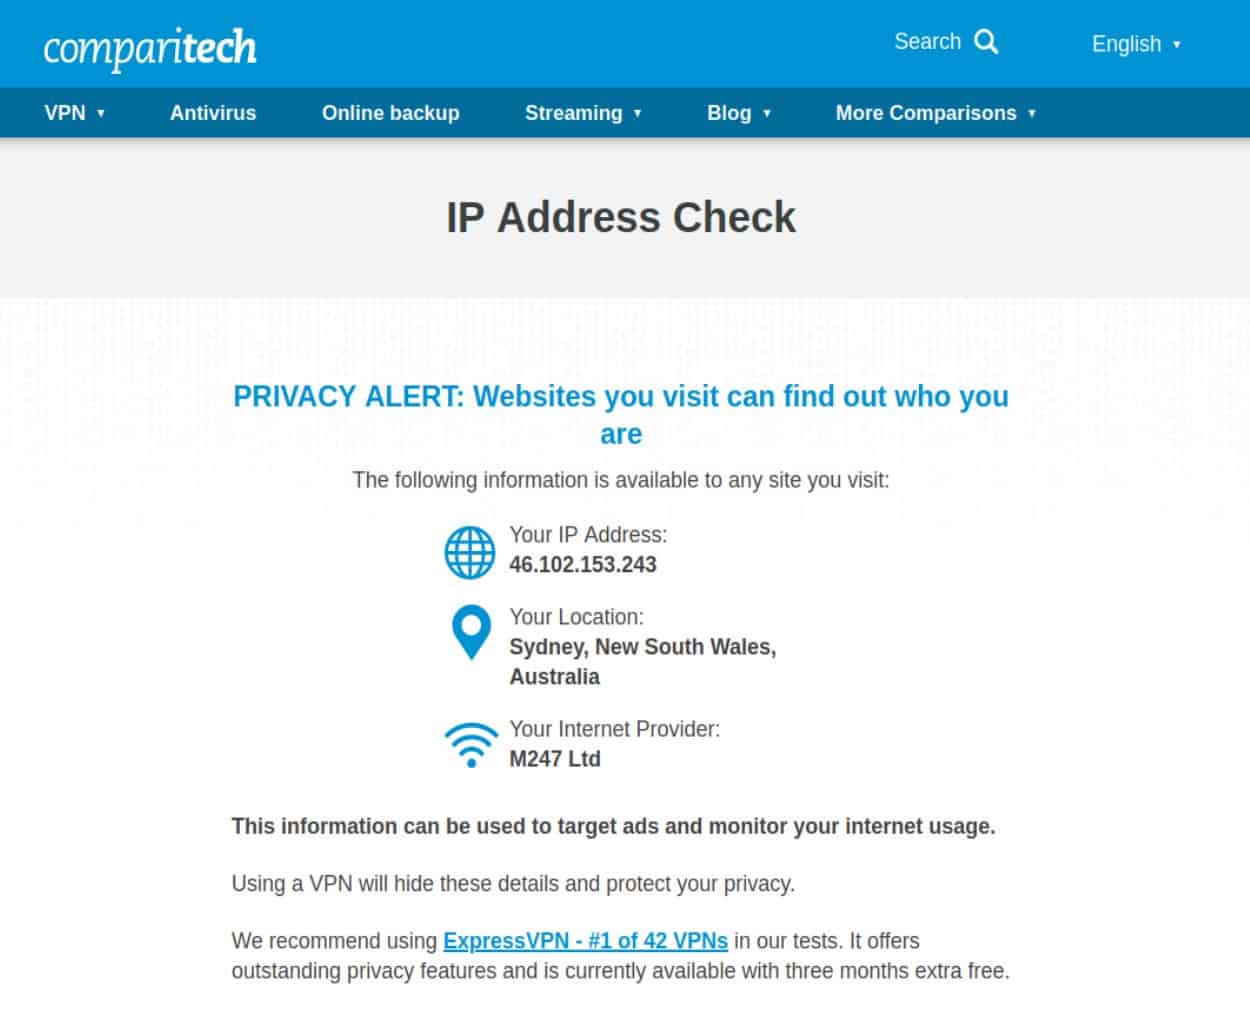

We can see that I now have an Australian IP address.
We just went through the automatic OpenVPN conection configuration. But you can also create your connection manually. Going through the manual configuration steps can help you if something goes wrong and you need to troubleshoot.
Configuring an OpenVPN connection manually
To create a manual connection, the same OpenVPN configuration files are required.
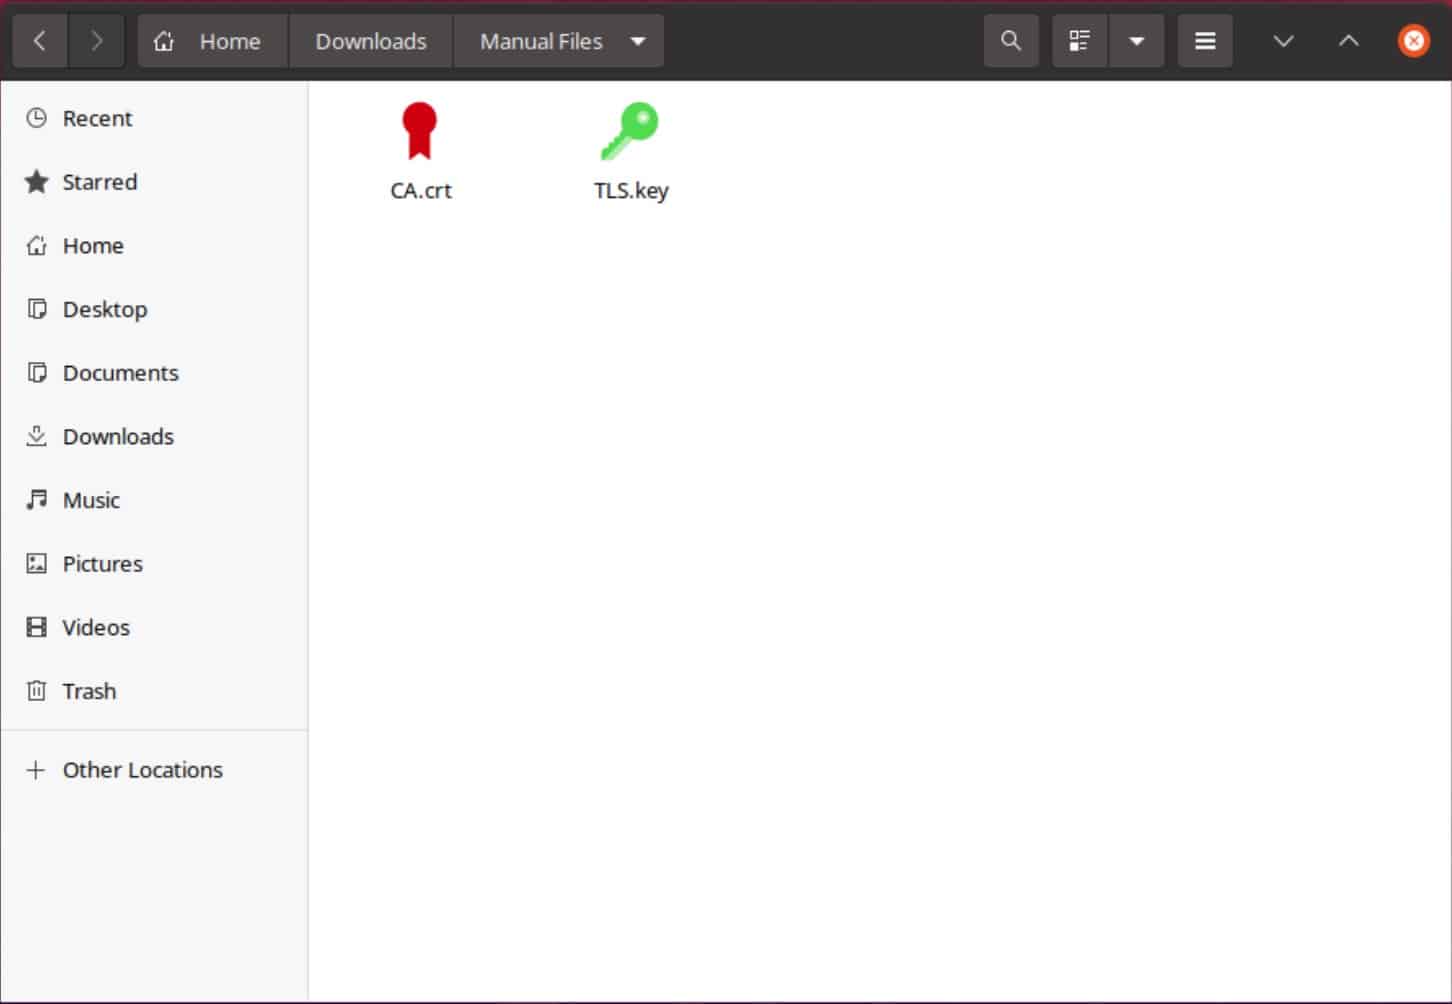
Once you’ve downloaded the .ovpn files, you’re going to need to create individual files for your CA certificate and your TLS key (if required).
- The CA certificate: The VPN provider’s Certificate Authority validates the connections to its VPN servers. To set up a VPN client in Ubuntu Linux, you’re going to need your provider’s CA certificate. It looks like this:

- The TLS key: Some VPN providers also require a TLS key to initiate a client connection to their servers. It is also referred to as a static key. If your VPN provider requires a static key to establish an OpenVPN connection, you’ll need that too. Here’s what it looks like:

All of these pieces of information can be found in the .ovpn configuration files. The images above should help you out if you’re not sure what each of them looks like. Once you’ve found the in the .ovpn file, copy each of them to a text file and then save the text files with the following extensions:
- CA certificate – .crt extension
- TLS key – .key extension
Here’s how my files look:
We’re going to need more than just the CA certificate and the TLS key to configure the VPN connection manually. But the OpenVPN configuration files also contain everything that’s required.
Let’s start.
- From the Desktop, click any of the icons at the top right of the screen. From the options window that appears, select Wi-Fi Connected or Wired Connected, based on your connection type. Then, select Wi-Fi Settings or Wired Settings. The Settings/Network Manager page is displayed.
- Click the + to the right of VPN. The Add VPN window is displayed.

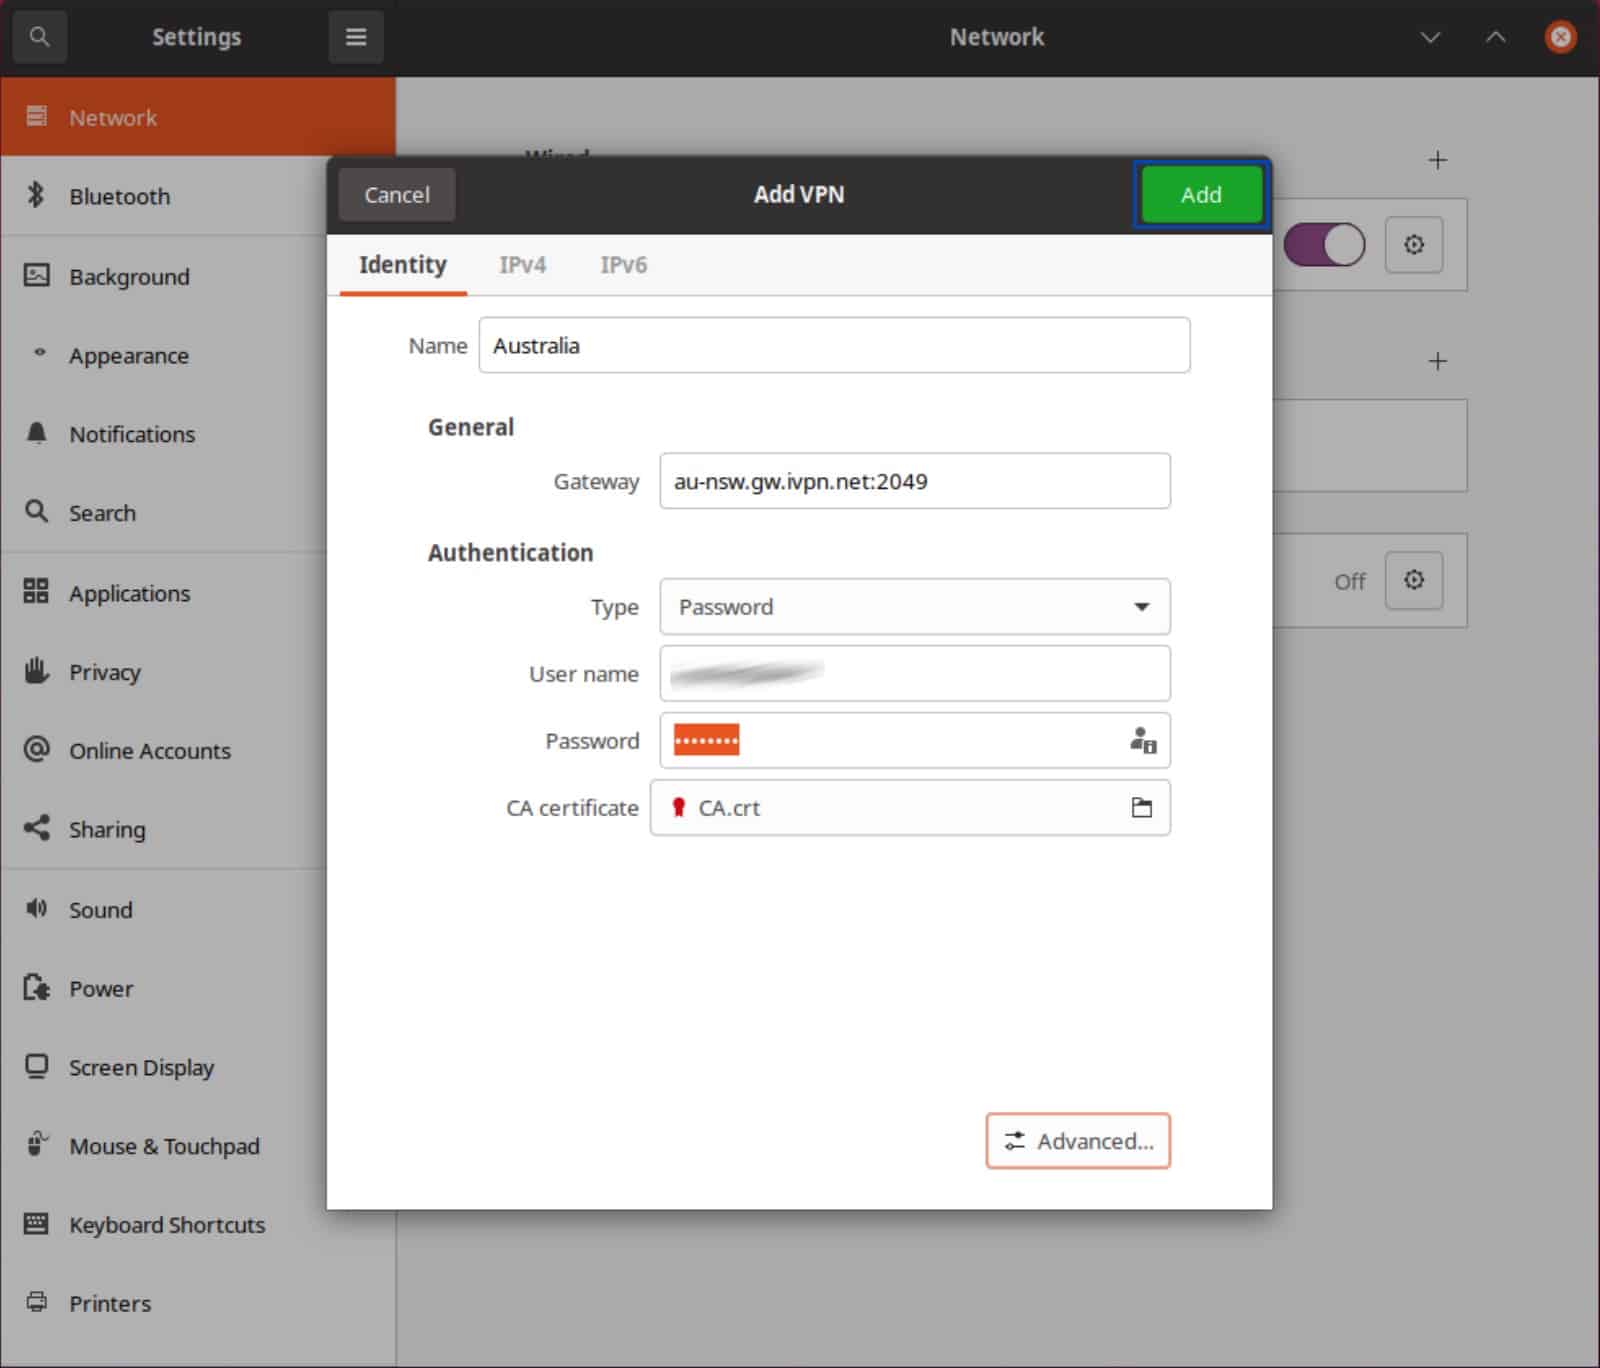
- Double-click OpenVPN. The Settings window for your new VPN connection is displayed.

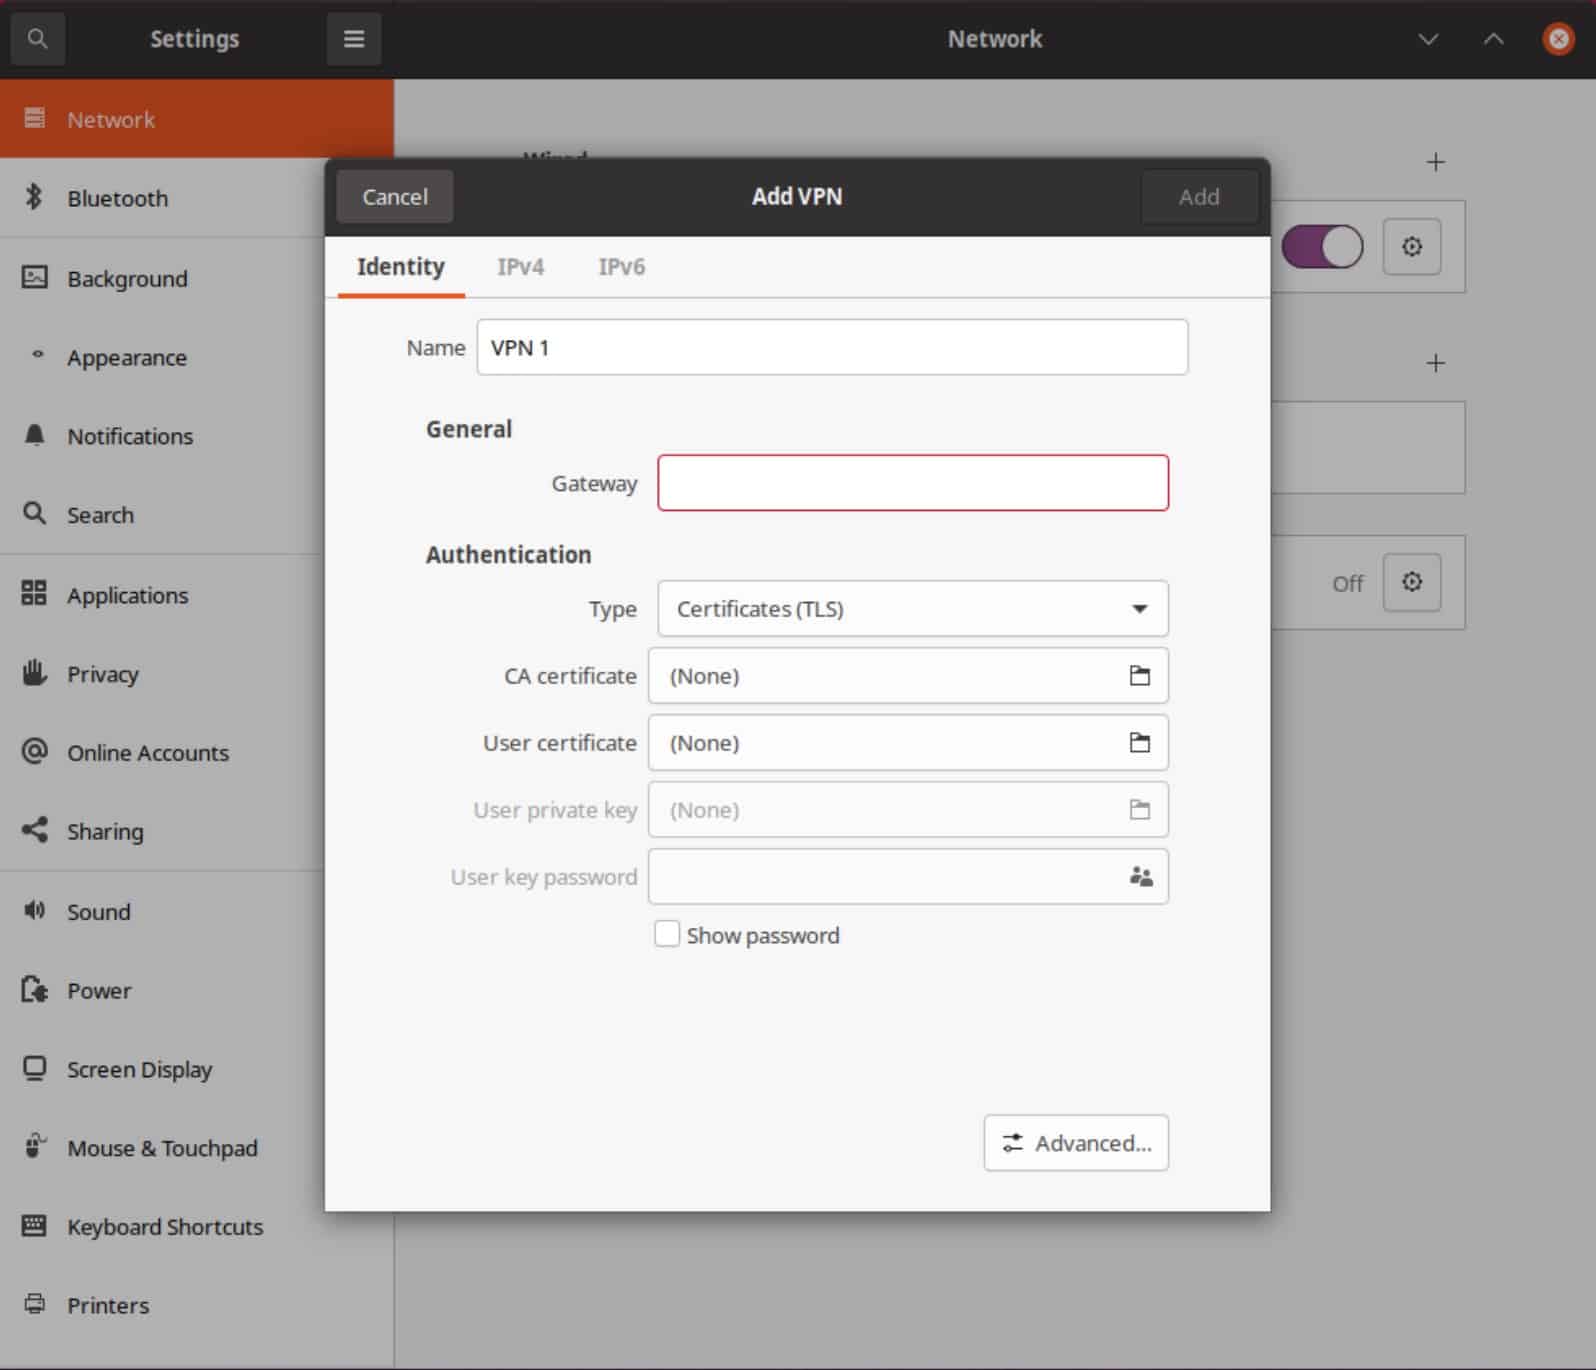
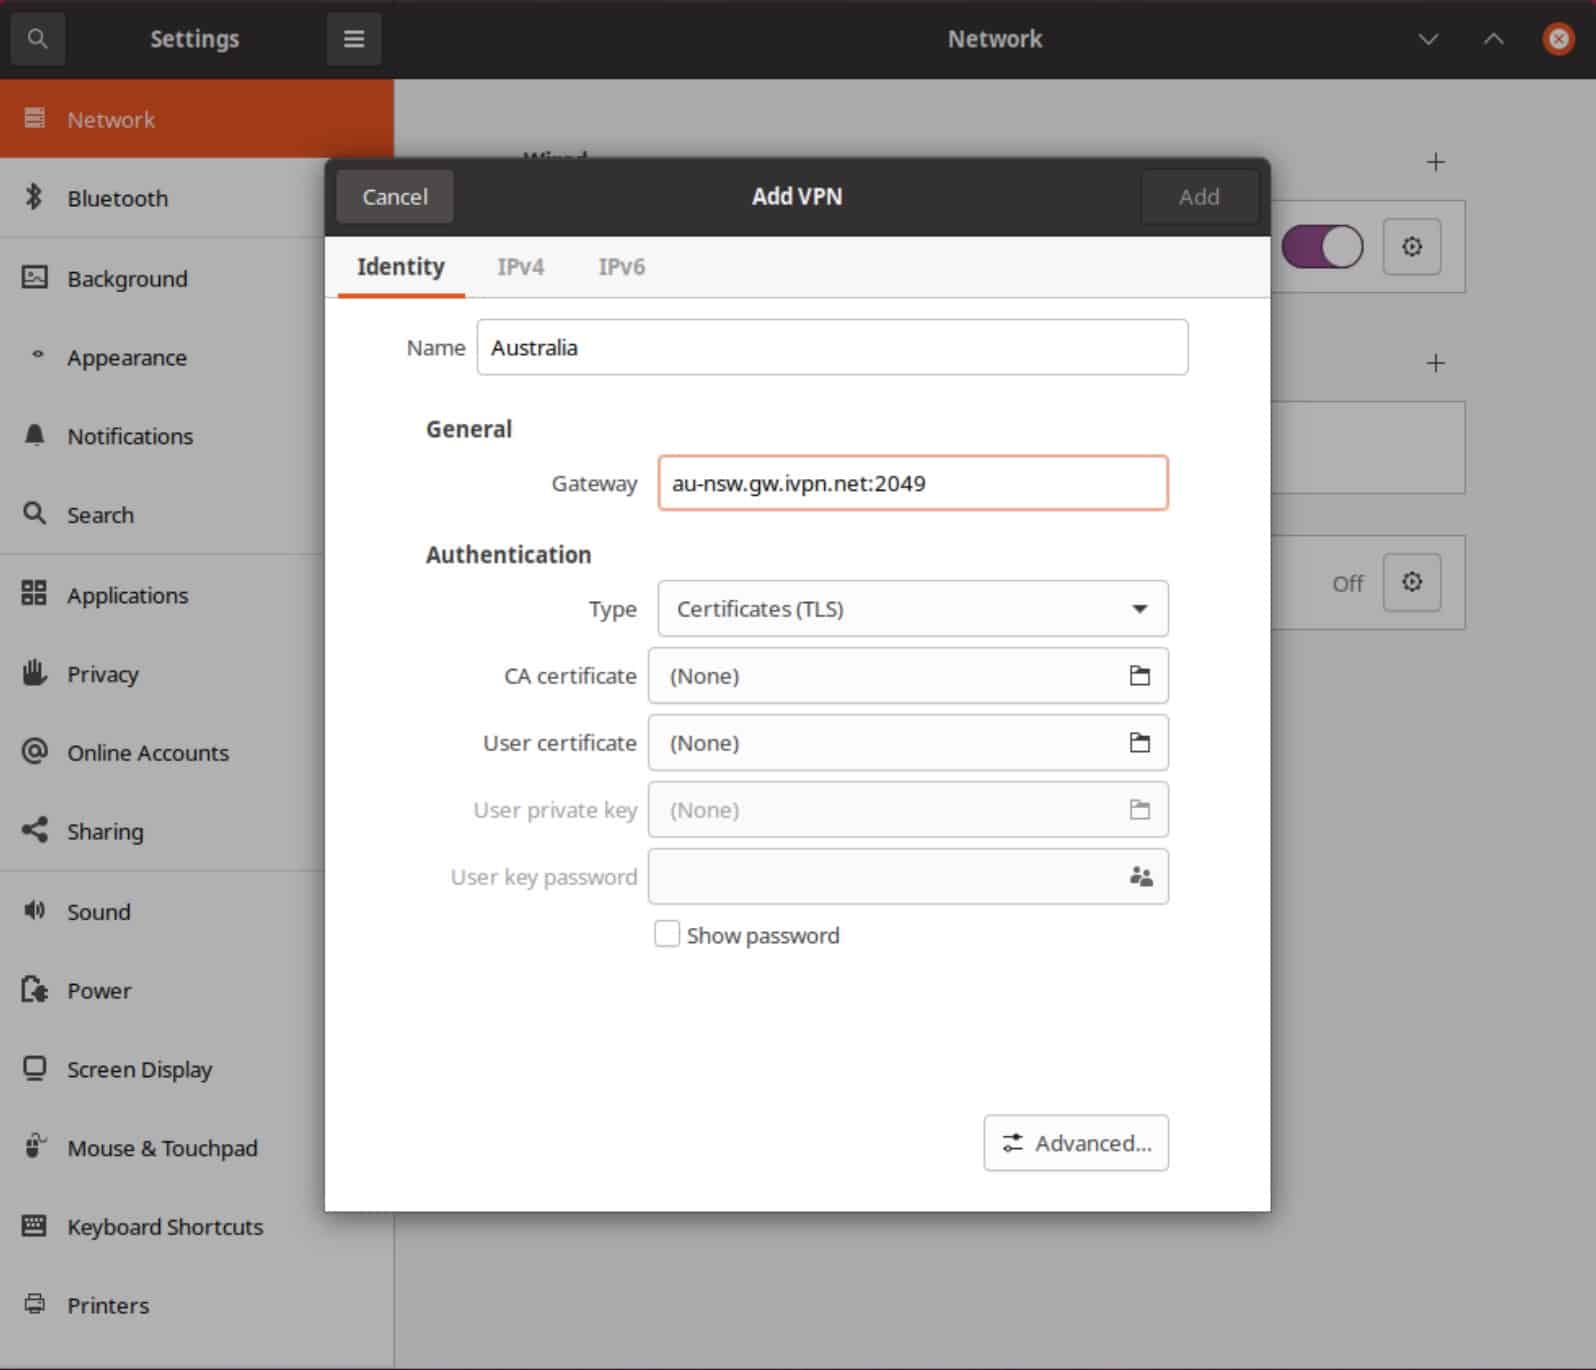
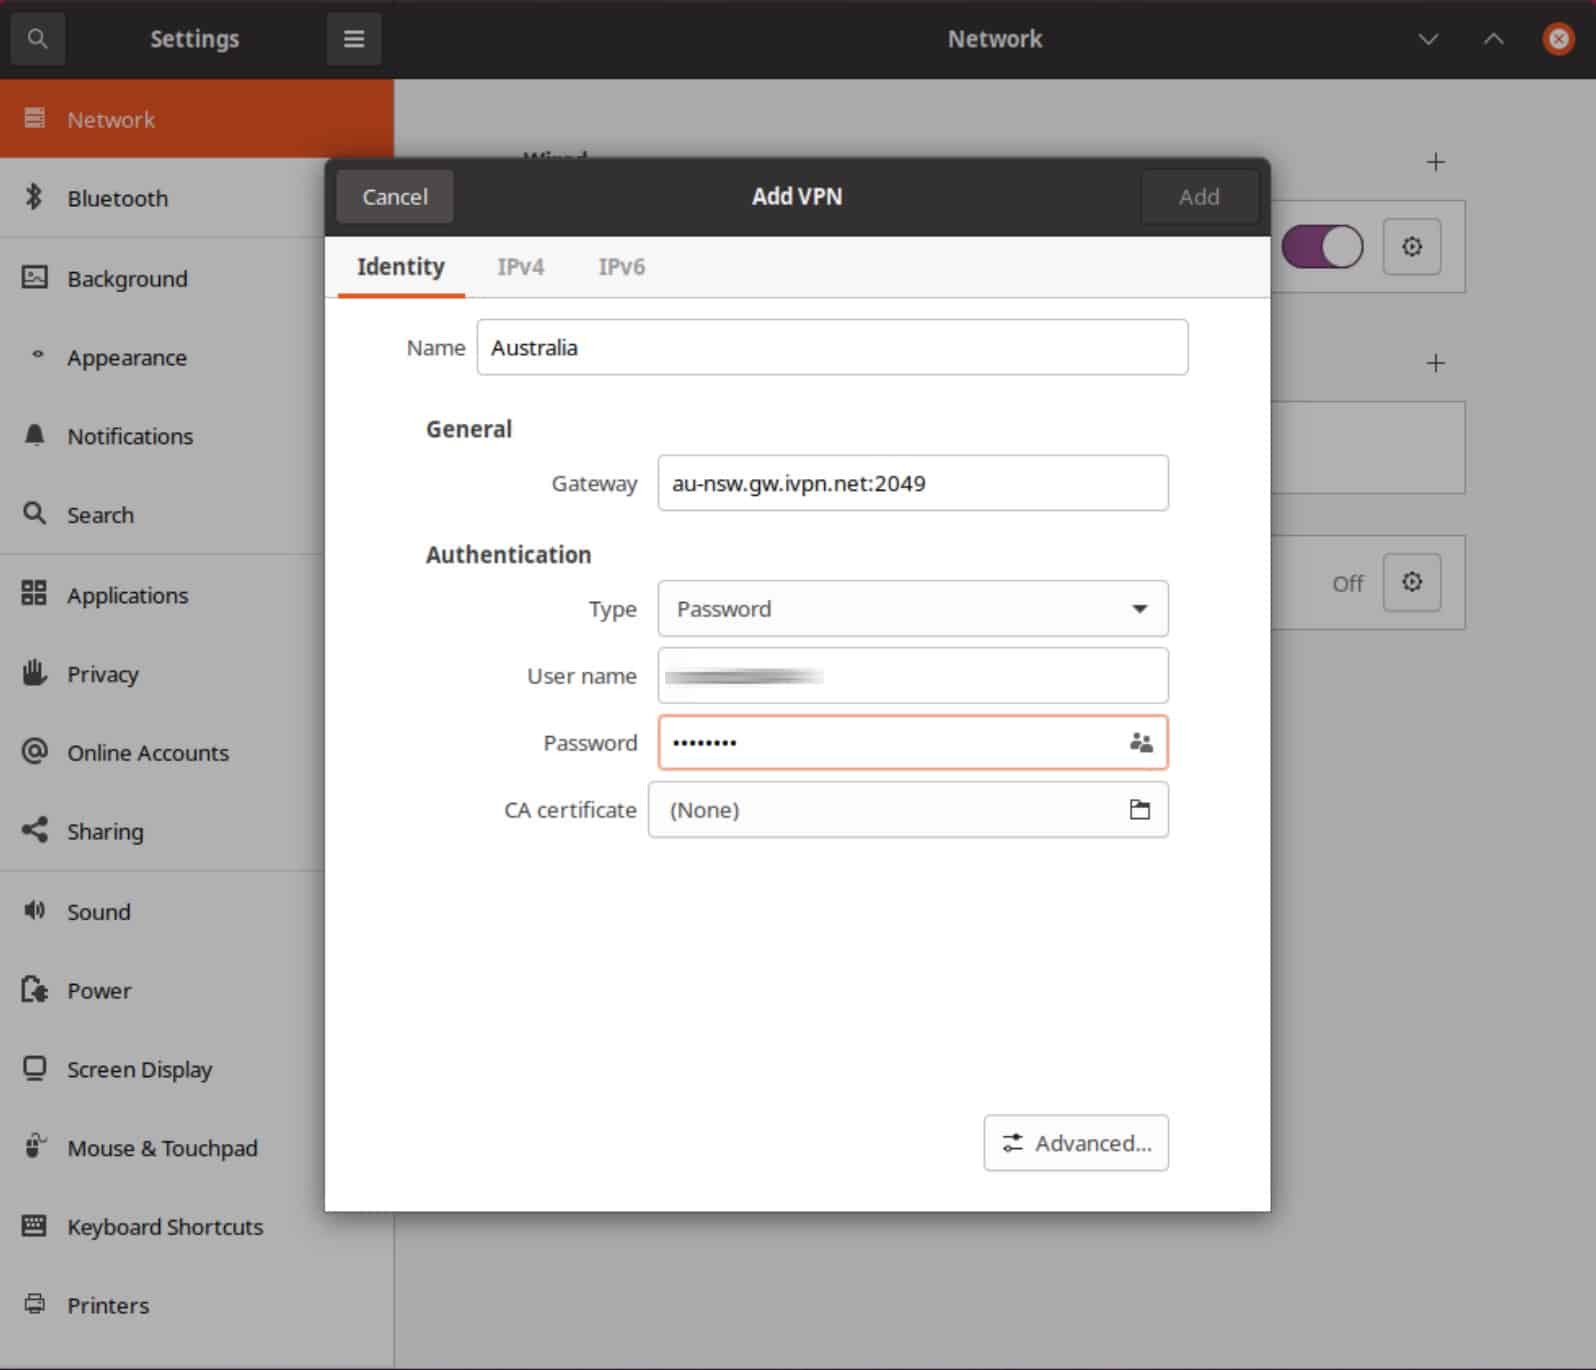
- Give the connection a name and enter the VPN server hostname or IP address in the Gateway field, followed by a colon and the port number. vpnserver.com:2049, for example.

- Under Authentication, set the Type field to Password. Enter your username and password and click Save. If your provider only requires a username, a client identifier, or an account number, and doesn’t require a password, just type anything in the password field. Don’t leave it blank.

- As above, by clicking the icon to the right of the password field, you can select The password is not required but in my experience, it still prompts you for a password regardless of whether or not this option is selected.

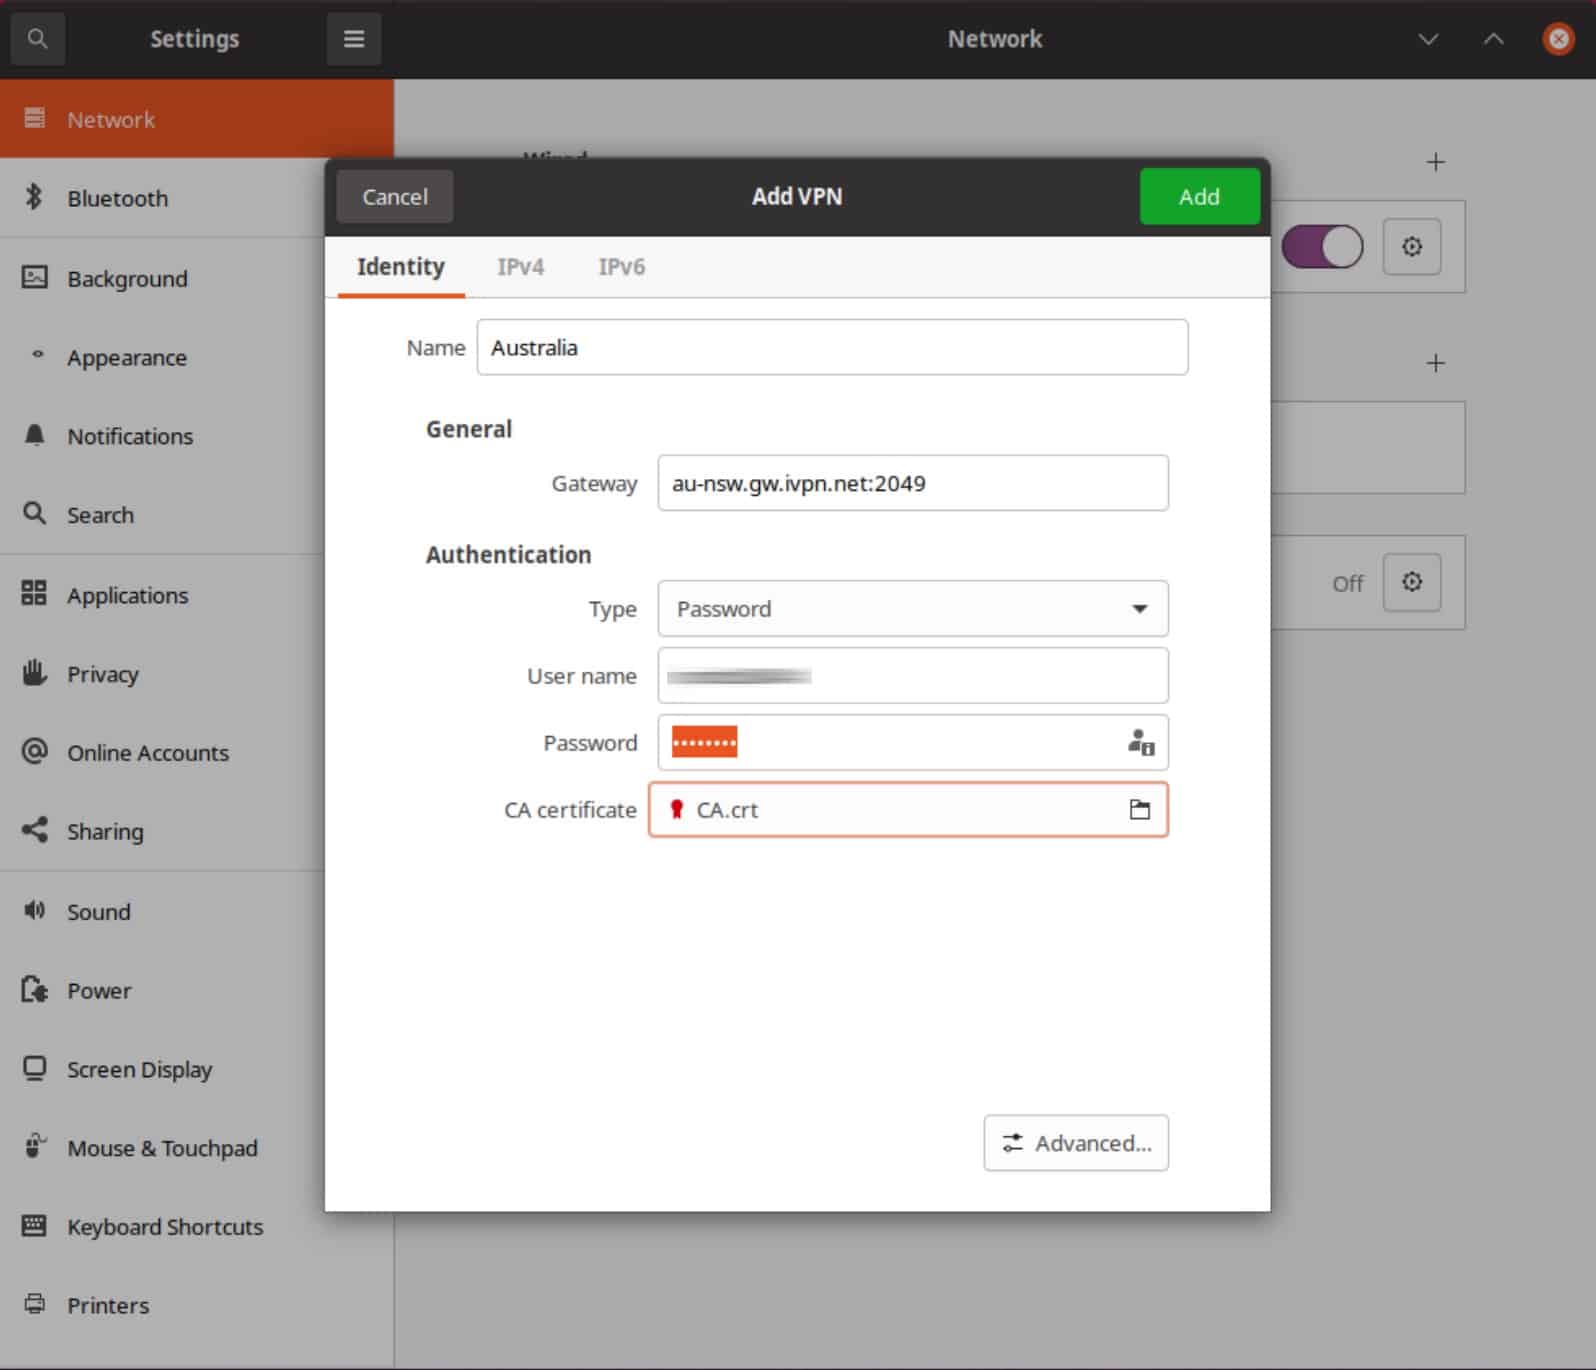
- Click the CA certificate field. The file browser appears. Navigate to the CA.crt file you created earlier and select it.

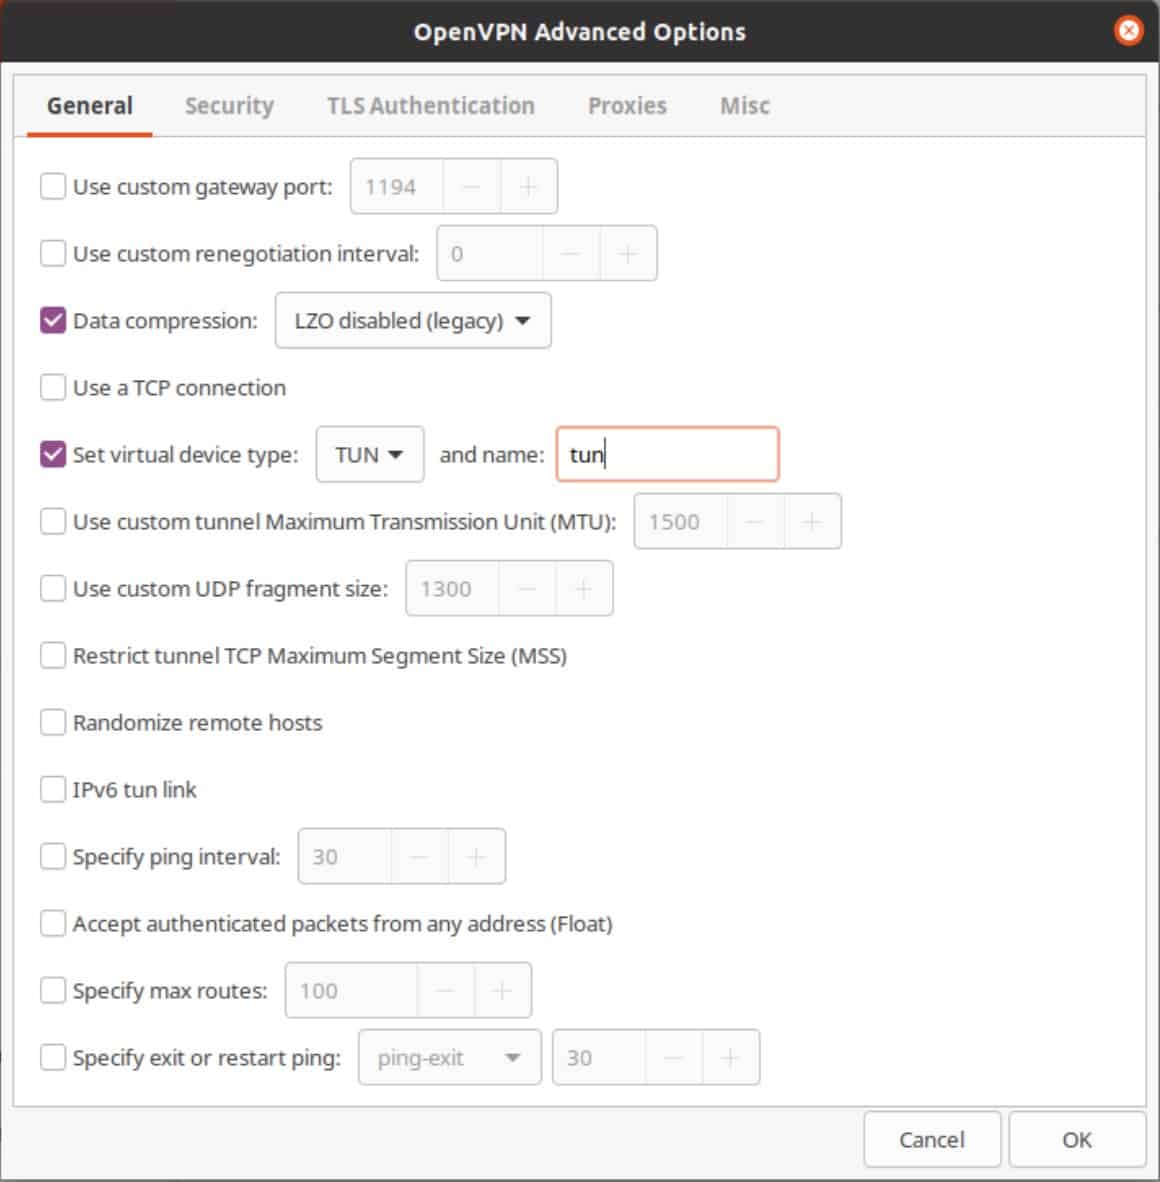
- Click the Advanced button. The advanced options are displayed.

- If your VPN provider uses data compression, tick Data compression and select the type of compression from the drop-down menu.
- Tick Set virtual device type, leave it set to TUN, and set the name to tun.
- Go to the Security tab.

- If your VPN provider supports different encryption ciphers, you can manually select your cipher here. If not, leave it to Default.
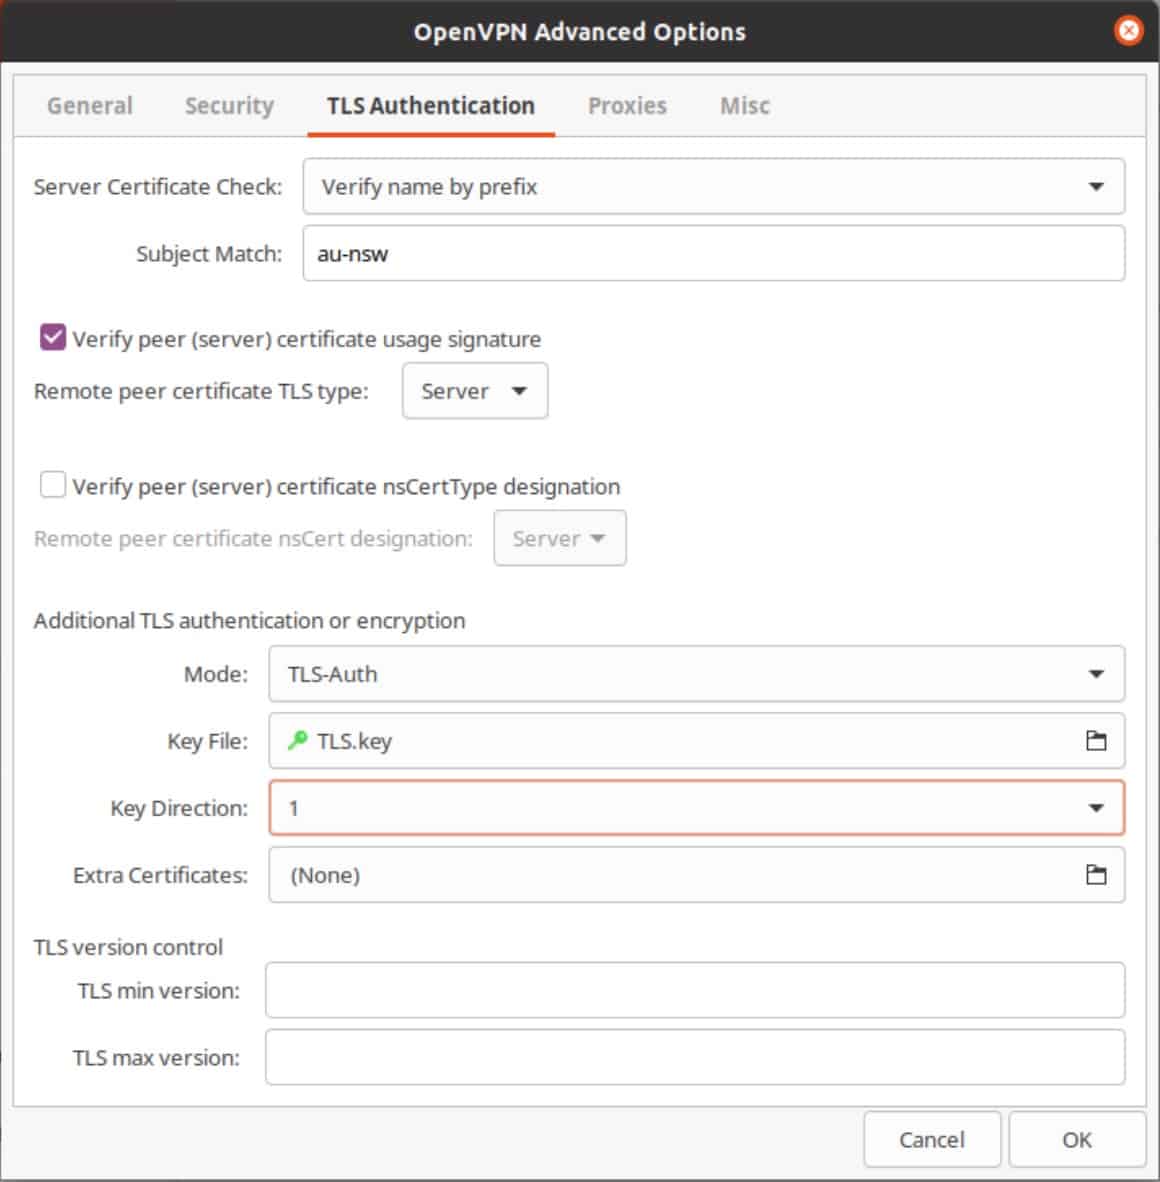
- Go to the TLS Authentication tab. Setting the TLS Authentication options is not required if your VPN provider doesn’t use TLS authentication and does not provide a TLS key.

- Select your provider’s Server Certificate Check method and enter the Subject Match. This is found in the .ovpn configuration file.
- Tick Verify peer (server) certificate usage signature and leave the setting to Server.
- Under Additional TLS authentication or encryption, select either TLS-Auth or TLS-Crypt, based on the options supported by your VPN provider.
- Click the Key File field. The file browser appears. Navigate to the TLS.key file you created earlier and select it.
- Click the Key Direction field and select 1 from the drop-down menu.
- Click OK. You’re taken back to the main Settings window for your VPN connection.
- Click Add. Your OpenVPN connection is now configured. Close the Settings/Network Manager window.

- To enable your VPN new connection, click any of the icons at the top right of the Desktop. Select VPN Off and Connect to turn your VPN connection on.
- Upon successful connection, you’ll see a new VPN icon at the top right of the Desktop. Clicking the VPN icon shows you’re connected to the VPN.
- You can verify that your IP address has been changed by using the Comparitech IP Address Check Tool.


So you can now connect to your VPN provider over Linux, using the Network Manager. And you can add as many connections as you want. When you want to connect, simply choose the server you want to connect to and toggle it on from the Network Manager.
However, there’s still one more step to complete in order to secure your traffic. You want to make sure that your traffic doesn’t leak out unencrypted if your VPN disconnects. So we’re going to create a VPN kill switch for our connection, using iptables. Iptables is a firewall for Linux distributions.
To do this, we’re going to be using the terminal window to run some commands. If you’re new to Linux, the Terminal might seem scary at first but learning to use it will greatly help you in mastering your Linux Fu.
Here’s a good article to read if you’d like to learn more about iptables and how to use it.
Configuring a VPN kill switch with iptables
Usually, native VPN client apps include a kill switch. A kill switch blocks all traffic from exiting your device if the VPN connection ever drops. A kill switch enhances your security and privacy when using a VPN.
In this section, we’re going to use iptables, a well-known Linux firewall, to configure our own VPN kill switch.
Installing iptables-persistent
- Disconnect the VPN.
- Launch the Terminal. We’re going to start by installing iptables-persistent.
- In the Terminal window type:
sudo apt update. Enter your password and press Enter. This will update your package repositories. - Type:
sudo apt install iptables-persistent. Enter your password if prompted. You will be prompted to typeYorNto install the package or to abort the installation. TypeY. The package is installed.
The iptables rules are saved in two files, one for IPv4 rules and one for IPv6 rules. The files are:
- /etc/iptables/rules.v4
- /etc/iptables/rules.v6
We’re going to start with our IPv4 rules.
Configuring an IPv4 VPN kill switch
- Type:
sudo nano /etc/iptables/vpn-rules.v4to create a new IPv4 rules file for our VPN. - Enter your password if prompted. An empty file is displayed.
- Copy the following to your file, but insert the IPv4 address of your VPN server instead of
<VPN server IPv4 address>and the VPN server’s port instead of<VPN server port>:
*filter
-A OUTPUT -o tun0 -j ACCEPT
-A OUTPUT -d <VPN server IPv4 address> --dport <VPN server port> -j ACCEPT
-A OUTPUT -j DROP
COMMIT
- Press Ctrl+X to save and exit. Type
Ywhen asked to save the file.
What these rules do is allow traffic out from the VPN interface, allow a connection to the VPN server via the default route, and then block everything else.
Configuring an IPv6 VPN kill switch
If your VPN provider supports IPv6 (most don’t), you can do the same thing for IPv6 traffic.
- In the Terminal window, type:
sudo nano /etc/iptables/vpn-rules.v6to create a new IPv6 rules file for our VPN. - Enter your password if prompted. An empty file is displayed.
- Copy the following to your file, but insert the IPv6 address of your VPN server instead of
<VPN server IPv6 address>and the VPN server’s port instead of<VPN server port>:
*filter
-A OUTPUT -o tun0 -j ACCEPT
-A OUTPUT -d <VPN server IPv6 address> --dport <VPN server port> -j ACCEPT
-A OUTPUT -j DROP
COMMIT
- Press Ctrl+X to save and exit. Type
Ywhen asked to save the file.
Dropping IPv6 traffic
If your VPN provider doesn’t support IPv6, I recommend creating rules to drop that traffic altogether.
- In the Terminal window, type:
sudo nano /etc/iptables/vpn-rules.v6to create a new IPv6 rules file for our VPN. Enter your password if prompted. An empty file is displayed. - Copy the following to your file:
*filter
:INPUT DROP [0:0] :FORWARD DROP [0:0] :OUTPUT DROP [0:0]
COMMIT
Now, all we need to do is to load our new rules files so the iptables will apply them.
Loading IPv4 firewall rules
In the Terminal window, type: sudo iptables-restore > /etc/iptables/vpn-rules.v4
Loading IPv6 firewall rules
In the Terminal window, type: sudo ip6tables-restore > /etc/iptables/vpn-rules.v6
You’ve now configured a working OpenVPN client connection in Ubuntu Linux. You can enable and disable your connection easily, using the Network Manager toggle from the top right of the Desktop.
You’ve also configured a VPN kill switch, using iptables. If your VPN connection ever drops, all outgoing and incoming traffic will be blocked and won’t go out to the internet unencrypted.


