
An Access Control List (ACL) is a crucial security feature used in networking to define and manage the flow of traffic within a network. It is a set of rules that determine which network packets are allowed or denied based on various criteria, such as IP address, protocol type, or port number. ACLs are typically implemented in routers, firewalls, and switches to control access to network resources, thereby enhancing network security and efficiency.
ACLs work by filtering traffic at the network layer, either inbound or outbound, to ensure that only authorized users and devices can access specific resources. By applying ACLs, network administrators can enforce policies that restrict access to sensitive data, prevent unauthorized network activity, and protect the integrity of the network infrastructure.
ACLs are highly customizable and can be used to allow or deny traffic from particular IP addresses, subnets, or even specific services based on defined criteria. Here are the most common use cases for Access Control Lists (ACLs) in networking:
- Restricting Access to Sensitive Resources: ACLs can be used to limit access to certain network devices or data, allowing only authorized IP addresses or subnets to connect to critical systems, such as servers or databases.
- Traffic Filtering Between Subnets: ACLs can be applied to control traffic between different subnets or VLANs, ensuring that only necessary communications are permitted while blocking unauthorized traffic.
- Preventing Network Attacks: ACLs help mitigate certain types of network attacks, such as Distributed Denial of Service (DDoS) or unauthorized access attempts, by denying traffic from suspicious or untrusted IP addresses.
- Enforcing Security Policies: ACLs enable the enforcement of corporate security policies, such as allowing only specific users or devices to access particular services, like email or FTP, while blocking others.
- Bandwidth Management and Traffic Prioritization: ACLs can be used to prioritize traffic for critical applications by permitting high-priority data flows while restricting or limiting lower-priority traffic to ensure optimal network performance.
This guide will provide a comprehensive overview of ACLs, exploring their types, configuration methods, and use cases in real-world networking environments. You will learn how to create and apply ACLs to enhance your network’s security posture and streamline traffic management. Whether you are a network administrator or a security professional, understanding ACLs is essential to ensuring that your network remains both secure and efficient, protecting against unauthorized access and optimizing resource usage.
For the purpose of this article, we’re going to be focusing on the access list applied to interfaces because this is the most common use case for an access list. For instance, you can configure an access list on a firewall interface to allow only certain hosts to access web-based resources on the Internet while restricting others. With the right combination of access lists, security managers gain the power they need to effectively enforce security policies.
Operating systems, applications, firewall, and router configurations are dependent upon access control lists in order to function properly. When you create an access list on a router, it’s inactive until you tell that router what to do with it, and which direction of traffic you want the access list applied to—inbound or outbound.
When an access list is applied to inbound packets on an interface, those packets are processed through the access list before being routed to the outbound interface. Any packets that are denied won’t be routed because they’re discarded before the routing process is invoked. When an access list is applied to outbound packets on an interface, those packets are routed to the outbound interface and then processed through the access list before being queued.
Types of access lists
There are two main types of access lists: Standard ACL and Extended ACL.
Standard ACL
Standard ACLs are the oldest type of access control lists. They are used to filter network traffic by examining the source IP address in a packet. You create a standard IP access list by using the access-list numbers ranging from 1–99 or 1300–1999 (expanded range). By using these numbers, you’re telling the router that you want to create a standard IP access list, so the router will expect syntax specifying only the source IP address.
Wildcards are used with access lists to specify an individual host, a network, or a certain range of networks. The wildcard mask tells the router which parts of an IP address need to match the access list and which do not. It then grants everything from that network either all or no access.
Standard ACLs do not care about where the packets are going to, rather, they focus on where they’re coming from. When you need to decide based on both source and destination addresses, a standard access list won’t allow you to do that since it only decides based on the source address. The standard ACLs’ inability to look for a destination address renders it ineffective in such scenarios. This is where Extended ACL comes into play.
Extended ACL
Extended ACLs extend the functionalities of standard ACLs by looking at not just the source but also the destination. It allows you to specify the source and destination address as well as the protocol and TCP and UDP port numbers that identify them. By using extended access lists, you can effectively allow users access to a physical LAN and stop them from accessing specific hosts—or even specific services on those hosts.
In medium to large enterprises, managing access lists can become difficult and complicated over time, especially as the quantity of numbered ACLs grows. In such scenarios, standard and extended access lists become unsuitable. This brings us to the concept of a named access list.
Named ACL
Named access lists are just another way to create standard and extended access lists. It allows you to use names to both create and apply either standard or extended access lists.
Named ACLs allows standard and extended ACLs to be given names instead of numbers. They are more convenient than numbered access lists because you can specify a meaningful name that is easier to remember and associate with a task. You can reorder statements or add statements to a named access list. The name can be meaningful and indicative of the list’s purpose. This is particularly important for documentation and maintenance purposes.
How access control lists work
Access list statements work pretty much like packet filters used to compare packets; or conditional statements such as if-then statements in computer programming. If a given condition is met, then a given action is taken. If the specific condition isn’t met, nothing happens and the next statement is evaluated.
There are two key points on a router that a filtering decision has to be made as packets pass through the router:
- As a packet arrives in the router interface (Entrance)
- As a packet leaves the router interface (Exit)
ACL conditions can be applied to these locations. When ACL conditions are applied at the entrance to the router, it is called an inbound filter. When it is applied at the exit point, it is called an outbound filter.
Inbound ACLs filter the traffic before the router decides-—and must be placed in the entrance interface. Outbound ACLs filter the traffic after the router decides-—and must be placed in the exit interface.
An ACL filter condition has two actions: permit and deny. We can permit certain types of traffic while blocking others, or we can block certain types of traffic while allowing others. Once applied, ACL will filter every packet passing through the interface. This causes the firewall or router to analyze every packet passing through that interface in the specified direction and take the appropriate action.
There are a few important rules that a packet follows when it’s being compared with an access list:
- It’s always compared with each line of the access list in sequential order starting with the first line of the access list, through to the second and third line as the case may be.
- It’s compared with lines of the access list only until a match is made. Once the packet matches the condition on a line of the access list, the packet is acted upon and no further comparisons take place.
- There is an implicit “deny” at the end of each access list—this means that if a packet doesn’t match the condition on any of the lines in the access list, the packet will be discarded.
Basic networking concepts: What you need to know
Before you can fully master the art of configuring and implementing access control lists, you must understand two important networking concepts: the Subnet mask and Wildcard mask.
Subnet mask: Subnet masks are used by a computer to determine if any computer is on the same given network or on a different network. An IPv4 subnet mask is a 32-bit sequence of ones (1’s) followed by a block of zeros (0’s). The ones designate the network prefix, while the trailing block of zeros designate the host identifier.
In a subnet mask, it is the network bits-—the ones (1’s) that we most care about. In VLSM subnetting or CIDR notation, we use /24, which simply means that a subnet mask has 24 ones, and the rest are zeros.
| Binary Notation | CIDR Notation | Decimal Notation | |
|---|---|---|---|
| IP address | 11000000.00000000.00000010.10000010 | /24 | 192.0.2.130 |
| Subnet mask | 11111111.11111111.11111111.00000000 | /24 | 255.255.255.0 |
Table 1.0 IP address and subnet mask in binary and decimal format
Wildcard mask: A wildcard mask is very similar to a subnet mask except that the ones and the zeros are flipped. It is the complete opposite of a subnet mask. Wherever there is a one (1), you replace it with a zero (0), and wherever there’s a zero (0), you replace it with a 1 (one).
To calculate your wildcard mask from the subnet mask, just subtract your subnet mask from 255.255.255.255. For instance, if you are to subtract the /24 subnet mask from the above address, i.e.: 255.255.255.255 – 255.255.255.0 = 0.0.0.255. As you can see, you’d arrive at a wildcard mask of 0.0.0.255. If you are configuring an access list with an IP address that has a CIDR notation, you should use a wildcard mask.
Table 2.0 IP address and subnet mask in binary and decimal format
Please note the following when using a wildcard:
- Whenever a zero (0) is present in a wildcard, it means that the octet in the address must match exactly. For example, using 172.16.30.0 0.0.0.255 tells the router to match up the first three octets exactly.
- Whenever a 255 is present in a wildcard, it means that the octet in the address can be any value. For example, using 172.16.30.0 0.0.0.255 tells the router that the fourth octet can be any value.
- The wildcard is always one number less than the block size. For example, If you used a block size of 8, the wildcard would be 7.
How to create a standard access list
With the above understanding, we will now show you how to create a standard access list. Now here is the syntax used for creating a standard access list:
Router (config)# access-list (1-99) (permit | deny) source-addr (source-wildcard)
The breakdown of the different parts of the syntax is as follows:
- <1-99 or 1300-1999> Specifies the standard ACL IP number range
- Permit Specifies packet to forward (to permit the configured source IP address traffic)
- Deny Specifies packets to reject (i.e. (to deny the configured source IP address traffic)
- Source-addr The source IP address that must be matched
- Source-wildcard The wildcard mask to be applied to the previously configured IP address to indicate the range.
| Binary Notation | CIDR Notation | Decimal Notation | |
|---|---|---|---|
| IP address | 11000000.00000000.00000010.10000010 | /24 | 192.0.2.130 |
| Subnet mask | 11111111.11111111.11111111.00000000 | /24 | 255.255.255.0 |
| Wildcard mask | 00000000.00000000.00000000.11111111 | /24 | 0.0.0.255 |
Table 2.0 IP address and subnet mask in binary and decimal format
Please note the following when using a wildcard:
- Whenever a zero (0) is present in a wildcard, it means that the octet in the address must match exactly. For example, using 172.16.30.0 0.0.0.255 tells the router to match up the first three octets exactly.
- Whenever a 255 is present in a wildcard, it means that the octet in the address can be any value. For example, using 172.16.30.0 0.0.0.255 tells the router that the fourth octet can be any value.
- The wildcard is always one number less than the block size. For example, If you used a block size of 8, the wildcard would be 7.
How to create a standard access list
With the above understanding, we will now show you how to create a standard access list. Now here is the syntax used for creating a standard access list:
Router (config)# access-list (1-99) (permit | deny) source-addr (source-wildcard)
The breakdown of the different parts of the syntax is as follows:
- <1-99 or 1300-1999> Specifies the standard ACL IP number range
- Permit Specifies packet to forward (to permit the configured source IP address traffic)
- Deny Specifies packets to reject (i.e. (to deny the configured source IP address traffic)
- Source-addr The source IP address that must be matched
- Source-wildcard The wildcard mask to be applied to the previously configured IP address to indicate the range.
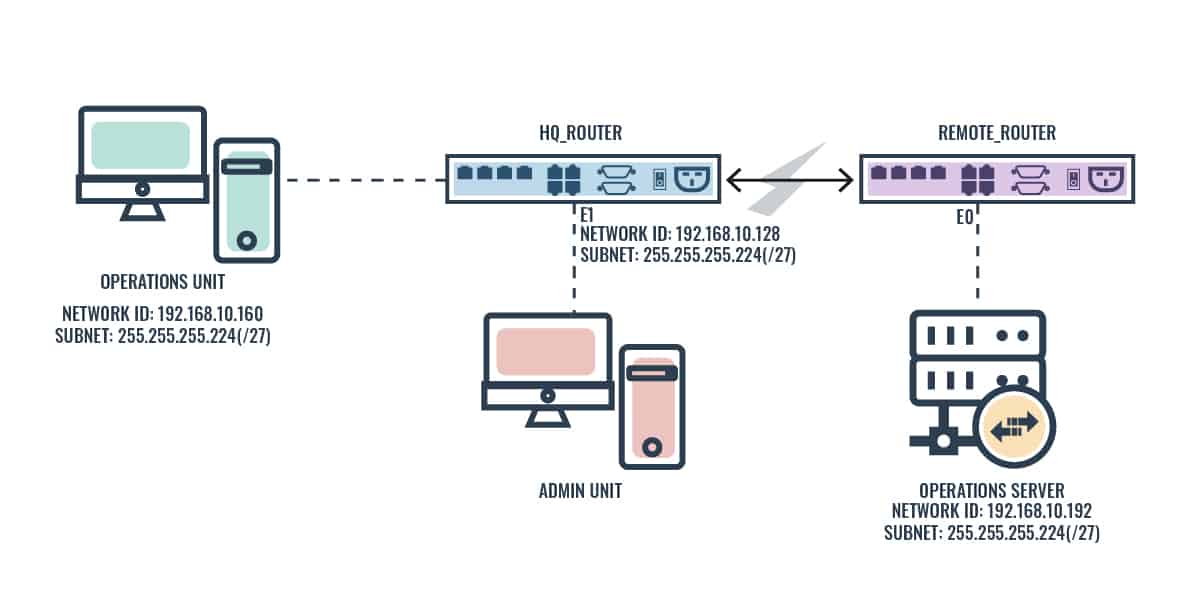
Figure 1.0 above shows an internetwork of two routers with three LANs including one serial WAN connection for a logistics company. As the network engineer for this company, you have been asked to use a standard access list to prevent users in the Admin unit from accessing the Operations server attached to the Remote_Router while allowing all other users access to that LAN.
First and foremost, you need to figure out the access list wildcard (which is basically the inverse of the subnet mask) and where to place the access list. Standard access lists, by the rule of thumb, are placed closest to the destination—in this case, the E0 interface of the Remote_Router. So in order to achieve this implementation, we will configure an access control list and apply it on the E0 outbound interface of the Remote_Router. Here are the required parameters for this configuration.
- Network ID: 192.168.10.128
- Wildcard: 255.255.255.255 – 255.255.255.224 = 0.0.0.31
The table below is a breakdown of the access-list commands to be used for this task.
| Command | Remark |
|---|---|
| Remote_Router#config t | Enter global configuration mode |
| Remote_Router(config)#access-list 10 deny 192.168.10.128 0.0.0.31 | Deny Admin LAN access to Operations server |
| Remote_Router(config)#access-list 10 permit any | Allow everyone else |
Remote_Router(config)#interface ethernet 0 | Enter interface configuration mode |
| Remote_Router(config-if)#ip access-group 10 out | Apply access list is on the interface as an outbound list |
| Confirm access list entry | |
| Remote_Router#show access-lists | Display all configured access list |
| Remove access list | |
| Remote_Router(config)#no access-list 10 | Remove the entire access list entry |
| Remote_Router(config)#end | Return to the previous exec mode |
| Remote_Router#sh access-lists | Confirm if the access list has been removed |
| Remote_Router# | Nothing to display, the access list removed |
How to create an extended access list
Next we will now show you how to create an extended access list. Here’s the command syntax for configuring an extended numbered access control list:
Router (config)# access-list (100-199) (permit | deny) protocol source-addr (source-wildcard)

(operator operand) destination-addr (destination-wildcard) (operator operand) (established)

Router (config)# access-list {100-199} {permit | deny} protocol source-addr {source-wildcard} {operator operand} destination-addr {destination-wildcard} {operator operand} {established}
The breakdown of the different parts of the above syntax is as follows:
- <100-199 or 2000-2699> Specifies the standard ACL IP number range
- Permit or Deny Specifies whether to permit or deny traffic according to the criteria that follows
- Protocol The protocol type, that is, IP, TCP, UDP, ICMP or other IP-sub protocol
- Source-addr The source IP address that must be matched
- Source-wildcard The wildcard mask to be applied to the previously configured IP address to indicate the range.
- Destination-addr The destination IP address that must be matched
- Destination-wildcard The associated wildcard mask to be applied.
As the network manager for the network shown in Figure 1.0 above, you have been asked to configure an access list that will stop FTP and Telnet access to the Operations server while allowing other protocols.
This task involves the use of an extended access list. In order to achieve this implementation, we will configure an access control list using the FTP and telnet port numbers and apply it on the E0 outbound interface of the Remote_Router. Here are the required parameters for this configuration:
- Network ID: 192.168.10.192
- Wildcard: 255.255.255.255 – 255.255.255.224 = 0.0.0.31
- FTP port number: 21
- Telnet port number: 23
The table below is the breakdown of the access list commands and configurations that can be used to implement this task:
| Command | Remark |
|---|---|
| Remote_Router#config t | Enter global configuration mode |
| Remote_Router(config)#access-list 120 deny tcp any 192.168.10.192 0.0.0.31 eq 21 | Deny FTP access to the Operations server on interface E0 |
| Remote_Router(config)#access-list 120 deny tcp any 192.168.10.192 0.0.0.31 eq 23 | Deny telnet access to the Operations server on interface E0 |
| Remote_Router(config)#access-list 120 permit ip any any | Allow all other packets/protocols |
Remote_Router(config)#interface ethernet 0 | Enter interface configuration mode for E0 |
| Remote_Router(config-if)#ip access-group 120 out | Apply access list on interface E0 as an outbound list |
Conclusion
ACLs can be an effective tool for increasing the security posture of your organization. But always remember that no action will be taken until the access list is applied on an interface in a specific direction.
However, if you are not careful enough, misconfigurations can occur. Any misconfigurations in network access policies on your firewall or router can lead to unwanted network exposure. However, with careful planning and adherence to best practices such as the principle of the least privilege and other important ACL rules, most of those issues can be avoided. Each of these rules has some powerful implications when filtering IP packets with access lists. Therefore bear in mind that creating effective access lists actually takes some practice.
Access control list FAQs
In which configuration would an outbound ACL placement be preferred over an inbound ACL placement?
An outbound ACL should be used for an outbound interface. It will filter packets arriving from multiple inbound interfaces before the packets exit the interface.
What configuration mode must you be in to create a new ACL?
You need to be in privileged EXEC mode in order to create a new ACL. Get to this by entering the command enable.
Which route map configuration command matches routes identified by an ACL or a prefix list?
In order to configure a route map to match an ACL list, you first need to create the route map with the command:
route-map name { permit | deny } [ sequence_number ]
Next, issue the command:
match ip address acl_id [ acl_id ] […] [ prefix-list ]
What is the command syntax to enter IPv6 ACL configuration mode?
You can use IPv6 in an access list and get the router in IPv6 access list configuration mode with the command:
ipv6 access-list name
