Hyper-V is a virtualization technology developed by Microsoft, allowing users to create and manage virtual machines (VMs) on Windows Server and Windows operating systems. Virtualization enables the abstraction of physical hardware, allowing multiple virtual instances (VMs) to run on a single physical machine.
The VMs can run different operating systems or applications, sharing the underlying physical resources like CPU, memory, and storage. This process optimizes resource utilization, enhances flexibility, and reduces hardware costs by enabling the consolidation of workloads.
Virtualization itself refers to the technology that allows one physical machine to host several virtual instances, each operating as though it is running on its own dedicated machine. This is made possible through software that isolates the virtual environments from the underlying physical hardware. Hyper-V is one such platform, providing a layer of abstraction to enable multiple VMs to run on a single host.
The term hypervisor refers to the software or hardware that manages the virtual machines on a physical host. It essentially acts as an intermediary layer between the hardware and the virtual machines, allocating resources and ensuring proper isolation. Hypervisors come in two types: Type 1, or “bare-metal” hypervisors, run directly on the physical hardware, while Type 2, or “hosted” hypervisors, run on top of an existing operating system. Hyper-V is a Type 1 hypervisor, offering enhanced performance and greater control over the hardware.
However, one challenge associated with Hyper-V virtualization is managing virtual networks. Hyper-V allows VMs to communicate with each other, the host machine, and external networks. Configuring and managing virtual networks can be complex, particularly when dealing with advanced network setups like VLANs, virtual switches, and network isolation.
Proper configuration is crucial for ensuring security, connectivity, and performance across virtualized environments. Misconfigured networks can lead to issues such as connectivity loss or potential security vulnerabilities, making careful management and monitoring essential.
The basics of Hyper-V
The underlying technology of Hyper-V is easier to understand if you have experience in networking technology. Specifically, it helps if you understand Layer 2 and Layer 3 concepts. As an indicator, Layer 2 is concerned with MAC addresses and switches, and Layer 3 works with IP addresses and routers.
Approach Hyper-V with new eyes. That means, don’t assume if you have experience with other virtualization systems that Hyper-V works the same as those other systems. Learn the methodologies of Hyper-V implementation from the ground up – don’t skip steps and don’t make assumptions.
Get Hyper-V operating at Layer 2
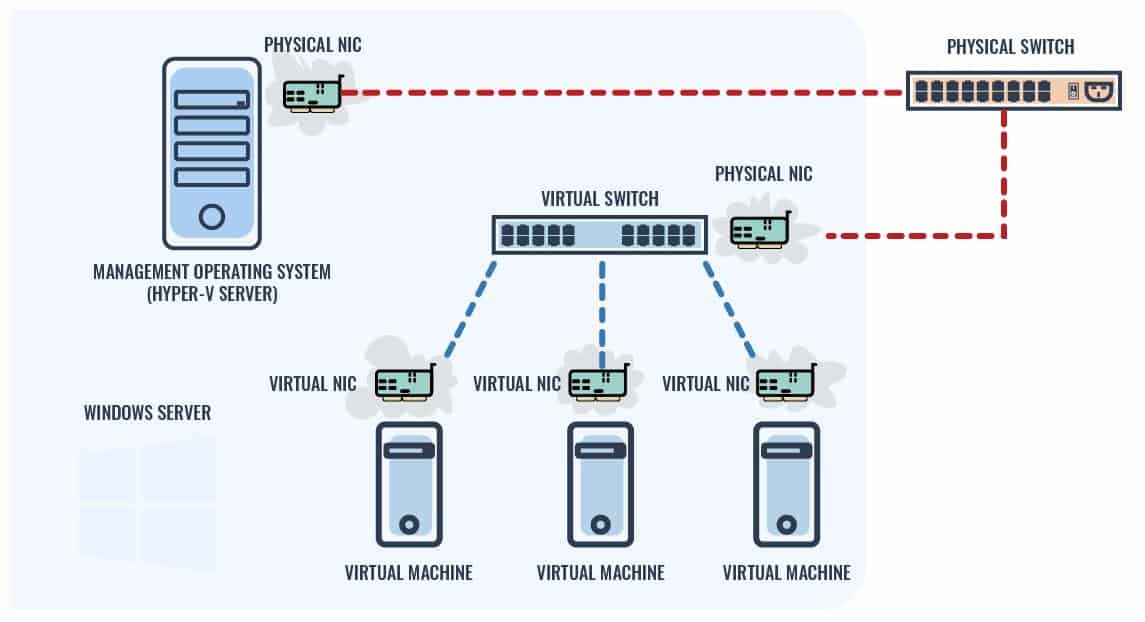
The Hyper-V implementation has two elements – a Hyper-V server and a virtual machine (VM). These two elements need to communicate with each other across a network. Even if they are both operating on the same computer, the conventions of Hyper-V mean that these two components connect to each other through a switch. This doesn’t necessarily mean a physical switch on your network.
At this point, you are dealing with Layer 2, so you need your virtualization to be able to communicate with a switch. All VMs are connected to a virtual switch. For the time being, we will deal with VMs connecting to a virtual switch, which in turn connects to a physical switch. The server will connect directly to a physical switch.
Your Hyper-V management software and the virtual server will be resident on a physical server that runs either Windows Server or Windows 10. So, you need to make sure that the Hyper-V system can communicate with the network interface on the physical server.
An important concept to understand is that the VM does not exist in the physical world. The physical server exists and communicates with real switches on behalf of the Hyper-V system, as it does for all of the other network-reliant applications that it runs.
The Hyper-V virtual server is an application on the physical server, so it has access to the network and to physical switches. The virtual machine does not communicate with physical switches. It communicates with a Hyper-V virtual switch.
The Hyper-V virtual switch
The Hyper-V virtual switch is really a relabeling of a network adapter. That network adapter cannot have two identities. So, once it is assigned to a virtual switch, it has no other purpose and cannot be accessed in any other way. The Hyper-V virtual switch occupies the network adapter entirely.
Once you assign a network adapter to a virtual switch identity, the operating system ceases to recognize that NIC as a network adapter. That means you won’t see it listed as an adapter in the Network Connections folder in Windows Settings. So, the procedures that you are used to using through the operating system to manage and adjust adapters can’t be used for your virtual switch.
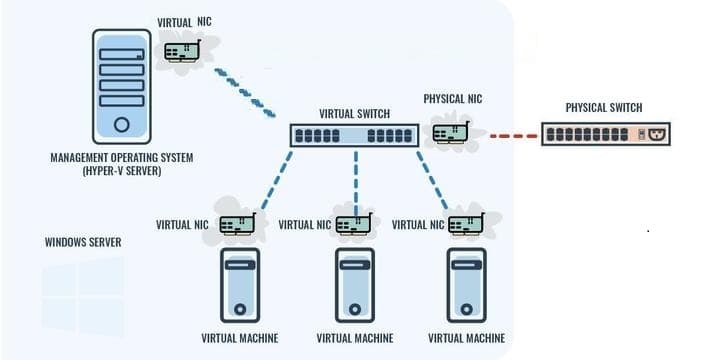
The Hyper-V server can connect to a virtual switch. However, it can’t use the same virtual switch that serves the VM, so it is a bit of a waste of time channeling the server to a virtual switch. That strategy would need for you to set up a network adapter on the physical server and a virtual switch. That’s unnecessary overhead. It is better to let the Hyper-V server communicate with a physical switch through a network adapter and set up a separate network adapter as a virtual switch for the VMs to use.
Essentially, this exercise requires a loopback from one adapter on the physical server out to a switch and back to another network adapter on the same server.
Here are some facts about virtual switches to keep in mind:
- Each VM connects to a virtual switch via a virtual NIC.
- Many virtual NICs can connect to one virtual switch.
- VM-to-VM communication has to pass through the virtual switch.
- In this basic configuration, VM-to-server communication has to pass through a virtual switch and a physical switch.
VLANs
At the stage of creating a basic Hyper-V implementation, do not worry about setting up a VLAN. A VLAN works to separate Layer 2 traffic and, at this stage, your main aim is to get physical and virtual Layer 2 devices to communicate. So, working on separating out that traffic creates complexity.
If there are no VLANs on the physical network, you don’t need them on your Hyper-V hosts. If you use VLANs to separate out Layer 3 traffic, you should design your Hyper-V hosts to match.
The use of VLANs is a major way that Hyper-V is different from VMWare ESXi. This is why you should clear your mind of everything you know about VMWare before implementing a Hyper-V project. The Hyper-V virtual switch automatically supports untagged frames and VLANs 1-4096 – this does not happen in ESXi. Also, Hyper-V does not have a “default” VLAN designation, so don’t worry about that. In Hyper-V, you set up VLANs on the virtual adapters, not on the virtual switch.
Basic Hyper-V implementation goals
To summarize your aims when approaching your first Hyper-V implementation:
- Get your Hyper-V management console and all Hyper-V services activated in your operating system.
- Convert a separate physical NIC on your physical server into a virtual switch
- Set up several VMs within the Hyper-V environment.
- Connect your VMs to a physical switch on your network through your virtual switch.
Once those elements are all working and can communicate, you have your basic Hyper-V implementation working. Become familiar with the settings of that configuration and then advance to more complicated scenarios.
Activate Hyper-V
Hyper-V is integrated into Windows 10 and in Windows Server since version 2008 but you have to activate it.
- In the taskbar search field type turn win and click to open Turn Windows features on or off
- Scroll down in the popup that opens to find Hyper-V. Check the box next to it.
- Click OK.

After the system processes the request, you will be prompted to restart your computer.
Create a Virtual Switch
The virtual switch will support the VMs that you are going to create.
- Open Hyper-V Manager.
- Select the Hyper-V host computer name.
- Click on Action in the top menu bar.
- In the drop-down menu, click on Virtual Switch Manager.
- In the Virtual Switch Manager, click on New virtual network switch in the left panel.
- Choose a virtual switch type (External, Internal, or Private).
- Click on the Create Virtual Switch button. This opens up the Virtual Switch Properties panel.
- Give the virtual switch a name and optionally type in a description. For example, Virtual switch for VMs.
- Optionally, change the type that you already specified by specifying the network to connect to. For an external network, you will need to specify the physical NIC to connect through.
- Click OK.
You will be shown a warning message that explains that the creation process will interfere with network activity. Click Yes to dismiss the message.
Create a Hyper-V Virtual Machine
You can now create a VM that will communicate through the virtual switch you just created.
A quick note on Generations, which is a concept that you will encounter during the creation of the VM:
Generation 1
These VMs support 32-bit and 64-bit guest OSes and BIOS-based architecture. These are the original VM types of Hyper-V.
Generation 2
These VMs support 64-bit Windows OSs and the latest versions of Linux and FreeBSD OSes. They enable advanced features, such as Secure Boot.
The generation of a VM is fixed at the point of its creation and can’t be changed later.
Here’s how to create a VM.
- Open Hyper-V Manager.
- Select the Hyper-V host computer name.
- Click on Action in the top menu bar.
- In the drop-down menu, expand New and click on Virtual Machine in the sub-menu. This opens the New Virtual Machine Wizard.
- Click Next on the opening page of the wizard.
- Name the VM and specify its location. You can leave the location as the path shown by default.
- Click on Next to advance to the Generation page.
- In the Generation section, choose between Generation 1 and Generation 2.
- Click on Next to get to the Assign Memory page.
- Check the Use Dynamic Memory box on the memory page.
- Click on Next to advance to the Configure Networking page.
- The Configure Networking screen contains a drop-down list of possible connections. The virtual switch you created should be in that list. Select it.
- Click on Next to get to the Virtual Hard Disk screen.
- Choose to create a new virtual hard disk, use an existing virtual hard disk, or skip this step and attach a virtual hard disk later.
- Click on Next to get to the last screen of the wizard.
- Look through the settings summary and then click on Finish to create the VM.
If in step 14, you choose to Create a Virtual Hard Disk, you need to fill out a supplementary screen, called Installation Options. You can defer this task and then move out of the screen. If you decide to set the disk up at this point, you need to install an OS on the disk. Your options are:
- Install the OS from a CD-ROM
- Install the OS from a bootable floppy disk
- Install the OS from a network-based installation server
Teaming
There is a method available in later versions of Windows Server that would allow the virtual server to direct to the same virtual switch as the VM. This is a method, called teaming. It enables a group of network adapters to be grouped together and provide one or more virtual switches.
If you employ teaming, you can manage all of the communications between virtual servers and VMs within one physical server. However, you will still need to loop out from the virtual switches to a physical switch in order to verify that the virtualization is able to work across the network. Each virtual server or virtual machine connects to the virtual switch through a virtual NIC. The connection through to a physical switch is optional.
This configuration gives you options over the virtual switch mode. There are three modes that you can use under this virtual setup:
- Private
- Internal
- External
Each of these options can be useful for enforcing or relaxing security and privacy.
Private Virtual Switch
A virtual switch in private mode only allows communication between VMs connected to that virtual switch. This communication path is also possible in the basic setup of a Hyper-V without teaming.

Internal Virtual Switch
This communication scenario is only possible with NIC teaming. In reality, the communication between the VM and the server passes through two NICs, but the data exchange between those two adapters is obscured by the operating system service that manages the teaming operation. The Hyper-V virtual switch management system sits on top of the teaming service.

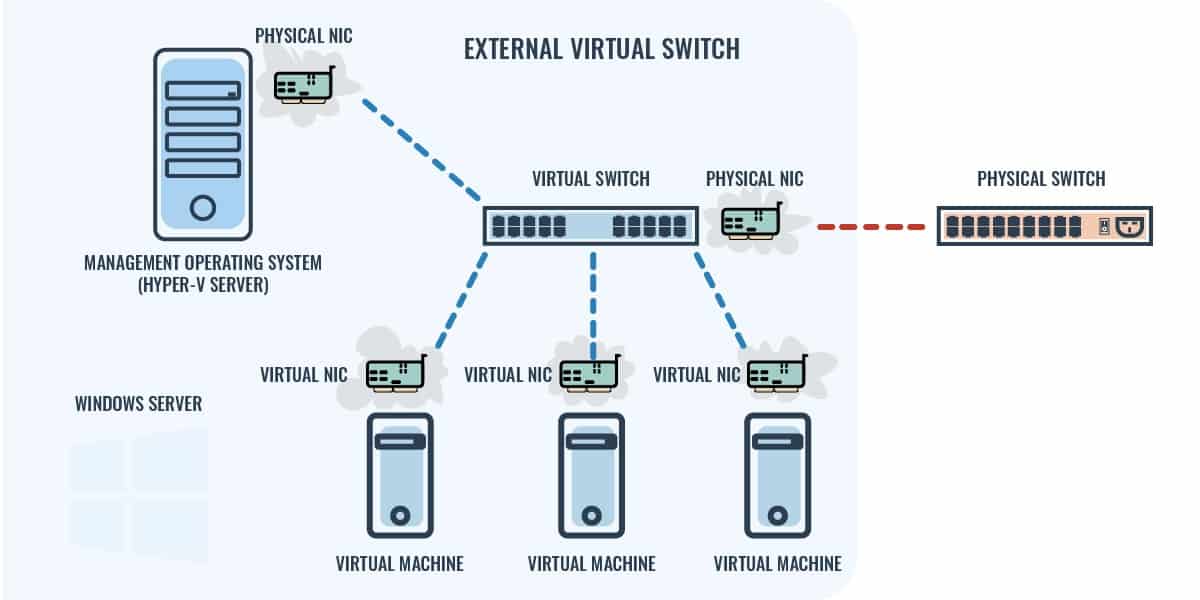
External Virtual Switch
This is the full virtual switch configuration that is enabled by teaming. In the basic configuration without teaming, the presence of a physical switch was necessary. In the teaming scenario, the physical switch is only needed to communicate with other physical devices across the network. Internal traffic is still possible and communication between VMs or between each VM and a Hyper-V host is mediated by the virtual switch without the need for the physical switch to be involved. As with the internal mode, communication between a VM and a Hyper-V server on the same host really crosses two physical NICs.
Virtual switches and PowerShell
You can create virtual switches through the Hyper-V management console, but it is time-consuming. It is quicker to create and manage them in PowerShell. If you are using teaming, you can manage that technique through PowerShell. There are also PowerShell cmdlets for creating and managing virtual NICs. You can also use PowerShell to set up a NIC team.
A straightforward virtual NIC (not a team) is automatically created when you set up a VM in the Hyper-V management console.
Create a team
In order for the same virtual switch to be for both a Hyper-V server and a VM, you need to base it on at least two physical network adapters. In order to do this, you need to create a Windows team of network adapters upon which you can create the virtual switch.
In order to see all of the physical NIC that you have on your server, use the cmdlet Get-NetAdapter -Physical.
Note down the names of two NICs. The name is the first column in the output of Get-NetAdapter.
Use the cmdlet New-NetLbfoTeam to create the team. Substitute the two NIC names you noted for <NIC1> and <NIC2> in the following command – don’t leave the angle brackets in.
New-NetLbfoTeam -Name vNICGrp -TeamMembers <NIC1>, <NIC2> -TeamingMode SwitchIndependent -LoadBalancingAlgorithm DynamicThis creates a team NIC, a concept that is called “tNIC.” The tNIC created by the above command is called vNICGrp, but you can call it whatever you like.
Here are some tNIC cmdlets that you might need to use:
Get-NetLbfoTeam
Lists all tNICs
Get-NetLbfoTeamMember -Team <team>
List all the NICs in <team>
Add-NetLbfoTeamMember -Name <NIC> -Team <team>
Add <NIC> to <team>
Remove-NetLbfoTeamMember -Name <NIC> -Team <team>
Take <NIC> out of <team>
Create a Virtual Switch
You can turn a physical NIC into a virtual switch and you can also base a new virtual switch on a tNIC – the cmdlet is the same. It is New-VMSwitch.
This creates an external virtual switch by default if the switch type is not specified. In the following examples, the cmdlet creates a virtual switch called vSwitch based on the tNIC called vNICGrp.
To create an external virtual switch:
New-VMSwitch -Name vSwitch -NetAdapterName vNICGrp -AllowManagementOS $false
-MinimumBandwidthMode Weight
To create an internal virtual switch:
New-VMSwitch -Name vSwitch -NetAdapterName vNICGrp
 -SwitchType Internal -MinimumBandwidthMode Weight
To create a private virtual switch:
New-VMSwitch -Name vSwitch -NetAdapterName vNICGrp
 -SwitchType Private -MinimumBandwidthMode Weight
Here are some virtual switch management cmdlets that you might need:
Set-VMSwitch -Name <vswitch> -SwitchType Internal
Change a switch from external to internal
Set-VMSwitch -Name <vswitch> -SwitchType Private
Change a switch from external to private
Set-VMSwitch -Name <vswitch> -NetAdapterName <vNICGrp>
Change a switch from private or internal to external
Set-VMSwitch -Name <vswitch> -NetAdapterName <vNICGrp2>
Move a virtual switch to be based on <vNICGrp2> instead of its current tNIC
Remove-VMSwitch -Name <vswitch>
Delete virtual switch <vswitch>
Hyper-V networking FAQs
How does networking work in Hyper-V?
Hyper-V networking is a virtual system. The central mechanism of a Hyper-V network is a virtual switch. As the name explains, this device does not have a physical presence but is a software-generated appliance. For the purposes of operations, the controller for any switch is a piece of software and so, whether the underlying switch is physical or virtual shouldn’t make any difference to how the connecting endpoints communicate through it.
What types of network connections does Hyper-V allow?
Hyper-V offers three types of connections: internal, external, and private. OF these, the most widely implemented is the external connection. This is essential to enabling the hypervisor to support real-world activities. The external virtual switch is bound to an actual, physical network adapter. Internal and private vSwitches have no physical element and are entirely software-based.
How do I set up a VM network?
The Hyper-V management console includes a setup function for virtual networks. This supports the creation of virtual switches and the granting of access to them from each virtual server and virtual machine. The connection of multiple virtual endpoints to a vSwitch creates a VM network.
Related posts:
