
PowerShell is a powerful scripting language and automation framework developed by Microsoft. Its flexibility and extensive library of commands (cmdlets) make it an essential tool for IT professionals, system administrators, and developers. However, the true power of PowerShell lies in its modularity. Through PowerShell modules, users can extend its functionality to manage systems, interact with cloud services, and automate complex workflows.
Modules are collections of cmdlets, scripts, and functions designed to perform specific tasks. Whether you’re managing Active Directory, configuring Azure resources, or monitoring network devices, there’s likely a PowerShell module that fits your needs. Installing these modules allows you to streamline your work, saving time and reducing the risk of human error.
In this step-by-step guide, we’ll explore various methods for installing PowerShell modules, including through the PowerShell Gallery, manual installation and using NuGet packages. We’ll also cover best practices for managing module dependencies, updating installed modules, and troubleshooting common installation issues.
By the end of this guide, you’ll be equipped to efficiently install and manage PowerShell modules, unlocking new capabilities for your scripts and administrative tasks. Whether you’re new to PowerShell or looking to expand your expertise, this guide will help you get the most out of this versatile tool. Let’s get started!

The PowerShell that is shipped with Windows comes with a few hundred cmdlets that can help you do basic tasks like reading files, creating registry keys, pinging computers, connecting to remote systems, and so on. However, this out-of-the-box PowerShell cmdlet cannot support all that you want to do with the language. To perform tasks outside of the built-in PowerShell commands, you must install modules that contain commands that give you that functionality.
PowerShell Module Components and Types
A module comprises four essential components, which include a PowerShell script or a managed cmdlet assembly, additional assemblies or scripts, a manifest file, and a directory that contains all of those components. The following sections describe the results you can get by mixing and matching the different possible parts of a module together:
- Script Modules: A script module is simply a Windows PowerShell script with a .psm1 extension, which allows administrators to use import, export, and management functions on it. A script module contains valid Windows PowerShell code. It can be saved or installed on the PowerShell module path or any path that you explicitly describe so that PowerShell can reasonably discover it.
- Binary Modules: A binary module is a .NET Framework assembly (.dll) that contains compiled code. Compared to a script module, a binary module allows you to create cmdlets faster or use features such as multithreading that are not as easy to code in Windows PowerShell scripts. In addition, a binary module can be saved or installed in a folder along the PowerShell module path.
- Manifest Modules: A manifest module is a module that uses a manifest file to describe all of its component binary modules but doesn’t have any sort of core assembly or script.
- Dynamic Modules: A dynamic module is a module that is not loaded from, or saved to, a file. Instead, they are created dynamically by a script, using the New-Module cmdlet. This module enables a script to create a module on demand that does not need to be loaded or saved to persistent storage. Dynamic modules do not require permanent folders to store their related assemblies.
How to Install a PowerShell Module
Once you have created a script, binary, or manifest module, you can save your work in a location such as a system folder where Windows PowerShell is installed, or a user folder, so that others may have access to it. First, you need to install the module. Secondly, you need to find the PowerShell commands that the module added using the cmdlet Get-Command, and lastly, you need to use the commands that the module added.
There are two main methods for installing PowerShell Module: PowerShell gallery method and manual method (if the modules are not available in the PowerShell gallery). The following section describes each of these methods in detail.
Method 1—Install Module from PowerShell Gallery
The PowerShell Gallery is an online package repository for PowerShell containing scripts, modules, and DSC resources you can download and leverage. Microsoft and the PowerShell community have authored these. You can find packages in the PowerShell Gallery by:
- Using the Search control on the PowerShell Gallery’s home page
- Browsing through the Modules and Scripts from the Packages page
- Running the Find-Module, Find-DscResource, and Find-Script cmdlets, depending on the package type
Once you’ve identified a package that you’re interested in, you can learn more about it by examining the metadata uploaded with the package at the package’s specific page on the Gallery. You may also want to download the package from the Gallery for further inspection. To do that, run either the Save-Module or Save-Script cmdlet, depending on the package type. This allows you to save the package locally for inspection of the contents without installing it.
Installing PowerShell modules from the PowerShell Gallery is the easiest way to install modules.
To install a package or module from the Gallery, we use the command: Install-Module or Install-Script cmdlet, depending on the package type.
The Install-Module and Install-Script command, by default, install the most current version of a package.
| Command | Location | Notes |
|---|---|---|
| Install-Module | $env: ProgramFiles\WindowsPowerShell\Modules by default. If you use this parameter: -Scope CurrentUser, the location will be: $env: USERPROFILE\Documents\WindowsPowerShell\Modules | This requires an administrator account. |
| Install-Script | $env: ProgramFiles\WindowsPowerShell\Scripts by default. If you use this parameter: -Scope CurrentUser the location will be: $env: USERPROFILE\Documents\WindowsPowerShell\Scripts | This requires an administrator account. |
| For either command, if you require an older version of the package: -RequiredVersion |
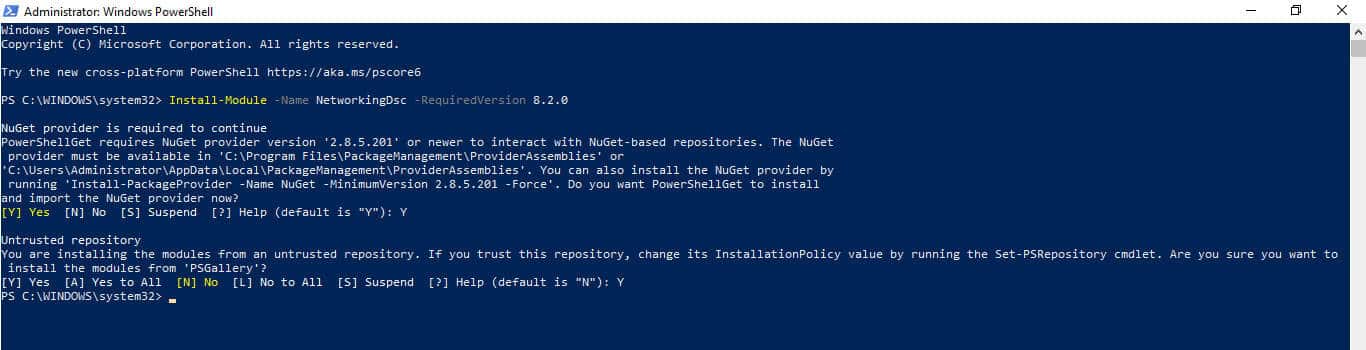
Furthermore, before installing a module, you need to know the module’s name and the command to install it. The Gallery page will tell you what the command is to install the module. In this example, we will install a module we found on the Gallery named NetworkingDsc. To do that, run the following command:
Install-Module -Name NetworkingDsc -RequiredVersion 8.2.0
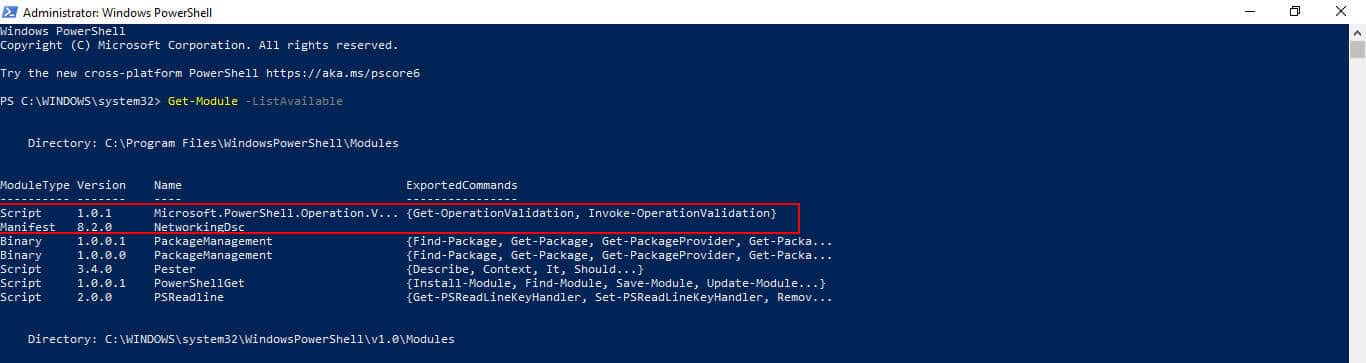
Depending on the NuGet provider you are running, you may receive the notification that the NuGet provider is required to continue. PowerShellGet relies on the provider named Nuget, and you may be required to install the newest version before proceeding. Type Y and press the Enter key if you see, “Do you want PowerShellGet to install and import the NuGet provider now?”. Again, depending on your settings, you may receive another notification, “Are you sure you want to install the modules from ‘PSGallery’?”. Type Y and press the Enter key to continue. This will commence installing the NetworkingDsc module, which you can see visually by the loading text at the top of the PowerShell window. After the installation is completed, you can verify it by running the command: Get-Module -ListAvailable.
If you want to deploy the installed package from the PowerShell Gallery to Azure Automation, click Azure Automation, then click Deploy to Azure Automation on the package details page. When clicked, it will redirect you to the Azure Management Portal, where you sign in using your Azure account credentials. If the package includes dependencies, all the dependencies will be deployed to Azure Automation as well.
From Gallery Recap
- Navigate to the PowerShell Gallery online to find modules or scripts to download.
- Identify the package you’re interested in and examine the metadata on its specific page on the Gallery. Optionally, download it for local inspection using the ‘Save-Module’ or ‘Save-Script’ cmdlet.
- Install the module or package using the ‘Install-Module’ or ‘Install-Script’ cmdlet.
- For module:
Install-Module -Name [ModuleName] -RequiredVersion [Version] - For script:
Install-Script -Name [ScriptName] -RequiredVersion [Version]
- For module:
- Note: The module/script is installed in the ProgramFiles directory by default. To install in the USERPROFILE directory, add
-Scope CurrentUserto the command. - If you require an older version of the package, add
-RequiredVersionparameter. - During installation, confirm any prompts to install the NuGet provider or from the PSGallery by typing ‘Y’ and pressing Enter.
- Post-installation, verify the installation by running
Get-Module -ListAvailable. - To deploy the installed package to Azure Automation, click ‘Azure Automation’ and ‘Deploy to Azure Automation’ on the package details page. Sign in using your Azure account credentials. All dependencies will be deployed as well.
Method 2—Install PowerShell Modules Manually
If the module is not available in the PowerShell Gallery, you must use the manual method to install it. To install PowerShell modules manually, you first need to determine your current PowerShell module directory path, download your new module to that path, and invoke the import-module command to let windows know it’s there. Then, follow the steps below to install PowerShell modules manually:
1. Determine the install Path: You need to determine the install path for your PowerShell modules, so you know where to put new ones. This helps ensure that the new module is installed in a path listed in the PSModulePath environment variable. You can determine where to install your module using one of the paths stored in the $ENV: PSModulePath variable. To do this, open a PowerShell window and run the command: $Env: PSModulePath.
The output displays the following path as shown in Figure 3.0 below:
- C:\Users\Administrator\Documents\WindowsPowerShell\Modules
- C:\Program Files\WindowsPowerShell\Modules
- C:\WINDOWS\system32\WindowsPowerShell\v1.0\Modules\

Use the first path if you want the module to be available for a specific user account on the computer. Use the second path if you’re going to make the module available for all users on the computer. The third path is the path Windows uses for built-in modules already installed with the Windows OS. Microsoft recommends you avoid using this location. So you are left with the first or second path.
Using one of these paths means that PowerShell can automatically find and load your module when a user calls it in their code. However, you may also wish to add your paths but stick with the first two paths unless necessary. If you store your module somewhere else, you can explicitly let PowerShell know by passing in the location of your module as a parameter when you call Install-Module. If you see other paths listed in your environment variable, it may be from your installed applications. Some applications install PowerShell commands and automatically add those to the variable. Now that we know where to put new modules let’s proceed to the next step.
2. Copy the new module to the path: Now download the PowerShell module from your preferred site and copy it into one of the two paths identified in step 1 above. In this example, we will make it available to all users on the computer to copy it to the directory C:\Program Files\WindowsPowerShell\Modules. Once completed, you can check if the new module is listed as available to PowerShell by running the command: Get-Module -ListAvailable.
3. Import new module: With the new module in place, we just need to tell Windows to load it to use it in our current PowerShell session. To this, use the following command syntax: Import-module -name ModuleName
For example, let’s say you want to import the command NTFSSecurity (PowerShell Module for managing file and folder security on NTFS volumes), you’ll run the command: Import-module NTFSSecurity. If you receive a notification to confirm if you trust the script or module and want to run it, type R to run once (assuming you’re sure you want to run it). And that does it, and the new module is now ready for use.
Although Microsoft allows you to install PowerShell modules from third-party sites, there are also security implications. Malicious actors may take advantage of this loophole to develop and provide scripts containing malicious codes. Therefore, ensure that you load only trustworthy modules or those from a reliable source.
Manual Install Recap
- Determine install path: Determine the path for your PowerShell modules by running the command:
$Env:PSModulePath.- Use the first path for a specific user account.
- Use the second path for all users on the computer.
- Avoid using the third path as it’s reserved for built-in Windows modules.
- Download and copy the module: Download the module and copy it to the chosen path from step 1. For instance, to make it available for all users, copy it to
C:\Program Files\WindowsPowerShell\Modules.- Verify the module availability by running
Get-Module -ListAvailable.
- Verify the module availability by running
- Import the module: Load the module for the current PowerShell session using
Import-module -name [ModuleName].- For instance, for the NTFSSecurity module, use
Import-module NTFSSecurity. - Confirm any prompts to trust the script or module by typing ‘R’ to run once.
- For instance, for the NTFSSecurity module, use
- Keep in mind the security implications of third-party modules. Always ensure the source is reliable to avoid potential security threats.
PowerShell installation FAQs
How do I get PowerShell modules?
The PowerShell system is already available within the Windows operating system and you probably already have many modules available. At the PowerShell prompt, type Get-Module -ListAvailable to see which modules are active. To install a module, use the Get-InstalledModule cmdlet.
Where PowerShell modules are installed?
In Windows, there is an environment variable that holds the storage location for PowerShell modules within the disk’s directory structure. For AllUsers this is $env:PROGRAMFILESPowerShellModules. On Linux and macOS, modules are stored in /usr/local/share/powershell/Modules.
How do I install Windows Update PowerShell module?
You should open the PowerShell prompt as the Administrator to install the PSWindowsUpdate module.
- Enter Set-ExecutionPolicy -ExecutionPolicy RemoteSigned to enable remote script execution.
- Enter Install-Module -Name PSWindowUpdate -Force to download and install the PSWindowUpdate module.
- Enter Import-Module -Name PSWindowUpdate to bring PSWindowsUpdate into the current PowerShell session.
- Enter Get-Command -Module PSWindowsUpdate to check that the installation worked and to see what commands are available within the module.
