
If you want secure remote access to your home network, running an OpenVPN server directly on your pfSense firewall is one of the most flexible and secure options available. It lets you connect to your home network from anywhere, securely access local devices, and even route your internet traffic through your home connection when you’re away.
This guide walks through setting up an OpenVPN remote-access server on pfSense using current security best practices. Along the way, we’ll explain why each setting matters so you can make informed decisions rather than simply following screenshots.
The short answer
Setting up an OpenVPN server on pfSense involves six main steps:
- Create a Certificate Authority (CA).
- Generate a server certificate.
- Create VPN users and client certificates.
- Configure the OpenVPN server.
- Create the required firewall rules.
- Export the client configuration and connect.
For most home users, we recommend:
- UDP transport
- TLS authentication enabled
- AES-256-GCM or ChaCha20-Poly1305 encryption (where supported)
- TLS 1.3 enabled (where supported)
- Certificate-based authentication
- Strong passwords (or certificate + password authentication)
- Keeping pfSense and all packages fully updated
If your hardware and clients support it, enable OpenVPN Data Channel Offload (DCO) to improve VPN performance (pfSense Plus only).
Why install OpenVPN on pfSense?
Running your VPN server on pfSense means every device on your network can be accessed securely without leaving another computer permanently powered on.
Some of the main advantages include:
- Secure remote access to your home network from anywhere.
- Secure access to NAS devices, file servers, and media servers.
- The ability to browse the internet using your home internet connection while traveling.
- Centralized firewall management.
- Easy integration with existing pfSense security features.
- Support for Windows, macOS, Linux, Android, and iOS clients.
Because the VPN terminates on the firewall itself, you can manage firewall rules, routing policies, DNS settings, and network segmentation from one interface.
Should you use OpenVPN or WireGuard?
Many readers ask whether to use OpenVPN or WireGuard before beginning. Both protocols are excellent, but they have different strengths.
| OpenVPN | WireGuard |
|---|---|
| Extremely mature | Newer protocol |
| Highly configurable | Simpler configuration |
| Excellent enterprise support | Faster in most situations |
| Wide client compatibility | Smaller codebase |
| Multiple authentication methods | Simpler key management |
For most home users, WireGuard generally offers higher performance and a simpler configuration. However, OpenVPN remains an excellent choice if you need certificate-based authentication, advanced enterprise features, extensive client compatibility, or you’re already invested in an OpenVPN deployment.
This guide focuses on OpenVPN because it remains one of the most widely supported VPN protocols available and is included directly within pfSense.
Before you begin
This guide assumes:
- pfSense is already installed.
- WAN and LAN interfaces are working correctly.
- You have administrator access.
- Your firewall can receive incoming connections from the internet.
Unless instructed otherwise, leave settings at their default values.
Choosing an authentication method
Before configuring the VPN server, decide how users will authenticate. OpenVPN supports three approaches:
Certificate authentication
Each user receives a unique client certificate.
Pros
- Very secure
- Resistant to password guessing
- Easy to revoke individual users
Cons
- Requires certificate management
Username and password
Users authenticate with credentials only.
Pros
- Easy to understand
- No certificate distribution
Cons
- Lower security
- Passwords can be guessed or reused
Certificate + username/password (recommended)
This combines certificates with user credentials. Even if someone’s password is compromised, an attacker still needs the corresponding client certificate to connect.
For most deployments, this provides the best balance between usability and security, so we’ll use this method throughout the guide.
Step 1: Create your Certificate Authority
Your Certificate Authority (CA) establishes trust between the VPN server and its clients.
Navigate to:
System > Cert. Manager
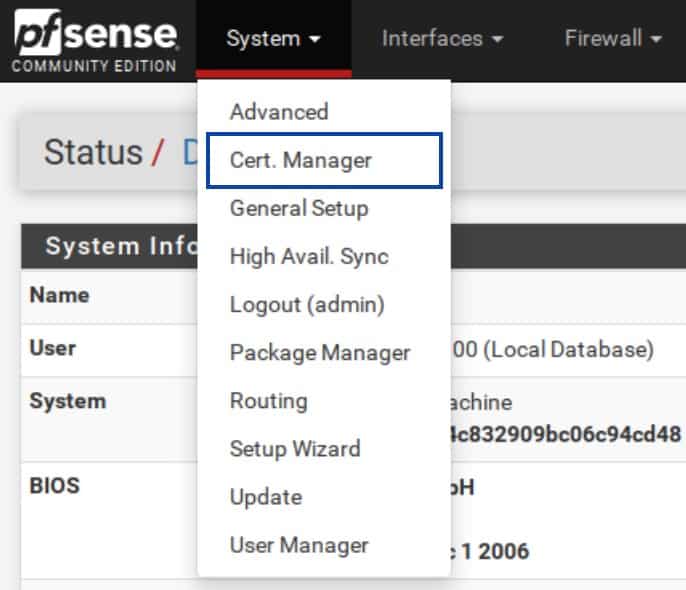
Click Add.
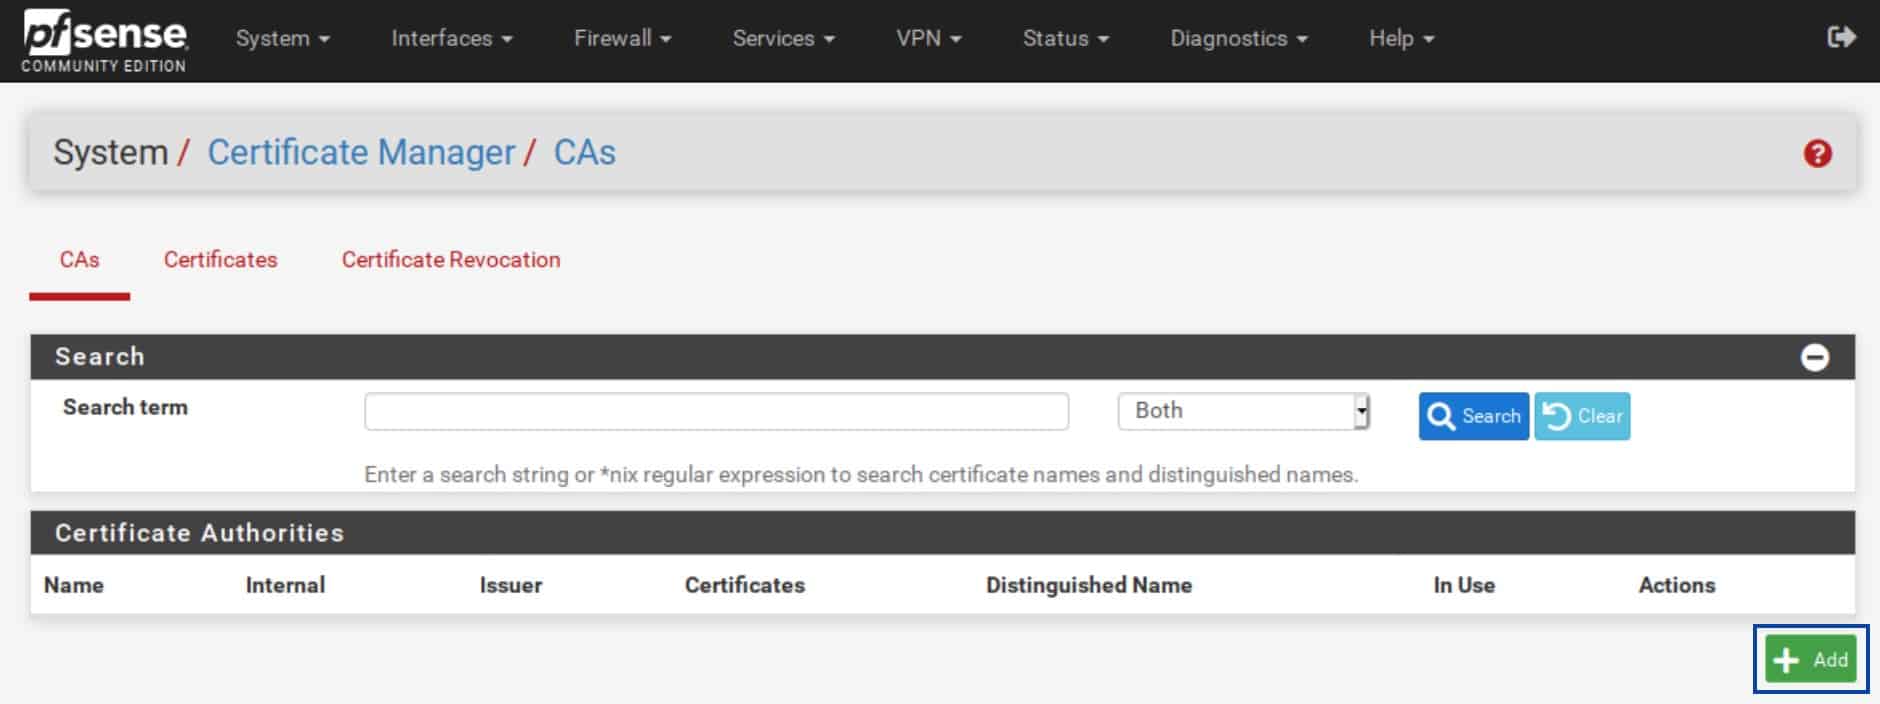
Configure the following:
| Setting | Recommendation |
|---|---|
| Method | Create an internal Certificate Authority |
| Key type | RSA or ECDSA |
| RSA key length | 3072 or 4096 bits |
| Digest algorithm | SHA-256 or stronger |
| Common Name | Choose a descriptive name |

In the example, we’ve used RSA for ‘Key type’ as it’s the most widely compatible choice. However, ECDSA generally offers better performance and smaller certificates but may not be supported by very old clients. If you’re setting up a new VPN today and all of your client devices are modern, ECDSA is an excellent choice.
Click Save to create your Certificate Authority.
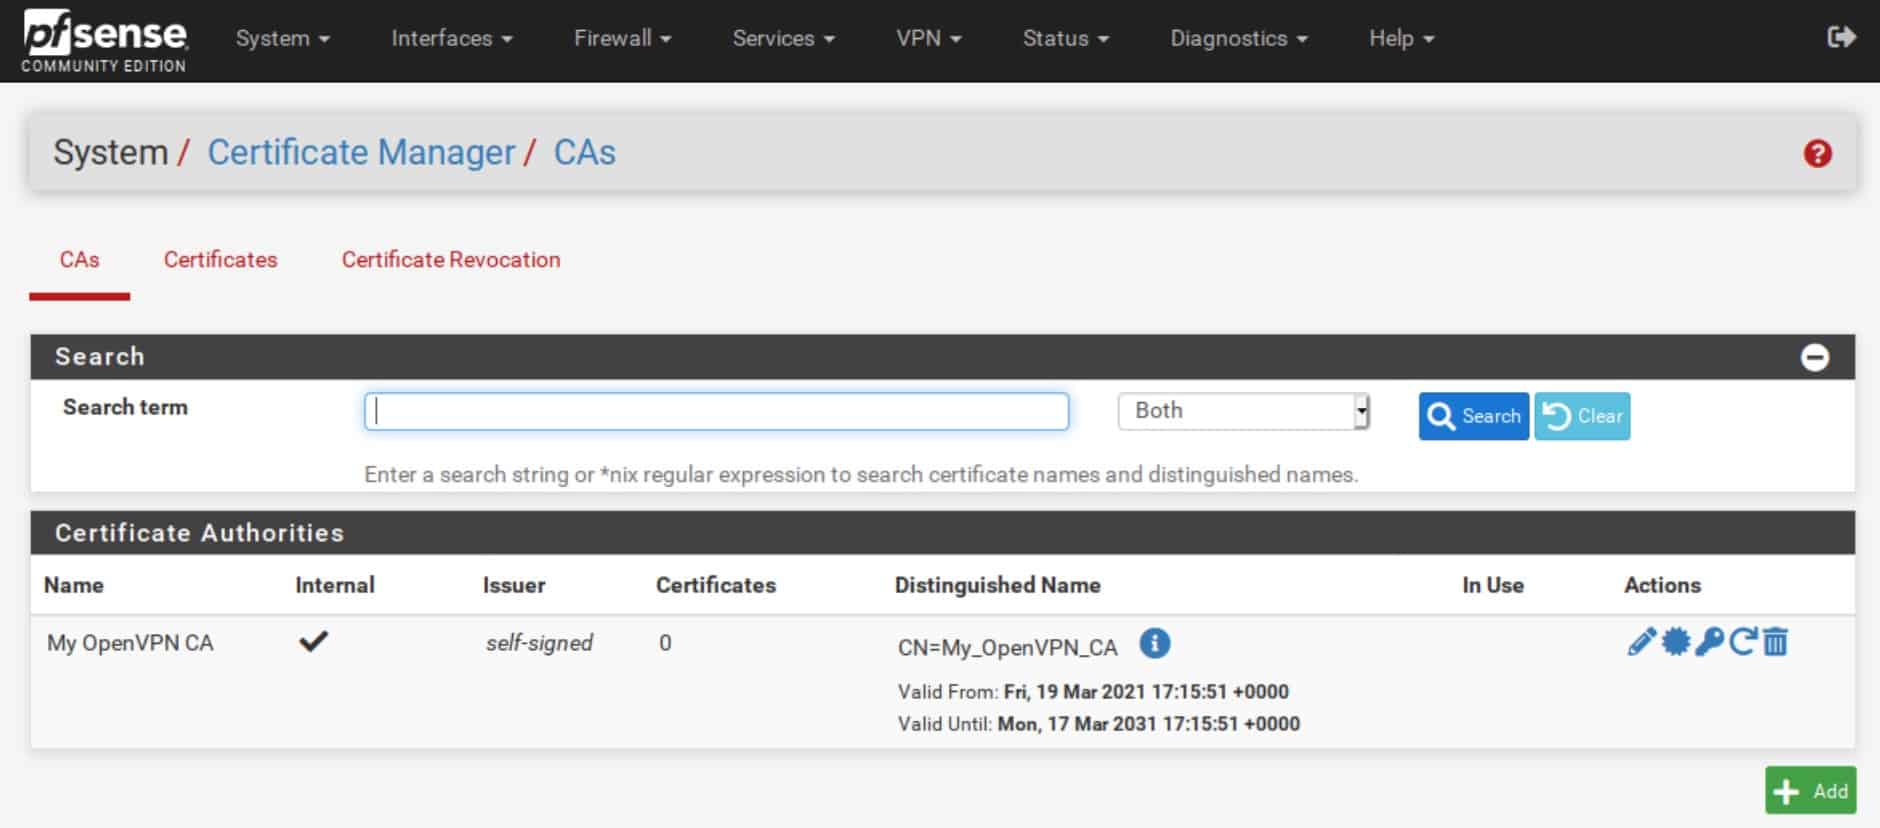
Why these settings?
You’ll notice we’ve avoided prescribing one exact configuration. Modern versions of OpenVPN increasingly rely on TLS 1.3 and AEAD encryption ciphers such as AES-256-GCM and ChaCha20-Poly1305. These provide both encryption and authentication in a single operation, reducing the importance of some older configuration options that were common in earlier OpenVPN deployments.
For that reason, it’s usually best to follow current pfSense defaults unless you have specific compatibility requirements.
Step 2: Create the server certificate
The VPN server needs its own certificate so that clients can verify they’re connecting to the correct server.
Navigate to:
System > Cert. Manager > Certificates
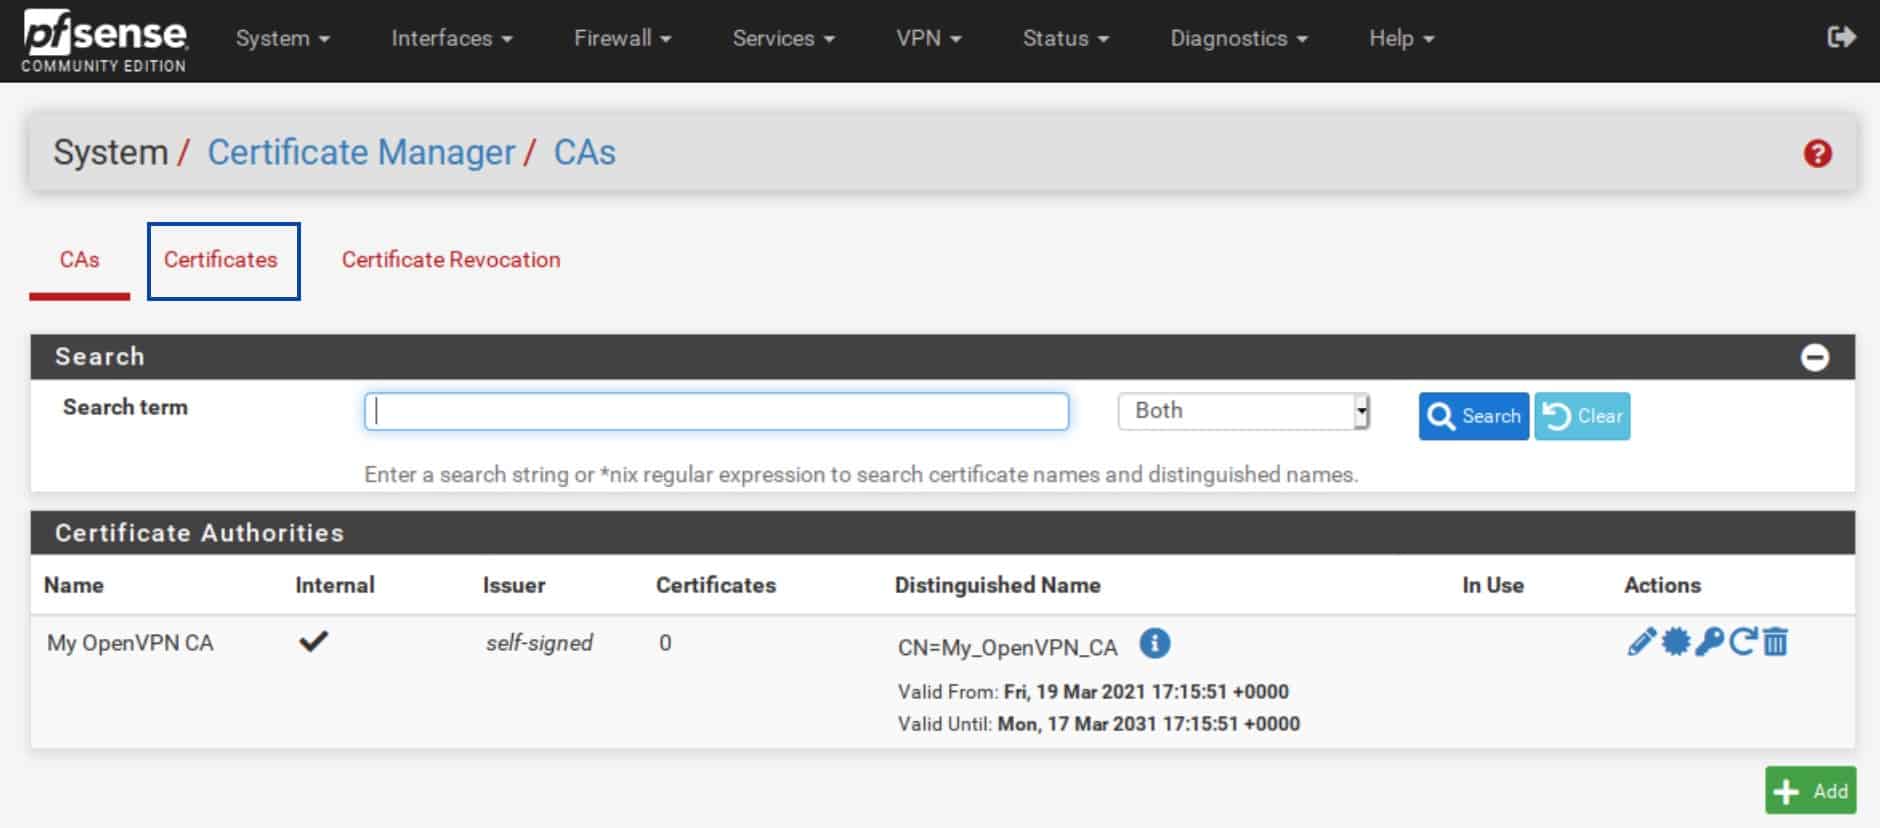
Click Add/Sign.
Configure the following settings:
| Setting | Recommendation |
|---|---|
| Method | Create an internal Certificate |
| Descriptive name | Choose a meaningful name (My OpenVPN Server Certificate) |
| Certificate Authority | Select the CA created earlier |
| Key type | Match your CA (RSA or ECDSA) |
| Key length | Match your CA |
| Digest algorithm | SHA-256 or stronger |
| Certificate Type | Server Certificate |
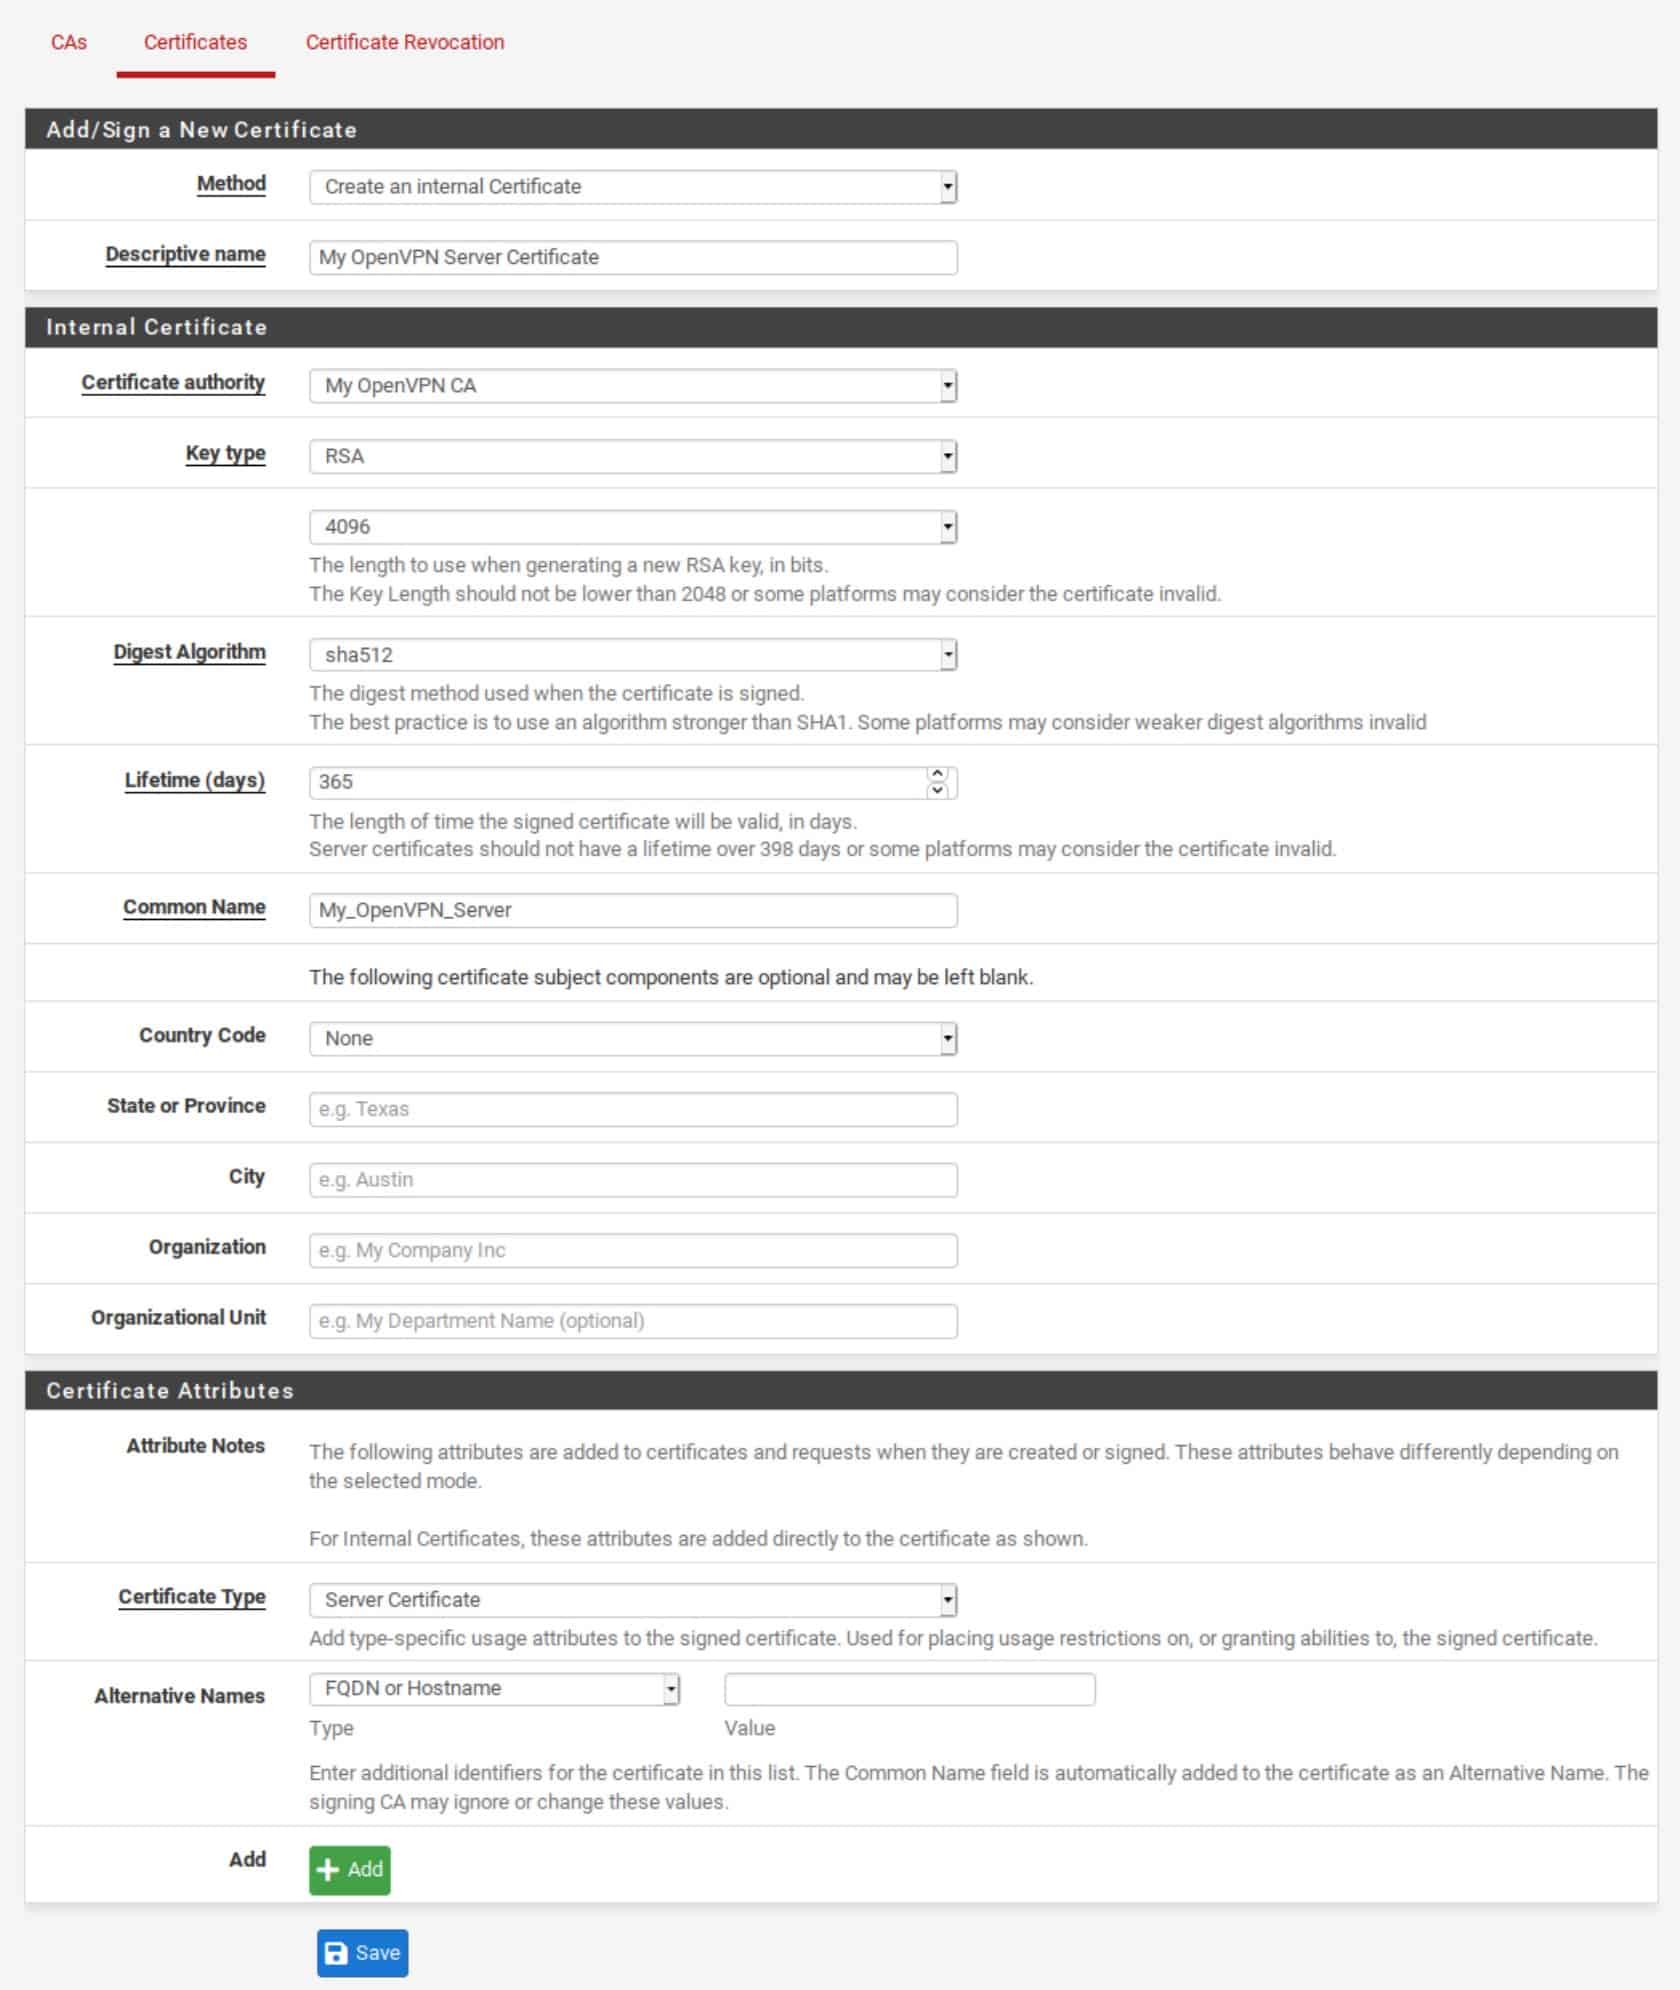
Click Save.
Your OpenVPN server now has a certificate that clients can verify during the TLS handshake.
Tip: If you’re deploying OpenVPN across multiple sites or replacing certificates regularly, use descriptive names that make future management easier.
Step 3: Create VPN users
Every person connecting to your VPN should have their own account. Avoid sharing usernames between multiple users. Individual accounts make it much easier to revoke access if a device is lost or an employee leaves.
Navigate to:
System > User Manager
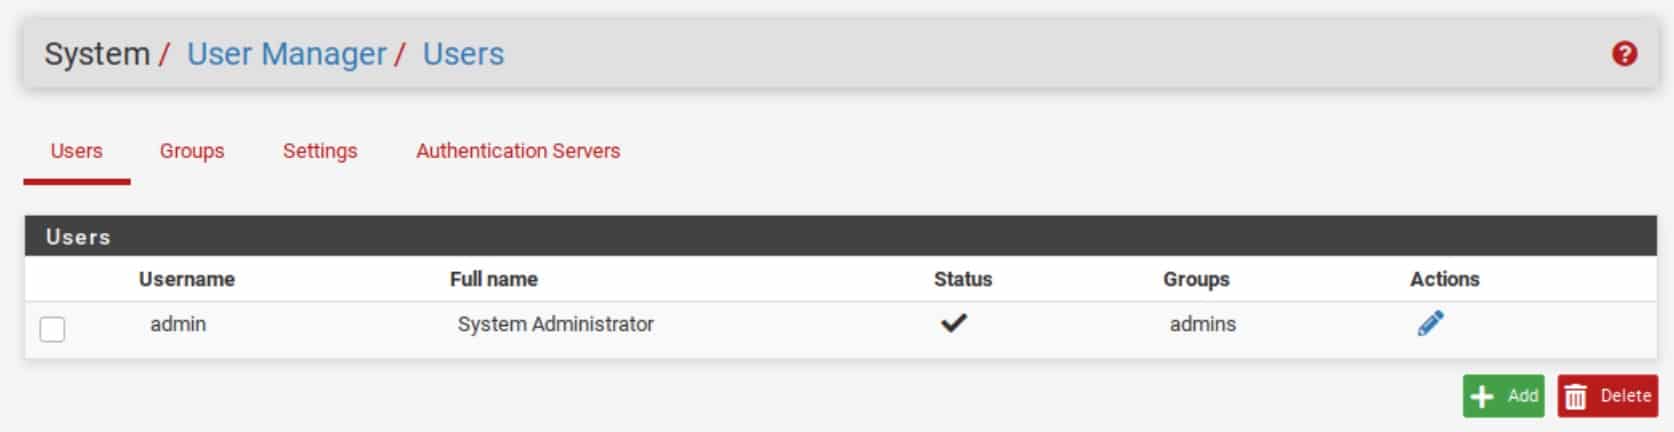
Click Add.
Enter:
- Username
- Strong password
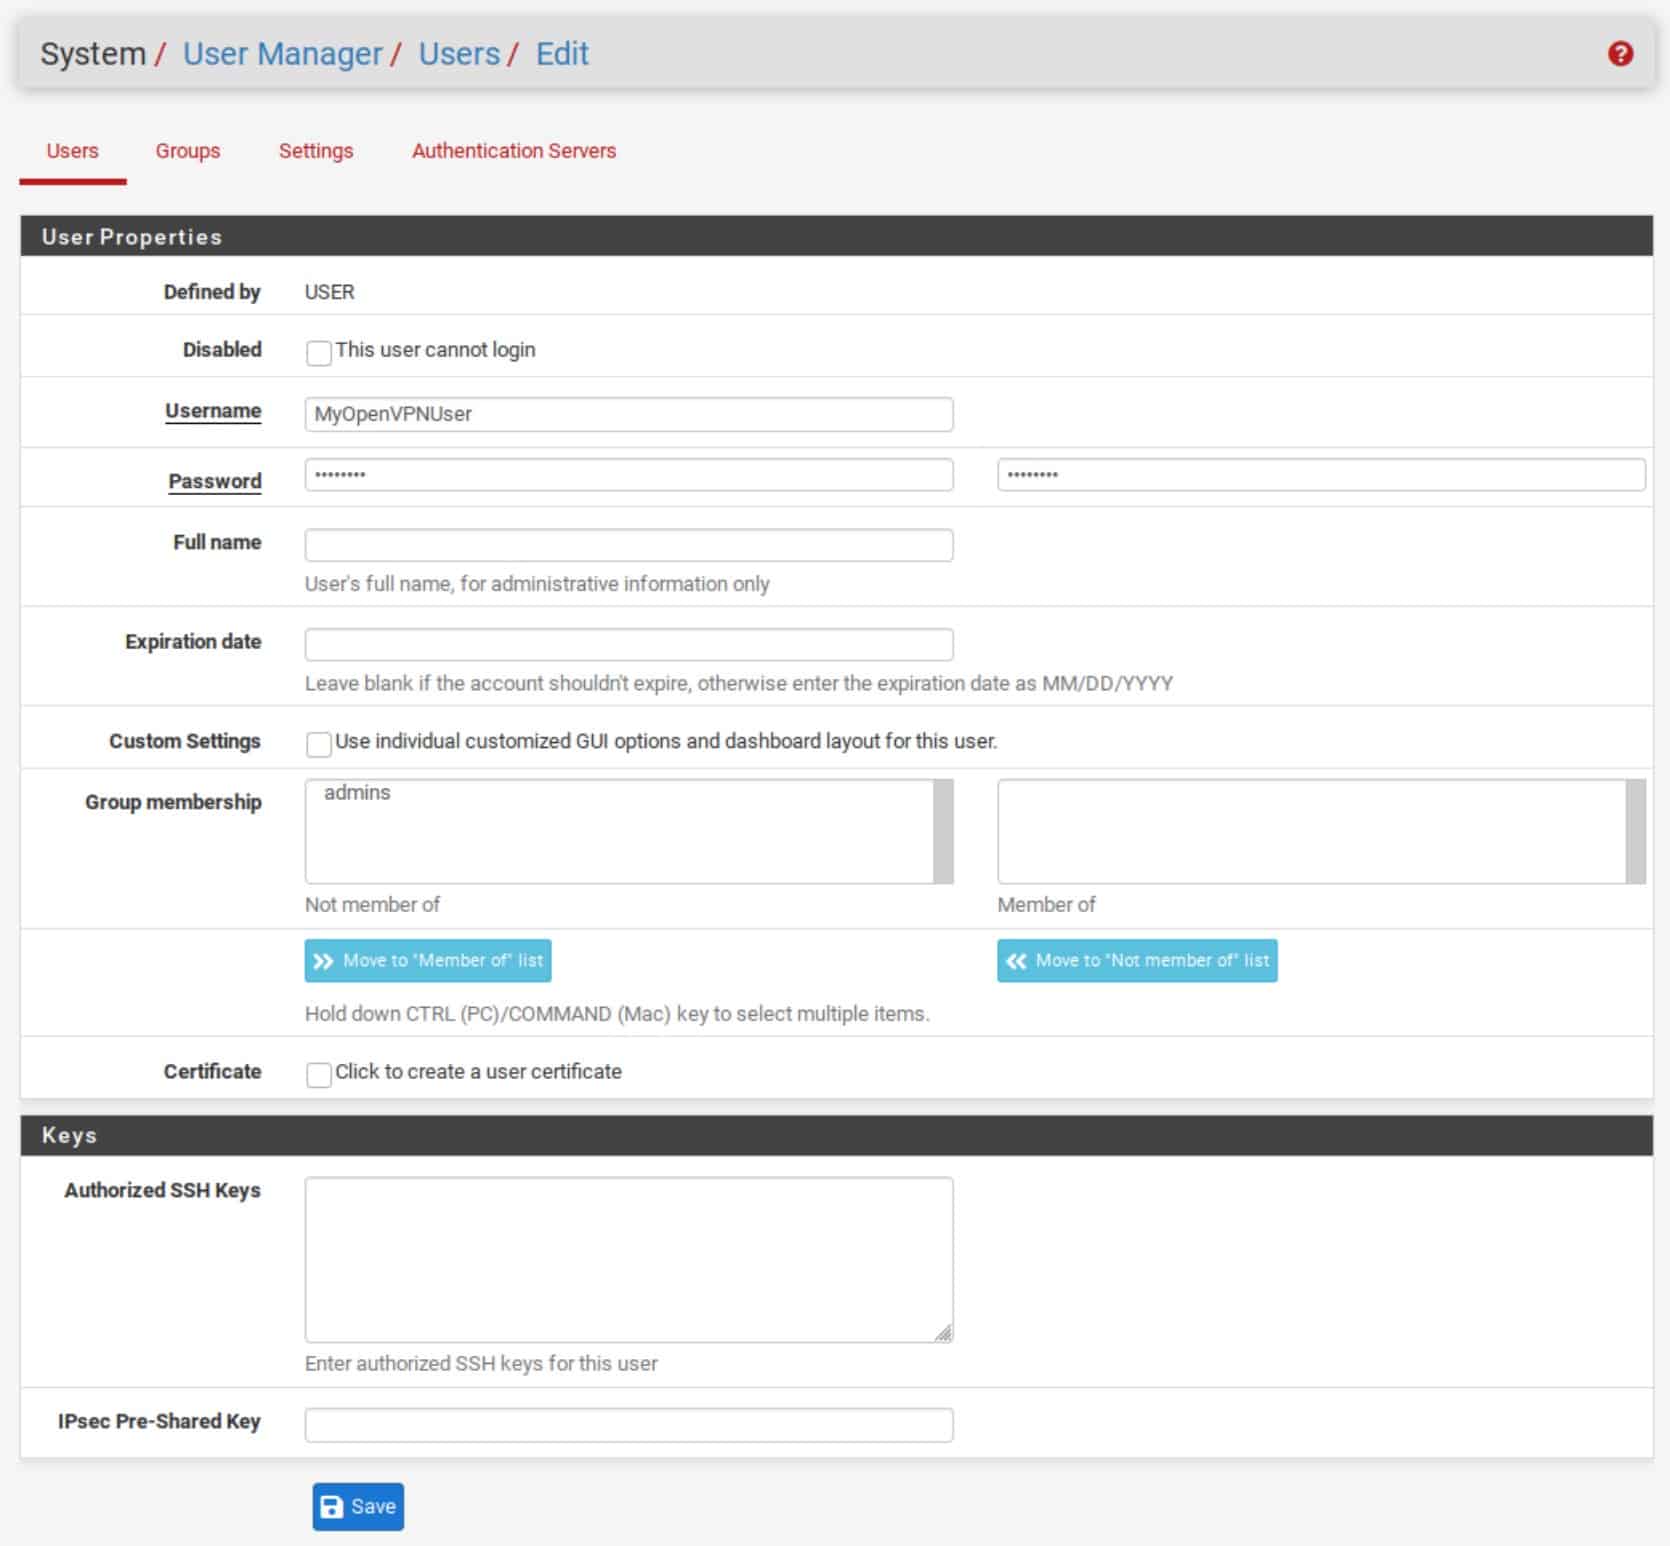
Click Save.
Repeat these steps for each VPN user.
Create user certificates
If you’re using certificate authentication (recommended), each user also needs a client certificate. Edit the user you just created and select Add under User Certificates.

Use the following settings:
| Setting | Recommendation |
|---|---|
| Method | Create an internal Certificate |
| Certificate Type | User Certificate |
| Certificate Authority | Select your CA |
| Key type | Match your CA |
| Key length | Match your CA |
| Digest algorithm | SHA-256 or stronger |
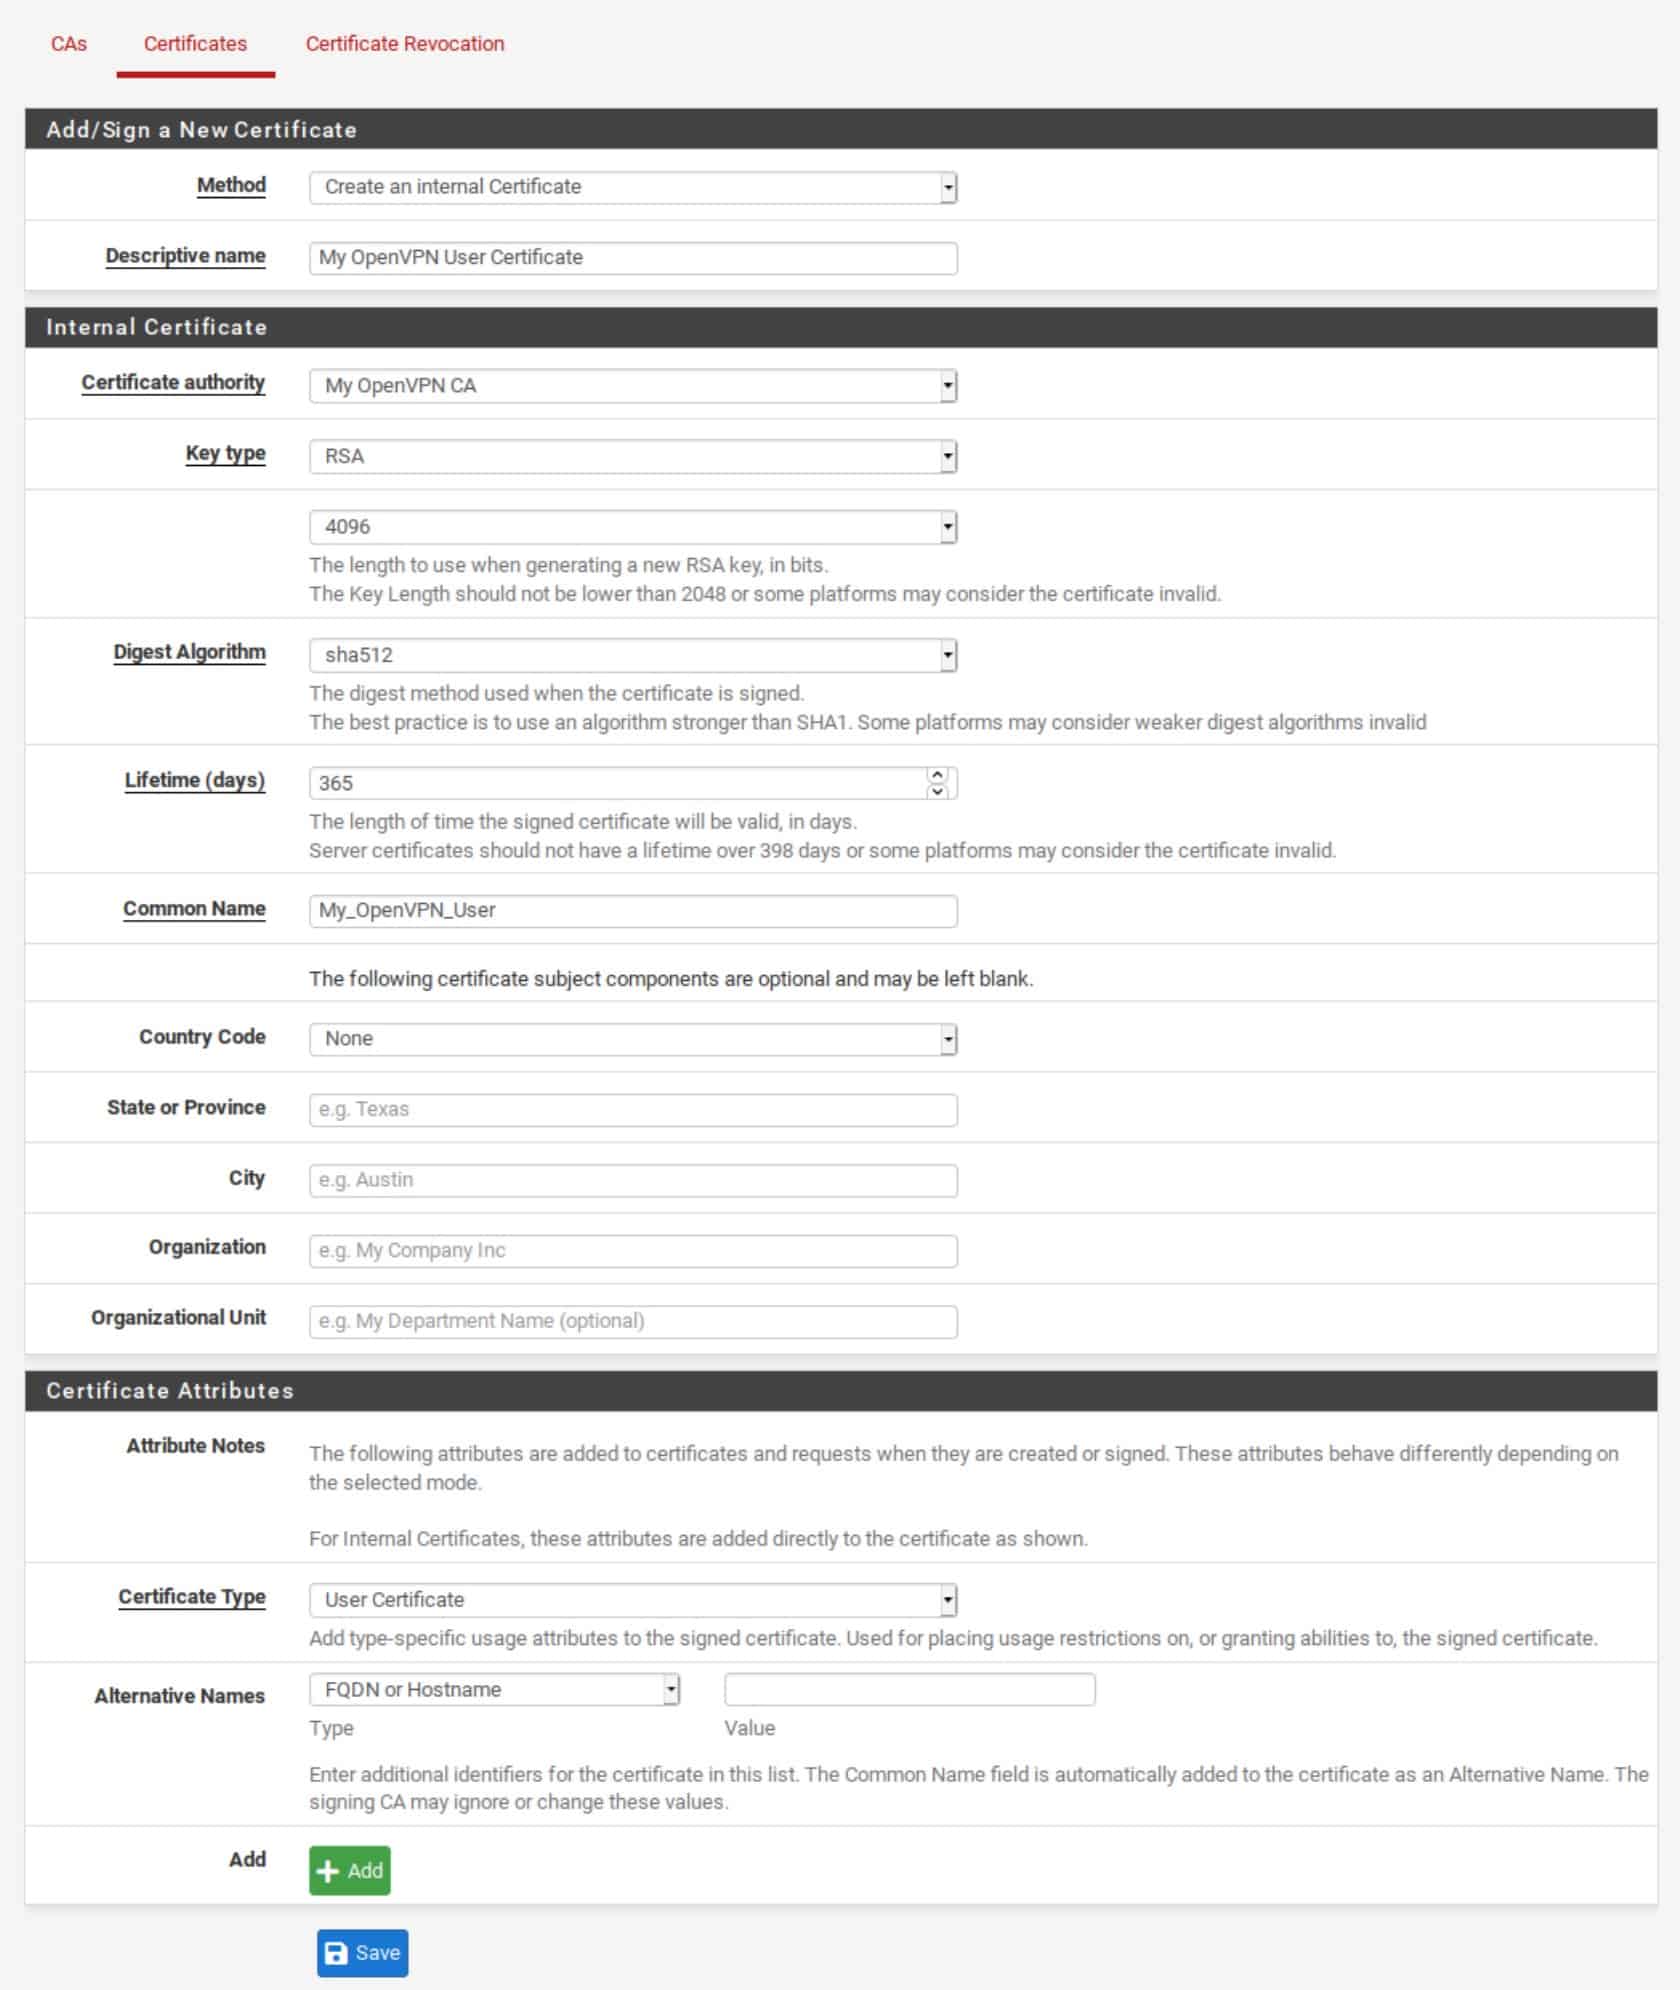
Save the certificate.
Each user now has:
- their own username
- their own password
- their own client certificate
This allows you to revoke individual users without affecting everyone else.
Why use certificates?
Certificates provide an additional layer of authentication that passwords alone cannot. Even if an attacker learns a user’s password, they still need access to the corresponding client certificate before they can establish a VPN connection.
For this reason, certificate + username/password authentication remains one of the most secure options for remote-access VPNs.
Step 4: Create the OpenVPN server
Navigate to:
VPN > OpenVPN
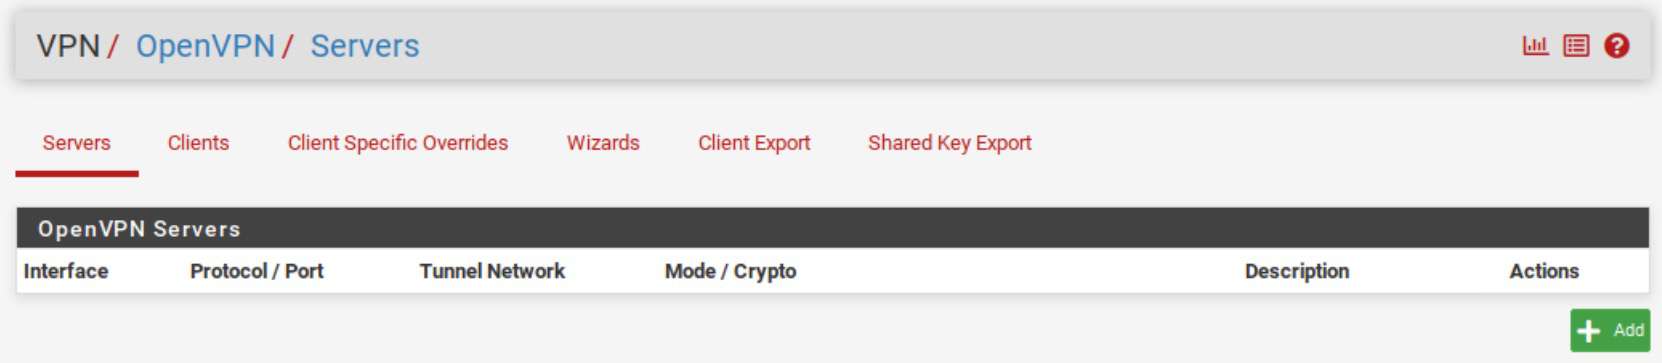
Click Add.
General settings
Configure the following:
| Setting | Recommendation |
|---|---|
| Server Mode | Remote Access (SSL/TLS + User Auth) |
| Protocol | UDP |
| Interface | WAN |
| Local Port | 1194 (or another unused port if required) |
| Description | Choose a meaningful name |
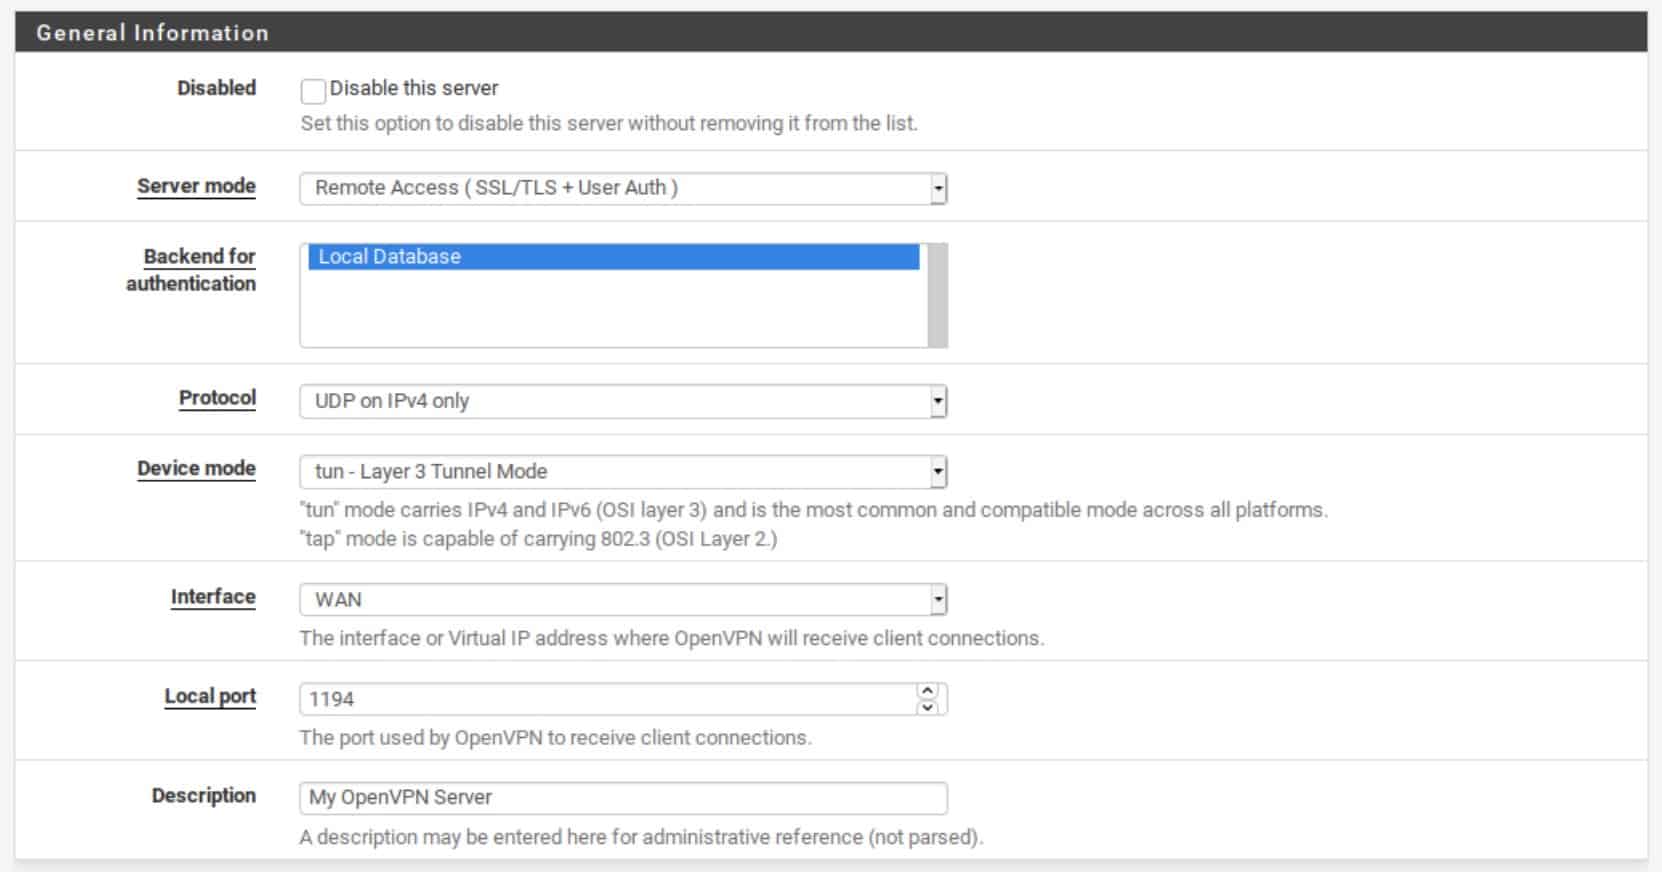
Why UDP?
UDP generally provides lower latency and better performance than TCP. Only choose TCP if your environment specifically requires it — for example, when UDP traffic is blocked by restrictive networks.
Cryptographic settings
Most current versions of pfSense already provide secure defaults. Rather than overriding everything manually, use modern defaults wherever possible.
Recommended settings include:
- TLS enabled
- TLS 1.3 supported
- AES-256-GCM or ChaCha20-Poly1305 data encryption (where available)
- Your Certificate Authority
- Your server certificate
Data Channel Offload (DCO)
If your pfSense version and client devices support OpenVPN Data Channel Offload (DCO), consider enabling it. DCO moves much of the packet processing into the operating system kernel, reducing CPU overhead and improving throughput on supported systems. Depending on the hardware and workload, the performance gains can be substantial.
Important: OpenVPN DCO is available in pfSense Plus (22.05 and later) but not in pfSense CE (Community Edition). If you’re using pfSense CE, you won’t see a DCO option in the interface. This is expected—the feature isn’t included in the Community Edition.
Do I need Diffie-Hellman parameters?
Older OpenVPN guides often recommend manually generating large Diffie-Hellman parameter files. In many modern deployments, particularly those using ECDSA certificates or TLS 1.3, this is no longer necessary.
Unless you have a specific compatibility requirement, following the current pfSense defaults is usually the best approach.
Tunnel settings
The VPN requires its own private subnet. Choose an IPv4 network that doesn’t already exist on your LAN.
For example:
192.168.2.0/24
If your network also uses IPv6, configure a separate IPv6 tunnel network.
If you want remote devices to send all internet traffic through your home connection, enable:
- Redirect IPv4 Gateway
- Redirect IPv6 Gateway (if using IPv6)
If you only want remote access to your home network and not full internet tunneling, leave these disabled.
Which option should you choose?
Route all traffic through the VPN if you:
- frequently use public Wi-Fi
- want your traffic protected while traveling
- want websites to see your home IP address
Route only local traffic if you:
- simply need access to home devices
- want the fastest possible internet connection while away
- don’t need your home internet connection for general browsing
Advanced settings
Most advanced settings can remain at their defaults.
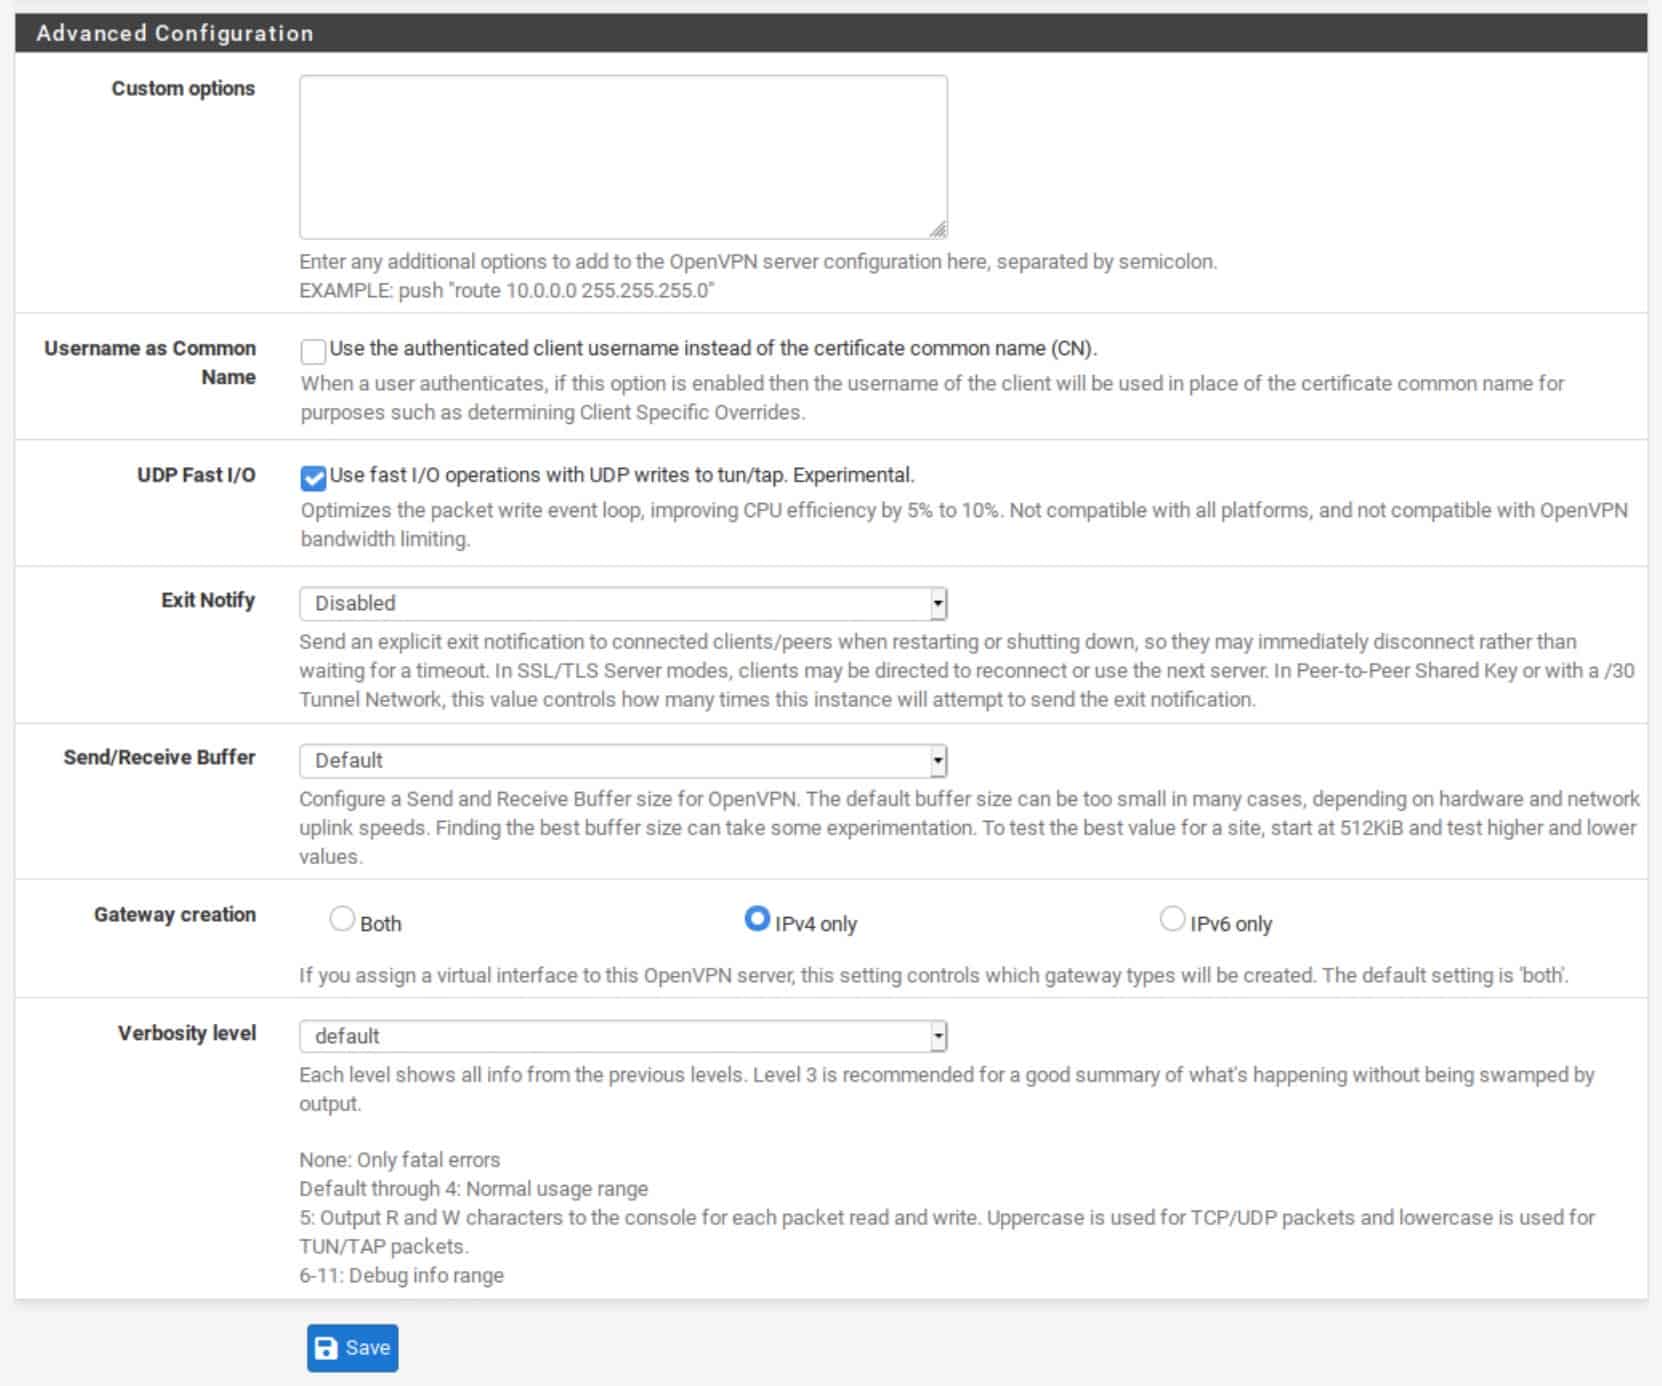
If available, consider:
- Enabling UDP Fast I/O
- Selecting IPv4 only if your network doesn’t use IPv6
- Leaving compression disabled
Why disable compression?
Older VPN configurations often enabled compression to improve speeds.
Today, compression is generally discouraged because it offers little performance benefit on modern broadband connections and has been associated with attacks such as VORACLE, which can leak portions of encrypted traffic under specific conditions. Leaving compression disabled is now considered best practice.
Verify the server starts correctly
After saving the server configuration, check that OpenVPN has started successfully.
Navigate to:
Status > System Logs > OpenVPN
If everything has been configured correctly, you should see:
Initialization Sequence Completed
If the service fails to start, the logs will usually indicate the cause, such as:
- certificate mismatch
- incorrect interface selection
- port already in use
- configuration syntax error
Resolving these issues now is much easier than troubleshooting client connections later.
Step 5: Create the firewall rules
Your OpenVPN server won’t accept connections until the appropriate firewall rules are in place.
You’ll need two rules:
- A rule allowing VPN clients to access your network.
- A WAN rule allowing incoming VPN connections from the internet.
OpenVPN interface rule
This rule controls what connected VPN users can access after they’ve successfully authenticated.
Navigate to:
Firewall > Rules > OpenVPN
Click Add.
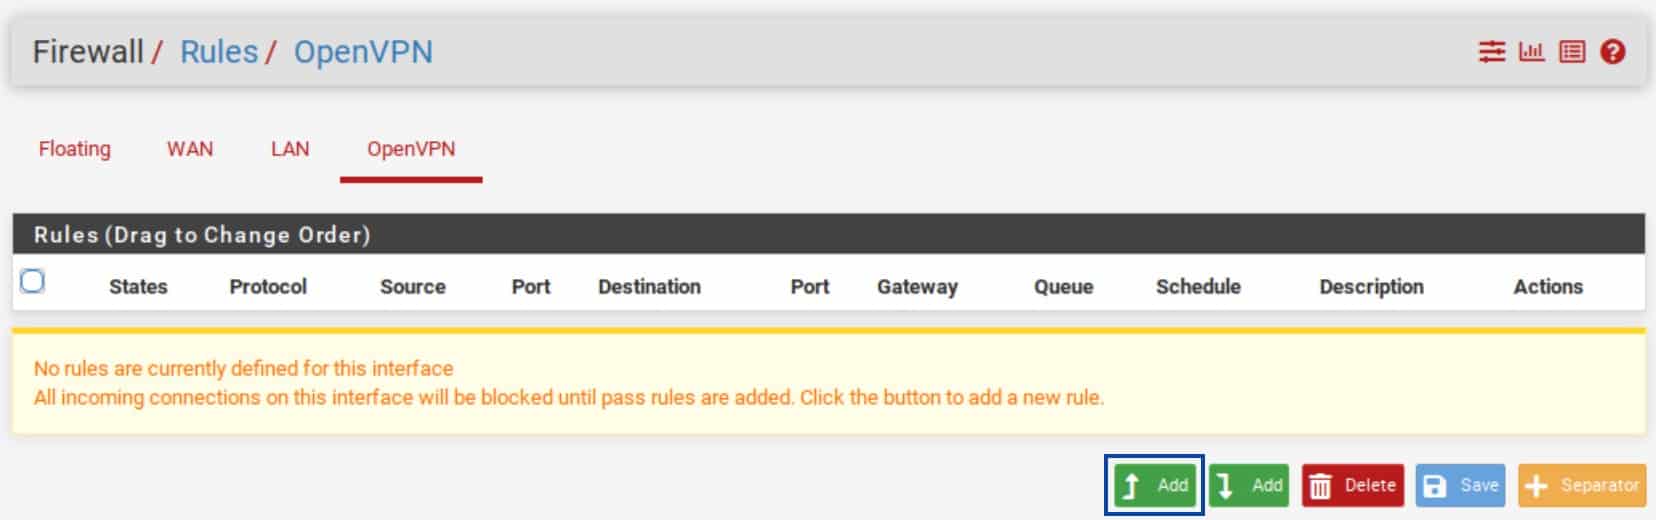
For a basic home setup, configure:
| Setting | Recommendation |
|---|---|
| Action | Pass |
| Address Family | IPv4 (or IPv4 + IPv6 if required) |
| Protocol | Any |
| Source | OpenVPN network |
| Destination | Any |
Save the rule and click Apply Changes.
This allows VPN clients to reach your internal network.
Security tip: For better security, consider restricting VPN users to only the networks or services they actually need instead of allowing unrestricted access.
WAN firewall rule
The firewall also needs to allow incoming VPN connections from the internet.
Navigate to:
Firewall > Rules > WAN
Click Add.
Configure:
| Setting | Recommendation |
|---|---|
| Action | Pass |
| Protocol | UDP |
| Source | Any |
| Destination Port | 1194 (or your chosen OpenVPN port) |
Save the rule and click Apply Changes.
Without this rule, remote clients won’t be able to establish a VPN connection.
Step 6: Install the OpenVPN Client Export package
pfSense includes a package that automatically generates client configuration files for many operating systems.
Navigate to:
System > Package Manager > Available Packages

Locate:
openvpn-client-export

Click Install, then Confirm.
Once installation completes successfully, you’ll have access to the Client Export utility. This saves a considerable amount of manual configuration and reduces the likelihood of client configuration errors.
Step 7: Export the client configuration
Navigate to:
VPN > OpenVPN > Client Export
Select your newly created OpenVPN server.
If your internet connection uses a dynamic public IP address, configure Dynamic DNS so clients can reconnect automatically if your ISP changes your IP. Otherwise, the default interface IP is sufficient.
Scroll to the bottom of the page and download the client configuration appropriate for your operating system.
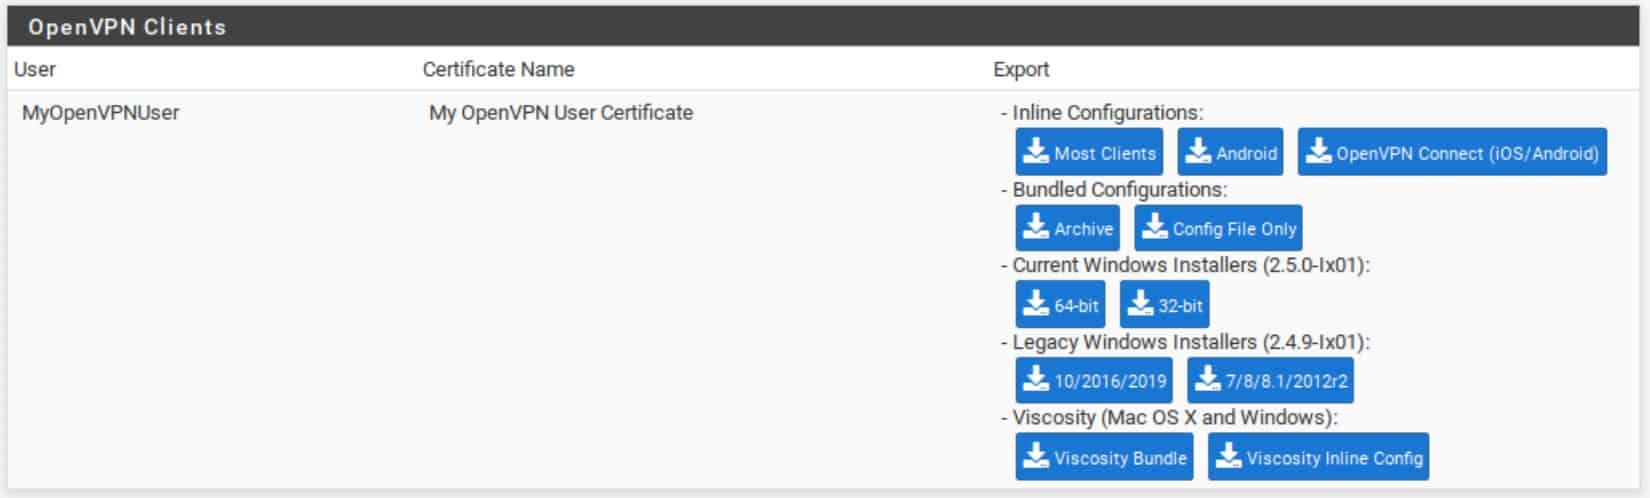
Import the configuration into your preferred OpenVPN client. When prompted, enter the username and password created earlier.
Test the VPN connection
Before relying on your VPN remotely, perform a few simple checks.
1. Verify the tunnel connects
The client should connect successfully without certificate warnings or authentication errors. If the connection repeatedly retries or times out, review the OpenVPN logs on pfSense for more detailed error messages.
2. Check your public IP address
After connecting, visit an IP address checking service. If you’ve enabled Redirect Gateway, your public IP should now match your home internet connection rather than your current location.
If it doesn’t, verify that gateway redirection is enabled and that your firewall rules allow outbound traffic through the VPN tunnel.
3. Test access to local resources
Confirm that you can reach devices on your home network, such as:
- NAS devices
- file shares
- printers
- media servers
- internal web interfaces
If these are inaccessible, double-check your firewall rules and routing configuration.
Troubleshooting common problems
Even a small configuration error can prevent a VPN from working correctly. Fortunately, most issues are straightforward to diagnose.
| Problem | Likely cause | What to check |
|---|---|---|
| Client won't connect | WAN firewall rule missing or incorrect port | Confirm UDP 1194 is open |
| Authentication fails | Incorrect username, password, or certificate | Verify user certificate and credentials |
| Connected but no internet | Redirect Gateway or NAT configuration issue | Check outbound NAT and gateway settings |
| Can't access LAN devices | Firewall rules or routing configuration | Verify OpenVPN interface rules |
The OpenVPN system log is usually the best place to begin troubleshooting.
Conclusion
Running OpenVPN on pfSense is one of the most effective ways to add secure remote access to your home or small business network. By terminating the VPN directly on your firewall, you centralize security, simplify management, and gain secure access to your devices from virtually anywhere.
Although the initial configuration takes a little time, most of the work only needs to be done once. After creating your certificates, configuring the server, and exporting your client profiles, connecting new devices becomes straightforward.
For the best long-term experience, keep pfSense updated, use modern cryptographic defaults, assign every user their own credentials and certificates, and periodically review your VPN configuration as new OpenVPN and pfSense features become available.
With these measures in place, you’ll have a flexible, secure remote-access solution that should continue serving your network for years to come.





Yeaaa best guide, thanks!!!
Marc,
Thank you VERY MUCH for posting this tutorial. It worked like a charm!
A+++
Thank you!!
Great directions. Had a few hiccups the first 3 times. The main problem I found was that by setting up users [I will be using Remote Access (SSL/TLS + User Auth) for this example.] I wasn’t getting the option to select the various OpenVPN Clients export(s) files. That area of the page failed to render. After a few times thinking I must have NOT entered the options correctly, it occurred to me that the users being [SSL/TLS + User Auth] just might require a user certificate to be generated. So, then I opted too just do [User Auth] w/o SSL/TLS, and Voila! the option to select the various OpenVPN Clients export(s) files section rendered. OpenVPN is now working on two different phones.
Thank you, very helpful tutorial.
Outstanding guide, got my first VPN working first try. Thank you!
Thank you, save my day after weeks of searching about fragmentation
Awesome Tutorial
Great Guide
Thanks. After following all the Steps, one by one, I was able to setup OpenVPN… Thank you once again.
Awesome tutorial, worked first time…. thank you! 🙂
Great tutorial, really covers everything!
Followed you instructions brilliant is it possible to make it more robust
Thank you, very helpful tutorial.
Nice Job! Figuring this out would have taken a lot of time.
Thankyou ! My previous VPN had stopped and I could not work it out.
Deleted everything, followed this guide and presto ! Working VPN
Thankyou!
Many thanks for your sharing!
Great Guide.
Thank you. Nice work. I appreciate it.
Great work, it’s really worked for my case. I was struggling since more than a month. Thanks a ton.
Thanks very much for this guide, it’s really appriciated
Thank you for the guide.
I had intermittent problems. The client would always connect, but it couldn’t reliably use the network. Some websites would load (https://wikipedia.org) and others wouldn’t (https://google.com). After a bunch of tinkering and some help on Reddit, I finally found the solution.
In the VPN Server Config ==> Advanced Configuration ==> Custom Options I set the following to limit UDP packet size:
link-mtu 1400;
I hope that helps others who run into similar problems.
Thank you.