Thinking about signing up with Instagram, but worried about your privacy? Have you ever wondered about how much information you’re giving away when you post, or asked if there are better ways to control who can see your information? We all want to enjoy our social networks to connect with family, friends, and followers, but sometimes we have stories we don’t want the entire world to see. Knowing what your privacy options are before signing up can help you feel more comfortable when using the app and enable you to share moments with confidence.
With over two billion active users worldwide, Instagram is a popular social networking platform with a devoted following. Whether you’re a new user who wants to know more about privacy before you join, or you’re an Instagram pro who wants to tweak some privacy options when using the app, here’s what to look out for.
Note: Any settings instructions provided below are for the iOS and may vary slightly for Android and desktop.
1. Pay attention to what you post
This is something every user on Instagram should be doing, yet horrible examples abound of innocent photographers revealing more about themselves than they should. Instagram is now one of the networks regularly scanned by hackers looking for fresh victims who unwittingly provide the keys for successful fraud or detailed information that can be used in a social engineering scam. Here are some examples of items that should never be included in images:
- Credit cards, bank checks, flight boarding passes, or documents that include financial numbers or account information.
- Items that include Social Security Numbers in sight, such as Social Security cards from the US or SIN cards from Canada.
- Tax documents, refunds, or financial forms.
- Identification cards and documents, such as a driver’s license or passport.
- Detailed health IDs, such as a health card or insurance number or form.
- School reports, documents, or application forms.
- Paper or electronic ballots after voting (these will invalidate the vote!)
- Images of you breaking local, state, provincial, or federal laws.
- Images of you goofing off or causing disruption at work—aside from risking an HR call regarding conduct, you may capture confidential information not meant to be shared outside the office.
2. Turn off activity status
Your activity status on Instagram tells other users when you are using or scrolling through the app, signaling to friends when it may be a good time to chat. This can be a good thing when you want to connect, but annoying if you’re doing a quick account check and don’t want to be disturbed.
To turn off activity status so that other users cannot tell when you’re online:
- Tap your profile picture in the bottom right to go to your profile
- Tap the three stacked horizontal lines in the top right, then tap Settings and privacy
- Tap Messages and story replies, which is below How others can interact with you
- Tap Show activity status
- Use the toggle switch next to Show activity status to turn your activity status on or off
3. Use two-factor authentication
Although not invincible, two-factor authentication (also known as 2FA) is popular in security and highly recommended. When in place, it means a hacker needs more than your username and password to access your account.
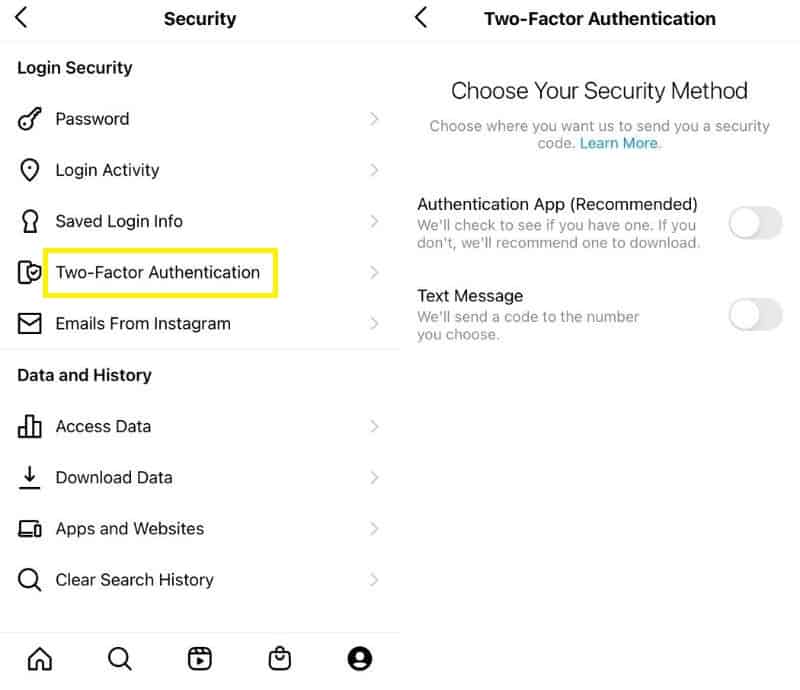
With Instagram, you are provided with two options: you can set your account to send a text code to one of your devices when logging in, similar to a second password. Alternatively, you can log into Instagram through a third-party authentication system, such as Google Authenticator or Duo Mobile.
To activate two-factor authentication on your account:
-
- Select the menu icon and hit Settings
- Scroll down to Security > Two-Factor Authentication > Get Started
- Choose whether you want to authenticate via text message or an authenticator app
Keep in mind that to use text message two-factor authentication, you will need to add a phone number to your account.
4. Consider locking your account
If you want to stop strangers from viewing your photos, consider locking the account so that only those friends and followers you approve of can see what you post.
Those who are under 18 when they sign up for an Instagram account are given the option to choose between a public or private account — though private will be selected by default. However, if you’re over 18, Instagram makes your account public by default.
To make your account private:
- Select the menu icon and hit Settings
- Select Privacy
- Toggle the Private Account option to the on position
Instagram notes that once your profile is private, new followers will have to send a follow request to see your images. However, posts you share to other social networks may be visible depending on the network preferences.
5. Block or restrict individual accounts
Feel like you’re being put under the microscope by certain parties? Consider blocking the specific account so they can’t see you. Blocked accounts can’t see your images or videos or search for your name, and their comments won’t appear in your Activity.
Although you won’t be completely hidden, as users not logged in will still be able to view your account, blocking specific users may save some grief as you know your images are not showing up on their timeline.
To block one or more accounts:
-
Tap your profile picture in the bottom right to go to your profile
-
Tap the three stacked horizontal lines in the top right, then tap Settings and privacy
-
Tap Blocked, which is below Who can see your content
- Tap in the top right and search for the person you’d like to block. Tap Block to the right of their name to add them to your blocked accounts list
- Tap Block at the bottom to confirm that you’d like to block the account and other accounts that they may have or create
- If you only want to block that particular account, select Block [username]. Tap Block again to confirm.
Note that you also have the option to restrict users. When you do this only you and the restricted user can can see comments they add to your posts or their replies to your story stickers.
6. Control comments on your posts
Comment controls won’t protect privacy by hiding your images or data, but they can limit what others post on your pictures and weed out offensive or annoying messages.
For more power over your conversations:
- Tap or your profile picture in the bottom right to go to your profile
- Tap in the top right, then tap Settings and privacy
- Below How others can interact with you, tap Hidden words
- Use the toggle switches below Offensive words and phrases to:
-
- Turn on Hide comments to filter out comments with common offensive words, phrases or emojis
- Turn on Advanced comment filtering to filter out even more comments that may be spam, or that may contain offensive words or phrases
- Turn on Hide message requests to send message requests that may contain scams or offensive words, phrases or emojis to a hidden requests folder.
7. Limit access of third-party apps
Third-party apps—those applications that can access your Instagram account—can allow the user to experience or apply Instagram in unique ways. For example, you might use a third-party app to apply unique filters to your image before uploading, to engage with your followers in different ways, or analyze what your followers are most interested in. There are concerns, however, that not all third-party apps take privacy seriously and may end up collecting or disclosing more information than you’re comfortable with.
Instagram itself implemented new controls for the data it can access as of April 2018, a move some reports have suggested was triggered in part by parent company Facebook’s Cambridge Analytica scandal. Before using a third-party app and granting it Instagram access, read the privacy policy and look for red flags or options to limit how much data the app can access.
8. Disable tagging
Not only can your friends view and comment on your pictures, but they can also tag you in images they upload, identifying individuals in the image. Those pictures can also be automatically added to your own profile, where they can be seen by your followers and visitors. Sometimes, however, we’d rather not showcase the image on our own networks.
If this sounds like you, there is an option:
- Select the menu icon and hit Settings and privacy
- Tap Tags and mentions, which is below How others can interact with you
- Under Who can tag you, select who you want to be able to tag you (e.g. Allow tags from everyone or Don’t allow tags)
9. Use the “Stories” feature
Instagram Stories are brief Instagram posts that disappear after 24 hours. They don’t appear in your regular feed, but are instead displayed as a button list at the top of the feed as users browse through and don’t remain in your profile later. They are the perfect way to share a memory briefly without keeping it forever within your profile history.
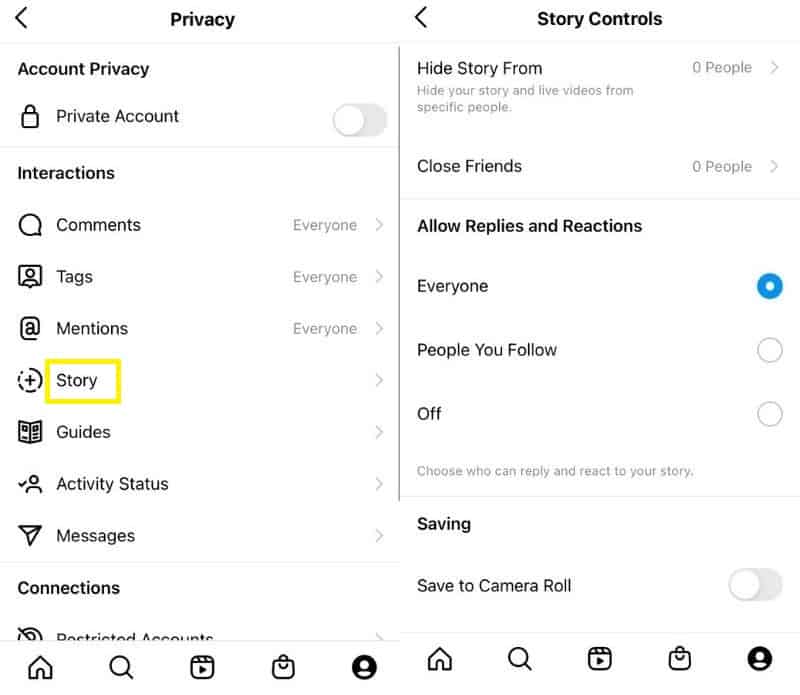
You can set images and video as stories by hitting the camera button at the top of your profile. In addition, Instagram allows you to toggle off others reshaping your stories, and provides other preferences under Story Controls. While there is no way to block users from sharing pictures uploaded as stories entirely due to screenshots, consider Story Controls as an option.
To set up Story Controls:
- Select the menu icon and go to Settings.
- Choose Privacy > Story.
- Select your preferences from the menus provided.
10. Turn off your location
You’ll need to go into your device’s individual preferences for this one, but if privacy is a concern, it’s never a bad idea to remove location access, either as a general default or by app.
To turn off your location from an Apple device:
- Leave the Instagram app and go to your iPhone’s Settings
- Go to Privacy
- Select Location Services
- Scroll down and tap Instagram
- Select Never or While using the app to choose location access
11. Limit the metadata contained in photos you upload
Metadata is commonly referred to as ‘data about data.’ It refers to little building blocks of information such as versioning, timestamps, authors, and geographic location. Unfortunately, however, images uploaded to Instagram stamped with the geographic location of where the photo was taken can provide others with more detail than the photographer wants to reveal.
On an Apple device, this can be disabled the same way you limit the Instagram app’s access to your location: by toggling off location services access by the camera. Alternatively, if you want to remove the metadata but leave your location services on, consider an app, free or paid, that will allow you to see and remove metadata before you upload.
12. Check for privacy with new app updates
Like all social media channels, Instagram periodically makes changes to its service, either to introduce new features or set up better security controls and remove unwanted bugs. After you’ve updated, take a quick scan of your privacy settings. You can also search online for the latest version of Instagram along with the word “privacy” to see if there have been any concerns over new features and how to turn them off.
Final thoughts
Since hitting the scene in 2010, Instagram has developed an impressive following. One study found that 37 percent of US adults (including 43 percent of women) use the image-sharing social media platform. Odds are, even if you’re not on Instagram yet, you have been curious about joining.
By setting up a few added privacy and security controls, you can connect on Instagram while limiting the app’s access to personal information. This means you can feel comfortable while engaging with the community and having fun.
See also:


I’m one of the people (based in UK) who has had their Instagram account hacked and the hacker has changed the email address. Frustratingly, Instagram emails me occasionally to tell me to change my password because my account has been active in Mosscow. Clearly I can’t do that because the new password goes to the hacker’s email. There are photos of me and my family on there and I have no idea what the future intentions of the hacker are. I’ve done everything to try to get Instagram to close the account and have even sent photo ID. Nothing is coming back from them. Does anyone know what else I can do? It’s causing me substantial worry and anxiety. Thanks
Thanks for reaching out; abet I certainly wish it was under better circumstances. Getting an account hacked is never fun, and your frustrations when dealing with Instagram are completely understandable.
For how to get your account back, there are a few tips on Digital Trends worth a look if they have anything beyond what Instagram’s official help offers. If you’re worried about your photos online, you might also have some luck with facial recognition search engines. Two sites provide detailed lists of services are MakeUseOf and Quertime. I’d start with Google’s tool as that’s likely easiest.
I also recommend checking the site haveibeenpwned.com to anyone who has been hacked, or think they have been part of a breach: might expose where the password was lost, and a heads up for similar accounts/passwords to change. I’ll ask around if there’s anything else that might help.
Very sorry to hear this happened to you!
Victoria