NAS systems are convenient since they let you access your files from anywhere in the world. However, anyone observing your network (your internet service provider, for instance, or the government) can see every packet of data you send or receive. Some ISPs have even been known to limit the network speeds of users who download a lot, so if you’re storing large files, this could be a real problem.
Luckily, an easy way to keep your network traffic secure is to install a Virtual Private Network (VPN) on your NAS. This will encrypt every byte of information you send or receive, ensuring that you’re the only person who knows which files were downloaded. You can install a VPN client on a QNAP NAS server in just a few minutes.
Before we begin, here’s a quick summary of the best VPNs for your QNAP NAS server.
Best VPNs for your QNAP NAS server:
- NordVPN: Our #1 choice for QNAP NAS servers. An excellent VPN service, Nord is fast, secure, reliable, and keeps no logs whatsoever. It also offers a risk-free 30-day money-back guarantee.
TIP In our testing we found that the cheapest NordVPN plan (Standard) works perfectly for QNAP VPN setup. - Surfshark: The best budget VPN for QNAP. This VPN provides decent speeds, a wide server network, and keeps your traffic private with advanced security features and a zero-logs policy.
- IPVanish: With reliable, high-speed connections, a no-logs policy, and strong security features, IPVanish makes it easy to use NAS systems anonymously.
- ExpressVPN: This consistently reliable VPN boasts powerful security features, strong privacy protections, and high speeds.
- CyberGhost: A vast network of over 8,000 servers in around 90 countries. High speeds and a wide range of security features.
- PrivateVPN: A very fast service that takes your security seriously and doesn’t keep any logs at all.
- Private Internet Access: This VPN allows up to 10 simultaneous connections and has a network covering over 80 countries. Reliable, fast, no-logs service.
Many VPNs claim to protect your privacy and offer a fast, reliable connection but most (especially free VPNs) limit your connection speed or leak information.
We regularly test the top 70 VPNs for security and speed and this list only includes VPNs which are fast, reliable and are highly rated for privacy and security. Plus we only recommend VPNs which offer a full-money back guarantee allowing you to try them risk free.
WANT TO TRY THE TOP VPN RISK FREE?
NordVPN is offering a fully-featured risk-free 30-day trial if you sign up at this page. You can use the VPN rated #1 for QNAP with no restrictions for a month—great if you're unsure about making a long-term commitment.
There are no hidden terms—just contact support within 30 days if you decide NordVPN isn't right for you, and you'll get a full refund. Start your NordVPN trial here.
Installing OpenVPN client on your QNAP NAS
Installing an OpenVPN client on a NAS server is slightly different from installing a PPTP or L2TP/IPsec client, but the good news is that it can be done in just three main steps. The process is the same regardless of which VPN provider you’re with. Just follow the instructions below.
Here’s how to install OpenVPN client on your QNAP NAS:
Step 1: Tell QNAP you’d like to use a VPN
First, ensure you’re using QNAP 5 since specific VPNs have trouble connecting with older versions. Once you’ve upgraded, login to your QNAP device.
Next, check to see if you already have the QVPN Service installed. If so, great — click it to move to the VPN management page. If not, you can download this service from the App Center.
Click the VPN Server option in the list on the left-hand side to expand it. Next, select OpenVPN and make sure there’s a check in the box marked Enable OpenVPN Server.
Step 2: Import.OVPN files and configure the connection
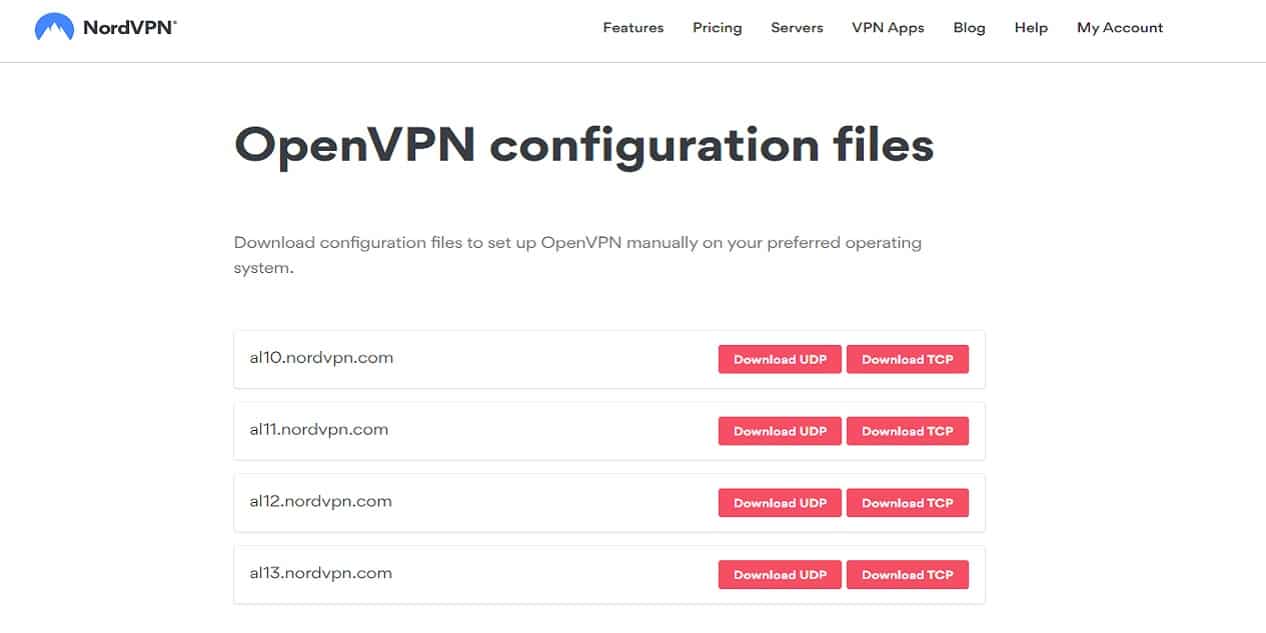
Now, you’ll be asked to import an OVPN file. This stores all of the information the server needs to create an OpenVPN connection to one of your VPN provider’s servers. We recommended NordVPN, and you can find their OVPN files here:
- NordVPN: https://nordvpn.com/ovpn/
If you’re using a different provider, you can often find these files linked to in their Linux installation guide.
Download the OVPN files and decide which server you’d like your NAS to use. Generally, choosing a server that’s fairly close to your location is a good idea as this keeps connection latency to a minimum. When you’ve made a decision, import the corresponding OVPN file.
A new window will open asking for additional information. Give your connection a name and enter your VPN login credentials in the Username and Password boxes. Make sure the subnet mask is set to “255.255.255.0”.
Enable the Use default gateway on a remote network and Reconnect when the VPN connection is lost options. Click the Apply button at the bottom of the page. You should now see your newly-created connection listed on the QVPN main screen. Finally, click Connect.
Step 3: Test the VPN connection
Now all that remains is to make sure everything is working as intended. This is a little more complicated than testing a VPN on a PC or mobile device, but it’s still fairly straightforward:
- First, visit IPmagnet and copy the magnet link address. Make sure to keep this page open!
- Go back to QNAP and open up the Download Station.
- At the top of the page, you’ll see a plus icon. Click this and select Input URL.
- Paste in the magnet address from earlier. Click Next, then Apply.
- Go back to the IPmagnet page. You’ll notice a second IP address has appeared. If these two addresses differ, you’ve successfully installed a VPN on your NAS server.
FAQs about QNAP VPN setup
What is QNAP?
QNAP (Quality Network Appliance Provider) is a solution for delivering Network Attached Storage (NAS) and Network Video Recording (NVR) for home users and professionals.
Why Should I Use QNAP?
The benefit of using QNAP is its ease of installation and simple operation, meaning you won’t need to rely on an IT professional to get up and running. QNAP is lower in cost compared to other NAS and NVR providers. QNAP offers granular security features and straightforward backup and recovery.
Why isn’t my NAS VPN working correctly?
Due to the general complexity of networking software and the many different NAS models that QNAP offers, it’s often difficult to identify the cause of a given problem. However, you can do a few things that will take care of the most common issues.
- The most common mistake is entering a VPN username or password incorrectly. As a result, this is the first thing you should check.
- Upgrade to the latest firmware for your device, and while you’re at it, check for QVPN updates too, since some VPNs won’t work with the original version.
- Try importing the OVPN file for a few different servers in turn. This should give you an idea of whether the problem is with you or your VPN provider.
- If all else fails, contact your VPN’s customer support team. They deal with similar problems every day and should be able to give you more in-depth advice.
Is QNAP compatible with Mac devices?
QNAP works perfectly on mac devices, including newer Macs with the latest M1 chip. To get started, you’ll need to download and install QFinder pro.
How do I protect my NAS from hackers?
Securing your NAS from hackers is essential to protect your data. Here are some steps you can take to ensure your NAS is secure:
- Implement strong password security – use a unique username and a strong password that is difficult to guess.
- Ensure that the NAS firmware is routinely updated – this will help keep your system up-to-date with the latest security patches.
- Never use default admin accounts – hackers easily guess these and can give them access to your system.
- Enable two-factor authentication – this adds an extra layer of security by requiring users to provide additional information, such as a code sent via text message or email, before accessing the system.
- Limit sign-in attempts – set limits on how many times someone can try to log in before their account is locked out for a certain amount of time.
- Use anti-ransomware software – this will protect against ransomware attacks by detecting and removing dormant malware before it takes effect.
- Utilize built-in firewalls – most NAS devices have built-in firewalls, so there’s no reason to turn them off, even if perimeter firewalls and other security measures already exist in place.
By following these steps, you can help ensure that your NAS remains secure from hackers and other malicious actors who may be looking to gain access to your data or systems.


