

The internet is truly a mind boggling thing. It is a global network of computers all hooked together sharing information. It has been marketed as a system whereby we visit
web sites and log on
to other systems in order to make it understandable. The reality of how the internet works is fundamentally different than those terms lead us to believe. In the gaps between the notion and reality of how the internet works is where security and safety problems lie. In this article, we’ll break out the most important aspects of internet safety into bite-sized chunks and offer some practical advice on each.
The internet is just the transmission medium. It simply connects computers together and has no actual content of its own. Much like a highway exists to provide a means for cars to get from point A to point B, the internet exists to provide a way for network traffic to get from point A to B. Using the internet really boils down to transferring a bunch of network traffic back and forth between computers. Usually, these include your own computer, and website computers called servers.
When you log in
to a website, what really happens is this, using a bank website as an example:
- Your web browser requests the login page from your bank website. It does this by virtue of you clicking the ‘log in’ button.
- That login page is transferred across the internet and downloaded to your computer where your browser displays it.
- You fill in your username and password and click the ‘log in’ button.
- That username and password is transferred across the internet to the web server.
- The username and password combination are checked against the web server’s user database.
- If it is correct, then the web server transfers your private account page to your computer. Your browser displays it and you can get on with your banking.
Every time you click a link, the same process occurs. Your request is transferred to the web server, it transfers the requested page back to you. If you’re following the highway analogy, then you’re probably starting to realize that all your data, private and public, is shuttled across the internet all the time. That’s where the potential for safety issues lie and there are some basic things you can do to hedge your bets and better protect yourself.
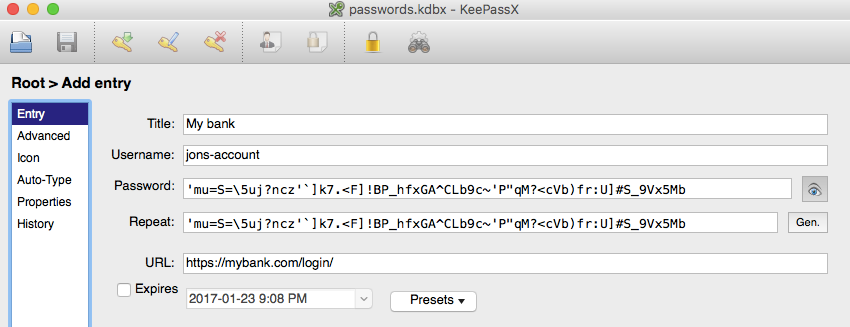
Passwords: how to create and protect them
It’s not possible to get too far into any computer or on the internet without providing a username and a password. Most websites require a login to access site features these days. It’s hard to keep track of all those passwords, and the easiest way to deal with it may seem to re-use the same email and password combination on more than one site.
This is a dangerous tactic and should be avoided. Every day, many websites are attacked and their database of usernames and passwords stolen. Once the bad guys (referred to as hackers
) have your username and password from one site, they’ll try to use it on other sites. If you’ve used the same username and password on your low-risk neighbourhood watch website and also on your high-risk bank website, you’ve just provided a bad guy with the credentials he needs to log in to your bank website. The best defence against this is to use a different password on every website.
Creating good passwords
The idea of a good
password seems vague. In order to understand what a good
password is, we first have to understand what a bad
password is. A bad password is one that can be guessed.
Databases of usernames and passwords are stolen from insecure websites every day. That means there are a lot of credentials available to be studied and from that it becomes very apparent that humans are terrible at creating good passwords.
Some studies show that only 1,000 individual words comprise 91 percent of all passwords1,000 individual words comprise 91 percent of all passwords. Note – that link lists the 10,000 most used passwords and some of them are colourful. These passwords are easy to guess because hackers have access to these same lists and will use your email address and these passwords on various sites to see if any of them work. If you’re interested to see how strong your current password is, try our password strength checker.
Many people try to make their password more complex by adding numbers to the end of it. That is a well known trick that hackers are also aware of. One database study showed that of the passwords that ended in a number almost a quarter of them used the number 1.
There is no shortage of advice on the internet about how to create a good password and it can be very hard to make sense of all the recommendations. The best passwords are a long random jumble of numbers, letters and special punctuation characters. Using nice strong passwords like this would be impossibly impractical if it were not for the existence of Password Managers which our own Lee Munson covers in detail here.
Using password managers
There is a breed of software named Password Managers that exist to make the use of long, random passwords practical. This software creates secure passwords for you, and stores them so you can easily look them up when you need them. Some of them have additional features which make them even more convenient to use such as:
Auto-fill
the login fields on a website for you so you don’t have to stop what you’re doing to look up your username and password.- Store your password data online which means you can access it from different devices such as your iPad and desktop computer. Note: the password lists these managers create is always encrypted which makes it possible to store online with some modicum of safety.
- Alert you when a website you use has been compromised so that you know you should change your password on that site since it is now known.
Comparitech has a list of the Best Password Managers, both free and paid, here.
Using two-factor authentication (2FA)
Two-factor authentication (2FA) has been around in corporations and governments for many years, but is just starting to become mainstream in the consumer space recently. It adds a second
factor to your authentication meaning that just a username and password is no longer enough to log in to your account. You must also provide a second piece of information and this is usually a numeric code that changes every few seconds. Consider a bad guy with your username and password trying to log in to your bank. When he’s asked to provide the ever-changing numeric code, he won’t be able to.
It is up to each web site to offer 2FA, and not all do. Check the security or login settings for your account on any given site to see if there are 2FA options. If there are, the will most likely take one of the following forms:
Sending a numeric code to your mobile phone number via text message (SMS)
This is the most common form of 2FA because it is easy to implement for the service provider and mobile phones are ubiquitous these days. You’ll need to provide your mobile phone number to the site and it will usually send a test code to your phone to verify it works. Once you enter that test code into the site, it will activate 2FA on your account.
From that point on, whenever you try to log in the site will send you a different code which you will have to enter to log in.
Using an application on your phone to generate codes
There are a number of applications that will generate 2FA codes such as Google Authenticator, Authy, and LastPass Authenticator. If a web site supports one of these apps instructions on setting it up will be on the security or login settings page.
Generally, you will need to install the app from your device’s app store, and then scan a code from the website using your device’s camera. That create a ‘slot’ in your authenticator app for that website which will display an ever-changing numeric code. Enter the current code into the website and it will activate 2FA on your account.
From that point on, you will need to open the app on your device and enter the code currently displayed for that site in order to log in.
Pros and cons of both types of 2FA
The SMS method is easier to manage because it does not require you to install an app on your phone. It’s also easy to transfer between phones because your phone number is tied to your SIM card and as you switch phones, the number goes with you. The downside is that you need to be in a coverage area. If you’re in a coffee shop somewhere with poor mobile coverage you won’t be able to receive the code. Also, if you’re a frequent traveller and in the habit of changing phone SIM cards to match the country you’re currently in, that means your phone number has changed. Keep that in mind before travelling if you’re using SMS two-factor authentication on any of your accounts.
The app method eliminates the need for mobile network coverage because it doesn’t need to receive a code. It generates the codes on the phone by itself so you can get a login code even if your phone is in airplane mode. The downside is that it is harder to transfer the authentication app to another phone. You’ll usually need to disable 2FA on all your accounts, then install the app on the other phone and then re-enable 2FA all over again.
How to identify unsafe sites
Bad guys are after one thing – your identity. They want access to your information and in order to do that they need your log in credentials to various sites. Since most of us won’t provide that information willingly, the bad guys need to trick us into divulging it. The two most common ways to do that are to trick us into entering our credentials into a fake website that we think is real, or trick us into installing spy software on our computer that will send that information to them. Later on, in this article there is a section about antivirus and security programs which provides some advice on security programs. This section is about identifying unsafe websites.
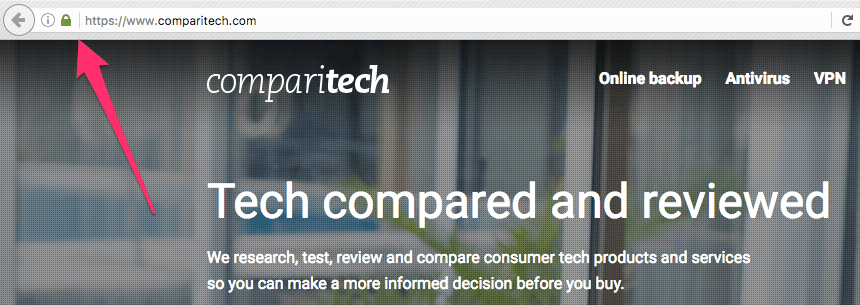
HTTPS/SSL – what does it mean?
If you use the web at all, you’re probably aware that some sites display a green address bar, sometimes with a padlock, when you visit it. This indicates that the data you will exchange with the web server is encrypted. For curious readers, the acronyms stand for Hyper Text Transfer Protocol Secure and Secure Sockets Layer. For practical purposes, they are interchangeable terms. That’s enough information to continue with this article, but if you’re interested in a “deep dive” into SSL, Sam Cook has a nice primer here.
Background:
Encryptionorencryptedmeans that the information you send the website, and the information it sends back to you, is scrambled. The only two parties that can unscramble the data and make it readable again are your web browser and the web server.
You can infer from that it is critical to see that HTTPS lock when you are transferring sensitive data such as usernames and passwords or any other personal information. This will ensure that data is not stolen in transit
between your computer and the web server.
It’s important to realize that the HTTPS padlock does not convey any credibility on a site. It does not mean the site does not have malware; it does not mean the site owners are not criminals; it does not mean you can trust the site at all.
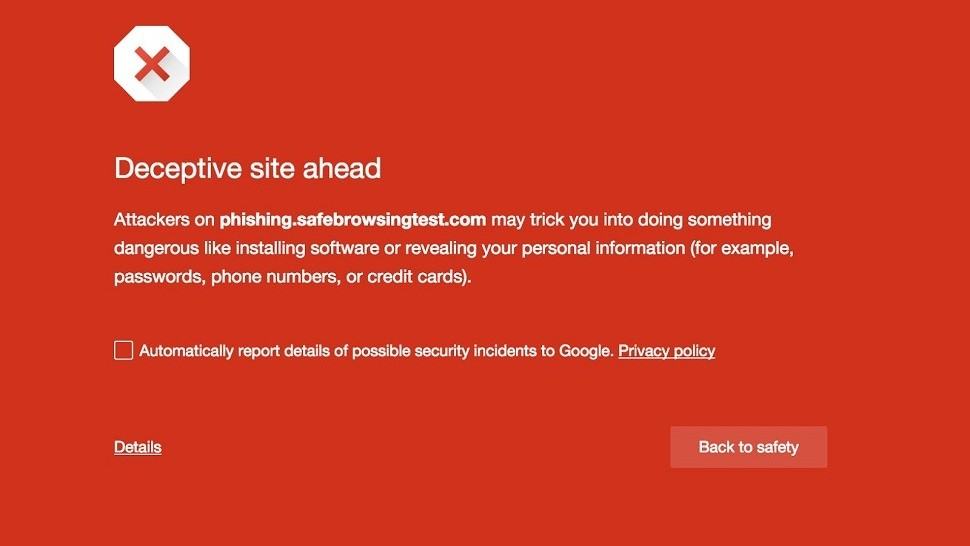
Google Safe Browsing warnings
Google is the world’s most popular search engine. It scans every website on the internet constantly and keeps a record of all the pages. While doing this, the Googlebot (that’s the piece of software that crawls each site looking for content) also looks at the code of each page. If it finds malicious code then it adds the site to a list of bad sites called the Safe Browsing list. Google’s web browser, Chrome, and some other browsers such as Mozilla’s Firefox and Apple’s Safari use this list. If you try to visit a site that is in the Safe Browsing list, those browsers will display a warning similar to this:
Note:
In order to provide the Safe Browsing service Google will know what sites you visit. There are claims that this information is shared with the NSA through the use of cookies so the privacy and security trade-off may not be acceptable to you. Optionally, read this article for for more information on the subject of staying safe while online shopping. or this article for more information on how to identify fraudulent websites.
Be skeptical of links and attachments
In order to access anything on your computer the bad guys need to place some type of software, called malware, onto your system. Since travelling to your house and installing malware is not a viable method, they spend a lot of time trying to trick you into clicking links or attaching malware to emails that will install this software for them. Once their malware is installed, it has access to your system and can do whatever nefarious task it was built to do. Some malware simply redirects your searches to paid advertisements so the malware author makes money. Some is far worse and can steal usernames and passwords that you use online, or even encrypt your entire computer to make the files inaccessible and held for ransom.
Background:
Malware is a combination of the words Malicious Software. Previously, malware was known as a Virus. As viruses became broader in scope and more varied in their attacks, the term malware was coined as a more inclusive phrase referring to any type of malicious software.
The bad guys have a vested interest in tricking you into clicking their links, so they can go to great lengths to make the links look legitimate. Some are sloppy attempts which are easily detectable, such as the notorious Nigerian prince
emails characterized by broken English and outlandish claims. Others are harder to spot because dedicated bad guys will use the names of your friends and family as the ‘from’ address in emails, so you’ll be more likely to trust the link.
There is another way the bad guys can try to get your usernames and passwords and that is through a process named phishing. They create a clone of a well known web site log in page and then attempt to trick people into entering their username and password into that site. Of course, the people who fall for that are not logged in to the site they expect, rather their username and password is sent to the bad guys.
Background:
Phishing is a term that refers to the act of trying to trick a large number of people to do something against their best interests. Phishing attempts are indiscriminate and simply blanket as many people as possible with emails in an attempt to trick at least a few. It’s akin to just throwing a fishing line in a river to see what you might catch, hence the phonetic variation of
fishing. There’s a more advanced variation of more targeted phishing called Spear Phishing but the same general avoidance methods apply. There are some good pointers here on how to spot a phishing email.
Always verify links before clicking on them. There are a few ways to do this:
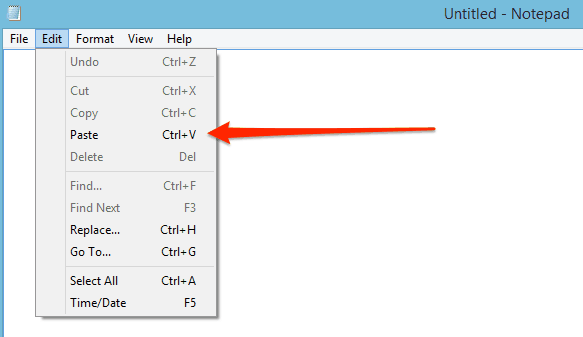
Right-click the link and copy it
Right-click
refers to clicking the right button on your mouse. If you’re using a laptop trackpad you won’t have a right mouse button. In that case, click with two fingers at the same time. This will bring up a menu of options. The exact text of your right-click menu will vary by operating system. This is how it looks in Windows:
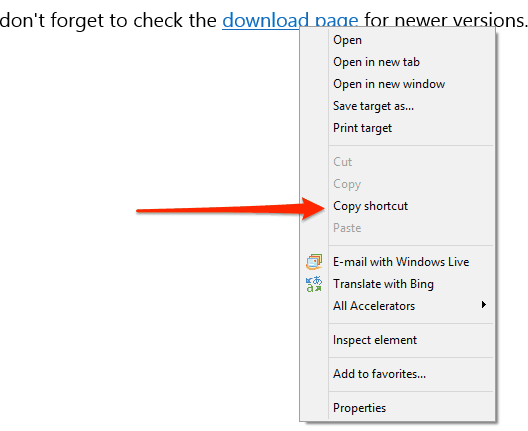
Click the Copy shortcut item and then paste the link into Notepad or a word processor. To paste the link, you can either use the Edit menu and click the Paste option, or you can do another right-click and select Paste.
This link was stated to be a link to the virtual machine download page on Microsoft’s website. Now that I can see the actual link in Notepad I can see that it looks legitimate:
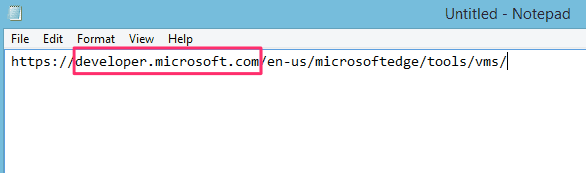
The most important part of a link is the domain.
Background
The domain is highlighted in red and it is comprised of the part of an address between the first set of slashes // and the next single slash /.
I can see that this link will take me to the developer.microsoft.com site which is what I would expect, so it seems safe.
Other browsers use the terminology link
instead of shortcut
. For example, this is the right-click menu in Firefox:
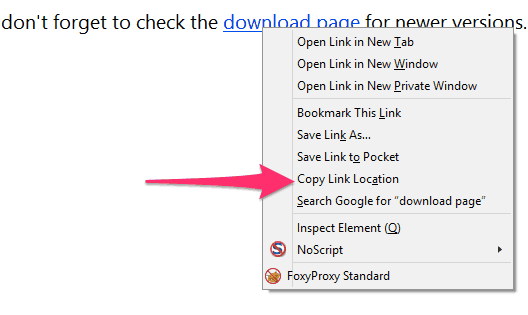
Hover over the link to see where it goes
Some programs will display the destination of a link if you hover the mouse over it.
Background:
Hover means to place the mouse pointer over a link, but do not click it.
Most browsers will reveal the actual destination of a hovered link at the bottom of the window. The screenshot does not contain the mouse cursor, but it is hovering over the Cybersecurity resources: A big list of link.
In this case, I expect the link to take me to another article on the comparitech.com domain and it does so it looks safe.
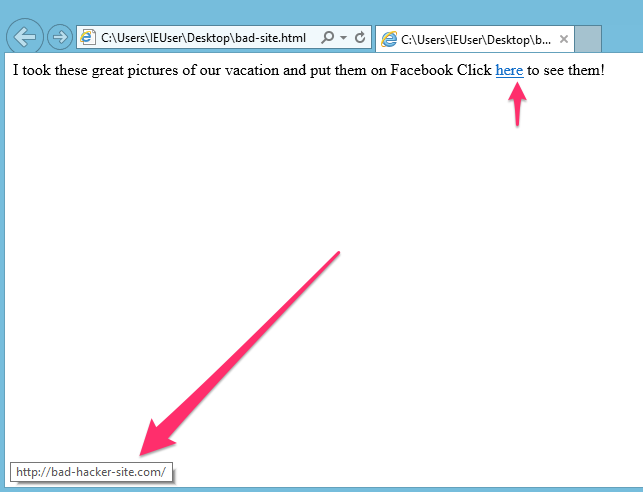
If the real destination does not look right, don’t click it. This link tells me that I have some nice vacation pictures on Facebook. But, if I hover over the link, I can see that the link will not take me to Facebook. It does not look safe.
How to use Public Wifi
Wifi is the tongue-in-cheek term given to wireless internet
. Almost every computing device today can hook into a wifi network and many public places offer it. There’s a bit of danger when using a public wifi network because you’re sharing that network with everyone else who is using it. That can include bad guys.
Background
The term
wifidoesn’t actually mean anything, it was just easier to market than its real name ofIEEE 802.11b Direct Sequence
The best rule of thumb is to never use public wifi networks. There’s no reasonable way to tell if the network has been compromised and all of your data is being captured by a bad guy. Some scenarios which occur daily are:
- Someone has set up a fake wifi access point with an official sounding name and you mistakenly join that access point. An example would be a bad guy setting up an access point named something like
Starbucks guest wifi
in a Starbucks. You’d have no way of knowing that is not the proper access point. - Someone has compromised the actual proper access point and is able to see all of your network traffic. In this case, you’ve joined the proper access point and you’d have no way of knowing that it is no longer safe.
There are other scenarios that make public wifi unsafe, but it’s hard to avoid it all the time. Therefore, if you have to use public wifi, following these tips will help keep you safer.
Don’t use public wifi for sensitive transactions
Don’t use public wifi for things like financial transactions or very personal information such as government website use. Assume that the information you’re sending is likely to be read and make your decisions accordingly. It’s probably fine to use it for casual reading or research, but if you find yourself needing to log in to a site, that’s the time you need to evaluate if you want to do that over public wifi.
Use a Virtual Private Network (VPN)
A very good way to make public wifi more secure is to use a Virtual Private Network (VPN). The mechanics behind a VPN are fairly complicated, but thankfully the process of using one is very simple. A VPN creates an encrypted tunnel for all of your traffic which does not get decrypted until it has left the public wifi network. This means that even if the public wifi network you’re using is compromised, the bad guy will be unable to read your data. Here is some more background on VPNs and some pointers on how to choose a good provider.
If you can’t use a VPN and you need to do more than casual internet use, shut off your wifi connection and use your mobile data. It is harder for mobile networks to be compromised so it is a little more secure than public wifi
Use two-factor authentication (2FA) on your accounts
Two-factor authentication (2FA) was discussed in the Password section near the beginning of this article. If you consider that your username and password may be stolen while using public wifi, it becomes apparent that the only thing stopping the bad guy from logging in to your account is a 2FA number. Not every service offers 2FA, but you should enable it for every service you can.
How to avoid and fix identify theft
Identity theft is the situation where someone has obtained enough personal information that they are able to pretend to be you. They use this information to open credit card accounts, bank accounts, and other things in your name which can cause you a lot of trouble down the road. If you follow the advice in this article you’ll greatly reduce the risk of identify theft occurring online. However, it can still happen and it can happen even offline.
Signs of identify theft
Your credit report is probably the best source of information. Credit reports show all credit and loan accounts opened in your name. Routinely examining your credit rating is a vital step to becoming aware of a problem. If you see credit accounts opened for companies you do not do business with, this is a danger sign.
Once a bad guy has stolen your identity and rang up some large bills, they’re not about to actually pay the bill for you. That means sooner or later creditors will start sending letters to you or collectors may start to call. If you start receiving collection activity from companies that you have no dealing with, that’s another red flag.
More serious identity theft can even occur in your offline world. Some very committed bad guys will try to have your postal mail redirected.
What to do if your identity has been stolen
The steps to report identity theft vary from country to country. But, in general, the steps are:
- Get a copy of your credit rating from your applicable credit bureaus
- Identify any accounts that are not yours
- Put a fraud alert on your credit account
- Contact the police
We have an in-depth identify theft remediation guide with step-by-step instructions for several countries.
Detecting and fixing malware infections
If your system has been infected with malware despite your best efforts, there may be time to save things. Depending on the purpose of the malware it may show telltale signs of its presence and there may be ways to remove it.
Signs of malware infection
If the malware on your system does anything even remotely difficult, it will use resources such as memory and probably your disk drive. If your system seems sluggish, or if you see your hard drive light flashing when you’re not using the computer you may have a malware infection.
It’s also possible to list the processes running on your system in an effort to identify anything you do not recognize. I recently wrote an article on web browser hijacking and there is a section in it that deals with malware detection in more detail.
A good antivirus program is your best bet to being alerted about malware on your system. But, malware infections can be hard to detect. If you are in doubt, it’s best to take it to a local computer repair shop for a thorough inspection.
What to do if your system becomes infected with malware
Some malware can be removed with antivirus software which is discussed later in this article. Ideally, you have antivirus software running all the time which will proactively defend against becoming infected in the first place. But, if you still get infected, it may be a simple process to remove it. The removal process depends heavily on the antivirus application you’re using but it will generally inform you of the virus and guide you through removal.
If you’re not yet running any antivirus, or if you need to remove a virus, we have an updated list of the best antivirus for each operating system here.
System and backup restores
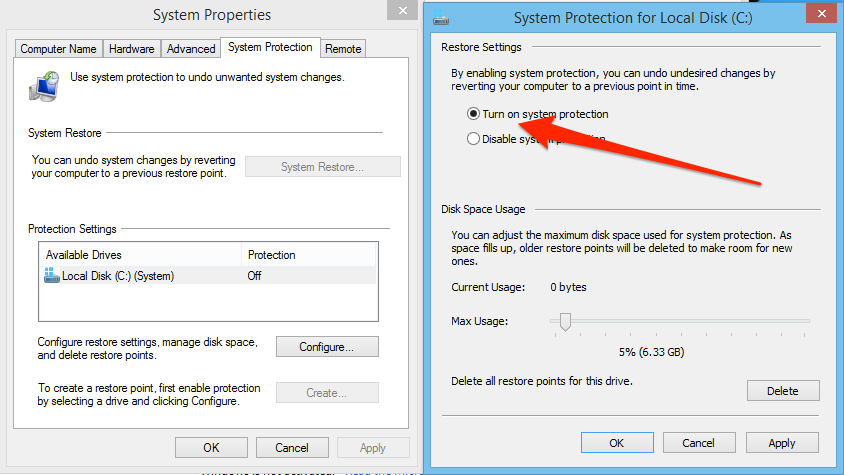
Another option that may work is to a system restore. If you have some idea when the infection occurred, and your system was previously configured to create restore points, rolling back to a restore point pre-infection may work.
Background:
There is a distinct difference between a system restore and restoring a backup. A system restore generally means rolling your system back to some other point in time, perhaps the very beginning. It infers that everything will be rolled back including all of your operating system files. Restoring a backup usually means restoring just your data such as your documents and emails. A backup restore generally does not include the operating system files. This can be an important distinction depending on what type of malware infection you’re dealing with.
System restores in Windows are done in the Windows Control Panel. There are step-by-step instructions with screenshots in Sam Cook’s article on Windows malware removal and prevention.
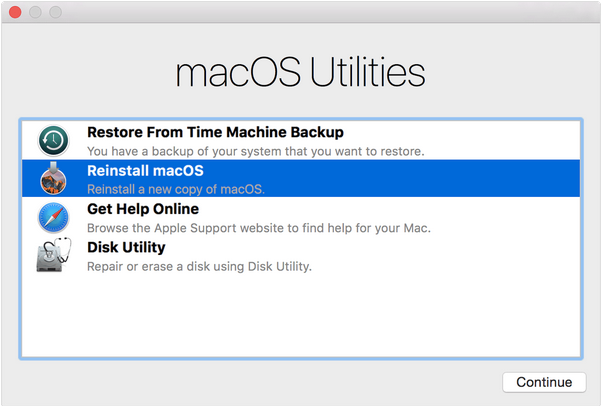
For macOS/OSX, you can restart the system and hold down the Apple command key and the ‘R’ button immediately after it restarts. That will bring up the system restore options. From there you can restore files from a Time Machine backup if you’ve set those up, or you can restore the system completely from scratch. The second option will remove everything, including all of your data, from the system. It’s drastic, but it’s certain to remove any malware along with everything else:
Desktop Linux distributions such as Ubuntu don’t have a native backup or system restore applications. There are many third-party backup applications which may take some skill to set up, or there are many cloud-based backup services such as CrashPlan and Jungle Disk that support Linux. CrashPlan has an advantge, in my opinion, because the free version lets you backup your files to another local disk for free. You only need to pay in order to use the advanced features such as cloud storage for your backups.
What to do if your online account has been hacked
The term hack
has grown to mean almost any bad thing that can possibly happen to anyone. In the context of the internet, it’s generally used to mean that someone has gained unauthorized access to one of your online accounts
Signs of a compromised online account
Unexpected activity from an account is one of the best indicators that your account has been hacked. You’re probably sensing a trend here; in almost all cases of nefarious activity the first line of defence is simply paying attention. If you received an email from one of your online services that you’re not expecting, that can be a warning sign something is wrong.
Depending on the intent of the bad guy, they will want to do one of two things:
- Keep the account running without notifying you that they are also accessing it along with you.
- Lock you out of the account in order to stop you from discovering it has been compromised until they are done.
In both cases it’s likely that the person will want to change your account email address or add their own to your account. Most services will send a notification email to the first email account when it is changed or a new email added for just this purpose.
Another indicator can be that you are not able to access your account. If the bad guys just need your account for a short time, perhaps to transfer all the funds out of it, then they may change your password to prevent you from logging in and stopping that. Again, many web services send alert emails when an account password is changed so keep an eye out for those.
Steps to be taken post-hack
If you become aware of an account hack either by an unexpected email alert, problems logging in, or some other method your first course of action should be to inform the web service.
If you’re able to log in to your account, do so and then search out the support contact information. Call them, or use live chat, or file a helpdesk ticket to inform them that you believe your account has been compromised. Most web services takes that very seriously and will assist you quickly in sorting it out. If you can’t log in, you should follow the same process but since you’re not logged in to your account it’s not as easy for the support people to ensure you are the legitimate account owner. They may request more information from you to prove your identify before assisting you. It pays to be patient even though this can be a stressful time.
Once you have your account back under your control, it’s time to assess the damage. Depending on what the hacker did, and depending on the type of information the account had in it, you may want to perform the same steps as you would for identify theft: file a police report and put a fraud alert on your credit accounts.
System management
Out of date software is a leading cause of malware infection. The reason for this is that updates almost always include changes that fix security holes that have been discovered since the last update. Bad guys can get the security updates just as easily as the rest of us. And, when they do, they can examine them to discover what security issues have been fixed. They can then use that information to go looking for computer that have not been updated yet and exploit those security holes while they’re still available. For that reason it is critical to apply updates for every application you use as well as any operating system updates as soon as you can.
Keeping your system up to date
The three major operating systems (Windows, MacOS/OSX, and Linux) can be configured to look for updates periodically and automatically apply them. These features should be enabled.
Windows 8
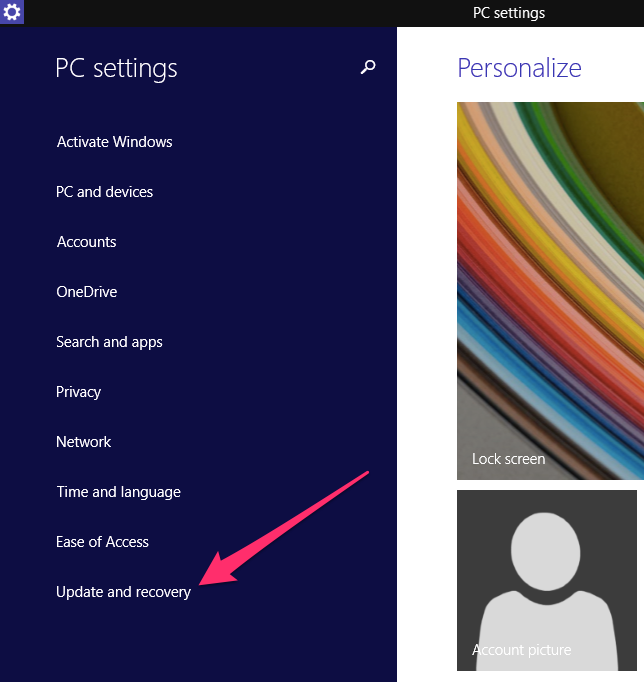
To set up the Windows update configuration, click the Windows Start
button and then the down arrow at the bottom left of the desktop:
![]()
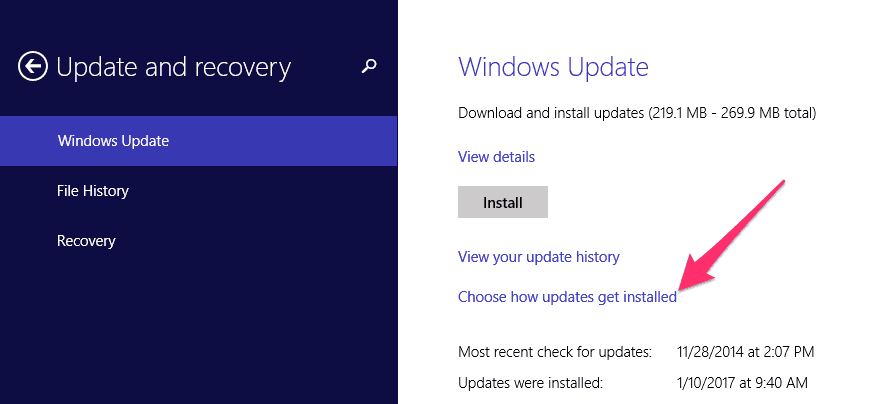
Select the PC Settings option and then the Updates and Recovery item:
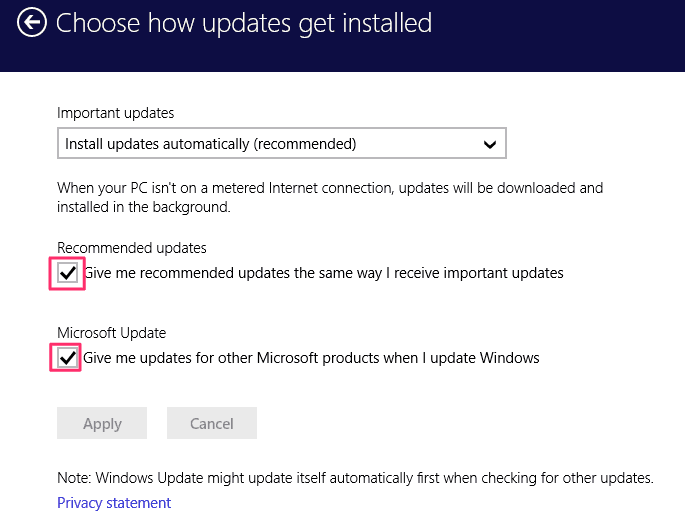
Click the Choose how updates get installed link and ensure the “Install updates automatically (recommended) is selected and the options outlined in red are selected:
Windows 10
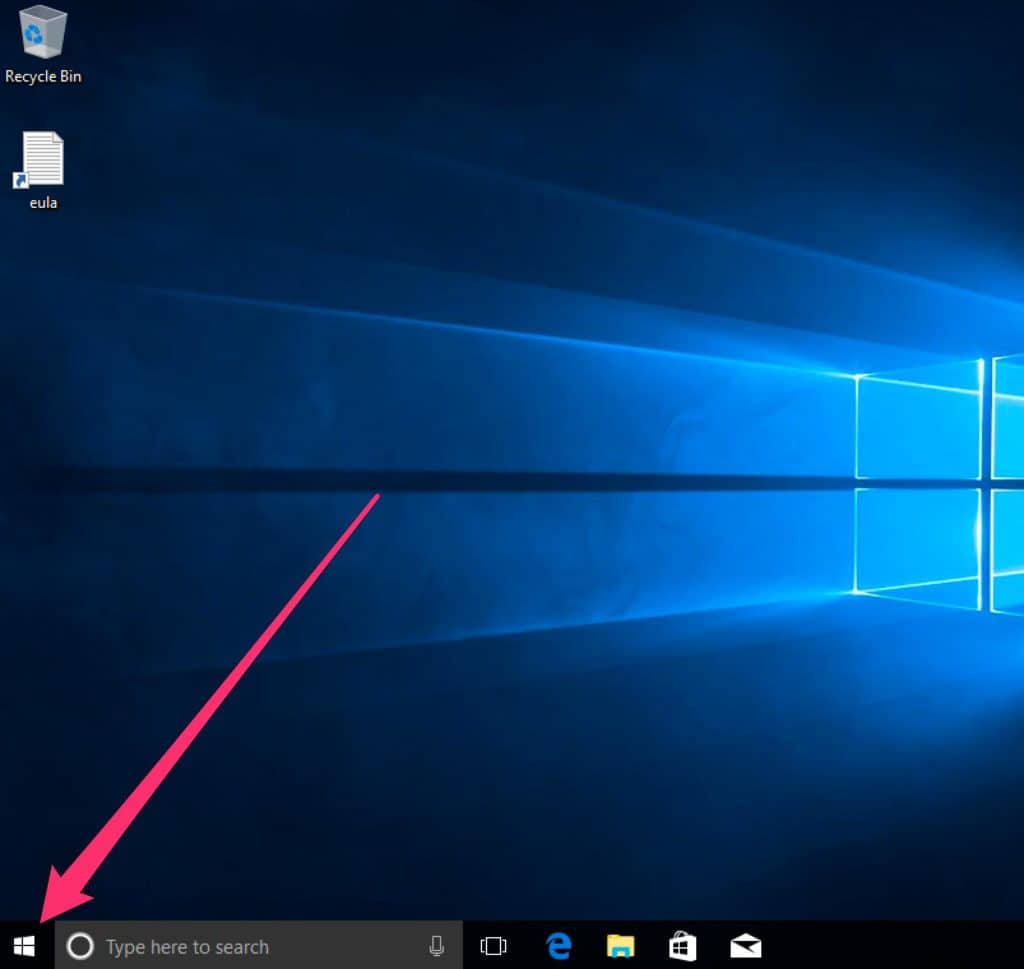
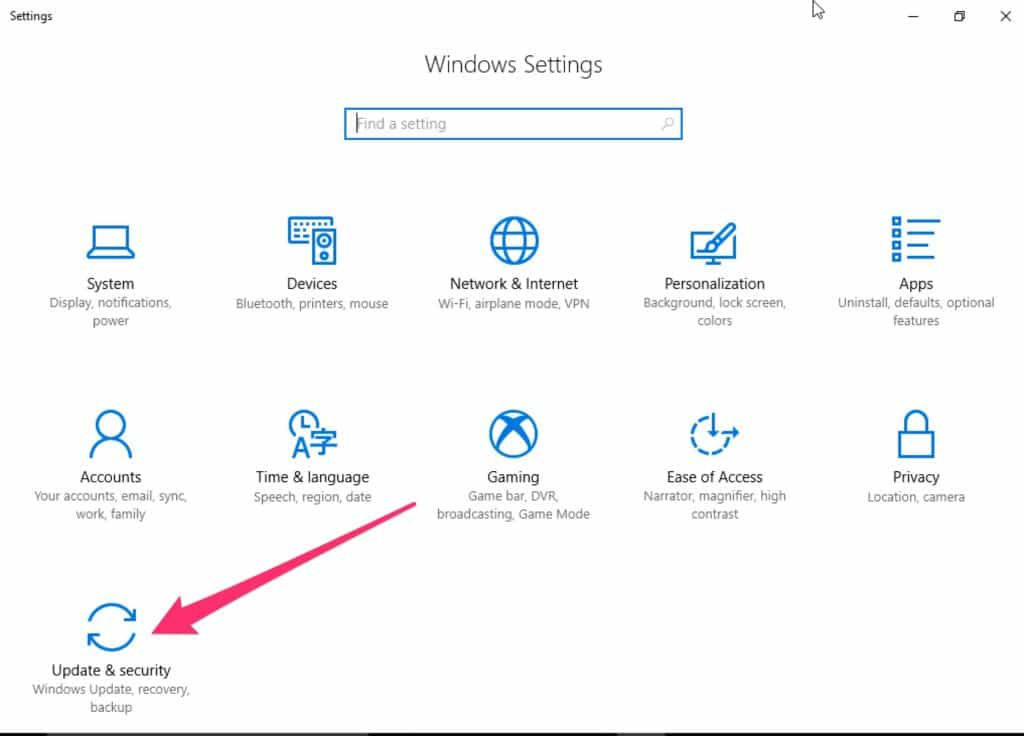
Configuring updates in Windows 10 is very similar to Windows 8. Click on the Start button.
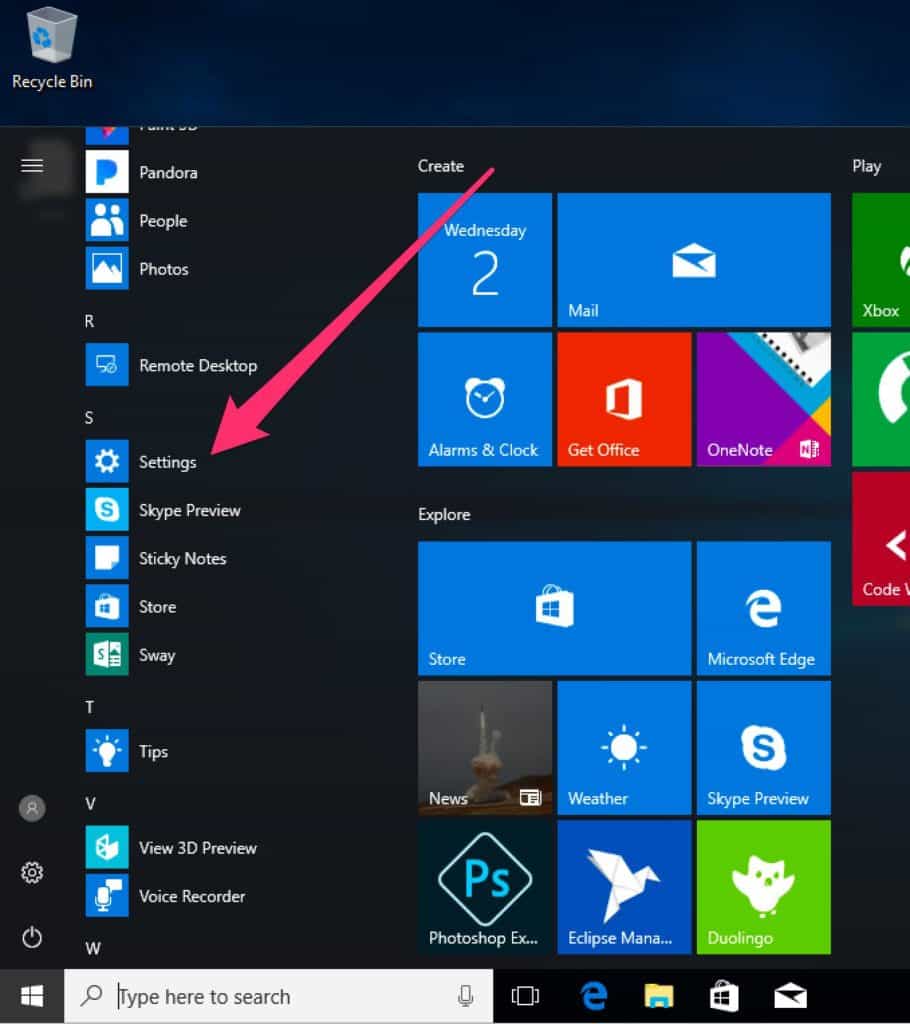
Then select Settings
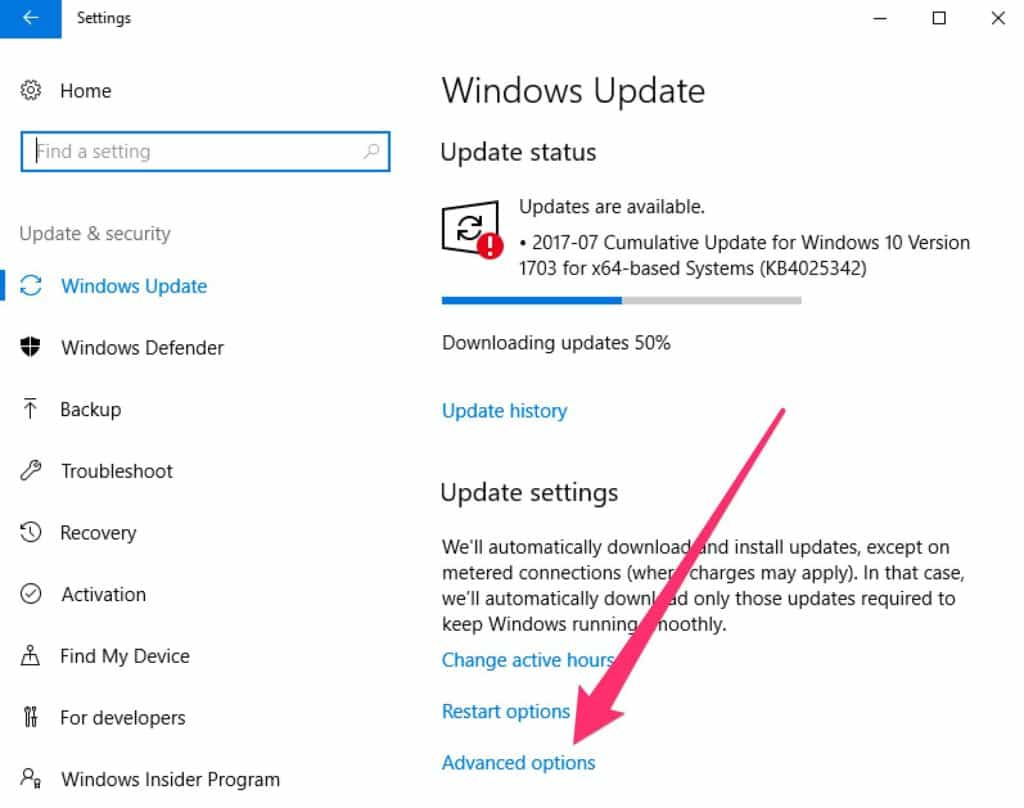
Select the Updates & security option to get into the update settings.
Select the Advanced options link.
Then view the options. The default set up is shown below, with the addition of the Use my sign in info to automatically finish setting up my device after an update checkbox. That is not checked by default and you may wish to do so. Checking that box allows Windows to complete any updates that may have been downloaded but can’t be deployed unless you’re logged in. If you leave this checkbox disabled, you will sometimes have to wait for updates to be applied when you log in for the first time after updates are downloaded.
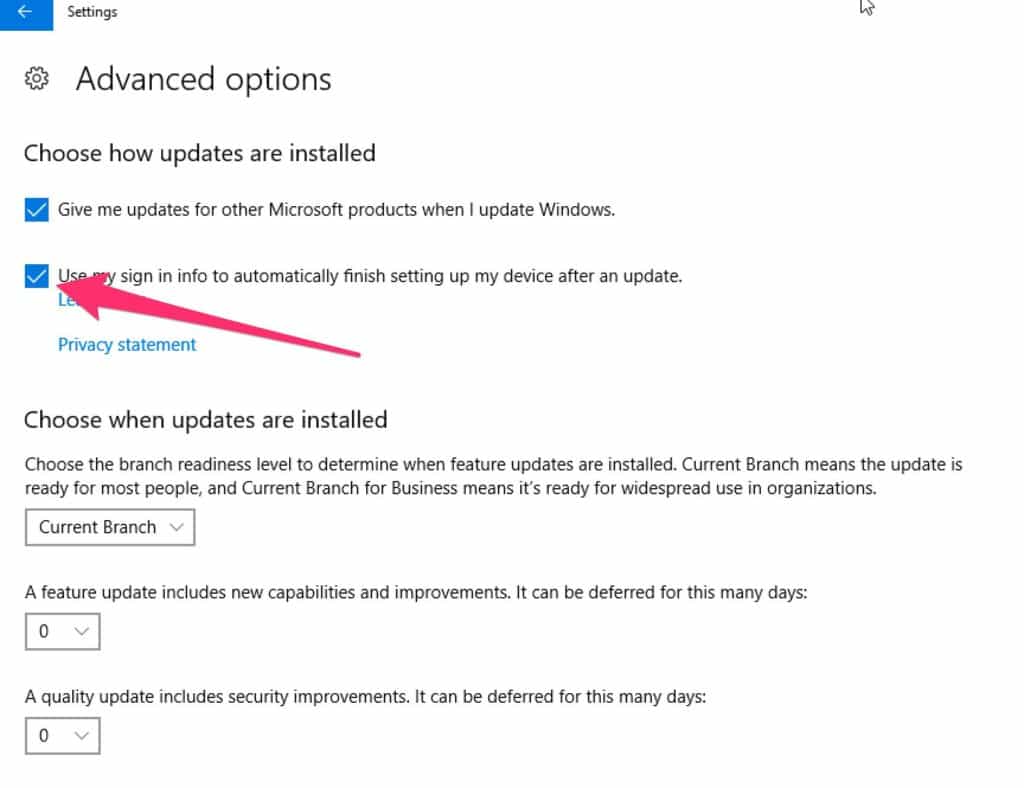 Unless you have a very specific reason to do so, leave the other settings alone. The Current Branch setting will give you the most stable updates, and delaying updates is usually not a good idea.
MacOS/OSX
Access the update configuration in MacOS by clicking the Apple icon at the top-right of the desktop:
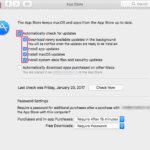
The operating system updates are contained within the App Store configuration. So, click on the App Store icon:
Finally, ensure all of the options outlined in red are enabled:
Linux
The update configuration for Linux depends on the desktop environment in use. The two most common desktops are KDE and Gnome.
KDE
There have been many changes to the KDE software updater over time. The way that seems to work the best today is to open a terminal window and type
sudo software-properties-kd
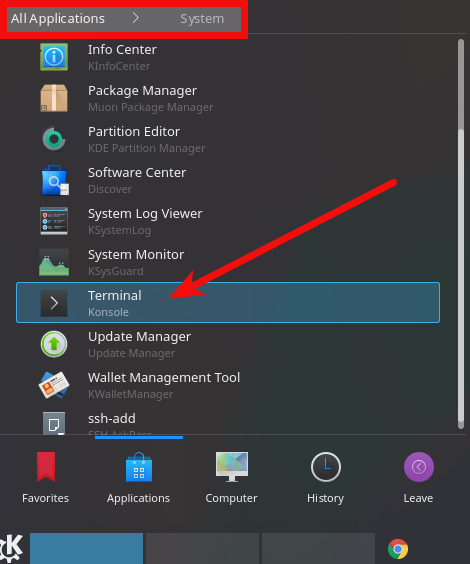
This will launch the Software Sources application. Click the Updates tab and ensure that the following options are enabled:
- Important security updates and Recommended updates are selected
- Check for updates is checked and Daily is selected
- Install security updates without confirmation is selected
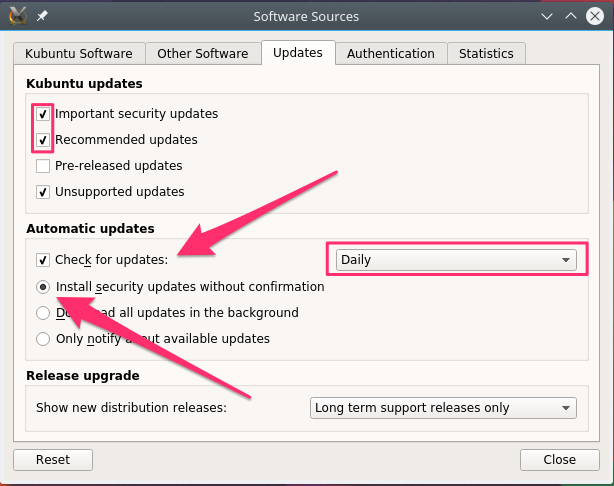
You can set the rest of the options as you prefer.
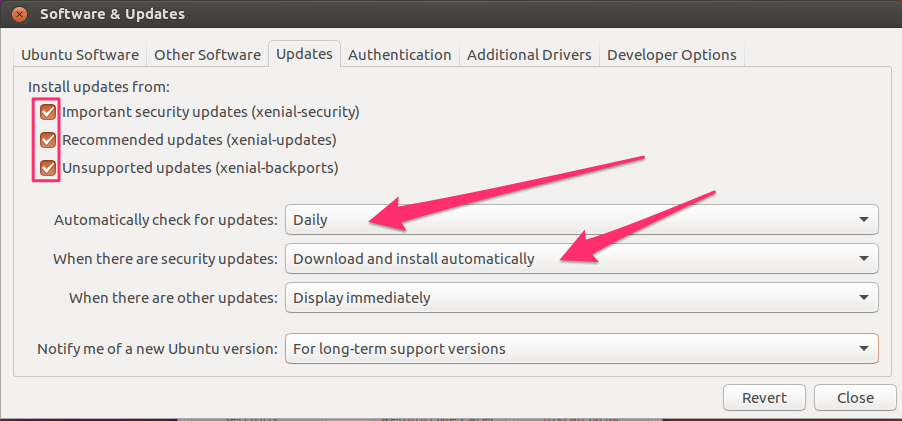
Gnome
Select the Applications menu from the top left of the desktop. Then navigate to System Tools -> Administration -> Software Updater:
The update will launch and check for available updates. You can install the updates from here, or click the Settings button to configure automatic updates:
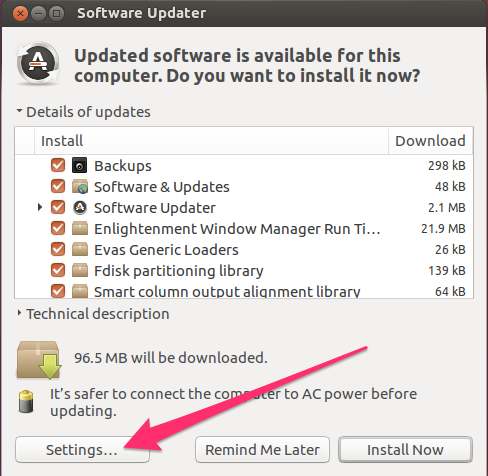
Ensure that security updates are set to download and install automatically. The other updates can be set to your preference as they are less critical than security updates:
Backing up your data
Despite your best efforts, there may come a time when you’ve lost some or all of your data. There’s an old saying that pertains to this situation:
There are two types of people in the world: those who have lost data and those who don’t know they’ve lost data yet.
With a little effort up front, joining the first group won’t be as painful.
Data can be lost by various means. It can be deleted, which still happens despite the presence of a Trash
can or recycling folder on most systems. It can be overwritten with bad data, and it can be damaged beyond repair by malware. In all cases the easiest way to recover your data is to have a backup.
Backing up your data used to be an arduous task that was frequently neglected. If you have to remember to do backups, you’ll probably eventually forget or get tired of doing them. The best way to ensure you have your data constantly protected is to use an automated backup service.
There are a number of backup services on the market and they all function in the same basic way. You’ll need to subscribe to an account with one of them and then install their software onto your computer. Usually, that’s all you have to do and it will start to back up your data. You can configure what data is backed up if you don’t like the default selection, and some of them have further options to tweak.
To help with the decision of which service to use, there’s a list of the Best Online Backup services for 2017 here.
Antivirus/Security programs
The best strategy is to avoid being infected with malware to start with. An important part of this strategy is to use some security software that includes an antivirus component.
Security software are applications or devices which try to limit access to your computer from the internet. You’ll want to access the internet from your computer frequently, but you don’t want people on the internet to be able to access your computer in most cases. There are a few ways to prevent this:
- Using a router is a good step in separating yourself from the internet. Routers are used in most internet setups these days and it’s likely that the technician who installed your internet used a router. If you’re not sure, ask your internet service provider how your service is configured.
- Enable your operating system’s firewall. Firewalls are specially constructed walls in buildings that are fire resistant and break the building into separate compartments. They make the spread of fire difficult should the building ignite. In computer parlance, the
fire
is the internet and the purpose of a computer firewall is to create separation between your computer and the internet to protect you from bad things.
Optional further reading:
If the idea of firewalls intrigues you, there’s a good article on types of firewalls and why you should use one here.
Windows
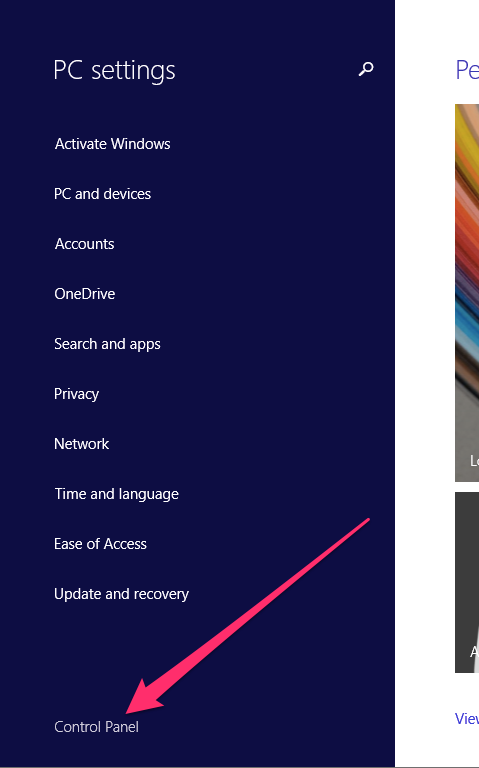
Windows comes with Microsoft Security Essentials built in, which is a decent combination security and antivirus application. To access it, navigate to the same PC Settings screen used to configure your updates, but click the Control Panel link instead:
Select the System and Security link:
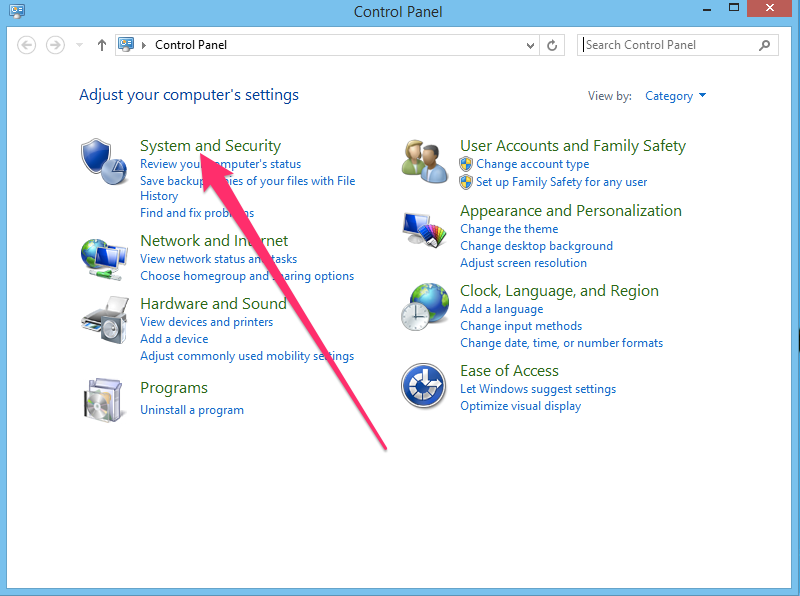
And then the Windows Firewall section:
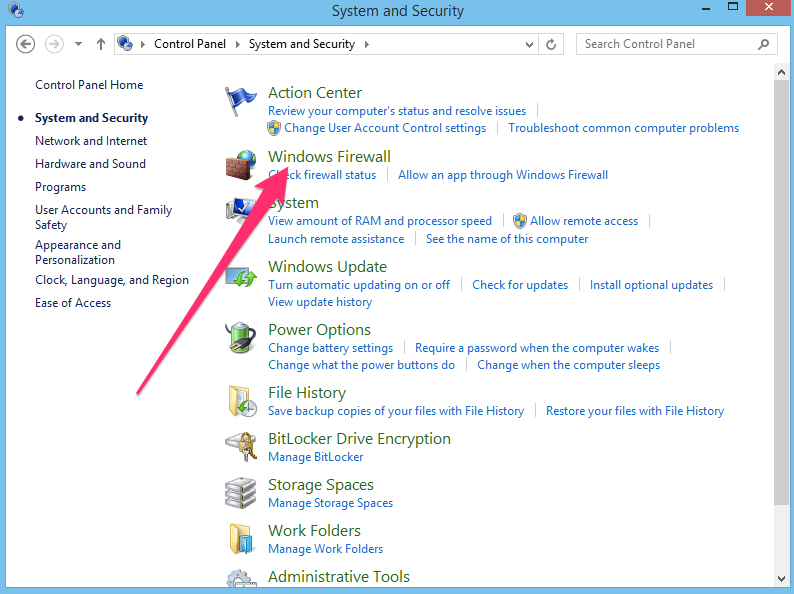
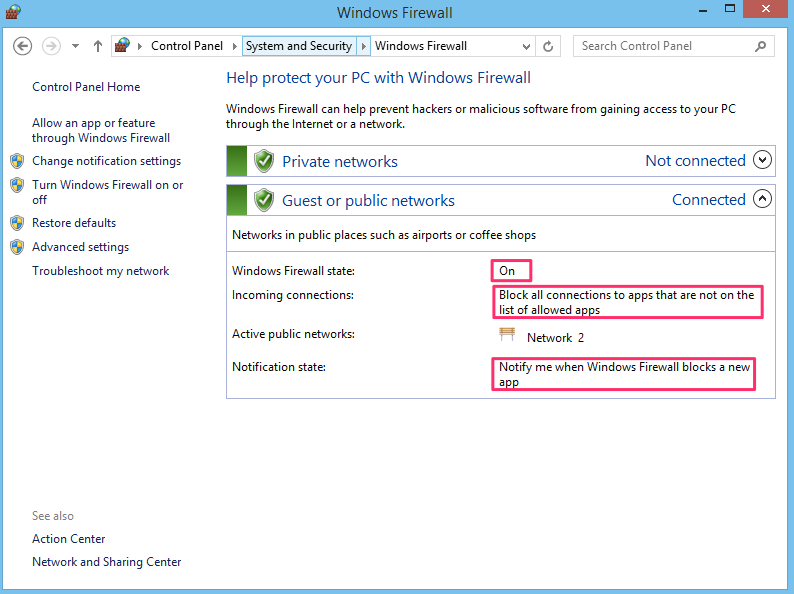
Ensure the firewall is on, blocking connections, and notifying you of any application that attempts to access the internet:
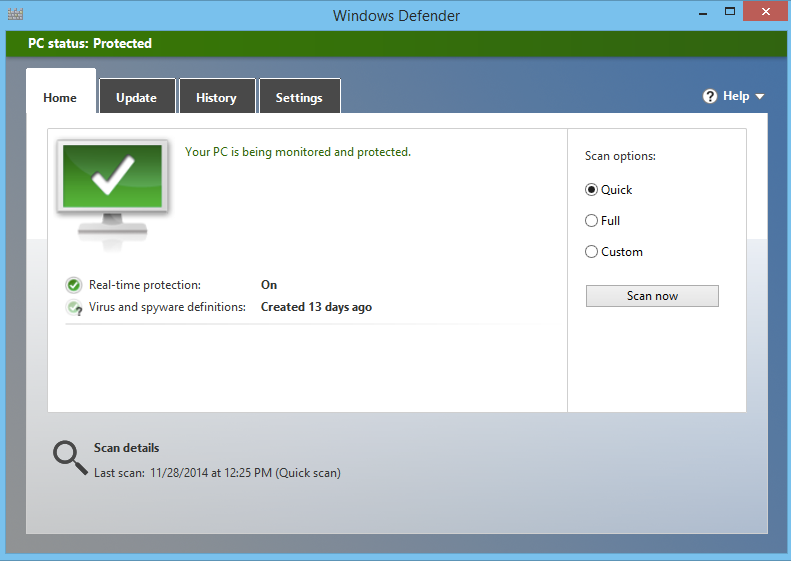
To view the antivirus settings, you’ll need to go to a different control panel section. Search for defender
in the control panel search box and click on the Windows Defender link in the search results:

This will launch the Windows Defender application. It is not necessarily enabled by default because it’s possible for other antivirus programs to disable it. Ensure it is enabled which is indicated by the green checkmark.
Windows Defender is good, but it is fairly basic. If you’d like more control over your antivirus and a greater range of options, you may want to use some third-party antivirus. There is a list of the Best Antivirus for 2017 here to help with that, you can find a good antivirus such as TotalAV from under $20 annually.
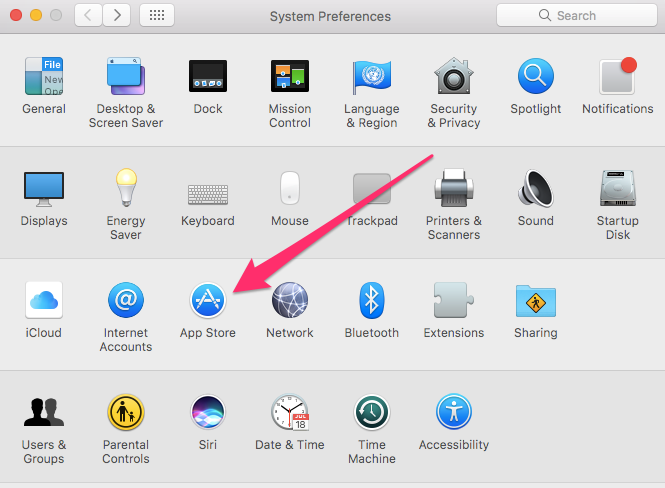
MacOS/OSX
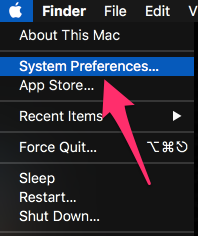
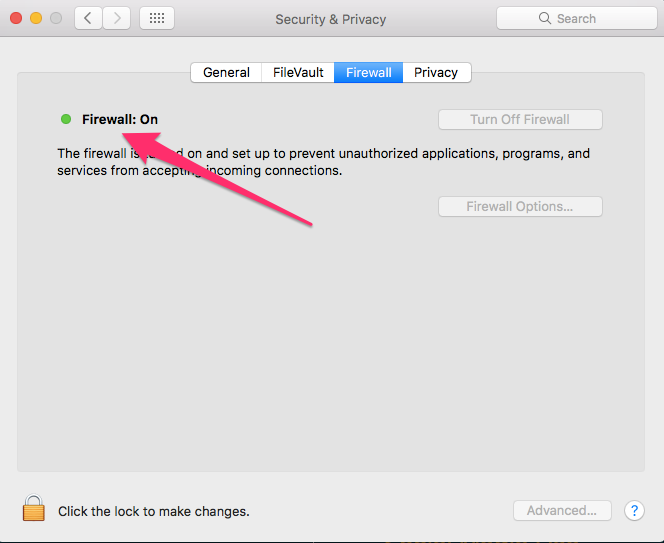
MacOS comes with a firewall. To access its configuration, click the Apple icon at the top-right of the desktop and select the System Preferences option:
Select the Security & Privacy icon:
![]()
Ensure the firewall is on.
Macs have the ability to find and quarantine known malware built right into the operating system. As long as you have your updates properly configured as described earlier in this article, your Mac will warn you if you attempt to open a known bad file.
Background:
The macOS operating system is “Unix-based” which means that it has a fairly robust security and user separation model. Because of this, Macs are less susceptible to malware, but they are not immune. There is a discussion and some recommendations on antivirus for Mac here.
Like Windows Defender, the Mac malware checking is good but it’s basic. Many people would like a wider range of protection and functionality from their antivirus. If you’re one of those people, Bitdefender is a very reputable antivirus application for macOS.
Linux
Modern versions of both Ubuntu and Kubuntu have a firewall named Ultimate Firewall. If it is not installed by default, you can use the following commands to install it. Open a terminal window and type:
sudo apt-get install ufw gufw
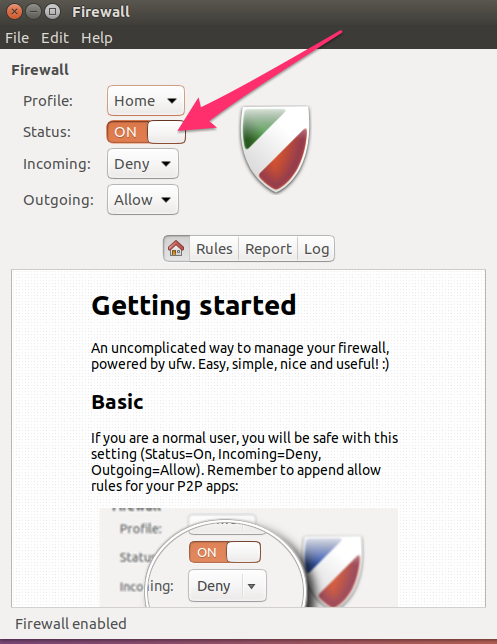
This will install the Ultimate Firewall (ufw) and the graphical interface for it (gufw) to make it easier to manager. Once it is installed, launch the Firewall Configuration application.
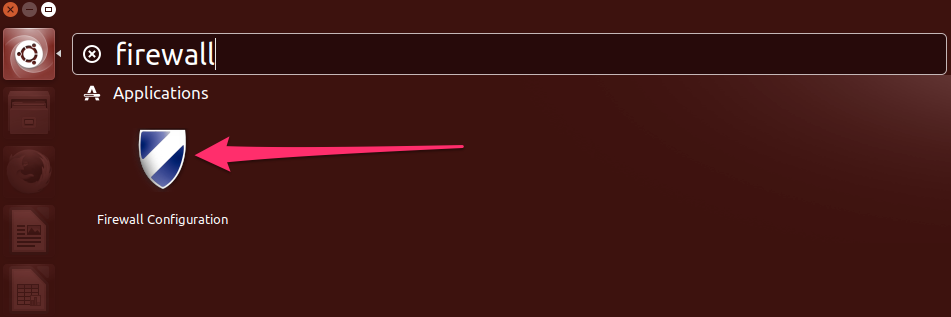
In Ubuntu, click the Ubuntu icon and search for the term firewall
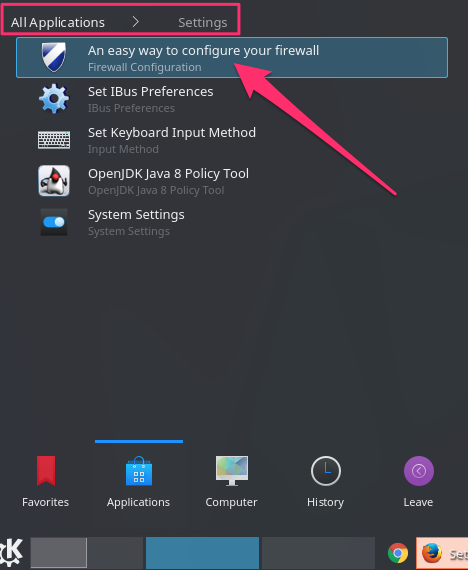
In Kubuntu, you’ll find the Firewall Configuration in the Applications -> Settings menu:
In most cases you simply need to enable the firewall by sliding the Status slider to the on position. Leave the Incoming setting to Deny
and the Outgoing setting to Allow
. That will prevent any unrequested access from the internet.
Background
Antivirus for Linux is a hot topic for much the same reason as it is for macOS. The foundation of the argument stems from the fact that Linux was originally built to be an operating system used by multiple users on a network. Windows was not built with that in mind at its inception. So, there’s a view that Linux has better user separation and network security and is therefore less susceptible to viruses. Statistically, that is true; there are far less malware infections on Linux than there are on Windows, but that doesn’t mean there are zero Linux infections.
ClamAV is a widely used and free antivirus application for Linux. If it is not installed by default, you can use the following command to install it:
sudo apt-get install clamav clamtk
The antivirus application is clamav and the graphics interface to manage it is clamtk.
Once installed, you will find ClamTK in Ubuntu by searching for antivirus
:
![]()
And in Kubuntu in the Applications -> Utilities menu:
![]()
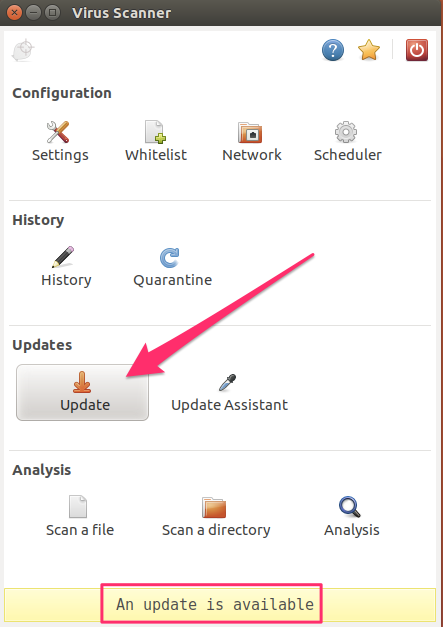
When it is first run, the virus definitions will be out of date. It’s important to heed the update notice at the bottom of the screen and double-click the Update button to allow it to do so:
Double-click on the Settings icon:
![]()
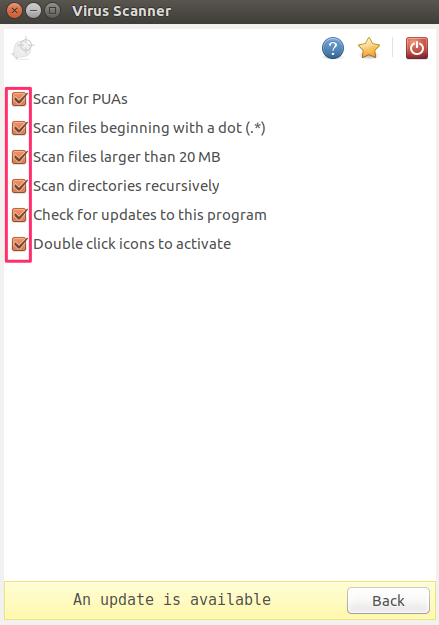
And enable all the checkboxes. Many are not enabled by default but you’ll want to scan everything.
Next, double-click on the Scheduler icon:
![]()
Enter a schedule for your system to be scanned and also to download new internet updates. The updates refer to virus signatures that the program uses to identify viruses on your system. It makes sense to schedule the updates prior to the scan so that the scan will have the most up-to-date signatures.
Background:
Antivirus software generally uses two methods to detect viruses. It will look for viruses that it knows about, and it will look for things that act like viruses. The first category is good for finding known viruses that are on your system, but it can’t find any virus that is not already known. The second category attempts to find things that look like a virus, even if it doesn’t know for certain that it is. The term signature refers to the identifying mark of a virus.
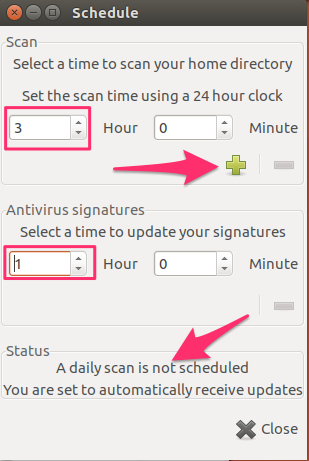
It’s not immediately obvious that a schedule has been set. Once you’ve entered a time in the scan time section, click the plus sign. Note that the plus sign turns into a minus sign and the text at the bottom of the page changes to reflect that a schedule has now been set.

If you want to reschedule the scan, click the minus sign to remove it, then re-enter it.
Social media use
Most of us have family and friends on Facebook and perhaps other social media sites. It’s hard to avoid joining Facebook if you want to keep up with your children and your friends. There are a lot of privacy concerns surrounding social media but there are some simple steps you can take to keep some modicum of privacy. I’ll use Facebook as an example because it is the most popular social media site, but the same general principles apply to all social media sites.
Social media sites don’t charge money for their use. The old adage applies here:
If you’re not paying for the product, then you’re the product.
This means that your personal information and behavior is what Facebook wants to collect, and providing free access to the site is how they collect it. You can infer from that Facebook doesn’t have a great deal of interest in protecting your information beyond what is required by law. The more of your information that is shared with the rest of Facebook, the more data they can collect.
However, much of that data is available to all Facebook users, including bad ones. With that in mind, you should take some steps to tighten up the default privacy settings and take care as to the type of information you post on Facebook.
What you should not share
It’s best to assume that everything you write is public now or going to be public at some time in the future. This includes new posts you create as well as comments on other people’s posts and pictures. This is not too far from the truth because, in the case of commenting on other people’s posts, you don’t have a great deal of control over the privacy of those comments. That falls mostly to the person who posted the content you’ve commented on.
You have more control over the privacy of your own posts, but Facebook is known for making changes to their system that change privacy settings without any notice so it’s best to assume nothing is private.
Extended absences
If you take the stance that nothing is private, it then becomes a little easier to judge the type of things you should not post to social media. Posting that you’re having a great vacation in Mexico and will be back in two weeks
simply serves to tell the world that you’re not home, which makes your house ripe for a break in.
Location checkins
Some social media sites allow users to check in
to locations. If you’re simply out for lunch, that’s fine, but you don’t want to check in to an airport or train station. That’s another signal that you’re probably going to be away on an extended absence.
Vacation pictures at the time
Almost every camera embeds information about the pictures it takes into the picture itself. If you’ve ever noticed after uploading a picture than the site was able to auto-fill in information such as the date or location the picture was taken, that information comes from the Exchangeable Image File (EXIF) data that is embedded in the image. Some social media sites strip this Exif data out of images. Some do not. If you’re posting pictures of the Eiffel tower with today’s date in the Exif data, that’s another signal that you’re not home. Post them when you get back home instead.
Personally identifying information
This may seem obvious; posting personally identifying information in public is never a good idea. But, many people do not realize the scope of what can be useful information for a bad guy. The obvious things like social insurance/security number or passport number are easy to grasp. However, lots of less-protected information is very useful as well.
Consider a time when you had to identify yourself over the phone or on a website when you did not have a password yet, or were setting up a new account. You were probably asked for a few pieces of identification such as your street address and perhaps something like your mother’s maiden name. Those two pieces of information are usually fairly easy to find online. We don’t tend to protect information like that because it’s not seen as very private. Maiden names are posted in obituaries, and genealogy sites have databases just stuffed with information like that.
Even your birth date, or the birth date of the significant others in your life, can help a bad guy guess numeric passwords such as bank card PINs. Researchers that review stolen password databases find that passwords using birthdates are far more common than random numbers and the bad guys know that, too. It’s not a good idea to use a birthdate as a password to begin with, but posting your birthday online only serves to make it that much easier.
How to implement basic privacy on Facebook
There are many ways to access Facebook. There are apps for Android and Apple devices, the main website itself, and a plethora of fringe devices such as smart watches and third-party apps. The website should be considered the canonical version of Facebook. As such, it will have the complete set of privacy settings available whereas other apps may not. Therefore, I’ll use the website as an example of how to set up your privacy.
Facebook’s privacy settings are mostly contained within the lock icon at the top-right of your page. Click that to see the main categories of privacy options:
![]()
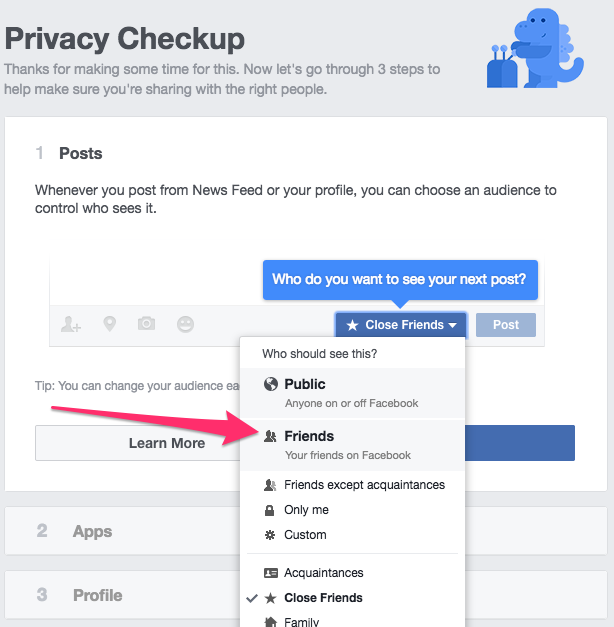
The Privacy Checkup is a good place to start. Clicking that menu option will walk you through a step-by-step process that will allow you to configure how your information is shared. Ensure this setting is not set to Public. Setting it to Friends is probably what you’d like as that will allow only people you have accepted as friends on Facebook to see your posts.
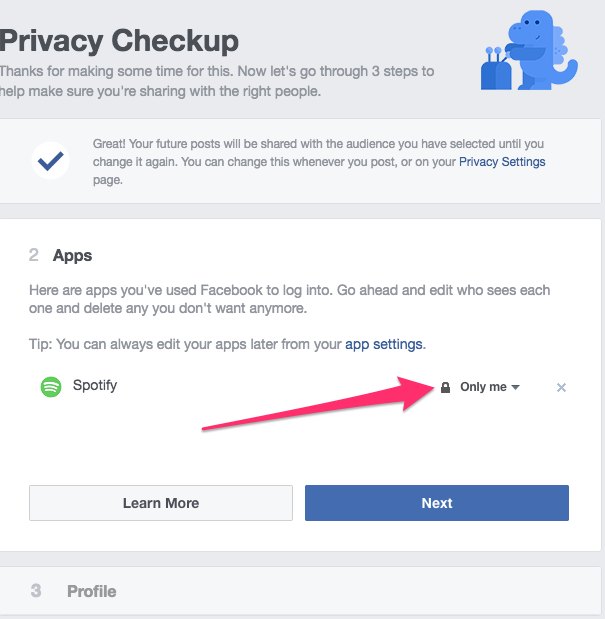
The next page will show the permissions any apps may have to your Facebook account. If you’ve logged in to other websites with your Facebook username and password, or if you’ve used any apps on your mobile devices that requested access to your Facebook account, they will be listed here. Unless I purposely intend for an app to make posts to my Facebook timeline on my behalf, I always choose the Only me option. I don’t trust any apps or sites to adhere to any promises they’ve made regarding whether they’ll post to Facebook. Selecting Only me will ensure that if they do post something, I will be the only one who can see it.
Background
Paul Bischoff has written an article on the methods whereby you can use your Facebook credentials to log in to other sites or apps. It delves deeper into the mechanics of it, as well as some advice to help you decide if you want to do that.
The next page will display your profile information such as phone number, email address, and your birthday. You’ll be able to select the privacy level for each of those pieces of information. It’s best to set everything to Only me, but you may wish to set your email address and birthday month/day to Friends.
Note:
Facebook breaks your birthday down into two parts. The Month/day part (April 5th) and the year part (1944). You can chose to share, or hide, each of those parts. If you choose to share only the month/day part with your friends then they will be notified when it is your birthday. But, since you have not shared the year part, it poses less of a security risk because it is incomplete data.
The three other sections of the Privacy menu allow you to quickly access settings and modify your privacy settings:
![]()
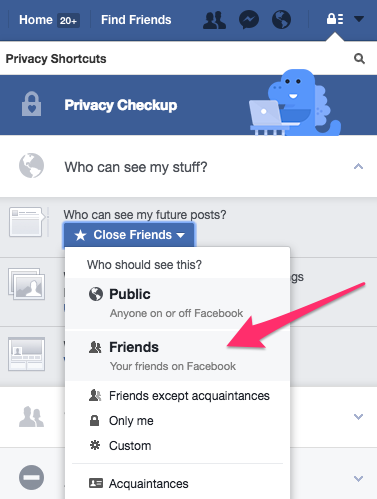
Who can see my stuff? Friends is probably the best option here, but you can completely lock down your Facebook account by choosing Only me,
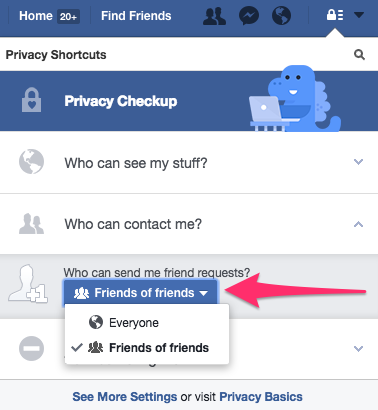
Facebook exists to connect people so it’s not possible to disallow everyone from sending friend requests. The best you can do is limit it to Friends of friends.
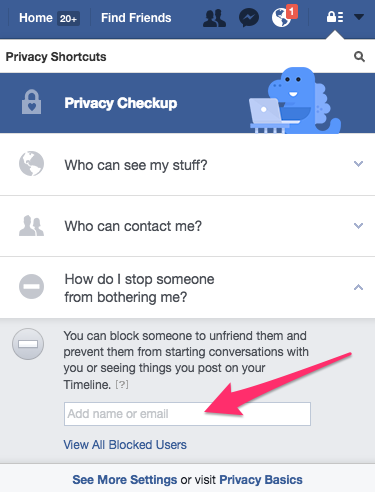
There may come a time when you want to ensure that another Facebook user cannot access your information. You can use the block user function to do that. According to Facebook, when you block a user, you will unfriend them and prevent them from starting conversations with you or seeing things you post on your Timeline.
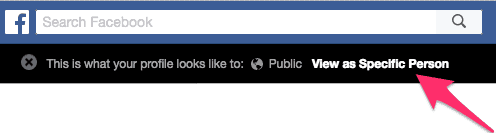
If you’d like to see how your Facebook profile looks to other people, or to the general public, use the View as option.

By default it will show you how you profile looks to the public, which is anyone who is not your Facebook friend. You can also select specific Facebook friends to see how your profile looks to them. Simply click on the View as a specific person link and enter the person’s name:
Encryption of data we send over the network is really necessary. A VPN can come handy if you want your data to be encrypted. It controls all the data we send or receive over the network and makes sure it is encrypted. It is also very important that we must not just go for a free vpn. Always go for premium versions. I use PureVPN and I’ve never had any issues with it. Look yourself for which VPN best suits your requirements and make a purchase.
Hi Ian,
I wholeheartedly agree. The importance of encrypting everything on the Internet can’t be understated. It’s my hope that people who do not use VPNs while using public WiFi will start to; and then, hopefully, wonder “why shouldn’t I use this all the time?”
We have a list of the best VPN services here and PureVPN made it.