
pfSense is an open-source firewall, based on FreeBSD, that also acts as a router. You can install pfSense on older (or newer) hardware, as long as the system has two network cards (WAN & LAN), and use pfSense as your router. pfSense offers more power, control, and security than most commercial routers you can buy, and has the benefit of frequent OS updates. It’s also got an easy-to-use web-based interface through which you can configure every aspect of your router/firewall.
One of the many cool things you can do with pfSense is to configure a client connection to an OpenVPN provider. Then you can configure pfSense to route all of the traffic of all of the connected devices (PCs, tablets, smartphones) through the VPN connection. This enables you to:
- Connect as many devices as you want to the VPN and bypass and hard limits to simultaneous connections your provider may enforce.
- Connect devices that do not natively support VPN connections, such as gaming consoles and smart TVs
- Connect to the VPN without using a dedicated VPN application.
In this post, we’re going to look at how to set up an OpenVPN client connection to a commercial VPN provider in pfSense. This guide assumes that you’ve installed pfSense and that you have a standard configuration with at least one LAN interface and one WAN interface.
VPN providers
Not all commercial VPN providers support pfSense – though a great many do. When a VPN provider officially supports pfSense, it’s quite easy to find all of the files you need to set it up on pfSense. Other VPN providers don’t officially support pfSense, but still put the configuration files that you need to set up a client connection on pfSense at your disposal. These are typically providers that support Linux and they make the necessary configuration files available for a Linux configuration. But as it turns out that the files you need to make an OpenVPN client connection in Linux are the same ones you would need to set that up on pfSense as well.
Here’s a list of providers known to work with pfSense (officially or unofficially). The list is not exhaustive, so there may be others.
DEAL ALERT: Get 3 months free with ExpressVPN, our #1 rated VPN provider.
- AirVPN
- ExpressVPN
- Surfshark
- hide.me
- Hide My Ass
- iVPN
- Mullvad
- NordVPN
- OVPN
- Private Internet Access
- ProtonVPN
- PureVPN
- TorGuard
- VyprVPN
- Windscribe
There are also different ways of setting up the same provider on pfSense. For this guide, I chose the most straightforward way that works well with a typical basic pfSense installation.
What you’ll need
To get this working on pfSense, you’re going to need to obtain the following from your VPN provider’s website. VPN providers that support pfSense (officially or unofficially) will make their configuration files available for download.
- Your credentials: This would be a username & password, a client identifier, an account number – whatever they call it. It varies by provider. It can be any of the above. You simply need your means of identification and authentication for your account.
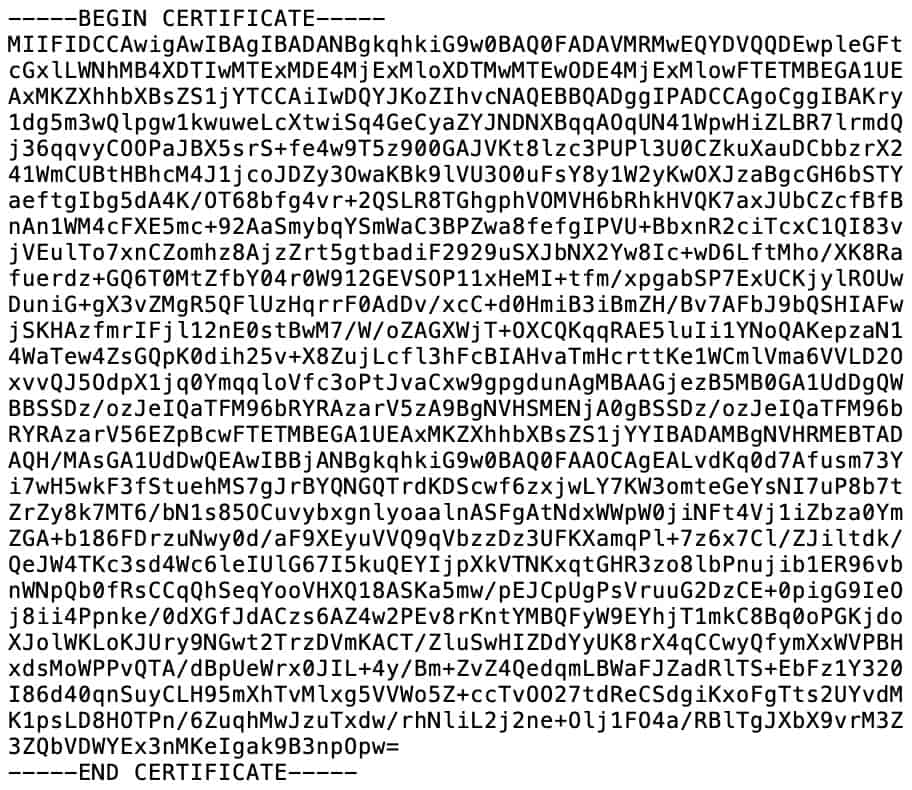
- The CA certificate: The VPN provider has a Certificate Authority that validates connections to its VPN servers. To configure pfSense as a VPN client, you’re going to need your provider’s CA certificate. It looks like this:
- The CA certificate private key: Some providers also require you to import the private key of the CA certificate. Not all do. It looks like this:

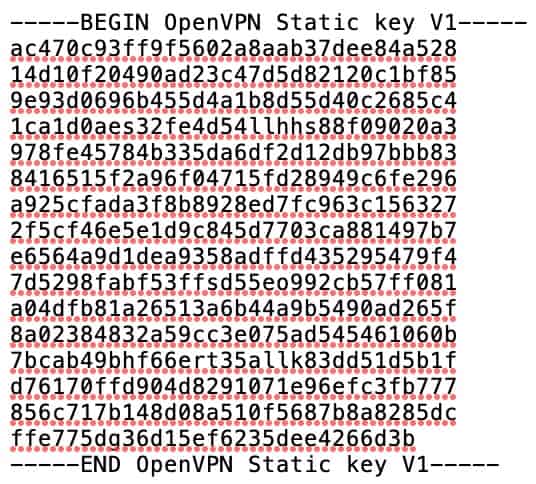
- The TLS key: Some VPN providers also require a TLS key to create a client connection to their servers. It is often referred to as a static key. If your VPN provider requires a static key to establish an OpenVPN connection, you’re going to need that as well. It looks like this:
So the first thing you need to do is obtain the OpenVPN configuration files from your VPN provider. Once you’ve got all that, you’re ready to start configuring the client connection in pfSense.
Configuring pfSense
Login
The first thing we need to do is to log into our pfSense box.
- Launch a web browser and type: https://<your LAN IP address> in the URL bar. pfSense defaults to 192.168.1.1.
- Enter your username and password. You’re taken to the pfSense Dashboard.

Importing the CA certificate and the key
We’re going to start by importing our VPN provider’s CA certificate.
How to import a CA to pfSense
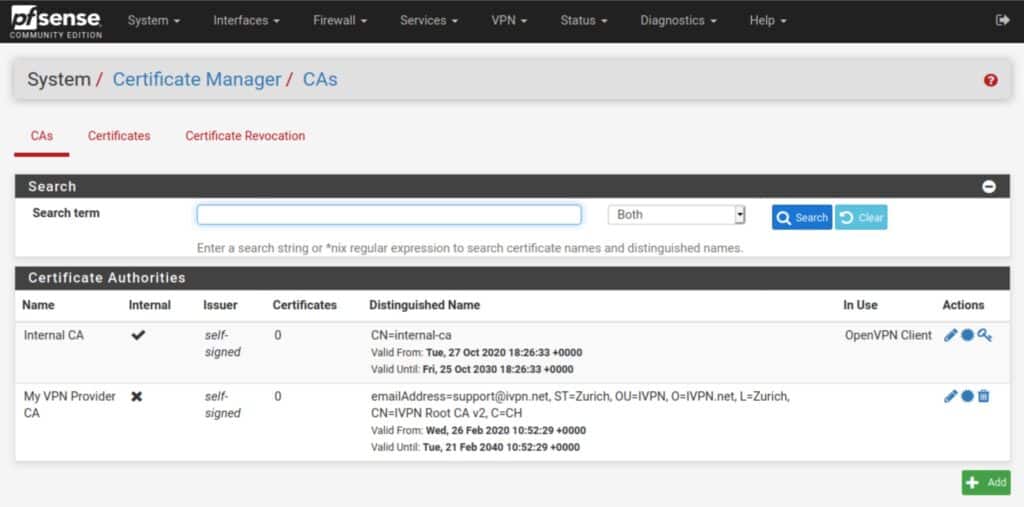
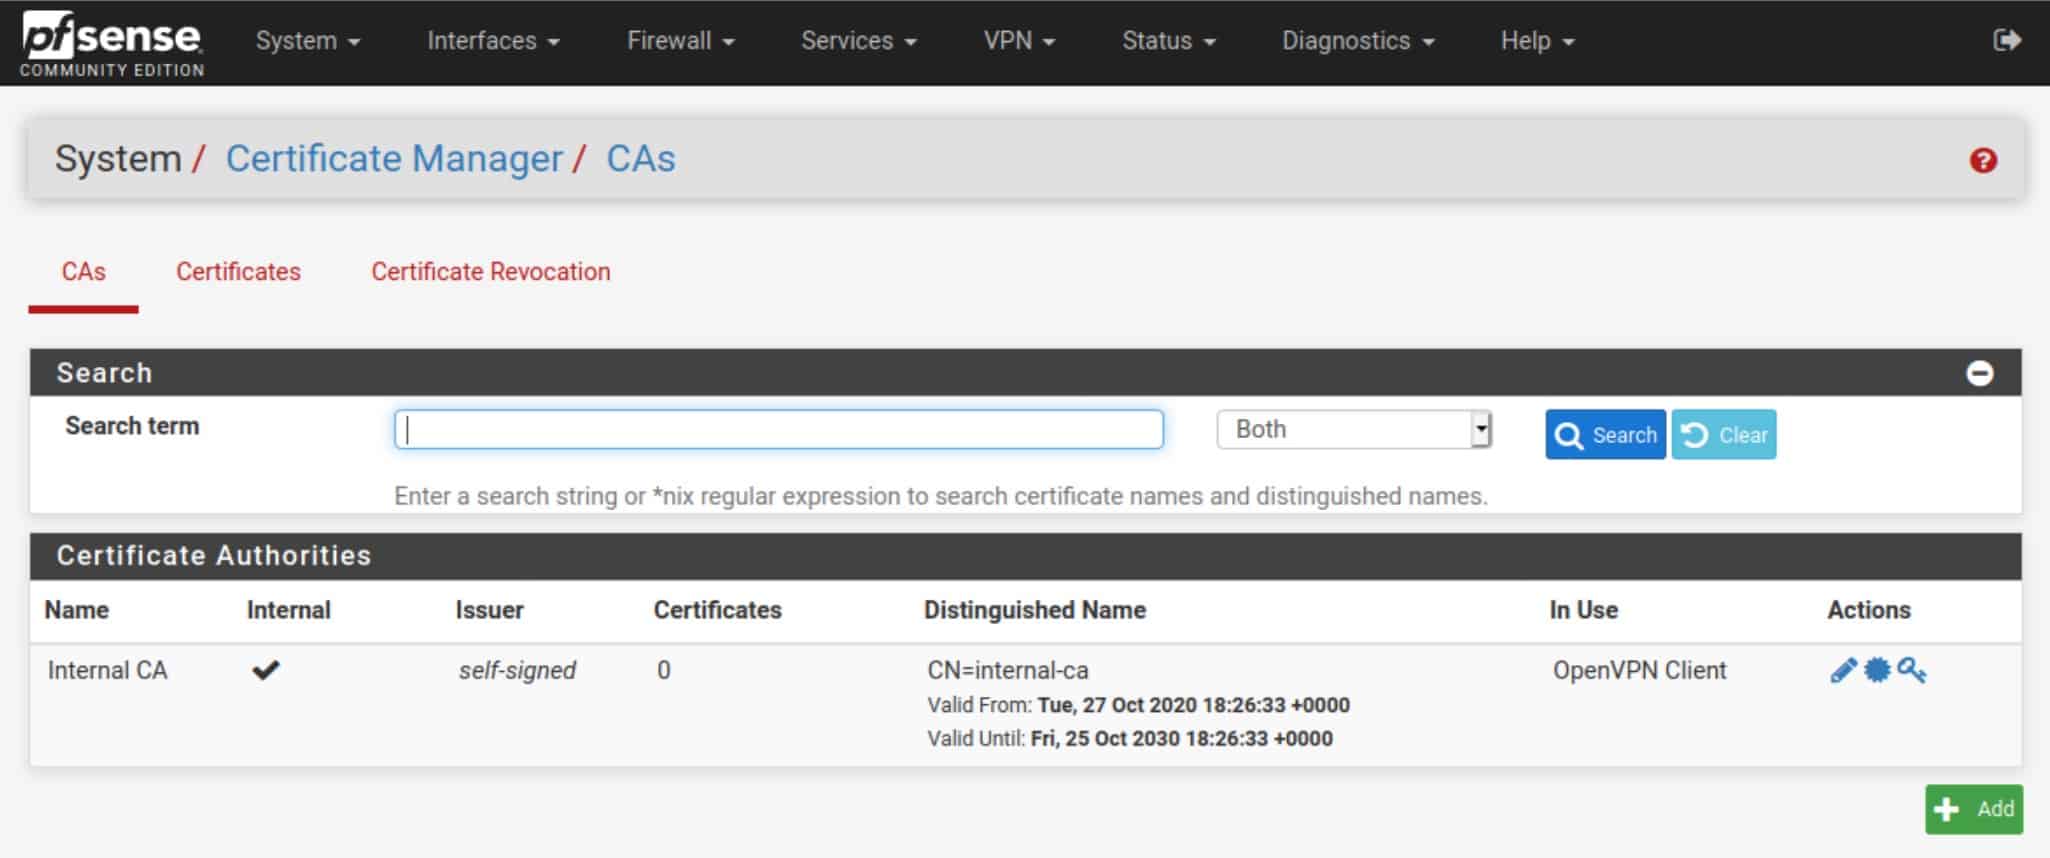
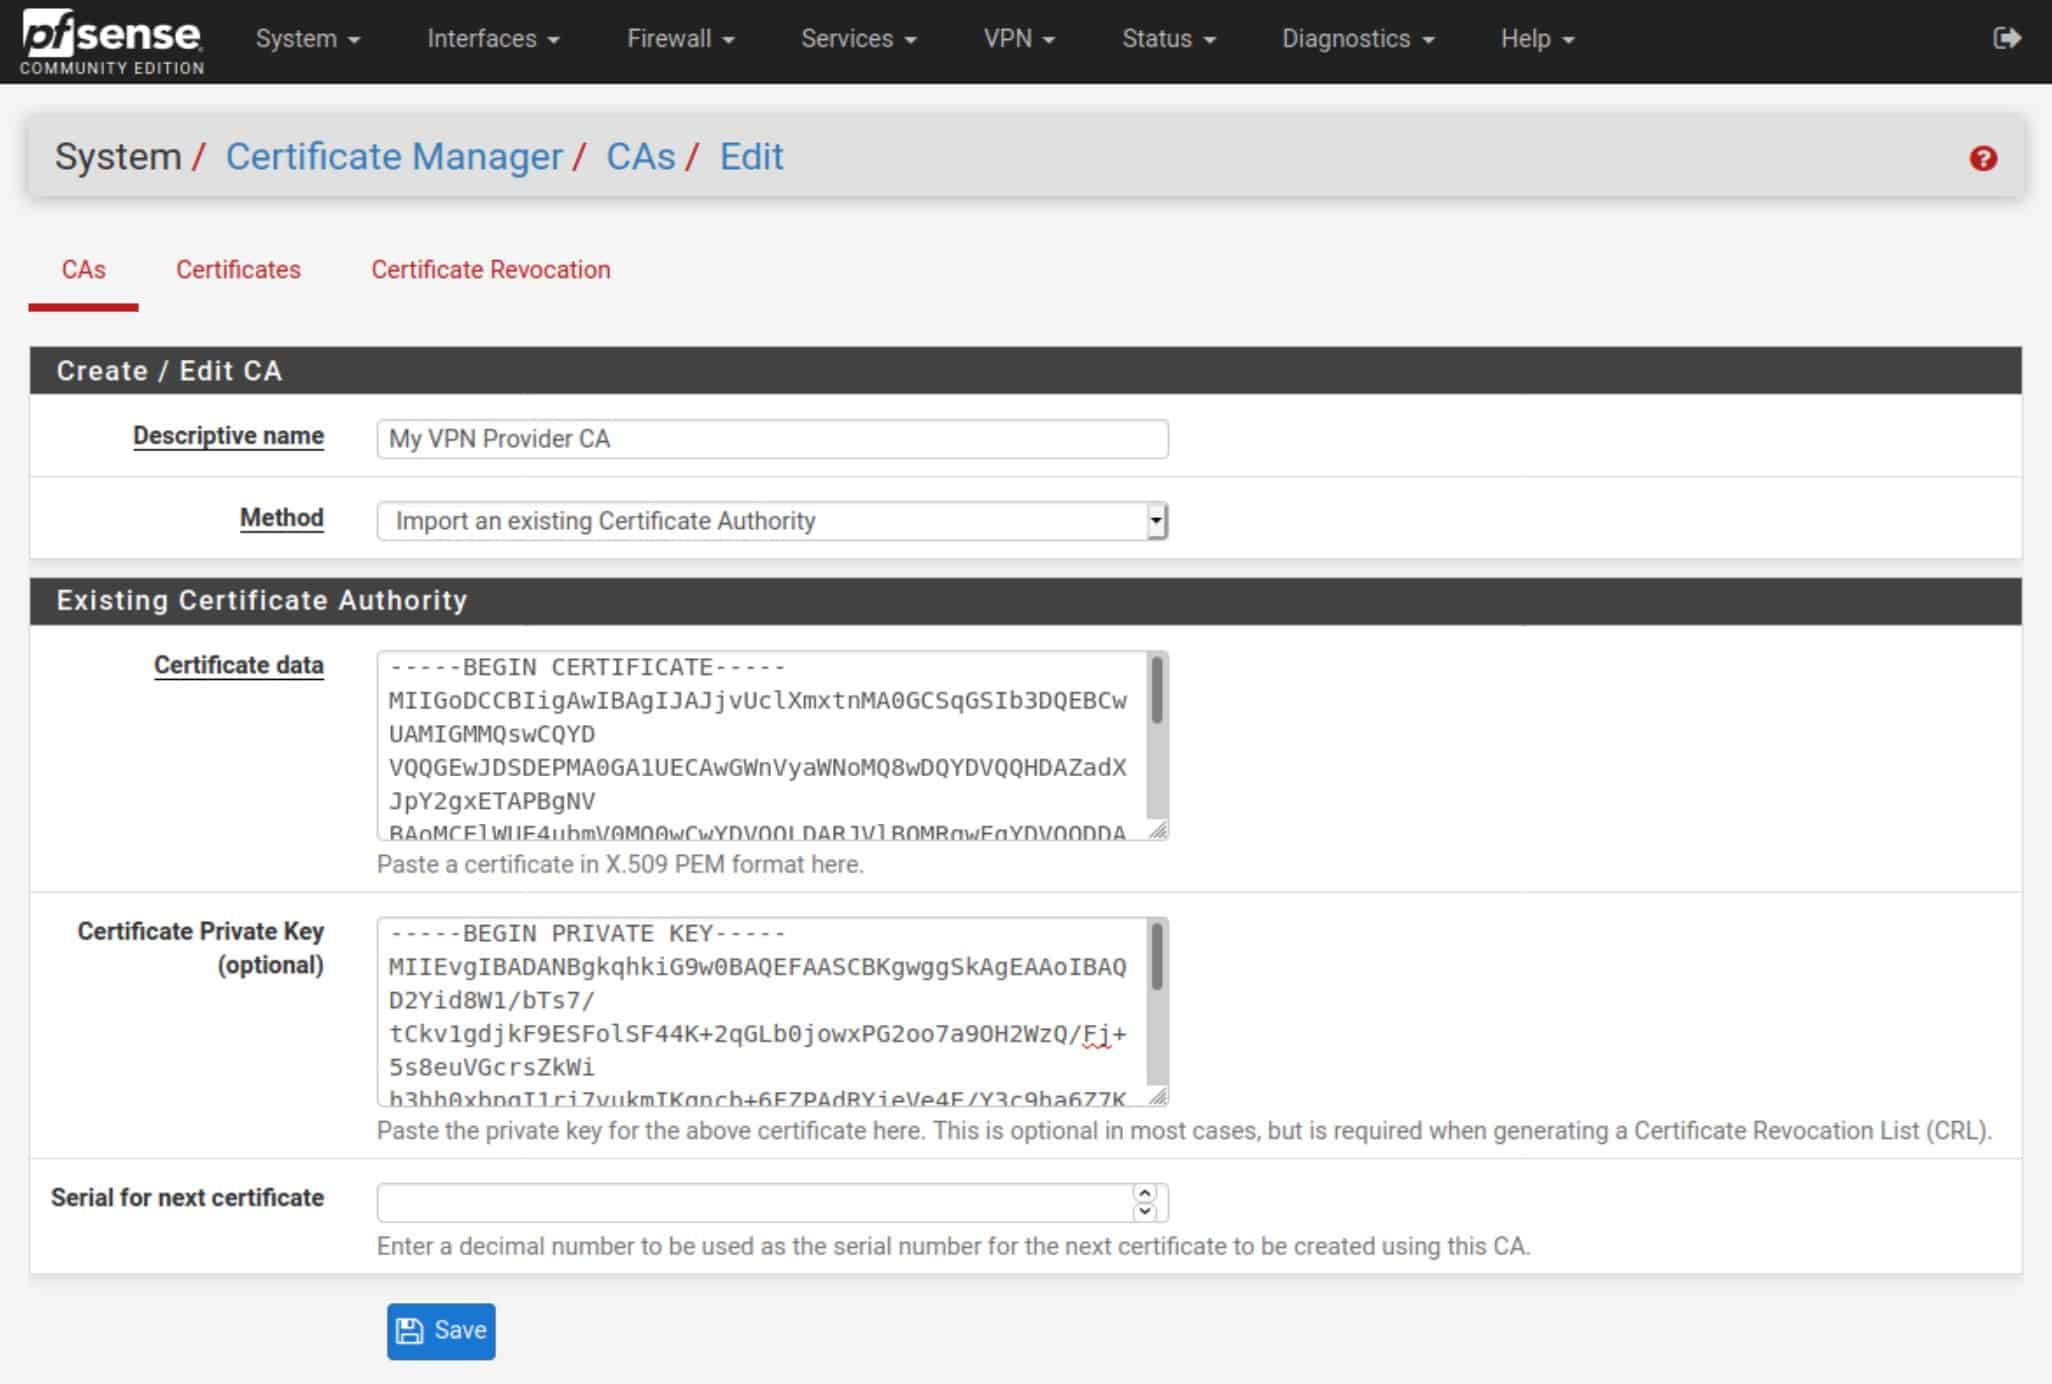
- Navigate to System > Cert. Manager > CAs and click the Add button at the bottom right.
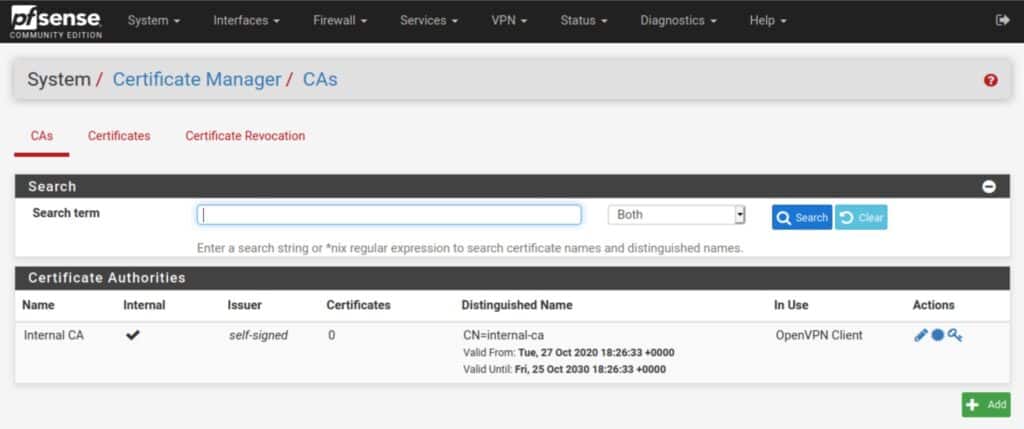
- Give the CA a descriptive name. I’m using My VPN Provider CA for this example.
- Set the Method field to Import an existing Certificate Authority.
- Paste your provider’s CA certificate into the Certificate data field.

- Paste your CA key into the Certificate Private Key field (if your provider requires this).
- Click Save. You’ve imported your VPN provider’s CA and are taken back to the CAs page where your newly imported CA is now displayed in the list.

Adding an OpenVPN client connection
Now that we’ve imported our CA certificate, we can go ahead and start configuring our VPN connection.
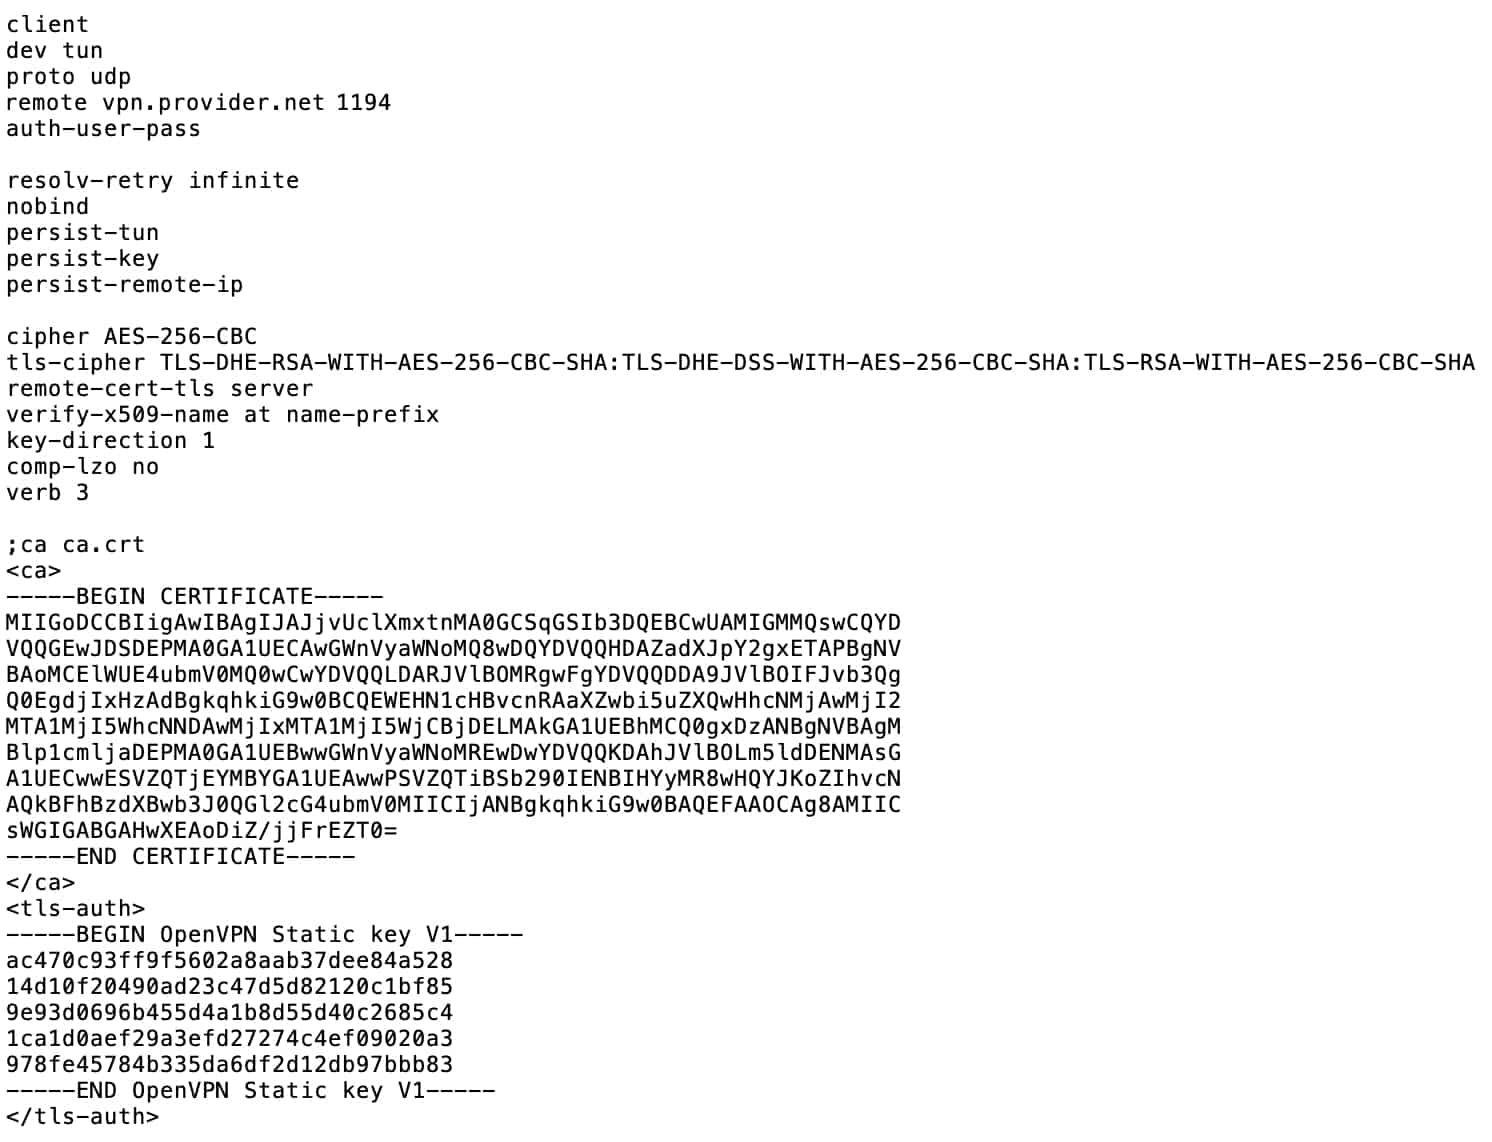
If your VPN provider explicitly supports pfSense, the information you need to set it up will be easy to find. If your VPN provider “unofficially” supports pfSense by supporting Linux, you can find the information needed in one of the .ovpn files made available for Linux. .ovpn files can be opened using a standard text editor. It will look something like this (the certificate and key have been shortened for the screenshot):
Navigate to VPN > OpenVPN > Clients and click the Add button.
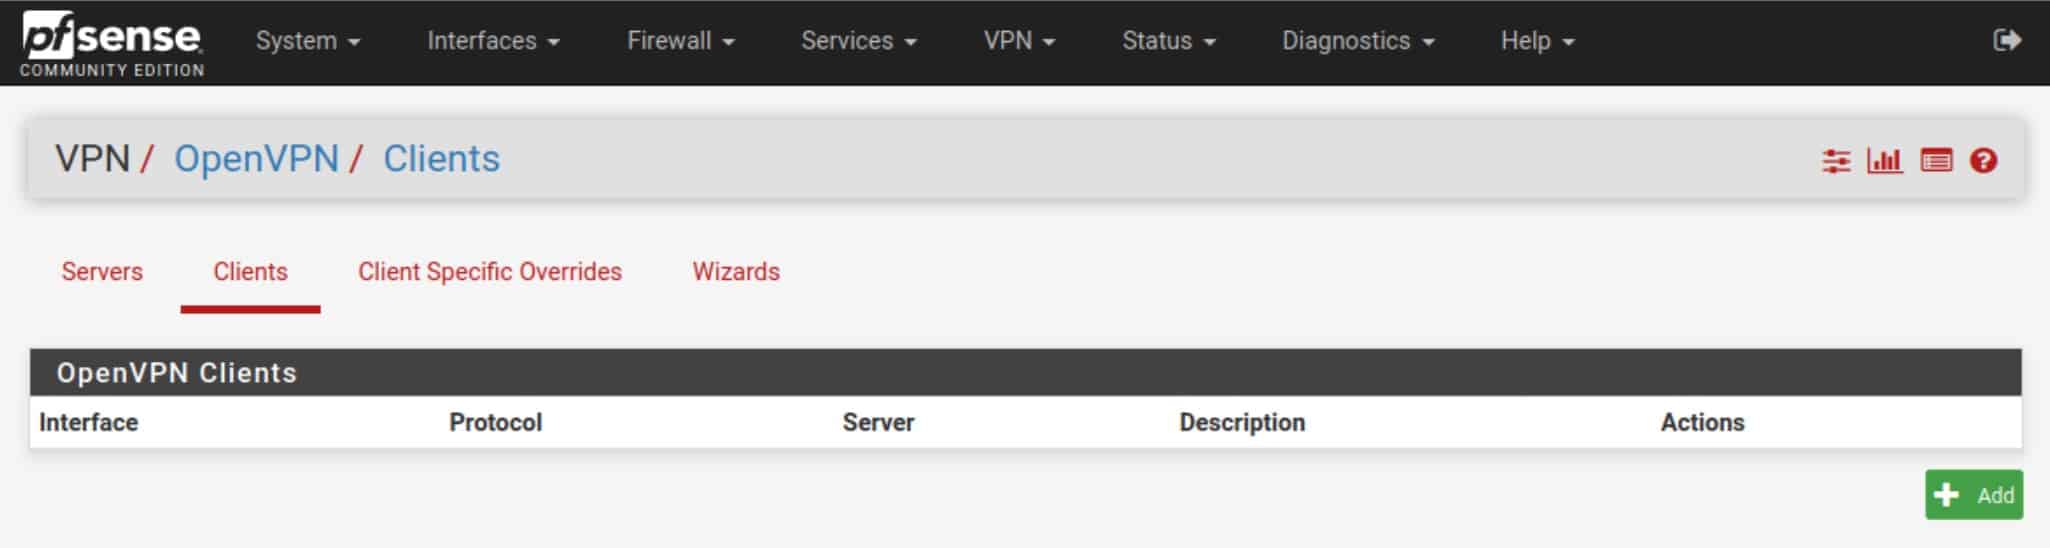
The OpenVPN client configuration page is rather long. We’re going to break it down by section and go over all of the parameters required to set up an OpenVPN connection.
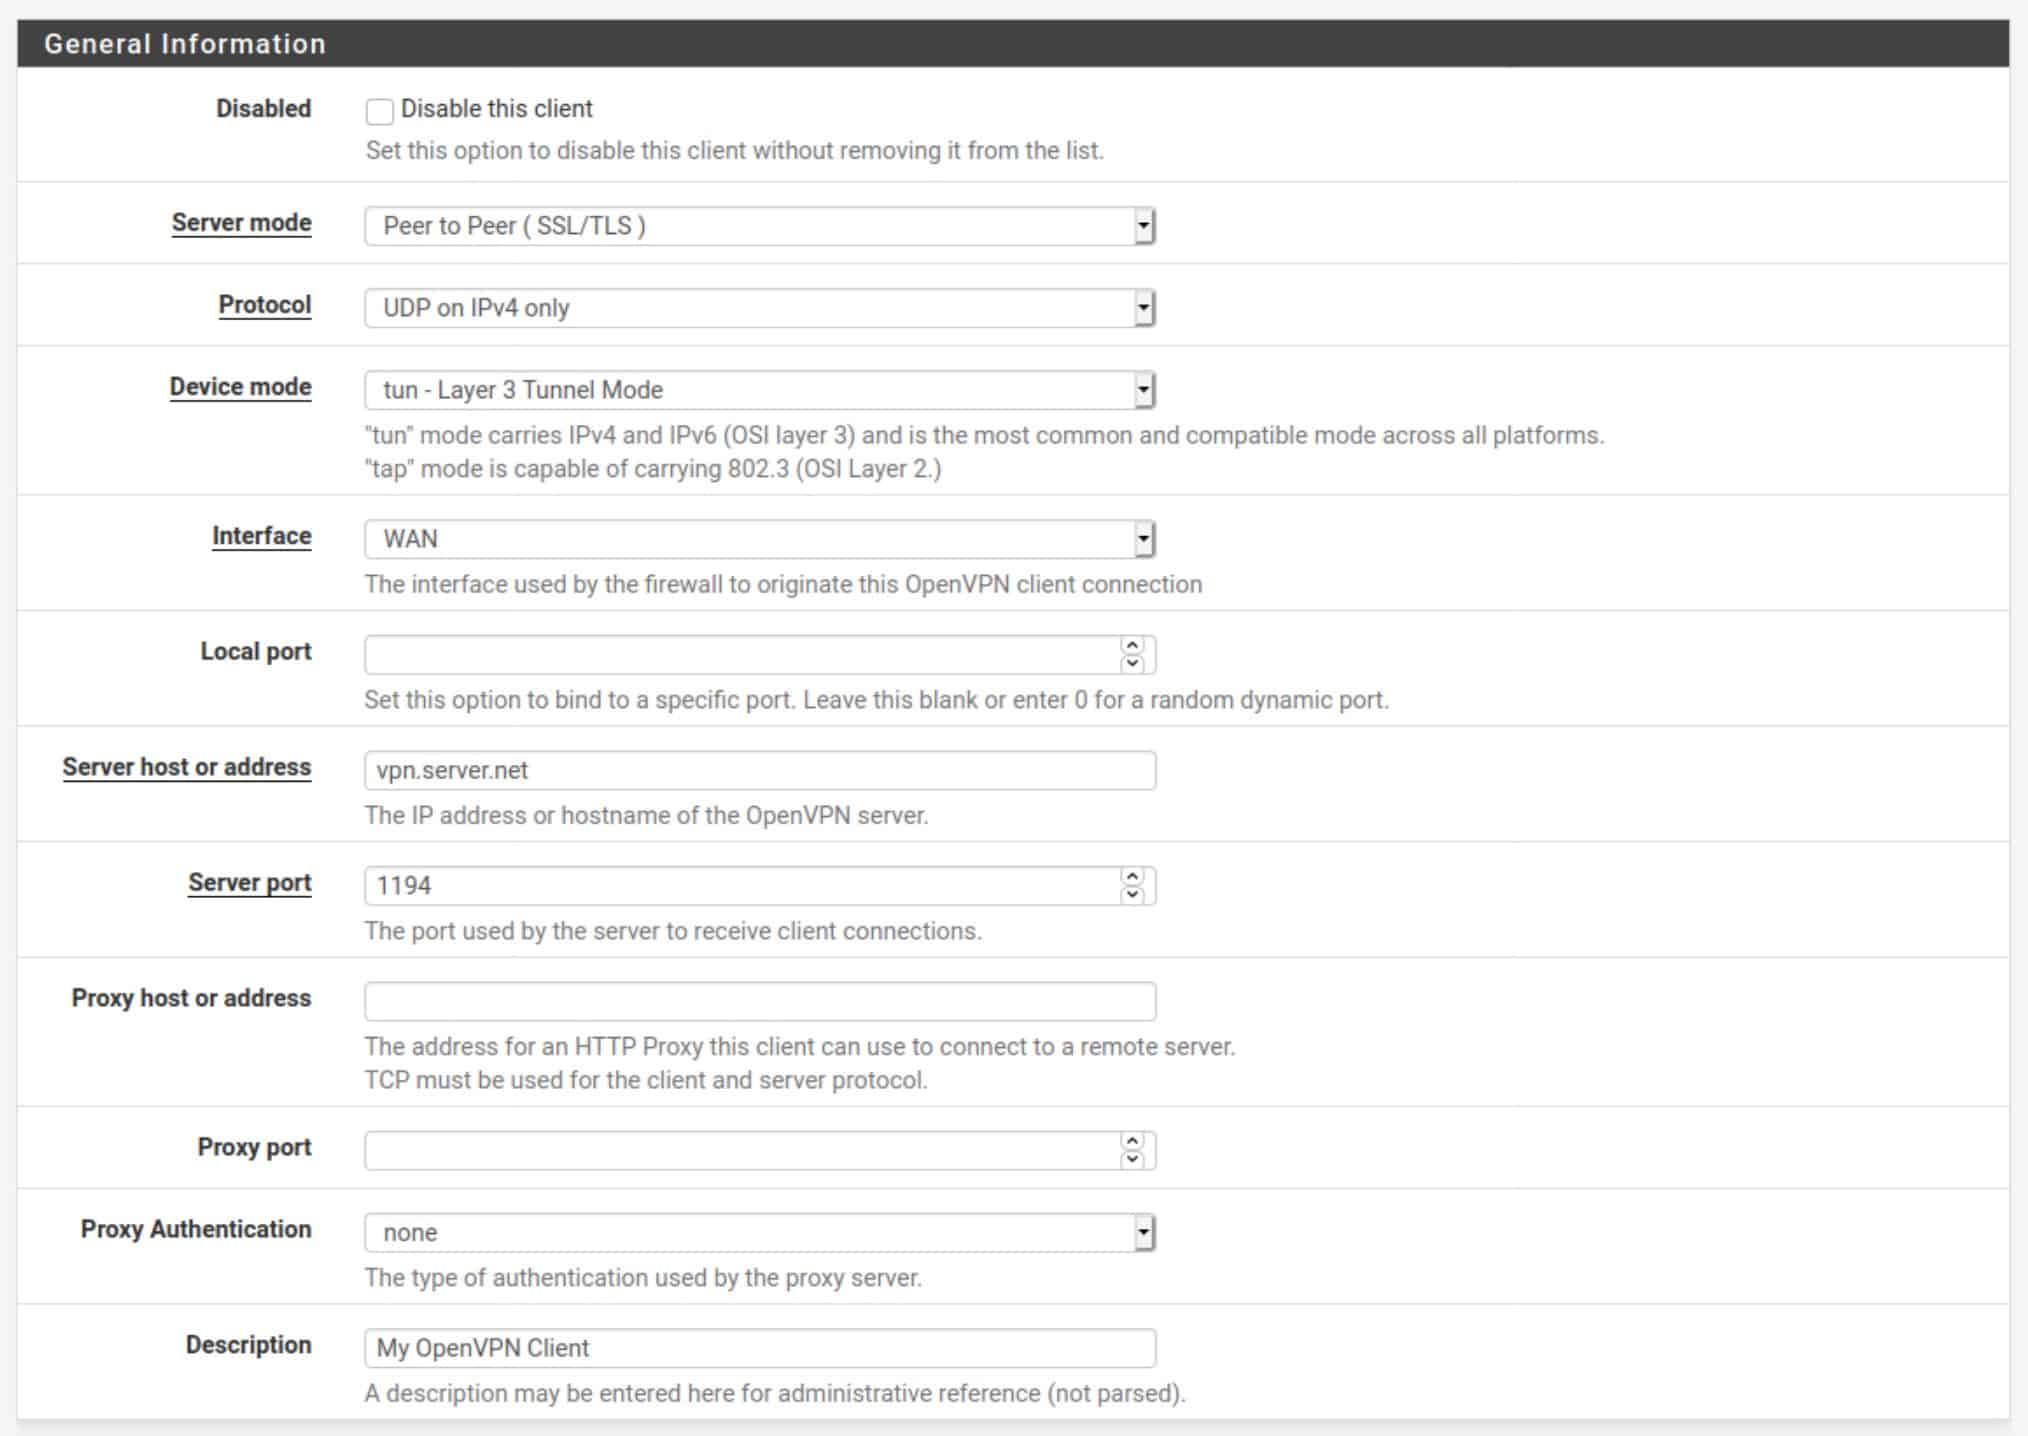
General Information
Disabled: Leave this unchecked or your client connection will be disabled.
Server mode: Set this to Peer to Peer (SSL/TLS). The other option, Shared Key, is typically used for point-to-point VPN connections that link two networks together over VPN.
Protocol: This is typically set to UDP, but can also be set to TCP if your provider supports TCP connections. UDP is usually faster and is the preferred choice for OpenVPN.
Interface: WAN
Local port: Leave blank unless specified by your VPN provider
Server host or address: The IP address or hostname of the VPN server to which you will connect.
Server port: The port over which the VPN connection will be made. This is determined by your VPN provider.
Proxy host or address: Leave blank
Proxy port: Leave blank
Proxy Authentication: Leave blank
User Authentication Settings
This is where you input your VPN provider credentials. As I mentioned above, this can be in the form of a username and password, or a client identifier, or an account number – whatever your VPN provider has chosen. If your provider does not require a password, simply leave the password field blank.
Username: Your username, client identifier, account number, etc.
Password: Your password (if required)
Automatic Retry: Leave unchecked so that your client will attempt to reconnect when authentication fails.

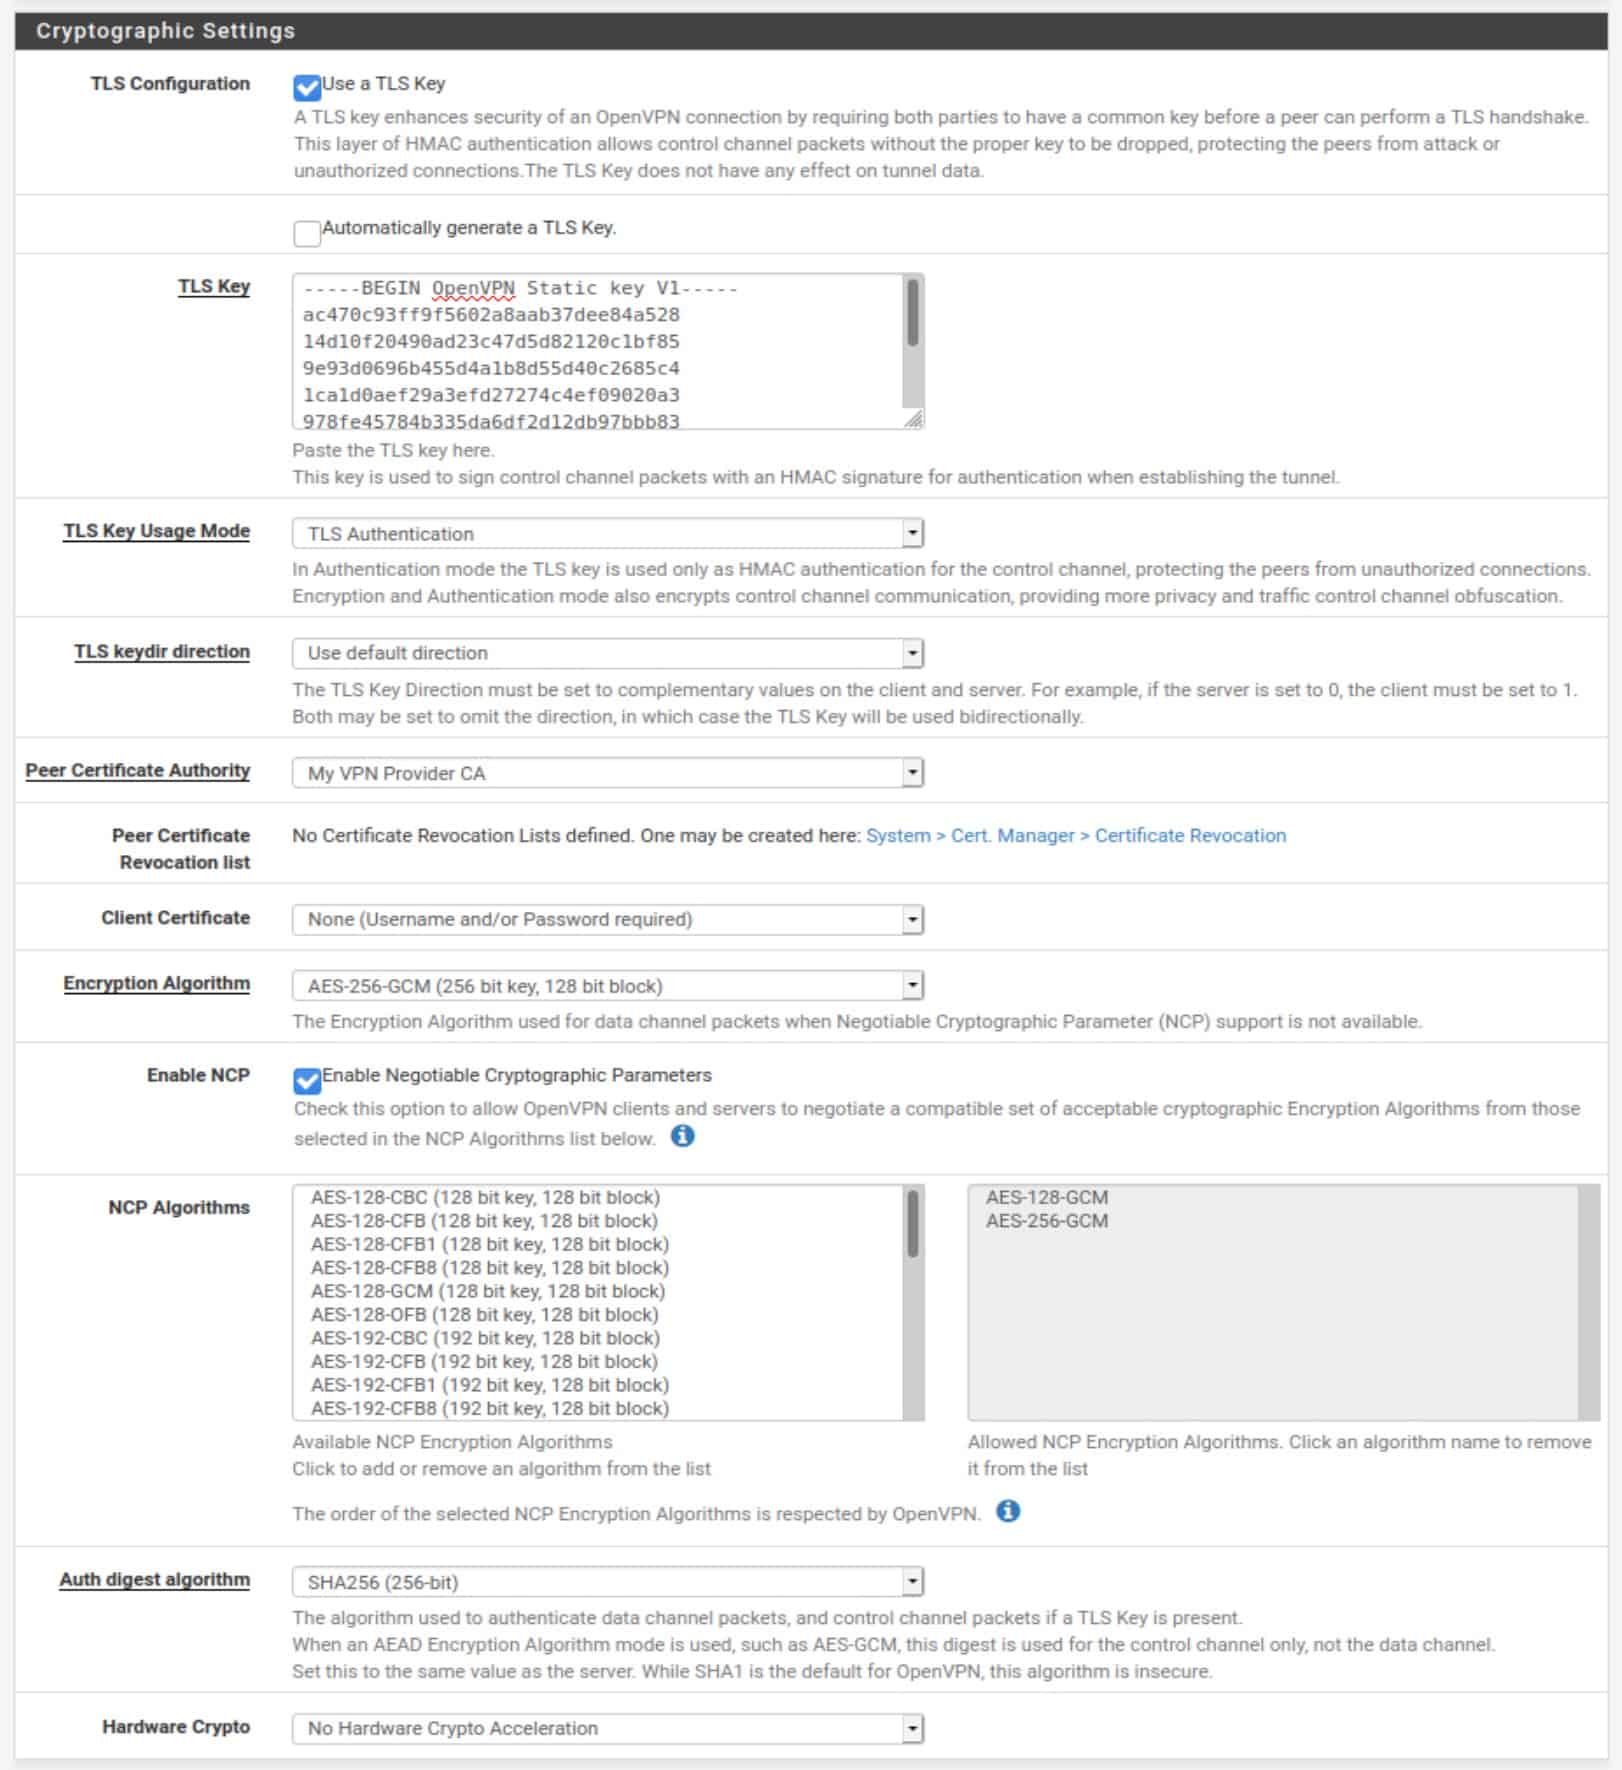
Cryptographic Settings
The way to configure the Cryptographic Settings section varies largely between VPN service providers. You will need to obtain the proper information from your VPN. Most providers make this information readily available.
TLS Configuration: Some VPN providers require a TLS key to be used for authentication of the OpenVPN connection. Others do not. If they do, the TLS key will have been bundled with the configuration files you downloaded. If your provider requires a TLS key, check Use a TLS key. Otherwise, uncheck it.
Automatically generate a TLS Key: Leave unticked.
TLS Key: Paste your VPN provider’s supplied TLS key here if required. Otherwise, leave the field blank.
TLS Key Usage Mode: TLS Keys can be used for either TLS authentication or for TLS authentication and encryption. This depends on your provider. Select the appropriate TLS Key usage mode from the drop-down menu.
TLS keydir direction: Leave at Use default direction unless a different setting is specified by your provider. The client and server TLS keys need to be set in opposite directions for TLS authentication to work.
Peer Certificate Authority: Select the CA we imported earlier.
Client Certificate: Leave this set to None. With OpenVPN, it is possible to use certificate-based authentication rather than a username & password, or both. However, every VPN provider I’ve seen uses credential-based authentication, presumably because distributing unique certificates to every customer would quickly become unmanageable.
Encryption Algorithm: This setting determines the cipher used to encrypt your connection. This again depends on your VPN provider. However, most providers use either AES-256-CBC or AES-256-GCM.
Enable NCP: NCP stands for Negotiable Cryptographic Parameters. If your VPN provider supports various encryption settings, NCP will negotiate the strongest possible encryption that is supported by both the client (your pfSense box) and the VPN server. Unless you know that your provider supports NCP, untick it and the cipher selected in Encryption Algorithm above will be used.
NCP Algorithms: If you use NCP, you can select which ciphers are available for negotiation. Clicking a cipher from the available list imports it into the allowed list.
Auth digest algorithm: This is the algorithm used to authenticate the data channel (the tunnel through which your traffic flows). This is determined by your VPN provider. Select the appropriate algorithm from the drop-down menu.
Hardware Crypto: If the system on which you installed pfSense supports hardware cryptographic acceleration, you can enable it here. If your system supports this setting, you can enable it regardless of which VPN provider you use.
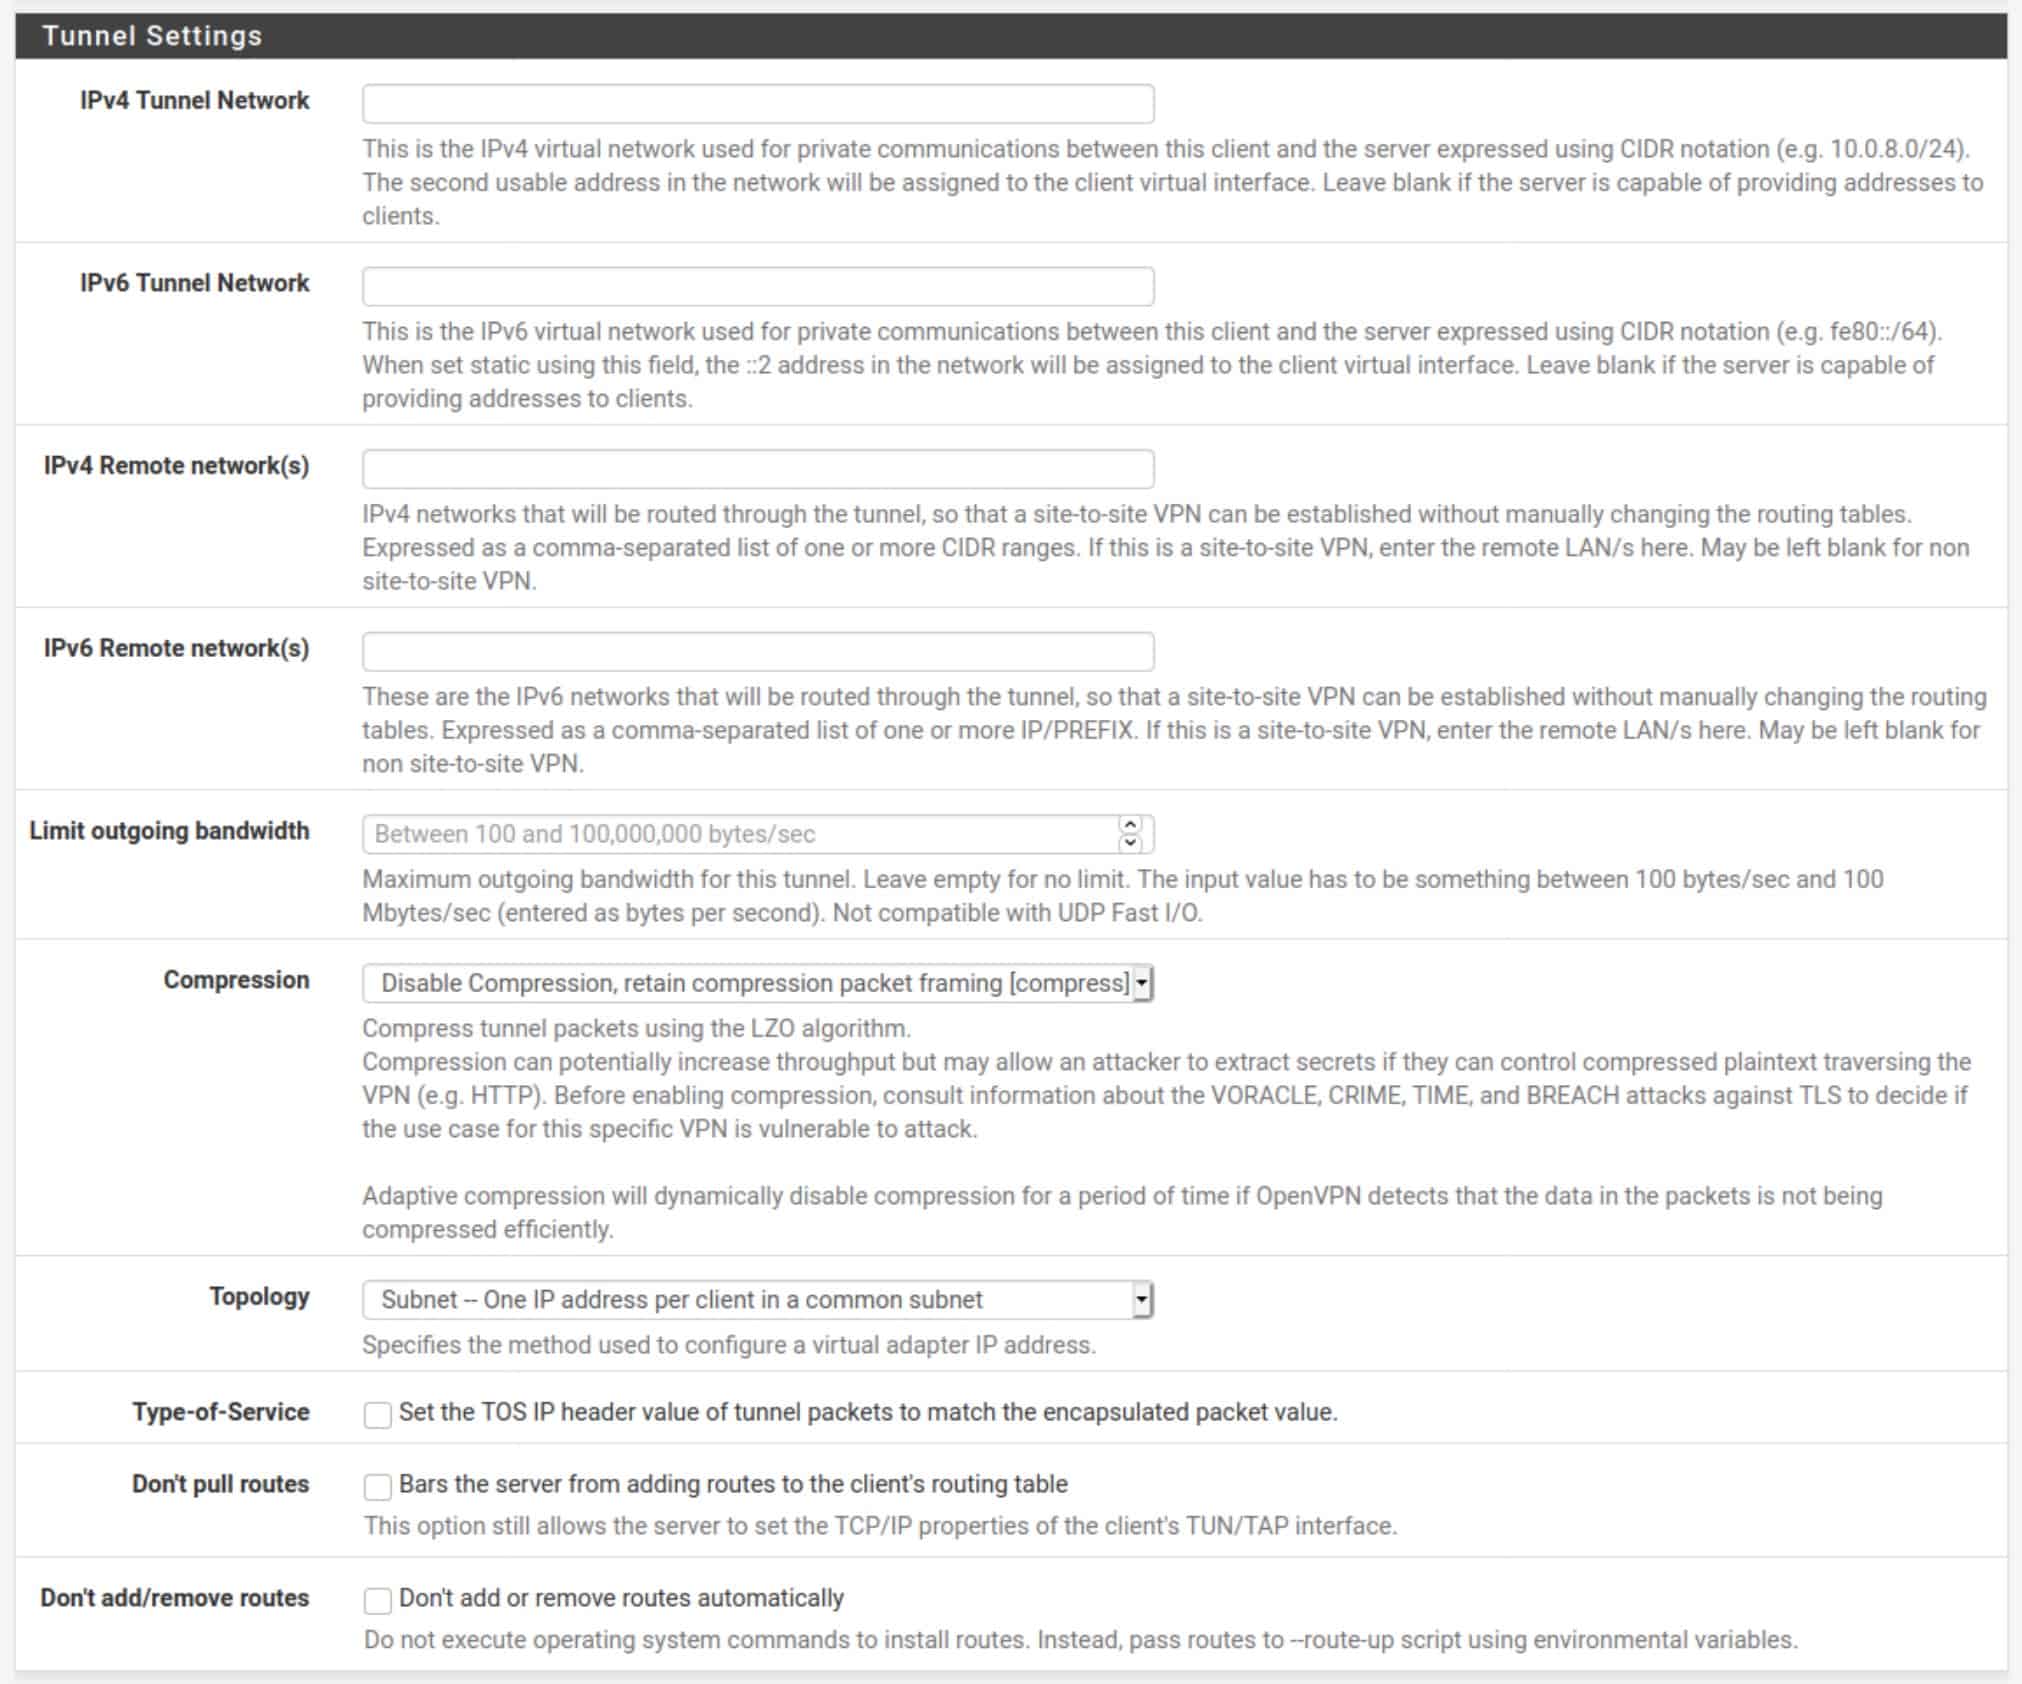
Tunnel Settings
The tunnel settings will be left largely blank. These settings have to do with routing between the client and the server and are typically handled by the VPN provider on the server-side.
IPv4 Tunnel Network: The IPv4 network between the client and the server. Leave blank.
IPv6 Tunnel Network: The IPv6 network between the client and the server. Leave blank.
IPv4 Remote network(s): The IPv4 networks that will be routed through the tunnel. Leave blank.
IPv6 Remote network(s): The IPv6 networks that will be routed through the tunnel. Leave blank.
Limit outgoing bandwidth: Sets a hard limit on outgoing bandwidth. Leave blank.
Compression: Some VPN providers may require you to enable compression on the traffic flowing through the VPN tunnel. If this is specified by your provider, select the appropriate option from the drop-down menu. Otherwise, leave it as is.
Topology: Specifies the topology of the VPN network. Leave as is.
Type-of-Service: Leave unticked.
Don’t pull routes: This setting bars the VPN server from pushing routes to the client. Some providers include the routing information in the client configuration and may ask you to enable this option (such as ExpressVPN). If this is specified by your provider, tick this option. Otherwise, leave it unticked.
Don’t add/remove routes: This option can be used to enable selective routing: sending some traffic through the VPN tunnel while sending the rest out the ISP gateway. This requires setting the VPN interface (which we will create below) as a gateway in pfSense and specifying some firewall and NAT rules to get it working. This is outside the scope of this guide. Also, in your typical commercial VPN scenario, you want all of your traffic to be tunneled through the VPN connection. Leave this setting unticked.
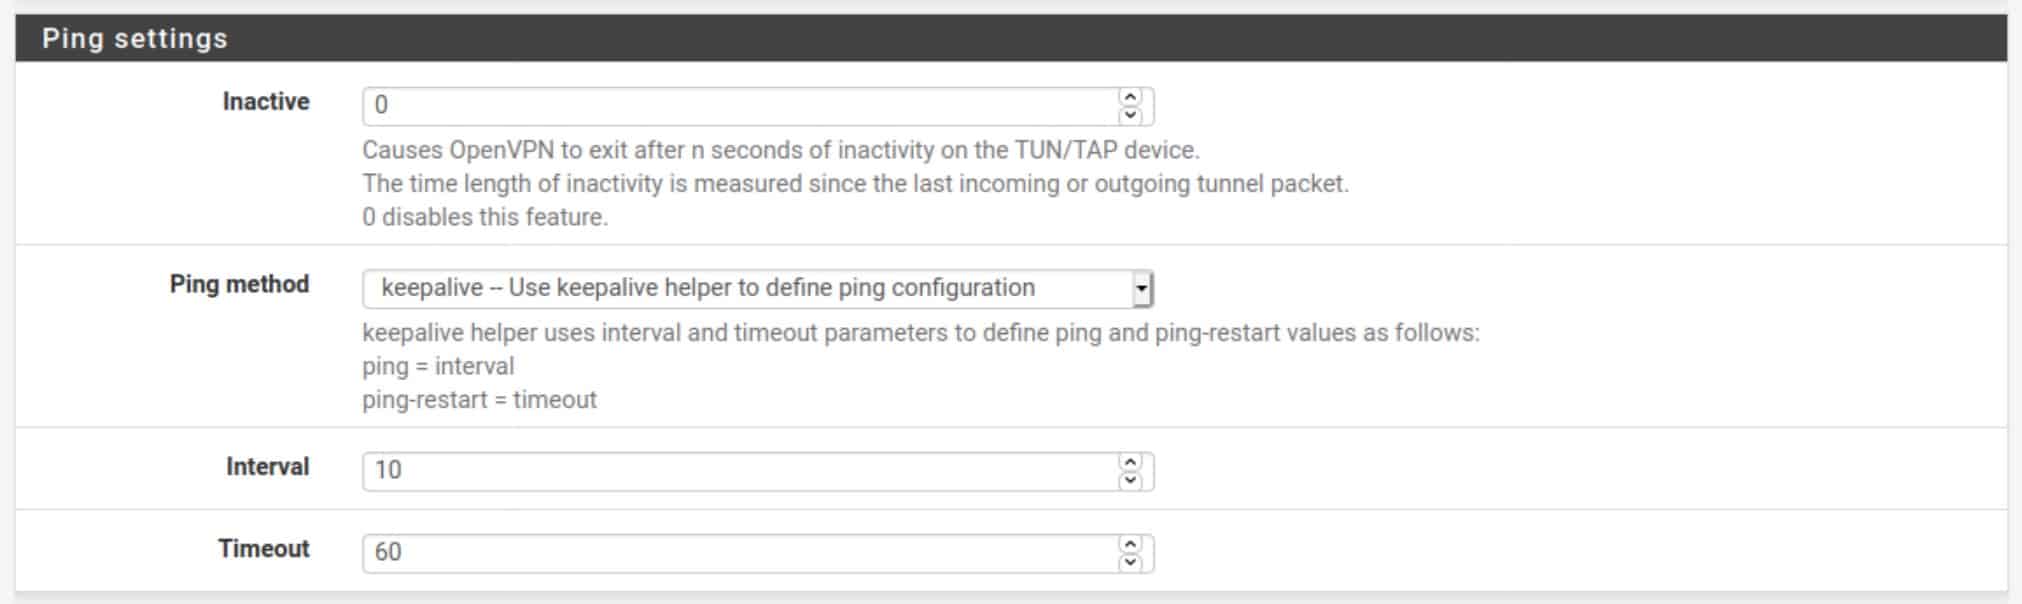
Ping Settings
The ping settings are used to determine if the connection is active or not and whether it should be closed or reinitiated. Leave all of the settings as they are.
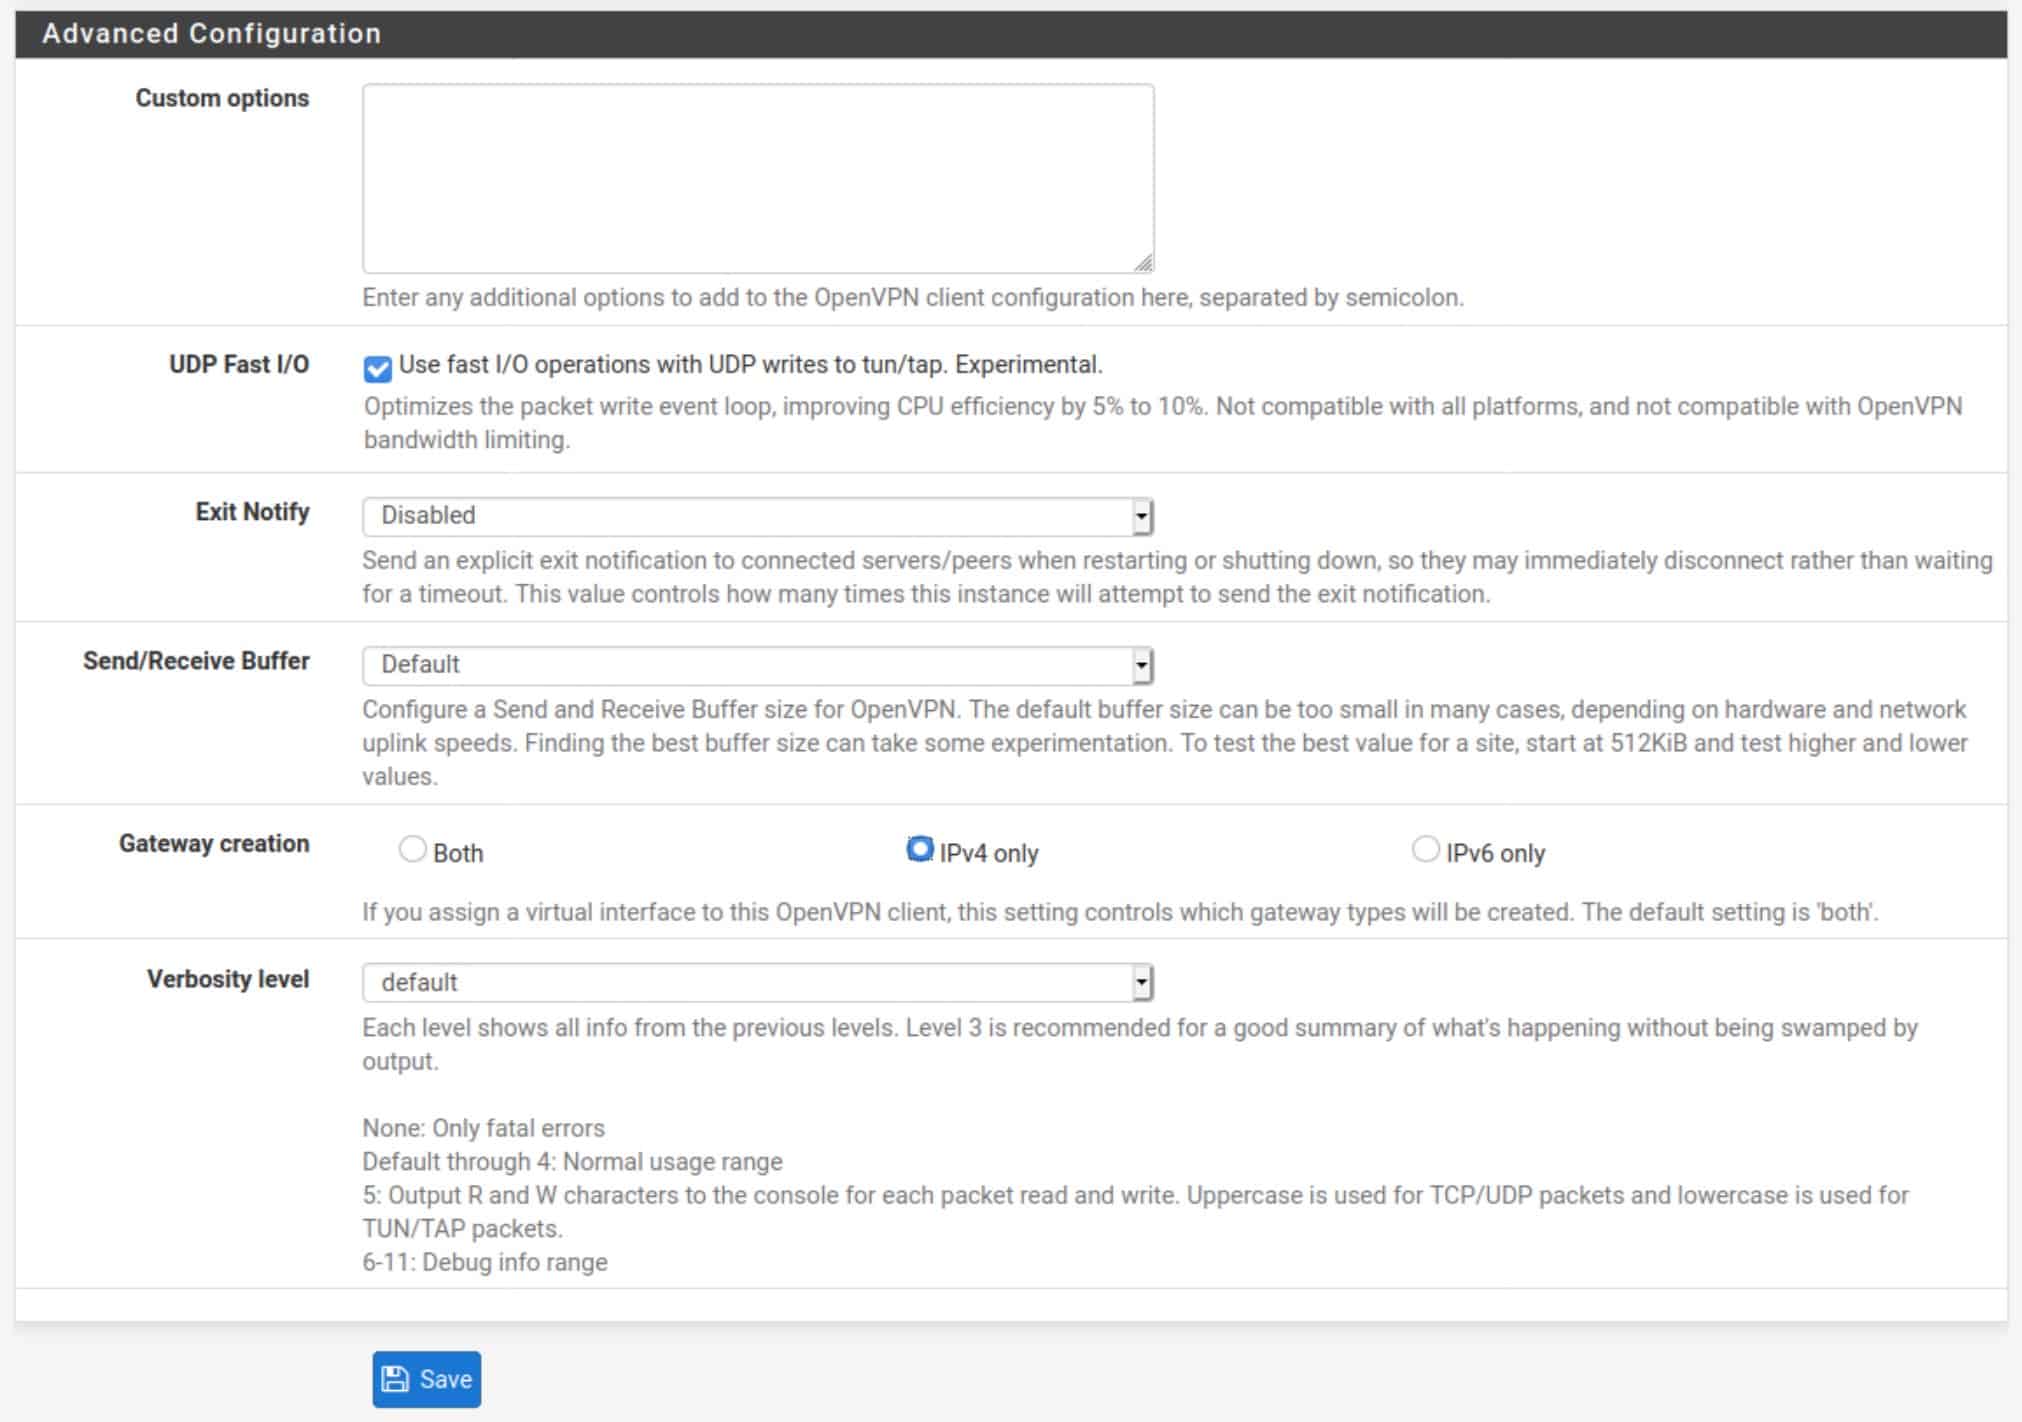
Advanced Configuration
Custom options: Some providers require setting some custom options to the client configuration. These can be added here. Unless your provider specifies the required custom options, leave this blank.
UDP Fast I/O: Optimizes packet writing and may speed up your VPN connection. This can be enabled and disabled at your leisure. I would say try both and see if you get a speed boost from it.
Exit Notify: This setting explicitly alerts the server when the client disconnects so that it can close the connection rather than wait for it to timeout. Leave this as-is unless specified by your provider.
Send/Receive Buffer: You can experiment with different buffer sizes within OpenVPN. Different settings will give different results in terms of speed. 512K is a good place to start. This setting is optional.
Gateway Creation: Selects whether OpenVPN gateways will be created for IPv4 only, IPv6 only, or both. Unless your VPN provider supports IPv6 (such as Mullvad), set this to IPv4 only. If your provider does support IPv6, set this to Both.
Verbosity level: Determines the verbosity level of the OpenVPN logs for this client. The default level is 1. But you can set this at a higher level to get more information when troubleshooting. OpenVPN logs in pfSense can be viewed by navigating to Status > System Logs > OpenVPN.
Now all that’s left to create our client connection is to click the blue Save button at the bottom of the screen and click Apply Changes.
Creating the VPN interface
The next thing we need to do is create the virtual interface that will host the VPN network segment (the subnet you become a part of after a successful VPN connection) on our pfSense box.
The interface was automatically created by pfSense when we hit save after configuring our connection earlier. But we still need to assign and configure it.
How to add an interface in pfSense
- Navigate to Interfaces > Assignments. You’ll see ovpnc1 listed to the right of Available network ports.
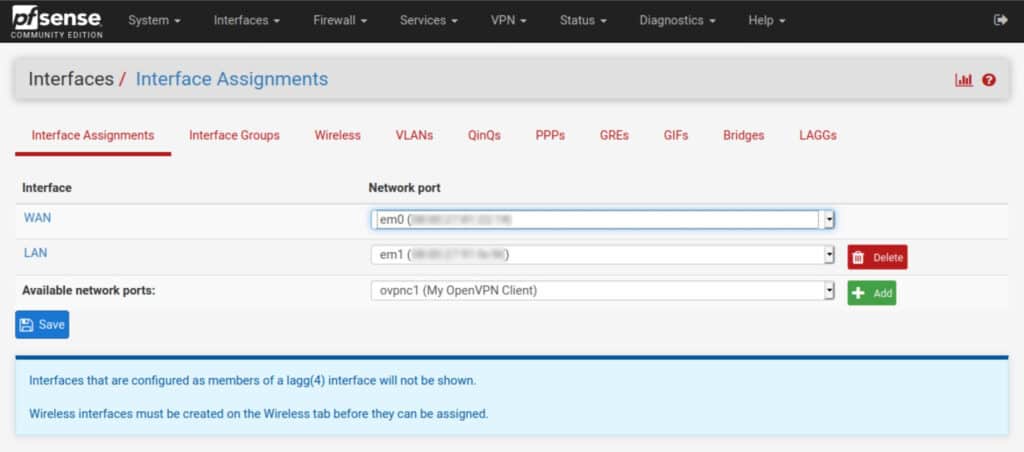
- Click the green Add button, to its right. The ovpnc1 interface is assigned and displayed as OPT1.
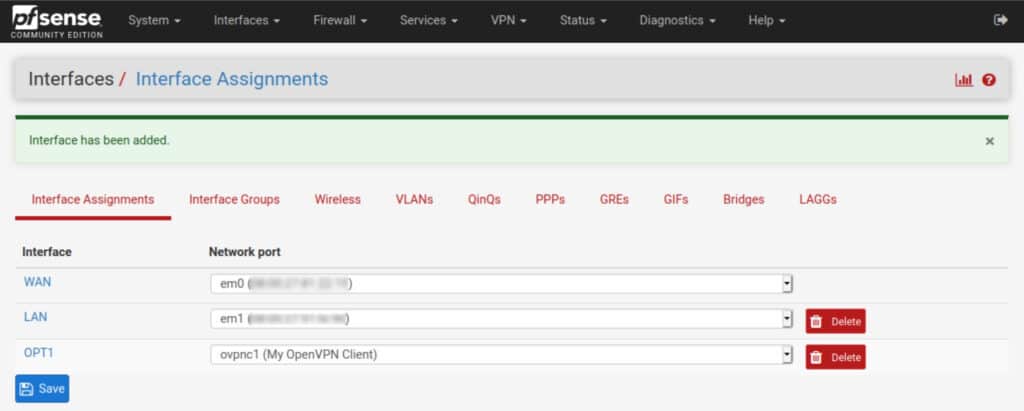
- Click OPT1. You are taken to the interface configuration page.
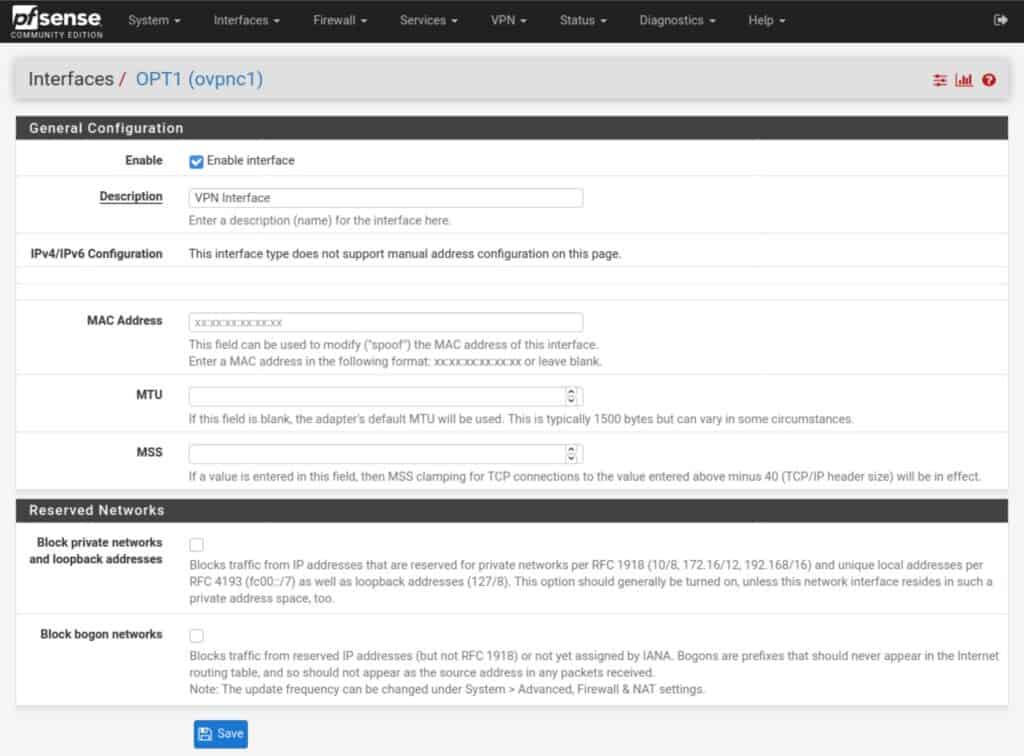
- Tick Enable interface and give it a name. Leave all of the other settings untouched.
- Click Save and Apply Changes. Your interface is assigned and enabled.

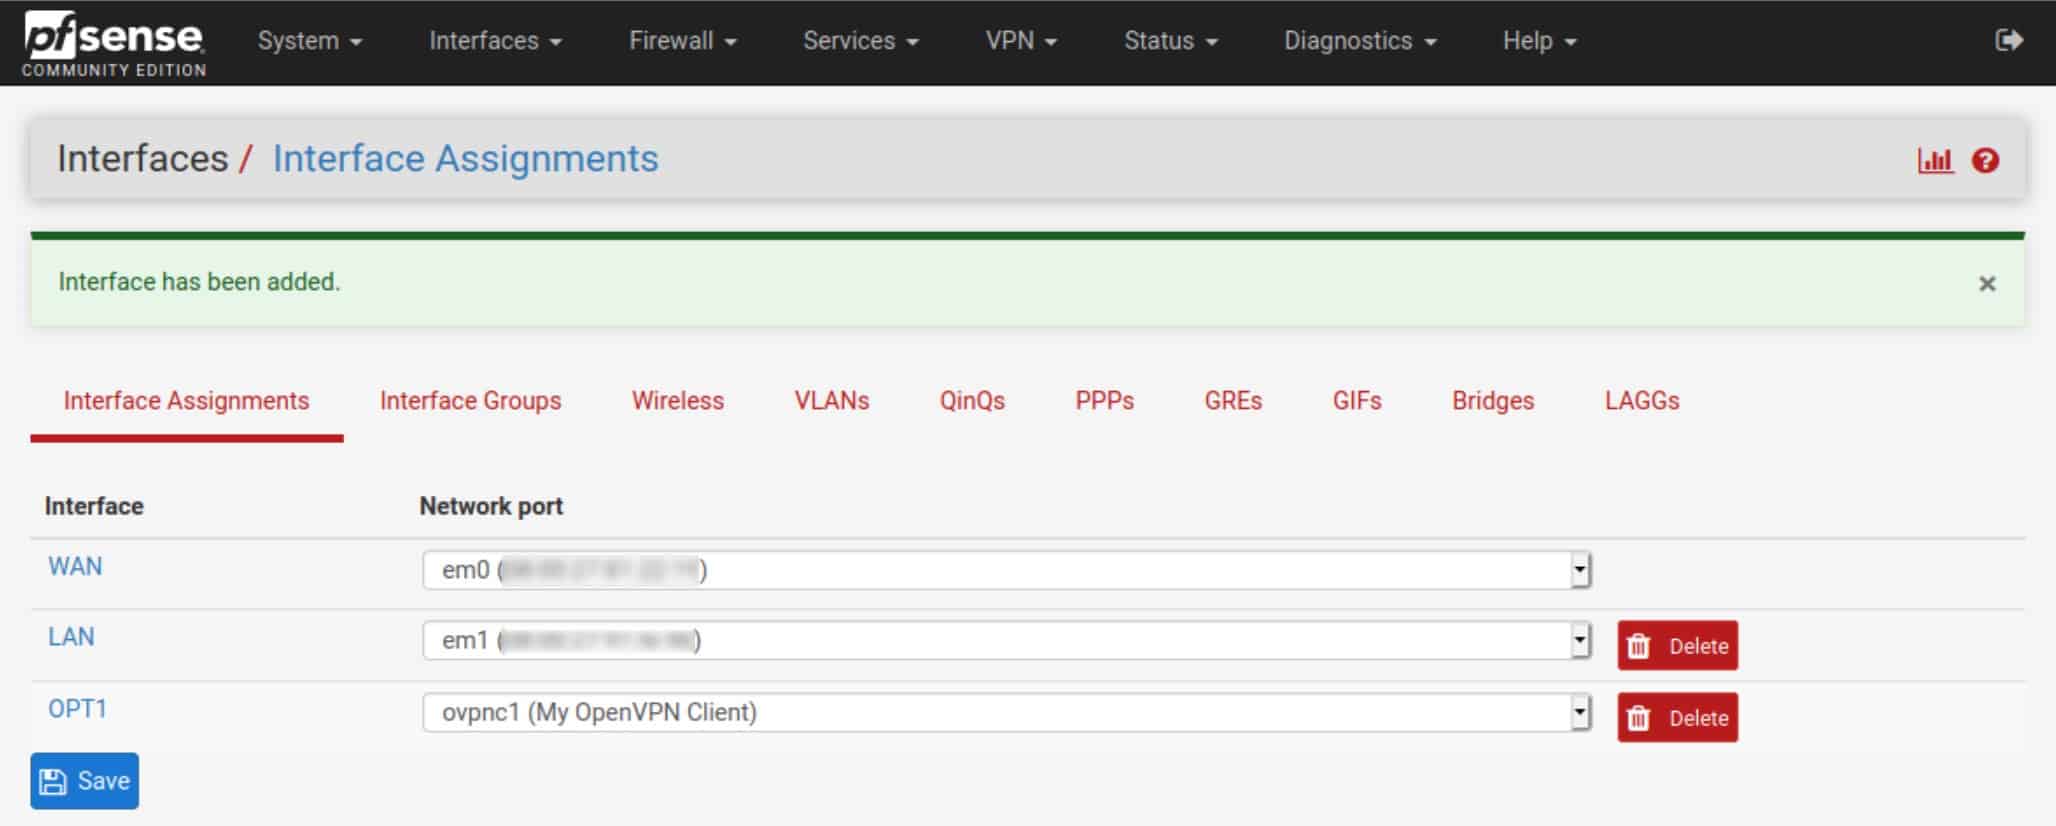

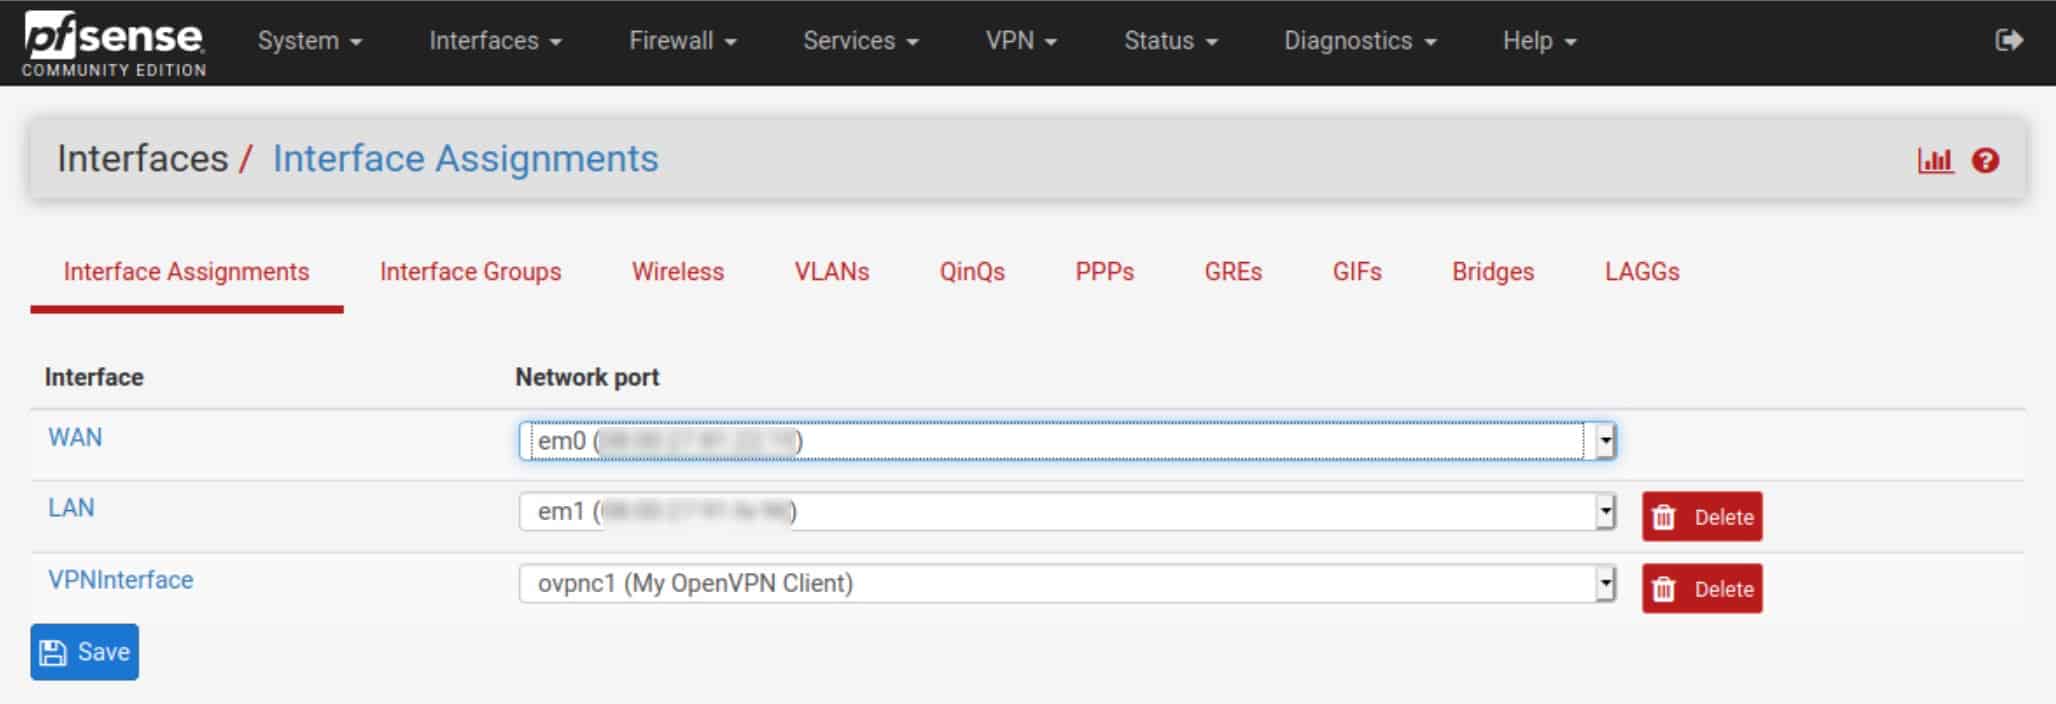
If you navigate back to the Interface Assignments page, you can see your named interface is now part of the list of active interfaces.
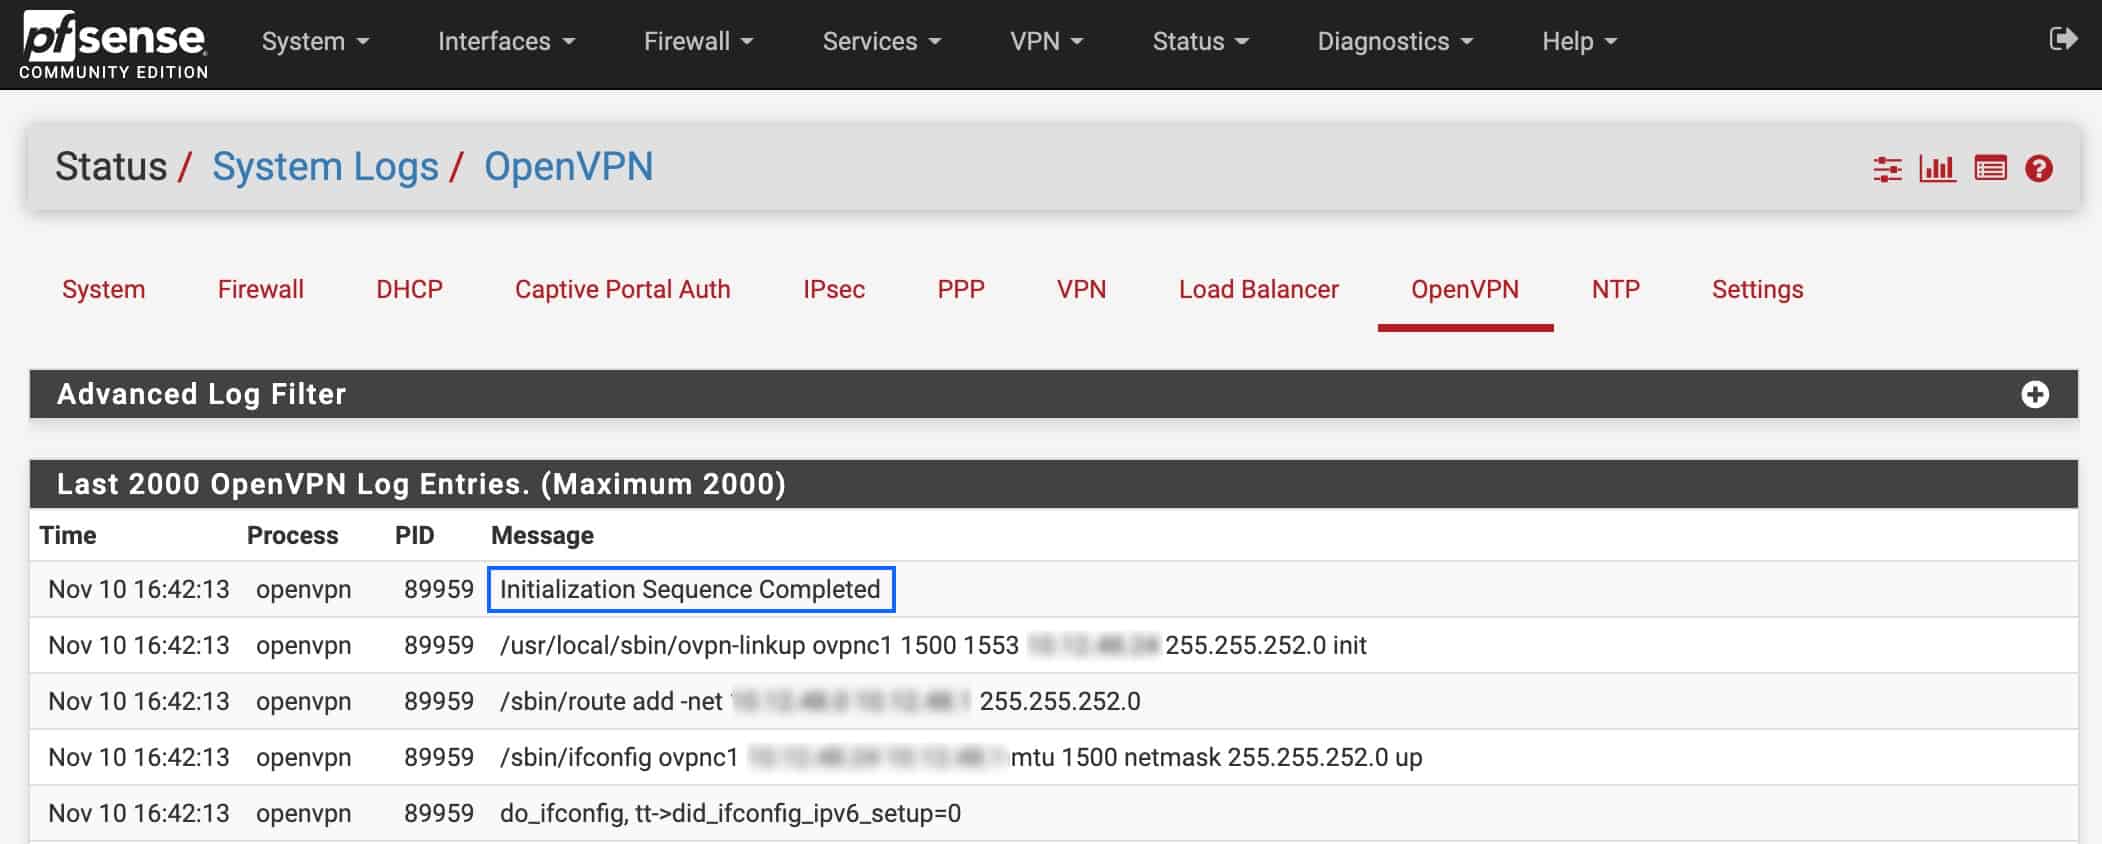
Checking the connection
OK, we now have our OpenVPN client connection configured and we’ve created our VPN interface. Our connection is working right now, but pfSense isn’t configured to route traffic through the VPN tunnel.
We can check that our connection is working, by navigating to Status > System Logs > OpenVPN. If the OpenVPN client is set up correctly, you should see Initialization Sequence Completed, somewhere near the top of the OpenVPN logs.
Now we just need to route traffic through the VPN tunnel.
Firewall rules
We need to make sure that the devices connected to the LAN interface can send traffic out to the internet via the default gateway. When you install pfSense, it automatically creates a rule allowing any type of traffic out of the LAN interface by default. So if you didn’t change anything there, you should be fine.
If you did change them, make sure that your rules allow the LAN devices you want to connect to the VPN to go out to the internet. Navigate to Firewall > Rules > LAN to view/update your LAN rules.
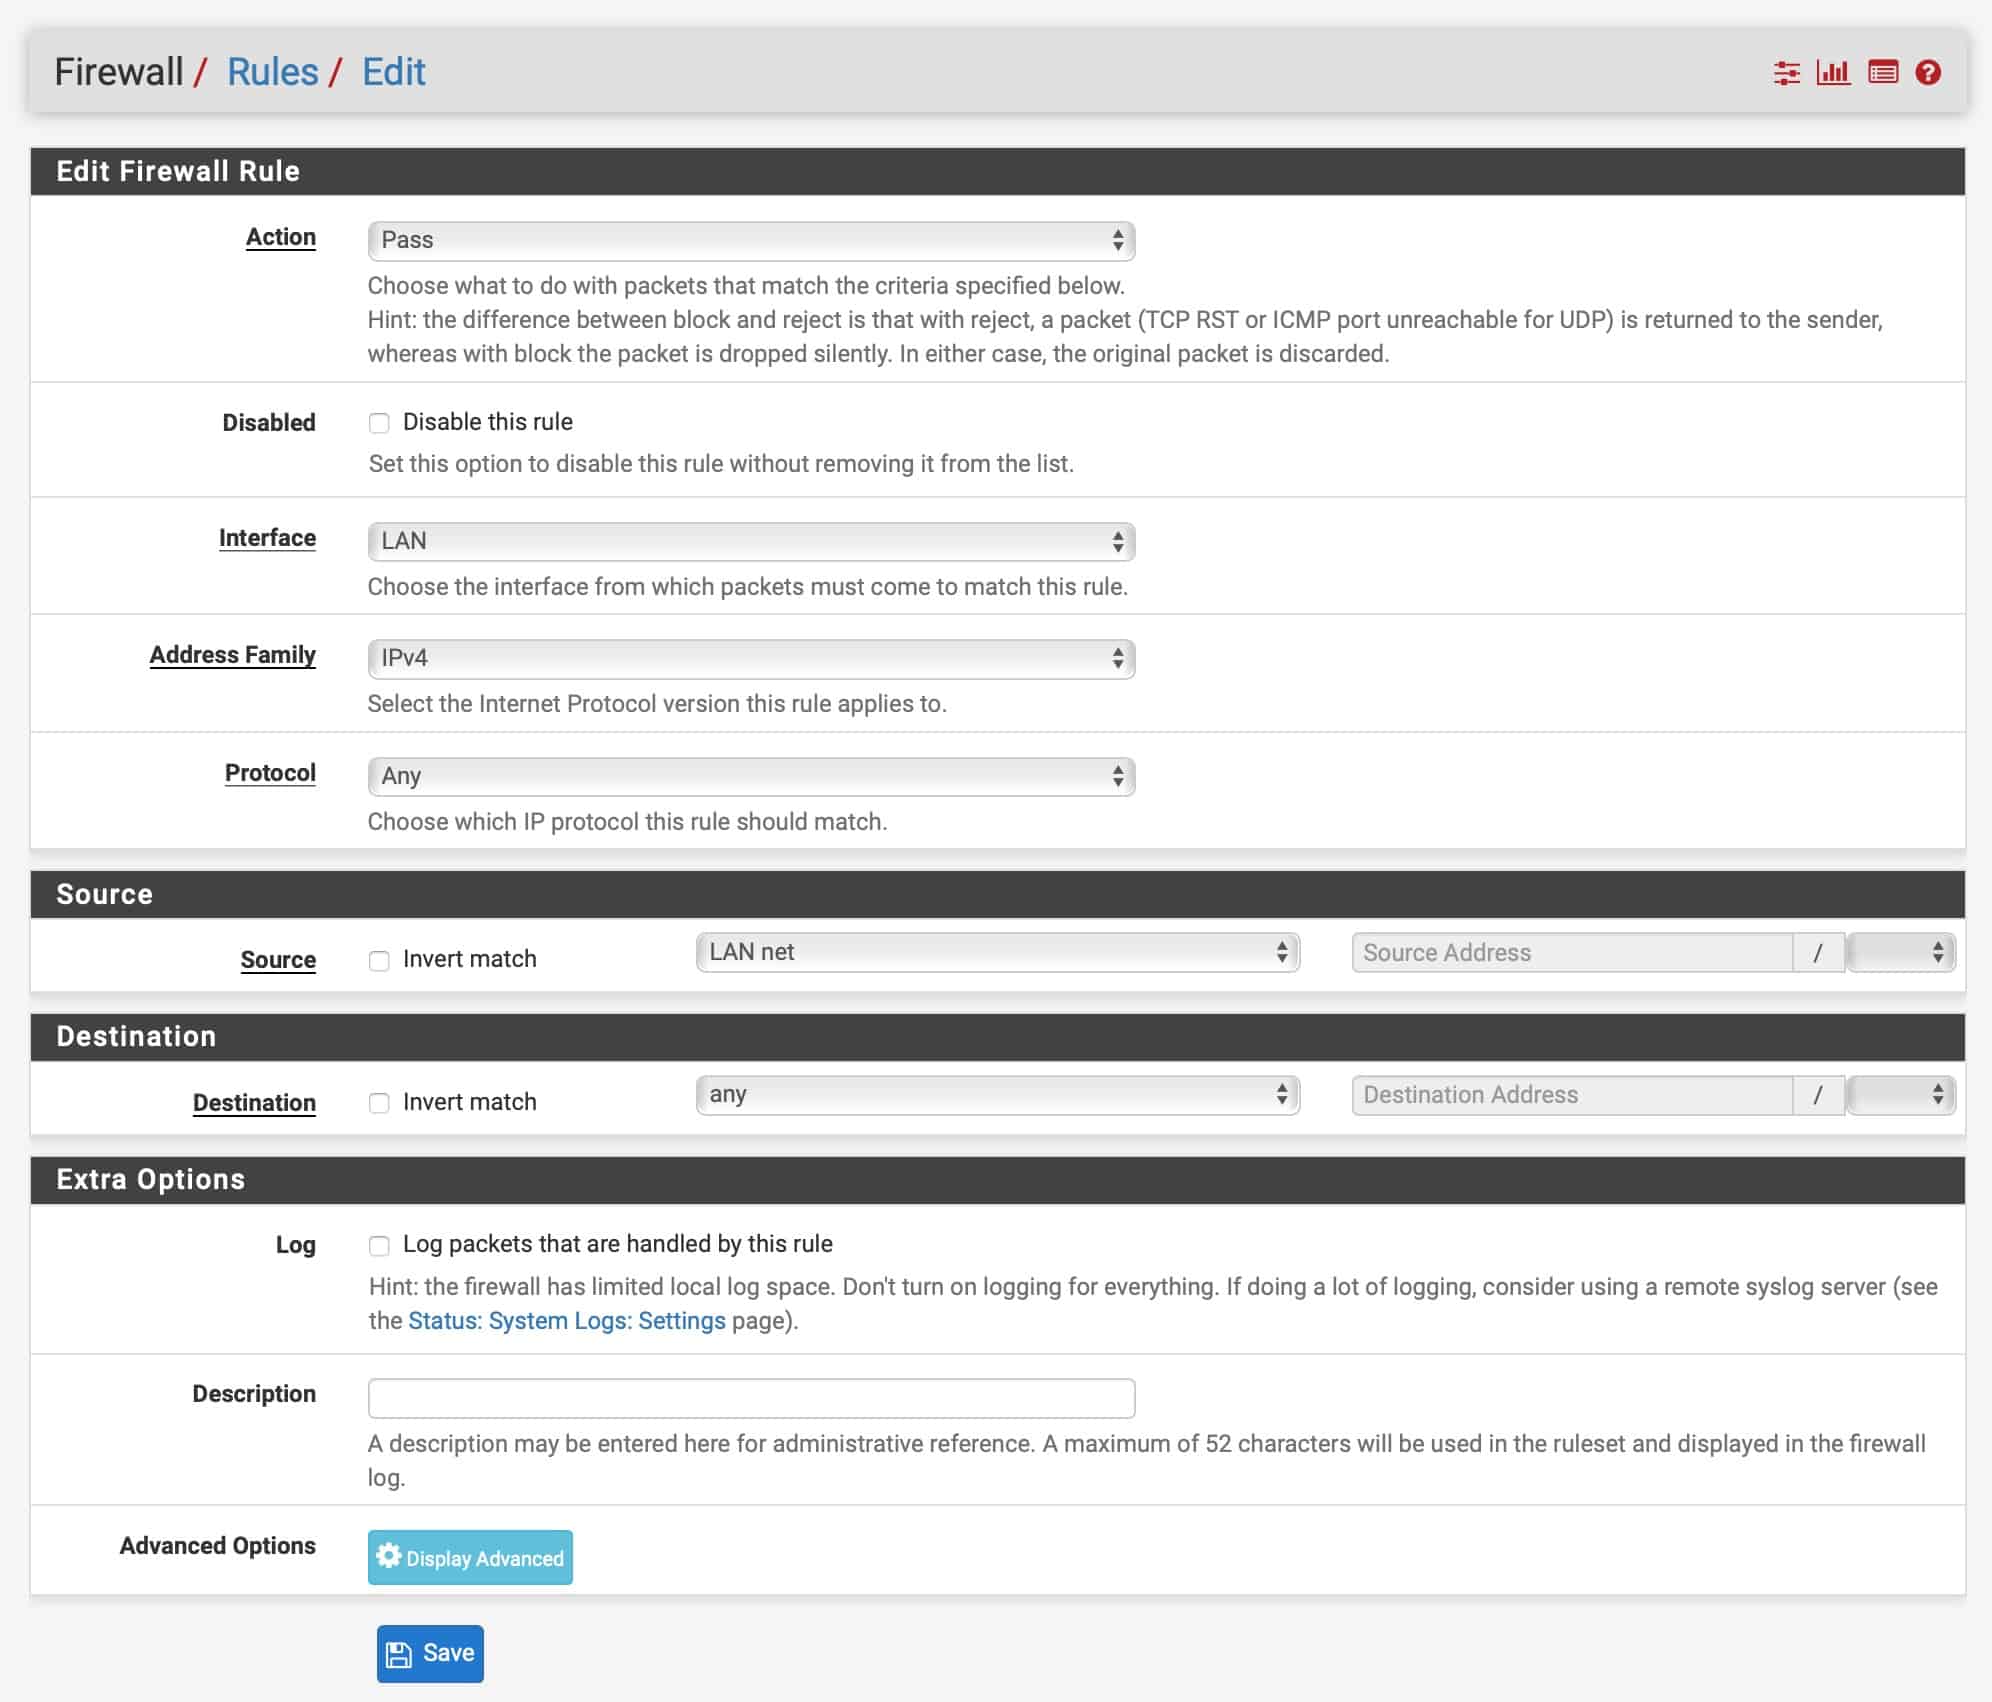
This is what the default LAN rules look like. By default, there is a rule for IPv4 and one for IPv6. Unless your VPN provider supports IPv6, you only need the IPv4 rule.
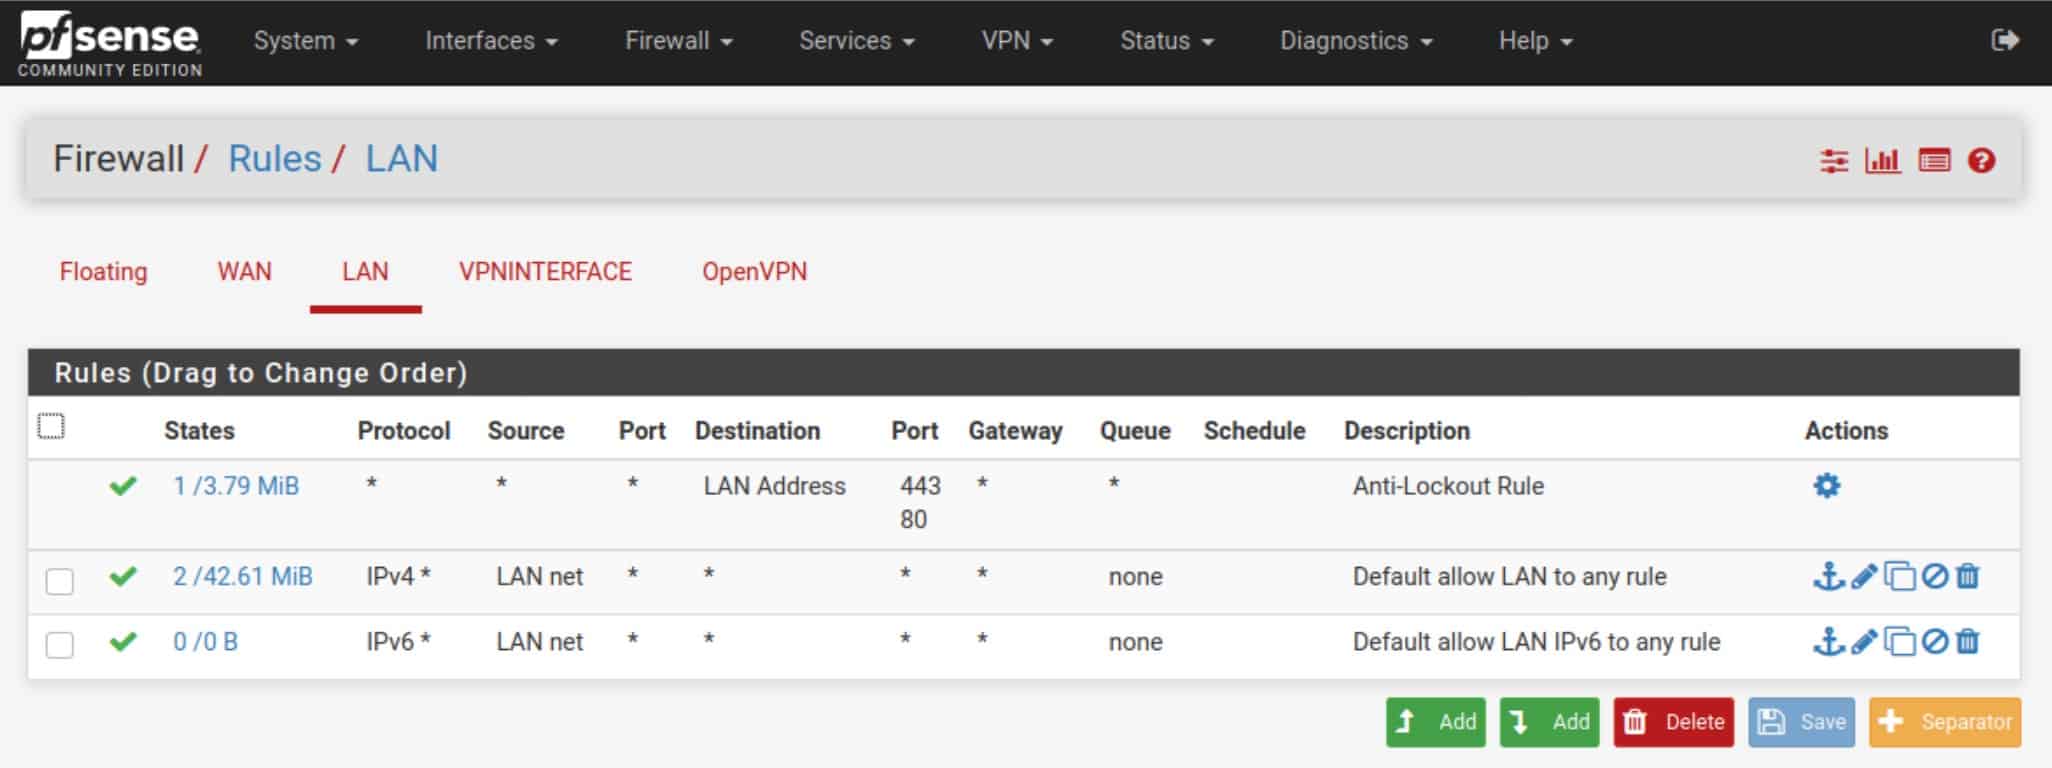
The rule allows any device on the LAN to connect to any destination, using any protocol over any port.
If the rule isn’t there, you can go ahead and create it.
How to create a LAN firewall rule
- Click the green Add button with an arrow pointing upward. It will place the rule at the top and pfSense will match that rule first.
- Set the Action field to Pass.
- Leave the Disabled box unticked.
- Leave the Interface field set to LAN.
- Set the Address Family to IPv4.
- Set the Protocol to Any
- Set the Source to LAN net.
- Set the Destination to any.
- If you need an IPv6 rule as well, repeat the process and select IPv6 from the Address Family drop-down menu.
NAT rules
The next thing we need to do is to configure our Network Address Translation (NAT) rules to properly route our VPN traffic.
How to add a NAT rule
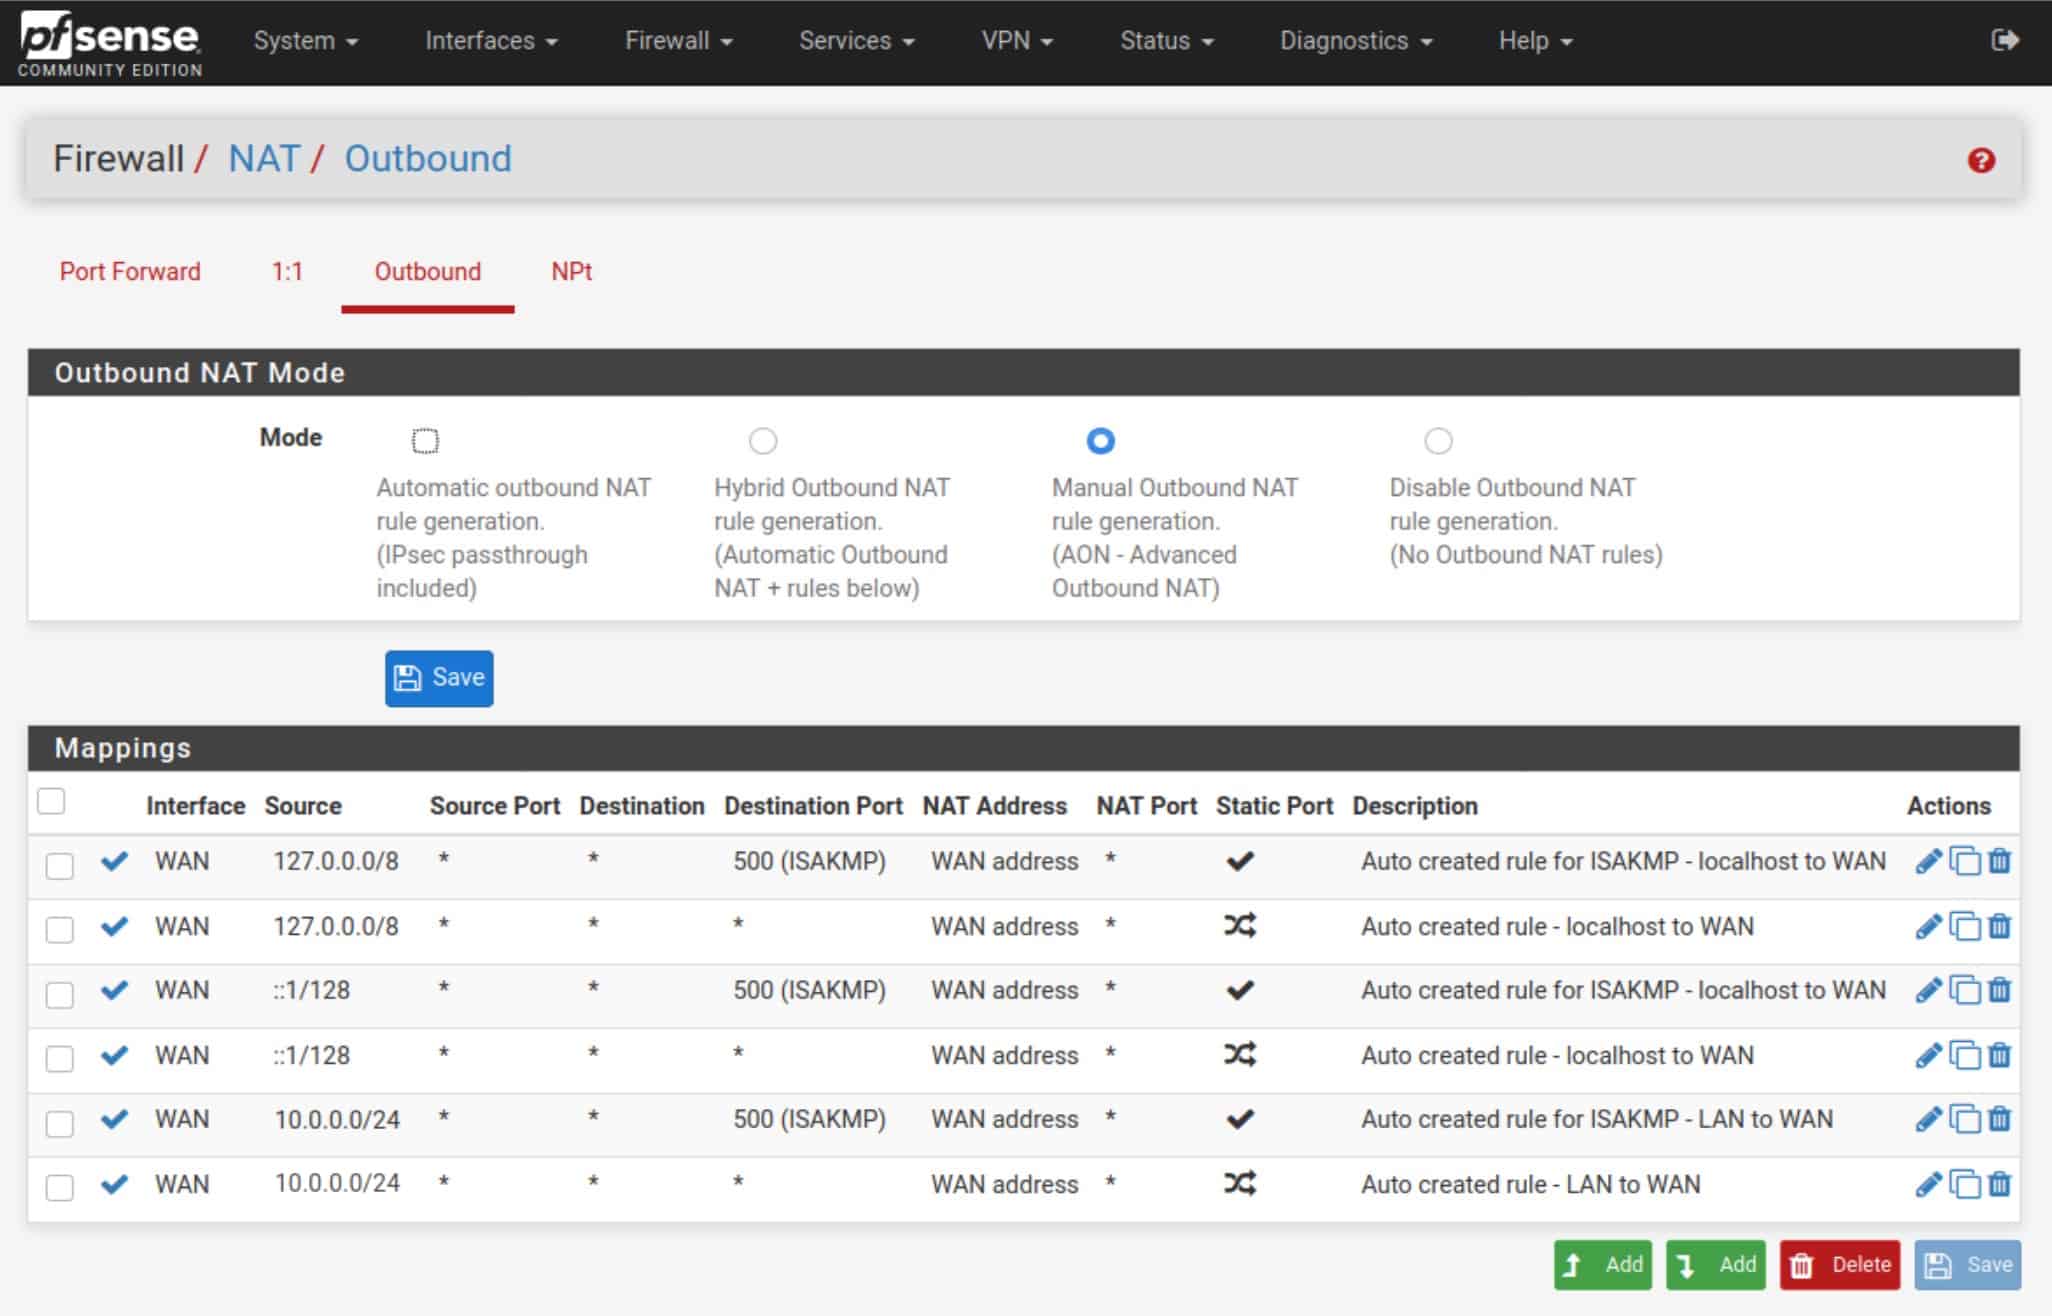
- Navigate to Firewall > NAT > Outbound.
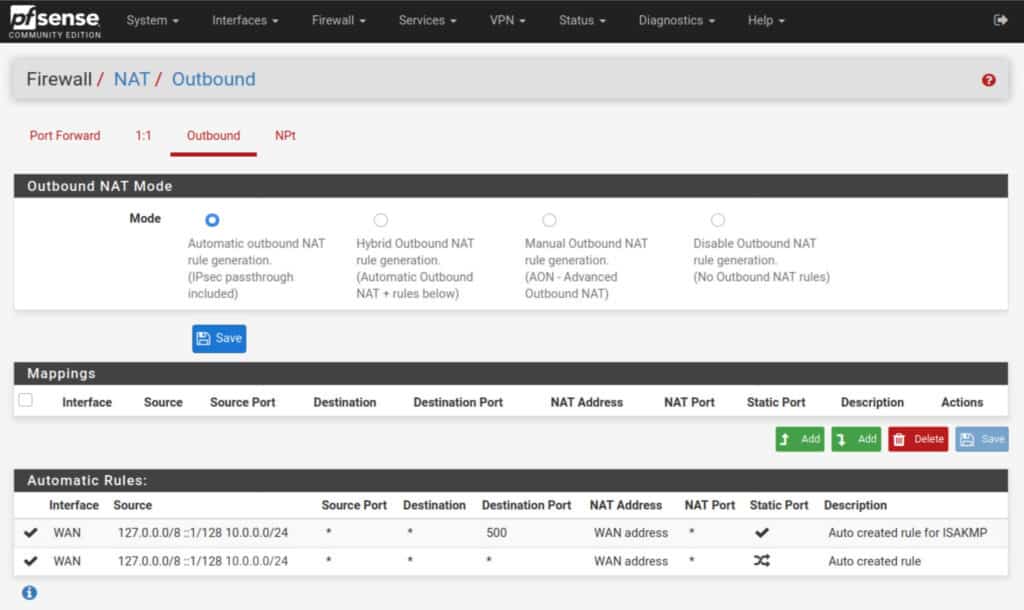
- Set the Outbound NAT Mode to Manual, and then click Save and Apply Changes. Your NAT rules should now look like this (but with your LAN network instead of my 10.0.0.0/24):
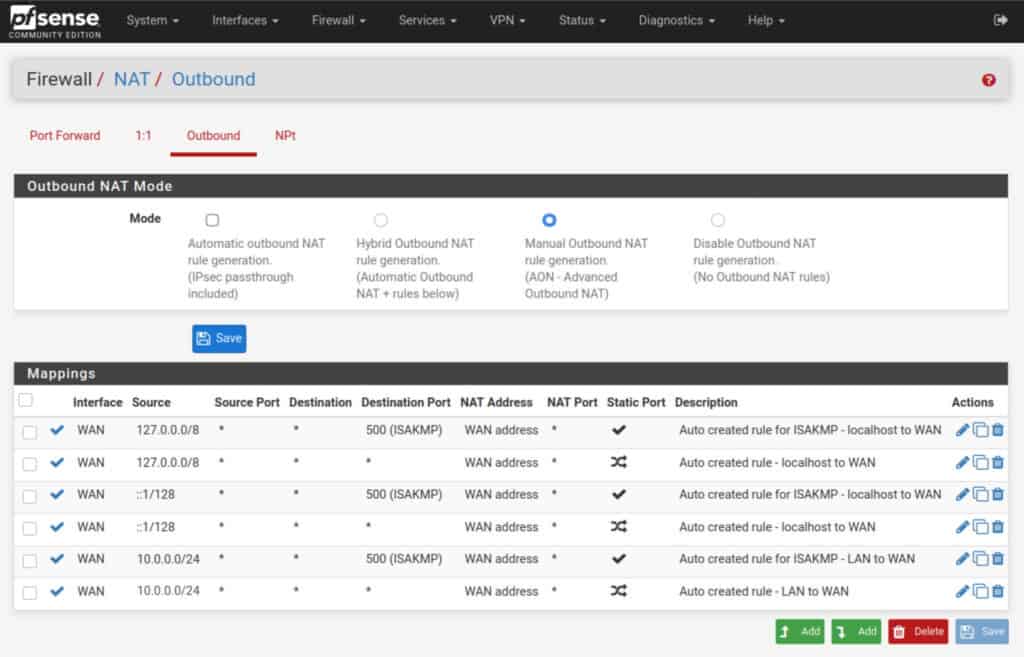
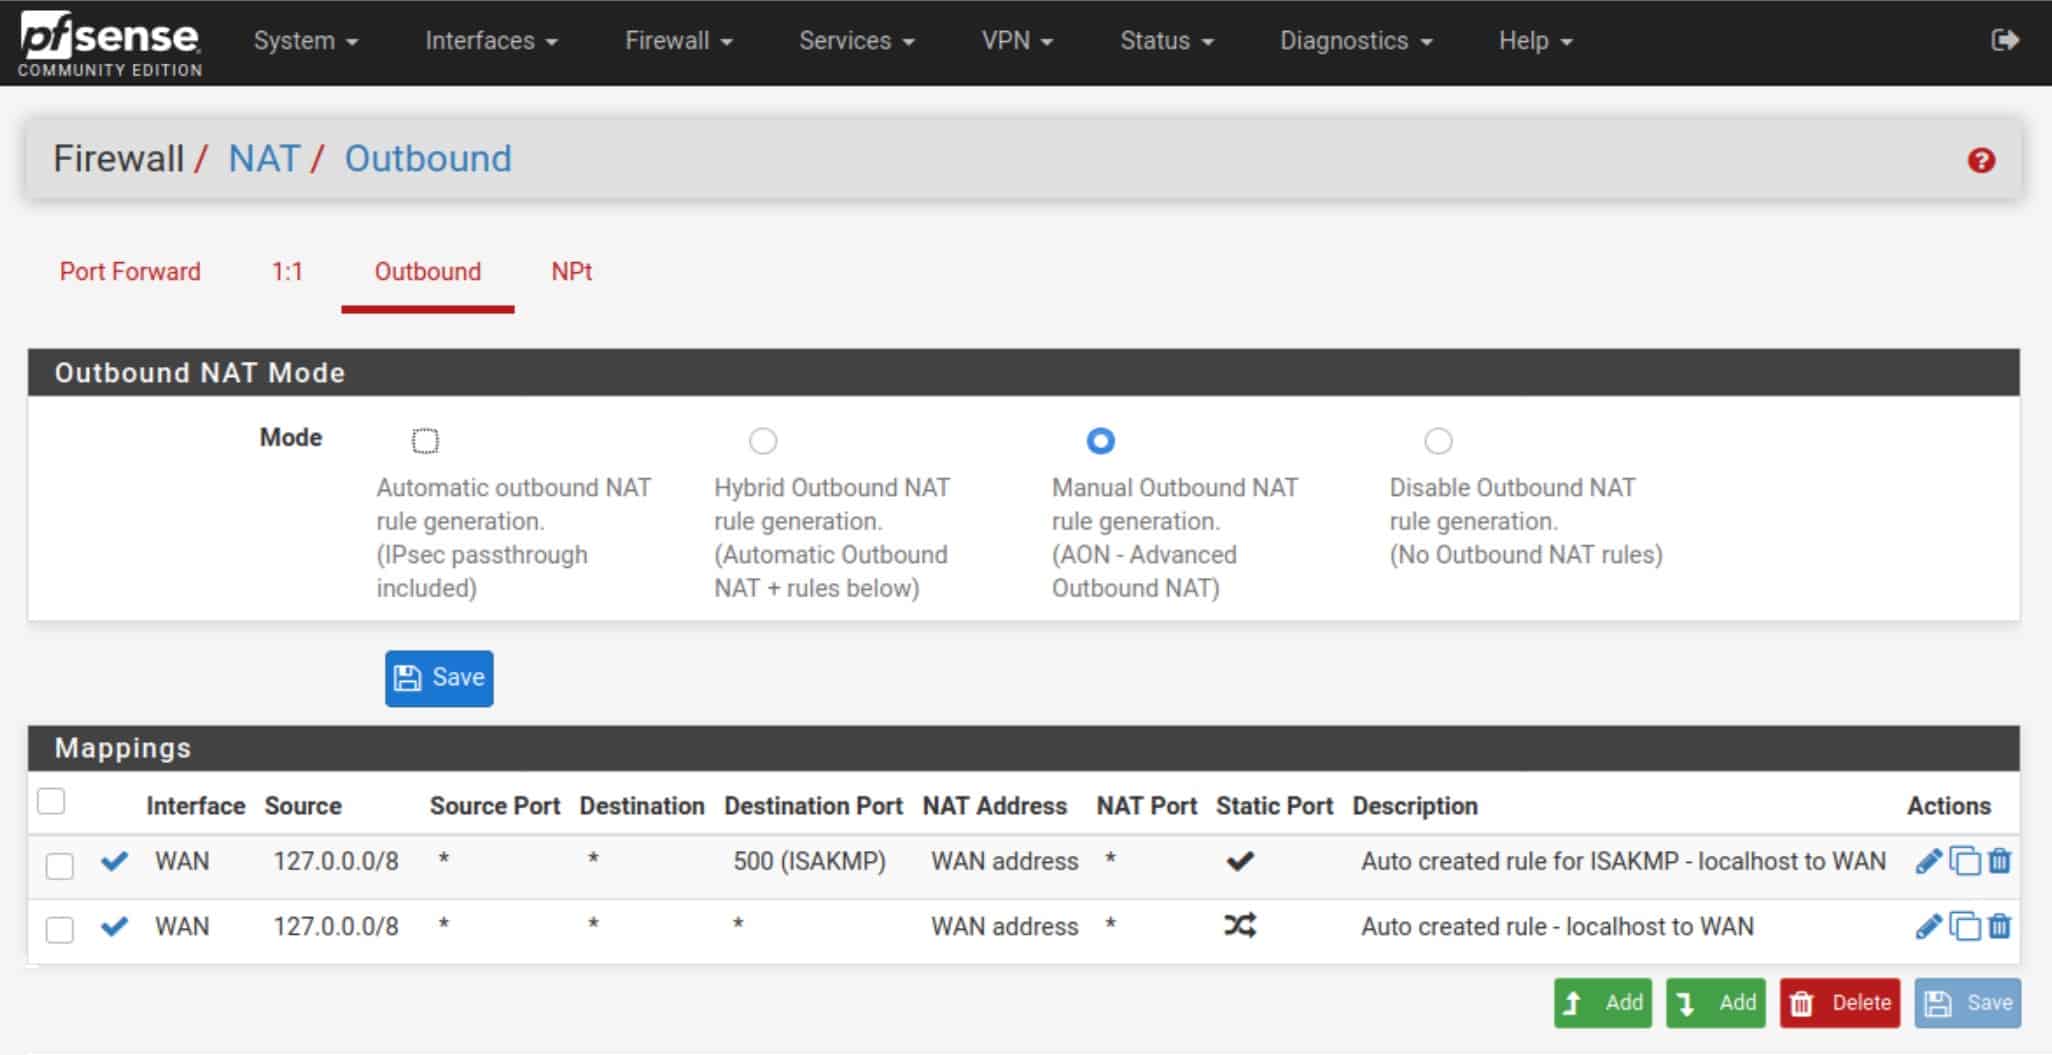
- Delete all of the rules, except the two top ones – the ones with 127.0.0.1.
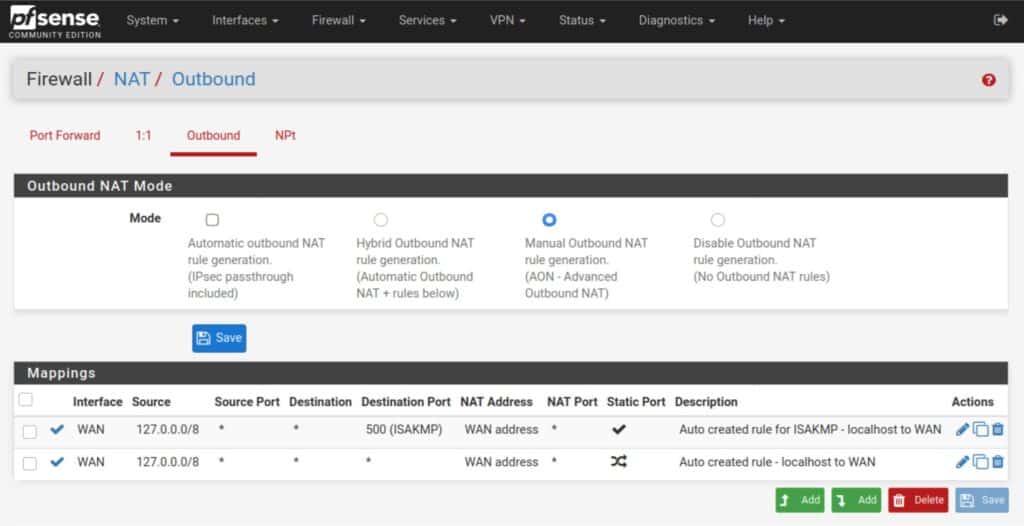
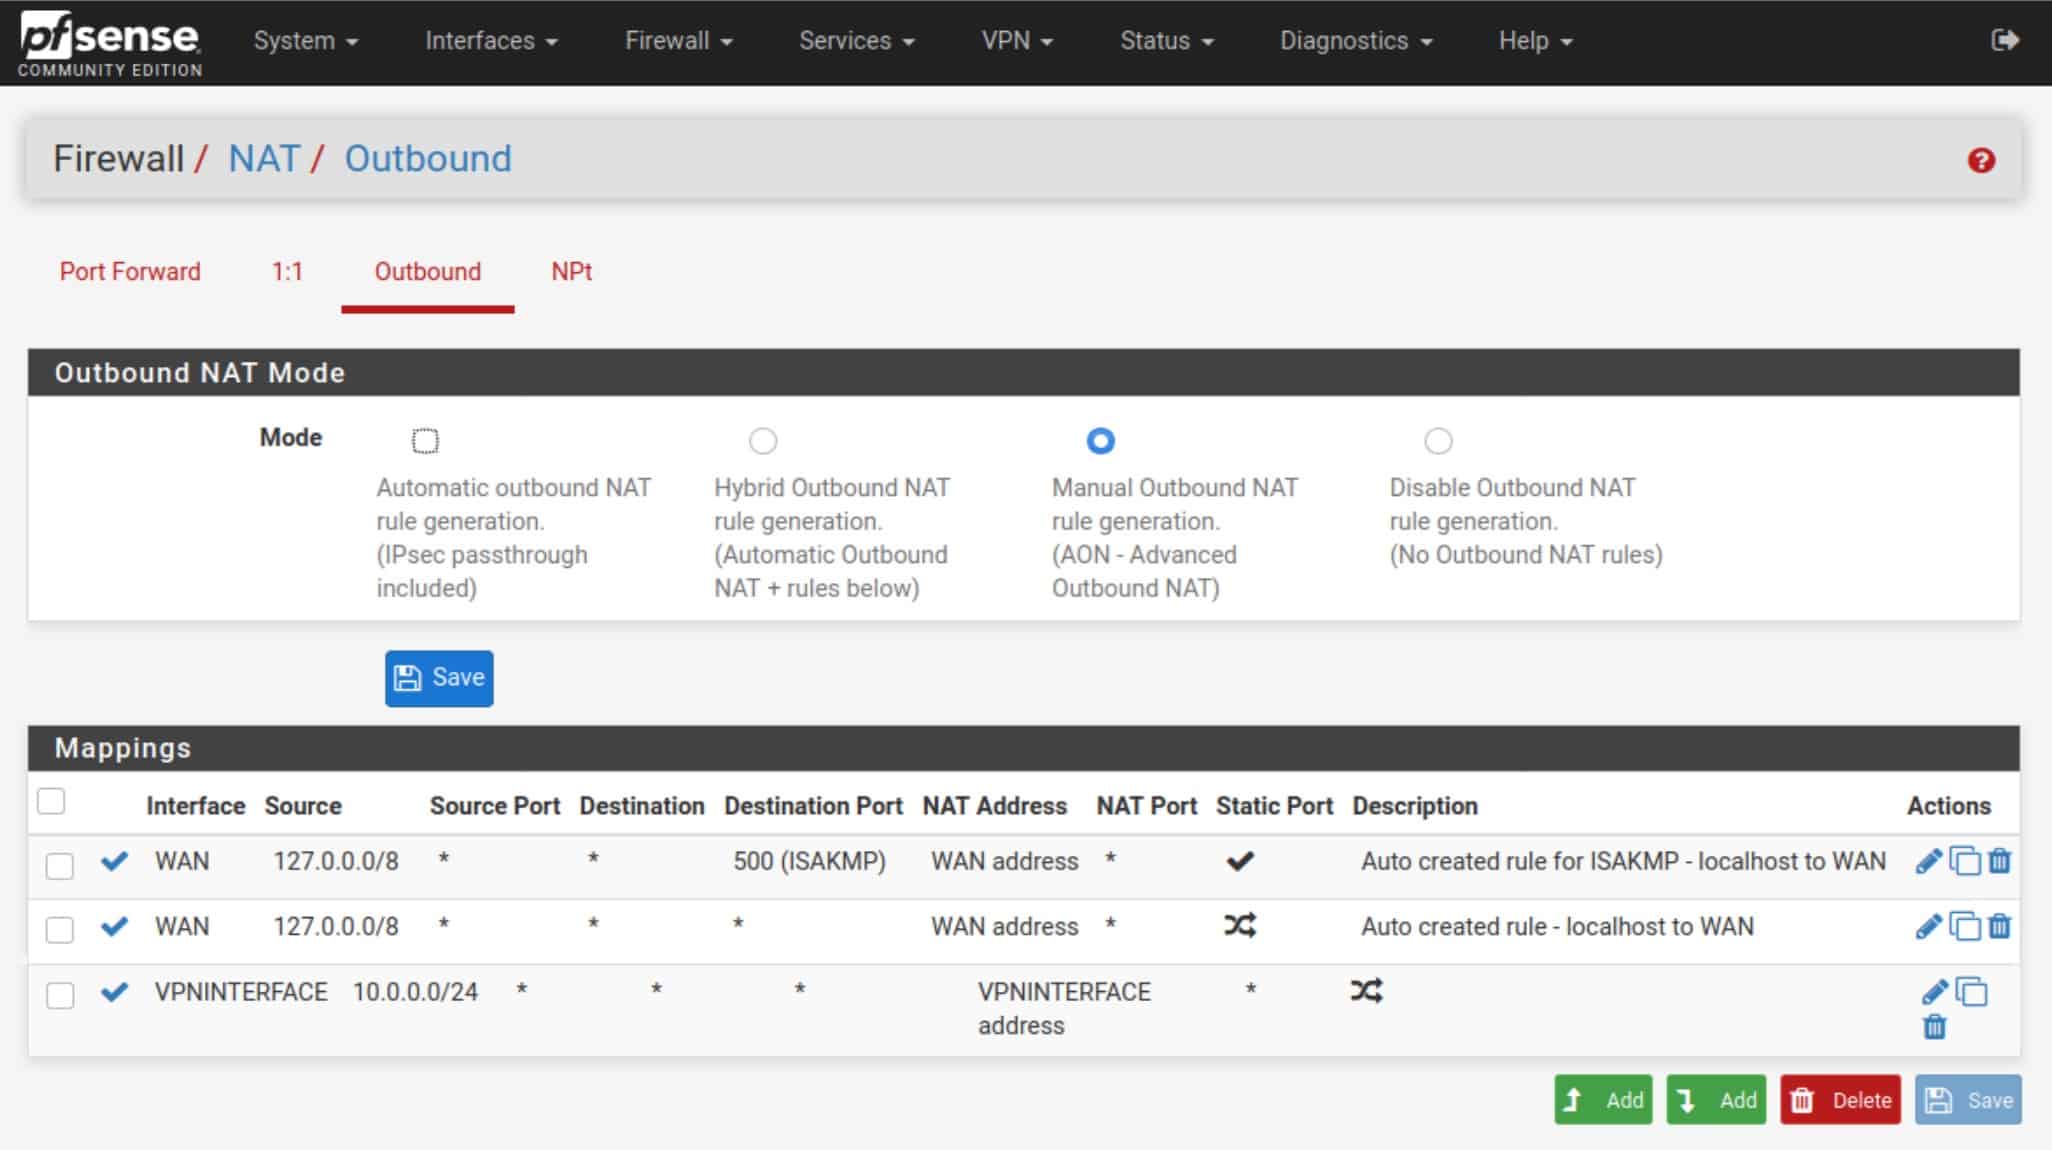
- Click the green Add button with a downward pointing arrow, to create a new NAT rule.
- Set the Interface field to the VPN interface we created earlier.
- Set the Address Family to either IPv4 or IPv4+IPv6 if your VPN provider explicitly supports IPv6.
- Set the source network to your LAN IP address, but make the last digit a 0 instead of a 1. So if your LAN IP address is 192.168.1.1, put 192.168.1.0 as the source network.
- Leave all the other settings untouched. Click Save and Apply Changes.


Your NAT rules should now look like this (but with your LAN network instead of my 10.0.0.0/24):
See also: What is a NAT Firewall
DNS
The last thing we need to configure is DNS for your VPN client. And there are different ways to do this depending on your pfSense configuration. Even if your VPN provider hard codes its DNS servers in their .ovpn configuration file, pfSense still needs to be aware of the DNS servers to be used.
DNS Resolver / DNS Forwarder
If you’re using the DNS Forwarder or the DNS Resolver in forwarding mode, you can simply add your VPN provider’s DNS server(s) to the General Setup page.
How to add a DNS server to pfSense
- Navigate to System > General Setup.
- Click Add DNS Server.
- Input the IP address of the hostname of the DNS server in the appropriate box.
- Leave the Gateway set to None.
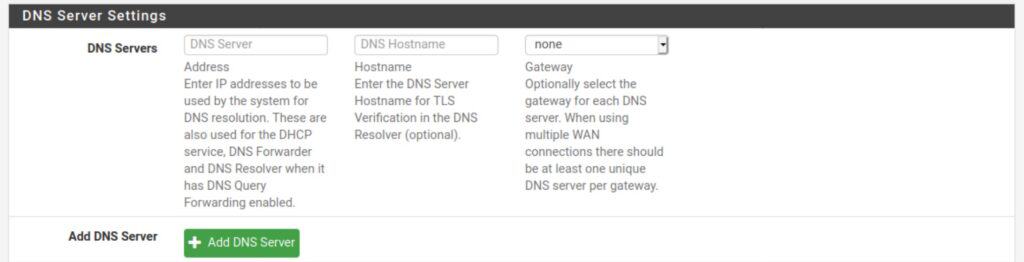
- Click Save and Apply Changes.
- Repeat to add additional DNS servers.

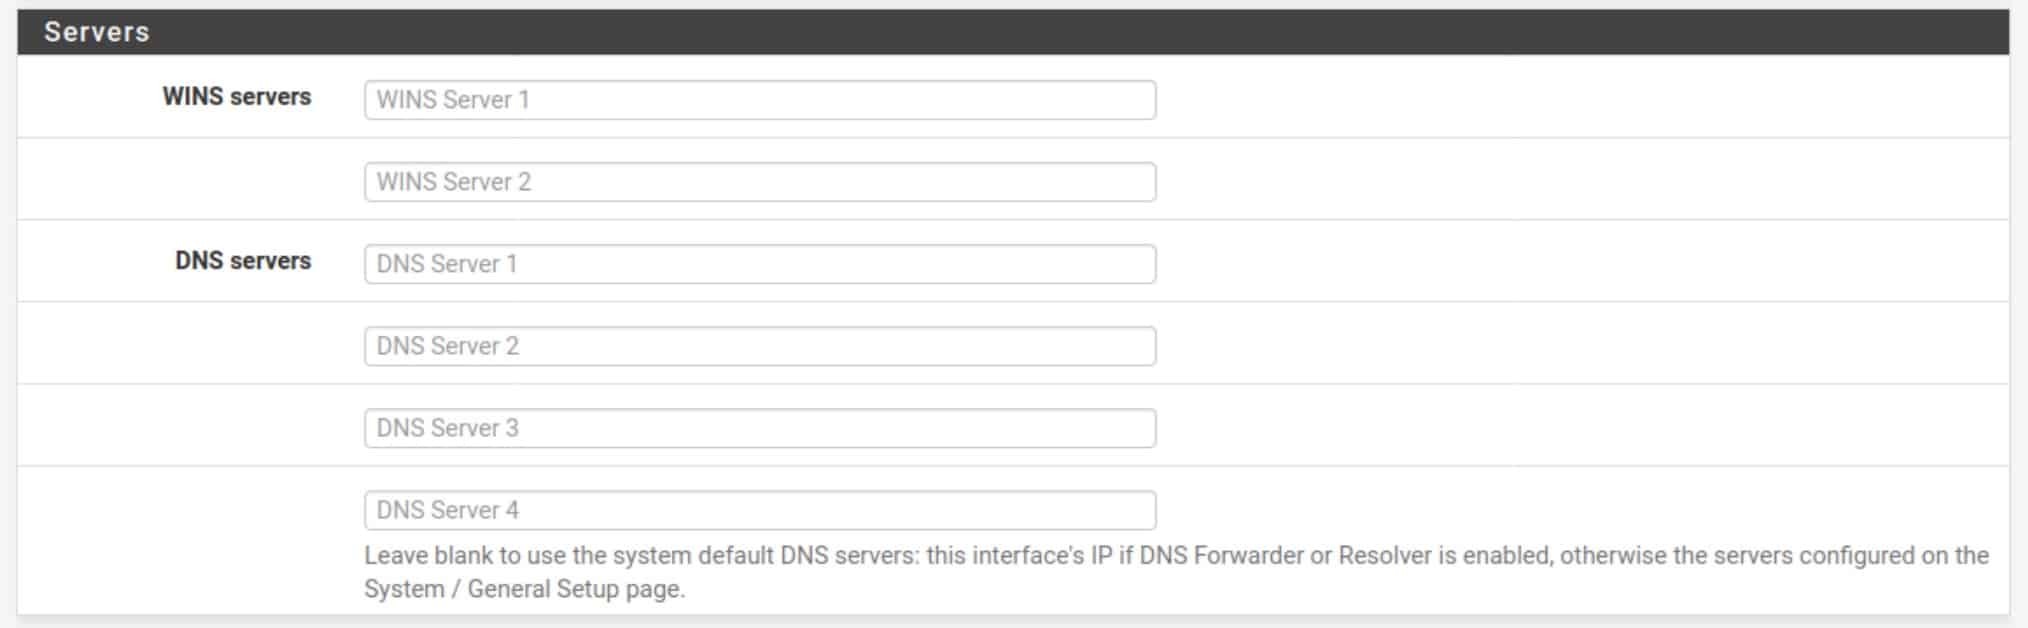
DHCP
How to push a DNS server to clients via DHCP
If you’re not using the DNS Resolver or the DNS Forwarder, you can have your DHCP server push the DNS server to any clients that request an IP address on your LAN.
- Navigate to Services > DHCP Server
- Under Servers, you can input up to four DNS servers.

- Insert your VPN provider’s DNS server(s).
- Click Save and Apply Changes.
Wrapping up
Congratulations, you’ve just configured an OpenVPN client connection on pfSense. All that’s left now is to reboot pfSense and connect a device to your LAN. Once connected, you can go to our IP address checking tool to verify that your public IP address has been changed to the VPN server’s IP address. You can also check for DNS leaks with our testing tool.
You can now use your commercial VPN with any device that’s connected to your pfSense box, without a dedicated VPN app. And remember, regardless of the limit your VPN provider places on the number of simultaneous connections, your router only counts as one device as far as your VPN provider is concerned. So you can connect as many devices as you like this way.


excelente explicacion pude configurar mi servidor openvpn a traves de un proxy , felicitaciones
Do these instructions work on pfS 2.5.2? Trying to get Express VPN working with no luck so far. Connected to internet, log indicates pfS and Express are talking to each other, but no web pages will load. Thoughts?
Same issue here as well.
I would also check to make sure that DNS and NAT have both been setup properly.
It should work on 2.5.2. I would check the OpenVPN logs (Status/System Logs/OpenVPN) to try and figure out what’s happening.