

OK. So you’ve read our beginner’s guide to Tor, have been using Tor for a little while and find it very helpful. You’re able to maintain some privacy online and are very thankful for that bit of security. Now you feel ready to advance to the next level: hosting your own Tor relay (also called a Tor node or Tor router).
Why would I want to do that?
The entire Tor network is a collection of volunteers providing the hardware running Tor and internet bandwidth. The fine people at the Tor Project provide the software and maintain the directory of relays.
The benefits of having and controlling your own relay or node are:
- You get to share part of the load by becoming a part of something greater
- You are able to find a use for that old server that’s been sitting idle in the rack
- You are able to provide your employees with a tool to help protect their privacy online
- You get the warm, fuzzy feeling of knowing that you are helping those that are helping you, as well as those that are just like you; in need of some anonymity.
Of course, there are also some risks involved. You see, there is a potential that Tor can be used for nefarious purposes. Of course, this sort of activity is highly discouraged and is even a bit pointless. Anyone interested in breaking the laws of their home country are going to find ways to break those laws. Period.
For most of them, using Tor for anything shady is a bit like stealing an old Ford Pinto to use as a getaway car in a bank heist. Will it do the job? Yes. Could you have picked a faster, sleeker, or less conspicuous vehicle? Obviously.
And there is the other end of the spectrum to consider. Just because you own a sports car doesn’t mean you’re planning on being the getaway driver for a bank heist, now does it?
It is expected that everyone currently hosting a Tor relay (if they haven’t already) will be contacted by their ISP or even local law enforcement concerning their IP address and some form of questionable activity online. Luckily, there are plenty of response templates available on TorServers.net.
The Tor Project team even recommends that you contact your local law enforcement and ISP ahead of time to let them know that you are running a Tor relay and help educate them on what that means for them.
The Answer:
Setting up a relay is actually rather easy. Customizing it to suit your needs takes a bit more technical ability, though. The first thing you will want to do is find out some basic information about your internet connection, the server that you will be using and how much it can/will be used.
Prep
Before starting the process, make a list of the following:
- What is your “real” internet bandwidth? You can get real world numbers at Speedtest. The important numbers are your download and upload speeds. It is recommended that you do a test during peak hours (09:00 to 10:00 for office environments) to see how much bandwidth is available during the highest traffic load
- Does your ISP limit the amount of data you can transfer each month? If so, what is that limit?
- What is your public IP address?
- Are you using a proxy server, router, NAT addressing or firewall to keep your network safe?
- Are there any specific applications that need to have their transmissions hidden? If so, what ports do they use, or can they be configured to use other ports? Examples would be: email clients, instant chat, IRC or messaging applications, etc.
Step-by-step:
As is the case for most servers, the starting point is choosing the hardware and it’s operating system. The 64 bit architecture is recommended as a minimum starting point. The main factor for hardware isn’t actually the server, though. It’s the speed of your internet connection. At a minimum, you should have a 250KBps each way, download and upload, that can be set aside for the Tor relay. Of course, the more the merrier.
The preferred OS for a relay is Debian (or a Debian derivative like Ubuntu) because there is a Tor package in the Debian repository ready to install. With just a few clicks of the mouse, a Debian or Ubuntu user can download and install the Tor package.
The Tor project team has this to say:
“You can run a Tor relay on pretty much any operating system. Tor relays work best on current distributions of Linux, FreeBSD, NetBSD, and Windows Server.
The best approach for most users is to run your relay on Debian or Ubuntu using the system Tor package — the deb takes care of running Tor as a separate user, making sure it has enough file descriptors available, starting it at boot, and so on. Tor relays also run nicely on other Linux flavors, and on FreeBSD and NetBSD for those who are comfortable with those operating systems.”
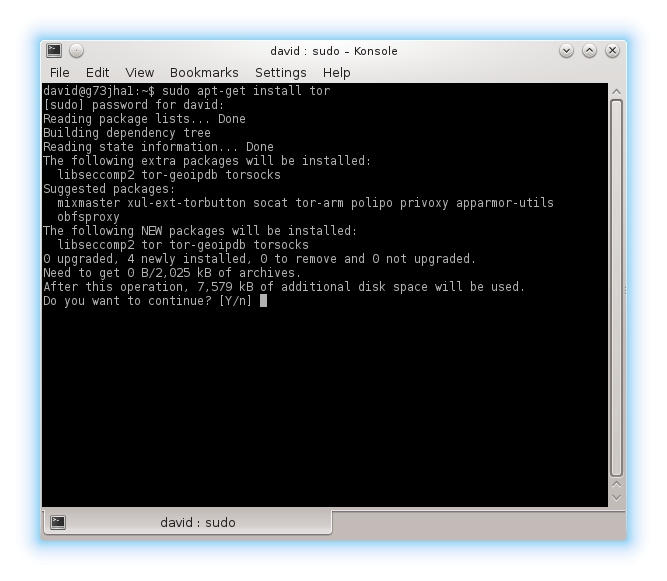
So let’s get cracking. Open a terminal, and type sudo apt-get install tor

You will be prompted for your password before it does anything. Apt will then take a look at your current setup and may prompt you with a message stating that some additional disk space will be used.
Press “Y” and “ENTER” to continue with the install.

If not, then you will find the reason for the failure in the messages log by typing sudo tail -f /var/log/messages in your command prompt. Resolve the issues listed in that log and try again to install Tor. Now comes the technical bit.
The main configuration file (torrc) on a Debian based relay server will be located in either /etc/tor/ or just /etc/. For other Linux distributions the installation will be from source. In that case, the default path to the torrc file would be /usr/local/etc/tor/.
Either way, we now need to open that file in a text editor and make some changes to make our relay work for us. We’re going to use vi for editing. Type in sudo vi /etc/tor/torrc
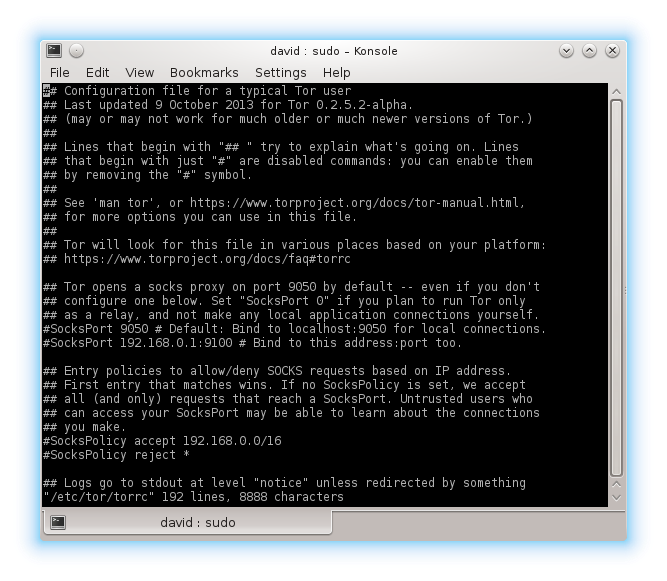
Of course, any line in this file that starts with a ‘#’ is a comment and will be ignored by the program. The nice people at Tor, however have gone a step further and specified at the beginning of the file that “Lines that begin with ‘## ‘ try to explain what’s going on. Lines that begin with just ‘#’ are disabled commands”.
What we need to do here is go to the bottom of the file and input these four lines:
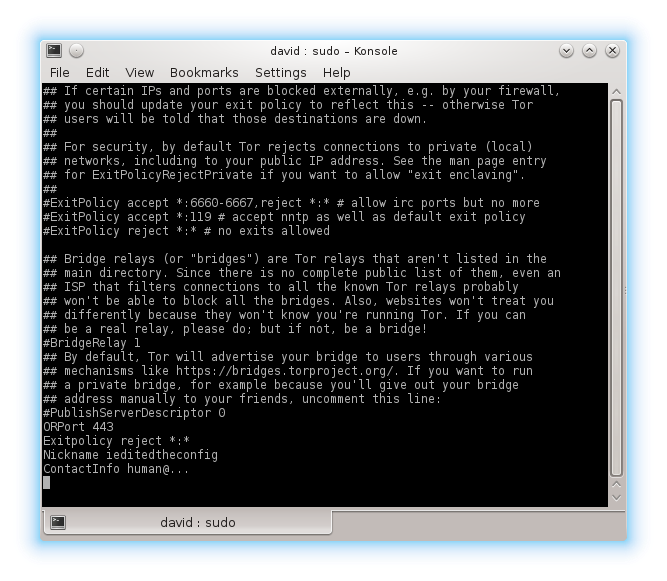
ORPort 443

Exitpolicy reject *:*

Nickname ieditedtheconfig

ContactInfo human@...
If you read through the torrc file you will see similar lines already in place. Because they are disabled with a ‘#’ it is safe for us to simply add new lines at the bottom of the file.
But you’re not going to stop with just those four lines. You’ll want to add a few more lines to limit bandwidth usage and enable hibernation when a transfer limit has been reached. The idea here is to offer a decent speed to Tor, while still allowing your client computers access to the lion’s share of available bandwidth. You will also want to limit the amount of traffic that goes through your relay so that it’s not chewing up all of your allotted data transfer limit. You do this by telling Tor to hibernate when it hits the limit that you define.
For example, let’s assume you have a 100MB cable connection that reliably gives you 50MB download speeds and 10MB upload speeds during the busiest hours of the day. Let’s also imagine that your ISP has a monthly data transfer limit (up and down, total) of 5GB before they drop you down to stone age speeds.
To allow your users to continue to use the internet connection, you will want to tell Tor to only use 5MB of the total bandwidth on average with occasional bursts of up to 10MB. You also want the Tor relay to go into hibernation when it hits 1GB of data transferred.
Add these lines at the end of that file and then save your changes: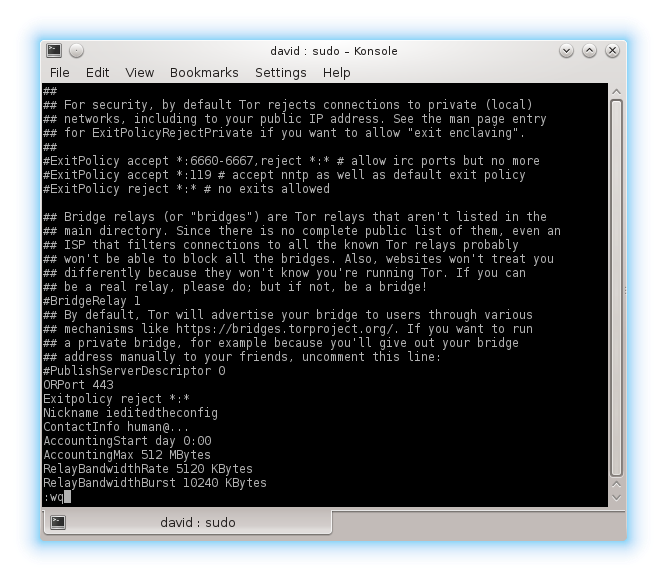
AccountingStart day 0:00

AccountingMax 512 MBytes

RelayBandwidthRate 5120 KBytes

RelayBandwidthBurst 10240 KBytes
All done. Simply save that file (:wq is the vi command to both write the changes and quit the program) and restart Tor: sudo service tor restart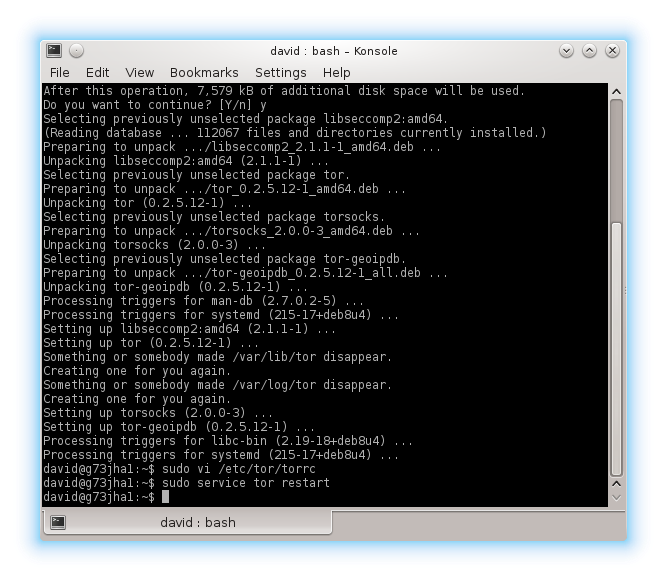
You may get a warning about using hibernation on this server in the log file and/or in the terminal. That’s fine. When Tor is done restarting you will have a running Tor exit relay. Congratulations!
What’s Next: Keeping an eye on things
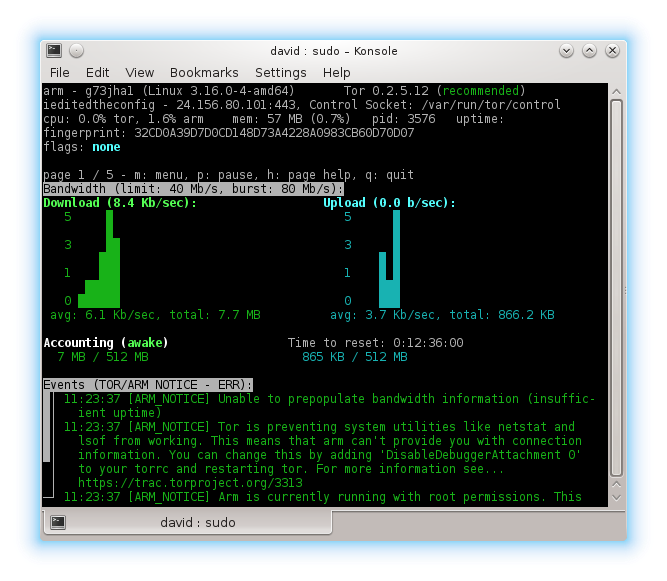
To help you monitor your relay, there is the anonymizing relay monitor, or arm. Arm is a terminal, or command line program for monitoring Tor either through a local terminal or an SSH remote connection to the server. To install, simply open a terminal and type in the command sudo apt-get install tor-arm. After that’s installed, launch it with sudo arm

After 68 days, it will be considered a full blown relay and will even be eligible as an entry point for other clients.
From then on, it will continue to operate as configured, each month, providing safe, private internet access to hundreds, maybe thousands of users from all over the world. Kudos to you for being part of something so great.
Related: What’s the best Tor VPN combination?
Any questions? Let us know in the comments and we’ll do our best to answer!
“Geographies of Tor” by Stefano.desabbata Licensed by CC BY-SA 4.0


