
A VPN kill switch is a set of firewall rules that will stop all internet traffic when your VPN isn’t connected. They’re completely automated, with the kill switch only kicking in when there’s a problem with your secure connection.
If you’ve ever kicked yourself for browsing while your VPN was down without even noticing, creating a VPN kill switch with UFW is a pretty easy fix.
What is UFW?
UFW is a set of scripts that act as a wrapper to the Linux iptables firewall. iptables is a powerful tool, but it’s not very easy to use. UFW makes it much simpler to build a useful ruleset, especially if you’re not a Linux power user who knows iptables by heart.
If you’ve ever struggled with Linux networking but still need a secure and user friendly firewall, I recommend UFW.
Before you begin
Before you get started, it’s a good idea to make sure your system is up to date. I’ll be using Ubuntu 18 LTS for this guide. As long as you’re using a Debian-based Linux operating system, the steps will be identical.
Use the following commands to update your operating system and installed software:
sudo apt update

sudo apt upgrade -y
Once the commands have finished executing, you’re ready to get started setting up a VPN kill switch with UFW.
Disabling IPv6
Many VPN providers still don’t have adequate IPv6 support, which can cause data leaks and other issues. I think it’s a good idea to disable IPv6 entirely unless you’re positive your provider supports it.
This step is optional, and you can skip it if necessary.
How to turn disable IPv6
You’ll need to disable IPv6 for both the operating system and UFW to be sure that your VPN provider won’t passthrough IPv6 traffic unencrypted. In Ubuntu, that means you’ll need to edit the following files:
- /etc/sysctl.conf to disable IPv6 networking
- /etc/default/ufw to stop UFW from automatically creating IPv6 rules
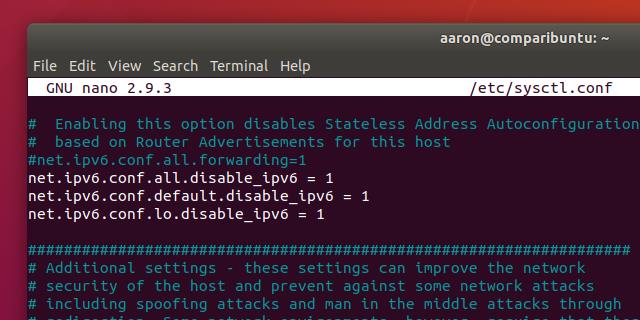
To get started, open /etc/sysctl.conf for editing with the following console command:
sudo nano /etc/sysctl.conf
Scroll through the file until you see an entry for net.ipv6.conf and add the following three lines to the end of the configuration file:
net.ipv6.conf.all.disable_ipv6=1

net.ipv6.conf.default.disable_ipv6=1

net.ipv6.conf.lo.disable_ipv6=1
Save your changes with Ctrl+X, Y and force the system to reload sysctl.conf and apply your changes using the command:
sudo sysctl -p

You can confirm the changes were applied successfully by taking a look at files in the /proc which contain information about your system. In this case, use the following command to make sure IPv6 is disabled at the operating system level:
cat /proc/sys/net/ipv6/conf/all/disable_ipv6
If your system displays a 1 as output, IPv6 has been disabled successfully.
Next, you’ll want to stop UFW from automatically creating IPv6 firewall rules. Even through the protocol has been disabled at the operating system level, UFW stubbornly insists on adding IPv6 rules until it’s been told to stop. Doing so will reduce clutter in your ruleset and might save you some confusion later on.
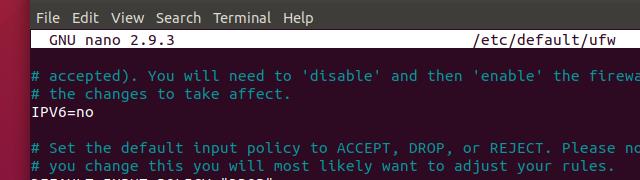
To turn off IPv6 in UFW, open the file /etc/default/ufw for editing using this command:
sudo nano /etc/default/ufw
Scroll through until you find the setting for IPv6 rules, and change it to read:
IPV6=no
Press Ctrl+X, Y to save your changes. If you’ve already enabled UFW prior to starting this project, you’ll need to disable it with the following command:
sudo ufw disable
Now that IPv6 has been disabled system-wide, you can move on to collecting the information you need to set up the VPN kill switch with UFW.
Getting the information you need
In order to setup a VPN kill switch in UFW, you need three pieces of information:
- The public IP address of the VPN server you connect to
- The port and protocol your server uses to communicate
- The subnet of your local network
Those settings can be found in the config file for your VPN server. In order to get information about your connection, you’ll have to look through the config and make a note of your settings.
Display the VPN server settings
In most cases, your VPN config will be stored in /etc/openvpn, but it’s possible to set it up in any location. If you don’t see an *.ovpn or *.conf file in /etc/openvpn, check your home directory.
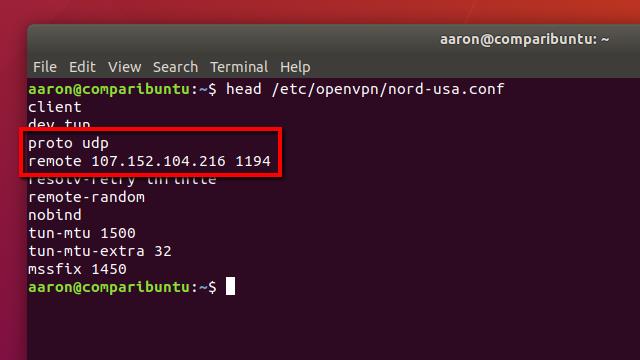
The port, protocol, and public IP address you need will be near the top of the config file. I used this command to display mine, as above:
head /etc/openvpn/config.ovpn
Make a note of all three, since you will need them to setup UFW.
Display the subnet
You’ll also need to know the LAN subnet your computer is on. In many cases, it will be 192.168.1.0/24 but if you’re not sure it’s a good idea to confirm before setting up a VPN kill switch with UFW.
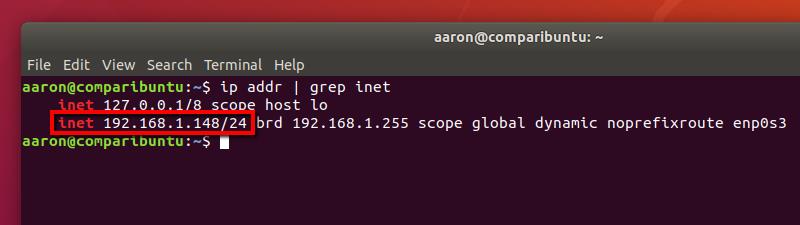
There are a handful of different ways to get the information you need, but I recommend this command:
ip addr | grep inet
You’ll see an inet entry for each network adapter on your system. In most cases, there will only be two entries; one for your loopback adapter, and one for your LAN adapter. Ignore the loopback adapter, which will always have a subnet of 127.0.0.1/8, and make a note of the other entry.
Setting up a VPN kill switch with UFW
Once you have the information you need, you’ll be able to setup the VPN kill switch with UFW. There are three steps to this process:
- Explicitly allow LAN traffic, so network services will work even when the VPN is down
- Disallow all other traffic unless it is running through the encrypted connection
- Enable UFW to activate the ruleset
Once you’re finished, the VPN kill switch will be active. All of the settings will stay active even if you reboot your computer.
Allow local traffic
It’s important to allow your computer to access the LAN even when the VPN is down if you rely on any local network resources. Since most people use network printing, and many Linux users rely on SSH, I really recommend you don’t skip this step.
Please note that this will only allow traffic in or out on your LAN. Your internet connection will be disabled when the VPN is down as intended.
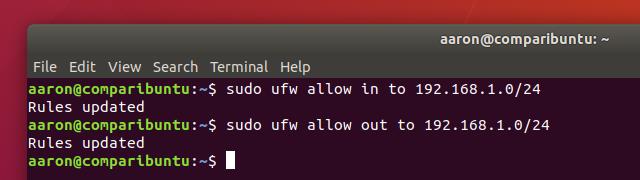
You’ll need to know your LAN subnet from the previous step, and use that subnet in place of mine at 192.168.1.0/24.
Use the following commands to allow LAN access to your computer:
sudo ufw allow in to 192.168.1.0/24

sudo ufw allow out to 192.168.1.0/24
You should get confirmation when each rule is added, as above.
Configure the VPN kill switch
Next, you’ll set up the kill switch itself. There are only 4 or 5 commands you’ll need to enter, but this will completely shut down your internet connection when the VPN is disconnected.
To start, set the default policy to deny all traffic using these two commands:
sudo ufw default deny outgoing
sudo ufw default deny incoming
Next, add an exception to the ruleset allowing you to connect to the VPN server. Without this line, you’ll be unable to authenticate and your VPN session won’t be able to start successfully. Use the VPN port, protocol, and public IP address you made a note of in a previous step.
Once you’re sure you’ve got the information you need, run this command with your own settings in place of mine:
sudo ufw allow out to 107.152.104.216 port 1194 proto udp
Now that you’re able to connect to the VPN through your firewall, you’ll have to write a rule or two forcing all outbound traffic to move through that connection. For this guide I’m assuming your VPN connects using the network device tun0, since that is the default.
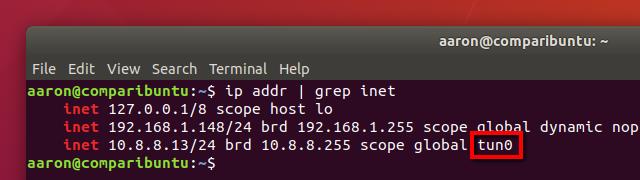
If you need to confirm, you can connect to your VPN and run ip addr | grep inet again. You’ll see an additional entry for the VPN connection, and you can pick out the name of your VPN tunnel adapter from the information listed.
Once you’re satisfied you know which network device your VPN is using, run this command to force all outbound traffic to use the VPN:
sudo ufw allow out on tun0 from any to any
Optionally, you may want to allow connections back in through the VPN. For instance, you might have a BitTorrent client with a web interface you need to connect to from the web, or a service like Plex that requires inbound connections through the VPN. Run this command to allow inbound connections if desired:
sudo ufw allow in on tun0 from any to any
Once you’ve executed the final command, your VPN kill switch is ready to enable.
Enable UFW
Enabling UFW with your custom ruleset is simple. Run this command, and UFW will start on boot:
sudo ufw enable
If you need to disable your kill switch, you can use this command:
sudo ufw disable
UFW remembers the ruleset you created, so feel free to enable and disable the firewall whenever you like. Just remember, when UFW is disabled your internet traffic is not guaranteed to be encrypted.
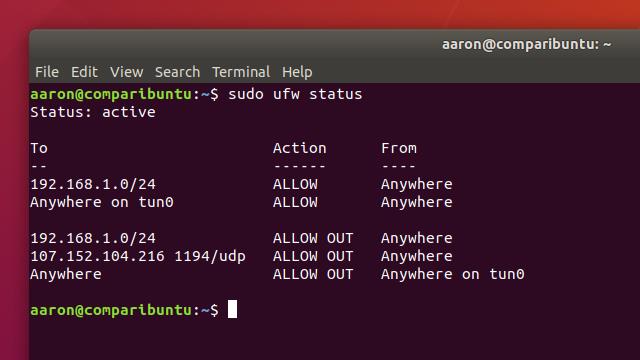
Of course, it’s easy to check and see whether UFW is active or not, and which rules are being applied to your network. Check the status of UFW using this command:
sudo ufw status
That’s all there is to setting up UFW, but there are a few additional steps I recommend you take to make using OpenVPN with a kill switch a little easier.
Configuring your VPN to connect automatically
Although this step is optional, setting up a kill switch won’t be useful unless you connect to your VPN automatically. OpenVPN is notoriously unwieldy out of the box, but there are a few tricks you can use to streamline connecting to your VPN.
Here’s what I recommend:
- Run OpenVPN as a service using a *.conf file instead of an *.ovpn profile
- Save your username and password so OpenVPN can connect automatically
- Use chmod to lock down your VPN config
If you implement those three suggestions, you’ll be able to connect to your VPN automatically with the knowledge that your login credentials are secure. You’ll also be able to control your VPN connection from the system console, which makes stopping and restarting the VPN connection much simpler.
Run OpenVPN as a service
Most people have their VPN configuration saved with an *.ovpn file extension. But if you change the extension to *.conf, and make sure the file is located in /etc/openvpn, you’ll be able to manage the connection like you do any other system service.
Setting up your OpenVPN connection to run as a service is as easy as renaming a file. First, move your existing *.ovpn profile to /etc/openvpn if it isn’t there already.
Then rename the profile to give it a *.conf file extension. In my case, I saved the OpenVPN profile as nord-usa.ovpn, so I’ll use the following command to rename it:
sudo mv /etc/openvpn/nord-usa.ovpn /etc/openvpn/nord-usa.conf
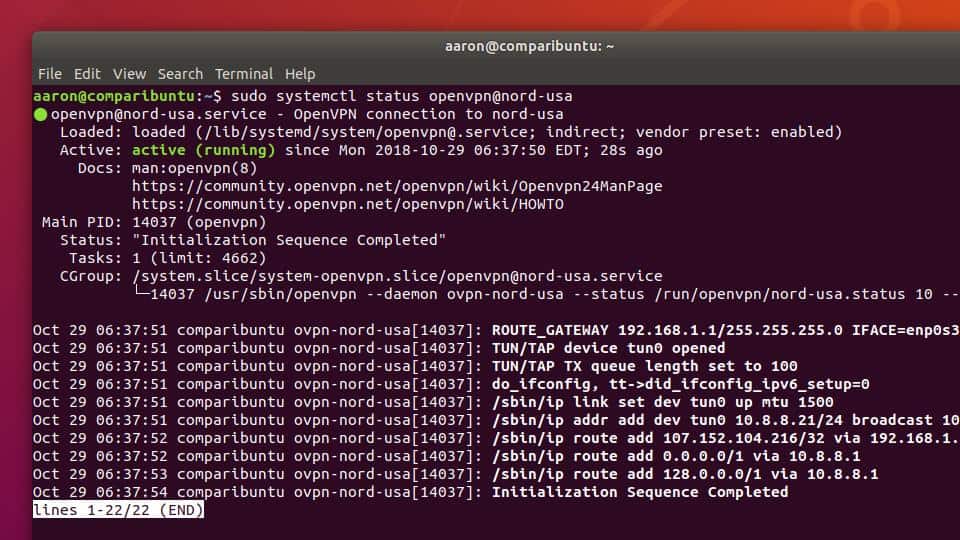
Once it’s renamed, you can start and stop OpenVPN just like any other systemd service. For instance, I’d use this command to connect:
sudo systemctl start openvpn@nord-usa
And this command to disconnect:
sudo systemctl stop openvpn@nord-usa
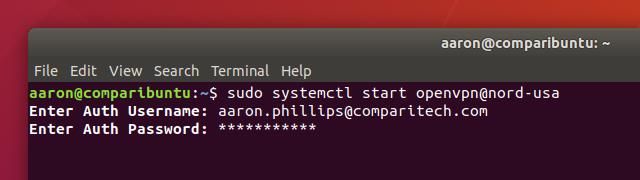
You’ll notice that OpenVPN prompts you for a username and password each time, though. That’s not ideal, but you can fix it by saving your username and password.
Save your username and password
In your OpenVPN profile, there’s a line that tells your client how to authenticate. Some organizations use RSA keys, but nearly every consumer VPN requires a username and password. With a single change to that line, you can store your password and never be prompted to login again.
Start by opening your OpenVPN profile for editing. You’ll want to substitute the proper filename, but I used this command:
sudo nano /etc/openvpn/nord-usa.conf
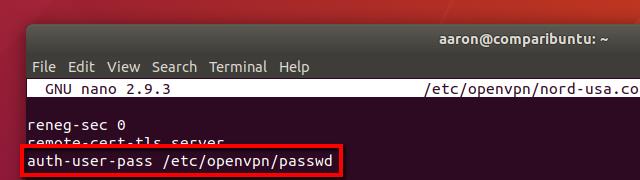
Scroll until you find the line that says auth-user-pass, and change it to read like this:
auth-user-pass /etc/openvpn/passwd
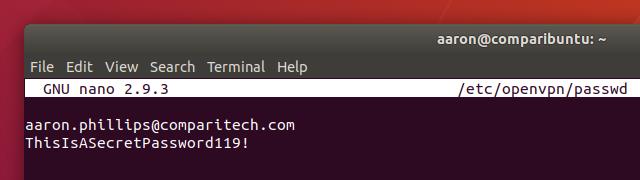
That tells OpenVPN to look at /etc/openvpn/passwd for your credentials. All you need to do is create that file with your username and password and OpenVPN will connect automatically. Use this command to create the file and open it for editing:
sudo nano /etc/openvpn/passwd
The structure is very simple, your username is on the first line and your password is on the second. Make sure it looks like mine above, then save with Ctrl+X, Y.
Now try to connect again using this command, substituting the name of your config:
sudo systemctl start openvpn@nord-usa
You’ll notice there are no more username and password prompts and your VPN session starts immediately.
Lock down the config
Anytime you store a username and password in a plaintext file, you’ll want to lock it down to make sure unauthorized users can’t get access. It’s also a good idea to ensure that the file in question is owned by the root user. Note that this represents the minimum amount of security—hashing the file is a better option, but it’s beyond the scope of this guide.
To lock down the config, you’ll want to take the following steps:
- Change ownership of /etc/openvpn/passwd and your VPN profile to the root user
- Change permissions on both files to restrict access
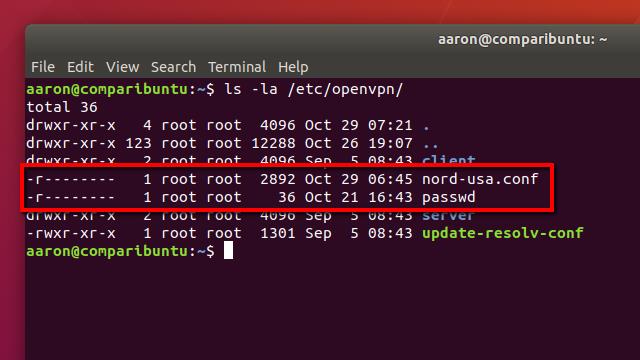
When you’ve finished, your directory listing should look like mine above.
In order to change ownership, you’ll use the chown command like this, substituting the name of your OpenVPN profile for mine:
sudo chown root:root /etc/openvpn/nord-usa.conf

sudo chown root:root /etc/openvpn/passwd
Setting the ownership to root will prevent users from changing the permissions to something less secure. The correct permissions will only allow the root user to read the file, which is all OpenVPN needs to be able to connect when it’s being run as a service. No other users on your system will be able to see the plaintext credentials.
To change permissions, use these commands:
sudo chmod 400 /etc/openvpn/nord-usa.conf

sudo chmod 400 /etc/openvpn/passwd
Once you’re finished, list the contents of the OpenVPN directory with this command:
ls -la /etc/openvpn/
You’ll see that the owner is now root, and only root has read access to the files. Once you’re finished locking down the file permissions, it’s safe to set OpenVPN to automatically start on boot.
Connecting to your VPN automatically
All that’s left is to tell systemd that you’d like OpenVPN to connect when your computer boots up. You can do that with a single command, substituting the name of your profile for nord-usa:
sudo systemctl enable openvpn@nord-usa
You’re finished, and OpenVPN will now connect every time you start your computer. It’s fully protected by the UFW kill switch, and you can be sure that no unencrypted traffic will leave the network from your workstation.
Top image licensed for reuse by Codeproject.com


Thank you so much. I was able to get this set up in under an hour
Thank you for the guide.
I’m having troubles trying to set the firewall rule
sudo ufw allow out to 107.152.104.216 port 1194 proto udp
I don’t have IP address in my VPN’s config. There is a usual internet address instead:
proto udp
remote at-vie.prod.surfshark.com 1194
So the command “sudo ufw allow…” fails.
What can I do?
Thanks.
Surfshark (great) support gave me an ovpn file for a fixed IP server. That solved the problem.