

Running your own VPN server is a great way to increase your mobile security and get access to your LAN from the internet, but they’re notoriously hard to set up. Pi VPN turns your Raspberry Pi into a cheap, effective VPN server using a guided installation that does most of the hard work for you.
You’ll be able to bypass website filters at work or school, and easily connect to devices on your home network like fileservers or printers. And with just a few extra steps, you can also enable end-to-end encryption and run all of your mobile internet through a secure and anonymous tunnel.
Contents [hide]
- What is Pi VPN?
- Choosing a VPN provider
- Getting ready for Pi VPN
- Installing Pi VPN
- Installing Pi VPN GUI
- Setting up an outbound VPN connection
- Pi VPN router settings
- Managing Pi VPN users
- Installing a mobile Pi VPN client
- Installing a Pi VPN client on your computer
- More ideas for Pi VPN and your network
- Hands on with Pi VPN
What is Pi VPN?
Pi VPN is a lightweight OpenVPN server designed to run on Raspberry Pi 2 or 3. It gives you access to your home network through a secure connection over the internet. By plugging a Raspberry Pi into your router, it acts somewhat like a bridge between mobile devices and your network.
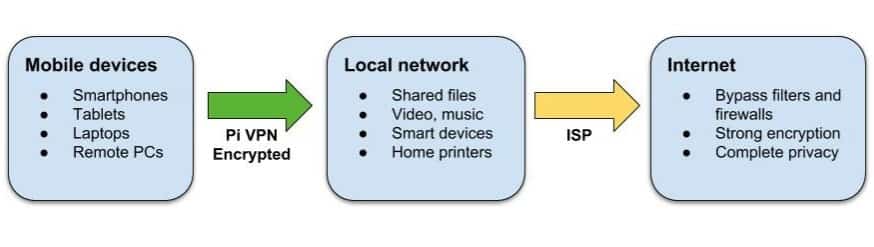
You can use Pi VPN to:
- Access your files, music, and movies from anywhere
- Encrypt your mobile internet connection
- Print on your home printers from your laptop
- Bypass firewalls and website restrictions at work and abroad
- Hide your mobile IP address
- Connect with your home cameras and smart devices
If you find yourself forwarding a lot of services through your router, a home VPN connection is a more secure alternative. Each port you forward is a tunnel that someone, somewhere could use to get into your network. Pi VPN only opens one port, and it uses strong encryption to keep your LAN secure.
Choosing a VPN provider
One of the most important choices before you even begin this project is which VPN provider you’ll use. And when you’re making that choice, the factors you need to keep in mind are security, bandwidth, and latency.
Security is vital, you need to know that your VPN provider won’t keep logs of your connection. But bandwidth and latency are just as important in this case. If you choose a provider with high ping times or not enough bandwidth, your internet connection is going to suffer.

With that in mind, I recommend you use IPVanish for this project. IPVanish has some of the lowest latency times and highest bandwidth of any provider, and we tested many. That will keep your connection snappy and responsive, even when you’re browsing the web through a double-hop VPN connection.
FAST AND RELIABLE:IPVanish has a large network of uncongested servers that hits great speeds. Strong security and privacy features. A favorite for Kodi and Amazon Fire Stick for their apps and streaming capabilities. Family friendly as it can handle up to 10 simultaneously connected devices. Try it risk-free with the 7-day money back guarantee.
Getting ready for Pi VPN
In order to get started, you’re going to need:
- a Raspberry Pi 2 or 3 with Raspbian installed
- an 8GB or larger memory card
For best results, the Raspberry Pi should be connected to a router with an ethernet cable, but a wifi connection will work, too. If you’re using wifi, you’ll need to substitute wlan0 for eth0 throughout this tutorial.
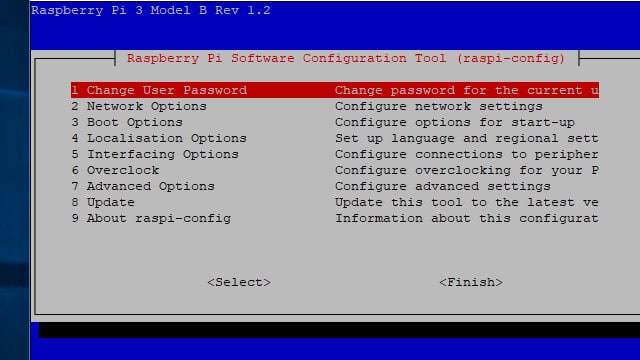
Turn on the SSH service in Raspberry Pi Config by enabling it in the Interfacing options menu. You can launch the configuration tool from the Pi menu or use this command:
sudo raspi-config
Reboot your Pi after you enable the SSH server.
Once your Pi is connected to your home network with SSH turned on, you can disable the X desktop and unplug your monitor if you want. It’s just as easy to connect to your Raspberry Pi remotely using a utility like Putty or your Mac’s terminal as it is to type directly on the Pi.
Connecting to your Raspberry Pi
Most of the time you’ll want to run your Pi VPN server without needing to plug it into a monitor. That’s easy to do as long as you have a secure shell (SSH) client. Using SSH, you can get access to your Raspberry Pi’s command line from another computer.
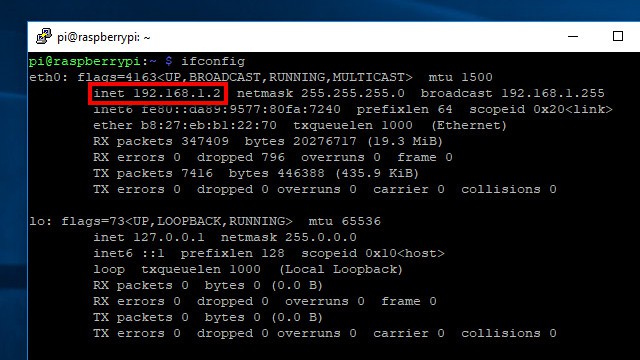
Before disconnecting your Raspberry Pi from its monitor, run the command ifconfig to show your Pi’s IP address. It’s listed in the inet field as shown above. You’ll need it to connect your SSH client.
If you’re going to be setting up your Pi VPN server in Windows, use Putty to connect to your Raspberry Pi. You can download Putty here for free.

Once Putty is up and running, connect to your Raspberry Pi by typing the IP address you noted earlier. Also make sure that the Connection type is set to SSH. Click the Save button to create a profile for this connection.
If you’re installing Pi VPN using a computer running Mac or Linux, there’s no reason to download an SSH client. Just use your operating system’s terminal; it supports SSH by default.
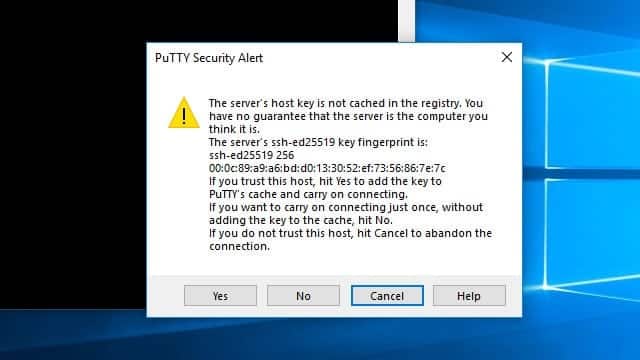
The first time you connect to your Raspberry Pi, you’ll be prompted to save a security key. Click the Yes button to accept the key as valid and save it on your computer.
Next, enter your password. If you haven’t changed it yet, Raspberry Pi uses raspberry as the default password.
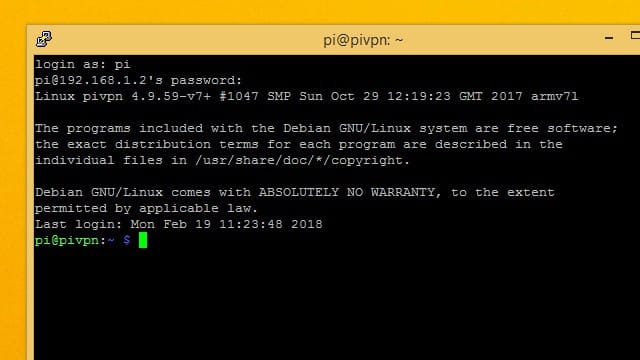
You’ve logged in successfully when you see the pi@hostname prompt.

It’s a good idea to change your default password the first time you connect over SSH. You can do that using the passwd command.
Updating Raspbian for Pi VPN
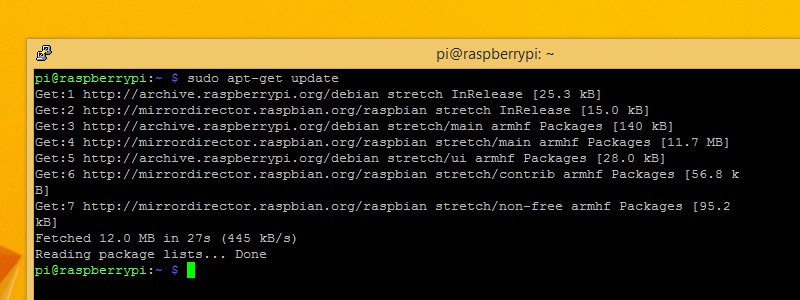
Make sure your operating system is up to date before you install Pi VPN.
First, get a list of all of the latest software. You can check for the latest versions of everything you have installed with the command:
sudo apt-get update
Once you have the latest list of software, tell your Raspberry Pi to upgrade itself with the command:
sudo apt-get upgrade

You’ll be prompted to press Y if you want to upgrade, and you should do it. It will take a few minutes for the upgrade process to run, and you can watch the progress on screen.
Setting a static IP address
Since you’re going to be relying on your Raspberry Pi for network services, you’ll need to know where to find it. That means you’ll have to set a static IP address before you begin.
You can also take this chance to change your hostname. Among other things, that will change the prompt you see when you’re logged in. It’s an easy way to tell multiple Pi’s apart, but changing your hostname is optional.

You’ll need to edit /etc/dhcpcd.conf to set a static IP address. Before you open the file, make sure you know your router’s IP address and the DNS servers you’ll be using. If you don’t already have that information, you can get it using ifconfig.
Once you’re ready, use this command to open it in the nano text editor:
sudo nano /etc/dhcpcd.conf
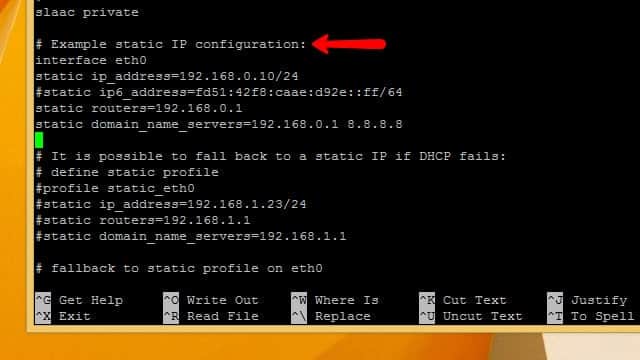
Scroll through the file until you see a line labeled Example static IP configuration. All you’ll need to do is uncomment the example configuration and make a few substitutions with your IP address, router, and gateways.

Uncomment static ip_address and substitute the static IP address you’d like to use. I’ve chosen 192.168.1.2 because it’s close to the router’s IP address and easy to remember.

Uncomment static routers and static domain_name_servers and insert your own values. Once you’ve made your changes, press Ctrl+X to quit, then Y to confirm that you want to save.

If you’re going to change your hostname, open /etc/hostname in nano as root with the following command:
sudo nano /etc/hostname

Change your hostname in the file and then press Ctrl+X in order to exit the editor, and Y to save the file.
You’ll have to do the same thing with the file at /etc/hosts. The command to edit the file is:
sudo nano /etc/hosts
Scroll down until you see 127.0.0.1 and change the hostname to whatever you’ve chosen. In my case, that’s pivpn. When you’re done, tell your Raspberry Pi to restart with the following command:
sudo reboot
After your Pi restarts, make sure to update the IP address that you’re connecting to in order to reflect the new static IP address.
Figuring out Raspbian’s firewall
Since Raspbian is a Linux operating system, the firewall is built into the kernel and enabled by default. But on a new installation it’s left wide open.
Raspbian’s firewall (iptables) policy is to allow all inbound and outbound packets, and forward anything that requests it. Later, I’ll show you how to lock down the firewall, but before you begin make sure it’s completely open to connections.
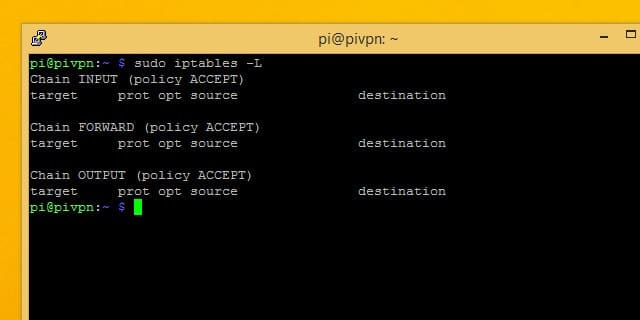
You can use iptables -L to list your current firewall rules and make sure they match the ones above. If you’ve been changing the firewall, you can restore it to default with the following commands:
sudo iptables -F
sudo iptables -P INPUT ACCEPT
sudo iptables -P OUTPUT ACCEPT
sudo iptables -P FORWARD ACCEPT
Choosing an encryption level
When you’re setting up your Pi VPN, you’ll be asked to pick the strength of your encryption. You’ll be able to choose from 1024-bit, 2048-bit, and 4096-bit RSA encryption. Here’s what you have to keep in mind:
- 2048-bit RSA encryption is the standard
- Using weaker encryption allows for higher speed
- 2048-bit is good for downloading, and streaming
- Using stronger encryption provides more protection
- 4096-bit is best used for email and browsing
Enabling 4096-bit RSA is tempting but, if you’re going to be streaming video or playing music through your connection, it will add a lot of overhead and slow things down noticeably. 2048-bit encryption is the standard for a reason, and I recommend you use it in most cases.
Timing out during long operations
SSH has a quirk, and sooner or later you’ll discover it for yourself. During long operations, if you’re connected to your Pi through SSH, the connection will drop when your computer goes to sleep. As soon as the SSH connection drops, the command you were running on your Pi stops being executed and you have to start over.
A utility called screen makes long SSH operations a lot easier to deal with. Using screen, you can start a session that’s tied to a single operation. Then you can connect or disconnect whenever you want, and come back to the session to check on its progress.
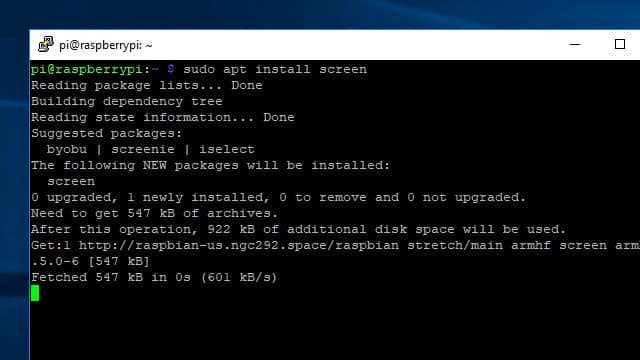
Once you install screen, you only need to know a few commands to use it. Get started by using apt to install screen:
sudo apt-get install screen
Once screen is installed, launch it with this command:
screen

It won’t look like anything happened, but now any commands you give won’t stop running if you disconnect.
So if your connection drops, just SSH back into your Raspberry Pi and type:
screen -r
You’ll automatically be reconnected to the SSH session, as long as it’s the only one active.
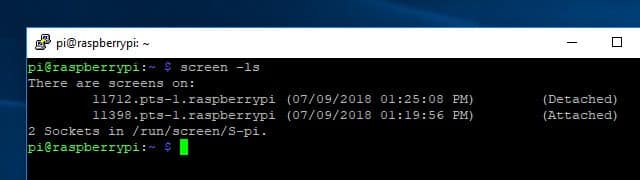
If you have more than one active screen session, you can list them with the command screen -ls. If you want to connect to a session you see in the list, you’ll need the 5-digit ID. So to reconnect to session 11712, I would use this command:
screen -r 11712
Once you get used to using it, screen makes managing your Raspberry Pi with SSH a lot more pleasant. You can learn more about all the different things screen is capable of here.
Installing Pi VPN
Once you’ve got your Raspberry Pi sorted out, you can connect to it and begin installing Pi VPN. This is the first part of a multi-part install, and it will provide the backend VPN functionality you need to connect to Pi VPN. In later steps, we’ll install a management web page and configure an outbound VPN connection for privacy.
Launching the installer
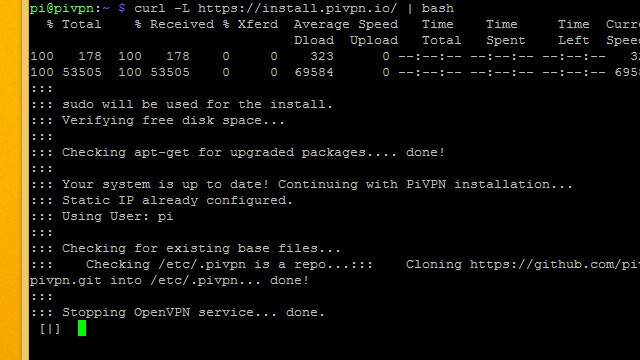
Pi VPN is installed through a script you download from its website using the curl command-line tool. Curl is just a tool for downloading from the internet without needing a browser.

The command you need to run in order to get started installing Pi VPN is:
curl -L https://install.pivpn.io/ | bash
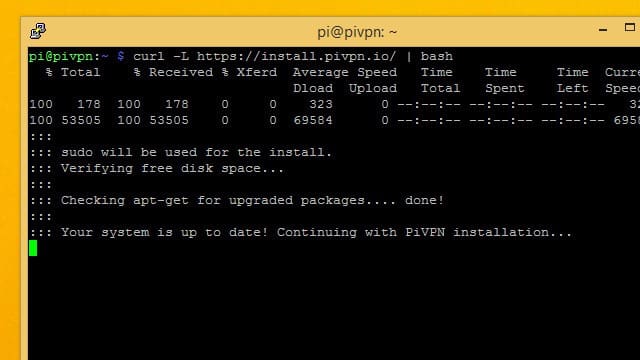
That command will download the installation script at pivpn.io and pipe it to the bash command interpreter for execution.
The installation process begins immediately. It starts by checking apt to see if you have packages you can update. If you’re following this guide, you’ve already updated your system so the script will move on to the next step.

A few necessary packages will be installed, then the Pi VPN installer will launch.
The Pi VPN installer
The Pi VPN installer is a pseudo-graphical setup wizard that’s perfect to run over an SSH connection. When your screen turns blue and you’re shown a message from the installer, you can get started.
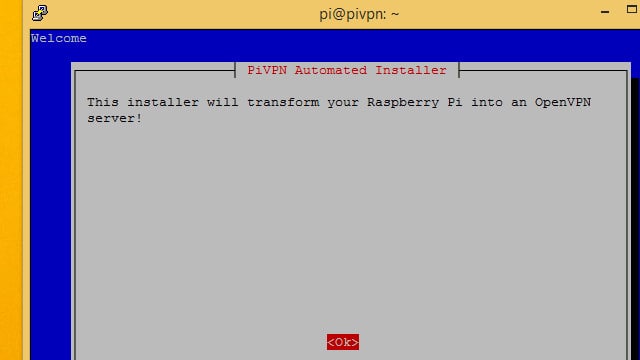
To begin, press enter to tell the Pi VPN setup wizard you’re ready.
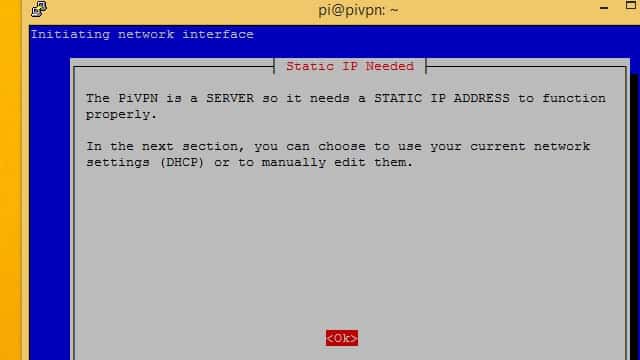
You’ll be warned that you need to set a static IP address. I recommend you do this before launching the setup wizard, so if you haven’t already set a static IP address exit now and follow the instructions in the previous section.
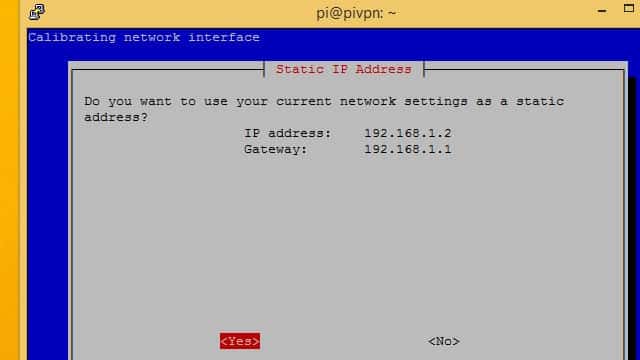
Pi VPN will show you the IP address it detected. If this is the static IP address you set previously, press the Yes button.

You’ll be warned about IP address conflicts. The safest way to avoid conflicts is to look on your router for the DHCP range, and use a static IP address outside of that range.
In my case, I’m using 192.168.1.2 and my router assigns DHCP addresses between 192.168.1.100 – 192.168.1.200 so there’s no danger of conflict.
Press Ok to move forward.
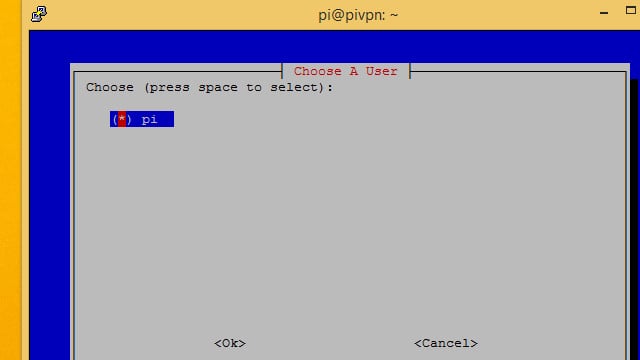
You’ll want to go with the default pi user in most cases, so make sure it’s selected and press the Ok button.
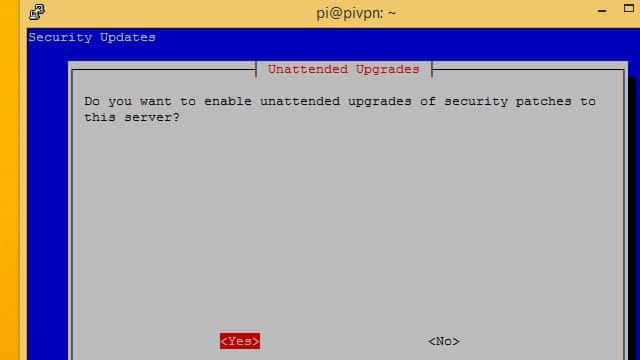
I recommend you click Yes to allow unattended security updates on your Pi VPN server. Your Pi will be exposed to the internet through port forwarding, so it’s especially important that Pi VPN stays up to date.
If you click No, take care to run regular updates on your own.
It’s normal to be shown the console for a moment after configuring automatic updates. The installer will come back after a few seconds.
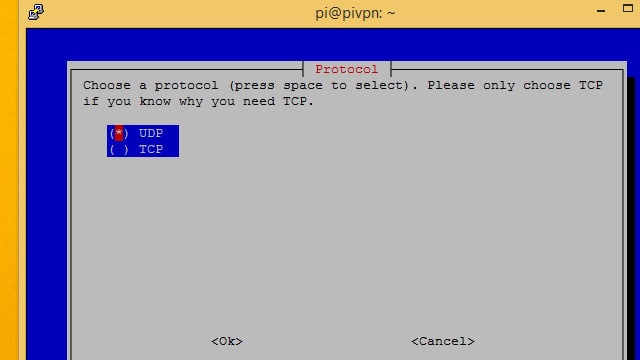
In most cases, you’ll want to setup Pi VPN using the UDP protocol. If you’re planning on using a subscription VPN provider to create an ultra-secure double-hop connection, use TCP.
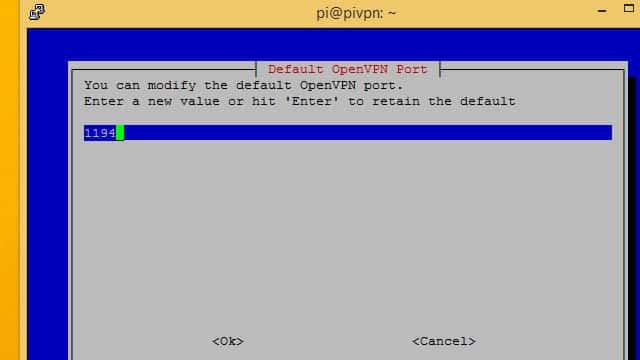
Take note of which port number you’re using for Pi VPN; you’ll need it later.
Port 1194 is the default for UDP, while TCP defaults to port 443. If you’re following instructions to create a double-hop VPN, do not use the default TCP port or it will cause a conflict later. I chose TCP port 4430 instead, because it was easy to remember.
Setting up encryption
Now you’ll be able to choose your encryption level. Earlier I outlined each choice and why you might pick it. if you’re unsure about which to pick, take a look back at my advice.
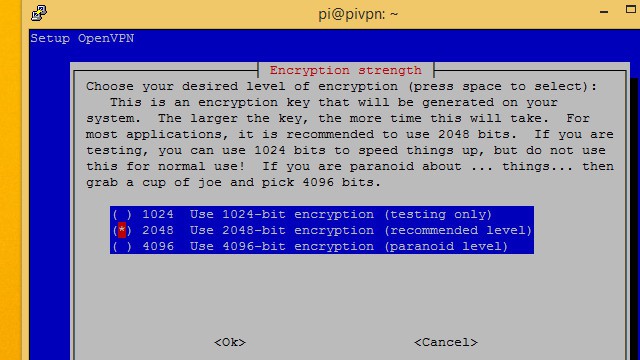
Select the level of encryption you’d like to use with the space bar, then press Ok. I’m choosing to run 2048-bit encryption so I can stream video over the connection.
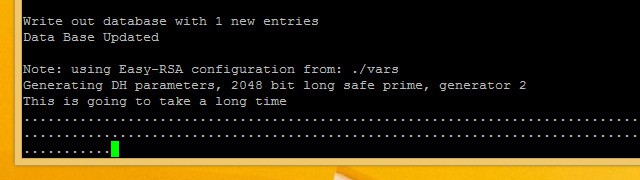
Generating these keys can take awhile. If you’re using high-level encryption, it will take even longer. Be patient and let Pi VPN generate your server keys.
Finishing the installation
After the server keys have been generated, the Pi VPN setup wizard is almost complete. Only a few more steps remain until you can connect.
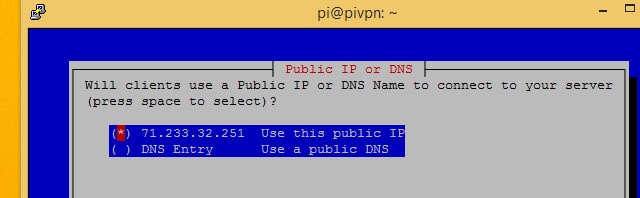
Select Use this public IP unless you have a dynamic DNS account. If you’re using dynamic DNS, choose DNS entry and enter your hostname and settings as usual.
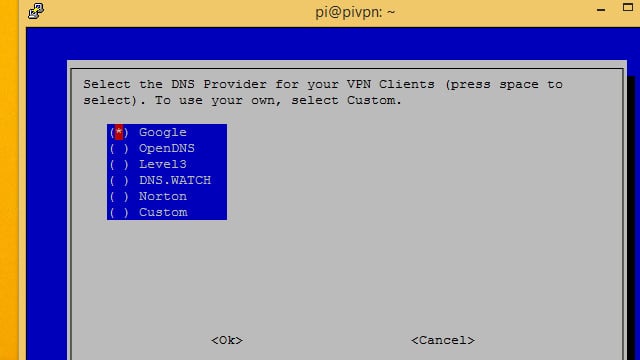
Next, you’ll have to choose a DNS provider for your VPN. I recommend Google for most users, since it’s free and easy. OpenDNS and Norton both provide secure DNS implementations if you’re interested in locking down any potential DNS leaks. You might also choose Custom if you’re going to be handling DNS requests with Pi-hole.
The setup wizard will tell you how to add users on the command line. In the next step, we’ll be installing a web application to help manage users. You can also use pivpn add.

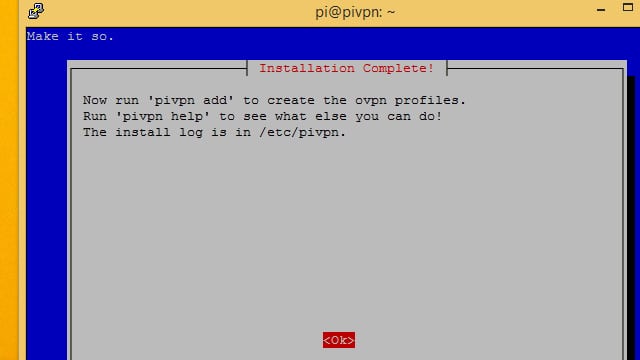
Finally, click the Yes button and reboot your Raspberry Pi.
Installing Pi VPN GUI
Pi VPN GUI is a web tool for Pi VPN. It’s optional, but using it makes managing users and adding new devices a lot easier. I recommend you install it.
Every time you add a user to PiVPN, you’ll generate an *.ovpn profile. You can use Pi VPN GUI to both create the user account and make it easy to download the profile.
If you choose not to use Pi VPN GUI, you’ll need to add and manage users with the pivpn add and pivpn remove commands. You’ll also have to manually copy the *.ovpn profiles that are generated, usually using a command-line tool like scp.
Getting ready to install Pi VPN GUI
Before installing Pi VPN GUI, you need to update apt. You’ll have to add a repository in order to download all of the software that Pi VPN GUI requires. Here’s how to do it.

Use nano to edit apt’s list of sources. The command is:
sudo nano /etc/apt/sources.list
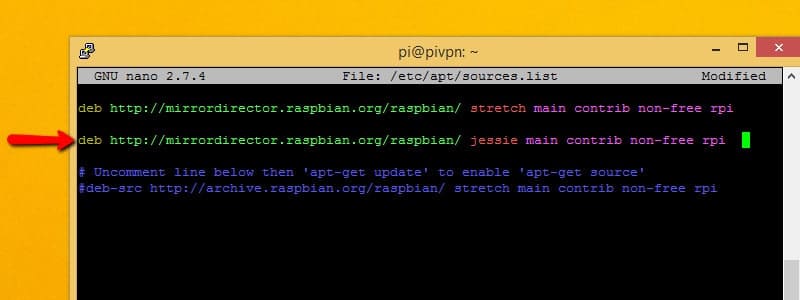
Add the following line to sources.list wherever you can find a spot:
deb http://mirrordirector.raspbian.org/raspbian jessie main contrib non-free rpi
That will tell apt that it’s okay to install packages from Debian Jessie, a previous release. That’s necessary because some of the software that Pi VPN GUI relies on hasn’t been added to the Debian stretch repositories yet.
Unfortunately, having a link to an old release in your sources.list file isn’t a best practice, even though we need it at the moment. It can cause conflicts later if you choose to install other software. It’s a good idea to remove the line you just added after installing these software packages.
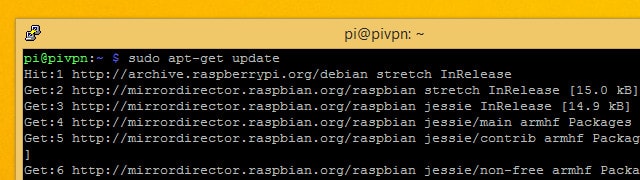
Next, save and quit nano. Update apt with the command:
sudo apt-get update
Once the check is complete, install any updated packages with the command:
sudo apt-get upgrade
That’s all you need to do in order to add the necessary repository to apt. Now, install the prerequisites for Pi VPN GUI with the following command:
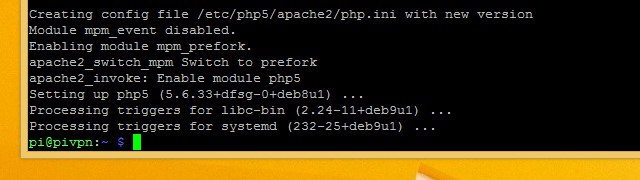
sudo apt-get install git apache2 php5 libapache2-mod-php5 php5-mcrypt expect geoip-bin
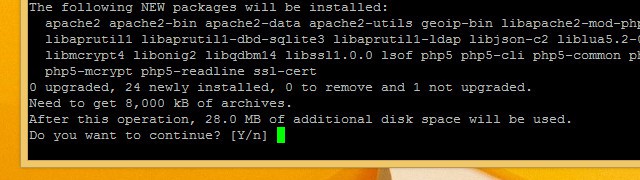
Press Y when prompted, and let the installer run. When you’re finished installing software, you’ll have to update some configuration files before you can install Pi VPN GUI.
Now that the prerequisite software is installed, you should remove the line you added from /etc/apt/sources.list and run sudo apt update again.
Updating the web configuration
Pi VPN GUI is a web app, and it needs an apache web server to run properly. We installed apache in the previous step, but now a few changes have to be made before Pi VPN GUI can run on your apache server.

First, you’ll need to change the user account that apache runs under. It defaults to an unsupported account, and we need to make it run as the user pi instead. Edit the apache config file using the command:
sudo nano /etc/apache2/apache2.conf
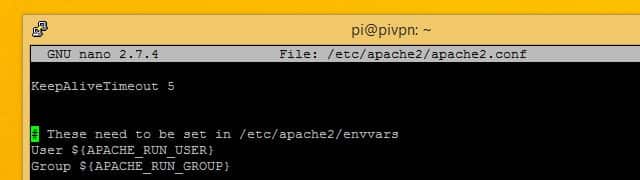
Scroll down until you see the line that says User $(APACHE_RUN_USER) followed by Group.
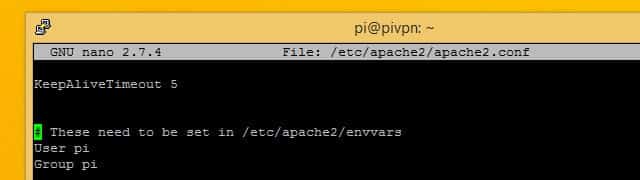
Change the values for User and Group to pi for both. Then press Ctrl+X to quit, and Y to save.

Next change the owner for the /var/www directory that apache uses to store websites in. You can give the user pi ownership of the web directory using this command:
sudo chown pi:pi -R /var/www

When you’re finished, change into the /var/www/html directory with this command:
cd /var/www/html
You should complete the Pi VPN GUI installation from that directory.
Downloading and installing Pi VPN GUI
After all that work setting things up, it’s actually very easy to download and install Pi VPN GUI. All you need to do is check the project out using git. If you’ve followed along, we installed the git utility in a previous step.
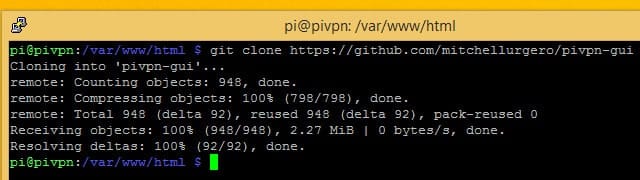
Make sure you’re still in the /var/www/html directory and run the command:
git clone https://github.com/AaronWPhillips/pivpn-gui
The command will use git to clone Pi VPN GUI’s project directory in the root of your webserver, making it available as a web page. You can check to see if the installation was successful using your browser.
Connecting to Pi VPN GUI
Now that Pi VPN GUI is installed, you can open it in your browser and use it to manage Pi VPN users. I installed Pi VPN to my Raspberry Pi with an IP address of 192.168.1.2, so I can find Pi VPN GUI at http://192.168.1.2/pivpn-gui.
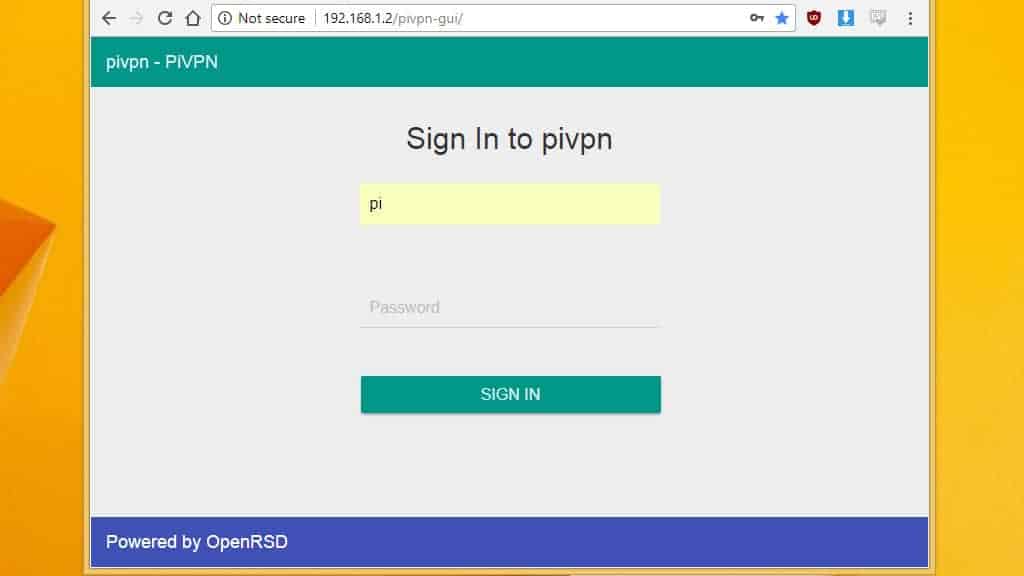
You should use the IP address that corresponds with your installation and open Pi VPN GUI in your browser.
You’ll be able to tell if you’ve connected successfully when you see a login prompt. If you’re unable to login, you’ll need to restart your Raspberry Pi.
For now, just bookmark a link to Pi VPN GUI so you can come back to it easily. The next step is setting up an outbound VPN connection in order to encrypt your internet connection. If you’d rather not sign up for a service like IPVanish, you can skip ahead to setting up your router and adding users.
Setting up an outbound VPN connection
If you don’t set up an outbound VPN connection, all of the traffic from devices connected to your VPN will connect to the internet using your LAN’s public IP address. Wherever you connect from, websites will think you’re connecting from home. That isn’t always a bad thing; for instance you might want to watch Netflix when you travel abroad.
But to get the most out of Pi VPN, I recommend you use an outbound VPN provider and create what’s called a ‘double-hop’ connection.
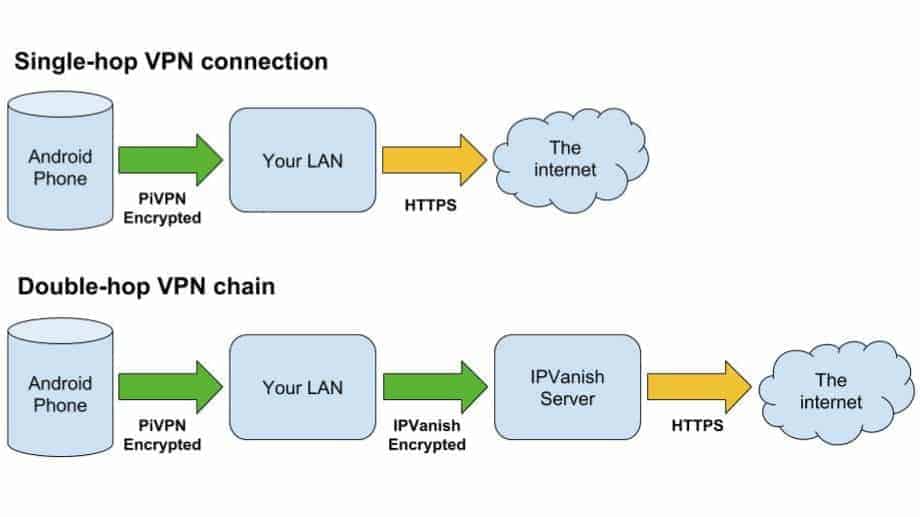
The advantage of a double-hop VPN connection is complete end-to-end encryption for your mobile internet when you connect to a site over HTTPS. The added security goes beyond just having two tunnels, since the outbound VPN server never sees the originating request.
In practical terms, that means any logs your VPN provider keeps won’t be able to identify the device that any individual request came from–everything resolves back to your Pi VPN server. It’s another layer of anonymity for everything you do online.
If you’re setting up Pi VPN just to connect to your home network remotely, you can skip this step and move on. But if you’re interested in creating a secure and anonymous internet connection for your phones, laptops, tablets, and other devices, you should use an outbound VPN connection along with Pi VPN.
READER DEAL: IPVanish offers a free 7-day trial for Comparitech customers if you don’t already have a VPN provider.
Using a VPN-enabled gateway router
If you already have a gateway router that supports an outbound VPN connection, your work is done. Since all traffic will leave your home network encrypted by the router, you’ve effectively got a double-hop VPN. In which case, you can stop and connect your clients.

If you’re interested in learning how to build a VPN-enabled router, or you have one that you’d like to set up, we have guides for that. If you already have a VPN-enabled router and need to set it up as a VPN client, take a look at how to choose a VPN provider and set up your router.
The rest of us will have to use our Pi to handle the encrypted outbound connection and routing required to create a second VPN hop.
Using IPVanish as an outbound VPN
IPVanish’s low latency makes it a great choice if you’re setting up a double-hop VPN connection like this, since your connection is waiting on two VPN servers to handle traffic. The process will be the same for any VPN provider that publishes OpenVPN profiles for their servers.
You’ll need to download an autologin profile and the digital certificate for your VPN provider. If you’re using IPVanish, those files are available to download here.
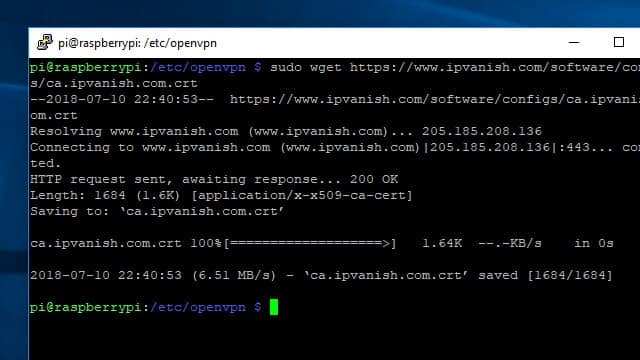
One easy way to get the files you need on your Pi VPN server is to connect via SSH and use the wget command to download them from the web. Make sure your Pi VPN server is connected to the internet, then change to the proper directory and download the files you need with these commands:
cd /etc/openvpn
sudo wget http://www.ipvanish.com/software/configs/ca.ipvanish.com.crt
sudo wget http://www.ipvanish.com/software/configs/ipvanish-US-Chicago-chi-a01.ovpn
Note that you should change the second URL to match the IPVanish server you’d like to connect with. In my case, I’m using an IPVanish server in Chicago.
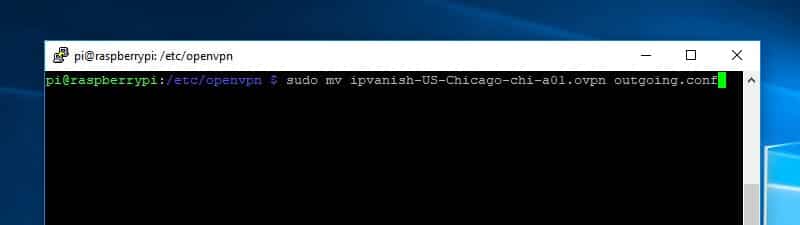
Since you’ll connect to IPVanish automatically using the OpenVPN service, it’s important to rename the *.ovpn autologin profile you just downloaded. The OpenVPN service will only connect to profiles with the *.conf file extension. Use this command to rename the file to outgoing.conf:
sudo mv /etc/openvpn/ipvanish-US-Chicago-chi-a01.ovpn /etc/openvpn/outgoing.conf
Now that the files have been downloaded and prepared, you’re ready to setup the connection to your outgoing VPN provider.
Setting up the IPVanish connection
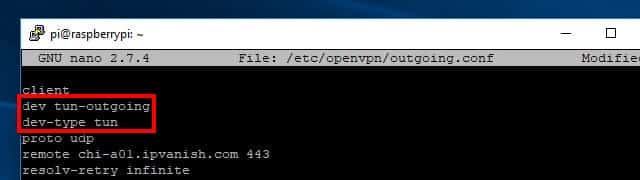
It’s easier to keep track of two simultaneous VPN connections if you rename each interface to reflect what it does. I like to use /dev/tun-incoming and /dev/tun-outgoing to refer to the different network interfaces.
Renaming the interfaces also ensures the connections won’t flip back and forth between being named /dev/tun0 and /dev/tun1, depending on which one comes online first. The device names are important to know if you want to be able to configure your firewall properly.
You can change the name of each interface by editing the connection settings. Each OpenVPN connection has a *.config file associated with it. Changing the first lines in each file renames the network interface.
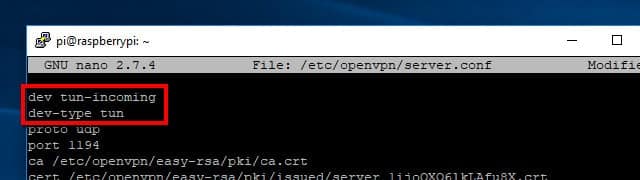
Start by editing Pi VPN’s settings, located in /etc/openvpn/server.conf, with the following command:
sudo nano /etc/openvpn/server.conf
Change the first line from:
dev tun
To the following, inserting a new line:
dev tun-incoming
dev-type tun
Press Ctrl+X and then Y to save your changes. The next time Pi VPN comes online, it will create a device called /dev/tun-incoming.
You’ll need to edit the incoming config file at /etc/openvpn/outgoing.conf in the same way. Open it with this command:
sudo nano /etc/openvpn/outgoing.config
Like before, change the first line and insert a second at the top of the config file. This one should read:
dev tun-outgoing
dev-type tun
But the outgoing VPN connection needs other changes, too. You’ll need to point it to the server certificate you downloaded in a previous step, and provide your username and password so the VPN can automatically connect.
Edit your outgoing.conf file to use the IPVanish server certificate. Change the line that starts with ca to read:
ca /etc/openvpn/ca.ipvanish.com.crt
Then update or add auth-user-pass to point IPVanish at your password file, which we’ll create soon:
auth-user-pass /etc/openvpn/passwd
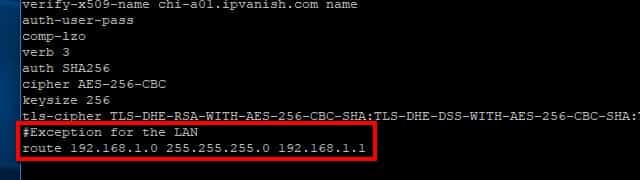
Your outgoing VPN connection also has to be told not to forward LAN traffic. You’ll need to add this line to the end of your outgoing.conf file to be able to access your local network through Pi VPN:
route 192.168.1.0 255.255.255.0 192.168.1.1
Remember to use the proper IP address for your LAN if it’s different than mine above. Save your changes to /etc/openvpn/outgoing.conf in nano by pressing Ctrl+X, then Y.
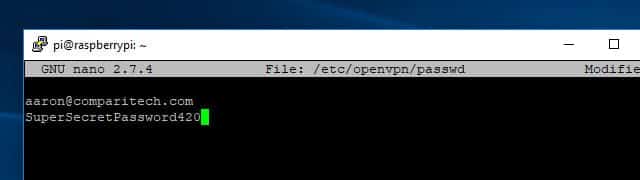
Now, create a password file that OpenVPN can use to login to IPVanish with your credentials. The format of this file couldn’t be simpler, it’s just your username on the first line and your password on the second. Use this command to create the file and open it for editing:
sudo nano /etc/openvpn/passwd
Enter your email address on the first line and your password on the second, then press Ctrl+X, Y to save the file. Since /etc/openvpn/passwd contains your credentials in plaintext, it’s important that you secure the file. You can lock down access to /etc/openvpn/passwd using chmod like this:
sudo chmod +600 /etc/openvpn/passwd
That will ensure only the root user can read or write the passwd file, which is the minimum level of security you need when storing your credentials in plaintext.
Updating your Raspberry Pi’s routing table
Before you can bring the outbound VPN online to secure your internet connection, you need to set your Raspberry Pi to route the traffic properly. Please remember to substitute your Pi’s static IP address if it’s different than mine below.
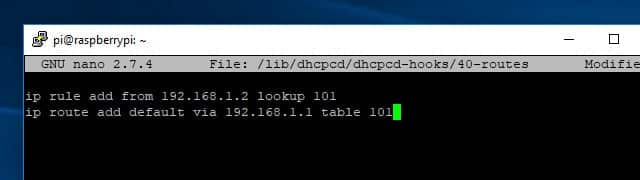
You’ll need to create or edit /lib/dhcpcd/dhcpcd-hooks/40-routes and add a few lines. Here’s the command:
sudo nano /lib/dhcpcd/dhcpcd-hooks/40-routes
Add these two lines to the script:
ip rule add from 192.168.1.2 lookup 101
ip route add default via 192.168.1.1 table 101
Then press Ctrl+X, Y to save your changes.
That’s the only change you’ll need to make to your Raspberry Pi’s routing table. After you’ve saved the changes and restarted your Pi, you’ll be able to run incoming and outgoing VPN connections at the same time.
Securing your DNS requests
In order to make your connection truly secure, you need to make sure to stop DNS leaks. A DNS leak occurs when your secure VPN connection looks up websites using a DNS server outside of the encrypted network. That exposes your VPN clients to dangers like DNS logging and man-in-the-middle attacks.
The solution is to force all incoming VPN clients to use the secure DNS server of your outgoing VPN provider. In this case, I’ll force my clients to use IPVanish’s DNS servers.
In order to change your DNS servers without having to reinstall Pi VPN, you’ll need to update /etc/openvpn/server.conf. Open it for editing using this command:
sudo nano /etc/openvpn/server.conf
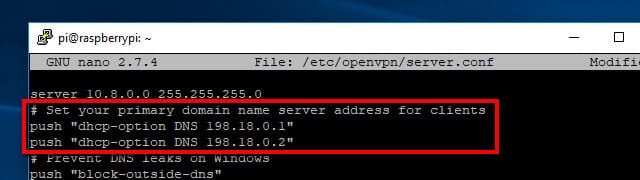
Scroll through the file until you see the two lines that push DNS settings to your VPN clients. I installed Pi VPN using Google’s DNS servers initially, so the two lines that need to be changed in my server.conf look like this:
push “dhcp-option DNS 8.8.8.8”
push “dhcp-option DNS 8.8.4.4”
If you’re using IPVanish, change these lines to read:
push “dhcp-option DNS 198.18.0.1”
push “dhcp-option DNS 198.18.0.2”
If you’re using a different VPN provider, you’ll need to look online to find their DNS servers.
Once you’ve edited the file, save it with Ctrl+X, Y. Your changes will take effect the next time the OpenVPN service is restarted, and your VPN clients will use IPVanish’s secure servers automatically.
Connecting to IPVanish
Before you set OpenVPN to automatically connect to your outgoing VPN provider, you should test the connection. From the command line, type:
sudo service openvpn@outgoing start
The screen will fill with text showing you the state of the VPN connection. Double check /etc/openvpn/outgoing.conf if you have problems connecting, and make sure your username and password are correct and on separate lines in /etc/openvpn/passwd.
When you’ve connected successfully, disconnect from the VPN by pressing Ctrl + C. The last step in creating an outgoing VPN connection is setting it to autostart.
Starting the VPN connections automatically
Once your connection has tested okay, you should set both of your VPN connections to start automatically. OpenVPN makes it easy by letting you refer to each connection according to the name of the configuration file.
To get started, you’ll need to edit OpenVPN’s global configuration file with this command:
sudo nano /etc/default/openvpn
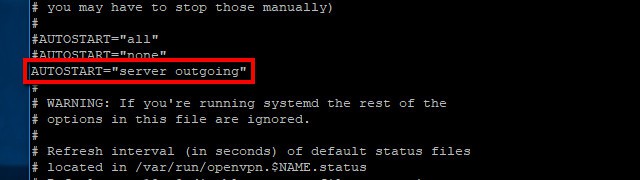
Then uncomment this line:
AUTOSTART="home office"
And change it to read:
AUTOSTART="server outgoing"
Once you’ve finished, save your changes with Ctrl+X, Y and restart your Pi VPN server with the following command:
sudo reboot
When your Raspberry Pi reboots, your Pi VPN server will be connected to the outgoing VPN provider and ready to start handling incoming connections.
Pi VPN router settings
The whole idea of a VPN is that it’s a tunnel from outside of your network to the inside. That means you’ll need to setup your router to allow certain connections through. We do this using port forwarding, and it can be very easy or a little more difficult depending on your router.
I’m using an entry model Linksys router for this guide, but every consumer router supports port forwarding. Your procedure might be a little different, but most router manufacturers offer port forwarding guides on the web.
Forwarding the VPN port
No VPN clients can connect to your network unless you forward the port you specified earlier. Normally all of these requests are blocked by your router for security reasons, but we have to make a special exception. In this case, it’s because we need to let VPN clients connect to Pi VPN through the internet.
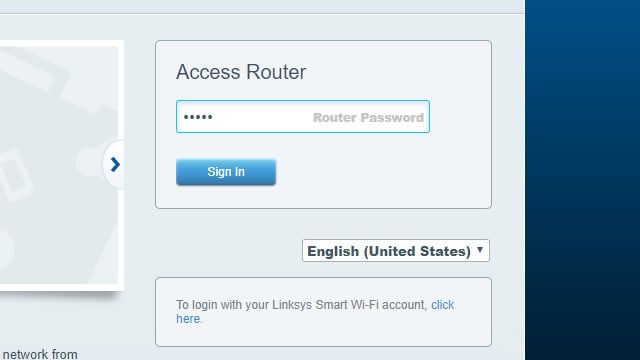
Start by logging into your router.

Once you’ve logged in, click through the menus until you find port forwarding. In my case, it’s in Apps and Gaming — Firewall Settings.
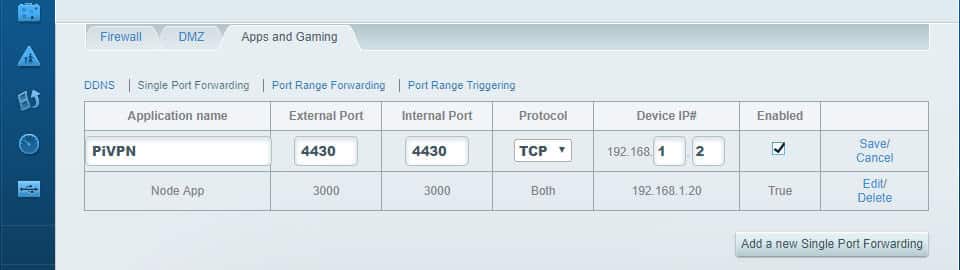
Click to add a new port. You’ll need to know the port number, which you selected earlier. You’ll also need the static IP address of your Pi VPN server. In my case, that’s port 1134 and 192.168.1.2.
Click Save when you’ve setup port forwarding. Now VPN clients will be able to login when they’re outside of the local network.
Comcast Xfinity customers note
I wasn’t able to get my Comcast Xfinity router to forward ports properly. The problem was my router has a built-in intrusion detection system (IDS), which gets used a bit like a firewall to stop malicious attacks on your home network. The IDS can’t be turned off, and connecting to a VPN through your Comcast router triggers it, blocking the connection.

My solution was to put the Xfinity router in bridge mode and connect a wireless router to it. Then I was able to use the wireless router to turn on port forwarding and allow connections to my VPN. If you’re a Comcast user having trouble with port forwarding, leave a comment below for help.
Managing Pi VPN users
Every device that connects to your VPN needs to have a user account associated with it. When you create each account, Pi VPN will generate an OpenVPN profile. Later, you’ll use those *.ovpn profiles on your devices to set them up automatically.
Creating profiles with Pi VPN GUI
Here’s how to add users to Pi VPN. When you’re finished, you’ll be able to download the profile needed to connect to your private network.
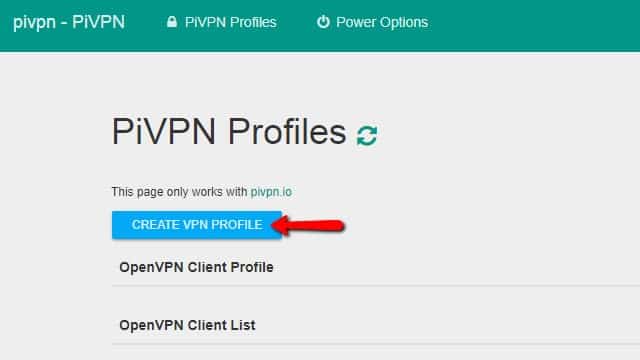
Click the Create VPN profile button to add a new user.

Then type a username and click the Create profile button. I recommend naming each user after the device you plan to connecting with. Later on, it makes it easy to tell at a glance which devices are connected to the VPN.

A status window opens so you can follow along with the profile creation process. Generating cryptographic keys can take a long time, especially if you’re using 4096-bit encryption.

Pi VPN GUI will sometimes take you to a 404 message after successfully creating a profile. Click the pivpn link in the upper-left corner to return to the profile browser.
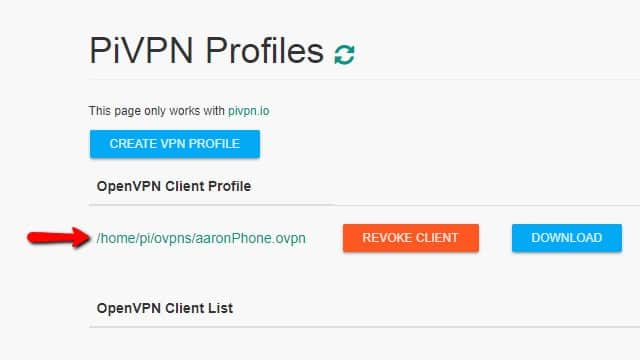
You’ll see a path to your OpenVPN client profile, and a button to Download it. You can click the Revoke client button to remove a user account. Revoking an account will cause the client to disconnect immediately.
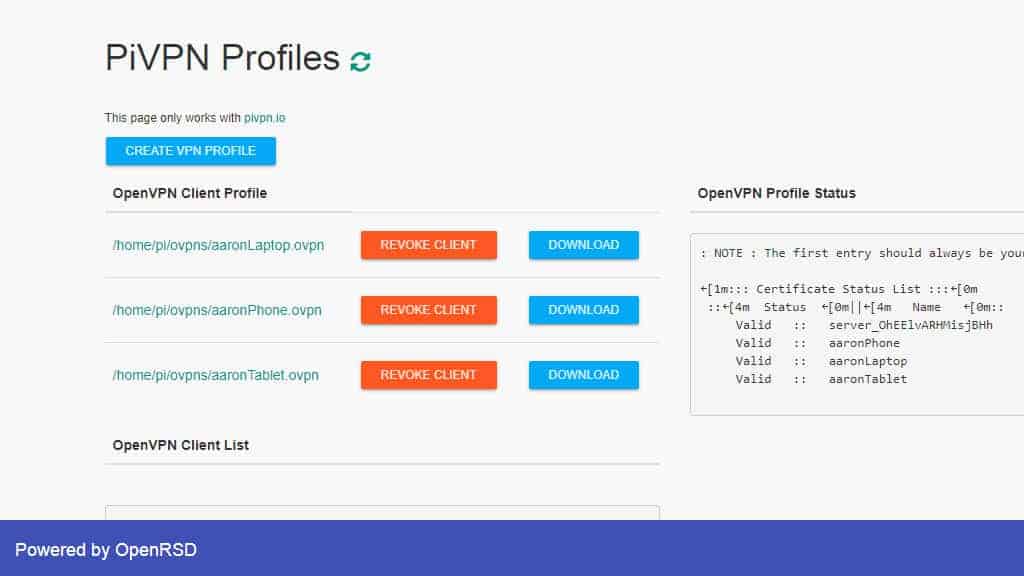
Click the Create VPN profile button until you have a client profile for each device you want to be able to connect to your VPN. For instance, I had profiles for my phone and tablet, along with a Raspberry Pi that I use to stream TV.
Once you have profiles for each device, you can move to the next step and connect to your VPN.
Removing profiles with Pi VPN GUI
Sometimes you’ll have a problem with a profile, or want to remove it from your VPN. You can do that by revoking the client in Pi VPN GUI.
Open Pi VPN GUI and sign in. You can see a list of active profiles on the main screen.
Click the Revoke profile button for the device you want to remove and the profile will be deleted.
When you refresh Pi VPN GUI, you can see the profile has been removed. Keep in mind that this doesn’t delete the old *.ovpn file from your hard drive. You’ll need to remove the file manually using this command:
rm ~/ovpns/profile_name.conf
Be sure to substitute profile_name.conf with the name of your OpenVPN autologin profile.
Even if you don’t delete revoked profiles, there is no security risk. You’ll never be able to log in using a revoked profile, but I recommend you delete them to keep things clean.
Installing a mobile Pi VPN client
If you’re going to be connecting to Pi VPN on a mobile device, I recommend OpenVPN Connect, the official client. It’s completely free and integrates really well with iOS and Android.
The first step is to open the App Store or Play Store, depending on your device. In either case, search for OpenVPN Connect. Agree to the terms and install the app as usual.
See also: How to install OpenVPN client and server on a DD-WRT router
Importing the Pi VPN autologin profile
You’ll need to make sure you’re connected to your home network over wifi, then open Pi VPN GUI in a browser. Remember that the path was set much earlier, and includes the local IP address of your Pi VPN server. In my case, it’s http://192.168.1.2/pivpn-gui/.
Log in with the username pi and the proper password.
iOS users: Note that Pi VPN GUI only works properly in Safari. Android users can connect with the browser of their choice.
Find the profile you made for your mobile device and click the Download button.
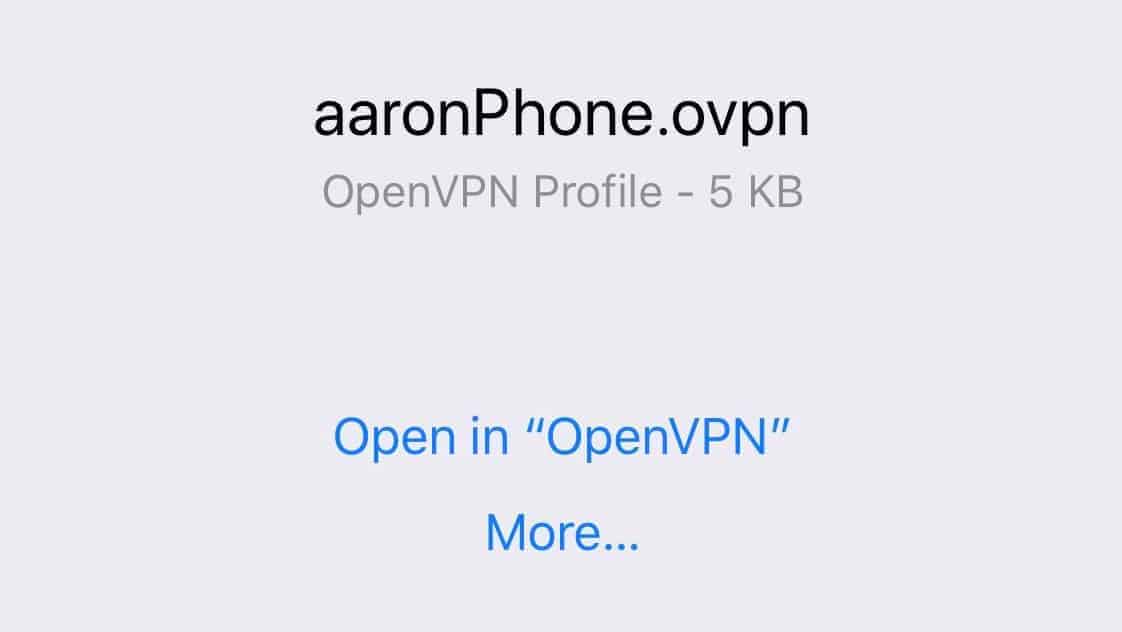
Use OpenVPN connect to import the *.ovpn file. When OpenVPN Connect launches, click the green plus. Your Pi VPN connection is ready to connect.
Connecting to Pi VPN
All that’s left is to open the tunnel to Pi VPN using the OpenVPN Connect app.
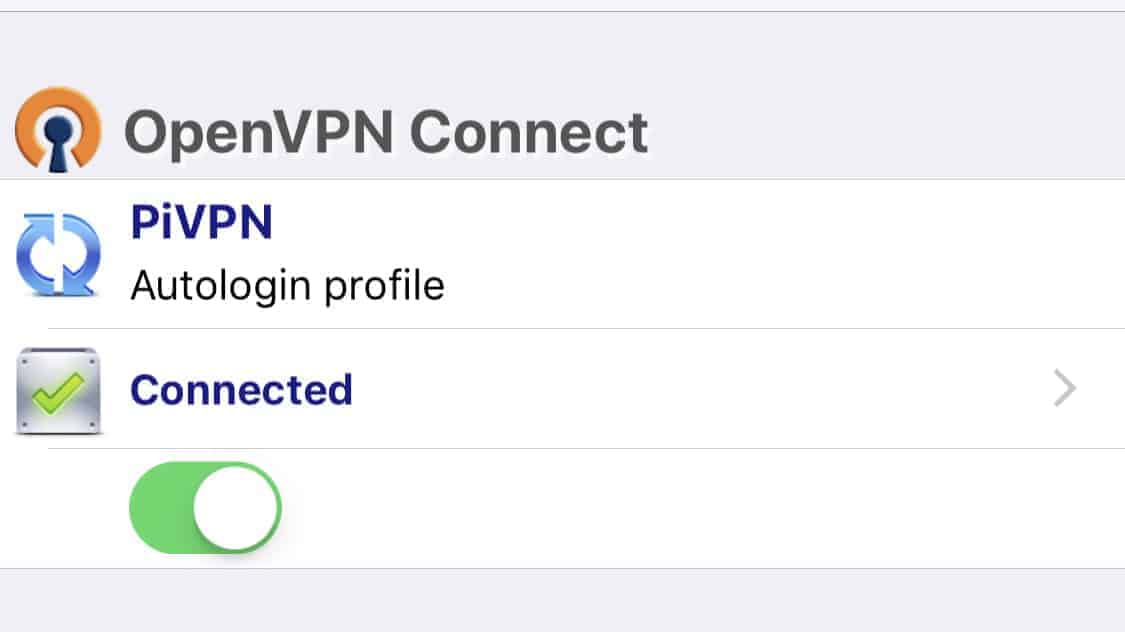
In the app, click the toggle button to initiate the connection. It should turn green, and your phone will display a VPN badge in the notification area.
You can check to make sure your VPN connection is working by visiting a site like http://www.ipaddress.com. If you’re not adding a computer to your VPN, you’re finished and can skip to the next section.
Installing a Pi VPN client on your computer
A lot of different VPN clients are available for Windows and Mac, but I recommend the official OpenVPN client. It’s free and easy to install, and lets you import your Pi VPN connection with just a few clicks.
Download the official client here, and install it as you would any other program.
Importing the Pi VPN autologin profile
If the computer you’re adding to the VPN is on your LAN, you can download the autologin profile from Pi VPN GUI. Browse to the path where you installed Pi VPN GUI earlier, in my case that is http://192.168.1.2/pivpn-gui/.
If the computer you’re adding Pi VPN is in a remote location, you won’t be able to connect directly to Pi VPN GUI. In that case, you’ll need to download the autologin profile using a device on the LAN. Once it’s downloaded, attach it to an email and send it to your remote computer. You can download the profile from your email and continue on as usual.

Once you have the autologin profile downloaded, right-click the OpenVPN icon in the system tray and click Import.
Connecting to Pi VPN
After the Pi VPN connection has been added, right-click the OpenVPN icon in the system tray and click the profile name to connect.
You’ll see a status window appear with the connection log. If your computer doesn’t connect properly, you can copy and paste the error code to figure out what went wrong. In most cases, if you can’t connect to your VPN, it’s because port forwarding wasn’t properly enabled.
Once connected, make sure the VPN is working by visiting a website like http://www.ipaddress.com.
More ideas for Pi VPN and your network
Having a server that’s accessible from anywhere makes it the perfect candidate for a lot of different projects. Here are some ideas for your Raspberry Pi now that you’re completely finished setting up your Pi VPN server.
Lock down the firewall
Raspberry Pi ships with a very permissive firewall by design, but it’s a good idea to be more restrictive when you’re running a VPN server.
Here are some sample rules to get you started. Remember to replace the PROTOCOL and PORT with what you’ve chosen for your Pi VPN server. Lines beginning with # are comments and don’t need to be typed.
#Accept incoming traffic on all interfaces, but limit eth0 to VPN only
sudo iptables -A INPUT -i eth0 -m state --state NEW -p PROTOCOL --dport PORT -j ACCEPT
sudo iptables -A INPUT -i tun-incoming -j ACCEPT
sudo iptables -A INPUT -i tun-outgoing -j ACCEPT
#Allow forwarding traffic between subnets
sudo iptables -A FORWARD -i tun-incoming -j ACCEPT
sudo iptables -A FORWARD -i tun-outgoing -j ACCEPT
#Forward traffic through eth0
sudo iptables -A FORWARD -i tun-incoming -o eth0 -m state --state RELATED,ESTABLISHED -j ACCEPT
sudo iptables -A FORWARD -i tun-outgoing -o eth0 -m state --state RELATED,ESTABLISHED -j ACCEPT
#Forward traffic through tun-incoming
sudo iptables -A FORWARD -i eth0 -o tun-incoming -m state --state RELATED,ESTABLISHED -j ACCEPT
sudo iptables -A FORWARD -i tun-outgoing -o tun-incoming -m state --state RELATED,ESTABLISHED -j ACCEPT
#Forward traffic through tun-outgoing
sudo iptables -A FORWARD -i eth0 -o tun-outgoing -m state --state RELATED,ESTABLISHED -j ACCEPT
sudo iptables -A FORWARD -i eth0 -o tun-outgoing -m state --state RELATED,ESTABLISHED -j ACCEPT
#MASQ tun-incoming as eth0
sudo iptables -t nat -A POSTROUTING -s 10.8.0.0/24 -o eth0 -j MASQUERADE
Once you’ve finished, use this command to save your changes:
sudo iptables-persistent save
Remember you can list currently active iptables rules with the command:
sudo iptables -L
Switch to dynamic DNS
Dynamic DNS adds lets you use a hostname instead of an IP address to connect to your Pi VPN server, even if you don’t have a static address from your ISP. For instance, you might use dynamic DNS to redirect vpn.websitename.com to your VPN server. If you’re thinking about hosting web services or email, in many cases you can run everything from the same Pi.
It’s best to re-run the Pi VPN installer if you’re going to switch to dynamic DNS. But once you’ve updated your settings, you’ll be able to access your Pi VPN server at the custom URL you selected.
Switching to dynamic DNS eliminates the need to reissue Pi VPN client profiles every time your public IP address changes.
Set up a fileserver
Your Raspberry Pi makes a great Samba fileserver. You can plug in a few USB drives, install lvm2 to create one giant filesystem spanning all of the disks, and share out your files to VPN clients.
Enabling Samba across your VPN takes a little work, but it’s extremely useful to be able to access your files, music, and movies from your mobile devices.
Install Pi-hole
When you set the DNS provider during the Pi VPN installation, you could easily install Pi-hole, change your Custom DNS provider to 127.0.0.1, and block mobile ads automatically over your VPN.
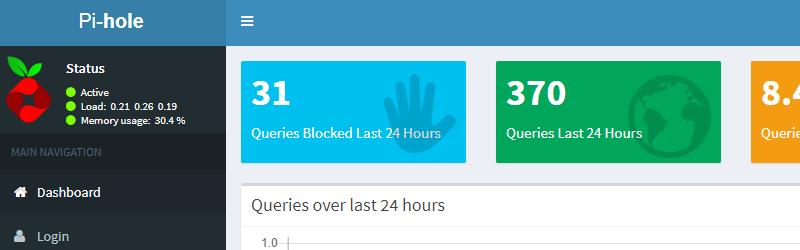
Running Pi-hole on a VPN connection is the best way to block mobile ads without rooting your phone. You can even turn off Youtube pre-roll ads and stop seeing sponsored products on Amazon. Take a look at Comparitech’s guide to Pi-hole for more.
Run a seedbox
If you’ve got an outbound VPN up and running, your internet connection is completely encrypted. Having an anonymous internet connection is great for torrenting, and turning your Pi VPN server into a seedbox with Transmission is really easy.
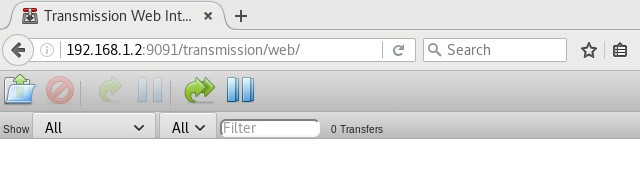
Since the connection is already encrypted, all you have to do is install Transmission and the web client. You’ll be able to add torrents from your phone or laptop, and they’ll download at home.
What is the maximum number of concurrent users for PiVPN?
The maximum number of concurrent users for PiVPN isn’t set in stone. It largely depends on your hardware, network, and how much your client devices use the network. While there’s no hard limit, the performance might degrade if too many users are connected at once. In other words, your PiVPN can handle as many users as your CPU and network can support. So, the exact number will vary based on your specific setup and usage conditions.
Hands on with Pi VPN
I don’t think I’m telling any secrets when I say that I’m a huge nerd. My home network is full of smart devices like Hue lights, a Nest thermostat, and a couple of Sonos speakers. I’ve got a fileserver with Transmission, a Plex server, devices running Kodi, and a bunch of odds and ends like a network printer and DNS server running Pi-hole to block mobile ads.
If your home network is anything at all like mine, I’d tell you that Pi VPN is a game-changer. Not only have I managed to shut off every port save one on my firewall, but my mobile internet is completely encrypted and I can access my LAN from anywhere. My network security has dramatically improved, and I don’t have to configure port forwarding on my router every time I add a new device.
Once you’ve spent an afternoon setting things up, Pi VPN is almost unbelievably good. So many projects for Raspberry Pi are flashy and fun, but ultimately pretty useless. I’m happy to report that Pi VPN is a huge exception.
“Raspberry Pi” by Lucasbosch licensed under CC 3.0


Hello,
Is it possible to configure an Access Point for the Pi after having setup the incoming and outgoing VPN connections? Or would/should you start over?
Hi Bob! It sure is. That’d be a great next step for a project like this.
You’d follow a guide like this https://www.raspberrypi.org/documentation/configuration/wireless/access-point.md but change iptables POSTROUTING to use ‘tun-outgoing’ in place of ‘eth0’ as a start. This would be a good project for a Raspi 4 since you’d want fast wifi & you’d want to learn about iptables before tackling it
You will get faster speeds with a regular VPN router if there’s more than a handful of people connected
In this line ‘route 192.168.1.0 255.255.255.0 192.168.1.1’
what is ‘192.16.1.0’ and ‘192.168.1.1’?
As the pi network address is ‘192.168.1.2’
Hi! 192.168.1.0 refers to your home network or the entire subnet from 192.168.1.1 to 192.168.1.254. 192.168.1.1 refers to the gateway router on that subnet.
So that line is telling the pi to send all traffic for your home network to the gateway router. That’s important if you want to access other computers on your home network through the VPN connection.
Why does this article specify Pi 2 and 3 only? I followed this guide for a first generation Pi and it woks great!
Hey, thanks Adam! I only had a Raspi 2B and 3B for testing. It’s good to know the first gen works too. I assume this will also work on a Pi 0 or 0W but w/higher latency & lower throughput so at slower overall speed.
Hello,
I trust that all is well.
Thank you for such a wonderful how-to guide on setting up Pi as a VPN Server.
I thoroughly followed your steps and my VPN server was not starting. Despite that, i ran Curl ifconfig.me and i was getting a strange public ip indicating that i was connected to the IPVanish server. I also was able to see tx and rx increases on the interfaces, indicating that there was a connection or at lease the vpn was running.
The browsing utility to assist with creating the vpn client profiles was not working as a result, it had to be done via the cli. funny enough, after its created via the cli, the gui shows the profile.?????
It also appears that the VPN profiles are not connecting to the server, i have followed this thoroughly with the exception of changing my internal ip address.
Is there any chance that you could have a look at the steps in the guide for any errors or left out lines?
Many thanks
I tried to log in to the pivpn gui too many times and got locked out
how can I reset this?
Hi, I installed pivpn-gui and it worked
But now I dont know the login and because i tried too many times it says to contact admin.
what can I do and what is my login?
sudo nano /etc/apache2/apache2.conf
You changed to:
User pi
Group pi
I just removed the line group and it worked.
Dont ask why, it was trail and error .
Good luck
You know what…the effort put into producing this guide is simple amazing. I am extremely appreciative that i was able to use this to get started with my own project.
Many Many thanks for you hard work!
This is probably the most well written and informative guides out there,
Thank you for this fine piece of work!
It looks like I forgot my password for logging in the web interface and now I’m getting a “Too many login attempts, please contact the system administrator.” message. How do I unlock this?
You’ll need to clear the file in /var/www/html/pivpn-gui/app/blocked_ip/ that corresponds to your IP address. To clear all blocked IPs, you could use this command: sudo rm -f /var/www/html/pivpn-gui/app/blocked_ip/*
I have the same issue :/
Hi Robert, you’ll need to clear the file in /var/www/html/pivpn-gui/app/blocked_ip/ that corresponds to your IP address. To clear all blocked IPs, you could use this command: sudo rm -f /var/www/html/pivpn-gui/app/blocked_ip/*
I’m having an issue. I can connect to the VPN from externally, however when I start the outgoing server to my private internet access VPN, I can no longer connect and get a TLS handshake error. Any idea what would be blocking the connection when my outgoing.conf service is started?
Not sure if you are still looking at replies but…
Everything seems to work for me except the login. No matter which username and password i use it says Login Failed.
I’ve rebooted
Hi Aaron,
Great guide so far…
I’m trying to install pivpn on a Rasp 4, this is my first experience with this beast and I’m not familiar with this kind of programming..
Using the “curl -L https://install.pivpn.io/ | bash” installer is going good, however, the process stop just right after I chose the encryption level.
(also here I can chose between: 256, 384 or 512-bit) ?
I get these messages:
gzip: stdin: unexpected end of file
tar: Child returned status 1
tar: Error is not recoverable: exiting now
chown: cannot access ‘/etc/openvpn/easy-rsa’: No such file or directory
mkdir: cannot create directory ‘/etc/openvpn/easy-rsa/pki’: No such file or directory
main: line 825: cd: /etc/openvpn/easy-rsa: No such file or directory
Do you have a hint what is wrong here and what to do in order to continue with the installation?
Hi,
It is possible to give some tips or guide how to get Pi VPN Gui working in the Debian stretch OS?
It’s quite a hassle to add user to pi vpn without the web interface.
Kind regards,
Thijs
900/5000
Great explanation how you can turn Raspberry Pi into a VPN server.
When I use the PiVPN GUI and want to create a profile I get the message that it has succeeded. However, I cannot find the profile in the PiVPN GUI or on the RaspberryPi if I log in via ssh and look in the ovpns folder. Could PiVPN GUI not work with PHP7.3?
I use NordVPN and as soon as I switch on this configuration I can no longer connect via SSH and OpenVPN on port 1194 udp from my iPhone or laptop. If I put the following option in the outgoing.conf: route-nopull so that no routes are added by NordVPN I can connect to SSH and OpenVPN on port 1194 UDP but I get to see my external IP from my internet connection instead of NordVPN. I have added the routes as in your tutorial and I also see them when I execute ip route.
Any idea?
Hi Aaron, thanks for an amazing article – I really enjoyed working through it and have everything setup.
However I have one problem. I have setup the double hop using privateinternetaccess as the VPN. My OpenVPN mobile client connects to the pi but I get ‘no internet’ when trying to browse. If I stop the openvpn outgoing service on the pi the mobile client can browse but obviously it’s using the insecure, non double-hop connection.
Using the browser on the raspberry pi itself with the outgoing VPN service started, works fine, i.e., the pi is using the VPN service via openvpn.
I guess it’s the routing tables and I’ve checked and checked that I have the same settings you detail (my home network IPs are the same as yours) but to no avail. Is there another IP I need to re-route?
Any hints or tips much appreciated.
Hello Aaron,
I sent a message before but for some reason it wasn’t published.
I’ve reached the point in your instructions where you need to log into the PIVPN GUI. For some reason it will not accept the credentials that I use to log into the raspberry pi.
Is there a simple way to fix this? Any Help would be appreciated.
Regards,
Jono
Hi Aaron,
Excellent article that your have written on setting up a pivpn gui!
I’ve been following it to the point where you have to put the user “pi” then a password. Stupid question but- what password should be entered? I tried root, but now I’m locked out. It says contact the system administrator.
I would appreciate you expert advice:) cheers from Perth Western Australia
Hello and thanks for the excellent guide. I followed the guide step by step but I cannot connect to the LAN devices using the raspberry as a gateway. What could be the problem?
Hi,
I’ve followed your tutorial on a fresh rasbian install. Everything works fine except the double hop portion.
Without the outgoing server I can vpn in and it appears as if I’m on my home network to the connected device.
When the double hop is active (in my case Nord VPN) I can connect to the VPN and I can browse to ip addresses in my home network – e.g. I can ssh to ip addresses. However – I can’t access any websites – it just times out.
Looking through the comments I see you’ve advised people to double check the routing table additions – I’ve done this and think it’s ok. My PI ip is 192.168.0.3 so I’ve put this in the “from” line and my router is 192.168.0.1 – so I’ve put this as the “via”
Any help appreciated
If your using a separate dhcp server (e.g. the one built into pihole) – how does this effect the routing? My setup is with pihole and the openvpn both on the same machine. (I’ve set the dns to the pihole i.e. the address of the pi) – without the outgoinging tunnel (and the routining in /lib/dhcpcd/dhcpd-hooks) all is ok i.e. a standard vpn setup.
When I add in the ougoing tunnel and the routing I can connect to the vpn, I can visit my internal network but I can’t browse anywhere – i.e. websites don’t work.
Thanks for any help
I have a problem. What I am trying to do is to get access to multiple pi’s from my laptop (to automate deployment across few pis in different places on this planet).
I installed everything fine, and all of my clients can successfully connect to the OpenVPN server. I also set up proper static IPs for clients that need it. I don’t have external (like Nord) VPN set up, because that’s not the main purpose I need VPN for. Once client connects, I can ping 10.8.0.1 just fine. However, I can’t ping any other client, and the server can’t ping other clients, either.
I’ve spent a few days already trying various configurations, but clients still can’t ping eachother. I was googling this issue a lot, but nothing helped so far.
I see you are still replying to comments, so here I am, hoping you see this and will be able to help me solve this issue.
Hey, thanks for reading. You’ll need to edit /etc/openvpn/incoming.conf and add the line ‘client-to-client’ in order to enable client-to-client communication.
You can also handle this with iptables rules if you need granular control over which clients are allowed to communicate with each other. More on that here https://backreference.org/2010/05/02/controlling-client-to-client-connections-in-openvpn/
Aaron:
I have a question. In route 192.168.1.0 255.255.255.0 192.168.1.1, what is the first numbers for? (I undersatand that the second is the Netmask and the thirs is the Getway address).
Thank you.
Aaron, thank you for your prompt answer.
Two questions:
1) From your answer, can I assume that putting the same address (my router has similar subsets) it may work?
2) If the answer to the first question is NO, then what is the best way to determine this “internet address”?
Yep! If your router is on 192.168.1.1 then the network address will be 192.168.1.0, and it will work as written.
Hey Jack, thanks for reading. Good question!
192.168.1.0 is a ‘network address’
So the command is saying ‘route traffic to any IP address on the 192.168.1 network through 192.168.1.1’
Now, it’s a bit trickier than that when you look at the netmask & a few other things. But in this context, the command makes sure that traffic on your local network stays on your local network instead of going out through the VPN. Without that route you won’t be able to access computers on your LAN through the VPN.
Hi,
Great tutorial, had a problem with routing traffic thru my IP
Router ip address is 192.168.0.1
pi is 192.168.0.2
so am i correct to use ‘route 192.168.0.0 255.255.255.0 192.168.0.1’?
i got no responses from trying to start the outgoing service, does this mean that the service is not started?
Thank you very much, Aaron, for your prompt response.
From your answer, can I assume that if I use the same IP address as you (my router has similar subsets) it may work? What do you suggest is the best way to find a suitable “internet address” to enter in this step?
Hi Aaron, I have a question for you as I am trying to implement this as it is exactly what I need. What is the 192.168.1.0 address for?
In other words, the doubt is in this line: route 192.168.1.0 255.255.255.0 192.168.1.1 (the second number is your net mask and the third is the gateway, but the question is the first).
Thanks for your help
Hi Aaron,
Lovely article thanks! Went through it with only change of using NORDVPN. Now if I dont start the outgoing everythings works like a charm. As soon as I do start it, it will connect to NordVPN, but than my clients could not connect to the OpenVPN – it all ends up with server poll timeout.
Any clue where I might be going wrong?
Any help is much appreciated!
Regards,
Roman
Hey Roman, I believe you need to update your routing table. Try this https://cdn.comparitech.com/wp-content/uploads/2018/07/routes.jpg
Yup, there is a typo in the article. Not in the instructions, but in the code line: sudo nano /etc/dchpcd.conf . Thanks for a great guide Aaron!
Thanks Mark, got it fixed
Hi Aaron,
This is ABSOLUTELY FANTASTIC. i have installed the PiVPN and PiHole successfully. I can connect from the outside network as well using OpenVPN. The only issue i am getting is that i can only connect the RasPi (192.168.2.251) and the ASUS 5300 Router (192.168.2.1) but cannot access any other machines on the Network e.g. 192.168.2.99 – 192.168.2.150.
I have added port forwarding on the ASUS for the RasPi and the port which i had configured the PiVPN for but doesn’t seem to work.
What am i missing here. Any help is appreciated
Thanks a lot for great tutorial. But there is a minor error in setting static IP. Please edit the correct file name to /etc/dhcpcd.conf.
Hi Aaron, I’m new to this and a little fuzzy on a couple points.
1. Will setting up Pivpn on the pi force all home network traffic to go through the paid vpn or only set up the server so those clients with a copied openvpn profile and username have the option to use the vpn by enabling/disabling vpn client side? Stated another way, I’m trying to understand if this setup with pivpn and pihole will still allow nonVPN traffic on the home network or whether it forces home clients to use the paid vpn. If I understand correctly, this setup allows only clients that enable the VPN to connect and all other traffic passes as if there were no vpn server on the pi.
2. The whole pi firewall thing. I’ve used ufw on linux but iptables looks like dangerous greek. Should I install ufw and a gui on rpi to look at firewall rules or could you explain (as if i were 5 yrs old) what you are doing in the section and how to ensure that the pi is secure when opening a port to the internet?
3. Lastly, would I be correct in assuming that this setup would affect RDP or sFTP connections from a mobile device to my home network in some way? I’ve been connecting to my PC from my phone from outside the network for things such as a Plex server but you seem to favor setting up a file server on the Pi itself, presumably closing all other ports to the home network in the process.
Any insight is appreciated, thank you for possibly the most detailed guide currently available.
Hey Adi, thanks for reading.
1. It will only force PiVPN clients to use the third-party VPN if you set one up. You can absolutely use your Pi as a VPN router on your LAN, but you’ll need to allow traffic IN from /dev/eth0 to travel OUT through /dev/tun-outgoing. I believe that will be the only additional step. You’ll want to do that with UFW, then make sure computers on your LAN are using the Pi as their gateway.
2. UFW works great! If you’re more comfortable with it, you should absolutely use it.
3. When your devices is connected to the VPN, you’ll be able to access LAN services using a local IP address. Or in other words, every device connected to PiVPN gets a local address just like you were connected to WiFi at home. And you nailed it, when your VPN is up and running you’ll be able to disable a lot of port forwarding and make your network more secure.
I do like raspi fileservers, especially now that the Pi 4 is out and we get full USB3 speed. But if you already have a NAS or something you’ll be able to connect using the local IP address, even if you’re out of the house, as long as your VPN connection is active.
Good luck! Feel free to post your UFW config here when you get it up and running.
Hello Aron. Thank you for your tutorial.
I can’t use my piVPN like gateway on my LAN.
Can you explain step by step?
Thank you
https://arashmilani.com/post?id=53
This is the ONLY other resource that I’ve found even mentioning IP tables and this is actually show on the video on the pivpn website: https://www.youtube.com/watch?v=pUBMcsvJfe4
12 minutes in he talks about IP tables, I don’t know if this will help other people as well who are stumbling on the firewall portion of this setup.
Thank you so much for responding. I’m trying to follow this guide as well as your Pi hole guide. Please allow me clarify as best I can what I meant in the earlier post.
1. My edgerouter X has my PI static IP set as nameserver to allow my Pi hole to block ads network-wide.
1a. Does this mean that my LAN is using the Pi as their gateway as a result?( I believe this means that only DNS traffic is currently routed through the Pi while all other traffic goes through the router.)
1b. Would setting up Pi as VPN router (without a third party VPN) change this behavior in any way for normal (nonVPN) traffic?
1c. Would setting up a paid VPN, for example the ExpressVPN that your website now suggests,
1d. Am I correct in assuming that two different things are meant by “Pi with VPN Server” and “Pi as VPN router”?
2a. Is the purpose of your “Lock down the firewall” section ONLY to secure the open port to the internet or does it accomplish something else that I cannot decipher?
Every other guide I’ve found on google searched websites, reddit, or youtube makes virtually no mention of post install firewall configuration which suggests that a whole lot of folks might be exposing pi’s port without proper protection. Although, they might simply be relying on their router firewall and some fail2ban-like solution.
Hi all,
So after doing some additional testing, I decided not to update this article to use OpenRSD. It adds a lot of features, but this is already long enough without all that. So I’m staying with pivpn-gui, I’ve forked the repo so I can maintain a copy of the codebase (that I won’t delete suddenly), and updated the article to reflect that.
I’ve confirmed this version of pivpn-gui works as expected
The author of pivpn-gui, Mitchell Urgero, recommends you download and install OpenRSD instead. It can be found here: https://github.com/mitchellurgero/openrsd
Hi Aaron,
Thank you for the detailed Instructions. This is fantastic..
I have the following issues though
1. The VPN GUI is installed and I can see the login page as well but when I try to login using the credentials Pi and the password I have for the Pi user it just keeps saying incorrect username or password.
2. I can access the VPN from outside my network (no issues there) but once I connected to the VPN I cannot access any of my local machines / servers
My Pi IP is 192.168.2.251 (Static) and my Main router is 192.168.2.1. I have added the port Forwarding so I can connect from outside but #2 issue still persists.
Any Help would be appreciated
I have the same problem
FABULOUS blog! I am happy to report that I followed this successfully to create a single-hop VPN using a RaspberryPi 4B running Raspbian Buster. The only thing not fully working yet is the pivpn-gui login. The web-app runs, but I cannot login for some reason. (I’ve added the proper user, directory permissions, etc.) Fortunately, I can use the pivpn add commands successfully. Kudos for an especially comprehensive set of instructions!
-Mike
As I mentioned earlier, I really enjoyed this blog – it helped me get going quickly.
Now, to attempt to provide a small return favor:
If you want an email when one connects by VPN and another when disconnecting, you can do the following:
Set up postfix on your raspberry pi:
This article was easy to follow and works well: https://blog.dantup.com/2016/04/setting-up-raspberry-pi-raspbian-jessie-to-send-email/
Then, create your connect and disconnect scripts, following the example here (mikej1234’s example): https://forums.openvpn.net/viewtopic.php?t=10024
At the end of your /etc/openvpn/server.conf, add the following lines:
script-security 3
client-connect path-to-your-script/connect-script
client-disconnect path-to-your-script/disconnect-script
That’s it!
Hey Hey
Great article, also only one like it on the web from what I can see.
Would you mind updating it as I believe certain components are not working anymore, specifically the routing.
I have a problem with my devices not being able to connect to the server (even on a local connection).
Hi Aaron,
I really enjoyed installing this vpn server on the raspberry pi 3. The information given is really intuitive. I am encountering a problem regarding the connectivity to my home network. When I connect using my OpenVPN GUI from my windows laptop it’s connected fine, bubble lights green and shows an IP address 10.8.0.2 . I am still not able to connect to my network which is on a 192.168.x.x. Am I missing something from the litreture?
Noel
Hi Aaron,
Many thanks for this tutorial, it’s exactly what I’ve been looking for. BUT I just can’t get the “double hop” working. I’ve tried changing the protocol for incoming and outgoing connections and I just can’t seem to get both connections running at the same time.
If the outgoing connection is running the incoming doesn’t connect, it just times out and fails. If I stop the outgoing the incoming works just fine, until I start the outgoing again.
It happens if outgoing is UPD & incoming is TCP – when both are TCP.
And I’m stuck, I’ve even tried separating the incoming and outgoing servers onto separate Pi’s, and pointed the incoming to the outgoing as its default gateway, this also doesn’t seem to work (which I was really hoping it would).
Any help would be most appreciated.
when you are going to make the clone you are asked for an usury and a password. How could I retreat and pass?
This seems like an excellent guide, I’ve been wanting to do this for a long time, might give it a go now when I have some time.
I just have one question – what happens if I don’t give all my devices a profile, could they access the internet normally through my router, just without the VPN benefits? I.e. if my Apple TV just remains connected through the router instead of having a profile, will it work? I wasn’t sure, so wanted to ask because I wanted to use this only for my smartphone and laptop.
Also, is there a way to “disable” the VPN easily on laptop/smartphone? My guess is just stop the OpenVPN app to access the net normally, right?
Anyway, thanks, looking forward to giving it a go!
In the section where you add the “Exception for the LAN” I’m not understanding the “192.168.1.0 255.255.255.0 192.168.1.1” part. My network is set up for the 10.0.0.0 configuration, other than that it’s been smooth sailing. what do I put for the first and last parts?
I realise this is a relatively old article but I’m hoping you can answer anyway. Why is a VPN provider (“Choosing a VPN provider”, the second main section of the article) needed? I thought the whole purpose, as expressed in the article, of setting up one’s own VPN server (at home) was to enable (1) secure connection to one’s home LAN from ‘outside’, (2) secure connection to the internet from mobile devices when ‘outside’ (ie using the home LAN as the internet gateway), and (2) avoiding website filtering at e.g. a college or university by, again, using one’s home LAN as the internet gateway. If you subscribe to a commercial VPN service then you can surely just connect to that directly, negating the need to route the traffic through a VPN server at home?
Hi Howard, this project is, optionally, a double-hop VPN that will give you access to your home network remotely and also encrypt your internet connection with a consumer VPN. Without a paid VPN service you’ll be able to access your home network through an encrypted tunnel as expected.
Hi Aaron… this was what i was looking for: the double hub. THX
I ran into this little issue when installing the gui:
i need to add a user and password bu pi and correct password dont work
pi@pivpn:/var/www/html $ git clone https://github.com/mitchellurgero/pivpn-gui
Cloning into ‘pivpn-gui’…
Username for ‘https://github.com’:
Password for ‘https://pi@github.com’:
Greetings from Amsterdam
Eric
Hi Eric, thanks for reading! Apparently, per other comments here the maintainer shut down Pi VPN GUI and recommends OpenRSD instead. I’ll re-write this guide soon to include instructions for OpenRSD, but for now you can find an install guide here: https://github.com/mitchellurgero/openrsd
You’ll be able to manage your user accounts in PiVPN using OpenRSD instead of PiVPN GUI
If you have problems with the OpenRSD install you can post them here and I’ll support you as best I can
Hi Aaron,
I’m running into an issue where (I think) the bash shell isn’t finding the pivpn command in the app directory. Here’s the output I get in the pivpn GUI when I try to create a user:
Notification : spawn /bin/bash
pivpn add nopass
root@legends:/var/www/html/pivpn-gui/app# pivpn add nopass
bash: pivpn: command not found
root@legends:/var/www/html/pivpn-gui/app# oakforest
bash: oakforest: command not found
root@legends:/var/www/html/pivpn-gui/app#
I understand what you’re saying about this not being supported software at this point, but would they have gone in and broken functionality of an already-released version, or am I screwing up a step somewhere?
Also, I see the recommendation to go to OpenRSD. My main interest in the GUI is not having to copy a tunnel key to a notepad or an email or anything. Does OpenRSD provide that same functionality?
Thanks!!
When I try to get the VPN GUI it gives me a username / password for cloning from git hub?
https://github.com/mitchellurgero/pivpn-gui/
do you get the same?
The following is the list from firewall after recommended changes. Is this right?
I also tried to check if VPN works, trying to connect from the same local network over VPN.
Connection does not open (I modified config accordingly, I mean I wrote local ip address of raspberry into openvpn config.
What can be the reason?
pi@raspberrypi:~ $ sudo iptables -L
Chain INPUT (policy ACCEPT)
target prot opt source destination
ACCEPT udp — anywhere anywhere state NEW udp dpt:openvpn
ACCEPT all — anywhere anywhere
ACCEPT all — anywhere anywhere
Chain FORWARD (policy ACCEPT)
target prot opt source destination
ACCEPT all — anywhere anywhere
ACCEPT all — anywhere anywhere
ACCEPT all — anywhere anywhere state RELATED,ESTABLISHED
ACCEPT all — anywhere anywhere state RELATED,ESTABLISHED
ACCEPT all — anywhere anywhere state RELATED,ESTABLISHED
ACCEPT all — anywhere anywhere state RELATED,ESTABLISHED
ACCEPT all — anywhere anywhere state RELATED,ESTABLISHED
ACCEPT all — anywhere anywhere state RELATED,ESTABLISHED
ACCEPT all — anywhere anywhere state RELATED,ESTABLISHED
Chain OUTPUT (policy ACCEPT)
target prot opt source destination
Hi there,
When trying to access the gui, I keep getting the “You must be logged in to view this page!” even though I am logged in.
Any help appreciated..
Thanks
Getting following error at last step of creating ovpn file.
error tls-auth key not found ta.key
Hey Aaron,
I just want to make sure I’m fully understanding. How do you connect to the home network from abroad? WIll it automatically connect if I am connected to wifi at another location? it sounds like the path directly to the home network is downloaded directly onto the phone, I just want to make sure I’m not misunderstanding.
Thanks for the instructions.
Having issue of vpn user to connect, when running both incoming and outgoing VPN servers. Incoming only works fine, as soon as I enable outgoing, I get errors for any client connect attempt:
TLS Error: incoming packet authentication failed from [AF_INET]x.x.x.x:6894
Authenticate/Decrypt packet error: bad packet ID (may be a replay)
Are you running both incoming and ougoing connections through UDP?
Yes, both are running through UDP, I changed port for incoming server to differ from default 1194.
Each of the servers running fine on its own. When both are on, outgoing server works, incoming server looks operational, but no client can connect. As soon as I stop outgoing server, incoming connections work right away. Seems like a conflict for packets routing.
I re-deployed everything once again to make sure I did not miss anything. Errors with verbose level 6 are as as below:
Jan 13 23:19:47 mypi ovpn-server[5649]: x.x.x.x:29892 PID_ERR replay [0] [TLS_WRAP-0] [6] 1547421580:1 1547421580:1 t=1547421587[0] r=[0,64,15,0,1] sl=[63,1,64,272]
Jan 13 23:19:47 mypi ovpn-server[5649]: x.x.x.x:29892 tls-crypt unwrap error: bad packet ID (may be a replay): [ #1 / time = (1547421580) Sun Jan 13 23:19:40 2019 ] — see the man page entry for –no-replay and –replay-window for more info or silence this warning with –mute-replay-warnings
Jan 13 23:19:47 mypi ovpn-server[5649]: x.x.x.x:29892 tls-crypt unwrap error: packet replay
Jan 13 23:19:47 mypi ovpn-server[5649]: x.x.x.x:29892 TLS Error: tls-crypt unwrapping failed from [AF_INET]x.x.x.x:29892
Jan 13 23:19:47 mypi ovpn-server[5649]: x.x.x.x:29892 UDPv4 WRITE [54] to [AF_INET]x.x.x.x:29892: P_CONTROL_HARD_RESET_SERVER_V2 kid=0 [ ] pid=860 DATA len=40
I’m afraid you’ll have to reinstall PiVPN using TCP or download a TCP config for your outbound connection from your VPN provider. One or both connections have to use TCP. I’m not sure why UDP won’t work in this configuration, it seems to me like the port numbers should be enough to differentiate. But it doesn’t seem to. I mentioned it in passing during PiVPN setup steps but I never mentioned what happens if you use UDP for both. It’s this, these weird connection issues that shut everything down.
Hello Aaron,\
I’m very happy with this tutorial. I installed the first part and got it working. On my Android smartphone I get the login page, but after login I got the message : “You must be logged in to view this page!”.
What to do now?
Thanks.
If you can interpret the PHP from the pivpn-gui files, you can remove the error and restart the service. Not an expert but pretty sure it was a broken if statement.
/home/pi/pivpn-gui/app/profile.php
Thanks so much for sharing Sam, I didn’t even think about fixing the stupid thing myself.
When this gets an update I’ll either fork and fix pivpn-gui (creator shut it down but it’s simple and I like it, and open source projects are never REALLY dead) or rewrite for https://github.com/mitchellurgero/openrsd
Asthe creator of PiVPN-GUI, It’s actually dead. Use OpenRSD instead which has a better built gui (same style)
Thank you for the link,
Could you please help with the following:
now I have folder “openrsd” in www/html/
After opening URL http://192.168.1.22/openrsd/index.php,
I see the Sign In page,
but with correct pi login/password, i get following error message:
Warning: touch(): Unable to create file app/auth_log/04-05-2019.log because Permission denied in /var/www/html/openrsd/app/auth.php on line 14
Warning: file_put_contents(app/auth_log/04-05-2019.log): failed to open stream: Permission denied in /var/www/html/openrsd/app/auth.php on line 43
The login does not perform.
First thanks a lot for this very complete explanation.
My VPN works but it is very slow. With my smartphone connected in 4G I cann connect to my client profil (with OpenVPN) and acces to local adress but it is very very slow. I can’t access to my local webcam adress.
I chose recommandated level ancryption, and UDP port. I don’t use DNS, chose Google DNS provider.
I didn’t install IPVanish as an outbound VPN.
Do you know what’s wrong with my configuration ?
Thanks
The following line is incorrect:
sudo nano /etc/dchpcd.conf
should be dhcpcd.conf
Hello, this is probably the best post ever on this topic.
But, I don’t know if I want to go with Ip vanish, it’s a little more than I might want to pay as a teen.
I’am a little confused on how to get around the problem with changing the vpn service. I did read the post above about express vpn but being new to coding on the raspberry pi I’am not that great 🙁
https://www.tunnelbear.com/blog/linux_support/
Do you think this would work?
Please let me know 🙂
Hi,
Firstly, one of the best and most comprehensive tutorials I think I’ve ever read. There are too many out there that just give you the basic information and expect you to fill in the blanks!
THANK YOU!
I have one problem though, when try and login, I put the username: pi and the password which I use to login to the Pi, this is where the problem starts.
It says ‘Logged in as pi’ at the top right but the main page says ‘You must be logged in to view this page!’ and I can’t access any of the other parts of the page.
Any ideas please?
Thanks very much
And you can try to delete cache of browser. In chrome it would be ctrl + shift + delete
I went into the PHP files on the Pi and deleted the broken if statement at the top. if you feel comfortable changing the source code, the file is here:
/var/www/html/pivpn-gui/app/profile.php
I tried this, I commented out the if statement lines – but I continue to get the same error.
So I restarted Apache (systemctl restart apache2.service) and rebooted the Raspberry Pi. Still get the same error.
Then added another die statement with a “hello” message to make sure my updated profile.php is actually used. Did not work. So it seems my edits to profile.php are not coming into effect, or this profile.php file is not used at all.
Can anyone please help further?
Thanks Jamie, I’ll update my fork of PiVPN-GUI. I appreciate it.
Switch to using OpenRSD, this pivpn-gui is dead. https://github.com/mitchellurgero/openrsd
When I do run the sudo nano /etc/dchpcd.conf. the file is completely empty. What is wrong? I am using wifi and not ethernet.
Try /etc/dhcpcd.conf
I bet that’s it. Maybe you misread, or there’s a typo in the article?
Hi,
Thanks fro this, it is excellent and I am slowly working through it, slowly but successfully.
I live over seas and when I have finished, I want to place the Pi VPN server at my parents house in my orginal country so that I can VPN through and stream TV that I cannot current acess from my overseas address. Fingers crossed…
I am thinking ahead because now I have to wait to return home to make the physical instalation and complete the router port forwarding but until I can do that I was thinking……
Why can I not connect using the Windows 10 inbuilt VPN connection?
It is not offered in the tutorial, you seem to favour third party software such as OpenVPN, but I would rather not purchase/subscribe/download another app if the inbuilt Windows 10 VPN client is adequate.
Do you have any advice on using and configuring the Windows 10 VPN connection for a beginner…..?
many thanks for your great work…..
Hi Richard, thanks for reading. It sounds like you have a good plan. If you’re not relying on the VPN for internet security, if all you ever want to do with it is stream video, use a lower encryption setting for a better experience. High quality encryption uses more bandwidth, and it’s noticeable with streaming video.
You can use any client you want. On my phone, I use the native client too. The Windows native client is harder to use because the certificate has to be imported. I’m not planning to write a guide on that, sorry. I recommend OpenVPN Connect for Windows. You can right-click the tray icon to import your *.ovpn profile.
You’ll need to generate new access certificates for all of the devices when you’re with your parents. The certificate contains the public IP address so it has to be generated on site.
Dear Aaron,
Thank for the help and the great guide.
I think I am nearly there. I took your advice and downloaded the OpenVPN Gui client.
I have created profiles and downloaded the .ovpn file to both an ipad and a Windows 10 laptop. Everything seems in order but I cannot make a connection. The Windows client provides some feedback, it tells me I have a TLS Error.
Fri Dec 14 15:10:50 2018 TLS Error: TLS key negotiation failed to occur within 60 seconds (check your network connectivity)
Fri Dec 14 15:10:50 2018 TLS Error: TLS handshake failed
I am confident I have a static I.p. and the open port is the same in the Pi and the router.
The only difference that I can see between my set up and your guide is that in the router configuration my router needs the Pie Mac address, not the static i.p.
I would appreciate any advice on the TLS Error, it is frustrating to be close but not able to establish the connection.
thanks,
rich
hi , do you found the solution , i have the same problem
FYI
The actual versions of Window 10 Home have ssh. You can call it in cmd as well as in PowerShell. Its very easy to copy from your tutorial, not only to the commandlines of ssh, but also in the nano window.
greatings
Thanks Jean! All of that is really helpful to know.
I’m stuck after the port forwarding part. I have the open VPN client set up for my phone and MacBook but can’t connect to my piVPN from either my phone or MacBook to download the profile files. Would it be an error in the port forwarding or something else?
Hi Jennifer. Okay, so it really sucks if you get stuck but I’ve been there. Yeah check port forwarding first. Double-check the server’s local IP address and make sure you’re forwarding the right ports to the right place. Make sure you generate new access certificates if you change something like the server’s hostname or public IP.
Maybe open one of the device certificates in notepad. Take a look at how the connection is configured. Is the public IP right? What about the port and protocol? Maybe forwarding is fine but your clients are messed up.
And then if you still can’t figure it out, have a look at the Open VPN logs and see if your connections are being rejected instead of not being forwarded properly.
You aren’t an XFinity user, are you?
If you keep posting I’ll try to help you figure it out tho
I’m an Xfinity user, how can I address this case?, I’m renting the router but can I get a new router instead?
i cant get the server to start
Hi Brian, can you go into a little more detail? Any error messages? Anything like that? What happens when you try to start it?
Hi, thanks for the detailed instructions.
If you can explain how can i use this with ExpressVpn. There is no direct link from the site for ovpn file, so i tried downloading to my pc and uploading to google drive. Didn`t work. Can you tell me how can i install the files in some different way.
Thanks
Hi, thanks for reading. It sounds like you’ve already downloaded the config file from Express, but in case anyone else needs a link the instructions are here.
I’d upload the file to your Google Drive or some other host and copy the URL. Then login to your VPN server via SSH (or just sit down at it) and use these commands:
cd /opt/openvpn
sudo wget [URL of the file]
sudo mv filename.ovpn filename.conf
You should be able to pick things up from there.
Best tutorial I’ve found so far, but I have a problem 🙁
Everything almost works until I try to go to a website while connected to the VPN, it simply doesn’t. I’ve tested this on an iPhone and Win10 PC.
The only part of the tutorial I didn’t do was the double hop and I don’t that was an issue.
Any idea where I went wrong?
Try this?
https://www.comparitech.com/blog/vpn-privacy/raspberry-pi-vpn/#Updating_your_Raspberry_Pis_routing_table
Same problem here. I added the routing info from the link but no success.
Regardless of my issue, this was the best tutorial I’ve ever seen. The only part of the tutorial I haven’t done is the double-hop section. Gonna hold off on that for now; but like I said, I have an issue lol.
So everything seemingly works for me right now (have to try a remote computer) except for the fact that I can’t connect to websites when I’m connected to my VPN. Any idea where I’m going wrong?
Try this and let me know?
https://www.comparitech.com/blog/vpn-privacy/raspberry-pi-vpn/#Updating_your_Raspberry_Pis_routing_table
OK so great article
–
when i get to the Downloading and installing the piVPN GUI
inside /var/www/html
–
“git clone https://github.com/mitchellurgero/pivpn-gui”
–
im receiving a message of
–
fatal: destination path ‘pivpn-gui’ already exists and is not an empty directory.
not too sure what i am doing wrong
–
I also have an issue when i typed in
–
sudo chown pi:pi -R /var/www
–
it responds
–
chown: invalid user: pi:pi
–
Even after I switch the user and group inside the apache2 config file.
Yikes, you’ve got two problems
The first one is with git. You’ve got to delete the old pi-vpn directory before you clone a new one.
sudo rm /var/www/html/pivpn-gui
The second problem is that you don’t have a ‘pi’ user. Are you running this on a pi with Raspbian? It’s okay though, just substitute ‘pi’ with your username.
When I try to clone the PiVPN I get
fatal: repository ‘https://guthub.com/mitchellurgero/pivpn-gui/’ not found
I’ve not tried the project (yet) but have spent a few days looks at posts/tutorials for advice. This looks excellent & exactly fits what I was looking for – just hope it works for me. Many thanks for taking the time to produce such a detail document ?
Hi David, I did the same thing before I wrote this. If you’ve got a Raspberry Pi running Raspbian Stretch you’ll be fine.
The article is very good but I lost a bit in the part of “Setting up an outbound VPN connection”, I just want to use it to connect to my home network, something simple. What steps should I skip from the guide?
Thank you very much and congratulations for the article.
Hi Matias, if you just want to connect to your LAN you can stop after Pi VPN GUI, just make sure to forward the VPN port.
Thanks pro a lot
I have pi2 and I want to make this project for my degree,thanks again for understandable guide a lot of respect for you?
Thanks for reading!
I love you.
Seriously. I’ve been trying to set this thing up for 5 days, two of which I haven’t slept and this guide was the first one that actually provided me with all the necessary information and steps for it to finally work.
Thanks
Thanks for reading!
I love you too, get some sleep.
Thanks alot for this understandable guide – appreciate it.
i have installed purevpn on raspberry pi3, few days ago and all it’s OK. But since yesterday i can connect to the vpn server from client , but i haven’t internet , and i can’t see my local network!
Do you have any idea?
Thanks