See also: the best VPNs for DD-WRT routers.
Contents [hide]
Where do I get a DD-WRT router?
Linksys produced the original WRT routers. The DD-WRT open source firmware of today is based on the Linksys WRT firmware developed for its WRT54G series of routers. The ‘DD’ part of DD-WRT is a hat tip to the license plate code for the city of Dresden, Germany, where the primary maintainer of the DD-WRT project lives.
Today, it’s possible to purchase routers already running DD-WRT from Linksys and other router manufacturers. It’s also possible to install DD-WRT on many other brands of routers that come with proprietary firmware installed. For example, my router is a TP-Link c1900 ArcherC9 that came with TP-Link firmware. I flashed it with the appropriate DD-WRT firmware and now it’s a DD-WRT router.
Why install OpenVPN on your router?
Your router as an OpenVPN client
Given that there is an OpenVPN client application for almost every computer, tablet, and phone on the market, it’s not always obvious why installing OpenVPN on your router can be an advantage.
Connecting your router directly to your VPN provider means that you don’t necessarily have to run VPN software on any of your devices. Hopefully you’re using WPA2 or some equivalent level of encryption on your internal network so it’s reasonable to assume that traffic is somewhat protected from prying eyes. But once your traffic hits the router, it passes through your ISP’s network on to its destination. Configuring your router as a VPN client ensures that the traffic leaving your router is encrypted as it passes through your ISP until it reaches the VPN egress point onto the public internet.
Advantages of running a VPN client on your router include:
- Only one connection to the VPN server is needed. This can help avoid connection limits set by some VPN providers.
- Many devices such as Apple TVs don’t have an easy way to install VPN software. By having the VPN software running on your router, all traffic from your network passes through the VPN seamlessly.
- The VPN is always on so you don’t have to remember to start it when you want to use it.
Your router as an OpenVPN server
Turning your router into an OpenVPN server means you will be able to access your home network from the outside. If you’re on the road but need to access documents or other computers on your internal networks, you can fire up an OpenVPN client, connect to your router’s OpenVPN server, and you’re in.
How do I turn my DD-WRT router into an OpenVPN client?
The DD-WRT firmware makes this very easy as it supports OpenVPN and PPTP style VPNs. PPTP is as a very insecure VPN protocol so we recommend OpenVPN over PPTP.
See also: Our VPN protocols cheat sheet.
Log in to your router. The login address of the DD-WRT administrative interface is usually 192.168.0.1, but you may have set up your network differently. Once you’re in, navigate to the Services tab, then to the VPN tab.
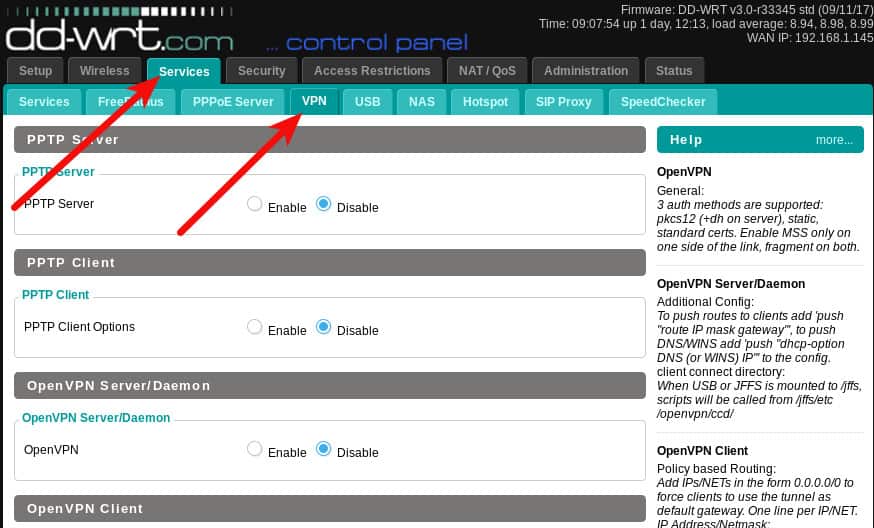
We are going to configure the OpenVPN client function of the router. The first thing you’ll need is an OpenVPN server to connect to. You may have built your own OpenVPN server or you may be using a VPN provider that supports OpenVPN. I’ll be using ProtonVPN for this article, but other than obtaining the OpenVPN configuration from Proton, there should be no significant difference in setting up different providers.
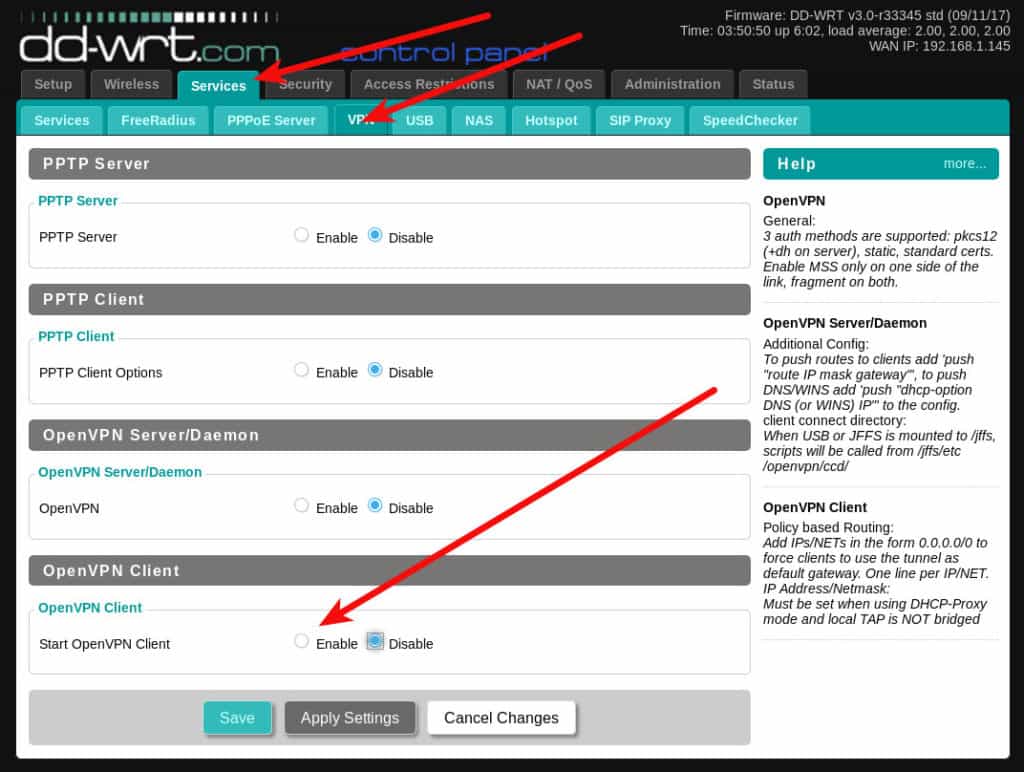
Enable the OpenVPN Client setting
Click the Enable radio button to expand the client settings.
Most VPN providers using OpenVPN will will provide a configuration file for you to use. In some cases, you’ll also need a username and password. The contents of any given OpenVPN configuration file can differ. It would be handy if the DD-WRT interface had an import function, but since it does not we have to try to identify what parts of the configuration file need to go into each field.
My ProtonVPN configuration file has some settings at the start, and then some certificate files in the end. I’ve indicated the few settings that you’ll need to manually configure on your DD-WRT router in this screenshot:

In the case of ProtonVPN, I also need to enter my username and password into the appropriate fields.
The remaining settings should be copied and pasted into the Additional Config field of the DD-WRT router.
At this point we want to save our settings by clicking the Save button at the bottom of the page. Security conscious people will want to do some further work on the router’s DNS settings prior to activating the VPN which is why I am not choosing to click the Apply Settings button yet.
Configure your DNS
When a VPN is active all of your traffic passes through it, encrypted, beyond the prying eyes of your local network and your ISP. However, in order to get anywhere at all on the internet, your computer needs to perform DNS lookups. DNS lookups resolve site domain names such as example.com to an IP address the computer can use. While those DNS lookups don’t contain any actual information about what you’re doing on any given site, they can provide an observer with a complete list of every site your computer has looked up and quite probably visited.
Some VPNs provide DNS services in addition to their VPN but you can also just set your router to use more anonymous DNS servers by making a quick configuration change.
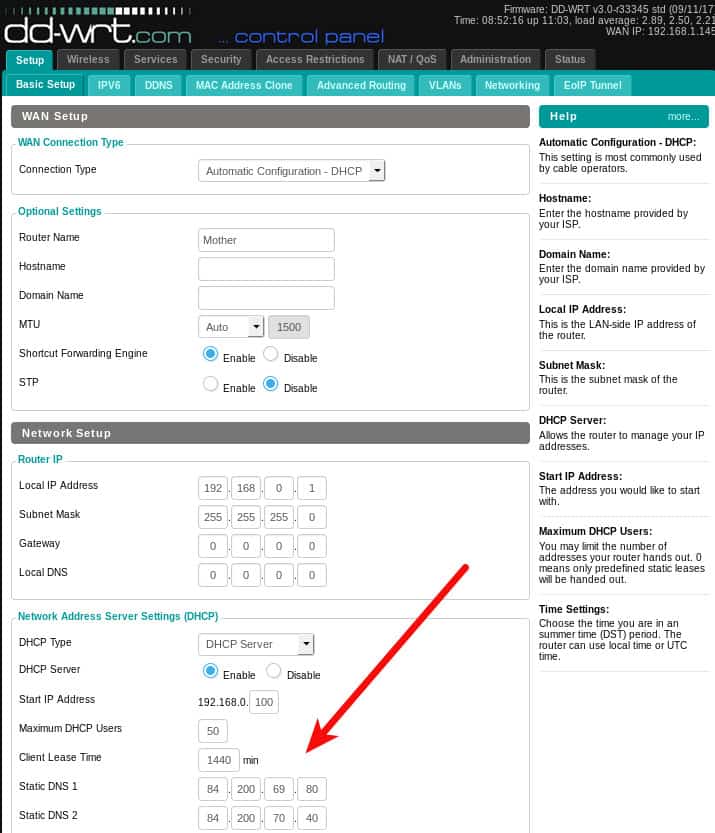
Navigate to the Setup -> Basic Setup tab and enter the DNS servers you’d prefer to use in the Static DNS fields. This example shows the DNS.WATCH servers.
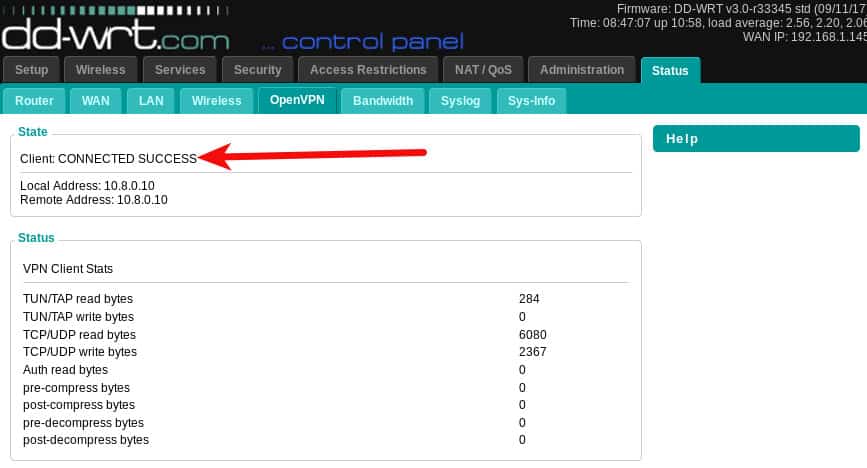
Click the Apply Settings button. Now you can start up the VPN. Go back to the Services -> VPN tab and click the Apply Settings button. Navigate to the Status -> OpenVPN tab and you should see the encouraging message Client: CONNECTED SUCCESS at the top. Note that the OpenVPN status tab does not exist until the OpenVPN service is enabled.
Your router is now sending all traffic from its connected devices through the VPN.
You can confirm your DNS settings are working by using our DNS Leak Test.
To disable the VPN, navigate back to the OpenVPN tab, click the Disable radio button and then click the Apply Settings button at the bottom. The OpenVPN settings pane will collapse when you disable it, but your settings will remain in place for the next time you enable it.
How do I turn my DD-WRT router into an OpenVPN server?
The first step is to generate some certificates and keys for the OpenVPN server to use. The easiest way to do this is to install OpenVPN on your computer and use its utilities to generate the necessary files. Find instructions about how to do that for Windows systems on the OpenVPN site. Linux users can use the commands below. If you’re interested in more background on the full setup, I have a more complete Linux OpenVPN setup article here. Note that although we are not actually installing an OpenVPN server this time (the router will be the server) we still need to do some of the same work to generate certificates.
For Ubuntu and other Debian-based users, install openvpn and the easy-rsa packages:
sudo apt-get intstall openvpn easy-rsaYou’ll need to use yum or a similar package manager for RedHat-based distros. The package names should be the same or very similar.
Create a directory to work in, I’m calling mine openvpn
mkdir openvpn; cd openvpnNow run the certificate generation commands. Paste these exactly including the dots:
/usr/bin/make-cadir CA
cd CA
source ./vars
./clean-all
./build-ca
./build-key-server server
./build-dh
./build-key client
cd keys; openvpn --genkey --secret pfs.key
Note that some of the commands will prompt for location information to be incorporated into the certificate. It’s fine to leave the defaults and maybe even desirable since that information can be read by anyone. If you want to customize it for some reason, you can update lines 64 to 69 CA/vars file with the location information you’d prefer to use. The defaults are:
export KEY_COUNTRY="US"
export KEY_PROVINCE="CA"
export KEY_CITY="SanFrancisco"
export KEY_ORG="Fort-Funston"
export KEY_EMAIL="me@myhost.mydomain"
export KEY_OU="MyOrganizationalUnit"
At the end of the two key generation sequences you will be asked to provide a challenge passphrase. Do not provide this for the server key because it will prevent OpenVPN from being able to start unattended. You may also wish to leave the client key without a password because some OpenVPN clients don’t have a way for you to supply that at connection time. To get past those prompts without providing a password just hit the enter key.
Note that the last command is optional but desirable. It is the key that will allow your router to provide Perfect Forward Secrecy (PFS). PFS allows your VPN connection to negotiate a new static key periodically during your session. This provides added security in the event that your private keys are ever compromised. Without PFS, all your past VPN connections can be decrypted by anyone with your private key. With PFS that’s not possible because the key changes periodically and the superseded key disappears in a puff of smoke.
At this point you should now have a bunch of key and certificate files in the CA/keys directory:
$ ls -1 CA/keys/
01.pem
02.pem
ca.crt
ca.key
client.crt
client.csr
client.key
dh2048.pem
index.txt
index.txt.attr
index.txt.attr.old
index.txt.old
serial
serial.old
server.crt
server.csr
server.key
pfs.key
We only need a few of these. Open the following files in a text editor such as notepad or vi. Do not use any kind of word processor. Copy the values and paste them into the corresponding field of the DD-WRT OpenVPN Server/Daemon page. On the router administrator interface, navigate to Services -> VPN and click the Enable radio button in the OpenVPN Server/Daemon section.
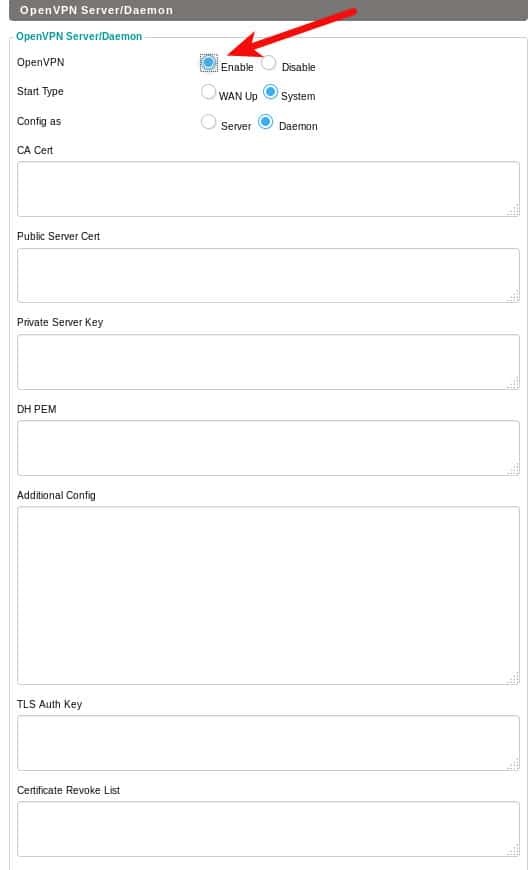
- Paste the ca.crt into the CA Cert field
- Paste the server.crt into the Public Server Cert field
- Paste the server.key into the Private Server Key field
- Paste the dh2048.pem into the DH PEM field
- Paste the pfs.key into the TLS Auth Key (assuming you created this key)
If you’re especially paranoid you can specify a Certificate Revoke List. This will tell the OpenVPN server to check the revocation list before accepting any certificate from a connecting client. Setting up and using a CRL is little advanced for this article.
Click the Apply settings button and your VPN server should start. You can visit the Status-> OpenVPN page to see the connection status. Note that this time, the message says Server: CONNECTED SUCCESS rather that Client: CONNECTED SUCCESS that you saw when the client was running.

The next step is to generate a client configuration file that you can use on your devices to connect to your new OpenVPN server. It’s important that certain settings on each side (client/server) compliment each other. I ended up with a client configuration that looks like this:
client
dev tun
proto udp
remote YOUR_IP_ADDRESS 1194
cipher AES-256-CBC
tls-cipher TLS-DHE-RSA-WITH-AES-256-CBC-SHA
auth sha256
comp-lzo
link-mtu 1570

<key>
-----BEGIN PRIVATE KEY-----
Copy the contents of your client.key file and paste it here.
-----END PRIVATE KEY-----
</key>
<cert>
-----BEGIN CERTIFICATE-----
Copy the contents of your client.crt file and paste it here.
-----END CERTIFICATE-----
</cert>
<ca>
-----BEGIN CERTIFICATE-----
Copy the contents of your ca.crt file and paste it here.
-----END CERTIFICATE-----
</ca>

key-direction 1

<tls-auth>
Copy the contents of your pfs.key file and paste it here
</tls-auth>
I then launched my openvpn client and it connected:
$ sudo openvpn --config client-config.ovpn
Sat Sep 23 16:05:05 2017 OpenVPN 2.3.10 x86_64-pc-linux-gnu [SSL OpenSSL)] [LZO] [EPOLL] [PKCS11] [MH] [IPv6] built on Jun 22 2017
Sat Sep 23 16:05:05 2017 library versions: OpenSSL 1.0.2g  1 Mar 2016, LZO 2.08
Sat Sep 23 16:05:05 2017 Control Channel Authentication: tls-auth using INLINE static key file
Sat Sep 23 16:05:05 2017 UDPv4 link local (bound): [undef]
Sat Sep 23 16:05:05 2017 UDPv4 link remote: [AF_INET]192.168.0.1:1194
Sat Sep 23 16:05:09 2017 [server] Peer Connection Initiated with [AF_INET]192.168.0.1:1194
Sat Sep 23 16:05:12 2017 TUN/TAP device tun0 opened
Sat Sep 23 16:05:12 2017 do_ifconfig, tt->ipv6=0, tt->did_ifconfig_ipv6_setup=0
Sat Sep 23 16:05:12 2017 /sbin/ip link set dev tun0 up mtu 1497
Sat Sep 23 16:05:12 2017 /sbin/ip addr add dev tun0 10.10.10.2/24 broadcast 10.10.10.255
Sat Sep 23 16:05:12 2017 Initialization Sequence Completed
I am using the Linux command-line OpenVPN client, but this same conf file should work with any OpenVPN client on any platform, I tried it on my Android phone using OpenVPN Connect and was able to connect as well.
Note the remote line of my client configuration. You can use your external IP address, but if your ISP rotates your external IP address from time to time, you may wish to use a dynamic hostname. Dynamic DNS is a process whereby you associate a static domain name with your router’s IP and that hostname remains pointed to the correct IP address even if it changes. Visit the Setup -> DDNS tab of your DD-WRT router to see the list of dynamic DNS providers it supports.
OpenVPN is a trusted and robust VPN solution. It is in wide use, particularly among very privacy conscious VPN providers. Routers running DD-WRT make it especially easy to run secure both your outgoing traffic via the OpenVPN client configuration, as well as your incoming traffic via the OpenVPN server configuration.
See also: The Best Linux VPN providers.
sudo apt-get intstall openvpn easy-rsa (typo)
sudo apt-get install openvpn easy-rsa
I believe I followed this guide to the letter, multiple times, but I keep getting zero-byte client.crt and server.crt files. There are no visible error message generated on the steps that produce these files. Any idea why this might be happening?
Hello. I’m running both, a openvpn Server and a client which connects to a payed VPN service on my dd-wrt Router. At my local LAN all Clients ,that connects to The Router are routet through THW payed VPN service. From outside my LAN (at work) I can then also connect to the openvpn Server with the certs and client-configs in my phone for example. That works great. But to connect to an RDP session on a local Server at my home I need to deactivate the openvpn client on the Router, so that I can connect via openvpnclient-config on my phone via openvonserver in the Router to the target machine at my home. What i’m doing wrong ? I think if the ovpb client is activated on the Router , the so policy based Router machines can’t be Seen from outside.
My iptables rules:
iptables -I INPUT 1 -p udp –dport 5086 -j ACCEPT
iptables -t nat -A POSTROUTING -s 192.168.2.0/29 -j MASQUERADE
PS: I can surf the Inet connected to the ovpn Server from my workplace routed through the ovpnclient on the Router, that works.
I have followed your instructions and getting the following error in the syslog:
…daemon.err openvpn[929]: Options error: You must define TUN/TAP device (–dev)
It sounds like you may be missing parts of the config file. This line should provide that:
dev tun
I can’t see where the pfs.ca file is generated. I’ve followed this through fairly carefully a number of times, and I’ve generated the pfs.key which you show, but not the pfs.ca
Appreciate your clarification.
Looks like a typo on my part. There is no pfs.ca file, you’ll need the pfs.key file contents in there. Thank you for noticing that error – I’ve updated the article.
Thanks for this excellent guide!
Two small remarks:
i. use `./build-key-server server` instead of `./build-key-server`
ii. use `./build-key client` instead of `./build-key`
This prevents errors like `shift: can’t shift that many` and also gives the files the names as shown in the list on this page.
Thanks for taking the time to write this guide 🙂
Good eye, thank you. I’ve fixed the article.