
A wi-fi extender is a simple device that boosts the strength of the signal coming from your wireless router. They can be used to extend the range of your wi-fi or to boost signal strength.
Many wi-fi extenders and repeaters are available online, but if you want to save some cash, you can make your own with a few household materials and tools that you probably have on hand.
See also: 10 ways to increase your wifi signal strength and range.
In this tutorial, I will build and test two popular designs for DIY wi-fi extenders.
Parabolic reflectors
They both use parabolic reflectors to direct radio waves in one direction. This means your wi-fi will get stronger in one direction but weaker in the opposite direction. This is useful if you have a room in your house where the wi-fi doesn’t quite reach, or if you own a small business with open wi-fi and you want to direct the signal away from moochers in a nearby apartment complex.
The antenna designs
Both of the antenna designs we use come from Freeantennas.com. To keep things simple we printed both onto plain A4-sized paper using the default size. You can scale up or scale down the cutouts as needed. With all the materials in hand, you can make either of these extenders in about 20 minutes.
Contents [hide]
DIY wi-fi extender design #1: Windsurfer
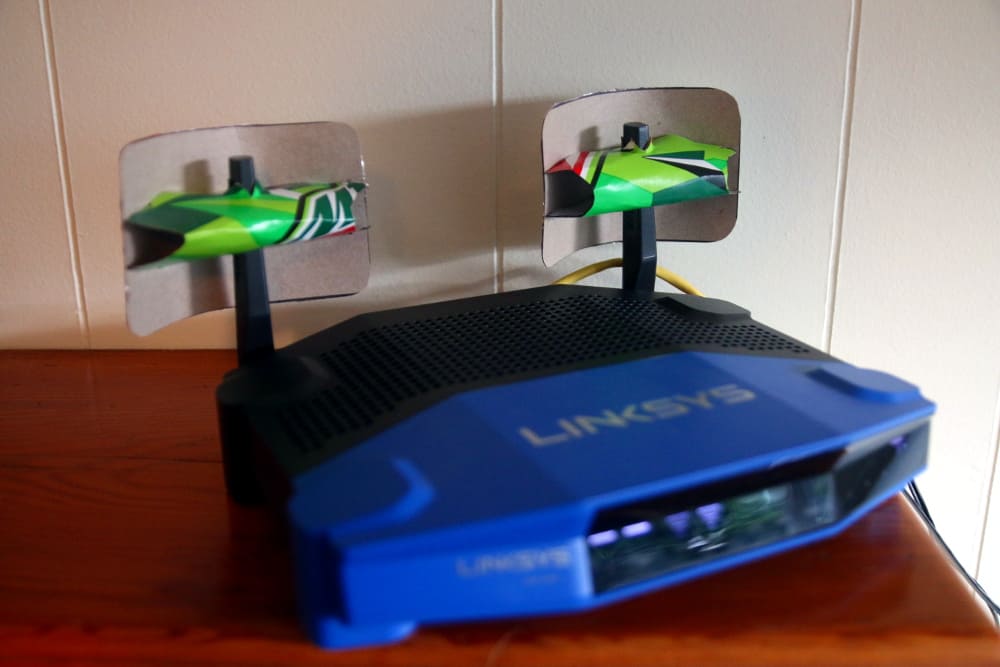
The first design is called Windsurfer. It was the smaller of the two designs and, to me, the better looking.
What you need for the Windsurfer design
To get started, you’ll need the following tools and materials:
- Printouts of the design from Freeantennas.com
- Card stock or cardboard (I used old cereal and soda boxes from my recycling bin)
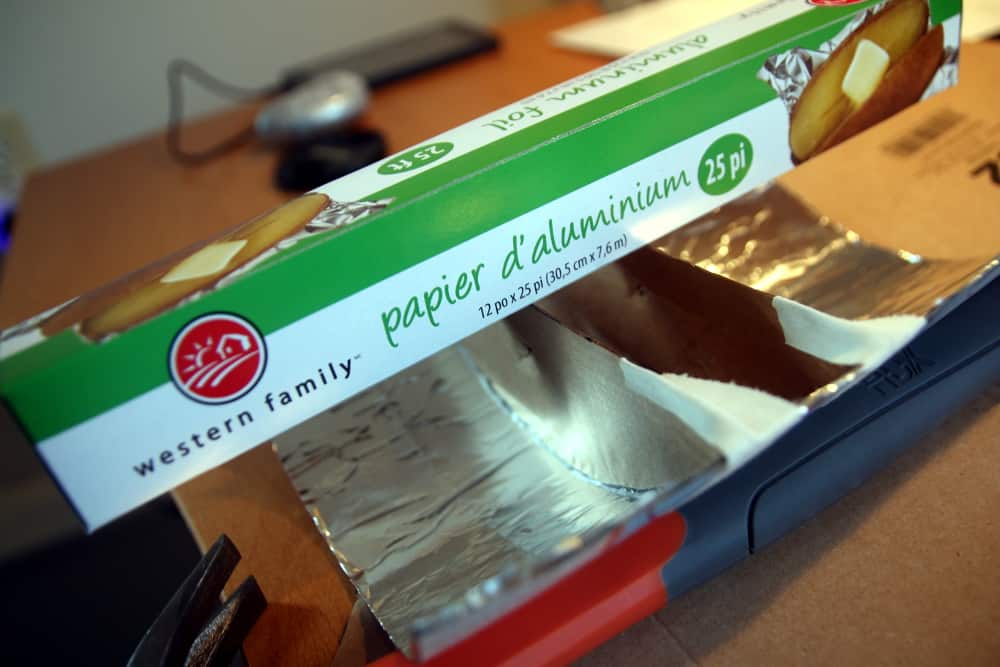
- Aluminum/tin foil
- Glue – Elmers is fine
- Pen or marker
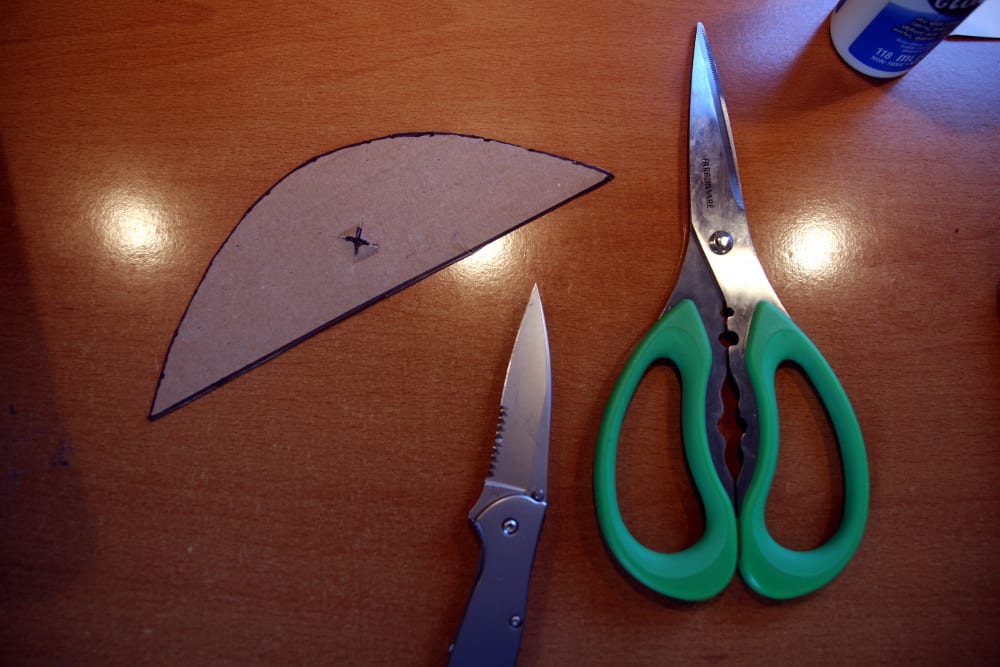
- Scissors – An X-Acto knife or something similar—I used a pocket knife—might also come in handy
Steps to creating the Windsurfer design
You might find it useful to have some sort of clamp to hold things together while the glue dries or while you trace the cutouts.
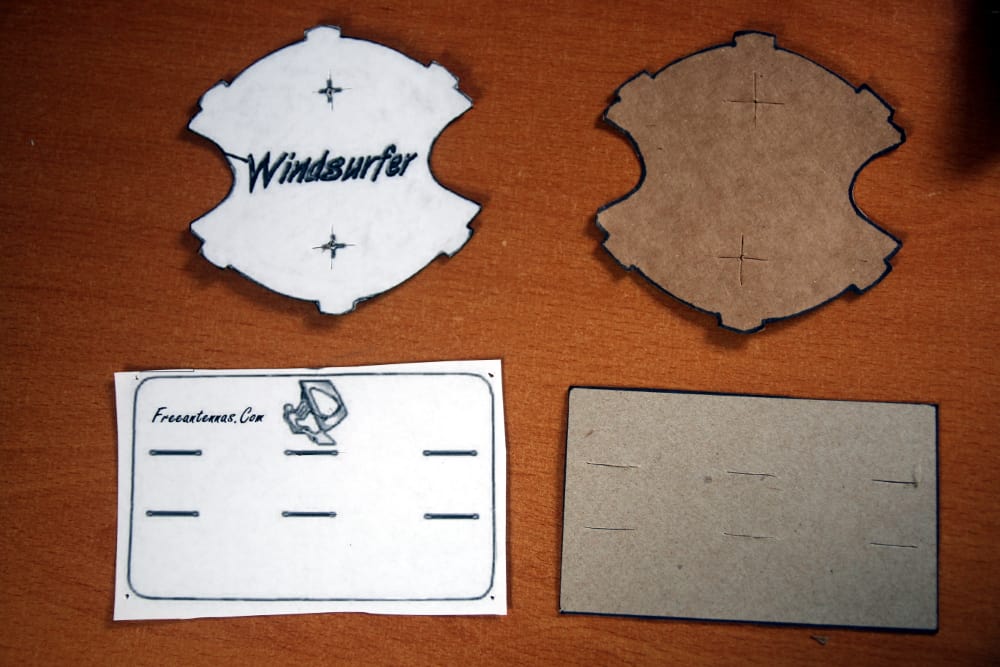
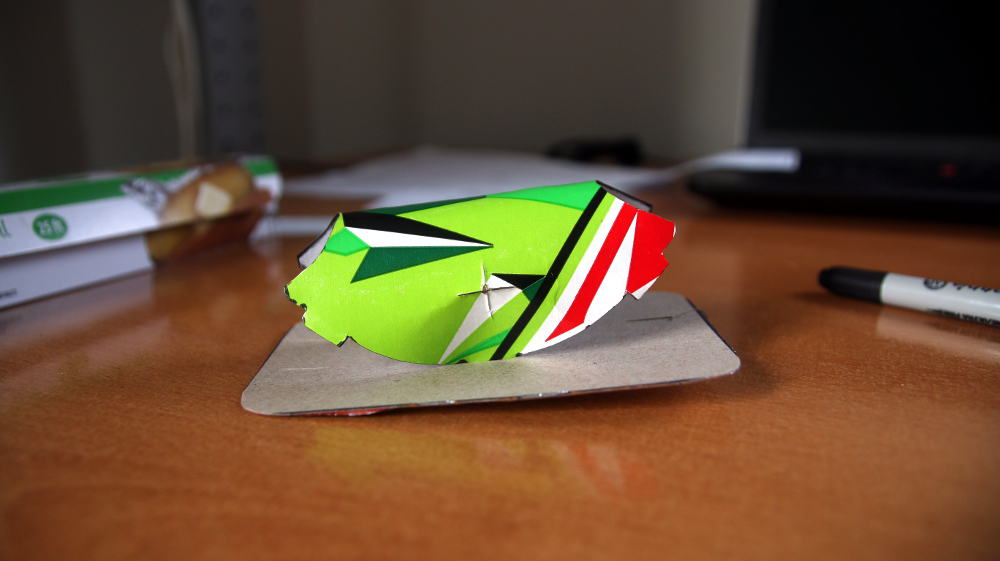
- You can print the templates directly onto card stock if you have a printer and the material available. I didn’t so I just printed it onto regular paper, cut out the template, and glued that to some cardboard from a box of soda. Do this with both pieces.
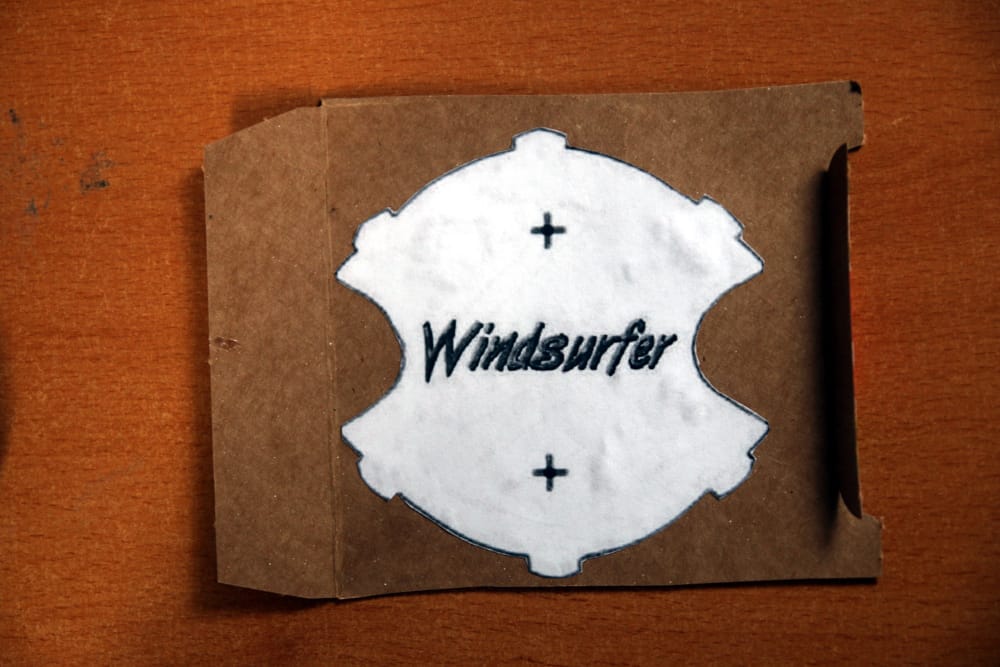
- Cut out the templates. Remember to cut slits on the round piece where you see the “+” sign, and the six slits on the reflector. This can be a pain with scissors so if you have a pocket or X-Acto knife, it will come in handy here. It’s important to put the “+” slits in the right place. This is where your antenna will poke through, and it serves as the focal point for all those radio waves. Make sure it will be big enough that your antenna can fit through, but not so big that it won’t fit snugly.
- If your router has multiple antennae and you’re making an extender for each, save yourself some time and trace the first cutouts onto your cardboard.
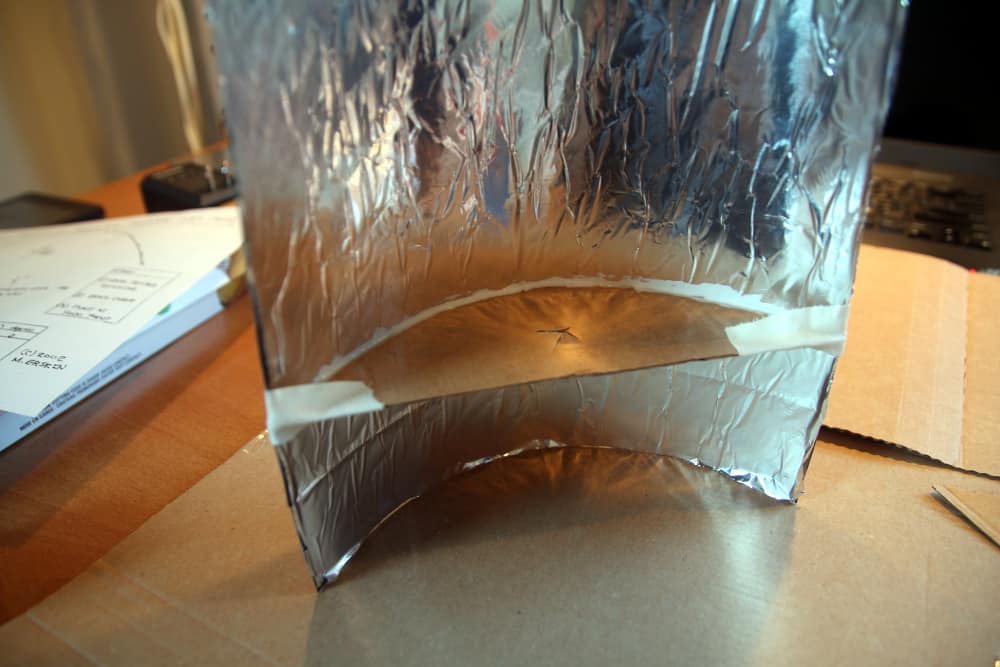
- Smear a thin layer of glue on the side of the reflector cutouts that don’t have the templates printed on them. Keep the glue out of the slits but close to the edges. Place a sheet of aluminum foil on top of the fresh glue and press firmly. Try to avoid wrinkles and bubbles. Then cut the foil to match the shape of the cardboard.
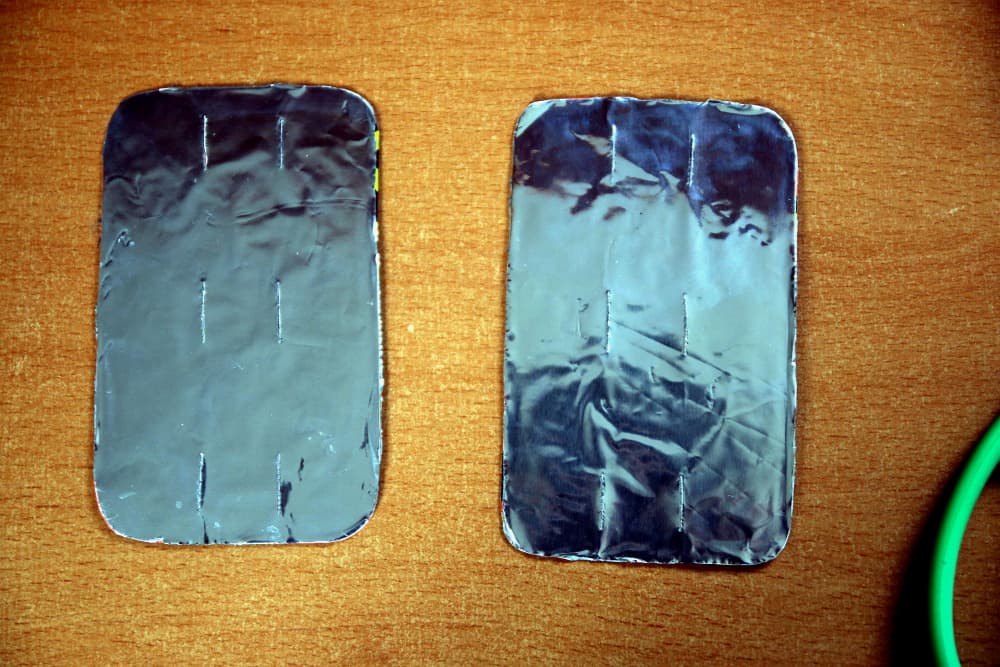
- Place the foil side down and use your scissors or knife to go over those horizontal slits again so they are in the foil as well.
- Now for the hard part. Bend the circular cutout in half so that the two “+” slits are directly over each other. Try to make it a gentle curve and not a hard angle. It should be fairly symmetrical. Start by pushing the center nubs through the center slits on the reflector panel. The foil on the reflector panel should be facing outward, away from the focal point. I’m not certain but I think this helps prevent wrinkles and bubbles in the foil. You may want to push your pen through the “+” slits on the circular cutouts to help hold things in place. It’s also a good idea to loosen up these holes ahead of time so that the extender doesn’t fall apart when you try to force it onto the antenna.
- Now move onto the other nubs and slits, gently pushing them through. Try not to bend the nubs or you will make things more difficult for yourself. Be patient. When you get one nub in place, another is likely to pop out. Keep working at it until they’re all attached to the reflector.
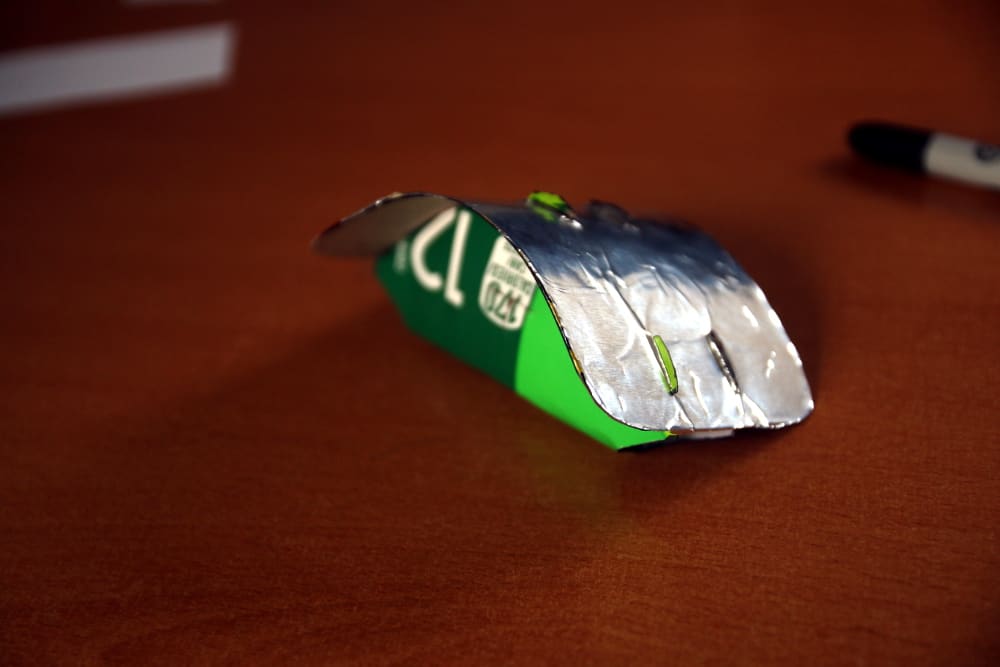
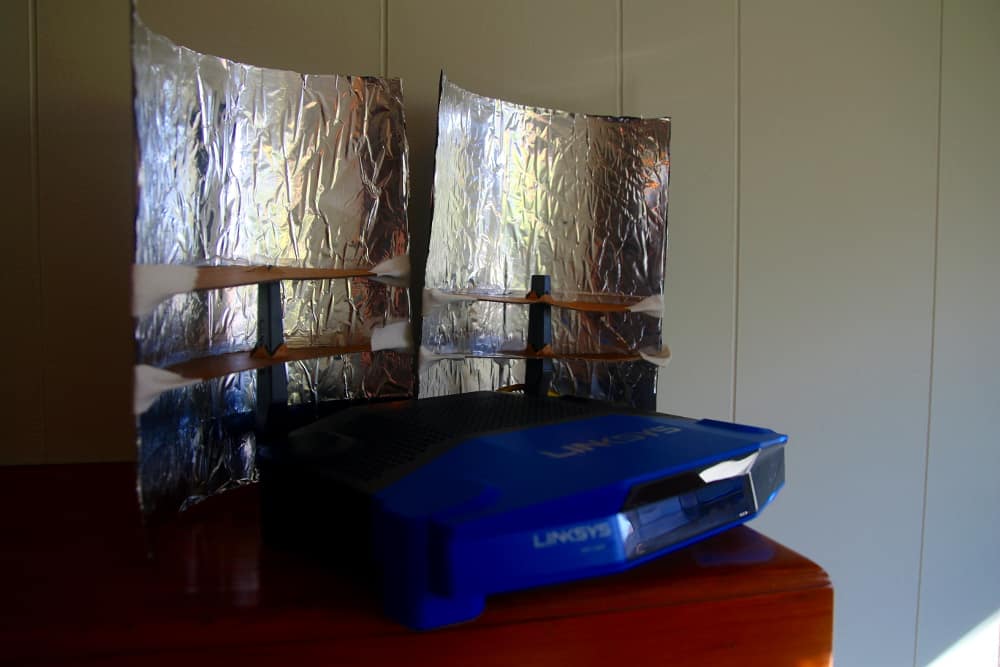
- Place the extender onto your router antennae. The top of the panel should be about even or just below the top of the antennae. Rotate the extender or the router itself as necessary so it points in the direction where you want a stronger signal.
That’s it! You should notice an increase in the range and strength of your wifi signal in the direction that the parabola is pointed. Note that this will weaken the signal in the opposite direction. See our test results below.
DIY wi-fi extender design #2: Deep Dish
The designer of the “Deep Dish Cylindrical Parabolic” wi-fi extender claims his invention outperforms most other designs while requiring fewer tools and materials. It works in much the same way as the Windsurfer but is a bit more flexible when it comes to size and materials.
What you need for the Deep Dish design
Here’s what you’ll need to get started:
- Printouts of the design from Freeantennas.com. Note that I just printed out the large template onto normal A4 paper, and this ended up nearly being too big for my router. I would suggest scaling it down a bit
- Card stock or cardboard (I used old cereal and soda boxes from my recycling bin)
- Aluminum/tin foil
- Glue – I used plain Elmer’s glue, but this turned out to be a poor choice when it came time to attach the struts to the parabolas. I recommend something stronger like hot glue or rubber cement if you have it
- Pen or marker
- Scissors – An X-Acto knife or something similar—I used a pocket knife—might also come in handy
Steps to creating the Deep Dish design
You might find it useful to have some sort of clamp to hold things together while the glue dries or while you trace the cutouts. I used a spare chip clip. Scotch or masking tape is also good to have on hand.
- Start by using the line labeled “side length” on the template to draw four sides of a square onto your cardboard. Use something with a square edge (like the paper that the template is printed on) to make sure you don’t draw a skewed rhombus. I did this by placing the paper on the cardboard and then punching a hole through with a pen at each of the corners.
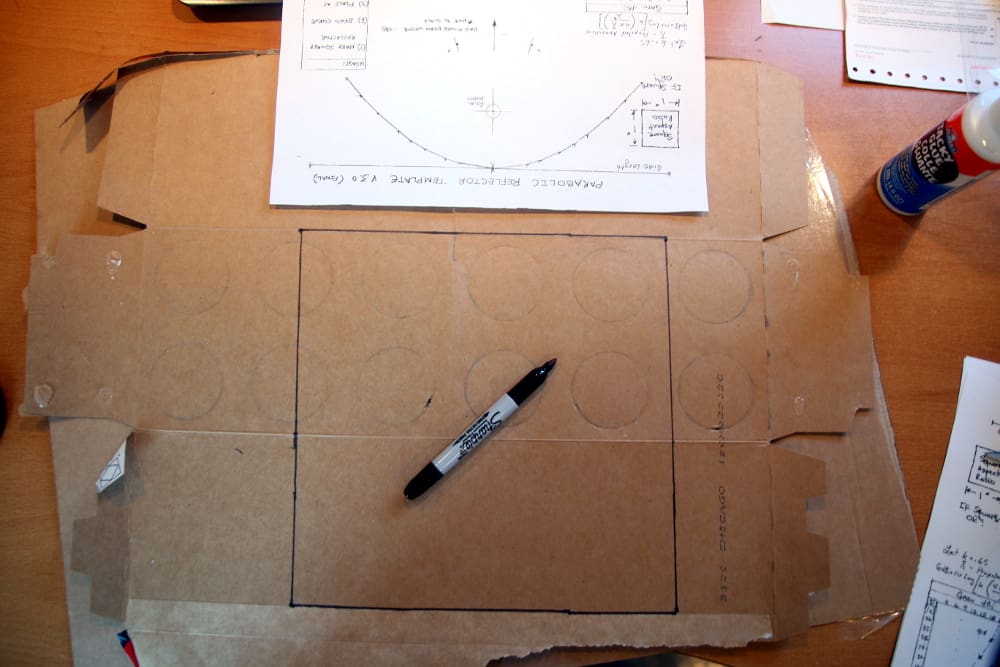
- Cut out the square. This will be the reflector panel. Smear a thin layer of glue onto one side of the panel. Be sure to get close to the edges.
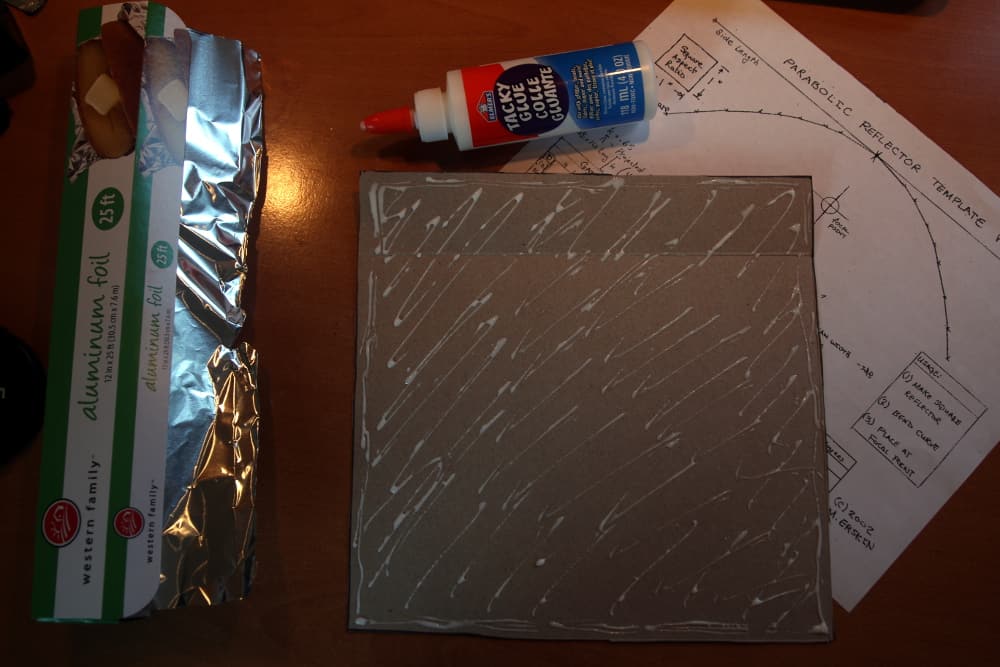
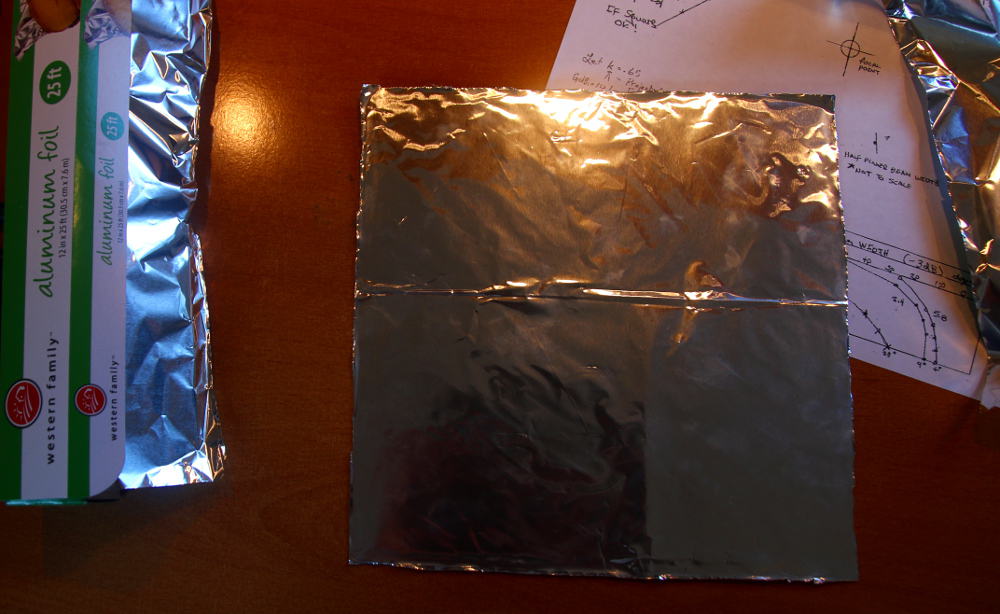
- Place a sheet of aluminum foil onto the glue, covering the panel entirely. Trim off the edges of the foil so it matches the shape of the cardboard. Try to press out any bubbles or wrinkles. Mine has a seam in the cardboard that couldn’t be avoided.
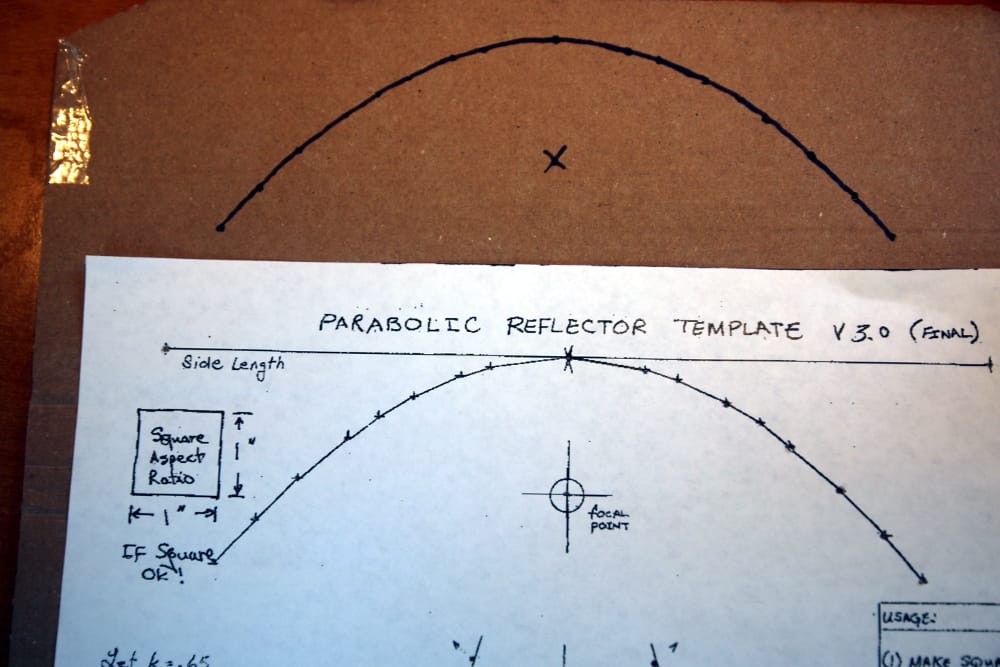
- Set the reflector panel aside and let dry. Now for the struts. I recommend a thicker piece of cardboard, at least 1/4-inch thick. Unfortunately, I didn’t have any on hand, so I just went with the thickest stuff I had on hand. You can also use a different material for this so long as it’s not reflective. Clamp down the template printout onto a piece of cardboard, then use a pen to poke holes along the curve. Use a pen or marker to draw a line through those holes, connect-the-dots style. Make sure you mark where the focal point should be as well. The designer notes that getting this a quarter-inch off can result in a significant loss of decibels. Draw a straight line between the ends of the curve.
- Cut out the strut, then use it as a stencil to trace and cut out another one. You’ll want two struts per panel.
- Now for the hard part. Line the curved edge of the strut with glue, and then wrap the reflector panel around it. The height of the struts depends on your antennae—the top of the panel should be level or a bit higher than the top of the antennae. Try to get the struts as close to perpendicular as you can to the panel. Note that this design has the reflective surface of the panel on the inside of the parabola, facing the focal point, whereas the windsurfer places it on the outside, facing away from the focal point. You can choose whichever you prefer.
- This is where it helps to have good glue like rubber cement or hot glue. I used Elmer’s glue and attempting to get everything to stay in place while the glue dried was a pain. I used some tape to help. I used some objects I had on hand to help ensure the panel didn’t peel away from the struts.
- Once the glue has dried, place the extender on your wi-fi antenna. You may want to stick a pen through the struts first to loosen up the holes. Point them in the direction where you want a better signal—or away from where you want less coverage—and you’re good to go.
As you can see, my deep dish wifi extenders came out way bigger than they needed to be, but they still worked pretty well. See our test results below:
How we carried out our test
We tested these two wi-fi extenders on a Linksys WR1200AC router using the 5 Ghz frequency using the Wifi Analyzer app for Android. We recorded the signal strength in decibel-milliwatts (dBm) and the distance at which the signal dropped below -80 dBm and became unusable from outside the house. The extenders were pointed out a window in the testing direction.
Results: Windsurfer vs Deep Dish
Without any extender, standing about 10 feet away in the same room, we recorded -36 dBm. The signal dropped below -80 dBm at a distance of approximately 120 feet.
The Windsurfer’s performance
The Windsurfer extender increased the signal strength to -28 dBm, an 8 dBm improvement when standing in the same room. The distance at which the signal dropped out also increased to 140 feet, stretching 20 feet further.
The Deep Dish’s performance
The Deep Dish boosted signal strength to -30 dBm, not quite what we got from the Windsurfer, but still a significant improvement. The wi-fi range rose to 150 feet, 10 feet further than the Windsurfer and 30 feet more than no extender at all.
The final verdict
So the Deep Dish scored the best for range and the Windsurfer was best for power. The size difference probably has something to do with the results, but we’d say either one is a good choice. For what it’s worth, I think the Windsurfer looks better, but if I’m honest both are kind of eyesores. You might be better off trying out a different material with the Deep Dish, as well as a smaller template.
These results are not particularly scientific and are just meant to give you an idea of what to expect. Your mileage may vary.
Tips to keep in mind if using a DIY wi-fi extender
Internal vs external antennae
Both of these designs were meant to be used with wi-fi routers that have external antennae sticking out, but many modern routers—the modem-router combos you get from your ISP in particular—often use an internal antenna.
While we haven’t tested this ourselves, other DIYers have reported the Deep Dish design can work with internal antennae if properly placed, but don’t expect the same jump in power and range.
For those of you with multiple antennae, we recommend building multiple extenders. Make sure they are sized properly so that they’ll all fit.
Boosting wi-fi signal vertically
If you’re in a multi-story home and want to boost the wi-fi signal vertically between floors, things get tricky. For a single floor, your wi-fi antennae should always be sticking straight up and, if you have multiple antennae, parallel. You may need to lie them flat, parallel with the floor, to get the signal to go up and down.
You can still use the wi-fi extenders we’ve built in this tutorial, so long as you can point them in the right direction. Always keep your antennae parallel if you have more than one.
Using different materials
I used cardboard and aluminum foil to build my extenders because that’s what I had on hand, but there are plenty of other materials you can substitute in. The key is that the reflectors need to be made of something … well, reflective. And the struts should be made of something very not reflective. The designer notes:
“People have made good ones from Pringles cans, large tin cans, wire screen, aluminum sheet, and tin roofing material.”
Other ways to boost your wi-fi signal
These extenders get the job done, but there are also other ways to boost your wi-fi signal.
Adjust settings in the firmware
You might also be able to boost the signal from your wi-fi router by adjusting settings in the firmware. Depending on your firmware, you can amp up the throughput and achieve greater range and signal strength. Just be careful, as this will also make your router run hotter and could damage or shorten its lifespan.
If your router doesn’t have this option, look into replacing the firmware with an open-source alternative like DD-WRT or Tomato. This will unlock capabilities that are walled off by the manufacturer’s firmware. Just use caution, as flashing the wrong firmware or flashing improperly could permanently brick the router.
Remove obstructions
Wi-fi signals can be partially absorbed or even completely blocked by obstacles and objects like walls, duct work, furniture, and home appliances. These obstructions have an especially negative effect on 5 GHz wi-fi networks since these higher frequency signals don’t penetrate objects nearly as well as lower frequency signals. For this reason, it’s important to remove as many potential obstructions as possible.
Choose a high-end router
In the same way that some computers struggle to handle casual web browsing while some can render complex 3D objects, routers differ in their capacity. If you want your router to deliver a strong wi-fi signal to multiple people in the house and outside as well, then it may be best to opt for a high-end brand.
Cut off wi-fi leeches
Neighbors, even if they have their own wi-fi, may still use your wi-fi network. To prevent this from happening, and weakening your signal in the process, you should encrypt your wi-fi and protect it with a strong, hard-to-guess password. This will protect your router from being hacked as well. Here are some tips to keep in mind about your wi-fi password:
- Include a combination of uppercase and lowercase letters, symbols, and numbers
- Don’t use common passwords, like 12345
- Make sure the password is at least eight characters long. Short passwords can be more easily guessed
- Don’t include any personal information in the password, such as your name, the name of your pet, or your telephone number
- Use a unique password and don’t write it on a piece of paper. If you can’t remember it, we recommend using a password manager
Related: Best VPNs for DD-WRT routers
Nice
What if you doing have antennas like the linksys and it just a square modem?
For internal antennae, it might not work. You can try building the parabola and experiment with placement around the modem.
I continually lost my wifi connection in my garage workshop, due to my neighbors wifi interference. Netspot reports 111 wifi SSIDs near my house (!). I built two of the Deep Dish aluminum foil reflectors, per the template, (but mine are only 6″ tall). I mounted them on the two outer antennas of my Netgear router’s four antennas, leaving 3″ open near the base. The two inner antennas were not reflected. My garage is 80 feet away from the router location (up on a cabinet in a back bedroom). With minor repositioning I achieved 5dB improvement from -62dBm average to -57dBm average. This boost was enough to regain stable wifi in my workshop, but it is now strong enough so it also cause the strongest neighbor interferers to move off its channel! This is a very cool article and really helpful.