Cloudflare launched a privacy-focused DNS resolver service in 2018 that anyone can use for free. The company, which also provides a content delivery network, DDoS protection, and other security services for businesses, says the DNS service speeds up web browsing and improves privacy.
DNS, or Domain Name System, is what computers use to turn human-readable domains like “comparitech.com” into IP addresses. An IP address is a unique string of numbers and decimals assigned to every device connected to the internet. When you type in a website address, a request is sent to a DNS server to look up the IP address for the website associated with that domain name. This process is called DNS resolution, and by default, it usually takes place on a DNS server owned by your internet service provider.
An ISP can use the information gleaned from DNS traffic to figure out which websites you’ve been visiting, even if you use HTTPS. And now that broadband privacy regulations have been rolled back in the US, Cloudflare is capitalizing on the demand for a more private DNS alternative. By switching your DNS settings to use Cloudflare instead of your default DNS server, your ISP can’t snoop on your web history or share that information with third parties.
In this article, we’ll show you how to set up Cloudflare DNS on Windows, macOS, iOS, Android, and wifi routers.
How to use Cloudflare DNS (1.1.1.1)
To get started, you’ll need a working internet connection. You can use wifi or Ethernet, but note that changing your DNS settings on one will not change them on the other. You’ll need to repeat the process for each network interface (wifi, Ethernet) you plan to use.
For any device, Cloudflare’s primary DNS server address is 1.1.1.1, and 1.0.0.1 is used as an alternative for redundancy.
How to set up Cloudflare DNS on Windows 10
For demonstration purposes, these are the instructions for how to set up Cloudflare DNS on Windows 10, but earlier versions of Windows should be fairly similar. I’ll cover how to do it on Windows 11 in the next section. Note that you must be an administrator on your computer to access some of these settings.
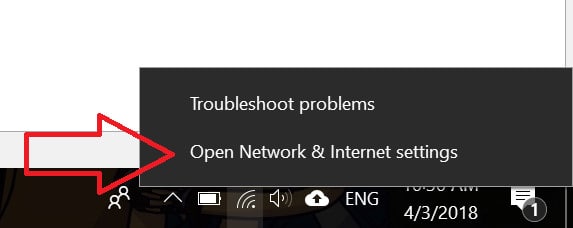
- While connected to the internet, right-click the Wi-Fi or Ethernet icon in your system tray (the right side of the taskbar) and select Open Network & Internet Settings
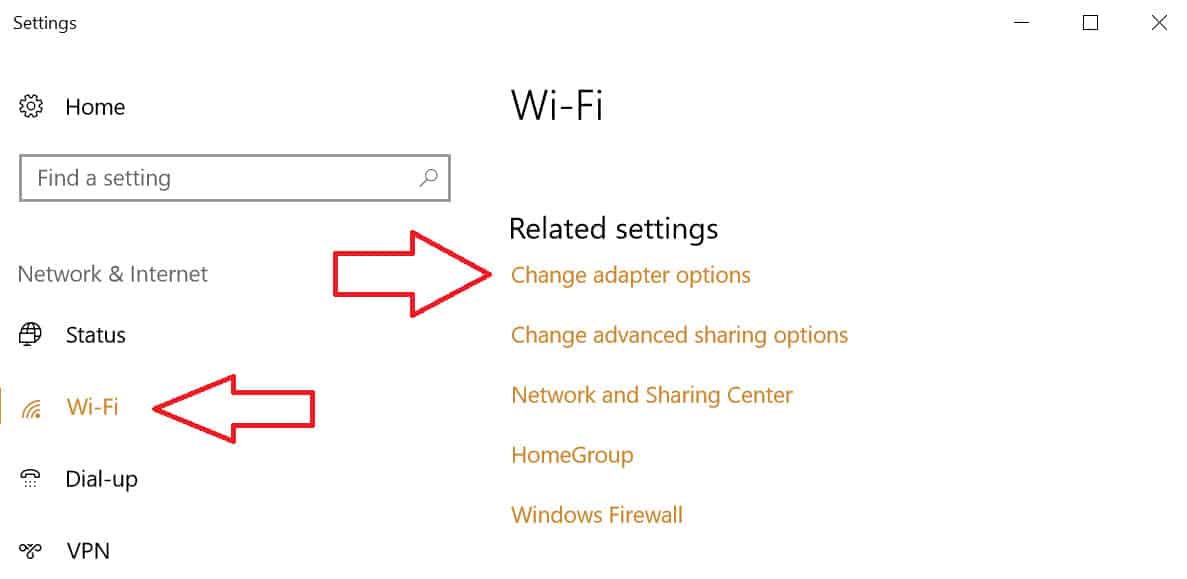
- Click Wi-Fi, then scroll down to select Change adapter options
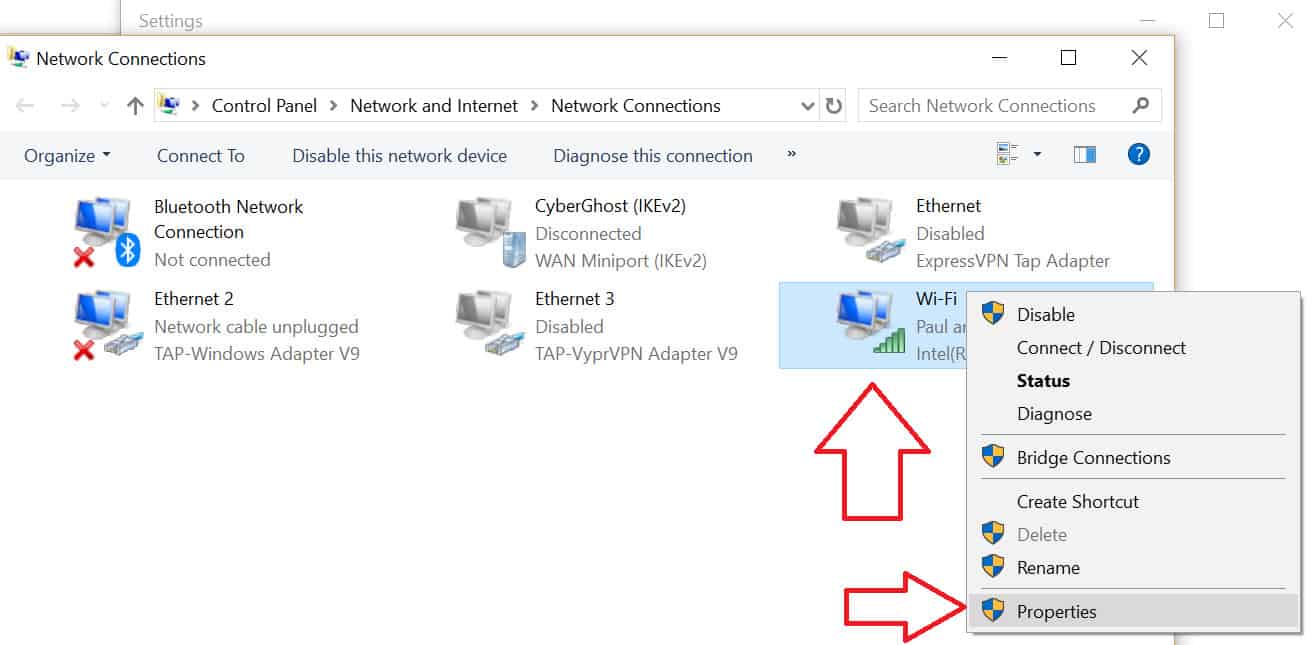
- Find the adapter you use—for most of you, this will be Wi-Fi or Wireless Network Connection- and right click, then select Properties
- In the properties window on the default Networking tab, look under This connection uses the following items to find Internet Protocol Version 4 (TCP/IPv4). Click it once to highlight it (do not uncheck it), and click Properties
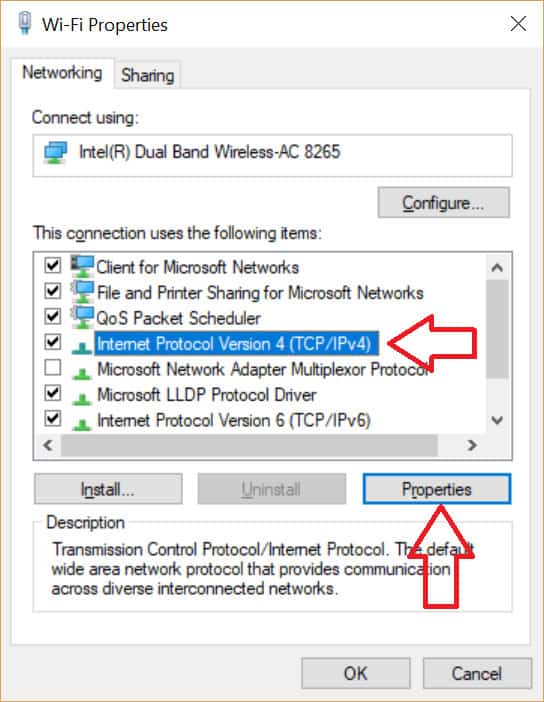
- Select the option for Use the following DNS server addresses and enter the following IP addresses into the two fields:
- Preferred DNS server: 1.1.1.1
- Alternate DNS server: 1.0.0.1
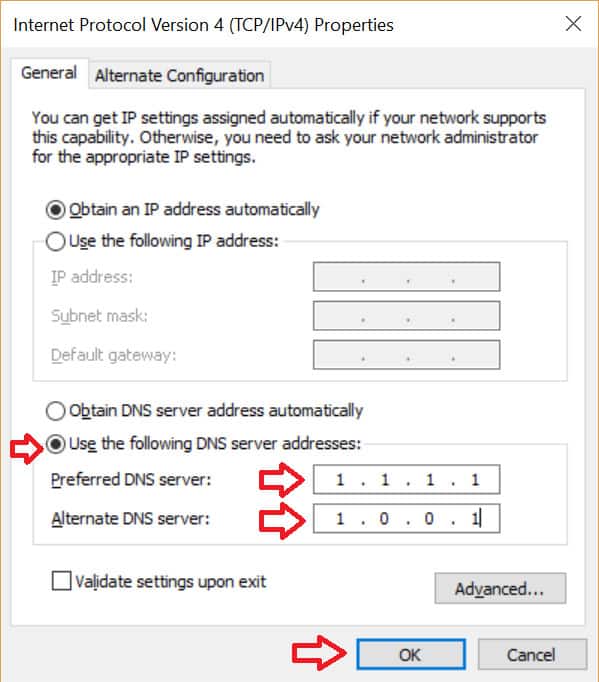
- Click OK
- If you use IPv6, back on the Properties menu, click (don’t uncheck) Internet Protocol Version 6 (TCP/IPv6) and click Properties
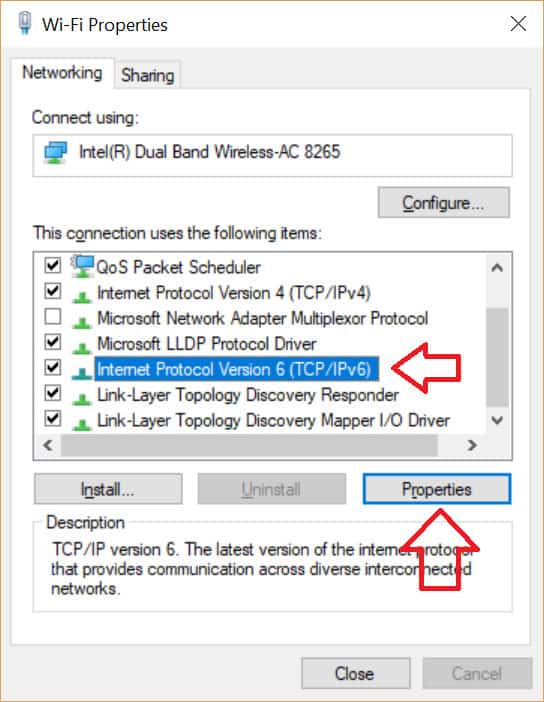
- Select the option for Use the following DNS server addresses and enter the following IP addresses into the two fields:
- Preferred DNS server: 2606:4700:4700::1111
- Alternate DNS server: 2606:4700:4700::1001
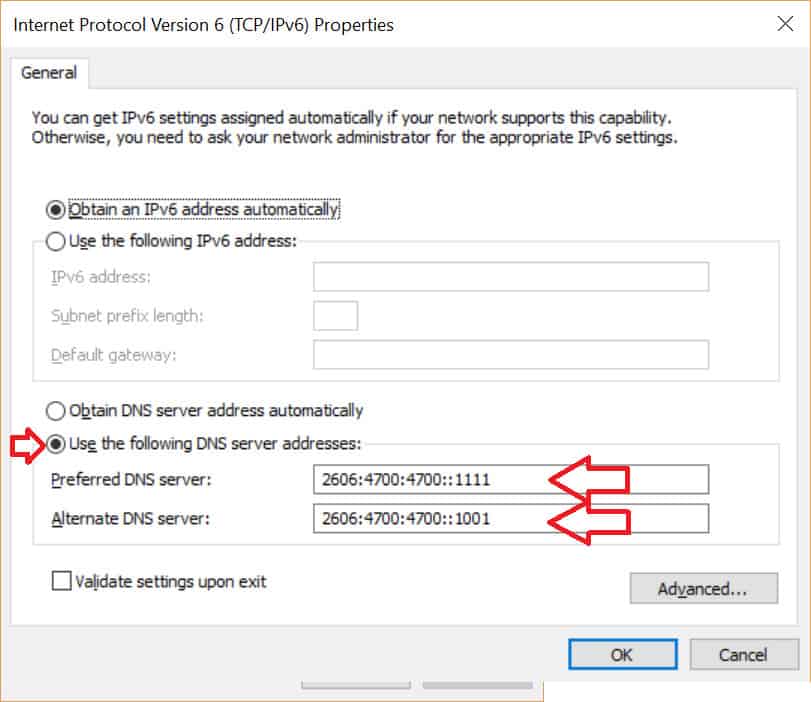
- Click OK
Repeat as necessary for any other adapters you use, such as Ethernet.
How to set up Cloudflare DNS on Windows 11
These are the instructions for how to set up Cloudflare DNS on Windows 11, which is a bit different from how it was in Windows 10 and earlier versions. Note that you must be an administrator on your computer to access some of these settings.
1. While connected to the internet, right-click the Wi-Fi or Ethernet icon in your system tray (the right side of the taskbar) and click Network and Internet Settings.

2. Click on Wi-Fi or Ethernet, depending on which one you use.

3. Click the properties option for your network.

4. Scroll down to DNS server assignment and click the Edit button.

5. Click the pull-down in the dialog box that appears, and click on Manual

6. You’ll see two toggle switches appear, IPv4 and IPv6.
7. Toggle the IPv4 switch to the “On” position.

8. You’ll see several new empty fields appear. Two of the fields are labeled Preferred DNS and Alternate DNS.
9. Enter the following IP addresses into the two fields, as seen above:
Preferred DNS server: 1.1.1.1
Alternate DNS server: 1.0.0.1
10. Click Save.
11. If you use IPv6, also toggle the IPv6 toggle switch to on.
12. You’ll see several new empty fields appear. Two of the fields are labeled Preferred DNS and Alternate DNS.
13. Enter the following IP addresses into the two fields:
Preferred DNS server: 2606:4700:4700::1111
Alternate DNS server: 2606:4700:4700::1001
14. Click Save.

Repeat as necessary for any other adapters you use, such as Ethernet.
How to set up Cloudflare DNS on macOS
This tutorial uses macOS Sequoia, but the process is similar on other versions of OSX and macOS.
- While connected to the internet, click the Apple menu and select System Settings (it’s System Preferences on some versions of macOS)

- In the window that appears, and left-click on Network in the left-hand menu panel, then click Ethernet or Wi-Fi in the right-hand pane, depending on which connection you use and want to adjust the settings on.

- In the next menu, click on the Details button for your connection.

- In the next menu, click on DNS in the left-hand panel
- Click the plus (‘+’) button to add a DNS server and type 1.1.1.1
- Repeat the previous step, but this time enter 1.0.0.1
- Click OK (You may have to enter your password or use Touch ID to authorize the changes)

How to set up Cloudflare DNS on Android
Android doesn’t play well with custom DNS settings. You’ll need a static IP address to use custom DNS servers, and by default, most people don’t use static IPs. Cloudflare instead recommends configuring the DNS server on your wifi router instead of on the device itself.
Cloudflare does not offer an Android app to provide access to its DNS servers. More about that later.
How to set up Cloudflare DNS on iOS 18 and iPadOS 18 (iPhone, iPad)
These instructions are based on iOS 18, but the process should be similar on other recent versions of iOS. The menus will be formatted differently on the iPad, although the steps are the same.
- While connected to the internet, from the home screen, open the Settings app
- Tap Wi-Fi
- On the Wi-Fi screen, you’ll see a Wi-Fi network with a checkmark next to it, that’s the Wi-Fi network you’re currently connected to. Tap the information icon (it looks like an “i” in a circle) to go to your Wi-Fi connection settings.
- Scroll down to DNS, then tap Configure DNS
- Tap Manual
- Clear any existing entries by tapping the minus (‘-‘) button and Delete
- Select the Add Server (‘+’) button and enter 1.1.1.1
- Repeat the previous step, but this time enter 1.0.0.1
- Click the Save button on the top right.

How to set up Cloudflare DNS on a wifi router
Setting up Cloudflare DNS on a wifi router will affect all the devices connected to it, routing all of their DNS requests to CloudFlare’s servers instead of your ISP’s servers. This can save you the trouble of configuring each individual device in your home, but remember that those devices will revert to their default settings if you connect to a different network.
Writing a tutorial for setting up Cloudflare DNS on a wifi router is problematic because router firmware is not standardized, meaning the process will vary based on your router’s model and manufacturer. With that in mind, we’ll do our best to offer some generic instructions:
- While connected to the internet through your router, open a browser and navigate to your router’s dashboard. This is usually done by entering 192.168.0.1 or 192.168.1.1 into the URL bar of your web browser.
- Enter your username and password. If you’re not sure, Google the default username and password for your router model, check the labels on the outside of the router, or ask your ISP. Often, the default credentials are something simple like “admin”.
- In your router dashboard, find the DNS settings. You may need to look through a few different menus to find it, depending on your router’s firmware.
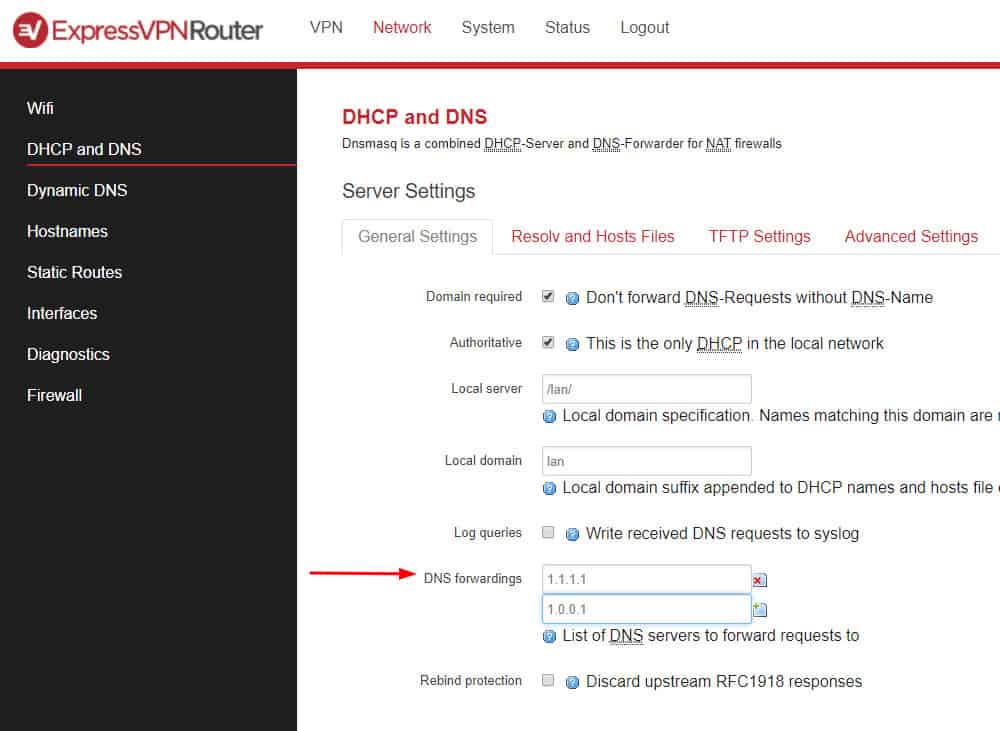
- Replace the current DNS servers with the following:
- IPv4 preferred: 1.1.1.1
- IPv4 alternate: 1.0.0.1
- IPv6 preferred: 2606:4700:4700::1111
- IPv6 alternate: 2606:4700:4700::1001
- Save your changes and restart your browser.
Note: If your router login still uses the default username and password, you should change them for better security.
Cloudflare 1.1.1.1 App
Cloudflare now offers an app that allows you to use its DNS servers without manually editing your DNS settings. It is available for the Android, iOS, macOS, Windows, and Linux platforms. For more information, check out the one.one.one.one website.
Cloudflare vs Google DNS
The largest public DNS provider in the world right now is Google. Cloudflare promises to be faster and more private than Google DNS for a number of reasons.
Let’s start with speed. Pretty much anything you do in a web browser starts with a DNS request, so a faster DNS service will noticeably improve page load times. Cloudflare boasts that it tests faster than Google DNS and Cisco OpenDNS, according to DNSPerf, an independent monitoring agency.
When it comes to privacy, Cloudflare says it will never log your IP address, which can be used to identify your computer, smartphone, or other device, along with its approximate location. Google does log users’ IP addresses, but only temporarily.
Cloudflare supports DNS over HTTPS and DNS over TLS, which ensure that DNS requests are encrypted and cannot be read by your ISP or any other third party.
Cloudflare logs DNS queries for diagnostic and debugging purposes, but those queries are deleted after 24 hours. This is important for privacy, as DNS queries can be used to cobble together a person’s web browsing history. Similarly, Google logs queries for 24 to 48 hours before destroying them, but keeps non-identifying information for longer.
Cloudflare does share DNS query data with APNIC Labs, which is part of the Asia domain registry APNIC. APNIC allows Cloudflare to use the 1.1.1.1 network address in exchange for that data, which it says it will use for research purposes. Those purposes include understanding DNS better and mitigating denial-of-service (DoS) attacks.
Cloudflare DNS vs VPN
Cloudflare DNS is shaping up to be a boon for internet users who are concerned about their privacy. But DNS is only one part of the puzzle. While your ISP won’t be able to see your DNS traffic when using Cloudflare DNS, it can still view the contents of any internet traffic that’s sent over the network unencrypted. That means your ISP can still snoop on any non-HTTPS sites you visit.
Furthermore, using Cloudflare DNS obviously requires that you trust Cloudflare and, in turn, APNIC, to keep your records private and destroy them as promised.
If you want more privacy or don’t fully trust Cloudflare, we recommend using a VPN. Short for Virtual Private Network, a VPN encrypts all of a device’s internet traffic and routes it through an intermediary server in a location of your choosing. The encryption prevents anyone, including your ISP, from snooping on the contents of your traffic. The intermediary server means no one but you and the VPN provider can know where traffic is going to or coming from.
A VPN app’s DNS settings will usually override your system’s settings unless you configure it otherwise. VPN DNS servers are usually located in the same place as the standard VPN servers, which helps to unblock geo-locked content by masking your real location.
The best, most reputable VPN providers keep no logs of your IP address or traffic contents but, again, you must trust the provider to adhere to these claims. What’s more, good VPN services use their own private DNS servers, which are also logless. See our list of the best logless VPNs for more information.


You can also try to mitigate the HTTPS issue while using CF DNS by using the HTTPS Everywhere add on.