
So you followed our tutorial on how to set up your own VPN server using OpenVPN and an Amazon EC2 server, and it was working great. That is, until it suddenly got blocked. Maybe you rebooted the instance and got a new IP address. It work great again for another couple days, then gets blocked. It seems your office, ISP, or government is actively blocking OpenVPN servers. So what do you do?
Basic firewalls block connections based on the port used and the destination IP address, but more advanced firewalls use deep packet inspection (DPI) and/or stateful packet inspection (SPI) to distinguish between different types of encryption algorithms and VPN protocols. That means they can detect OpenVPN traffic and flag it so the admin can block the server.
There are three options to get around this: an obfuscation proxy, SSL tunneling, and SSH tunneling. In this tutorial, we’ll discuss the lattermost. SSH tunneling wraps your already encrypted connection in another layer of encryption so the firewall can’t make the distinction. Each of these methods should bypass DPI and SPI firewalls put in place either by corporations or censorship-heavy governments like China’s.
OpenVPN over SSH does have a couple downsides. First is a performance hit due to the double encryption. Second, OpenVPN’s fingerprint can no longer be detected when tunneled through SSH, but some firewalls block SSH traffic as well. This is the case for services like Netflix, which halt the use of any type of encrypted proxy, OpenVPN, SSH, or otherwise. In this case, we recommend you set up Obfsproxy instead, which makes encrypted traffic appear to be normal and un-encrypted. Obfsproxy is much more powerful for this reason, but also more complicated to set up and run.
Unfortunately, Obfsproxy combined with OpenVPN currently only works on a desktop, so far as we are aware. SSH tunneling can be used on an Android or iOS mobile device.
This tutorial assumes you already have a functioning OpenVPN server set up and can connect to it using the OpenVPN GUI or OpenVPN Connect app. You must also be able to SSH into your server using either Terminal on a Mac or PuTTy or one of many PuTTY alternatives on a PC. For demonstration purposes, we’ll be using PuTTy. If you don’t have all that set up, please refer to our previous tutorial.
Setting up OpenVPN over SSH on a PC
In our last tutorial, we discussed how to set up a simple SSH proxy, then expanded on that to create a full-on VPN server. This approach combines the two, which means you should already have everything you need.
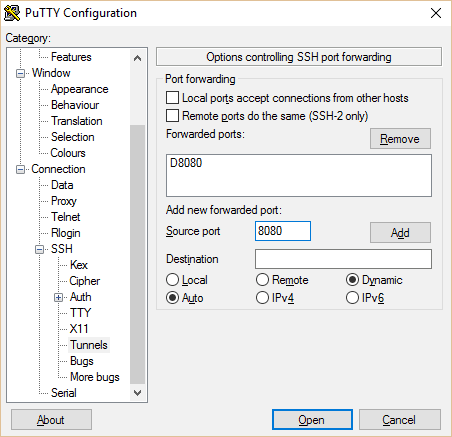
Open PuTTy and load up your VPN server configuration. In the sidebar, navigate to Connection > SSH > Tunnels. Make sure D8080 is included in the list. If not, type 8080 into “Source port” and check Auto and Dynamic. Then hit Add. You now have an SSH proxy running through port 8080. You can save this as a separate session configuration if you want back on the Session tab of the navigation tree.
Click Open and log into your server. Remember that on the newer Amazon Linux AMI, the username is “ec2-user”.
Navigate to your openvpn.conf file and check the contents using these commands
 cd /etc/openvpn

cat openvpn.conf
This should display the contents of your OpenVPN server configuration file. It should look like this:
 port 1194

proto tcp-server

dev tun1

ifconfig 10.4.0.1 10.4.0.2

status server-tcp.log

verb 3

secret ovpn.key
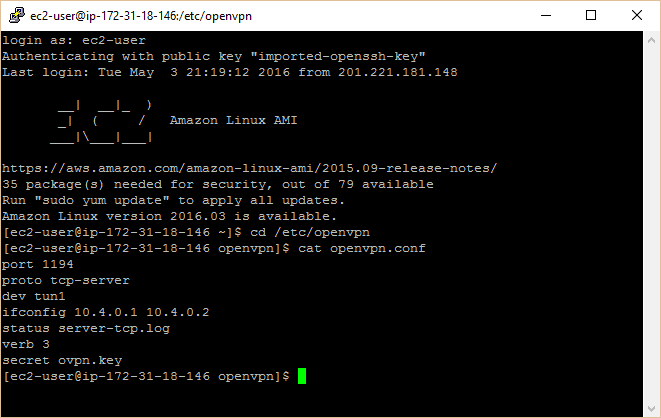
The important thing is that the second line is set to TCP, not UDP. If you need to change it, you can edit it with this command:
sudo nano openvpn.conf
Then click CTRL+O (the letter “o”, not zero) to save the file, then CTRL+X to exit the editor.
Client config
On your local machine, navigate to your OpenVPN client config files. If you used the default installation directory, this will be C:/Program Files/OpenVPN/config.
Create a copy of your existing OpenVPN config file from the last tutorial or create a new one. Find Notepad or another plain text editor and right click it to Run as administrator. Open or create your new config file, which should look like this:
 proto tcp-client

remote localhost 1194

port 1194

dev tun1

secret ovpn.key

redirect-gateway def1

ifconfig 10.4.0.2 10.4.0.1

socks-proxy-retry

socks-proxy 127.0.0.1 8080
Note the second “remote” line uses localhost instead of the OpenVPN server IP, plus the two lines on the end that configure OpenVPN to use a SOCKS proxy. Everything else is the same as before.
Save your new config file into the config folder of your OpenVPN directory.
Setting up apps
The last step is to configure your apps to use the proxy over port 8080. This is similar to what we did with the basic SSH proxy from the last tutorial. Many apps will have a proxy setup available in the settings, and some may even auto-detect it. If you need to set it up manually, the three pieces of information you need are:
- Host: 127.0.0.1
- Port: 8080
- Proxy type: SOCKS5 (or SOCKS v5)
Here are the instructions for Firefox and Chrome:
In Firefox:
- Go to Tools > Options > Advanced > Network > Connection > Settings > Manual proxy configuration
- Set SOCKS Host as 127.0.0.1 and the port as 8080 (or whatever you set the tunnel port to on PuTTy).
- Click OK to save
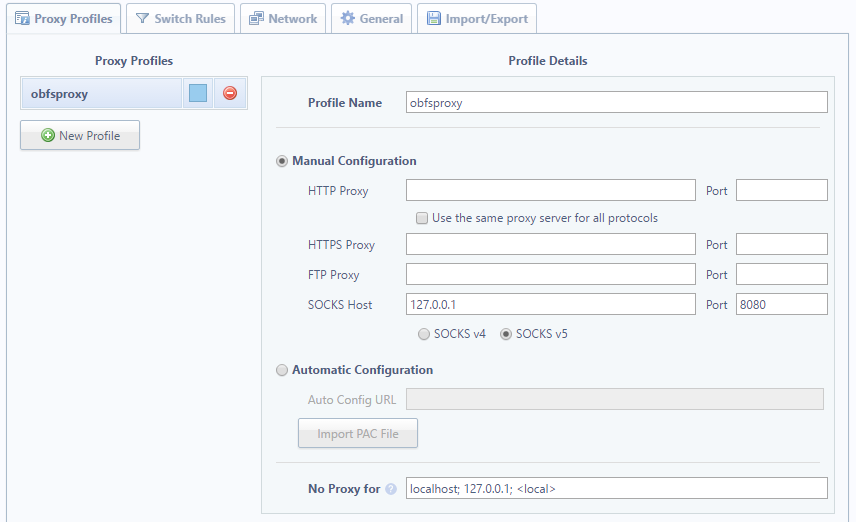
In Chrome Proxy Switchy
- A setup page should appear as soon as you install the extension, or click the icon in the top right of Chrome and click Options.
- Name the profile whatever you like. Under Manual Configuration, set the SOCKS host to 127.0.0.1 and the port to 8080 (or whatever you set the tunnel port to in PuTTy. Leave everything else blank.
- Hit Save, then click the icon again to select your proxy profile.
Now connect to your server first with PuTTy using the configuration above, then with the VPN using the new config file we created.
You are now connected to the internet with OpenVPN over SSH!
Mobile
We’re going to explain how to adapt your OpenVPN+SSH tunnel for Android, though iOS shouldn’t be all that different.
Before we begin, there are a couple caveats. First, this method only works for web browsing. That’s because, unlike a desktop, you can’t just open ports as you please on a stock Android or iOS device. That means the ports used by other apps won’t get directed through the SSH proxy. To overcome this, you can root or jailbreak your device and use an app like ProxyDroid or Cydia’s Unix apps to configure the proxy.
That’s a tutorial for a later day. For now, let’s get it up and running on stock Android with Firefox. You’ll need to install the following apps:
- OpenVPN for Android (note: NOT OpenVPN Connect, which is more picky about authentication)
- ConnectBot, or an equivalent SSH terminal app (JuiceSSH is good but costs extra to forward ports)
- A file manager such as File Commander
- Firefox, or another browser that lets you configure proxies
You’ll also require some means of transferring files from your computer to your phone. A USB cable is fine. I used IBackup’s sync folder.
Locate your ovpn.key and the .ovpn config file you created above on your desktop, and move them onto your phone’s internal storage or SD card. Also, move the .pem key file provided by your server host. It’s probably located in the same place as your .ppk file that you use to authenticate with PuTTy. If you’ve lost it, you’ll have to create another one on the Amazon EC2 dashboard, or from whichever server hosting service you use.
Optionally, you can grab the standard .ovpn config file that you use to connect without SSH. Then you can use your VPN with all apps instead of just the browser, and it’s useful for troubleshooting.
ConnectBot setup
Run ConnectBot on your phone. Click the three dots on the top right hand corner, and go to Manage Pubkeys. Click the dots again on the next page, and click Import. This should launch the file manager you installed. Find the .pem file you just moved onto your phone and select it. It should now appear in the list of public keys with a red lock next to it. Tap it so it turns green. Hit the back button to go back to the main page on ConnectBot.
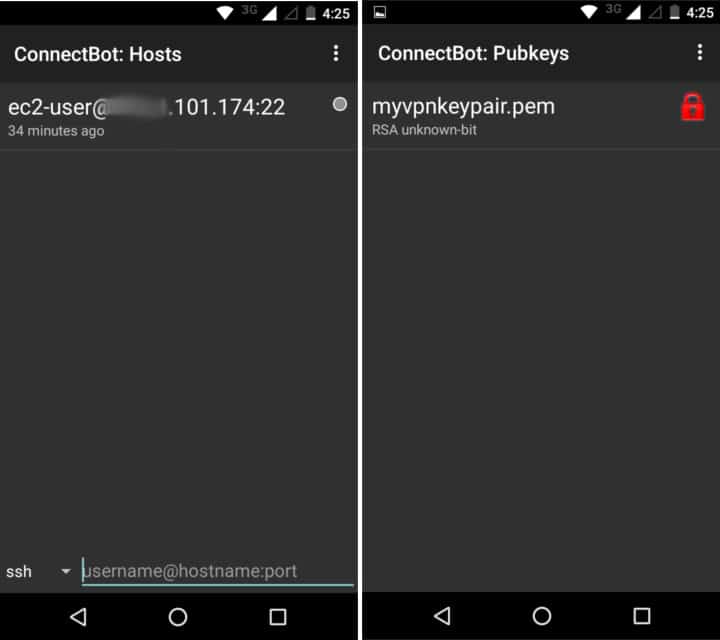
In the bottom terminal field next to “ssh”, input your SSH details. It should look like this:
ec2-user@<your-server-IP>:22
Replace <your-server-IP> with the IP address of your OpenVPN server. Tap the enter key to SSH into your server. All this should be saved so you won’t have to re-enter it again, but you may need to toggle the public key again in the future.
Once you’ve successfully connected, hit the three dots again and disconnect. Your profile should be saved on the home screen of ConnectBot. Long press it to open a context menu, and tap “Edit port forwards.” On the next page, tap the three dots and choose “Add port forward.”
Name it whatever you like. Set Type to Dynamic (SOCKS) and source port to 8080 (or whatever is in the socks-proxy line of your OpenVPN config file). Tap “create port forward”.
ConnectBot is ready to go, but we won’t connect just yet. Let’s set up OpenVPN first.
OpenVPN for Android setup
Run OpenVPN for Android.
Click the square button with a down-facing arrow on it in the top right corner to import a profile. Navigate to your .ovpn config file and select it. On the next page, hit the button that says “Select”.
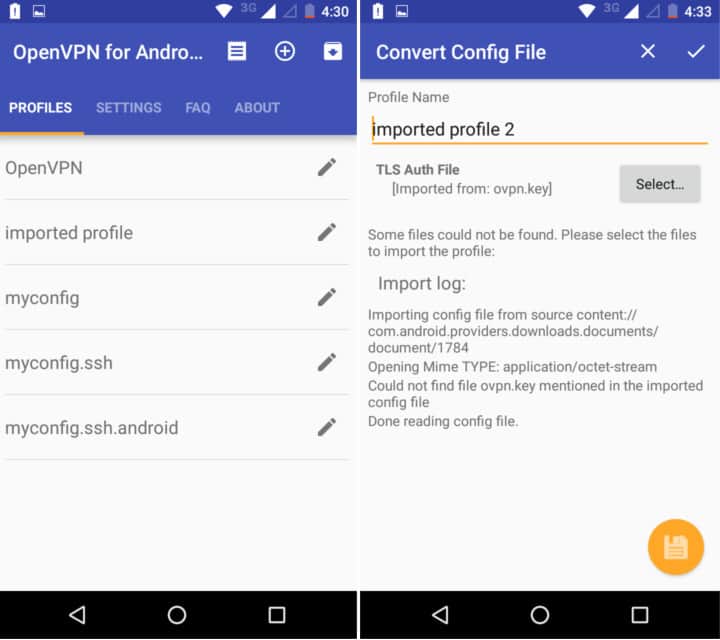
This time, navigate to your ovpn.key file and select it. Hit the yellow save button on the bottom right hand corner.
Your new profile should now appear in the list on the home screen of the app.
Before we connect, let’s double-check our server firewall. Login to AWS, select Instances and highlight your OpenVPN server. In the Security Groups field, click the one used for this instance. Right click it and select “Edit Inbound Rules”.
Add Custom TCP rules for ports 22, 1194, and 8080, adjusting as necessary for your personal configuration.
Now, it’s time to connect. Open ConnectBot first. Tap the profile we just created to SSH into your server. Make sure the pubkey is toggled on, otherwise you’ll get an error about a password. After you’ve successfully connected, switch over to the OpenVPN app. Tap your profile there to connect.
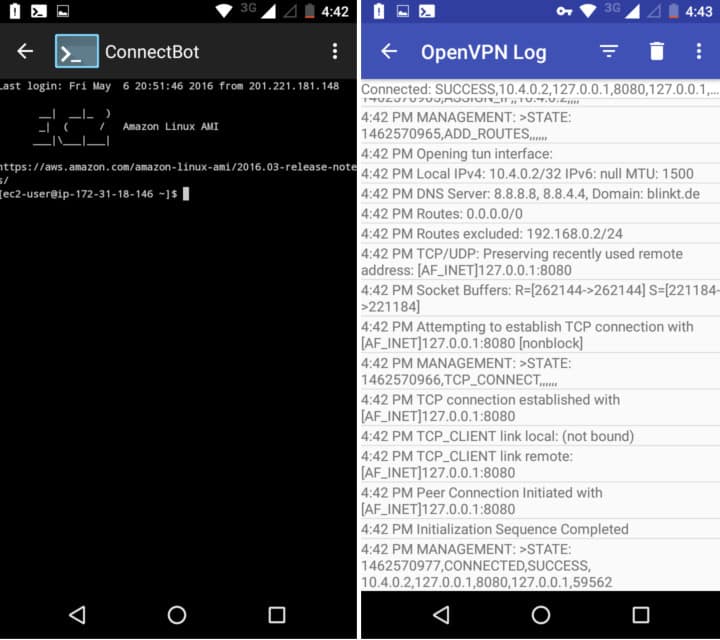
At the end of the OpenVPN log that pops up when you connect, you should see a message that says “CONNECTED,SUCCESS”.
Note that because we’re using the same .pem and .key files as on our desktop, you can only use these credentials on one device at a time. Make sure you aren’t connected on your desktop first. If you want to connect simultaneously on multiple devices, you’ll need to generate new credentials (.key and .pem) for each.
Configure Firefox to use a proxy
Finally, we need to configure Firefox to use the proxy. Chrome and Safari on mobile don’t come with proxy configuration options, which is why we recommend Firefox. You can try setting up the proxy in the wi-fi settings, but then you’ll have to change them every time you want to connect without a proxy.
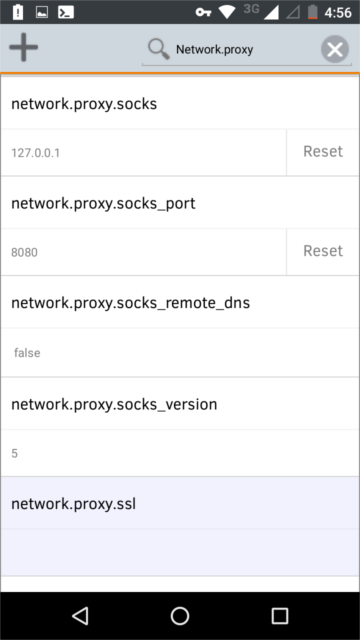
In the Firefox URL bar, type “about:config”. In the search bar on that page, type “network.proxy”. This will bring up all the fields we’re concerned with. Input the following settings on the indicated fields:
- network.proxy.socks: 127.0.0.1
- network.proxy.socks_port: 8080 (or whatever you set in your OpenVPN config and ConnectBot)
- network.proxy.type: 1
That should route Firefox’s browser traffic through OpenVPN and SSH. You can now surf the web from a mobile device through a VPN without fear of deep packet inspection!
Should you want to connect through the SSH proxy without OpenVPN, just SSH into your server with ConnectBot and don’t connect with OpenVPN. Conversely, you can import your basic non-SSH .ovpn config file into the OpenVPN app and connect with that sans SSH proxy.


“Unfortunately, Obfsproxy combined with OpenVPN currently only works on a desktop, so far as we are aware. ”
Is that still the case? (For unrooted Android devices.)
Hi Bart, so far as I know there is still no official support for Obfsproxy on Android, though there may be some unofficial libraries on Github. Here is some info that might help you: https://uninstallguides.freeforums.net/thread/241/setup-proxy-openvpn-obfsproxy-android
Hi. Does pem file necessary for connection? I did all of them but. I had error (connection refused). What did ı wrong? Thns
Yes, you will need a .pem or similar file. Follow the first part of the tutorial that I link to at the top to get that set up.
If you’re going to have to set the proxy in the web browser, why bother with openvpn? you already have the socks tunnel provided by ConnectBot. if you could use openvpn to direct everything (all traffic, not just web) to the socks tunnel, it would be useful. In this instance, it seems you’re only adding extra overhead.
Am I missing something?
Thanks,
Eric
Setting the proxy for the web browser is only if you plan to port forward through SSH port 22. If you plan on using OpenVPN, there’s no need to configure the proxy in your browser.
hi Paul,
can you show a configuration if not using the amazon server, im using vps server that i just brought from a hosting company
Hi rees,
A VPS is a bit different than a VPN, although in this case they can both serve the same purpose. I don’t have a VPS set up for myself at the moment, so I can’t give you a working config.
Best,
Paul
Great! Nice info, Thanks for article!
Great solution. Appreciate the concise nature of the post as well. Cheers~
—
Sam Smith
Technology Evangelist and Aspiring Chef.
Large file transfers made easy.
http://www.innorix.com/en/DS
Hello Paul! Excellent tutorial, for sure I will take advantage of your pieces of advice. I would like to ask, when using VPN of some company (I do not remember which company it was), I checked anonymity by means of https://2ip.io/privacy/ and, as for me, the result was very poor, about 50%. This anonymity check service is good I always use it. Therefore, there is a problem with the VPN itself. What can it be connected with? Thank you!
Hi Rich,
I’m glad the tutorial was helpful. I’m not sure why your VPN would score so low without seeing the full report. I just tried it with NordVPN and scored 99%.
Best,
Paul
A score of 99 means there’s a 99% probability that you are hiding your identity.
Hello,
Thanks for the wonderful tutorial. Can you make the configuration using only “openvpn for android” for android mobile phone. Or what if i use only the”openvpn for android” for this.
Thank You Paul, May God bless you.
Hi rees,
You could use OpenVPN Connect but it handles authentication a bit differently, which makes it a pain. I found OpenVPN for Android much easier to set up.
Hello! Thanks for the fresh article! I’m going to do it in these days! 🙂
What do you mean” app like ProxyDroid or Cydia’s Unix apps to configure the proxy”?
I search in Cydia but even one app is called Unix.. I know that for android there is Proxydroid but what can I use for Iphone? I’m searching for months and months..Thanks for helping!
[…]That means the ports used by other apps won’t get directed through the SSH proxy. To overcome this, you can root or jailbreak your device and use an app like ProxyDroid or Cydia’s Unix apps to configure the proxy[…]
Hi Willy,
I’m not terribly familiar with the Cydia repository as I don’t have an unlocked iPhone to test it with, but try looking for a terminal app that allows you to navigate send send commands to the OS in the same way that you would a Unix terminal (i.e. the same way you interact with your server). You must be able to log in as root to do so as well.
Best,
Paul