

Several devices are capable of running Kodi. These include Android TV boxes and the Amazon Fire TV stick. These solutions have been shown to work quite well, but they do require you to spend money in order to acquire the device of your choice.
You might have a cheaper—and more portable—option lying around the house. If you are a tinkerer and want to get Kodi set up using equipment you already have or just wish to save some money, running Kodi from a USB drive may be a viable option.
The main options available for running Kodi from a USB drive are as follows:
- Run a Kodi-based operating system from a bootable USB drive. Click a link below to skip to the relevant section:
- Run a portable installation of Kodi on a USB drive (Windows only)
Each of these methods has its merits which we will soon discover. They are both Linux-based. Note that none of these options will work with a smart TV or other device without a computer BIOS.
Pro tip: use a VPN with Kodi
When you connect to Kodi, you may be exposing yourself to hackers who have hijacked add-ons through man-in-the-middle attacks. Additionally, your ISP may decide to throttle your connection due to an excess of online movie and TV streaming.
We strongly recommend you use a VPN with Kodi. A VPN can help hide your identity, both from hackers and your ISP. A VPN encrypts your internet connection and routes it through an intermediary server, hiding both the contents and source of data in transit.
Our preferred option is IPVanish, which works with all Kodi add-ons. It’s fast and offers the sort of levels of privacy protection that has made it so popular with the Kodi community. For alternate options, here is a full list of recommended Kodi VPN services.
OpenELEC vs KodiBuntu
You might be wondering why you would run Kodi this way when you could just install it directly to your computer’s native operating system. The simple answer is that these Kodi-optimized operating systems generally run more quickly than a larger operating system such as Windows. You will only really be running Kodi, so there will be fewer resource-hogging processes running in the background.
On top of that, you can bring a USB drive with you pretty much anywhere, and you can run your personal Kodi build on any PC or Macbook.
Two main Kodi based operating systems are available: KodiBuntu and OpenElec. The main difference between the two is speed.
KodiBuntu runs quickly, but you will find that OpenElec is generally a little speedier. KodiBuntu, however, allows you to explore the wider Linux ecosystem while OpenElec pretty much locks you into just using Kodi.
Note the following requirements for the USB drive you will use before we begin to make sure that KodiBuntu and OpenElec run as smoothly as possible:
- Use it with a computer that supports the USB 3.0 standard and a USB 3.0 drive. Without this, your Kodi could be unbearably laggy.
- For KodiBuntu the minimum recommended USB drive size is 2GB.
- For OpenElec the minimum recommended USB drive size is 256MB
How to run KodiBuntu on a USB flash drive
In order create a bootable KodiBuntu USB drive, first download the latest version of KodiBuntu from here. Choose the 32-bit or 64-bit version depending on your system’s capabilities. Update: KodiBunti has been unsupported since 2019.
After downloading the version you need, you will need some software in order to get your USB drive up and running.
Windows KodiBuntu setup
For Windows, Linux Live USB Creator will do the job. Download and run the Linux Live USB creator. The application is easy to use and is divided into five sections.
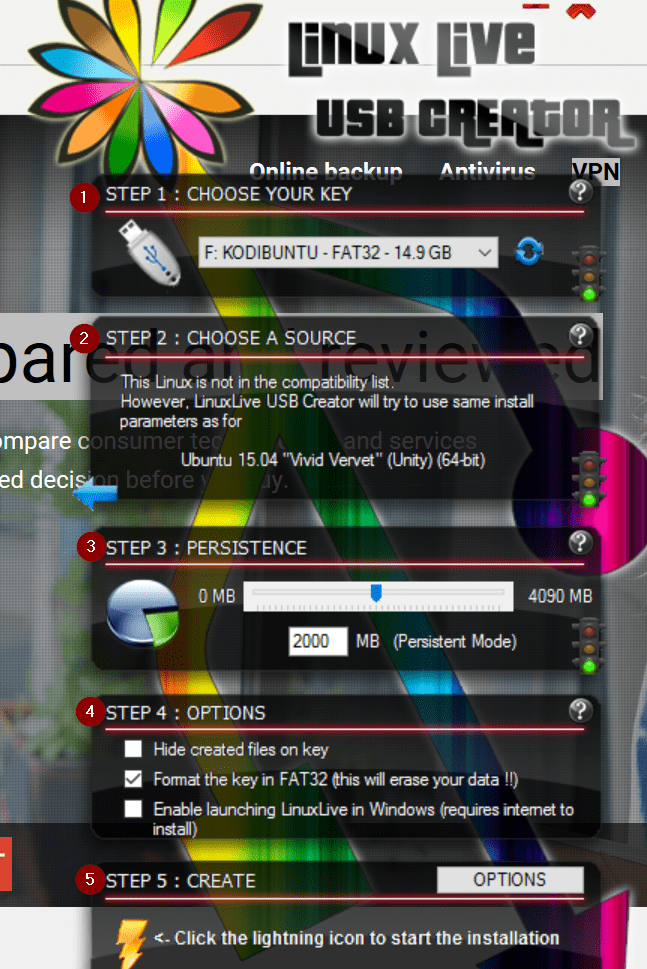
Follow these instructions, which correspond to each section:
- Choose your USB drive.
- Choose an image file. This will be the KodiBuntu ISO image you downloaded earlier.
- It is best to set persistence to around 2000 MB. The size you allocate to this will obviously correspond to the size of your USB drive. Persistence refers to the amount of storage allocated to things such as files, settings and installed programs. Having these things stored to your USB drive means that you won’t have to start off with a fresh installation every time you boot KodiBuntu.
- Check “Format the key in FAT32 (this will erase your data!!)“. As stated, this will erase all of the data on your USB drive. With that in mind, please use a drive that you plan to dedicate solely to running the operating system.
- Click the lightning icon to start the installation.
Once the installation is complete, restart you computer and enter the BIOS settings with the USB drive plugged in. How you do this depends on your device model. Change the boot order so that the computer boots from the USB drive before the hard disk, which will allow you to boot directly into KodiBuntu.
Mac KodiBuntu setup
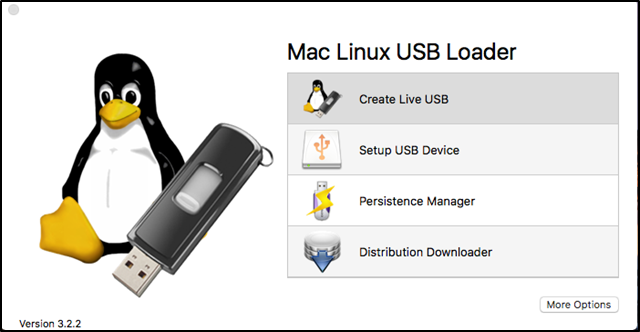
If you are running MacOS, then you will need the Mac Linux USB Loader (Github) in order to get up and running.
- After downloading the file, first run the Disk Utility application on your Mac.
- Select the USB drive you wish to install KodiBuntu on and select Erase at the top of the screen.

- Make sure you choose MS-DOS (FAT) under Format and Master Boot Record under Scheme. Give the drive a suitable name as well and then hit Erase.
- Now open the Mac Linux USB Loader and select the Create Live USB option.
- Now, select the drive which to install KodiBuntu on.
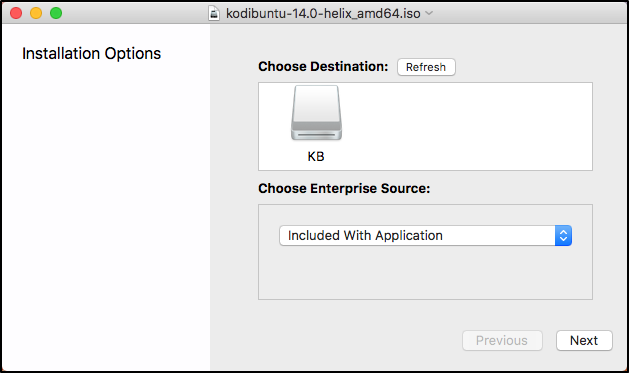
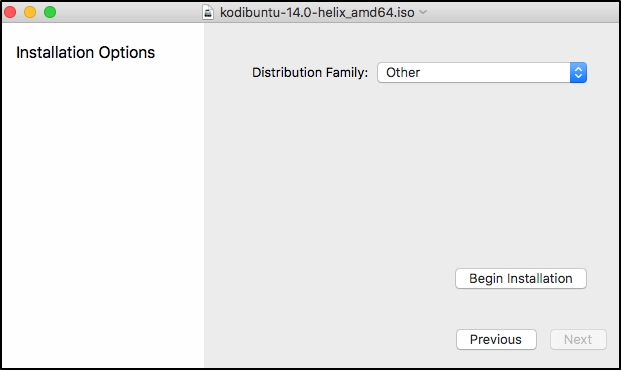
- Hit Next and on the following screen select Other under Distribution Family.
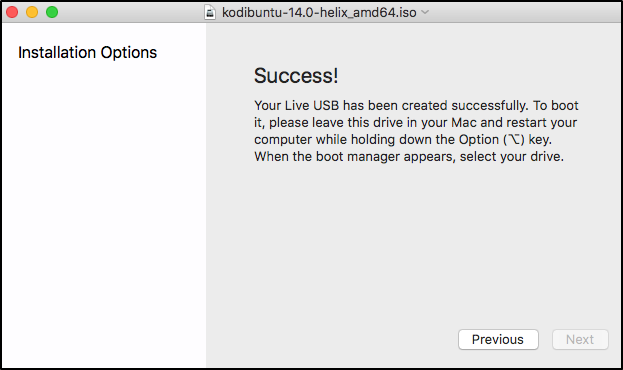
- Select Begin Installation in order to carry out the installation process. After the process is complete you will be greeted with a message indicating that the installation was successful.
- Restart your computer and enter the BIOS settings with the USB drive plugged in. How you do this depends on your device model. Change the boot order so that the computer boots from the USB drive before the hard disk. This way, you can boot directly into KodiBuntu.
How to run OpenElec Kodi on a USB flash drive
Download the appropriate version of OpenElec from the official website. The x86 generic stable release should get the job done.
Windows OpenELEC setup
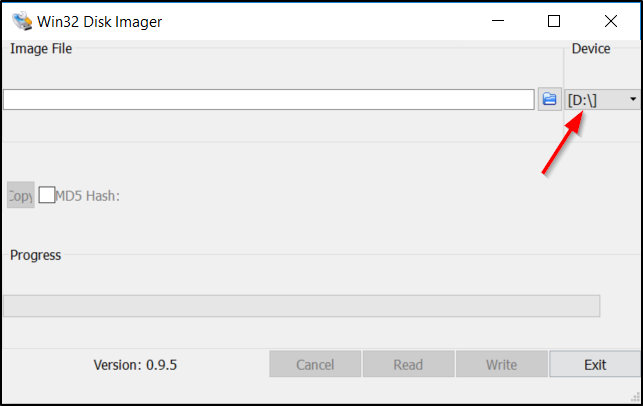
In order to create a bootable USB drive for OpenElec on Windows, use Win32 Disk Imager.
- Download and run the application. Select the drive to install OpenElec on.
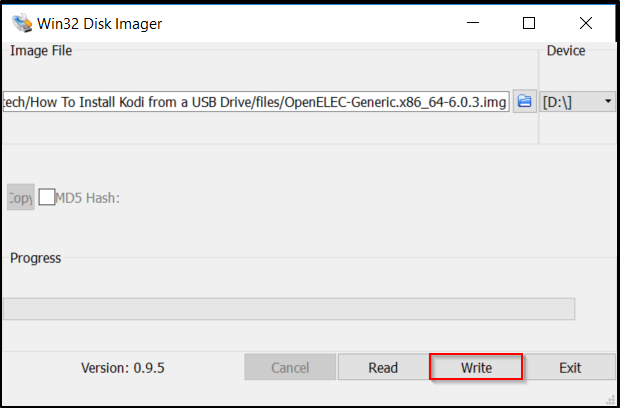
- Extract the OpenElec file you downloaded earlier using suitable software such as Winrar. Now select the resulting .IMG file within Win 32 Disk Imager.

- Select Write, and that’s it.
- Once the installation finishes, restart your computer with the USB drive installed and enter the BIOS settings. How you do this depends on your device manufacturer. Change the boot order so that the computer boots from the USB drive before the hard disk. This will allow you to boot directly into OpenElec.
Mac OpenELEC setup
On MacOS, the MAC Linux USB Loader process will work for OpenElec as well. Please refer to the KodiBuntu instructions above.
How to run a portable installation of Kodi on a USB drive
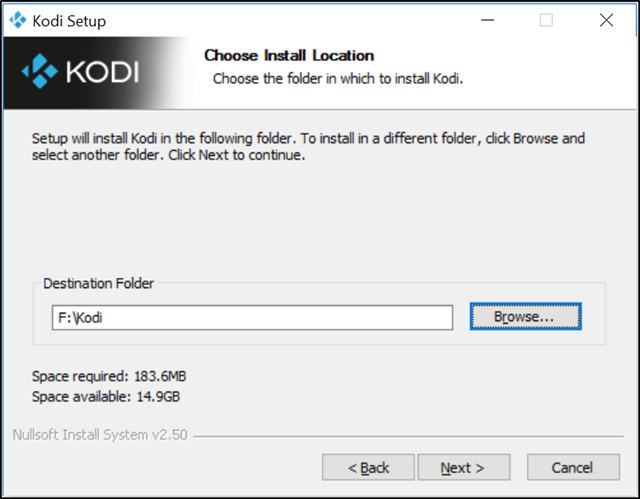
Another available option is the portable installation of Kodi. Note that this method only works for Windows users. In order to create a portable Windows installation, first obtain the installation file from here. Many computers run Windows, so chances are that you will be able to use your Kodi installation most places you go.
- Now, run the installation file but set the installation path to the root directory of your USB drive.
- Select Do not create shortcuts in the following step.
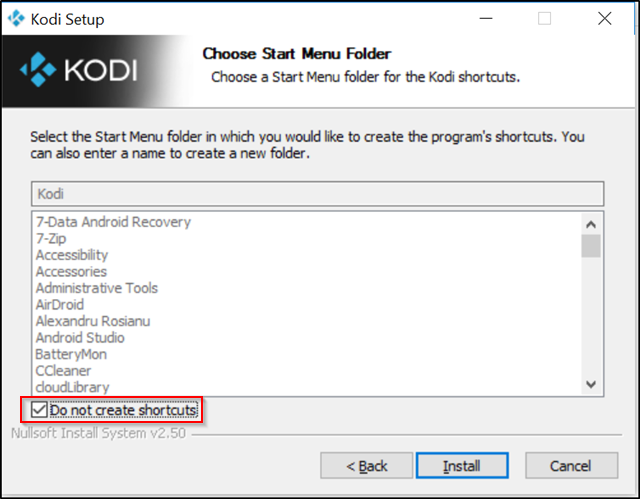
- Select Install but make sure not to run Kodi after the installation has been completed.
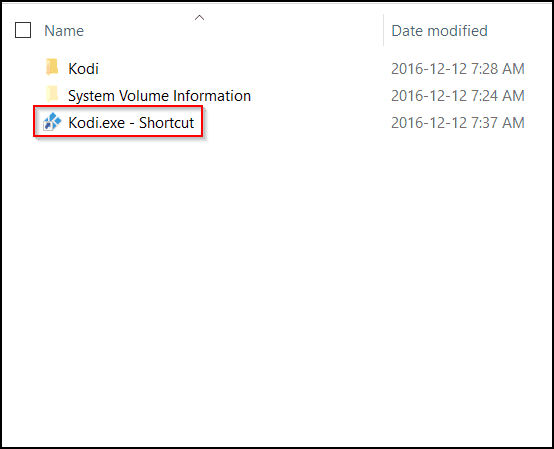
- Now create a shortcut to kodi.exe by right-clicking on the file in the Kodi folder on your drive and selecting Create shortcut. Move this file to the root directory of your USB drive.
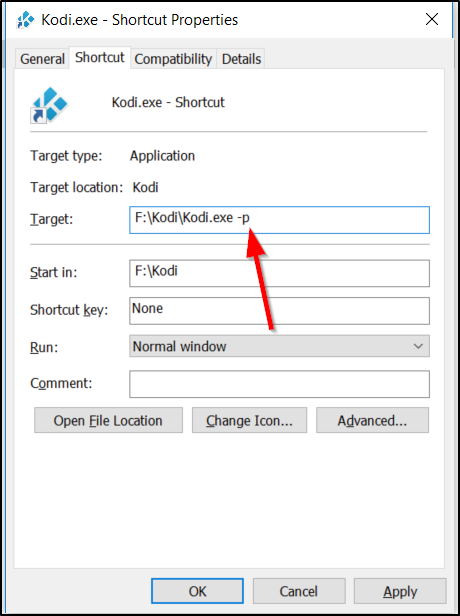
- Right-click on the shortcut and select Properties. In Target add “-p” next to the text that is already there as pictured below. This will make sure that the Kodi folder on your USB drive will be used for storage of important files such as plugins, skins, user data and scripts so that you have a truly portable installation.
With the installation finished you will be able to run Kodi from the .EXE file located on the USB drive on any Windows machine. Please remember to keep the USB drive plugged in with this option and all of the others. The files necessary for all of these options to work will be located on the USB drive.
Comparitech does not condone or encourage any violation of copyright restrictions, including illegal streaming through Kodi. Kodi can be used for many excellent, legal online streaming purposes. Please consider the law, victims, and risks of piracy before downloading or streaming copyrighted material without permission.
Kodi v17.3 “Krypton” is the latest stable version of Kodi available for download


After you download can Kodi on usb how do you watch tv
Hi Ann,
Please see our Kodi mega guide (https://www.comparitech.com/kodi/what-is-kodi-mega-guide/). This will help you get up and running watching TV on Kodi. Thanks for reading.
hi
I just installed Kodi update 17.5 on my tv firestick and cannot complete the necessary addon’s required for streaming. I am not “computer savvy” enough to understand all the commands. Can I “plug” my tv firestick into my computer to find and load the required addons?
Hi Maurice,
Please see the sections on sideloading from these 2 articles:
https://www.comparitech.com/blog/vpn-privacy/install-kodi-on-amazon-firestick/#How_to_update_Kodi_on_Fire_TV_Stick
https://www.comparitech.com/blog/vpn-privacy/install-kodi-on-amazon-firestick/#How_to_update_Kodi_on_Fire_TV_Stick
Hi William
I created a openelec USB stick. Changed to boot order USB/CD but it only boots to hard drive and Windows 7.
And worse when I formatted to try again it turned my daughter’s 8 GB USB stick into 512 MB. ☺️
Any thoughts what I should do?
Rob
Sometimes there’s more than one entry that could correspond to your USB drive. Please check to see that you have selected the right one. As for your daughters flash drive, use Easeus Partition Master (https://www.comparitech.com/kodi/failed-to-install-a-dependency-error-kodi/#Checking_Kodis_error_logs) to delete all of the current partitions and then reformat it to Fat 32 to get it back up and running.
I, installed Kodi 16.1 on a usb drive. The add ons would not enable on my pc any thoughts?
Hi,
Please see this article: https://www.comparitech.com/kodi/failed-to-install-a-dependency-error-kodi/#Checking_Kodis_error_logs
I think this may help you.
So what do we do once we’re in Windows bio. im writing this from my phone because you have fucked my laptop!!!
Hi Lee,
You need to change the boot order. If you wish to boot from Windows, select your laptop’s harddrive.
Ah-ha! A clear case of the Look-what-you-made-me-do Defense!
will running these leave any trace files on the pc?
Ryan, if you write a batch file with the RD (remover directory) command and point it at your kodi folder located in “c:/%username%/appdata/roaming/kodi” and set the batch script to run the kodi.exe then there will be no traces left.
Would you be able to make a batch file for me?
Would you be able to write me a batch file?
I understand what you are saying but I am not sure how to make it.
So If you make me a batch file.. I would just launch the batch file which will then launch the Kodi.exe right?
Please let me know asap! Thank you!!
Thanks for the article!
Should “here” be a hyperlink?
“How to run a portable installation of Kodi on a USB drive
Another available option is the portable installation of Kodi. Note that this method only works for Windows users. In order to create a portable Windows installation, first obtain the installation file from here.”
Robert
You’re welcome Robert! Thank you for pointing out the missing hyperlink.