
Brief history of cryptography
In its simplest sense, cryptography is the process of disguising the true content of a message in a way that only the sender and recipient can decipher. Those parties use some type of device to perform the encryption and decryption. These devices can take many forms but are generally referred to as keys
. The term Cryptography
stems from the two Greek words means hidden
and writing
. The first instance of what appears to be the use of cryptography was found in 1900 in the tombs of the old Kingdoms of Egypt (2686–2181 BCE) although some historians dispute that the hieroglyphs found should be interpreted as cryptography. A more concrete example is seen in an encrypted clay recipe from Mesopotamia circa 1500 BCE.
In modern times, cryptography has largely only been used by governments and other large actors. Until the 1970s, modern encryption was not readily available to the general public. The U.S government feared it so much that it classified encryption as Auxiliary Military Equipment
and made its export out of the country illegal. This proved nearly impossible to enforce so the restrictions were relaxed in the 1990s, but the US still has restrictions on mass exporting cryptography greater than 64 bits. The term bits refers to the size of the keys used for encryption. There is more on key bitness and key space later in this article.
One of the biggest problems plaguing the wide adoption of cryptography was the issue of exchanging keys. In order for two parties to exchange cryptographic messages they would both have to have possession of the key or keys. Since anyone with possession of the keys could decrypt messages, this necessitated transferring the keys in some secure way; usually via a face-to-face meeting to ensure that they keys were not compromised. In order for encryption to be usable by the general public and see widespread use, there had to be some way to exchange encrypted communications between people who had never met each other and, in fact, may have been completely unaware of each other’s existence.
This process now exists and is an integral part of Public Key Cryptography. Public key cryptography involves two keys: a private key that can be used to encrypt, decrypt, and digitally sign files, and a public key that can be used to encrypt and a verify digital signatures. More on this in the Symmetric and Asymmetric keys section.
The concept of ‘non-secret’ cryptography was conceived at GCHQ in the UK in the 1970s and passed to the NSA at that time. Neither organization was able to develop it enough for practical use, so it lay dormant and it was not until 1976 that Whitfield Diffie and Martin Hellman at MIT devised a practical method of key agreement that made public key cryptography a reality. By this time, the internet was developed enough to share files, and that became the primary method of distributing public keys.
Symmetric and Asymmetric keys
Keys must be used at least twice in any encrypted conversation. The key needs to be used to encrypt the conversation by the sender and the key also needs to be used on the other end to decrypt the conversation. Before the advent of Public key cryptography, the key used for encryption and decryption were the same; they were symmetrical. This posed the problem I discussed earlier. In order for two parties to exchange encrypted communications, they must have exchanged that key in the past via some secure method that ensured other people had not copied it. This is a pretty big hurdle to overcome and it contributed to the lack of adoption by the general public.
Public Key Encryption solved this problem through the use of asymmetric keys. Users now generate two keys, not one. The Private key, which needs to remain a secret and never shared, and the Public key, which can be shared and seen by everyone. Senders can encrypt information by using the widely available public key of the recipient. The information can only be decrypted by the recipient’s private key. Conversely, if the recipient needs to reply, then the sender’s public key is used to encrypt the reply to ensure that only they can decrypt it. In this manner, the role of sender and receiver change in every leg of the conversation. While this may seem complicated, there is an entire infrastructure, aptly named Public Key Infrastructure (PKI), that makes public key retrieval and private key usage very easy. I discuss that in the Current Implementations section of this article.
Given this explanation, you may wonder why anyone would ever use Symmetric encryption any more. The main reason is that it is faster to encrypt and decrypt. If you’re just sending a few pages of documents or emails, there is no noticeable difference. But if you are encrypting gigabytes or terabytes of data on a hard drive, it can make a big difference. Symmetric encryption is also considered stronger than asymmetric encryption, but both are sufficiently hard to break so that is not a practical issue for most people.
Key space and key length
All keys are not created equal. Keys are created with a set number of bits that determines the key length and key space.
The key length refers to how many bits were used to create the key. The key space is the pool of keys that could have plausibly encrypted the ciphertext. The larger the key, the larger the key space. For example, if I told you that I am thinking of a three-digit number, you would eventually figure out the number I am thinking of because there are only 900 three-digit numbers in our numbering system (999 – 99 = 900). In this case, the key space is 900. In cryptography, the key space is expressed like this:
2n
… where n equals the number of bits used to create the key
Background:
- keylength = number of bits used to create a key. Also referred to as key size or bitness. The longer the key, the larger the keyspace.
- keyspace = number of possible keys
That number grows exponentially large with very few iterations. For example, a now ancient and easily broken 40-bit key has a key space of 1,099,511,627,776 possible keys. Today’s 2048-bit and larger keys are considered infeasible to brute force at this time.
Brute forcing an encrypted message is different from brute forcing a website login. In the latter case, the attack takes the form of attempting a large number of username and password combinations in the hopes of stumbling across a valid pair. In cryptography, brute forcing an encrypted message means to try all the keys in a given key space knowing that one of them is correct.
Background:
Encrypted information is referred to as ciphertext and decrypted text is referred to as plaintext.
A word about breaking cryptography
Encryption works. It is very hard to break. There’s a reason why governments are passing laws to force people to unlock their phones and disclose their social media passwords: modern encryption uses a key space so large that the alternative method of gaining access to those things is to try to break the encryption, which is nearly impossible.
Hollywood has ruined the idea of encryption protection. We see Felicity Smoak and Angela Montenegro casually break the cryptography of nation states weekly on shows like Arrow and Bones. The truth is much more like Mr. Robot‘s Elliot Alderson declining to attempt to break into a consumer-grade WPS router that anyone can purchase from Costco because it would take weeks
which, in itself, hints at methods other than brute force to break it. Encryption works.
Having said that, there are a few caveats:
Discovering the key to any encrypted text is a theoretically guaranteed success. As in my 900
example, there is a known number of keys, therefore brute forcing encrypted text is simply a matter of going through every possible key because one of them is correct. However, due to the large key lengths used today, we lack the computational power to go through the massive key spaces that exist in a realistic time frame, so this type of attack is not very feasible. It can take years to brute force ciphertext encrypted with even moderately strong keys.
Because of this difficulty with large key spaces, brute force is rarely used against encryption. Rather, the algorithm used to create the encryption is explored to look for weaknesses that will identify flaws. Or, mathematical attacks are used to determine and attempt more likely keys. Any of these types of attempts seek to lessen the key space so that a brute force attack once again becomes feasible.
If there were a scale of difficulty for breaking encryption, it would spin like a fan. Computing power increases daily and with each increase, an exponentially larger number of keys can be attempted in the same time frame, which increases the likelihood of success using brute force methods. On the other hand, as computing power increases, more complicated and larger keys can be created to perform stronger encryption in the first place.
Finally, never forget that anyone can get lucky. Just because there’s a key space of billions of possibilities for a piece of ciphertext doesn’t mean you can’t luck out and hit the key on the first try.
How can it be used
Email encryption
Email is not a secure or private medium. The internet was built for a small set of trusted users and therefore was not built with any real security mechanisms inherent in it. Over time, as the internet has become populated with a very large number of very untrusted users, security protocols have been bolted on in an attempt to keep the internet safe. Email is no exception and it has no inherent security built into it at all.
Background: The term protocol refers to an agreed upon set of standards as to how something will work.
Using email as an example, there is a protocol dictating how email servers will act, the types of messages they will send to establish a connection in order to send or receive email, and the format of the message itself. Protocols are necessary because they allow the creation of ad-hoc internet services that will be able to function properly with the other parts of the internet. Since the entire internet depends on these protocols being followed, it is very difficult to change an established protocol. That is why there has not been any large degree of change in older protocols such as email to afford better privacy. Instead, it is easier to change the transmission method or change the content of messages that are not needed for delivery.
In the case of email, the transmission protocol is TCP/IP, but many email servers now support TLS encryption. This creates an encrypted tunnel between mail servers so that your email is safely encrypted inside that tunnel while in transit from your mail server to its destination. However, once it reaches its destination, it just sits on the mail server in plain text. In addition, you don’t have much control over whether the receiving email server your recipient uses supports encrypted connections, so your email could end up travelling over the internet as unencrypted plain text.
Adding encryption to your email protects against both these weaknesses. Encrypted email is protected in transit whether or not it has a secondary TLS encrypted tunnel to travel through. Also, encrypting email ensures that the delivered email sits on the recipient mail server as an encrypted blob which can only be decrypted by the recipient’s private key.
File encryption
File encryption is fundamentally the same as email. Encrypted email is the process of encrypting the plaintext email into ciphertext. The recipient’s public key is used to perform the encryption. File encryption performs the same process on any file; it encrypts the file so that it can only be decrypted by the private key that matches the public key used to encrypt it. If you’re intending to send an encrypted file to someone else then you must use their public key for encryption. If you’re just encrypting files for your own use, you should use your own private key. File encryption is widely used in things like backup services and file storage services to ensure that the contents of the files can’t be read by others. In these cases, generally a new keypair is created by the backup client software and that keypair is used for encryption so the process is transparent to you.
Signature for non-repudiation
Non-repudiation is a term meaning that something cannot be denied. In cryptography, the term specifically refers to the use of digital signatures on messages or files which can be used to confirm that it came from the source that it claims to be from.
In public key cryptography, digital signatures are created by the secret private key and recipients can use the signer’s widely available public key to confirm that the signature is valid. Therefore, short of someone stealing a sender’s private key and using it, digital signatures provide a measure of authenticity that the message or file came from the source it claims.
A typical example of signature use is in email communication so that receivers know they can trust the email is from who it says its from. Signatures are also used to sign files in the same way.
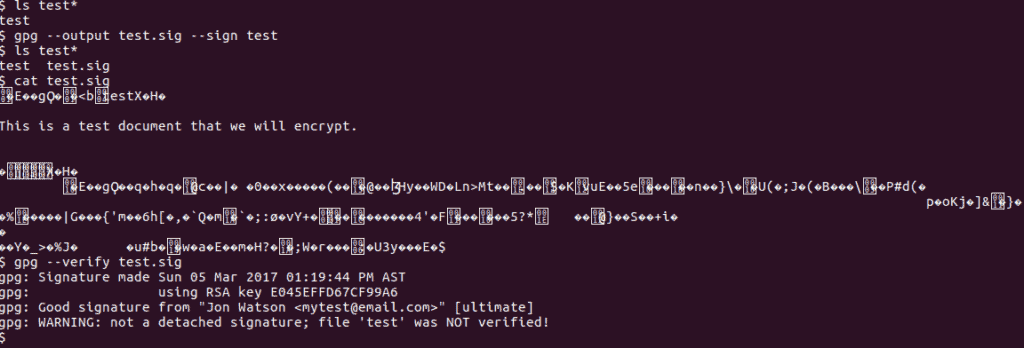
GnuPG is a widely available public key application for most operating systems. I go through the command line and graphical applications for it later in this article. All the commands are the same when used from the command prompt or terminal so, to sign a file, use the -s switch:
gpg -s test
Note how the file is not encrypted – the plaintext is still readable. But, a digital signature has been added to the end of it.
If you receive a signed file, you can use the --verify command to ensure the file was signed by the person claiming to have signed it. The sender signed the file with their private key, therefore you will need the sender’s public key to verify the signature.
Revoking keys
There may come a time when your private key has been compromised, stolen, or should no longer be used for some other reason. In that case, there is a process to revoke the corresponding public key. A revoked key should not be used by anyone to encrypt messages any more.
To prevent anyone from arbitrarily revoking your public key, revocation is done via a certificate method which is signed by your private key. That revocation certificate is then shared with the online public key repositories to notify people that you have revoked your public key. Normally, at the same time, you would generate a new keypair and upload the new public key to the repositories as well. That will let people obtain your new public key at the same time they become aware that your old public key should no longer be used.
To revoke a key in Ubuntu, select the key and choose the Revoke button. Select a reason and then click OK.

On the command line, the --gen-revoke switch will generate a revocation certificate:
ASCII armored output forced.
-----BEGIN PGP PUBLIC KEY BLOCK-----
Comment: This is a revocation certificate

iQEfBCABCAAJBQJEvE3GAh0CAAoJEOBF7/1nz5mmwOsH/jmnR4X7dbaOTv3rrRBKHFkLX7gTfo8K1AmwJiShI3Wl9yPxrqFstLcZPoW67il0K457eBWXojFUNUX5Esnqhfpqs8ryBGb8LazP/Z/3vItl9LKAjhfqapoLlkUIPNC7uoXUIzAY7lnzee99NShADSktqtEZLsvoCeqwh6nOTlR79QWyfUNengFcZye5t3FvtqpVS6unz1leVnMXOMq5veYAu3v/TwAAvPTS/qbdf1PmrLI0//K82eSOqO4X5XHhH8gCl6ZqKjYZQ68fhStEWWT1hrRaJZvMP+Ve+f2gZwcmqGyvO+veqiCGXBo8eiROu1aiBbYzvc6Y21c+qM8hic==JRyx
-----END PGP PUBLIC KEY BLOCK-----
Revocation certificate created.

Please move it to a medium which you can hide away; if Mallory gets access to this certificate he can use it to make your key unusable. It is smart to print this certificate and store it away, just in case your media become unreadable.  But have some caution:  The print system of your machine might store the data and make it available to others!
Background: Note the use of the name Mallory in the warning message. To illustrate certain concepts in Public Key Cryptography, real names are used rather than arbitrary names such as
user 1, or user 2. The names Alice and Bob are used to indicate sender and recipients, and Mallory is used to indicate a an attacker attempting to steal your cryptographic text. There are other established names with known roles as well which can make for some interesting reading.
Signing keys to gain trust
Since anyone can generate a key pair using any information they wish, it’s very easy to spoof a key. There are two main ways that create trust in the public key ecosystem. The first is that keys are assigned to email addresses. While it’s technically possible for me to create a key pair for any email address in the world, it will not do me much good if I don’t have access to that email account. Replies to my encrypted email would end up in the inaccessible email account rather than being sent back to me. The second method is through key signing.
Any PGP user has the ability to digitally sign other people’s public keys. The mechanics to do so are in the Generating and Signing Keys” section later in this article, but the premise is simple. By signing someone else’s key you are indicating that you trust that key belongs to that person. Your private key is used to sign other’s keys which serves to provide that you are the actual creator of the signature.
A public key that has signatures is viewed as trusted more than a key without any signature. Each signature means that the signer trusts that key so it lends credibility that it is legitimate. However, signatures are really only valuable if you personally trust the signers. A key with dozens of signatures from people who are unknown to you is arguably no more trustworthy than a key with no signatures at all.
Some key signers take their role very seriously and will only sign the keys of other people after meeting in real life and producing valid identification.
Current implementations
In order to use public key encryption, you’ll need to generate a private and public key pair. Once you have that set, there are various ways to use them.
The Pretty Good Privacy (PGP) tool is available for all operating systems and and there are various implementations of it. I will cover one such implementation for each of the big three operating systems.
Generating and Signing keys
macOS/OSX
Visit the GPG Tools website and download the GPG Suite.

After installation, find the GPG Keychain application in your Launchpad and start it.

Click the New icon to create new private and public key pair. Keys are always tied to email addresses.

Fill in the data. Note that you can have multiple keys for a single email address but most of us don’t need that many keys. When people try to find your public key in order to encrypt data to send to you, they will do that by searching for the key that matches your email address. If you have more than one key for any given email address, it causes confusion over which key to use.

I have not checked the Upload public key
option because I am only creating a test key for the purposes of this article. If you are creating a real keypair to use then you should check this box. It will automatically upload your public key to the internet key repositories which is how other programs and people can find it when they need it.
Key expiration is also recommended, but not required. Security comes in layers and routine expiration of any kind of authentication or security token is a good idea.
Good key generation requires a certain amount of randomness. In computer parlance, this is called entropy. The amount of available entropy on a computer is one determining factor as to how long it takes to generate a key. Most key generation processes will ask you to do things like move the mouse during key generation to create more entropy.

Once the creation is complete, I can see my new key pair in the main key window. There are a few things to note about this listing.
- The GPGTools Team key that came pre-installed into my GPG Keychain is only the public key as denoted by the pub in the Type column. My new key is a complete pair with the private and public key which is indicated by the Type sec/pub where
sec
meanssecure
. - Also note the Validity column. This is the same as the trust issue discussed already and indicates how likely it is that they key belongs to who it says it belongs to. The keypair I created is completely trusted for me because I created it. The GPGTool Team key is not very trusted because nobody has signed it yet.
- The validity of a key is determined on a per-user basis. For example, my new public key would not be trusted by anyone else at this point because they can’t be sure where it came from. So, it would not show up with four green bars on anyone else’s system; it would be two yellow bars at best.

To sign a key and increase its validity, right-click the key and choose the Sign menu option.

This process will add my signature to the key indicating the degree of trust I have in this key. There are other options available in the right-click menu to do things like upload your public key if you did not during creation, or email your public key to someone. A detailed tutorial on the GPG keychain in out of scope for this article so now that we have a working keypair on macOS/OSX we can use it.
Ubuntu Linux
Ubuntu comes with GPG pre-installed. Simply typing gpg --gen-key in a terminal window will start the key generation process.

Key generation will begin and there’s that need to create entropy again:

Both keys will be generated, the pubic key will be signed and ultimately trusted, and a revocation certification will be prepared as well.

To see your new keys, use gpg --list-keys to see the public key, and gpg --list-secret-keys to show the private key.

To sign a key, use collect the public key identifier from the key you want to sign, and then use the gpg --sign-key <identifier> command.

GPG knows I am going to use the mytest@email.com private key to sign this key because it is the only other private key in my key ring. Had I more private keys, I would need to select the key I want to use to sign.
To use a private key for any function, it must be unlocked with the passphrase that was supplied at key generation time.

You can see the signatures a key has by using the gpg --list-sigs <identifier> command.

Additional GPG commands are listed in the help file which can be viewed by using the command gpg --help.
If you prefer a graphical interface on Ubuntu, there are a variety of front end packages for GPG. Seahorse comes installed with Ubuntu but is strangely named Passwords and Keys
so it is not obvious to find.

By double-clicking a key, you can see more details about it and access the signature configuration.

The validation options are slightly different from the macOS GPG Keychain, but the basics are the same. You’ll have to specify how well you verified the key and what private key you wish to sign it with.

Windows
Download the GnuPG application from the GnuPG website..

Run the installation program and then type gpg --gen-keys to create a new keypair.

Now that you have keys you can use them to encrypt files and email.
An easy way to encrypt your email is to use an email client either natively supports encryption or has add ons that do. Mozilla Thunderbird with the Enigmail addon works well across all operating systems. To install the Enigmail add on, visit the Mozilla store and download it.

If you’re using the Firefox browser it will recognize a Thunderbird add on and prompt you to install it automatically.

If your system does not recognize this as a Thunderbird extension you can follow the manual installation instructions provided by the download page.

After installing the addon and restarting Thunderbird, the configuration wizard will start.

A standard installation should be good enough to get up and running.

Enigmail will discover your existing OpenGPG installation and list the available key pairs on your system. You can also elect to create a new keypair at this point, but we will use an existing one for this article.

Once the configuration wizard is complete, you will have new encryption options in your composition window.

You can now encrypt or sign email messages by selecting the corresponding button. The lock icon will encrypt the message using the recipient’s public key. The pencil icon will digitally sign the message using the private key you’ve set up in the Engimail preferences.

You can change the key in use by clicking the Select button and choosing a different key from your key ring.

The general Enigmail settings that will take effect over all accounts can be accessed by selecting the Enigmail Preferences…
button and then the Display expert settings and menus
button.

Take note of the Keyserver tab. This contains a list of servers that store public keys online. It is this setting that allows Enigmail to retrieve the public key of someone you’re writing email to if you don’t already have it. Engimail will query those servers for the recipient’s public key for you, and if it finds one it will download it and add it to your key ring.
When you receive and encrypted email you will need to provide your private key password. This temporarily unlocks your private key so that it can be used to decrypt the email.

Even when decrypted, Thunderbird will continue to let you know that the email has been decrypted.

Webmail
Many people use webmail these days instead of dedicated email clients such as Thunderbird. Some email providers support encryption directly in their web sites. Both Proton Mail and Hush Mail allow you to provide your own keys and use the to encrypt and decrypt email. A more general solution is the Mailvelope add-on for Firefox and Chrome.
Mailvelope will come to life when it detects encryption and will display an opague overlay on the page. Clicking the overlay will prompt you for your private key password. Once you provide that, your email will be decrypted. There is a quick Mailvelope tutorial on the Comparitech site here.

The advantage of using of using Mailvelope over dedicated email providers is flexibility. You can use Mailvelope with any web mail provider.
File encryption
Use the -e switch to tell GPG to encrypt a file:
gpg -r myemail@email.com -e test

Note how the resulting encrypted ciphertext file has the same name as the plain text file, but with a gpg extension. Attempting to read it reveals that it is now encrypted gibberish that cannot be read.
The original file remains unchanged. If your intent is to only maintain an encrypted version of the file then you should manually delete the plaintext file. However, keep in mind that, because you used your recipient’s public key to encrypt the file, you won’t be able to decrypt it again. Only the recipient’s private key can decrypt the file now.
If you have the private key that matches the public key you can use the -d switch to decrypt the file.
gpg -d test

Like encrypting, decrypting does not create a file. It will display the contents of the file, but not write a plain test file. To preserve the decrypted text you can copy and paste it into a file or use the redirect operator on Unix-like systems.


